Another pantry makeover....

There was a time when I loved DIY projects and was constantly working on something…everything from room makeovers to furniture rehab.

Unfortunately the time came when my back and fingers just couldn’t take the daily beating. And truthfully I’ve pretty much done everything to this house that can be done. Except the yard…I’m still out there designing and planting and digging…when it is not 100+ out!

One of my favorite DIY projects are pantry makeovers and those I can’t resist.

HERE I shared my pantry.

HERE I shared the pantry I revamped for my son and daughter in law.

Some serious reconfigurations can make a huge difference in the functionality of the space.

My stepson and daughter in law have talked about giving their walk in pantry a makeover for years…actually since they bought the house.

Over time, it became a disorganized disaster….

The shelving was the typical “builder grade” shelving…bull-nosed MDF spaced a good 16-18” apart which leaves a ton of wasted space. Few pantry items need more than 14” head room and a great majority of it just need 10-12”. Just by reconfiguring the shelf layout you can often gain at least 2-3 additional shelves.

Okay in all fairness and in her defense she has a very rambunctious 17 month old and a 2 week old, 5 week premature baby.

So she is a little preoccupied.

Which is all the more reason to get this space in order. With a growing family, having an organized pantry is just a must.

So when they announced a few weeks ago that they were finally ready to get serious about revamping their pantry I jumped on the opportunity to go to work!!!!

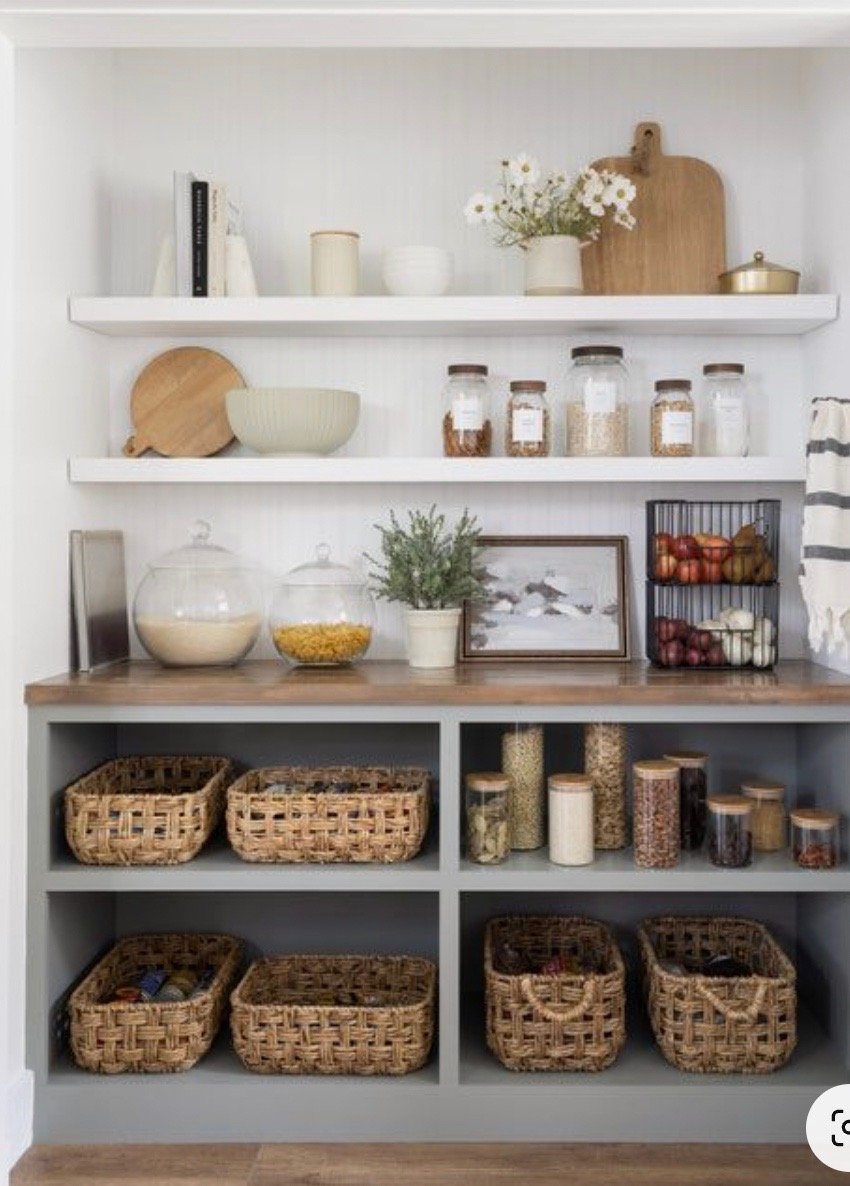
First things first…find your inspiration. I did what I always do…searched “pantry” on Pinterest. Here are a few that caught my eye…. (again, no links…I cut and paste pictures and put them in an “inspiration” folder on my computer.)

Of course it all had to be approved by the home owner. (I hate it when other people think they should have an opinion…lol!)

Fortunately, she liked many of the same looks I liked.

The most appealing thing in all the inspiration photos is the appliance tower. LOVE!

She loves the counter top look with natural wood tops. She loves the look of the floating shelves in the last picture…but she wants natural wood shelving and will paint the base black. I think it will look awesome!

So time to roll up my sleeves and go to work.

First up…take measurements and make a plan….

My plan is to make the cabinet and shelving across from the door “pretty.” This is where she would like a black base cabinet and natural wood floating shelves. They always have the door to the pantry open so we think it would be perfect to make it aesthetically appealing….pretty.

The shelving and the cabinets to the left will be “utilitarian.” A place for all their “food stuffs.” And then of course the coveted appliance tower to the left of the door. Since they have 10’ ceilings we were able to add a ton of shelving space just by reconfiguring the spacing of the shelving.

While this paper plan may make absolutely NO sense to anyone but me, it is what I need to figure out how I can reconfigure the space and what materials I will need.

After I got plan approval from my daughter in law, Brian and I went to Lowes and bought all the materials and had my son precut all the plywood for shelving and base cabinets with his table saw.

The construction of the shelving and bases will be very similar to what Lindsay did in her pantry space. She has a great tutorial for building everything so again, I am not going to reinvent the wheel. As I always say, find a tutorial that makes sense to you and use it.

Day 1….demo!!! I had my DIL empty the entire pantry and my stepson and I went to town with sledge hammers and crowbars and took out everything from top to bottom!

When you remove the existing shelving you may find sheetrock damage and you will notice that you have “lines” where the existing trim (shelf supports) was…primarily because the trim was caulked then the walls are painted…and the walls behind the trim are raw. So you will need to skim those areas with sheetrock mud, sand smooth, then spray with canned wall texture. If you don’t do this, you WILL see the lines where the old shelving was…so do it right… fix the walls, then repaint the walls before installing the new shelving.

TIP: If I am going to paint the shelving I usually paint the walls and shelves the same color…it makes it easier to paint the shelving without having to tape everything off. I use a different grade on the cabinets and shelving vs. the walls, but the same color.

I always prime and sand all the new wood before I cut and intall it…that way I don’t have to do major sanding in the house.

Right now I am still priming, cutting and installing so we have a few more days of work!

Hopefully I will have a big reveal in a week or so!!!!

Bathroom makeover on the cheap....

IMG_1880.JPG

I consider myself “apolitical.” In other words, I have an opinion, a personal “ideology,” but I really try to avoid all the political “fodder.” It’s just too depressing, stressful, overwhelming…

It eats into my personal happiness.

But with all that is going on, I found myself sitting on the couch mesmerized by the news ALL DAY FOR AN ENTIRE WEEK!

I was so overwhelmed.

I HAD to get moving and my little morning walk and ride wasn’t cutting it…just too much time left in my day.

So I tackled a project I could not have cared less about lifting a finger or spending a dime on…the guest bath.

It gets used MAYBE 2-3 times a year when the kids come for overnight visits. I threw down a few comfy rugs, stocked it with “guest necessities” (this stuff is important) and hung a nice curtain. I would clean it when I knew we were going to have over night company…other than that…out of sight, out of mind.

The fact that few used it or saw it on a regular bases was just fine by me.

It wasn’t completely offensive.

It was just “blah.” Beige walls, off-white cabinets, dated, boring lighting and fixtures…just blah.

Again, who cares…

But I needed to get moving and put my body in motion. And this was the perfect project. Inside in the AC but away from the TV.

Inspiration…anything “unblah.”

My plan…”unblah” it.

Budget…as little as it takes to “unblah” it.

IMG_1843.jpg
IMG_1844.jpg
IMG_1842.jpg

Usually I am all for finding an inspiration, making a plan, and working with a sound budget. In my opinion, it is the only way to attack a big project like this.

But I need to move and I didn’t have the time or patience to sit and think about this for weeks. I decided my MAIN objective was to use the materials I have on hand and try to make a few changes that would “unblah” the space without breaking the bank.

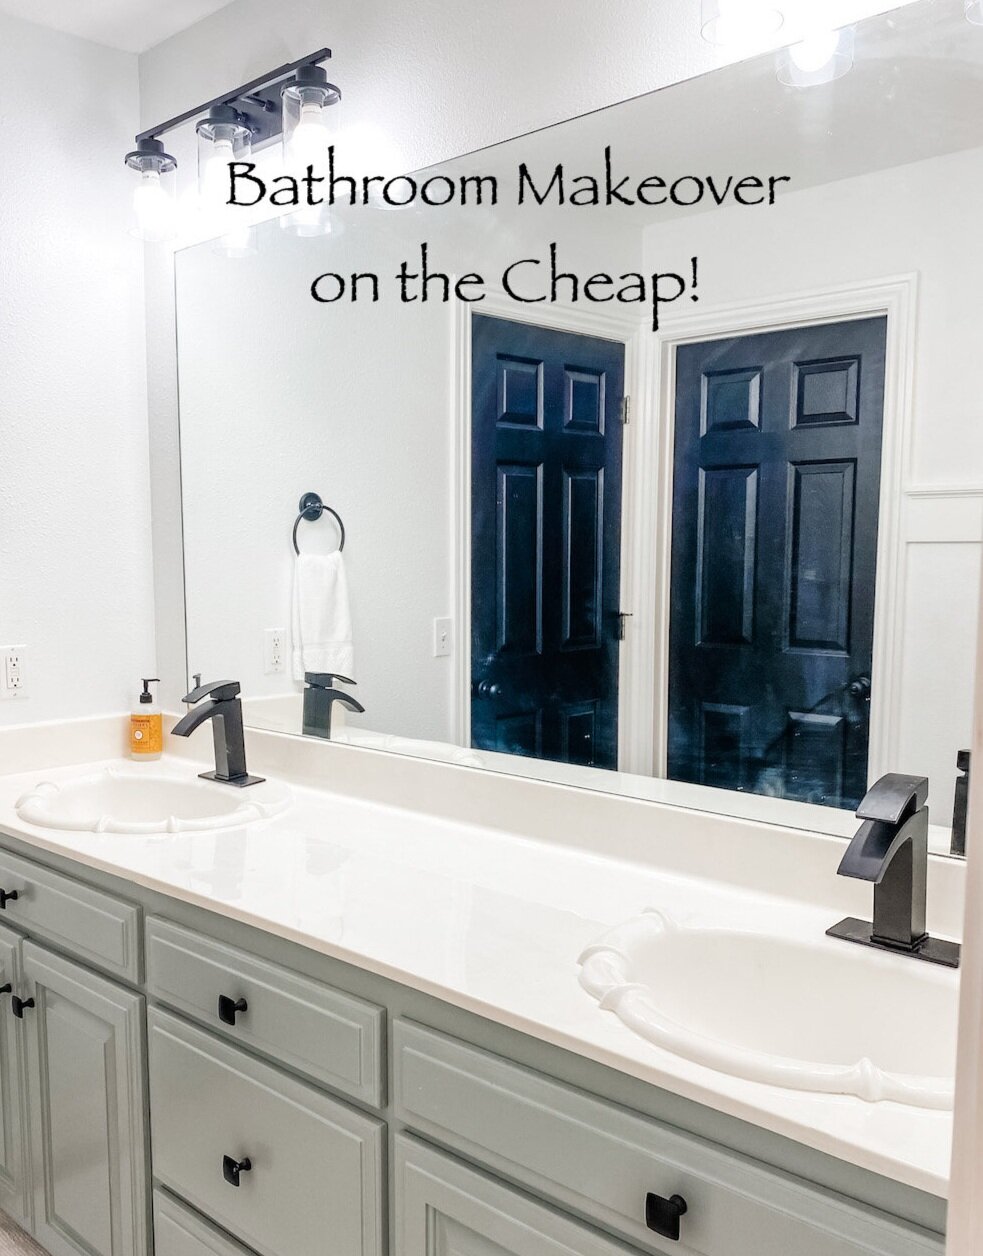
First on the list…get rid of all the gold fixtures. The style wasn’t TOTALLY offensive but they are gold…gold towel and hand towel bars and gold TP holder. I decided to “repurpose” the hand towel holders and TP holder by painting them black. A little primer, a little black paint…both in my stash. Cost…zero.

IMG_1875.JPG

I also replace the faucets…the existing weren’t totally offensive but these were pretty inexpensive on Amazon…less than $50 each.

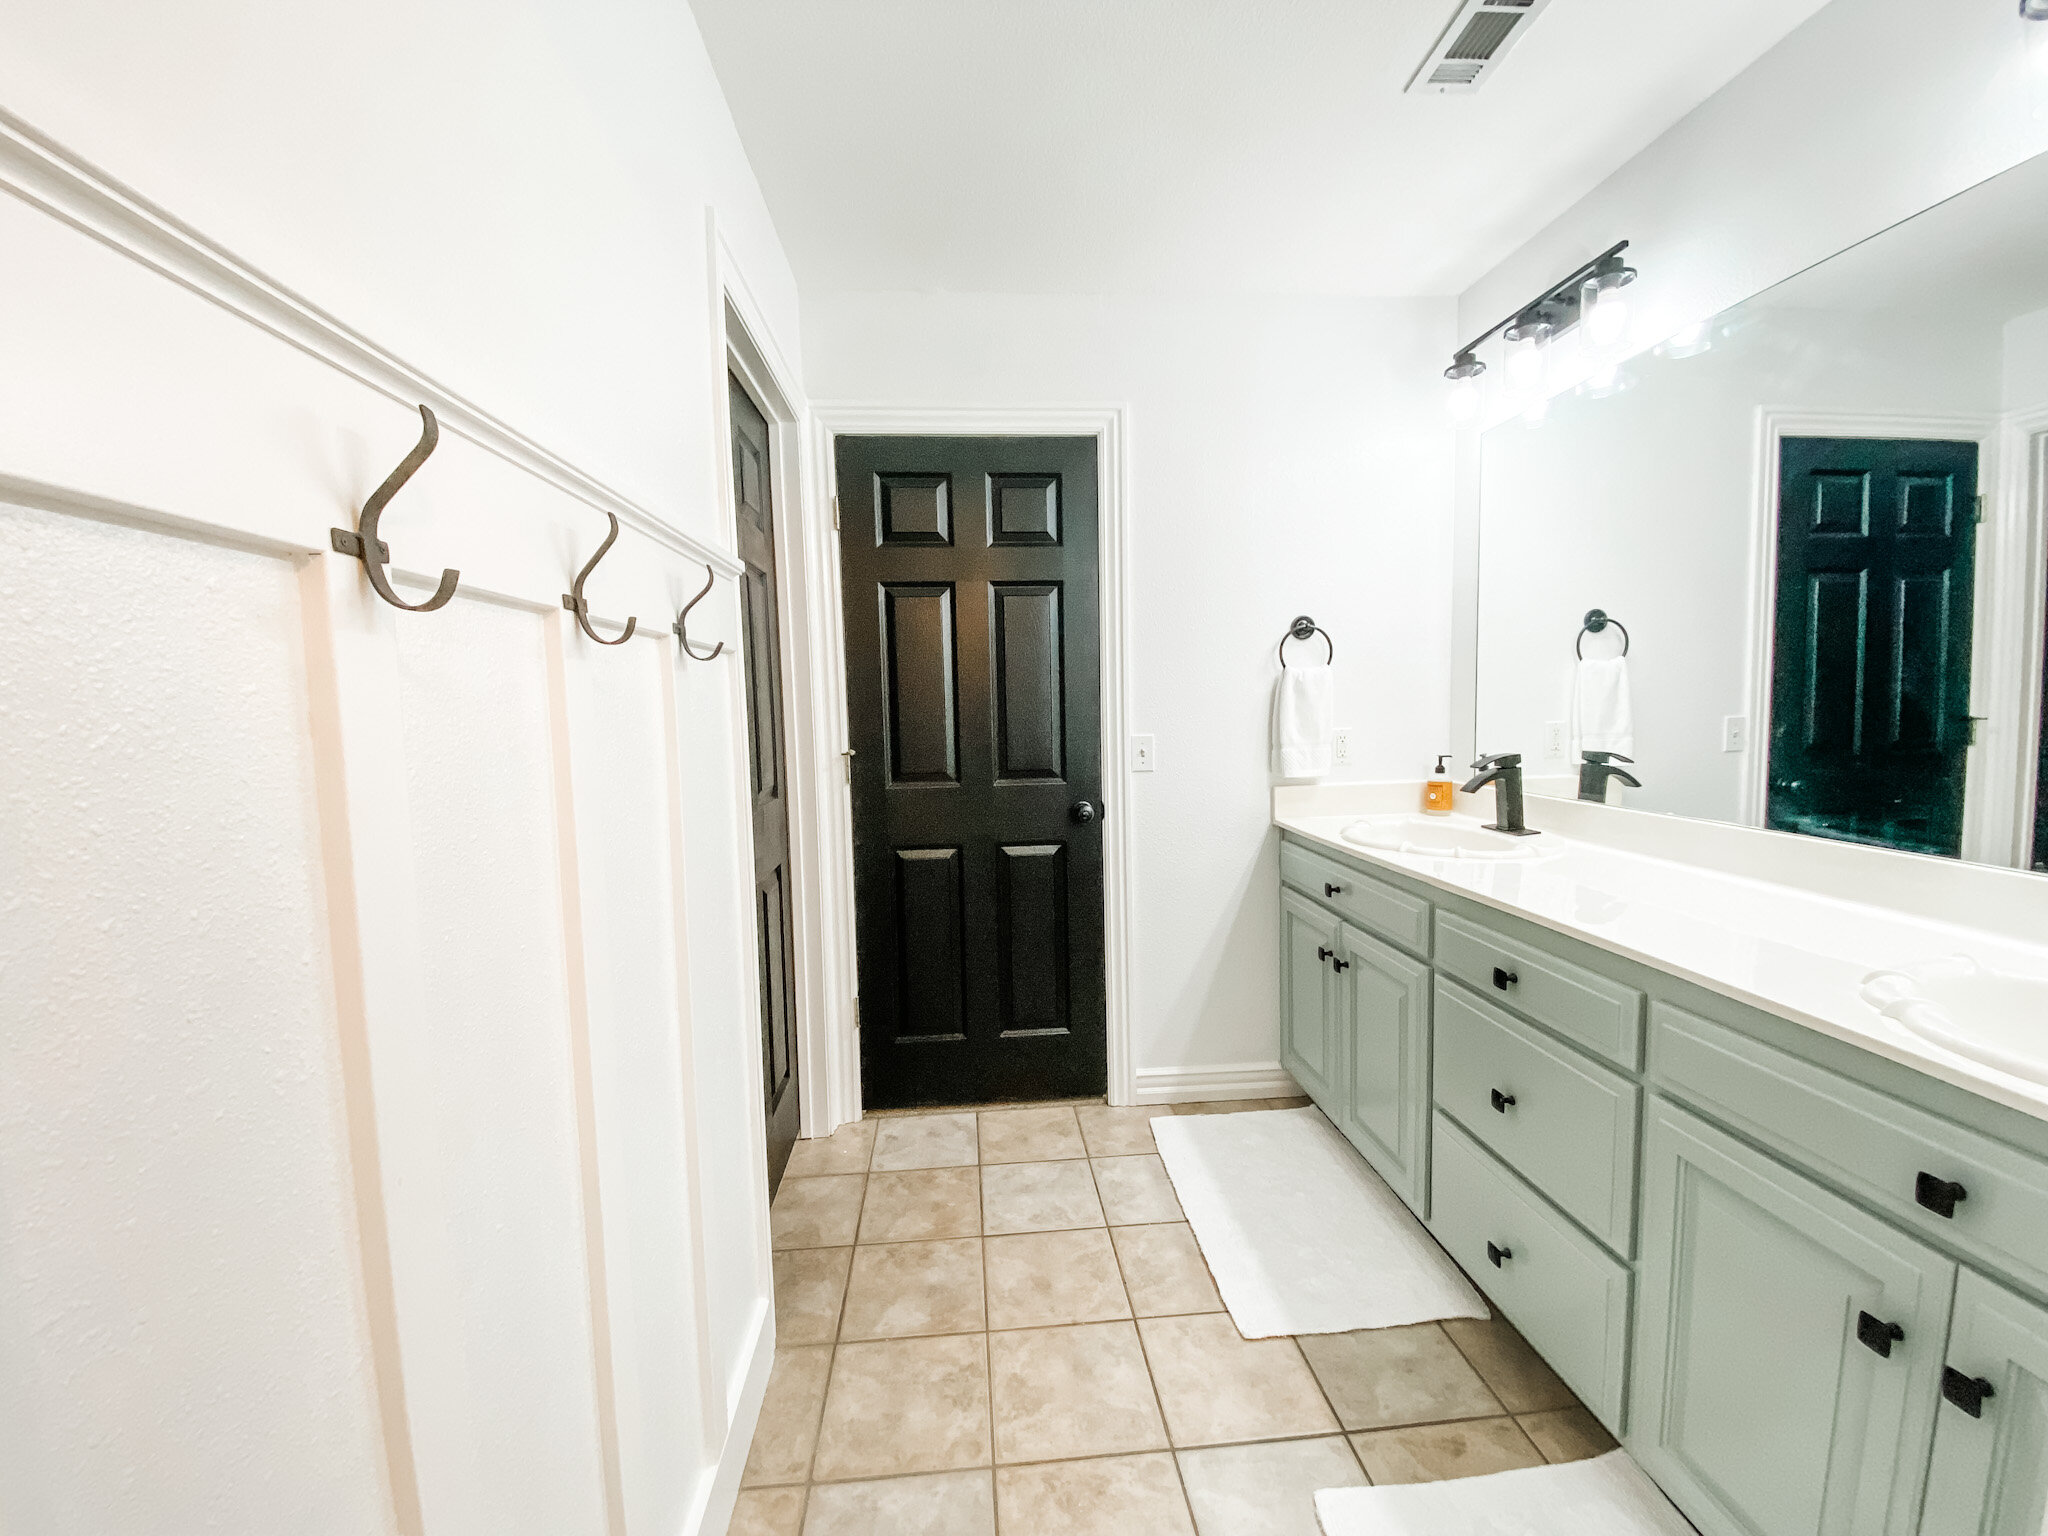
I removed the towel bar and added a little bit of board and batten with hooks for towels. Similar to my entry….super simple…again look for a tutorial that makes sense to you! Less than $50.

IMG_1886.JPG

I used some leftover trim paint to paint the board and batten and all the trim. Cost…zero.

I painted all the doors in the main part of the house before we moved in…but again, this space got completely ignored! I even ordered black door knobs but never put them on these doors. I used the left over black paint and the knobs I bought over a year ago. Cost today…zero.

The cabinets….I used the leftover paint from my master bath cabinets. Cost…zero.

I did buy new inexpensive hardware. About $4 each so less than $40. (But I could have painted the existing hardware with black paint I had on hand.)

IMG_1880.JPG

The ceiling needed to be painted. Big water spot around the HVAC vent. I sprayed the spot with some Kilz I had on hand and dug out the leftover ceiling paint! Cost….zero.

IMG_1839.jpg
IMG_1869.jpg

The beige walls needed to be “deblahed.” I painted them white…plain ole’ pure white. I only needed about a gallon and my son had some leftover from their house. Cost…zero.

IMG_1881.JPG

I would have loved to change out the 23 year old tops…maybe add a pretty tile backsplash…but the tops aren’t terribly offensive (just a bit dated) so for now they stay. Just added the new faucets.

Three new light fixtures…two vanity lights and a pendant light…again, Amazon. All three for less than $250.

IMG_1884.JPG

I could have repurposed the lights that where there with a little paint but the new were worth the investment.

Again, this space only gets used 2-3 times a years so it’s not like I need something expensive.

The flooring could stand to be changed…but again, this is a room that is rarely used….soooooo…..

The only other thing I would love to do in this room is change out the mirror…or at least frame it. I found THIS tutorial for a wall treatment I absolutely LOVE….

KM_DIYMirrorUpdate_0015.jpg

Not necessarily the gold mirrors…I think I would go with round wood framed. But I love the wood slate treatment and I may eventually tackle that project…someday…maybe when we have another national crisis and I need to focus on something constructive.

Sadly at the rate our country is going, that may be next week.

With all the negative looming over our heads…fires, hurricanes, Afghanistan, Covid, inflation….I can not stress enough how important it is to stay focused on the positives in your life. Believe me when I say I GET IT. It is hard to stay positive when people we love are sick and dying, our retirements are swirling the drain, you can’t meet you monthly financial obligations, the very fabric of our great country is being shredded.

Turn off the tv…shut down your computer….turn your radio dial. I’m not advocating bathing yourself in complete ignorance….just turn off and tune out the onslaught of negativity and focus on something that makes you happy.

The laughter of your children as they play.

The sound of the the crickets and birds on your morning walk around the neighborhood. (Get out and breath fresh air…EVERY DAY)

The babble of a brook in a nature park.

Coffee on the porch early in the morning before the heat and humidity sets in.

A tiny bit of “quiet time.” (Whether you do yoga, meditate, read your bible, just sit and stare…ALWAYS carve out a little bit of quiet, alone time EVERY DAY.)

A stroll down the aisles of Hobby Lobby…fall and Christmas are just around the corner!!!

I’ll admit it…my life isn’t all roses and peach fuzz. Somedays I really struggle to find something positive to focus on. But as I said HERE, you choose your “hard.”

Choose wisely.

ANOTHER laundry room makeover!

One nice thing about blogging is I can go back and know exactly when I did something…case in point, the laundry room.

Here I shared how the laundry room went from this….

…to this….

…in 2014.

I raised the cabinets to the ceiling and painted them. I painted the walls, stenciled the little birdie murals, installed a new light fixture, purged and added a little storage cart. Nothing earth shattering but enough to dress it up a tad.

The most dramatic thing I did to the laundry room was installing reed glass in the door. Here I share a tutorial on how I turned a plain ole’ hollow core door into a really awesome feature!


One thing I debated and am now glad I did not do…put a solid “top” across both the washer and dryer. I worried some day I might go back to a top load washer. Sure enough I did! The shelf is perfect and it is an element I kept!

The only other changes over the last few years was a little kitchen cabinet I removed in one of my kitchen makeovers and put in the laundry room and I moved the sewing machine to a little portable table.

When I painted the walls I was a tad frugal and used some paint I had on hand. I decided to go for broke and actually buy an entire gallon of custom color paint this time. Gasp! I wanted a soft “sagey/greenish” color so I did what I always do…headed to my favorite DIY store, picked up about 15 paint samples and brought them home. Took me all of 2 minutes to pick the perfect shade! Seriously, I think this is the perfect “sagey/green” color…I wish the photos did it justice!

THIS is the process I use for any “makeover”…whether a room or a piece of furniture. Find your inspiration, make a plan and execute the plan.

Inspiration came from cruising Pinterest. As I said in the first makeover, I don’t have the laundry room of my dreams but I have a space I want to be pretty and organized. I knew exactly what I wanted (the plan)…paint, storage, lighting and tile!

First step….PURGE! Empty out the entire space.

Yes, you are going to make a mess…there is just no way around it!!!

My goal is to NOT put back most of the stuff I take out. Now in my case, I am a pretty good “habitual purger” so I have very little “stuff”….but there are always things lurking that have been untouched for years and can go!!!

Next, remove the old light fixture, paint the ceiling (with a flashlight) and install a new fixture. It wasn’t that i disliked the old fixture, but it had fluorescent bulbs that got really hot and one of the three sockets evidently had a short or something because I could never get it to work right. I tried to change out the sockets in the fixture to accommodate LED bulbs, but the wiring was too short and I finally said “FORGET IT” and bought a new fixture.

Remove switch plates, shelving, and stuff on the walls.

Wipe everything down with a damp cloth….don’t paint over dirt!!!

Build storage shelving. I have lived here long enough to know what I need and how I want a space to function.

Caulk the new shelving.

Paint the trim, then walls.

A new shelf…I went with poplar sealed with a clear finish…no stain. I may or may not stain it or paint it in the future…for now, I like this look!

Then a debate. Do I or don’t I stick with my original “plan.”

So my original “plan” called for tile on the wall behind the washer and dryer. I really gravitate towards that look and every time I see a picture of it on Pinterest, I really love it. Yes, that would mean losing the birdies…

HOWEVER, as I have mentioned many times before, NOTHING is “timeless.” And I know me well enough to know that in 5-6-7 years I will not like whatever tile I pick out today…which means that sometime in the future I will have to remove the tile, repair sheetrock and do something else.

NOT something I look forward to. A huge reason why I didn’t put wallpaper in this house 20 years ago, even though it was still a “thing.” I had removed enough wallpaper in my years to know I never wanted to do it again.

So…no tile…for now! I painted the wall and added a little “farmhouse” mirror. The light fixture and the mirror add a touch of “farmhouse fad” without breaking the bank. This is a small room so the mirror is a huge plus!

The storage shelving is THE BOMB!

Love it…it is something I have wanted to do for years! And again, since I have lived in this house for 20 years, I knew exactly what I need. A place for doggy towels, some simple baskets for light bulbs and dust rags and plenty of room for my detergent stockpile! I designed the shelving so I would have the perfect spot for my sewing cart (See how I “upcycled” an old typewriter cart to make a portable sewing table HERE!) At the last minute I added a shelf above the sewing cart so I would have space for a sewing machine if I ever did away with the cart in the future…right now it holds my little coupon box.

Keep in mind that the cart between the washer and dryer I built on the last makeover holds a ton of stuff…dryer sheets, MORE detergent, the iron, spray starch, etc.

The back of the cubby is perfect for storing paints…remember, STORE YOUR TOUCH UP PAINT IN THE HOUSE!!!! Not in the garage or storage building!

Since I now only do laundry for two, my laundry room isn’t near as chaotic as it was when I was raising kids. But whether you do 8 loads a week or 30, there is NO reason to have a disorganized and blah laundry room. Get it organized. Make it a space that is beautiful…it won’t take the sting out of doing laundry but maybe it will make the experience a little more enjoyable.


Another antique chest makeover...

I promised last week to share all the dresser and chest of drawer makeovers I have been working on. This time of the year it is tough to get a lot of work done over several days because of the temperatures…fortunately this dresser was one I could work on inside.

Takes a little “strategizing” to figure out what I need to do outside on warm days and what can be done inside on cold days.

I knew I was going to paint the cabinet so I managed to get it (and a few others) Kilzed on a warm day. I try to avoid using Kilz inside because it is SUPER stinky…and I like to use the spray kilz on smaller pieces and that can’t be done inside. Sanding and wiping with tack cloth can be done when it is a tad colder so no biggy. I had to strip the drawers and top outside, but that can be done in the cold as well. I was able to bring everything inside to oil the drawers and top and paint the cabinet!

Again, this one didn’t need any major repairs…the only real boo-boo was one missing handle. This hardware was one of the most unique I had ever seen….not only the style but the fact that it was installed “vertically” vs. “horizontally.” Different…I like…so I was determined to use as much of the original hardware as I could.

I removed all the hardware. First I primed them with “metal primer” then I sprayed them with black lacquer.

Since one of the handles was missing and I knew there was NO way I was going to find a replacement, I decided to remove the handles on the top two drawers and replace them with knobs.

That meant the holes in the top drawers had to be puttied…and there is no good way to “disguise” putty holes without painting…but the wood on these drawer fronts was so pretty I really didn’t want to paint them!

The drawer on the right has been stripped…the drawer on the left has not. I just love how “clear and clean” the wood looks after removing the old finish (I used THIS process! Super easy!)

I decided the best way to disguise the puttied holes was to paint a stripe down the drawer fronts. I did this BEFORE applying the tung oil finish.

The stripe needed to be pristine…absolutely NO bleed through…and we all know how tough that is! I read a few tutorials on preventing that…some suggested using modge-podge…one suggested using caulk. I went with the caulk suggestion and it worked like a charm.

I used blue painter’s tape to tape off my stripes, then I ran clear LATEX (NOT silicone) caulk along the edges of the tape….

Then I used my finger to “mash” the caulk along the edge of the tape and wipe off any excess. WORKED LIKE A CHARM! Zero bleed through! I used clear caulk so any caulk that bleed through didn’t show!

I painted the stripes and cabinet. I used a grey latex I had on hand. I added Floetrol…ALWAYS add a paint additive…Penetrol for oil based paints, Floetrol for latex. I use a 4”foam roller and a high quality brush to minimize brush strokes and roller marks. And again, always apply 2-3 LIGHT coats to avoid drips and runs. I oiled the drawer fronts and top with 3 coats of tung oil finish (sand and tack between coats), drilled new holes for the knobs and reattached all the hardware and PRESTO!

Cute as a bug’s ear and super simple!

I just love bringing these pieces back to life!!!!

A vintage chair makeover for the new house....

As I have mentioned before, it is important to do research on "vintage" or "antique" pieces before you take a can of spray paint to them...God forbid you find LATER that you have spray painted a potentially valuable piece.

Such was the case with this pathetic little chair....

Someone had painted a true "vintage" piece...a McGuire ratan chair. (At least I THINK someone painted it...I couldn't find any information indicating this chair would have originally been painted)

With a little bit of research I found a listing for this pair on 1stdibs selling for a small fortune!

The prices on 1stdibs and Chairish always seem a bit high for my tastes but I have found both sites to be excellent sources for researching vintage pieces. 

When I first researched this coffee table (Drexel Declaration) I found it on one of these sites for around $1600. And this little cabinet for thousands.

This little chair sat out front of 410 Vintage for several weeks before I decided to tackle it. I wasn't drawn to it because of "what it is" but rather Matt needs a few little accent chairs. Since they sold it to me for $10 I didn't feel too guilty about painting it...the "true value" was pretty much toast in its current condition! 

The strapping on the joints (strictly decorative) is actually leather, but it was all pretty dried out and one was broken...a little hot glue fixed it right up. 

I repaired the broken seat strapping, primed the frame with Kilz, sanded a bit, sprayed it with black satin paint and made new cushions and pillows. I had some foam cushions stored away in my attic from an old couch and a few small pillow forms lying around so the only thing I had to buy was the paint and fabric.

Since Matt is a pilot and we are leaning towards an "aviation" theme in his living room, I thought this fabric choice for the pillows was down right clever...lol! 

Not bad for a small investment.

So now Matt has a defaced "McGuire ratan" accent chair...of little value but perfect for his needs! 

And cute as a bugs ear!

Closing is next week and I can't wait to get started...not sure if I am more excited about Matt buying his first home or getting all this "stuff" I have accumulated out of my house! I have most of the pieces ready to load and go! I am ready to roll out the rugs, set the furniture and hang the pictures. 

In a few weeks I will post a few "project pieces" I have worked on for Matt's house. I can't wait to share what a few bucks and a little time and effort can do.

More painted furniture projects and how you can get perfect paint results!

I know I share a lot of painted furniture projects. There was a time when I was a "paint snob." If it is wood, no paint.

But I have learned in my resell business that paint is often the best way to "enhance" a piece and give it new life. 

We all have "that piece." The one mom gave us or maybe we bought at a thrift store or garage sale because we needed a dresser or side table. A maple dresser from the 60s or one of those fake wood "cherry" tables from the 80s. We still need it for the storage or even to fill a space and buying new just isn't an option.

As I have said before, life is too short to live with ugly furniture and even the ugliest piece can benefit from a little "makeover" 

Updating an old dresser or bedside table isn't difficult. Yes, Pinterest is filled with precious stenciled and glazed projects...and we all envy. But simple is easy and the impact can be huge.  I have shared hundreds over the years and every week I complete at least 2-3 pieces that often do not get shared...either I forget to take pictures or they sell so fast I think "why bother." 

So today, again, I'm going to share a few simple little projects and how to get the best results.

Mini makeovers that can make a huge impact in any room!

This campaign dresser had seen it's better days....

As you can see, it had been seriously abused. But even the ugliest piece has potential....

Not the best "after" picture, but I didn't think to take a picture before I took it into 410 Vintage so I snapped one with my phone...but you get the idea. (If you haven't been to 410, GO!)

It sold the day I took it in! These "upcycled" dressers are perfect for a bedroom or even a tv and storage cabinet in the living room.

You might have noticed one piece of the hardware was missing. I happened to have one of the pulls from this project so I used the same method to retrofit it. You don't have to do anything that complicated...most home improvement stores have tons of hardware options. All the hardware was solid brass so I cleaned it up with some Brasso, steel wool and elbow grease. The point...the hardware doesn't have to be all matchy-matchy. 

This little bedside table had seen it's better days!

A simple little makeover...paint and new hardware....new life....

This is a typical hard rock maple dresser you can find for next to nothing at thrift stores and garage sales...

Usually sturdy as the day they were built, but seriously ugly and dated!

They obviously can benefit from a little love and attention...nothing fancy just a little paint and hardware update....

An inexpensive little "fake wood" side table......

And AGAIN...

I liked the brass hardware on this one so I just cleaned it up!

Sooooo...what do all these projects have in common. 

KSTP...Kilz (or any good primer!), sand with 220 grit paper, wipe down with a tack cloth and paint.

The two dressers were painted with latex paint using a 4" foam roller and paint brush. I used spray paint on the two little side tables.

So, here are a few TIPS for getting the best results when painting furniture.

1) Always clean the piece of any dirt or debris. Just wipe it down with a damp cloth and make sure you get all the "ick" off! If the piece is super grungy, you might want to clean it with ammonia or wipe it down with mineral spirits! (If it has a lot of flaking paint, you can sand it down a bit or better yet, strip it using this process...just make sure the existing paint or finish is stable!)

2) Make repairs. DO NOT waste your time making it pretty if it needs repairs. And remember, glue and clamps are your friend!!!! If you don't know how to repair something, google it or email me. MOST furniture repairs aren't that difficult...but if you do it wrong (or not at all) you will be wasting your time making it pretty! 

3) Primer....always a must if you are going to paint with spray paint or latex or oil paint. I swear by the oil-based Kilz. If you want your paint to stick and not chip or peel, prime. For smaller projects I use spray Kilz. For larger projects I roll on Kilz with a 4" foam roller. Even if your paint says "all in one paint and primer"...use primer.

4) Sand smooth after the primer has thoroughly dried. A 220 grit paper should do the trick...FEEL the surface...if you can feel it, the paint won't hide it. 

5) Use tack cloth. Most tutorials will tell you to wipe the piece with a damp cloth. That won't cut it! Tack cloth will pick up the finest grains of dust and debris you can't see until you paint the piece! Use it!

6) If you are going to brush on latex or oil, use a quality brush AND TAKE CARE OF IT! I have brushes I have owned for years because I am religious about cleaning them thoroughly after use. And don't even think about using those cheap disposable brushes (chip brushes). They are great for many things, but not for getting a smooth paint finish on furniture!!!! 

7) ALWAYS use an additive....Floetrol for latex, Penetrol for oil based paints. 

8) Use quality paint. Especially spray paint. I know it is cheaper at discount stores but pay the extra few dollars and buy a quality spray paint at your home improvement store. Cheaper will NOT be better if it doesn't hold up to wear and tear! I do 2-3 light coats (spray or brush) rather than trying to get solid coverage with one coat...trust me when I say, there is NO paint on earth that will get good coverage with just one coat!

9) Cure time is important. Seriously, I know they style their pieces on those HGTV shows within hours of painting a piece of furniture. Just don't! Just because the paint feels dry to the touch DOES NOT mean it has cured. Latex...a few days...oil...a week. Give your paint time to cure or it is going to peel or chip if you try to use it right away! Put the piece in place and chill!

10) Spray vs. Brush/roller. For me, it all depends. I have learned that large flat areas are tough to get an even coat of paint on with spray paint...and of course there is the expense factor for large pieces. A dresser can take 2-3 cans of spray paint. So it really depends of the piece. Sometimes I will spray the drawer fronts of a dresser and roll the top and sides. 

11) Keep a little spare paint for chips and dings...if you use latex or oil, just put a few tablespoons in a little container and stick it in the back of the drawer...just in case! If you are using spray paint, keep a can with a little paint. Manufacturer's change paint colors and you might not be able to find that awesome color in the future. Keep spare paint in the house...not the garage or storage shed!

Regardless of whether you spray or roll/brush, you have to follow the first rules of KSTP....Kilz (primer), sand smooth, then tack....then paint!

If you follow these simple guidelines, you can update a dated piece with just a little time and effort. 

Again, life is too short to live with ugly furniture...

Drop door cabinet makeover....

Enough about my entry makeover FOR NOW! I'll get there eventually but I'm at the "wait" and "hum" stage...waiting on tile and stair treads and not quite sure what I want to do about trim and lighting...hum....

So in the meantime I thought I would share one of the wash stands I rehabbed. I went to an awesome auction several weeks ago and brought home 5 potentially beautiful dressers and wash stands. One just needed to be cleaned and oiled but the others needed some serious work.

On these older pieces I just can't bring myself to slather them entirely in paint. I always have to restore a little bit of the original wood. I know in today's world of home decor, paint is all the rage, but I need a good balance of paint and the "warmth" of wood. So no matter the condition of the top, if it is solid wood, I am going to strip it and refinish it. 

This little cabinet was originally a "wash stand." It wan't in terrible shape but it had seen better days!

It had a little mirror on the back, which when removed left a  "gap" along the back edge.

If I was going to paint the top, I could have filled it in with a strip of poplar and been done with it. But I knew I wanted to refinish the top so I added a piece of oak...

...just routed the edge, then attached it with glue and trim nails. I stripped the top with this process, applied a little walnut stain and sealed with poly!

I chalk painted and distressed the base and sealed with poly. The little drop front REALLY distressed, but sometimes I just let furniture do what it wants to do! A little update on the hardware and it is good to go!

The drawers on most antique pieces have some issues....remember GLUE AND CLAMP when repairing drawers! Not nails and screws! And since the drawers were pretty ratty and stained, I gave them a little KSTP treatment! (sorry, no pictures!) They look and smell much better if you will take the time to paint the inside of the drawers of these older pieces!

I think this would make an awesome bedside table or entry piece! Or even a tv cabinet!

I tried to "stage" this little piece with some of my auction finds....

....an old cheese box, some awesome scales and a wood duck decoy. But again, I am not the best photographer and I am definitely more about doing and less "froo-frooing." 

I have several dressers and another wash stand to share, so stay tuned!

Simple bench or stool makeovers...

At least once a month I run across pathetic little benches or stools at the auctions or in thrift stores. I have featured a few in the past....

...this cute little piano bench here....

A bench I made for my daughter out of an old coffee table here....

My dad's old tool bench....

I use it as a little side table next to the chair in the den! This is one of those things that serves a purpose and has tremendous "sentimental" value as well! 

And at least a dozen or more I failed to take either before or after pictures of over the years! I'm a baaaad blogger!

Trust me....they are super simple to makeover with a little paint and fabric and always turn out precious! 

Recently I did a little footstool and bench and actually remembered to take a before AND after picture!

This little foot stool was pretty pathetic in it's original state....

I stripped the fabric (and removed at least 2,483 staples), chalk painted the base, distressed a bit and sealed with poly (gives lighter paint an "aged" look), added a little bit of foam to "fluff" it, new fabric and new "gimp" trim.

Cute as a bugs ear!

I found this old icky coffee table at the apartments. Like the old coffee table I turned into a houndstooth bench for my daughter, it was pretty worthless for it's intended use...a coffee table. 

I removed the top (super simple...a few screws), added foam padding and batting and covered it with fabric and gave the base a little KSTP treatment.  Reattached the top to the base with screws. Super simple! 

Both are now in my new flea market booth at 410 Vintage in Fayetteville! Awesome place so make sure to drop in sometime and check out all the AMAZING treasures! 

Next time you see a ratty old foot stool or a dated old coffee table, see it for its potential! They are super simple to make-over and are perfect for additional seating or a place to throw your clothes at the end of the day...and of course, they are the perfect little touch to add character to your home!

Paint...the easiest way to update a piece!

When I first started this site I posted every day. Seriously. Every. Single. Day. 

That's okay when you are trying to catch up on 30 years of DIY projects...but after awhile it gets a tad tiresome. For a time I posted twice a week...very doable and since I usually have 2-3 projects a week in the pipeline, I always have something to share. 

But life has gotten pretty busy around here the last few months. Katie's senior year (and all the hoopla that goes with that!) and then she and Matt's graduations....

Matt graduated from the UofA with his master's degree and a week later Katie graduated from high school with "highest honors."  Precious....

And of course the apartments...seems the work around there hits in tidal waves...not just "waves" but darn near tsunamis. So the last few months I only found time to post about once a week...which means the projects have been piling up in my "blog files." 

Right now I have hutch tops-turned-display cabinets, an antique dresser, a mid century dresser, an antique table, a side table, two chairs and much more...all piled up in the garage, finished and ready to share!

Today I thought I would share a few projects to show that a little bit of time and paint can completely change the look of a piece. I've shared similar projects in the past (tons to be exact...just cruise around this site!) but time and again I see people posting on several blog sites questions about "what can I do to make this better"..."help"..."blah, blah, blah.... bitch, bitch." 

Dude. Seriously. Go buy a stinking can of paint! It really isn't hard to take a simple, "blah" piece of furniture and turn it into something worth having in your home.

Take this table for example....

...I see little tables like this at thrift stores and auctions for next to nothing. Or maybe your parents or grandparents gave you one when you started furnishing your own home. Solid little tables...usually in mahogany or walnut or even oak. (I have a similar one in my den that I painted and feature here.)

Let's be honest...not real appealing. I think this one sat in my booth for MONTH before I brought it home and gave it a bright chalk paint/distress treatment (My recipe for "chalk/plaster paint"... 2 1/2 TBS of Plaster of Paris, 1 1/2 TBS of water, mixed well then add 1 cup of latex paint)

I stuck it back in my booth and it only lasted a couple of days. Notice I didn't even invest in new hardware...I spray painted the existing handle with off-white paint!

This antique oak buffet was pretty "dated" as well. Again, something you might inherit from a family member or find in a thrift store or on Craigslist for not a lot of money!

(I took the picture after I had removed the mirror in the top piece)

Some people like the antique wood look and these pieces can be beautifully restored if you use this process. 

I chose to restore the top since it was solid wood and paint and distress the rest of it....

I changed out the hardware...again, it only lasted a few days.

And another....

Sorry for the picture quality...phone camera!

This empire dresser was, as you can see, a hot mess. Literally falling apart but nothing a little glue and clamps couldn't fix right up. 

Which reminds me...I was working on another dresser this week. Seriously people...dove tail joints were not nailed FOR A REASON!!! So don't try to fix them with nails. And silicone is NOT glue...so don't try to fix loose joints with silicone. My point, if you are going to fix something, fix it RIGHT. I spent over an hour just "undoing" someone else's "fix." If you don't know how to fix it right, GOOGLE IT! My daddy didn't teach me everything I needed to know about DIYing...but he did teach me to use my head and use available resources to find out how to do it RIGHT. And he didn't even have the internet!!!

Okay, rant over. So after some "rebuilding" and repairs on this dresser, I chalk painted and distressed it (again, Google it...you'll get around 1,170,000 results on chalk or plaster paint...I'm not kidding...I googled it and that is how many results I got)

The piece had nifty wood knobs...several were missing so I used a few from the buffet. I decided to give them a little facelift so I primed them and sprayed them with light blue spray paint. 

I think it lasted a week!

And lastly, a mirror. I have featured a number of mirrors on here. IMO, they are one of the easiest things to update. This wood mirror had some interesting and intricate carvings but it was a bit dated and dark!

I decided to forgo my usual "boring off white" and give it a little pop of color.

For the time being, it is hanging behind the front door in what little "entry way" I have. Not sure I actually love it there but that is where it is...for now....

My point...stop looking at your dated, drab furniture and growling at it. Find some inspiration and roll up your sleeves.

Don't turn your nose up at those "dated" pieces your mom and grandmother want to give you...take them...again, find some inspiration and give them a simple facelift. There are countless super awesome ideas out there for every kind of project!

There are also unlimited tutorials out there on how to repair, paint, refinish, decoupage...if you can imagine it, a tutorial is out there to tell you how to do it! 

Display hutch...before and after!

Brian has long since stopped questioning my purchases at auctions. I think he has developed a little bit of faith in my ability to make something out of nothing. But occasionally I do question myself. I must have subconscious flashes of inspiration that, in the stark light of day, are forgotten because occasionally I will look at a piece I brought home and think "WHAT WAS I THINKING!!!" 

This would be one of those pieces....

It's not a horrible piece...it's just very "ho-hum." Not an antique or even remotely interesting. Just...well...boring.... for lack of a better word.

Basically just a  "pine and particle board" piece that is pretty dated...seriously, hunter green?

The upside to this piece is it did not need any major repairs...just a few nuts and bolts tightened here and there. The stained top, shelves and crown where in good shape and didn't need to be refinished.

Honestly, it just needed a little "facelift." A brighter color to update it a bit! I taped and papered off the stained areas, removed the ugly wooden knobs and gave it a little KSTP treatment (Kilz, sand, tack cloth and paint!) 

My favorite teal spray paint and simple little black knobs and we are good to go!!!

I even "displayed" a few of my auction finds just so the pictures would have a tiny bit more interest! This piece would be an awesome addition to a kid's room, an office, or even in a kitchen!

Again, this is one of those "boring" or "dated" pieces you probably have floating around your house. Whether it be bedroom furniture, a little table,  an old dresser, or even a dated light fixture, a couple of hours and a few cans of spray paint can make all the difference. You don't have to be even remotely creative...just find your inspiration and go for it!!!

I have a garage full of projects I have been working on since the weather warmed a bit! I can't wait to share...something for everyone!