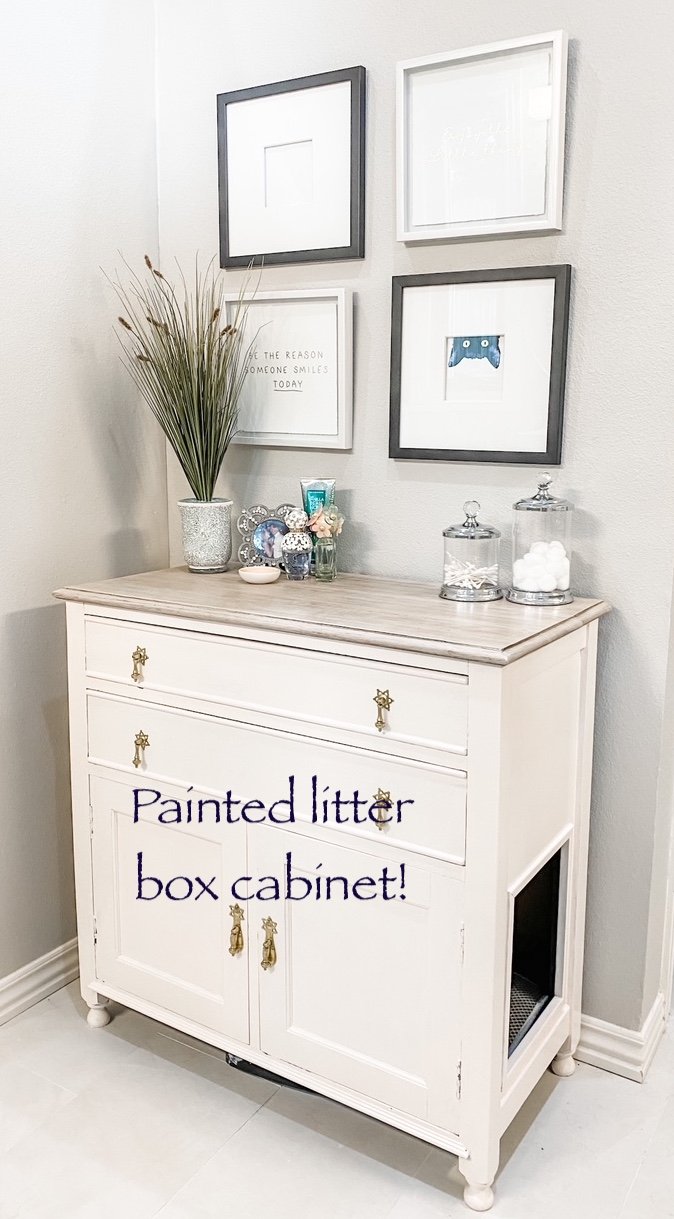
Painted bathroom litter cabinet...

I keep a list of projects I want to do on my refrigerator. Repair the irrigation line on the norths side of the house, wainscoting in the dining room, paint the trim, trim tops of windows and doors, paint the bathroom cabinet, add a flower bed around the backflow…and on and on it goes.

When something gets done, it gets marked off…when I think of something I want to do, I add it to the list!

It keeps me focused on what I want to get accomplished…eventually! And being able to check a project off my list feels amazing! (Sometimes if I do something that wasn’t on the list, I add it just so I can mark it off)

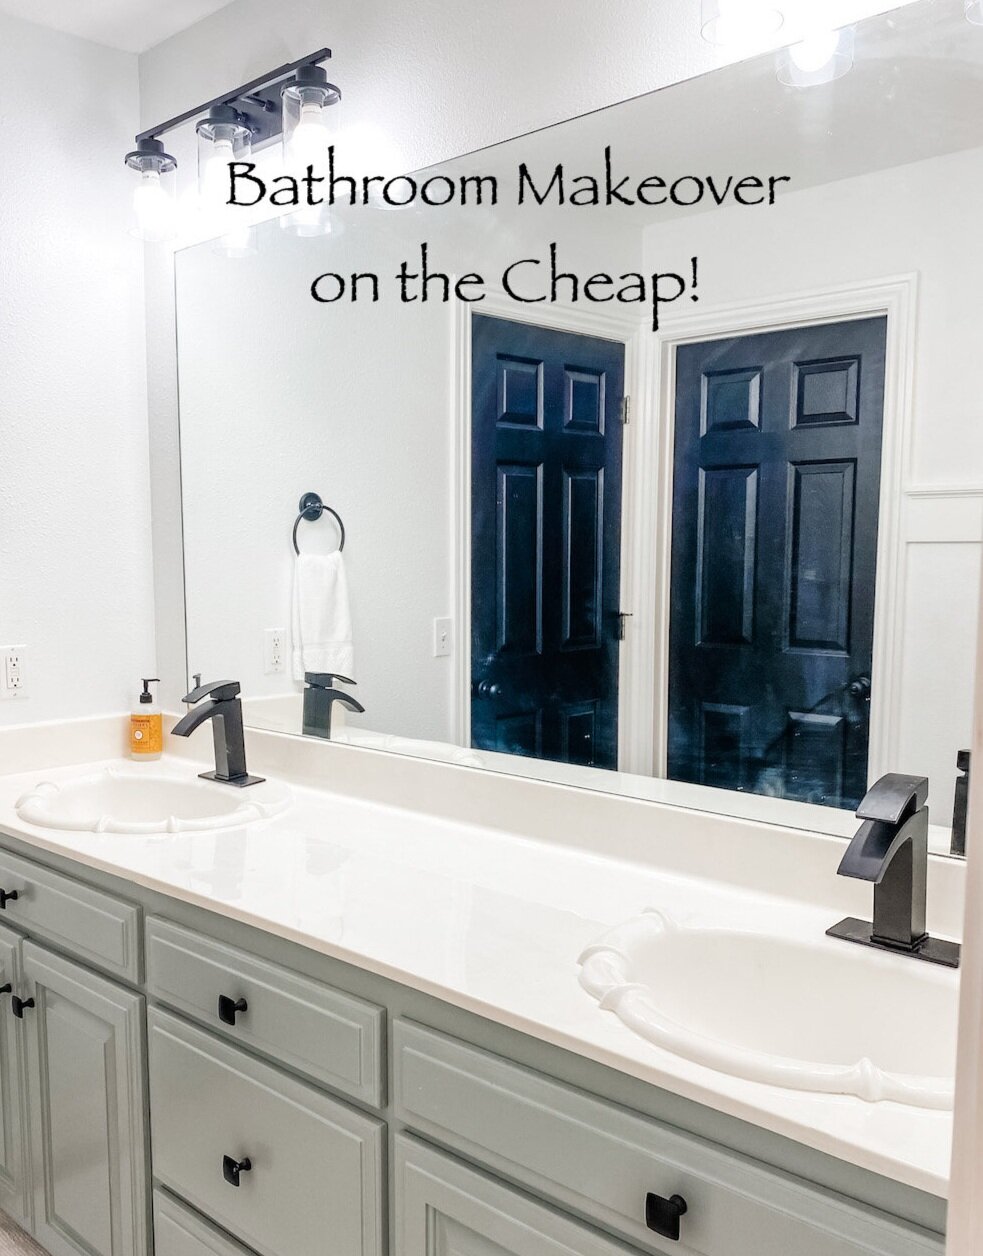
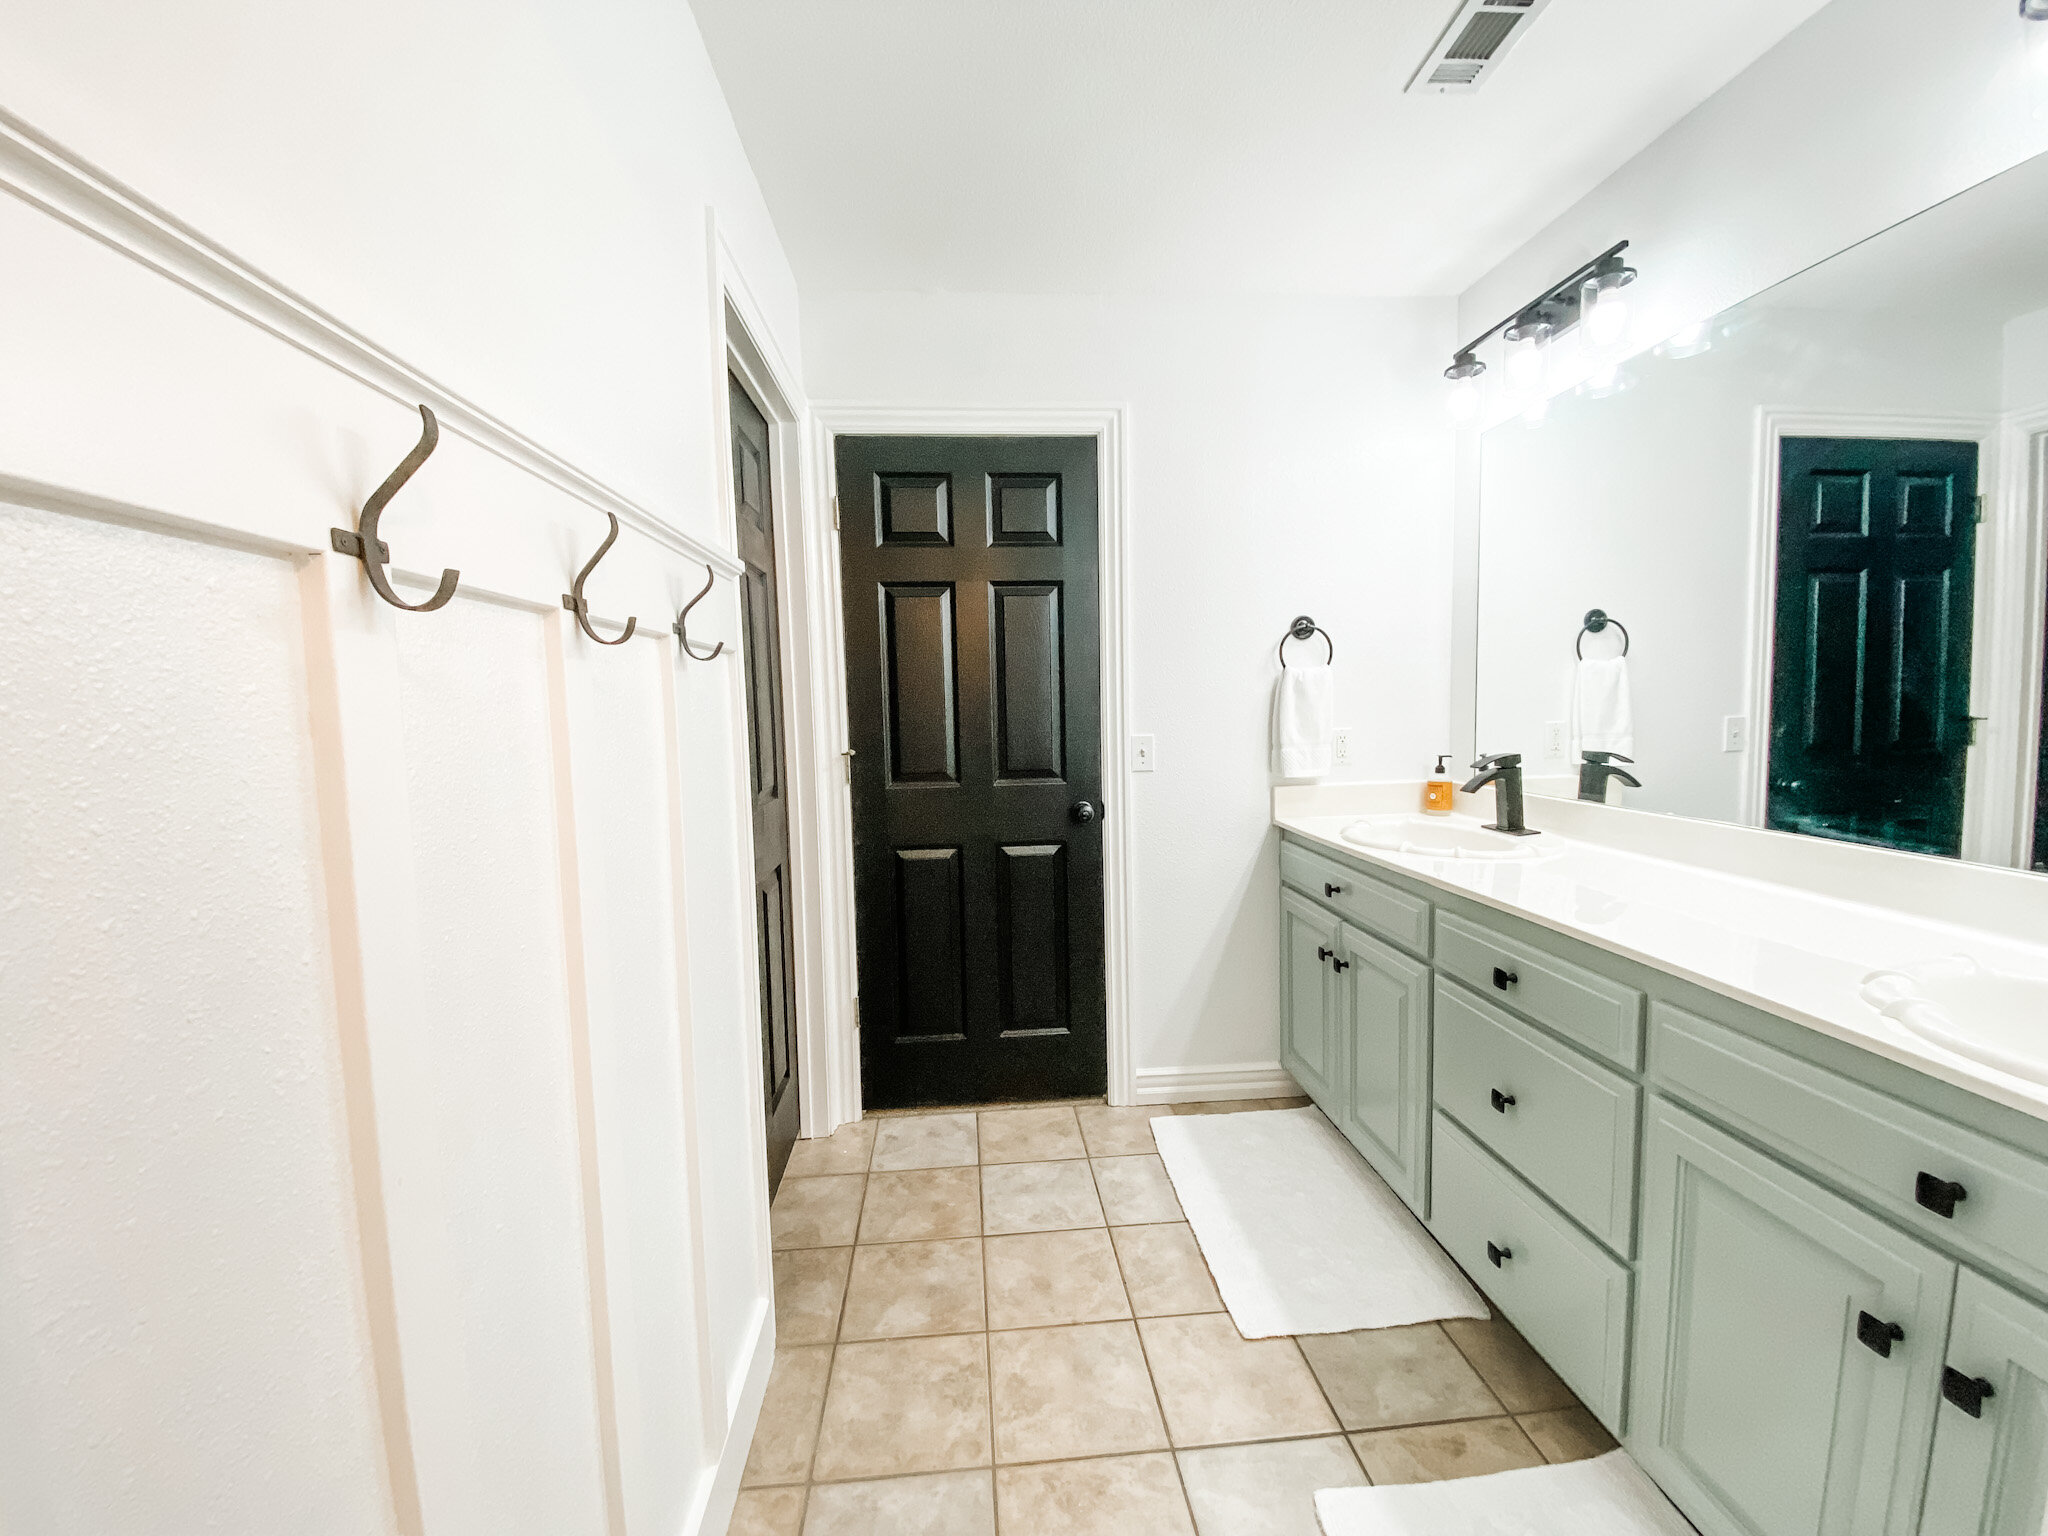
I’ve managed to get a few things done this week. The flower bed around the backflow is done. The dining room wainscoting is done (will share next week) and the littler box cabinet in the master bath has been painted.

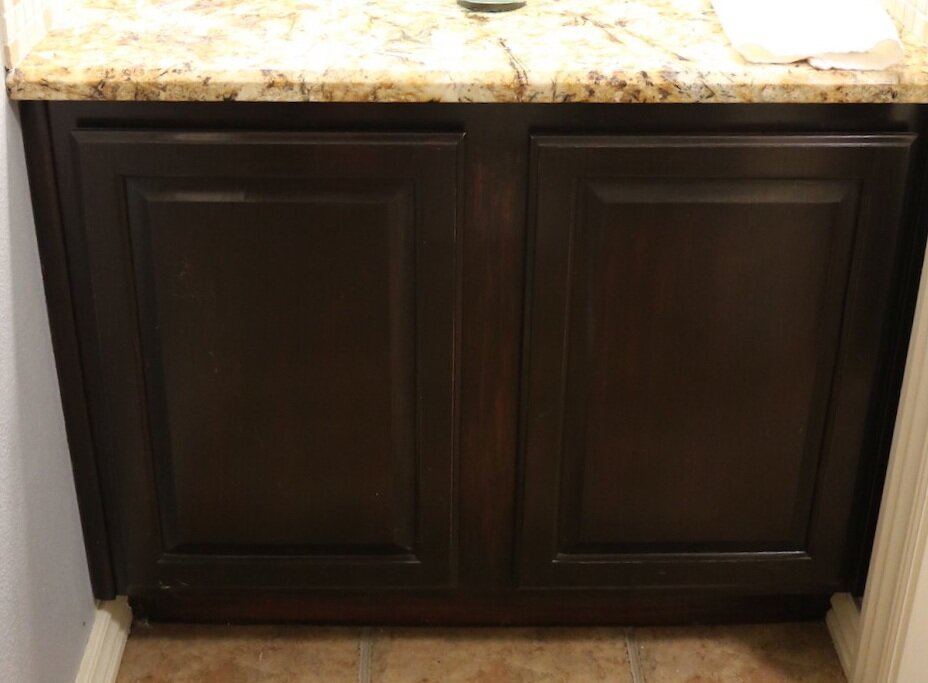
Why did the litter box cabinet in the master bath need to be painted since I just painted it you ask?

Last year I painted the bathroom cabinets and in my opinion the two kind of clash…so it has bothered me for the last year.

So I wanted to paint the litter box cabinet but couldn’t decide on a color.

Last week I was cleaning out some drawers and found a little dish my daughter in law got me as a gift. I have no idea why it was stuck in a drawer, but it was my “inspiration” for the cabinet.

I have three cats…I would have more if Brian would tolerate it. My children know me well.

Anyway, I love pink. When I finally decorated my home office, I added a tiny bit of pink. I try not to over-saturate my house with pink because there is a guy living here, but I do like to throw it in there from time to time.

Pink…

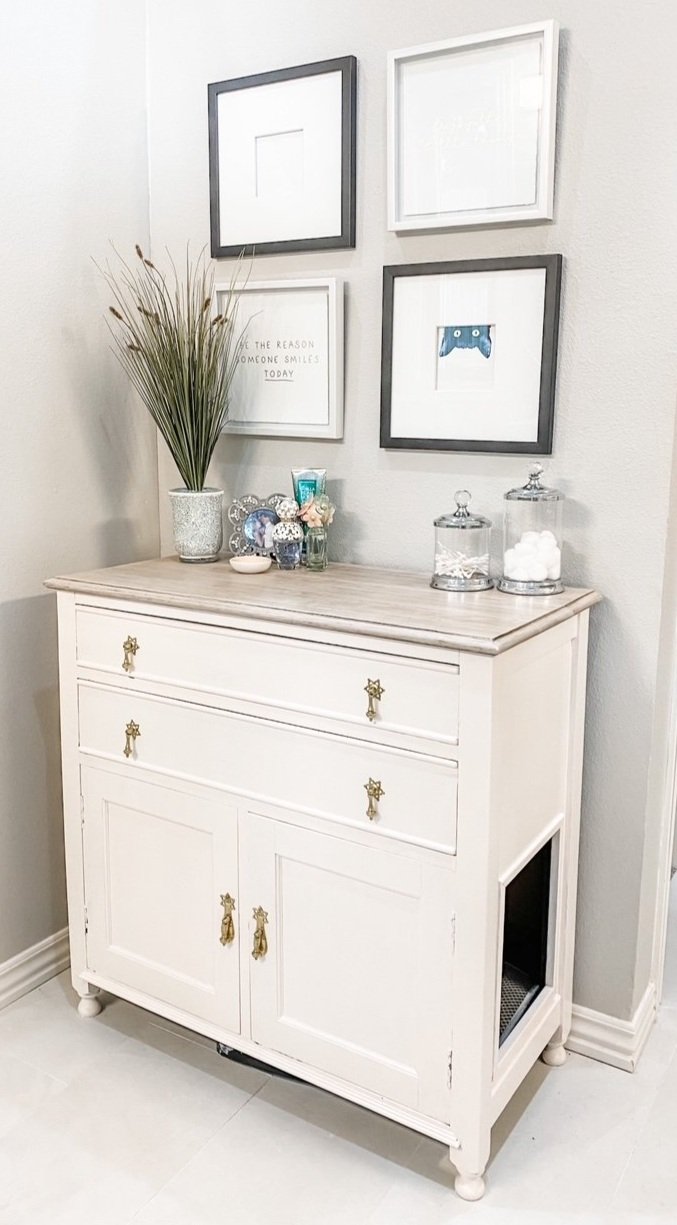
Since I had already done all the sanding and repair and priming and all the other fun prep work before I painted it the first time (HERE I did a fairly decent tutorial for turning a cabinet into a littler box), all I did this time was remove the hardware, scuff the finish with 220 grit paper, tape off the inside and rolled and brushed on my new favorite paint…the BM waterborne alkyd.

Better than my “go to” white…not as stark as black. Shined up the brass hardware again and walla!

Love!

Check. One thing down, a dozen more to go! But that is okay…being able to check one thing off the list feels amazing!

Bathroom makeover on the cheap....

IMG_1880.JPG

I consider myself “apolitical.” In other words, I have an opinion, a personal “ideology,” but I really try to avoid all the political “fodder.” It’s just too depressing, stressful, overwhelming…

It eats into my personal happiness.

But with all that is going on, I found myself sitting on the couch mesmerized by the news ALL DAY FOR AN ENTIRE WEEK!

I was so overwhelmed.

I HAD to get moving and my little morning walk and ride wasn’t cutting it…just too much time left in my day.

So I tackled a project I could not have cared less about lifting a finger or spending a dime on…the guest bath.

It gets used MAYBE 2-3 times a year when the kids come for overnight visits. I threw down a few comfy rugs, stocked it with “guest necessities” (this stuff is important) and hung a nice curtain. I would clean it when I knew we were going to have over night company…other than that…out of sight, out of mind.

The fact that few used it or saw it on a regular bases was just fine by me.

It wasn’t completely offensive.

It was just “blah.” Beige walls, off-white cabinets, dated, boring lighting and fixtures…just blah.

Again, who cares…

But I needed to get moving and put my body in motion. And this was the perfect project. Inside in the AC but away from the TV.

Inspiration…anything “unblah.”

My plan…”unblah” it.

Budget…as little as it takes to “unblah” it.

IMG_1843.jpg
IMG_1844.jpg
IMG_1842.jpg

Usually I am all for finding an inspiration, making a plan, and working with a sound budget. In my opinion, it is the only way to attack a big project like this.

But I need to move and I didn’t have the time or patience to sit and think about this for weeks. I decided my MAIN objective was to use the materials I have on hand and try to make a few changes that would “unblah” the space without breaking the bank.

First on the list…get rid of all the gold fixtures. The style wasn’t TOTALLY offensive but they are gold…gold towel and hand towel bars and gold TP holder. I decided to “repurpose” the hand towel holders and TP holder by painting them black. A little primer, a little black paint…both in my stash. Cost…zero.

IMG_1875.JPG

I also replace the faucets…the existing weren’t totally offensive but these were pretty inexpensive on Amazon…less than $50 each.

I removed the towel bar and added a little bit of board and batten with hooks for towels. Similar to my entry….super simple…again look for a tutorial that makes sense to you! Less than $50.

IMG_1886.JPG

I used some leftover trim paint to paint the board and batten and all the trim. Cost…zero.

I painted all the doors in the main part of the house before we moved in…but again, this space got completely ignored! I even ordered black door knobs but never put them on these doors. I used the left over black paint and the knobs I bought over a year ago. Cost today…zero.

The cabinets….I used the leftover paint from my master bath cabinets. Cost…zero.

I did buy new inexpensive hardware. About $4 each so less than $40. (But I could have painted the existing hardware with black paint I had on hand.)

IMG_1880.JPG

The ceiling needed to be painted. Big water spot around the HVAC vent. I sprayed the spot with some Kilz I had on hand and dug out the leftover ceiling paint! Cost….zero.

IMG_1839.jpg
IMG_1869.jpg

The beige walls needed to be “deblahed.” I painted them white…plain ole’ pure white. I only needed about a gallon and my son had some leftover from their house. Cost…zero.

IMG_1881.JPG

I would have loved to change out the 23 year old tops…maybe add a pretty tile backsplash…but the tops aren’t terribly offensive (just a bit dated) so for now they stay. Just added the new faucets.

Three new light fixtures…two vanity lights and a pendant light…again, Amazon. All three for less than $250.

IMG_1884.JPG

I could have repurposed the lights that where there with a little paint but the new were worth the investment.

Again, this space only gets used 2-3 times a years so it’s not like I need something expensive.

The flooring could stand to be changed…but again, this is a room that is rarely used….soooooo…..

The only other thing I would love to do in this room is change out the mirror…or at least frame it. I found THIS tutorial for a wall treatment I absolutely LOVE….

KM_DIYMirrorUpdate_0015.jpg

Not necessarily the gold mirrors…I think I would go with round wood framed. But I love the wood slate treatment and I may eventually tackle that project…someday…maybe when we have another national crisis and I need to focus on something constructive.

Sadly at the rate our country is going, that may be next week.

With all the negative looming over our heads…fires, hurricanes, Afghanistan, Covid, inflation….I can not stress enough how important it is to stay focused on the positives in your life. Believe me when I say I GET IT. It is hard to stay positive when people we love are sick and dying, our retirements are swirling the drain, you can’t meet you monthly financial obligations, the very fabric of our great country is being shredded.

Turn off the tv…shut down your computer….turn your radio dial. I’m not advocating bathing yourself in complete ignorance….just turn off and tune out the onslaught of negativity and focus on something that makes you happy.

The laughter of your children as they play.

The sound of the the crickets and birds on your morning walk around the neighborhood. (Get out and breath fresh air…EVERY DAY)

The babble of a brook in a nature park.

Coffee on the porch early in the morning before the heat and humidity sets in.

A tiny bit of “quiet time.” (Whether you do yoga, meditate, read your bible, just sit and stare…ALWAYS carve out a little bit of quiet, alone time EVERY DAY.)

A stroll down the aisles of Hobby Lobby…fall and Christmas are just around the corner!!!

I’ll admit it…my life isn’t all roses and peach fuzz. Somedays I really struggle to find something positive to focus on. But as I said HERE, you choose your “hard.”

Choose wisely.

Painted bathroom cabinets...

As I mentioned in the first two reveals of my master bathroom (HERE and HERE), it is one of those ever evolving rooms.

This is where we last left off…

…the addition of the operable windows. I can not express how much I love these.

The cabinets….not so much. They are actually kind of an off-white-yellowed-ick kind of color. And the hardware was pretty blah and cheapo. Cheapo is great if it has just a tiny bit of character, but these didn’t.

I debated changing out the drawers and doors to mission style doors but honestly I don’t want to spend the money on them right now. Someday I may do some major magic on these cabinets but for right now I just want to give the room a more “polished” look.

Paint…hum. An inexpensive way to give a space a little facelift.

So the debate raged…white or color…and if color, what color.

You would think as much as I do this kind of thing paint color would be no big deal for me.

WRONG!

This is just a few of the paint samples I brought home.

This is the trick to finding the right paint color. Go to the store and pick up every sample you THINK you might like…then take them home and look at them in your light. You would be surprised at how much a paint color can change in different lighting. If you still find yourself drawn to 2-3 colors, buy sample pots…they are well worth the investment. Also, if you are torn between a light color and just a tad darker, go light. First, the bigger the area, the darker a paint will look. Second, if you still think you want darker you can always go back and have them mix it the darker shade. Once you have the darker shade mixed, you really can’t do much more than buy another gallon.

I finally landed on one I think I kinda sorta like. I ordered simple brushed nickel hexagon hardware…inexpensive but with a tiny bit of character.

IMG_1656.JPG
IMG_1657.JPG

The two vanities took all of about 1/10th of a gallon of paint. I should have bought a quart but custom colors tend to be a smidge off in the quarts.

All in all I’m not UNHAPPY with it, but not sure I am over the moon thrilled. For the time and money you can’t beat slapping a coat of paint on a wall or a piece of furniture or cabinets to change the entire look.

Now, I want to share my latest “find.” I am, as I have said before, “old school.” Primer and oil-based on furniture, trim and cabinets and latex on walls.

I have experimented with a relatively new (to me) product and I have decided I kind of like it.

It is a “hybrid” paint….will go over latex OR oil-based without the need to strip or prime. I do knock off the shine and any rough spots just a tad with 220 grit sandpaper and wipe it all down with tack cloth, but other than that it takes very little prep. And the super cool thing is it doesn’t matter if the old paint is oil-based or latex…usually that matters A LOT. This hybrid paint needs no additive, brushes on super easy, “levels” beautifully (which is great if you are brushing or rolling on wood), cleans up with soap and water and so far seems super durable.

The only problem I have with it is it seems to be a tad thinner than most paints and you need to watch carefully for drips and runs…but because it levels so nicely they are easy to manage!

Both Sherwin Williams and Benjamin Moore carry it and I have used both…with great results.

So if you are not sure what type of paint your trim/cabinet/furniture is and you don’t want to go to all the trouble of priming, try this product. So far, so good.

So that’s that for this bathroom…for now. I really don’t have any more MAJOR changes I want to make in there. But knowing me, I’ll find something. This week my project has been my utility room. A necessary change that I will share next time….

static1.squarespace.png

Master bathroom windows...FINALLY!!!

IMG_1509.JPG

At last!

This isn’t the first master bath reveal and it won’t be the last.

This room is one of those “processes” that will take time, money and a lot of of “humming.”

By that I mean I’m still not sure what i want to do with the cabinets. But I knew from day one I wanted operable windows in this room. Why I didn’t do it when I did the major remodel before we moved in is beyond me.

I had the perfect spot….

IMG_0455.jpg

On either side of my vanity mirror. This wall is adjacent to the back yard and over looks the flower garden I put in under the humungus oak trees.

I learned in my last home that an operable window in the master bath is a MUST!

It is the mustiest, stuffiest room in the house and there are just times when you need to throw open a window and let the fresh air in!

Adding a window will entail cutting sheetrock, removing brick, framing and in my case moving both plumbing and electrical.

Like every major project, the best way to start is to just start…and in this case that meant cutting two big ole’ holes in the wall.

That was when I discovered the plumbing in the left opening. Okay, no biggy. I can manage that. I didn’t discover the electrical issues in the right window until I removed the insulation a few days before my windows arrived. CURSES!!!!

Again, no biggy for me. Just a few junction boxes, new wiring , relocate a light fixture…. blah, blah, blah. Fortunately I have a few basic skills (and a SIL electrician on speed dial) so I was able to do what needed to be done. But If I were without those skills and planning a “little remodel” like this, I would certainly budget for professionals. If you don’t need them, kudos…but be financially prepared.

IMG_1509 2.JPG
IMG_1507.JPG

They let in a ton of natural light!!!! (This is with NO lights)

IMG_1506.JPG

I can not even express how much I love these windows.

I thought adding a window in my laundry room was the best decision I made in this house. Hum…may be a tie! The extra light and ventilation in both is a must!

Even through the screens, I love the view of the back flower garden!

IMG_1512.jpg
IMG_1504.jpg

Now on to the next head scratching project. The bathroom cabinets. It may be difficult to tell in the photos but they are kind of a blah off-white.

I have contemplated refacing the fronts and replacing the doors and finishing it all in a light stain. I like the “concept” but when I searched Pinterest I kind of don’t care much for the look.

This is just a few examples of a bazillion I have put in my “inspiration” file….

a5a48166a2fd9000b6bf16011990d19d.jpg
fce0f15bf4f9aa2fd15d91ab2e960d5c.jpg

I like, but I don’t love.

I kind of like the look of a color…

8bcf39527809249718d4f65e500c4114.jpg
75df4049c026a2d7d83548afdc2e15ca.jpg

Again, liking but not sure I am loving. (And again I can not give proper credit because I stole them from Pinterest and dropped them in my inspiration file…my sincerest apologies!!!)

As much as I dislike the thought of the “sterile” look of all white in this bathroom, I think in reality I would really like it.

So right now I am leaning towards painting the cabinets a brighter white and definitely replacing the hardware.

That is the nice thing about paint… if I eventually find a color that really trips my trigger, it’s just another gallon of paint, a couple of hours of time and a back ache.

Until next week…

static1.squarespace.png

Slow but steady progress...

The first week of “semi-retirement” has been brutal! I closed on two rental houses last week as well as the house we will be living in. I close on another rental house Friday!

The rental houses need my attention…blinds, a little paint, cleaning, etc. I spent one day this week cleaning carpets and painting trim.

The house we are going to live in also requires my attention. Meeting with sub-contractors, ordering tile and windows, selecting appliances, supervising the demo guys.

I’m exhausted.

But that is okay…it is a “good” exhausted and everything is moving along nicely.

My “demo guys” are on day four of demo. Little by little tubs and showers, trim, old appliances, the wall between the kitchen and living room are all making their way to the curb or into the garage for resale.

So far the bathroom and kitchen are gutted, the transom windows have been exposed for replacement, all the trim has been removed in the rooms I am adding hardwood, the crown above all the windows and doors have been removed, the new laundry room window has been framed, and all the replacement items have been ordered. HOPEFULLY, the plumber will show up today to move all the plumbing so we can start putting everything back together.

(Yesterday, this wall came down…LOVE!!!!)


I am so glad our community has “bulk trash” pickup!

The good news is I love what I love…and while I would kinda sorta like to take this opportunity to make some changes, I love the tile in my recently remodeled master bath and I love my new kitchen counter tops. I am going back with the exact same quartz top and tile backsplash in the laundry room that I used in the guest bath makeover. The wall paint color is the one I used in my laundry room here when I remodeled it recently.

That is how I know I made good decisions the first time!!!

As much as I tried to shake things up, I am basically going back with a lot of the same things I have in this house…including the black painted interior doors!

Right now, it is a MESS. But every morning when I wake up at 3 a,m, I can clearly visualize the finished design…and of course I have to map out my entire day which explains why I can not go back to sleep.

That’s okay…eventually I might get back to sleeping until 5:00 a.m. again. As much as I would love to recoup all this lost sleep, I have often said if I had the opportunity to recoup all the sleep I’ve have lost in this life time from kids, pets, and “stress” I would go to sleep and never wake up!


BIG LIFE CHANGES

I know this is a rare Monday posting, but I can finally share the big changes that are happening in my life.

A few months ago I woke up one morning and decided it was time to sell my apartments.

I called a realtor I had worked with last year and told him I was ready to sell. At 3:30 that afternoon he brought me an acceptable offer.

I have owned these apartments for 23 years.

At first I was a bit “sad.” After all, they have been my “career” for 23 years…they are what I do!

The income has provided me with the ability to provide for my children and give them a good life.

I’m only 56…I still feel like I have a few good years in me.

Yes, I am giving up a decent income. I have to roll the profit into other investment properties, specifically rental homes, but they will not produce near the income the apartments have. But that is okey…sometimes you have to sacrifice quantity for quality. The “quality” of my life will be greatly improved.

Yes, I am “starting over” at 56. The new rental homes will not take up near the time the apartments did…so the question now is what will I do with all this free time. Trust me…I am not one to sit around on my hands. I have no doubt I will find SOMETHING to do!

It’s been a stressful few months…I’m usually awake and ticking by 3 a.m. and at this point I feel like I am running on fumes.

So naturally I did what I do when I am stressed and frazzled…I went out and found something else to fret about.

We bought a new home.

For years I have wanted to “down size.” Now that we are empty nesters we don’t need a big house with three empty bedrooms upstairs and a huge yard to care for.

So naturally I went out and found a house that is WAY bigger than what we have now and has a large yard that needs TONS of work.

After a lifetime of owning “projects” I wondered if I might have ONE MORE project in me. I guess I am getting ready to find out.

The new home is waaay more “traditional” than I like…but it has soooo much potential. It has good bones and a workable floor plan!

The kitchen and master bath are complete gut jobs…and after a lifetime of living in “remodel messes” I have decided that this work will be contracted out and we will not move until the big, messy work is done!

The big wall between the kitchen and living room will go away, as well as all the cabinets, and I plan on putting a humungus island smack dab in the middle of the existing kitchen.

The wall on the far right with the glass cabinets will become the “cooking” center with a cook top, wall oven and microwave. And the coolest tile backsplash in the whole world. I can’t wait to share!

No need for lots of upper cabinets because it has a huge walk in pantry!

This is the “sitting room” adjacent to the kitchen…

One way to “detradionalize” this home will be to replace the arched transoms with rectangle ones…a bit of work since it will require brick and sheetrock repair. This is on my list of things to do, but closer to the bottom.

The quickest, simplest and cheapest way to “detradionalize” is to remove all the crown molding around the cased openings and windows! The crown around the ceiling will stay!

Another way is to change out light fixtures…that is closer to the top of the list along with removing carpet and adding more hardwood flooring (yes they are REAL hardwood floors) and refinishing them all with just a clear coat…no stain!

The fireplaces? Yes those will eventually get redesigned…again, not something I will tackle right this minute but it is on “the list!”

The master bathroom…ICK!!!! Suffice it to say, it is a gut job!

Right now I am in the process of “making the plan.” Meeting with tile guys and cabinet makers and flooring companies…getting quotes and ideas. Making a list of what HAS to be done…wants vs. immediate needs.. As always there are things I WANT to do but I might not be able to do right this minute…they stay on the list, just closer to the bottom.

I have a life time of inspiration to pull from but I am still grabbing pictures from the Pinterest and the internet. I pretty much know what I want…

Now that we have closed, it is time to “execute the plan.” We start this week with demo…and then I will work the plan from there.

One by one I will be closing the new rental houses and hopefully creating a “new career.”

These are the big life changes that are going down in my world! Huge!

While the apartments have been stressful and back breaking at times, they were my “career”…they were what I did to provide for my family. Saying good-bye is like retiring and moving on to another career.

This house has been our home for 20 years…it is where I raised my children and I have poured my money, talents and time into this house to create a home.

It will be tough to walk away from both…but that is what is going on in my life and I am super excited about the next chapter…whatever that may be!

Master bath reveal!

I KNOW! I have been MIA for a while now….there is just soooo much going on right now that I can not share! I promise, in due time.

In the meantime, AGAIN, I want to revisit one of my all time favorite “makeovers.”

I revealed my master bath makeover almost two years ago and I can honestly say I STILL love this bathroom. Love it! I don’t missed the tub at all and the walk-in shower is still my favorite addition to this house!

Head over to this post and check out the transformation and MAYBE next week I’ll have something new to share!

Guest bath makeover....

I’m trying to complete a few small projects…a few weeks ago it was my laundry room.

This past week it was my guest bath.

The guest bath is right across the hall from the laundry room…since I painted the laundry room a pretty “sagey green” I decided to tone down the blue in the guest bath. While I was at it, I decided to change out the counter top and backsplash.

I installed a glass vessel sink, a super awesome faucet and new lighting when I gave the room a little makeover a few years ago (probably a decade ago!) and I still love them so I didn’t need new ones.

(My dismal attempt to photograph dark cabinets with no natural light!)

The wall decor over the toilet had yellowed a tad because I sealed it with poly. (Yes, poly yellows…to avoid, use polycrylic or a clear coat sealant)

My “plan” was to paint the walls and trim, change out the top and backsplash, strip the cabinet and mirror frame for a “lighter” wood stain and repaint the wall decor.

After painting the room a lighter color and installing a lighter top (white quartz) and white backsplash and lightening the wall decor with a fresh coat of white chalk paint, I decided to stick with the vanity cabinet and mirror “as is” for the time being. I had stained the vanity “java” with gel stain years ago and I think it looks fine (but impossible to photograph!)…the mirror has a “java” stain finish, so it coordinates well with the vanity.

Just these few easy changes made a huge difference…the paint really lightened and brightened it.

Still love the Devoe prints I added two years ago!

One of my favorite little projects…a TP cubby! Super simple!

Fresh white chalk paint with a tiny bit of distressing…this time I sealed it with a clear coat so hopefully it won’t yellow again!

I would like to mention my trim paint…I painted it the same color as ALL the trim in my house. White would have been great but I decided to stick with the color of the trim throughout the house…just my personal preference.

Paint.

A must when you want to change a room! Whether you paint the walls or furniture, JUST DO IT! Paint is relatively cheap (only took 1/2 a gallon for this room) and if you don’t like it, you can always change it!

I love this little makeover. I have been coveting white quartz for my kitchen tops and this tiny bit has REALLY stoked the fire.

Who knows….

A new storage project and Christmas 2019!

It has been a minute since I shared a home project…just too much going on the last few months to do anything other than what HAS to be done around here!

But I saw this little storage idea HERE and knew it was exactly what I need in my guest bathroom!

I had to build a little Christmas gift but I can’t share that just yet since it is suppose to be a surprise. But while I had the saw and nail gun out I decided to take time to build this little storage unit.

I keep plenty of spare toilet paper under the vanity but it is out of reach if you have already sat down. So for years I kept spare rolls in a basket on the floor next to the potty but I just didn’t think it was a sanitary place to store paper. So I set up a little wickerish box…paper inside, magazines on top.

So here’s my opinion about reading materials in a bathroom. First, I don’t want guests hanging out long enough to read an article in the guest bathroom…seriously, do that in your own bathroom. Second, if you have to sit there long enough to read an article, add fiber to your diet.

I needed something to set a little Christmas tree in so the little box got “repurposed.”

Anywho, I saw this little storage idea and thought “HEY! I can do that!”

I constructed mine a tad differently than Barb, but the concept is the same…and as I always suggest, use the tutorial that makes sense to YOU!

Either way, SUPER simple build! Something you could do with a miter saw and box. hammer and screw driver if you don’t have fancy power tools!

The first thing I did was use a stud finder to locate the studs then I cut into the sheet rock to measure the exact distance between studs…

…15”. Most wall studs are 16” on center so they SHOULD be 15” apart, but you never know so it is better to be safe than sorry! Just measure the distance between the studs and make your box a smidge narrower than that…or do as Barb did and “fur out” the studs to make a box a specific width.

I laid out the TP hanger (THIS is the one I used) and the spare rolls to see how tall I wanted the entire box to be…17” seemed to be perfect.

One suggestion…make sure the bar on the holder you choose “pivets”…you want the bar the paper will sit on to swing freely so you can swing it out of the box to put the paper on!

I used 1x4 (actually 3/4” x 3 1/2”) pine boards and 1/4’ luan to build the box. I cut the width pieces about 14 3/4” to give myself a little wiggle room between the studs. Basically I made a 14 3/4” x 18 1/2” box (outside measurements), then backed it with luan, cut to fit. I used wood glue and brad nails…ALWAYS glue your joints…trust me, the nails just hold everything together until the glue dries!

I used “door stop” for the face trim…it is 1/4” thick and 1 1/2’ wide and has a very simple profile! I used it when I installed the glass on my laundry room door…simple and beautiful!

After the box was constructed, I puttied the holes and caulked the joints, primed it with Bullseye primer, sanded it smooth, then wiped it down with a tack cloth.

I used the backside of the box as the “template” to mark the sheetrock, making sure it was level with a small 6” level (don’t assume your studs are level). I used a sheetrock knife to cut the sheetrock.

To install, I slipped the box between the studs, making sure the trim sat flush on the sheetrock. I drilled four 1/4 “holes approximately 3/8” deep on the inside of the box (2 on each side) and used 1 1/2” sheetrock screws to attach the box to the studs. Then I used wood putty to fill those holes and sanded it smooth after it dried.

All my trim is oil based “Swiss Coffee” (and of course I have spare paint on hand) so I painted the box with the trim paint. Again, ALWAYS use an additive when brushing or rolling paint on wood…in this case Penetrol since I am using an oil based paint. Two coats!

After the paint dried well I installed the TP holder and stocked it with spare paper.

Too stinking cute and perfect for storing extra paper and even a little “air freshener.”

Christmas is next week and so little changes from year to year it seems almost redundant to share my Christmas decor. But I will leave you with a few pictures of our cozy holiday home…

I hope you and yours have A VERY MERRY CHRISTMAS!!!

Master bathroom reveal....

Like so much in my home, my master bathroom has certainly “evolved” over time.

Before the first “makeover.” Booooo…..

This is after the first little makeover. I removed the hideous gold shower enclosure…new cabinets and lighting…a new tile backsplash…new paint…new vanity top and sink…new mirror…new operable window (my absolute favorite change!)…nothing earth shattering but enough to give it a little update and make it more functional.

While the few changes I made on this go round SEEMED relatively straight forward, the process was messy, back breaking, expensive and worth every bit of it!

Demo and new plumbing done!

Durrock and shower pan done…

I LOVE the curbless showers…and I really thought about biting the bullet and putting one in…but that would have required busting out the slab under the shower and pouring another below the finish level of the rest of the bathroom or building up the entire bathroom floor, which would have required removing the counter tops and cabinets. That wasn’t happening…so curb it is.

Waterproofing done and tile going up! (yes, I hired the tile install…worth every penny!)

(Notice the fan hanging in the window…it is facing out. That helped pull a lot of the dust outside…not all but A LOT)

As I mentioned when I posted the first makeover, I didn’t have (nor do I really want) a big sprawling space to work with…it is a relatively tiny bathroom….and I am okay with that. I would rather have the square footage in other areas of the house. That didn’t mean I couldn’t create a space that not only suited our needs but was pretty.

I loved “the first makeover” for many years!

The time will soon come when stepping into a whirlpool tub we never use will be an issue so it was time to make some major changes…while we can still climb the stairs to the spare bathroom! I joked with Brian for years that we needed to do this before we broke a hip and couldn’t use the tub or walk upstairs…joke, right? Then our friend, BR, broke his hip and had to have a partial hip replacement…HE’S OUR AGE!!! Suddenly it wasn’t so funny and it really is a “need” vs a “want.”

First, I had to again find my inspiration…that was a tough one! I loved the tile surround and floor tile I installed 19 years ago.

Since it is a small bathroom I knew I wanted to keep it light and bright!

I brought home and ordered many tile samples and searched the internet for inspiration….

I knew the look I was going for. Light and bright and something that would carry me through another 20 years…..I didn’t want to do anything too trendy.

I love the sliced pebble tile and after using it on the tile back splash I knew I had a winner for the shower floor and niche!

I like the look of subway tile but I didn’t want the “busyness” of a small tile on the shower walls…fortunately Dal Tile makes a large 6x18 subway tile. One of the things I hated though was the small bullnose trim…usually 2x6. Fortunately the tile I choose had a large 4x12 bullnose trim…PERFECT!

The flooring…that was a real booger! Truth be told, I loved the floor tile I had…it was light and bright and had awesome “texture.” Unfortunately it was 12x12 tile with 1/4” grout lines…very 1999! I knew I wanted a 12x24 with small grout lines.

I finally settled on kind of a “greyish” porcelain tile I found at Lowe’s. But in my heart I knew I didn’t want to go with grey…just too “trendy.” While I was at the tile shop ordering the wall tile I stumbled upon a special order tile I thought I might really like. All they had was the sample board so I brought it home, looked at it for all of 5 minutes and went back and ordered it. Eck!!!!

But you know what…I LOVE IT!!!!

Originally I planned to use the bullnose trim around the window and niche. But then my “blog friend,” Cristina, shared her bathroom makeover and I absolutely fell in love with the pencil trim pieces she used! (Her bathroom is absolutely stunning and beautifully staged! Check it out!)

I immediately ran to our Home Depot only to discover THEY DID NOT CARRY IT IN STOCK! I found it online and ordered it. It arrived two days later as promised.

Broken! Eleven out of 26 of the fragile trim pieces were broken. And while I am smart enough to always order more than I think I will need, I certainly didn’t order THAT much extra.

I promptly reordered more trim. Fortunately the delay didn’t hang up my tile guys…too much! I ordered 20 more knowing I only needed 11…good thing I did because the second order had 7 broken tiles! (They really should reconsider their packaging!)

I absolutely love this trim around the window and niche!

Speaking of window…I know the glass block probably screams 1999 as well. My original plan was to change it out. Now that the tile is done, I don’t find it as offensive. It may not be the “hip” thing to have right at the moment, but I can live with it!

I decided to reuse the existing base trim. I carefully removed it during demo, pulled all the nails and sanded it. I painted it with my “go-to” trim color, BM Swiss Coffee. Then I reinstalled it, puttied the holes, caulked and gave it another coat of paint!

I debated on a glass shower enclosure but honestly, I don’t like them. Just too high maintenance…no matter what you do, there will always be water spots. I found a longer curtain online so I ordered it…nice thing about curtains, you can always take them down and wash them.

The teak bench. I didn’t add a built in bench because the only place to put one was in the back of the shower…the side wall and the back wall are on the exterior of the house so expanding “out” wasn’t an option. A bench in the back of the shower kind of defeats the purpose if you want to sit in the shower. Seriously, who does that? Brian…when he is sick he likes to sit in the shower. And I need something to prop my legs on when I shave them. So I bought a little teak bench. It looked kind of dinky sitting in the back of the shower and Mr. Jinx needs a place to sit while we shower (he use to sit on the edge of the tub…weird cat!) So for now it will sit outside the shower unless we need it (lets be honest, who really shaves their legs EVERY day?)

My super awesome son-in-law installed new lighting during the first makeover…I still love it! For now I will keep the lighting and the cabinets, vanity top and sink. All were good! (I did repaint the ceiling since I had to do a little sheetrock repair)

As you can see from these pictures I don’t do a lot of froo-froo! I’ve worked hard to create space for everything behind closed doors. Fortunately I have a large pantry space in my master closet where I store “extras.” No need for lots of extra storage cubbies and because the vanity top is relatively small, I don’t like to clutter it with stuff. I love the beautifully staged “spa retreat” mega bathrooms, but I don’t have the space or the desire…I want clean, bright and clutter free…very “utilitaryish.”

I do have bath rugs but they are plain ole’ white spa rugs so I took them up to show off the floors!

We don’t reuse towels so no need for cute hooks. We take our dirty clothes to the laundry room so no need for hampers. Everything is stored in drawers and cabinets so no need for pretty jars and baskets. And since I like to bleach all my towels and rugs I only use white rugs, towels, and wash cloths.

All in all, I’m pretty darn happy with these changes. Eventually I may change out the vanity doors and paint…I may paint the walls a different color…I may change out the block window…I may add a few more decorative elements…I may add some trim detail…I may change out the shower head to something more like a “shower” and less like “rain”…I may…I may not.

There will always be little “snafus” when remodeling…in my case there was the broken tiles and the difficulty of demo and the discovery that my “niche plan” wasn’t going to work. But in the end, it all worked out and I have a beautiful bathroom I HOPE will carry me through another 20 years!

Hopefully…maybe. Who knows! Check back with me in 20 years…lol!