Board and Batten in the breakfast room...

This is a simple project I have wanted to complete from day one.

Board and batten in the breakfast room.

As I have said before, there are TONS of board and batten designs and tutorials on the webisphere. Watch videos, read blogs, search Pinterest…find a design you love and a tutorial that makes the most sense to you.

So here is a little before and after.

Before….

Not totally offensive but lacks a little “character.”

After….

Simple project for me since I have done this a time or two. (Check out the guest bath, the entry in the Lankford house and the Bogey house. )

You might notice another little change…the china hutch.

Originally I had the awesome mid century Drexel buffet but I thought I would change it up a bit. I read somewhere china hutches are making a comeback. I can see why…pretty and functional.

Eventually I would like to add some art on each side of the hutch…maybe some botanicals.

My original plan for this piece was to repair it, paint it and sell it but honestly, I kind of like the look in this room. I FINALLY have a place to display some of my heirloom china that has been boxed up and in storage for a year and a half!

Before…

After….

Next week I will share the steps I took to give this piece a little facelift! Not difficult and as you can see it made a HUGE difference!

Until then….

Accent wall tutorial...

I shared HERE how I found inspiration for the accent wall in my office.

I shared HERE the office after everything was done. (Well, everything for NOW!)

At first glance, the accent wall may seem somewhat intimidating.

This is actually a wallpaper. I like the dark wall with lighter accent stripes. I think it gives the wall “depth” and makes a room look larger.

You could easily replicate this entire look with paint…just paint the wall then paint the stripes.

I kind of did the opposite…light walls, dark stripes. I knew from day one I wanted a pink accent wall and decided to make the stripes out of walnut. My office is a big room with tall ceilings…it can take an accent wall that makes the room APPEAR smaller.

Now if you have followed this blog for any amount of time you know I have a deep love for walnut.

I made my fireplace mantel out of walnut.

My kitchen cabinets are walnut….

I made my living room shelving out of walnut…

And most of my furniture is walnut. If it is any other wood there is a good chance I will paint it if need be…but not walnut!

So, pink wall, walnut stripes.

The first thing I did in this room, after a good purge and reorganization, was paint the walls.

The accent wall was painted pink and the three other walls and trim where painted white (BM Chantilly Lace…closest I can find to a TRUE white without an undertone.)

They were ready to go….

So here is a little tutorial for doing any accent wall.

Print off a picture of your inspiration wall…as large as you can get it on a full size piece of paper. I printed off the picture above.

Measure your wall then draw the wall to scale on a piece of graph paper. For me, this is a must any time I am doing a room makeover. I need to know the scale of the space I am working with and how each element fits in that space…on paper.

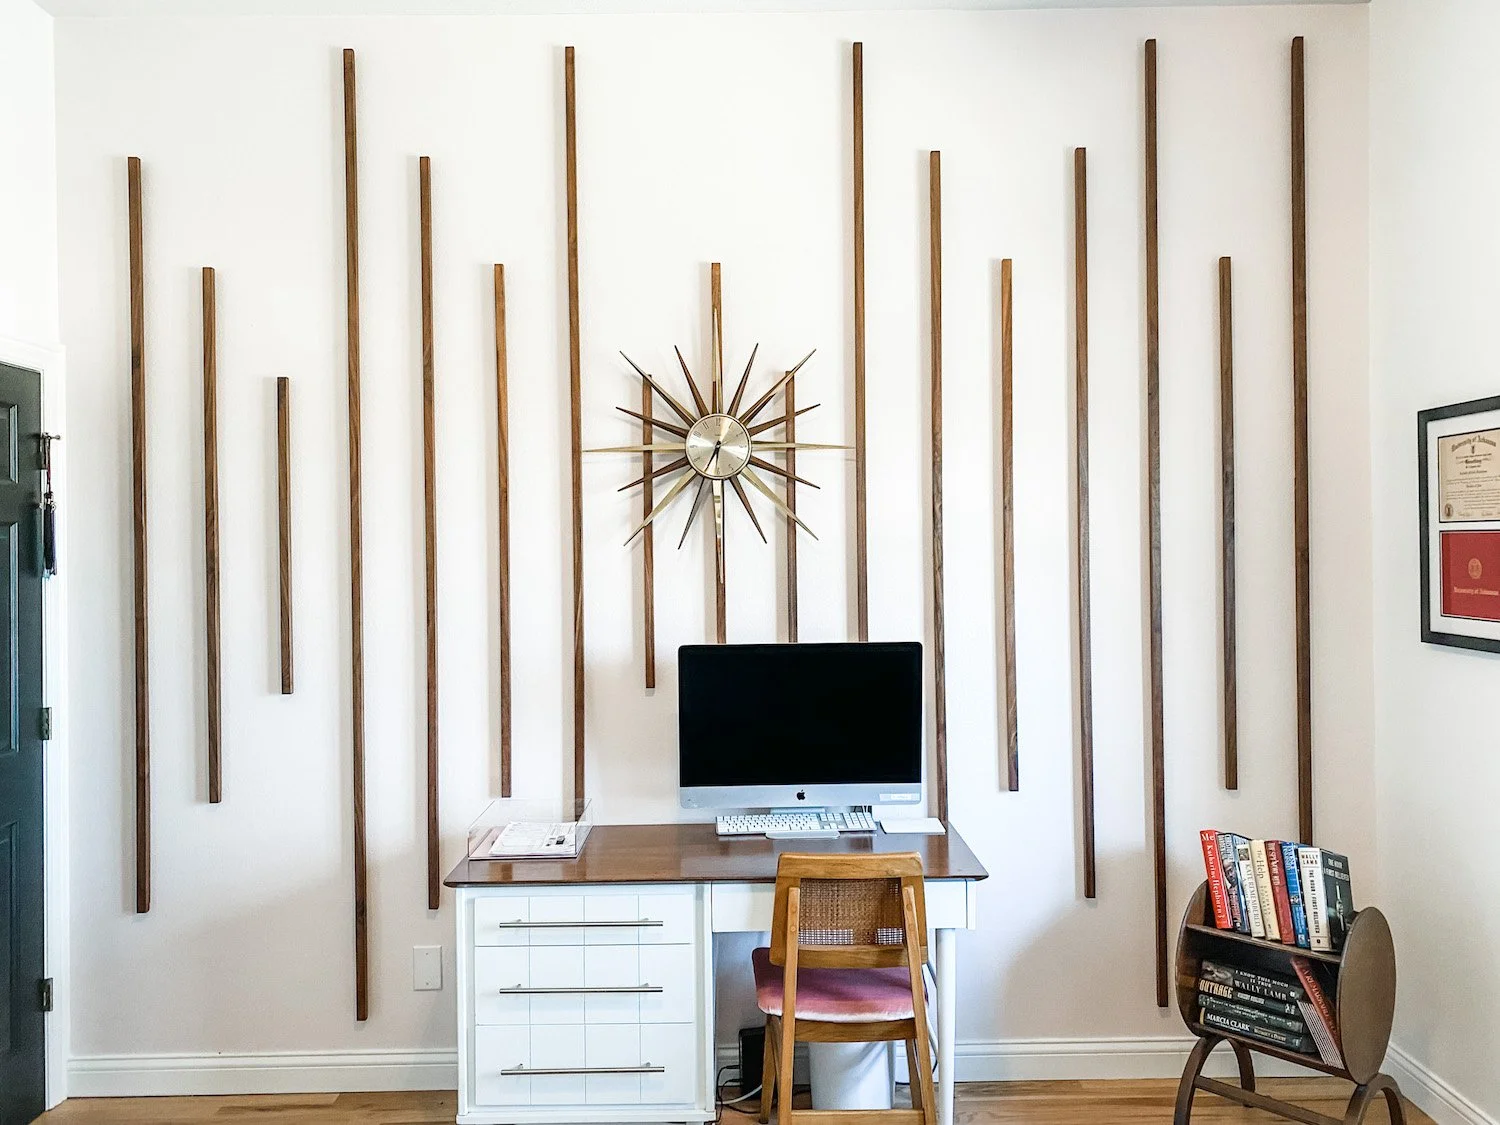
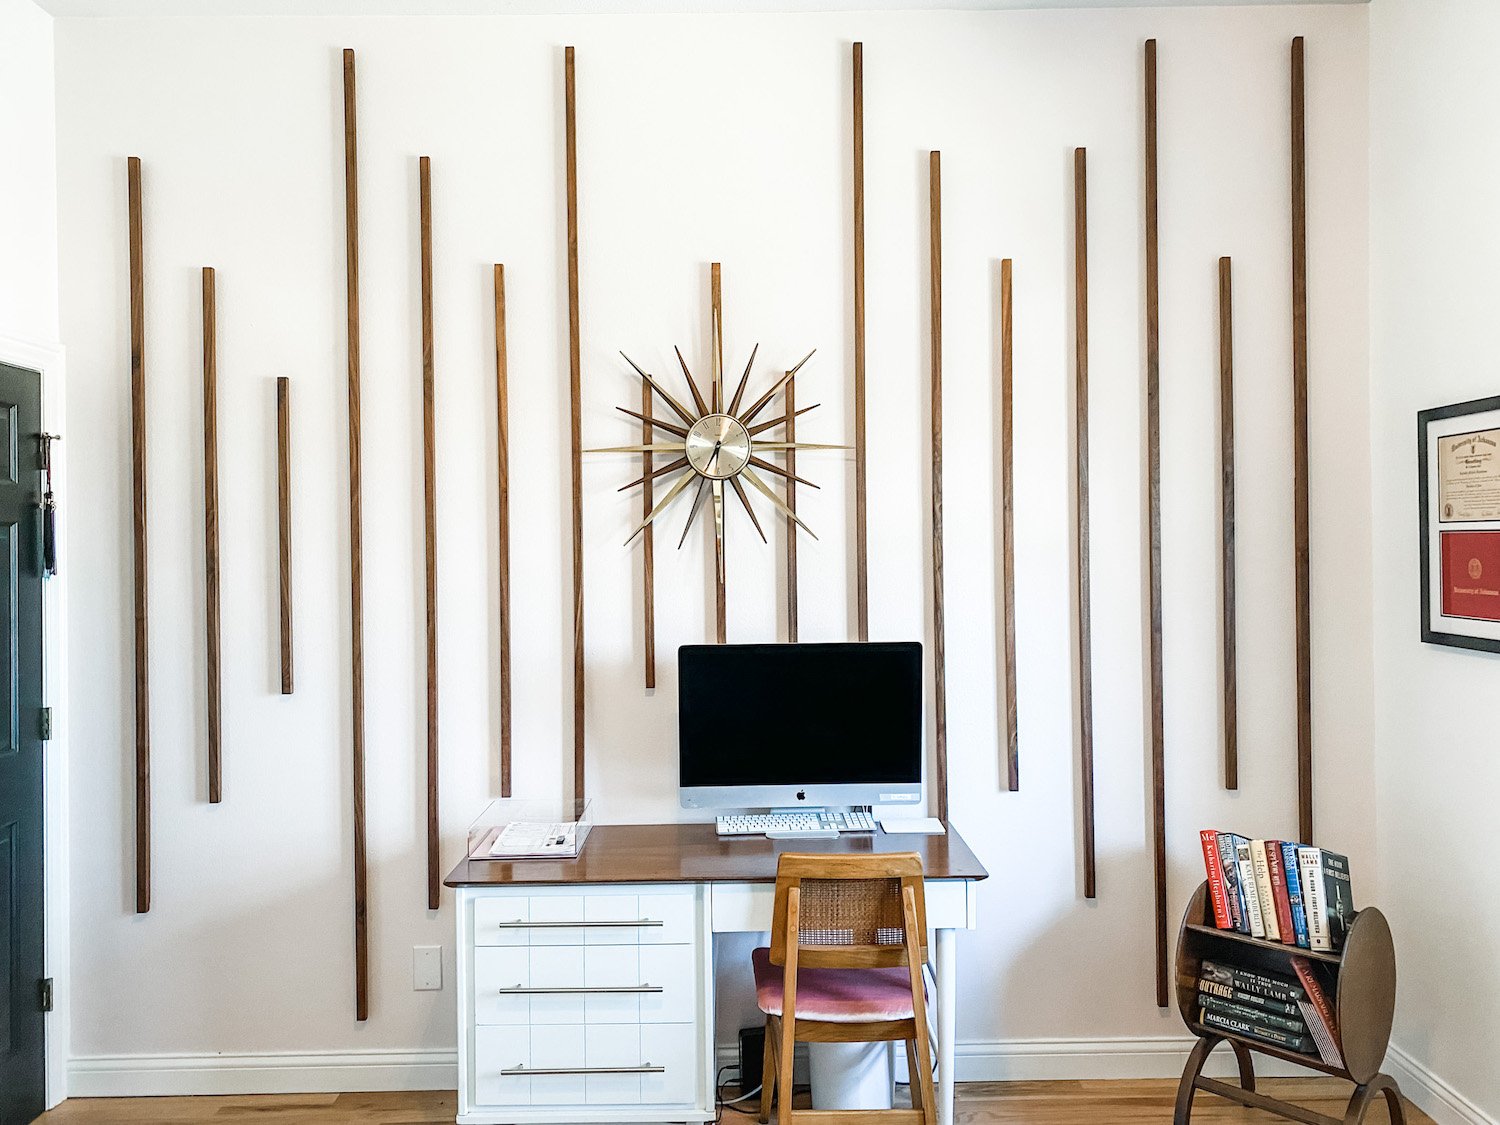
Since I wanted the accent stripes to be centered between the ceiling and the top of the baseboards, I measured and graphed from the top of the baseboard to the ceiling. I did NOT measure from floor to ceiling.

Identify and mark your center point on the wall…from there you will work out from center to left and from center to right.

I had to figure out the “scale” of the stripes. I did this by making the assumption that the longest stripe in the inspiration picture (#1) was 4” from the ceiling…just a guess. When I measured that with a ruler on the printed picture, it measured 1/8”…that became my scale…1/8” = 4”. The distance between the stripes measured 1/4” on the picture, so I determined the distance between stripes would be 8” (I actually did 8” on center (OC)…which means I drew my stripes 8” apart then centered the 1” strips of wood on that mark.)

All this information gets transferred to my scaled drawing.

I counted the number of each of the different sized stripes. The inspiration wall had 4 different sized stripes…so I assigned each size a number, 1-4. There were 5 #1s (the longest)….4 #2s…5 #3s…3 #4s (the shortest) that would fit on my wall, spacing 8” OC apart.

By using my 1/8” = 4” scale, I determined that each stripe was 24” shorter than the next (12” from the top, 12” from the bottom).

So #1 is 107” (top of baseboard to ceiling is 115” - 8” (4” from ceiling and 4” from baseboard)…#2 is 83” (107” - 24”)…#3 is 59” (83” - 24”) and #4 is 35”. (59” - 24”)

If #1 is 4” from the ceiling, then #2 would be 16” (4” + 12”) from the ceiling, #3 would be 28” from the ceiling and #4 was 40” from the ceiling.

All this was drawn, to scale, on the graph paper.

Man, this sounds confusing….but it really is not. If you draw it all out on a graph paper to scale, it makes perfect sense…I promise.

Then it was all transferred, in pencil, to the wall.

It is so much easier to erase something that is wrong than it is to tear glued and nailed boards off a wall.

So, now I have the entire plan drawn out on paper, to scale, and I have the measurements of each stripe.

I decided to make my walnut stripes 1” wide. I also decided to give them a “3-D” affect by placing them on 1/2” furring strips. Walnut is a pretty expensive wood so I made the furring strips out of plain ole’ poplar and stained the sides to match the oiled walnut.

Matt and I used his table saw to cut the walnut in 1” strips. We cut the poplar into 1/2” strips.

Using the graph paper with the accent drawn to scale as my guide, I used a pencil and level to mark the wall where each stripe would go. After marking the wall, I attached the furring strips using Gorilla Construction Adhesive and my nail gun. I let that dry overnight since the nails did not hit a stud (impossible!!) so the construction adhesive is what really holds the furring strips to the wall.

While that was drying, I prepped the walnut strips.

After cutting each piece the length needed, I sanded, then applied Waterlox. I LOVE this oil. It is a clear oil. It is my “go-to” wood finish these days. I first used it on my kitchen cabinets a year and a half ago and it has held up beautifully!!!! So I used it on the mantel and shelving. No stain…just 3-4 coats of this stuff will make any wood shine!!!

I applied two coats…steel wool and tack cloth between coats…and then applied a third coat after I had installed the strips on the wall and puttied the nail holes.

I applied the walnut strips directly onto the furring strips. Again, I used the construction adhesive and nails.

MAKE SURE EVERYTHING IS LEVEL AS YOU GO!!!! I made sure each furring strip was perfectly level and then I made sure each walnut strip was level. I worked top to bottom…wood, especially narrow strips, will bend…so make sure each strip stays level all the way down.

After I puttied the nail holes with wood filler mixed with stain to match the oiled walnut, I wiped on one more coat of oil.

After all this is done, go back and do wall paint touch up. You will scuff up the walls with the wood strips and the level.

Beautiful!

Now, this may seem like a really tough project. It really is not. It is like any other DIY project…it all hinges on the “prep.” In this case, laying it all out on paper BEFORE you start buying materials and cutting wood.

Changes I would make? I wanted a “3D affect”…in other words I wanted the walnut strips to “stand out”…which is why I added the solid furring strips. I think if I did this again (which I won’t) I would want to use spacers to make the walnut strips stand out. The only downside to that would be that wood has a tendency to “move”…twist, bend, warp. By attaching the walnut strips to solid furring strips, the walnut will not bend or warp! So maybe the way I did it is best…who knows…I just think I would have liked the look of “floating stripes” better.

Other than that, I am pretty happy with the results.

I have some leftover walnut so I THINK, when it warms up a bit (we got 8'“ of snow last night and it is still snowing), I may make some floating shelves for this wall…

Again, I eventually want to make a few other changes to the room (rug, chair, credenza) but I love this accent wall.

As with all DIY projects, the key to success is the prep and planning.

This week I planned, prepped and prepared for board and batten in the breakfast room….

My plan is to install board and batten at chair rail height and paint it white.

I also finished this nasty china hutch…

I know this looks pretty ratty but I painted it and did a little tweeking on it and it turned out super cute. My plan was to sell it, but I think I will move it into this room and style it first…I may even like it well enough to keep it. We’ll see.

Hopefully next week I will have the breakfast room done and in order and I can share that as well.

Until then….

Another Drexel server....

Several years ago I shared a Drexel server I repurposed for my dining room

The “breakfast room” in our new house is almost identical to our old dining room.

Including the Drexel server.

I love it…it is one of my favorite pieces.

So when I spied ANOTHER Drexel server on Marketplace I could not help myself.

As I have mentioned, I have pretty much retired from the whole repurpose/upcycle/refinish business. My hands and back just can’t take all the work that goes into refinishing pieces on the scale I have in the past.

I have refinished a few doozies…just looking back at all the pieces I have shared on this blog blows my mind. There were some pretty nasty pieces that were beautifully refinished and restored and readied for another life-time of love!

When I saw this piece I couldn’t help myself. I had to have it and I wanted desperately to work a little magic on it.

Here is my plan…MAYBE I can discipline myself enough to pick up just one piece at a time, refinish it, sell it, then pick up another…just one at a time. Just one dresser/buffet/nightstand at a time.

Hum…I’m a pretty “self-disciplined” person so I am going to start with this one.

One week into this plan…I have failed. Last week I picked up ANOTHER piece that needs a little TLC….a pretty beat up china hutch.

I have these creative juices in me that have just been screaming for a project.

So, “the plan” ….specifically for the vintage Drexel piece. Strip and oil the drawer and door fronts using THIS process. Shine up the brass hardware….no secret there, just lots of Brasso, steel wool and elbow grease. Prime and paint the “cabinet” a high gloss black lacquer.

For the china hutch…I went to Etsy for inspiration and looked around. There are some beautiful china hutches that have been painted black with the insides painted white…LOVE them.

I THINK that is what I want to do. Sometimes the process takes on a life of its own and I find myself drifting in another direction. We will see.

Right now they are sitting in my AMAZING shop. I was in there last week rearranging everything so I will MAYBE have room to make some kind of paint booth. The shop has electricity and I can easily heat and cool it for temperature control but just not sure I will have enough room since we do use it for mower/yard equipment storage as well.

I can’t wait…this is a “job” that doesn’t really pay well, but it is one I do love.

Mid century chair makeover and the dogwoods...

I originally shared the a makeover of this heirloom chair HERE.

After this little makeover it might not look much different…

IMG_1397+copy+3.jpg

…but it definitely is!

It was my grandmother’s and a “few years ago,” while gathering furniture for her college condo, Katie and I recovered the cushions and stripped and oiled the frame.

When she moved into an apartment her junior year, we found two matching mid century chairs she liked a bit better so this one came back home.

A few months ago I mentioned to Kate that I needed to recover the cushions because the dog had done a number on the white vinyl in the last few years. It was pretty ratty looking…

“Mom…you have had that chair in your house for almost 4 years now…it’s been more than a “few” years.”

Wow, time flies!

So yes, it was time to recover the cushions.

Two minor issues…one, the cushions seriously sucked. I am certain they weren’t the “original” cushions…my grandmother probably replaced the original when she recovered them with the darling blue cotton fabric that was on it when I received it. When Katie and I gave it a little makeover 5 years ago, we just added a little batting to the cushions before we recovered them.

They really weren’t sized properly and they were super uncomfortable.

Second, AS ALWAYS, I really struggled with what fabric to use. It is definitely a “mid century” style chair and so many of this style chair are indeed white and black vinyl. As much as I would have liked to “change it up” a tad, white vinyl really was the best option.

The frame is still in pretty good condition. I could have freshened it up a bit with another coat of tung oil finish, but nah…

New cushions…new fabric. That is all it really needed.

I bought 4” foam, cut it to fit properly and wrapped it in batting.

IMG_1382.jpg

TIP: The BEST way to cut foam is with an electric knife!

IMG_1181.jpg

The vinyl I used didn’t give me near the issues I had the last time we recovered the cushions. This time it went through my sewing machine just fine and I was able to easily create piping. Piping is a tedious accent to make and truthfully you could easily make cushion covers without it if you want to forgo the detail.

If you are having trouble getting vinyl to go through your machine THIS is a pretty nifty trick….

I have said it before and will say it again…and again…and again. If you do not know how to sew a straight stitch, LEARN. Take lessons from your local craft store, online or county extension. It is a skill that will open up your entire DIY world! On one hand I kind of curse my mom for making me take sewing lessons when I was a teen (because I really dislike sewing), but on the other I am so grateful I can make pillows, cushion covers, and curtains! And don’t think you need a high dollar sewing machine. Mine is a basic model and is AT LEAST 35 years old. The more basic, the easier it is to use!!!

AGAIN, I suck at tutorials so find an instructional video online that makes sense to you!!! Making cushion covers is not hard but there are tips and tricks that will make the process easier!

All in all it was time well spent. The chair now has a fresh new look!

IMG_1397+copy+2.jpg

Thank goodness the dog has now moved on to the big leather chair in the office by the front window. Fits her better and the dirt doesn’t show on the brown leather NEAR as badly!

IMG_1386.jpg

We had awesome snow showers Tuesday (seriously a blizzard Tuesday afternoon and by Tuesday evening it was ALL gone!) and a freeze Tuesday nigh.t I had to cover all the hostas with buckets and sheets. Back in the 70s by this weekend. Typical Arkansas weather. This is why I refuse to plant tender annuals even after our “freeze date.” As it is all the beautiful dogwood and azalea blooms may not survive. Sooooo frustrating.

That is one thing I discovered about this house…every single window has an amazing view of the dogwoods! Beautiful.

From the dining room window.

From the dining room window.

From the front porch.

From the front porch.

From the master bedroom window.

From the laundry room window.

From the laundry room window.

From the screened porch.

From the screened porch.

From the back of the house…this will be the view out of my new master bath windows when they FINALLY get here!

From the back of the house…this will be the view out of my new master bath windows when they FINALLY get here!

This past weekend I took a walk around our neighborhood with Cleo and every single yard has dogwoods and azaleas.

Another reason why I love my home!

static1.squarespace.png

Another new living room rug and my thoughts on board and batten...

Over the years I have been able to remove all the wall-to-wall carpeting and install hardwoods. I learned the hard way (after raising 4 kids and several puppies) that I never want to spend a lot of money on area rugs.

Unfortunately they are a necessity on hardwood and tile. What isn’t a necessity is spending A LOT of money on something that gets tons of wear and tear and may go out of style on a whim. So several years ago I started experimenting with indoor/outdoor rugs…and honestly., I have found that I get serious bang for the buck!

It started with this rug…

….an indoor/outdoor rug I picked up at a big box store for less than $100. I just needed something simple to pull the room together. Since this room only gets used a few times a year, I wasn’t too terribly concerned with having “super comfy” under foot!

I was so impressed with the quality and look of the rug I decided to give the “indoor/outdoor” thing a shot in the den! Let’s be honest…the den is really just a big romper room for the dogs! One reason we don’t even have a coffee table in the room!

I picked up this indoor/outdoor rug at my favorite home improvement store!

Not super comfy but it is neutral and has held up well. If I want “comfy underfoot” I wear my Ugg slippers.

I spent a little more and went a little more “fancy” on the dining room

…this rug doesn’t get a lot of wear and tear so I was okay spending a tad more. Still love this rug!

When it was time to change out the rug in the living room I found a really pretty and simple indoor/outdoor rug at a local home decor store.

I knew the minute I unrolled it I had a problem.

It was stiff and not at all pliable. It had some serious “crease marks” from being rolled up and the edges curled up. I went ahead and put it down and hoped and prayed the creases and rolled edges would eventually go away.

Nope.

Honestly, I think they got worse and I’m lucky I didn’t break a dang hip on the thing.

I tried steaming the edges and curling them the opposite way…nothing worked.

The rug just plain sucks.

If a rug looks like crud when you lay it out, good chance it isn’t going to get much better. I should have rolled it up and taken it back but noooooo….I just crossed my fingers and hoped it would get better.

So now that the holidays have passed and everything is back in order I decided it was time to find a new rug that wasn’t a tripping hazard.

Again, I just wanted something inexpensive that would pull the space together. We have moved the big (ick) brown leather couch back into the living room so I really wanted something relatively neutral. (Why do I still have the big (ick) brown leather couch…because it is Brian’s and he spent a ton of money on it so I can’t bring myself to get a different one)

I try to keep the furniture and rugs in this room relatively neutral so I can add splashes of color with pillows and throws…right now I am enjoying a “pink phase.”

Two major changes coming in this space…first, I have FINALLY ordered new windows for the front…the old ones are the 20 year old original aluminum windows that are terrible…can’t hardly open them and they leak some serious air! And as you can see they dominate this space!!

I would love to change the 1990s arched window to a simple transom but unfortunately I can’t get my brick anymore and changing out the shape of the window would require additional brick…curses!

Regardless, the window seal has broken in the arch window and there is condensation between the panes…nothing you can do about it but replace the window.

I COULD just buy a new window insert but since I am replacing the bottom aluminum window with vinyl I decided to change out the arch window as well.

I changed things up a bit on the style and design and I can’t wait to share! Hopefully those will be here in the next week or so and we will have a decent day to install them!

The second change is the entry. I shared it here….

I’m looking at the date of the original post…3 1/2 years ago….and sadly, little has changed.

But last fall I bought a nifty antique mirror at a local market…at Christmas I put a wreath on it, and honestly, I kinda like the look. So when I took Christmas down, I hot glued a hook onto the mirror and hung an olive branch wreath on it…

Hum…kinda like that look too.

So it looked funny to have a mirror on that side of the entry AND still have the blue “moroccanish” mirror behind the door, so I took that mirror down and gave it to my daughter!

So now I have a blank wall.

So change is coming…maybe…I think…some day. It only took me 3 1/2 years to get this far so what’s a few more years.

Truthfully I am kicking around the idea of extending the board and batten to this wall…from the door to the stairs. And then maybe put some little hooks on it to hang purses and such. I can’t do anything too bulky because the door swings into that wall.

My ONLY issue with board and batten is that I know it will go out of style in the coming years…and while I have the energy and time to install it today….what if I don’t have the time, energy or money to remove it in 5-7-10 years?

I know, I know….”Board and batten is timeless…it will never go out of style.”

Bull…hardwoods are timeless…but yet 40 years ago people covered them with wall to wall carpet. Subway tile is timeless…yet decades ago people ripped it out and put up olive green and harvest gold 4x4 tile.

My point, just because something was popular 100 years ago and came back around, doesn’t mean it is “timeless.” Trust me, something different will come back around and all those painted white cabinets and rooms full of board and batten will be the bane of our existence.

I’m not saying you should live with a dated carpet, tile or wall treatment if it makes you crazy. I’m just saying think carefully and spend wisely when “updating” your home decor!

And if you are like me and procrastinate long enough, you may miss the current bandwagon…but trust me, another will come along!

The upside is I save myself a lot of work AND money by being somewhat indecisive…lol!

UPDATE!!! I WROTE THIS POST WHILE I WAS ALL COMFY IN BED. I got up, put on my grubby paint clothes and had time on my hands.

Something is going down!!!!

Or rather UP!

Yep, board and batten in the entry!

And you know what, I’m kinda glad I did it. It only took about 2 hours to install it and another hour or so to paint it.

There are dozens of tutorials for installing board and batten…much better than anything I can do.

If you want it, JUST DO IT!!!!

And yes…I still believe it will go “out of style” in a few years but whatevs.

See, even I don’t take my own advise…so “grain of salt” people…lol!

dining room makeover...

For years my “dining room” has been little more than a pass-thru from the kitchen and living room into the den.

A few months ago I refinished a little table that is my current love…

You can see the evolution of my dining tables here. The criteria for a table is that it is compact but can expand to seat 8-10 people the one time a year we need a big table…basically Thanksgiving.

This new table fits the bill but try as I might, I could not find chairs I was really happy with. I knew what I wanted but I couldn’t find them in my normal “thrifty” way…I tried these “mid century” style chairs…

No way Jose’….super ick.

So I bit the bullet and ordered chairs from an actual retail store.

Whoa! Who knew dining chairs could be so stinking expensive!

Other than a revolving door of tables and chairs and a few changes to the art work and a new light fixture…and maybe the addition of ANOTHER buffet, the space never got a full-fledged “makeover.”

It has never really been styled as a “dining room.” Truth is, I have a bar we use regularly so other than our holiday gatherings, this space gets very little use.

I don’t really have an actual dining ROOM…it is more like a dining “space.” And again, it has always just been a thoroughfare from the kitchen to the den. So why bother styling it…

Because it is a very prominent space in my house that has been horribly neglected so it was time it got a little time and attention.

First, the table…I love the little mahogany trestle table. Maybe not specifically the style…or specifically the color…but just the whole of the sum. Don’t know how to explain it any better than that…it’s just pretty and small but easily expands.

The buffet. I love this piece…it only took me a year to figure out what to do with it, but now I love it….the style, the color, the size.

These two pieces alone are as different as night and day…one VERY traditional and antiquey looking and one very mid-century. That pretty much sums up my entire home decor…”eclectic.”

I changed up the buffet vignette a bit…just simplified it a tad…you can see HERE how I turned a candle stick into a lamp.

So, on to the rug.

What a nightmare. I THOUGHT I wanted to use this little space to infuse some serious color into my home.

Hum….not really loving it to be honest.

The first….

Wow…now that was some color.

ALL the pictures on Pinterest show rectangular rugs with rectangular table and round rugs with round tables….but because this space is a bit smallish and because we walk through this space A LOT, I tried a round rug…

Meh….

I LIKE the look of a round rug…but again, not sure I am digging all the color…even though I THOUGHT I wanted to infuse color into this space.

So I took the first one back and picked up another rectangular one with color, but a lighter background…

Hum again…

I LOVE this little scatter rug but alas it doesn’t come any bigger…curses.

I just love the colors and the amazing textures! But it did make me rethink my “color plan.”

This plain ole’ blue one….

I like the simplicity…I like the style…I like the quality. Nothing earth shattering and obviously I gave up on the idea of infusing color by putting down a “wild and crazy” rug. Oh well…I never professed to be a designer.

The wall decor. For a few decades I really liked the look of the two frames I had on this wall. They have “transitioned” over the years…first they went from the “dark and dank” to a chalk painted frame and new matting…then I changed up the matting and added botanical prints. So often I get so use to a certain look that it is difficult for me to see anything different…such was the case with these prints. I loved the pop of red of the matting and I adored the botanical prints. Unfortunately it was obvious two was not going to work…and one just looked so dinky.

Brian and I found these totally awesome mirrors.

IMO they look pretty awesome…not terribly expensive so when I tire of them I won’t feel too bad. But it took me 19 years to get rid of the two large frames so I doubt these go anywhere any time soon!

Fortunately, I LOVE the table, the buffet and the light fixture. Rugs and artwork are an easy change out if I find something I like better.

For now I will keep the little bench off to the side. It is perfect for when I expand the table and need a little extra seating.

I am excited to decorate this space for the holidays!

The only other thing I MIGHT add are curtains on the two flanking windows…or maybe shutters. Who knows…they have had blinds for 19 years…what’s the rush!

This is where I will admit I am like 90% of you out there… I just want Emily Henderson or Candice Olson or Joanna Gaines to swoop in and just do it all! I am always amazed that they can do in one hour what it has taken me 19 years to do!

I have avoided the whole “farmhouse decor” look only because I think it is a fad that will pass in short order…but this dining room gives me a little taste of the “farmhouse look” without going all out. Just a pinch and a dab that can easily and inexpensively be changed out when the time comes.

A few MCM makeovers and a life decision...

Again, I am a baaaad blogger. I jump head-long into a project and fail to take “before” pictures.

Prime example…

No “before” picture. It was in similar condition to THIS dresser…reeeeally bad. But of course I have no proof of that. Just take my word for it…again.

The entire piece was originally the old “natural” finish with a lot of “wear and tear.” I primed and painted the six side drawers and cabinet and stripped and oiled the top and middle drawers.

I absolutely love the wood handle “hardware” and the super nifty black concave and brass hardware. I sprayed the little concave pieces with metal primer and black paint.

The top had some chipped veneer. I originally planned to paint the top so I could repair these areas, but I just can’t resist beautiful walnut…even veneer. So I did what I often do…I just let it be what it is…an older piece with a few blemishes. You can buy replacement strips of veneer…but I would rather have flawed original…just a personal preference!

I did take a before picture of this piece….

I love the brass hardware on these pieces…again, the way to tell if it is solid brass is to use a magnet. A magnet will not stick to solid brass. Important because in order to clean these pieces I have to really scrub them with steel wool. No secret to cleaning brass hardware…lots of Brasso, steel wool and elbow grease!

Now…on to my “life decision.”

I have decided to stop doing the whole “auction/flea booth/resale” thing. I love doing what I do but doing it to “pay the rent” has become tiresome. I am just not enjoying it the way I use to.

So this past week I gave my notice at 410 Vintage and I went on a major “purgefest” in my garage (aka shop). I sold a lot of stuff on Facebook Marketplace, I donated a truck load to our local community thrift store and I took a truck load to the dumpster.

I have a friend who opened an awesome little consignment/flea market (Gathered Goods) so I took a few things to her to sell on consignment.

My garage has been a disaster for some time.

I painted the walls and cleaned all the shelving and cabinets!

I installed a Rubbermaid track system for large items….

…and we installed a nifty metal peg board system for all our tools. I knew where all my tools were but no one else could really figure out where anything was.

I even gave the door between the garage and laundry room a fresh coat of paint.

I am not “retiring” completely. I will still refinish and rehab pieces…I just won’t have to go looking for projects. If I find a project I want to work on, I can always take it to Darlene at Gathered Goods.

So fear not…I will always have a project to share here…and of course there are always my enlightened “muse” posts.

Drexel Accolade Makeover...

An entire year…A YEAR!!!! That is how long this Drexel buffet has sat in my dining room in it’s original state because I couldn’t pick a stinking paint color. I may be able to paint and refinish and upholstery…but picking a paint color or fabric is TORTURE!!!!

I LOVE the white lacquer finish on this little side table….

….and I love how the bright brass hardware just POPS on the white lacquer but I really wanted to do something different.

But I could NOT make up my mind. I did a lot of research and most of the painted Accolade pieces are white or black…and honestly I did not want to do black.

Hum….

I found a paint color I am madly in love with!!!! It is actually a Krylon “chalky paint” and I have used it on several pieces and I just LOVE the color…Krylon’s Anvil Gray. While it has “gray” in the name it really is a true deep, rich navy. And it sprays on beautifully!

There was one problem with this paint for this project…it is super flat…like most “chalk” paints. I desperately wanted a “high gloss” finish so I tested a few clear coats over the paint to see if I could find a good gloss. I tried a new product (at least to me), Krylon Triple-thick Crystal Clear Glaze. It SAYS it is a “glass-like coating” and “superior high-gloss finish” and it is as good as advertised.

The finish is super high gloss and exceptionally durable…I am VERY pleased.

So…

I changed up the art in the dining room over a year ago and I still love it. I still love the red fabric I used on the chairs. I love the draw leaf table. If you search “buffet” or “dining room table” on this site you will see few last long around here….but truthfully, I think I am finally loving the “look” of my dining room…so these pieces may actually make it a tad longer.

Again, no secret to cleaning brass….lots of brass cleaner, SOS pads, and elbow grease…but worth every bit of the work!

I have already stocked it with my holiday and seasonal dishes. Pretty with a purpose…my favorite. But as I said, buffets don’t last long around here so we’ll see how it fairs.

I think I have mentioned before that I DO NOT have a green thumb when it comes to indoor plants….so some of you may be shocked by the massive peace lily.

A little side story…we went to an auction…they were selling the plants (yes, they sell EVERYTHING!) Nobody would bid on this big ole’ monster so then they threw in a monster pothos plant…I’m talking HUGE!!!! My youngest daughter has been sprouting “cuttings” for her apartment so I knew she would love the pothos…so I ended up buying them both for ONE DOLLAR!!! No kidding….a dollar for two huge plants. She didn’t want the peace lily so I stuck it in my dining room and other than dump my leftover night time water in it every morning, I pretty much ignore it.

And you know what…it THRIVES. It is growing, it is healthy and it is constantly blooming. Go figure!

Now I want to share a little issue I am having with my beloved Kilz…I had this issue sometime back when I was using white lacquer…so honestly I attributed it to the paint since lacquer tends to be a “hot” finish.

But I had the same issue this time, and I was using plain ole’ spray paint.

I call it “alligatoring.”

I cleaned the pieces, sprayed on the Kilz, sanded smooth, then wiped it down with tack cloth. When I sprayed on the paint, it “alligatored.” Curses!!!

I thought MAYBE the tack cloth left a weird residue, so I sanded the spots smooth after they dried well, reapplied Kilz, sanded and then just wiped it down well with a rag…another coat of paint…same problem, just in different areas. The entire piece alligatored randomly. WTF!!! Temperature…nope…humidity…maybe. But I had the same problem when I painted on a drier day. So who the heck knows. Like I said, I had this problem sometime back on another project.

The Kilz is what is actually crackling…not just the paint. I contacted Kilz and they swear they didn’t mess with the formula and were as stumped as I was.

My solution….well I had to sand the entire piece down, paying close attention to the areas that “alligatored.” After everything was smooth and clean again, I used Bullseye 1-2-3 Primer, let it dry well, sanded, and tacked. Sprayed on the paint and presto-bingo…perfect.

Kilz was kind enough to send me a replacement can of primer. Yippee…somehow I guess that is suppose to make up for two days of grief and cursing.

So now my “KSTP” process will become “BSTP” …eck…not really a good acronym…but I hesitate to use Kilz if it really is the only common denominator in this little disaster. Since no other factors seemed to affect the out come, I can only assume it is the culprit.

Who knows…but from now on I can’t say that Kilz is the be-all end-all of primers when painting furniture.

Sorry guys!

Another MCM dresser makeover!

This is not a dresser…this is a chest of drawers. I think there is often confusion, and I am the world’s worst at referring to a chest of drawers as a dresser.

There is a difference!

But seriously who cares…lol!

Regardless of what you call it, it was A MESS! But oh the potential.

My very first love…MCM pieces. It would take a month of Sundays to link to all the MCM pieces I have refinished…just search MCM or mid century on this site. Truth be told I would have kept every one of them if I didn’t have a fear of being featured on Hoarders. So I find pieces I love, give them a good little makeover and am sincerely happy when someone else gives them a good home.

In spite of all it’s flaws, I loved this piece. It had the normal wear and tear, a seriously cruddy finish, a chipped wood handle (aren’t those wood handles AMAZING!!!!) and what I THOUGHT was some stains around the hardware on the top drawer…turns out it is a beautiful wood inlay. But you couldn’t really tell because the finish was so icky. (The missing knob was in the drawer…yipeee!)

Let’s be honest, we will all have a pretty worn finish after 60 years on this earth!

My first thought was to paint the wood handles an accent color so I could repair the chip. My daughter suggested I just strip them first. So glad I listened to her. I used this process to strip the drawer fronts, handles and legs…the old stain came off the wood handles and revealed a beautiful white wood (oak, teak? Couldn’t tell)….LOVE!!! I sanded the chip down…and you know what, I can live with it….it is obvious it isn’t the way it is suppose to be but HEY…this is a vintage piece and vintage pieces are going to have a few boo-boos!

The drawer fronts and base were stripped and oiled, the cabinet was given a KSTP treatment (Kilz, sand, tack and painted with white high gloss enamel)

(After I took the pictures, I saw the VERY fine over spray on the top drawer…curses…a little mineral spirits cleaned it right off!)

Personally, I love the high contrast of the wood handles and walnut veneer. The Lane Acclaim tables I collect have the same stark contrasting wood detailing when I refinish them…LOVE!

Often vintage pieces would have been stained and finished so all the differing woods and the entire piece had a “uniform” look and the grain detail was toned down a bit. I say LET IT SHINE BABY!!! If you are a “purist” and want vintage pieces to reflect their original state, you probably don’t want to use the processes I use to refinish pieces!

I am all for exposing the grain and the natural color of the wood.

And I am all for bringing the old pieces back to life!

MORE makeovers...

Surprisingly I have MORE makeovers to share. The weather has been fairly cold and dreary but we have had enough warm days here and there to get a little work done. I get kind of lazy during the winter months…when it is cold and dreary I like to curl up and read. When it is warmer, I NEED to be out working…either at the apartments or on projects.

This first dresser makeover is something you could pretty much do inside on a cold day.

The only thing I had to take it outside to do was distress and seal. But honestly you could do both inside.

I use latex paint for my chalk paint recipe (5 tbs. of Plaster of Paris, 3 tbs. of water, mixed well, then add 2 cups of flat latex paint) and that can used inside.

To do a “wet sand” you would use a sponge with a scrubby on one side…something like this…

After the second coat of chalk paint, before it has thoroughly dried, you would take your sponge, wet it (DAMP NOT DRIPPING!) and start “scrubbing” the areas you want to distress…kind of like dry sand distressing. Keep a bucket of water on hand to rinse the sponge periodically. Doing it like that cuts down on the “dust” created when you dry sand, so you can do it inside.

Then I just seal the entire piece by brushing on a polycrylic (or wax if that is your preference.)

Rather than spend the money on all new hardware, I painted the existing hardware. I use a spray primer and spray paint so that needs to be done outside…but truthfully, you could live with the existing hardware until warmer weather…or just replace it.

But all in all, you COULD do this entire project inside…and it is well worth the time when you consider how much better it looks!

This next piece pretty much had to be done outside on warmer days…I wanted a high gloss lacquer finish on the cabinet and that entails spraying. And I wanted to strip the old finish on the drawer fronts and that definitely has to be done outside.!

I removed and labeled each drawer…that is a MUST because the drawers need to go back into their original position…just mark the underside with a pencil.

I removed the old finish on the drawer fronts using THIS process! I know I refer back to this tutorial a lot, but it is the BEST way to remove old finish or paint…it works and on projects like this, it probably only took me about 30 minutes to remove the old finish on these drawer fronts. Once the old finish was removed, I applied three coats of tung oil finish, rubbing with 0000 steel wool and tack cloth between each coat.

I sprayed the “cabinet” with Kilz, sanded and wiped with tack cloth, and then sprayed 3 LIGHT coats of white lacquer (KTSP).

As you can see from the “before” picture, it did not have legs…but it would have originally and there was even places on the underside to screw in the legs. I ordered new legs HERE and stained them to match the oiled drawer fronts.

Each is completely different and each required a different technique…but both were relatively simple and make a huge impact.

AGAIN, I am sharing how easy it is to do this because AGAIN…

LIFE IS TOO SHORT TO LIVE WITH UGLY FURNITURE!