Vacation and the bathroom renovation!

We returned from our vacation last week….AMAZING! One day of floating and fishing the Gunnison Gorge, one day of fishing the Colorado River and five days of beautiful Aspens in all their glory! Sadly, Brian nor I took our phones into the Gorge or I would have some breath taking pictures of some of the most beautiful landscapes this country has to offer. All I can tell you is to go see it yourself! It will not disappoint!

I knew I would have to hit the ground running when we came home. I have an apartment that needs tile repair, a cabinet rebuild and paint. And I found an amazing mid century dresser that has all the problems one might encounter with a dresser and I was excited to do a step-by-step tutorial on properly repairing busted drawers, fixing chipped veneers, stripping and painting.

But Monday the tile guys called and they are ready to start on my bathroom. Since I am too cheap to pay someone THOUSANDS to demo the old tile, I decided to tackle that chore myself with the help of my son, Matt.

And chore it was!!!! My plans to take out the wall tile in sections only worked about half the time…the other half we were beating out little chunks of tile and durrock. My plans to “pop up” the floor tiles went by the wayside when we discovered it came up in small slivers with a mere chisel and hammer.

One of the things I learned from my dad…build it to last a lifetime…and since I installed the tile 19 years ago, it was more than a booger to get up!

Thank goodness for tool rentals. This little “tile-buster-upper” thingy saved us about 2 days of work! Seriously, it was the best $60 I ever spend.

I still had to replace some insulation, add a few studs, do some floor scrapping by hand and I had to hire plumbers to move the drain and rebuild the shower valves. But all in all it is coming along nicely and HOPEFULLY it is ready for the tile guys.

As with all “best laid plans” there is one small snaffu in my plan. I had intended to do a shower niche on each side of the shower head…two shelves in each…like the one in my “inspiration picture.” Unfortunately the layout of the studs and plumbing messed up that whole plan….

…so now I can only put one on the right…que sera! Sometimes you just have to drop back and punt!

I can tile. Not a problem. Here I showed you the new backsplash I installed on the vanity! But I am glad I decided to pay someone else to tackle the bulk of this project. After two days of demo, I’m not sure I could lift a box of tile if I had to!

This is where I want to reiterate the importance of doing what YOU love! Not what is “in”, not what Pinterest says is all the rage, not even what your friends and family think you should do! I am all for “finding inspiration” for home decor and improvement projects, because let’s be honest, sometimes we just can’t find a vision for the changes we want to make. But doing what YOU love is important because otherwise you may find yourself hating an expensive change in the not so distant future!

I still love the wall tile and floor tile I picked out 19 years ago…but I know the day will come when stepping into a big ole’ whirlpool tub we NEVER use may be a major feat…a walk in shower will be, some day, a necessity!

So find your inspiration but do what you truly LOVE!

MAYBE next week I will have time to get started on that amazing dresser and I can share how easy it is to turn a trashed piece of furniture into something you will be thrilled to use in your own home!

Grouting the live edge pebble tile backsplash....

Last week I shared the installation of my "live edge pebble tile" backsplash. This week I will continue that little tutorial...specifically the grouting and caulking!

Remove all your spacers and clean off any excess mastic that might have squished out or is on the face of the tile. Run a piece of tape along the counter, slipping it a tad under the tile.

It is important that you NOT get a lot (if any) grout in the space between your counter and the backsplash...again, you will run a small bead of caulk in that space when the grout is dry...caulk is flexible...grout is not. If you barely slip the tape under the tiles, it will pull out any grout that might slip in that gap when you pull up the tape.

Grouting is not hard! Quick tip...in general SANDED grout is for floors with larger grout lines...UNSANDED grout is for backsplashes and small tiles. Here is a good outline of the difference between the two...but as always I would suggest going with the manufacture recommendation for your specific tile or the advice of a PROFESSIONAL (not the kid at Lowes!)

In this case I used sanded grout. Why? Well, because that is what I had on hand and there are some pretty substantial gaps between the pebbles and it is in a wet area. But if you have small, uniform spaces between the backsplash tile or a tile that would scratch easily, I would go with unsanded grout.

Mix your grout the consistency of say, really thick peanut butter.

TIP: A little water goes a long way with grout so add a little water at a time and mix well. I used my shop spatula. I never dump ALL the grout in...save some in case you add too much water...otherwise you will have to go get more grout...trust me, been there, done that. 

Use a grout float to mash the grout between the pebbles/tiles, then wipe off the excess with the float. Make sure you fill the gaps well. I even use my fingers to mash in the grout in hard to reach areas. Again, TRY to avoid getting grout in the gap between the tile and the counter! Fear not...if you get grout in this gap it will pull out when you pull the tape up while the grout is still wet!

After you have filled all the gaps well and removed the excess with your float, use a tile sponge to gently wipe the pebbles/tiles. DO NOT use a plain ole' kitchen sponge...they "shed" and you will get little flecks of sponge in your grout...from experience. Buy a sponge specifically for this purpose.

TIP: I set aside a "gloob" of wet grout just in case I need to go back and fill in little spots here and there...just smash it in the gap, then wipe it with the sponge. 

On your first wipe, your goal is to get rid of the excess grout on the tiles...if you "gouge" the grout between the tiles just smash some more in and wipe.

After all the excess is removed, peal up the tape...it should remove any grout from the gap between the tile and counter. I take a utility knife or toothpick and "flick out" any that is still lurking. Then wipe again with your sponge!

I have found that using a "swirling" motion tends to "buff" the grout and give it a smother, more uniform finish.

Wipe well, let it sit for about 30 minutes, then go back and wipe again...keeping your sponge clean. You will want to do this repeatedly, every 30 minutes or so, until there is no more "grout film" on the pebbles/tile. 

I personally think grouting is one of the things that sets a “professional look” install apart from a “DIY” job…so take your time with this process. You want the grout to be uniform, smooth and even with or just a hair below the edge of the pebbles/tiles. You don’t want it on the face of the tile. Again, it never hurts to go back and add wet grout, then wipe again. Once the grout is dried and set, it’s a little tough to make adjustments…so take your time and do it right!

TIP: Just from past experience...don't rise your sponge in the sink...not saying it WILL clog your sink, just saying. Use a bucket, changing the water often!

After you have finished removing all the excess grout and the pebbles/tiles are sparkling clean, and you are happy with the grout lines, let it dry overnight.

After the grout has dried, put down another fresh line of tape to protect the counters and coat everything with the "impregnator sealer" (if you have natural stone) Brush on, let it dry for about 5 minutes, then wipe with a clean cloth. That will seal both the stones and the grout. Or apply a grout sealer (per the directions) if your tile is ceramic or porcelain. Let that dry well.

Then caulk...here I give you a pretty decent tutorial on caulking! Super important so make sure you do this one final step! 

Again, silicone caulk can be tricky for a novice and really not necessary in this area. I am a pretty proficient caulker, but if you are a novice I would suggest using this tape trick.

CAREFULLY tape both the tile and the counter...only leaving the "gap" exposed.

Apply the caulk, smooth away all the excess with your finger, pull the tape, and then smooth again with a clean, damp finger...you SHOULD get a nice smooth grout line.

I used white grout so I used white caulk. Most grouts have a matching caulk and you want your caulk to match your grout...worth the small investment.

And presto-bingo...a live edge pebble backsplash!

I LOVE it!

I know not everyone will love the "natural" look of a live edge backsplash...so many seem to prefer the structure of a "straight line" application. But as I look around my house I realize I really gravitate to a "natural" and random flow....

The dry stack fireplace tile....

The "randomness" of the tile kitchen backsplash...

Maybe it is all a part of my "go with the flow" attitude! I would like to think that in a world of structure and symmetry we all need a little randomness in our lives!

My son said it looks very "Coloradoish!" BINGO! That is exactly what it kind of reminds me of!

We leave next week for our annual fall trip out west! I finally get to check “a float trip down the Black Canyon" off my bucket list...we have a guided fishing trip scheduled! And then we will do our annual guided trip on the Colorado River with Cutthroat Anglers. This is a trip I look forward to every year!

I'll break out all the fall decor before we leave so I will be ready to kick back and enjoy the fall season when we get home! Hopefully the summer heat will have gone away and I will be able to pack up the shorts and flip flops for the year.

Live edge tile backsplash and a dresser makeover reveal...

In my quest to make changes in my master bath, I FINALLY decided on the a sliced white pebble tile for the shower floor and niches. One decision down...too many more to go!!!

When I first remodeled the master bath, I did a glass tile backsplash on the vanity...I like it, but honestly I am no longer in LOVE with it.

And to be honest, I think the glass tile backsplash craze is running it's course. In other words, it is a fad that is fading...at least in my opinion. Besides, it had brown in it and I am moving away from browns!

Since it is such a tiny bit of tile, I decided to change it up a bit.

AGAIN WITH THE DECISIONS!!!! But I got to thinking...I love live edge wood countertops, coffee tables, benches..."live edge" wood anything is just beautiful! If you don't know what I am talking about, google it!

Why can't I make a "live edge" tile backsplash?

The pebble tile I picked out for the shower floor has a "live edge."

In other words the pebbles are laid on the sheet in such a way that the edges of each section of tile are "natural."

This vendor carries a tile border but it is only 4" tall. You can also remove each individual tile from the netting and place each individually...nah, way to much work for me!

Since I have a small backsplash, I cut each 12x12 sheet of tile in half with a wet saw. I only needed 3 sheets of tile...less than $40!

Then I had to set it on the vanity for a few days to see if I was really going to like it!

LOVE!!!

So here is a tutorial for making a "live edge" tile backsplash...

First, I had to remove the old tile. There are times when the easiest thing to do is to cut the sheetrock along the tile down to the studs and remove the whole kit-and-kaboodle! That was an option, but I decided to remove the tile and scrape the old mastic....

Since that tore up the sheetrock AND the new tile wasn't going to cover the entire section I removed, I had to do some sheetrock repair.

No biggy!

If you decide to cut the sheetrock down to the studs, here is a super simple way to "patch" the section you remove!

I didn't have to do any patching, but the basic rules apply...mud, sand, texture and paint!

Apply a coat of mud, let it dry overnight, then sand. Then another coat, let it dry and sand again. I can not stress the importance of sanding sheetrock mud smooth...FEEL IT! If you can feel it, you are going to see it when you paint it! Sand, feel, sand, feel! I used an 80 grit paper. You are better off sanding too much and having to apply more mud!

This product is one of my favorite little DIY "hacks." Sheetrock texture!

If you have properly sanded, this stuff will blend old with new! Just make sure you shake it WELL and always test spray it before you start spraying your wall. On more than one occasion I have had to wipe off the wall and start over because the texture came out to thick or too thin...so take time to test it before you start spraying it on your wall! The knob adjusts for different "textures." Follow the directions on the can.

Let the texture dry WELL before you paint!

And again, I can not stress the importance of keeping spare paint on hand. Fortunately, I just repainted my bathroom a few months ago so I had fresh paint on hand...

So, on to the fun stuff...tiling!

First, this is a "natural" stone tile (if you don't know if your tile is a "natural stone" vs. ceramic or porcelain tile, ask!) The very first thing you want to do is seal it with an "impregnator sealer." Ask...they have it at most home improvement and tile stores. Super simple to apply...brush it on...let it sit for about 5 minutes, then wipe it with a clean cloth.

I would suggest doing this before you cut it with a wet saw, but definitely before you install it and grout it!!!

Since the top edge of the backsplash is going to be the "live edge" it was important to remove any "netting" from the edge...

The net backing is what is holding all the little pebbles in place so you don't want to get carried away...just trim the netting away from the edge that will be exposed!

I used a utility knife and my little sewing scissors (and I wonder why I can't keep a decent pair of sewing scissors!)

I used a premixed tile mastic. Mastic is for small tiles...thinset for large tiles. Always use the adhesive and trowel recommended by the tile manufacturer. I coated the back of the sheet with mastic using a properly sized trowel. I used a small craft brush to apply mastic to the edge pebbles...it is okay for the mastic to "squish out" between the pebbles a tad, but you don't want it squishing out on the edge pebbles...I kept Q-tips on hand "just in case." Just make sure you get enough mastic on the back of the edge pebbles for good adhesion. 

TIP! Never set a tile backsplash directly onto the countertop...always use spacers and then after you grout you will run a small bead of caulk between the backsplash and the top. In this case I wanted a very small space so I used dimes as spacers! Thank goodness we keep a change jar and I was able to fish out a few bucks worth of dimes!

Let the mastic dry over night before grouting! 

Now this is where I tell you to "tune in next week" for grouting instructions. Why? Well because as I mentioned I needed 3 sheets of tile to complete this task and I only had the two I ordered as samples. So now I am waiting on the other sheet to be delivered so I can finish this little project. 

I know...it's annoying to get engrossed in something only to be told "to be continued." But I promise...next week I will share how simple it is to grout, seal and caulk the new tile backsplash.

Until then, I will share something I promised last week I would share!

(The grouting tutorial is up…take a look!)

A DRESSER!

I shared last week that I have been in "dresser mode" recently. I currently have FIVE dressers and chests sitting in my garage ready to roll! 

Last week I took a dresser in and it sold that day! I think it has been in my garage for over 6 months...I just never took the time to work on it.

It wasn't in horrible shape...just a really bad paint job (you could see all the brush strokes) and the hardware was pretty chippy!

I didn't change it up too much...KTSP...kilz, sand, tack and new oil based high gloss white!

The hardware got a little makeover...I primed it with metal primer and sprayed them with high gloss black lacquer.

Again, not a huge change but enough to give it a new life!

Maybe next week I'll share another one...if I can dig them out of the garage!

Well, that and the "to be continued" of the tile saga! 

Modifying a cabinet...

When I first remodeled my master bathroom, I loved it...honestly, I still do! But someday soon I want to make some major changes just for practical purposes. Specifically, I want to remove the whirlpool tub (seriously, I think I have used it 3 times in the last 20 years!) and add a walk in shower.

As much as I love the existing tile, I know that will mean picking new tile for the shower....which means I will want to go ahead and replace the floor tiles...you know, while there is already a mess! But picking a tile that will carry me through another 20 years is tough for me...I know people say this or that is "timeless" but I can assure you NO home decor is timeless.

This will all happen as soon as I can find the perfect tile person to construct the shower. I do not want to hire someone who isn't VERY experienced because one of the worst things that can happen would be a shower that leaks! 

There is one other tiny detail that kinda bugged me...the "medicine cabinet."

While I love the look, it just wasn't practical. Why? Because everything in the back half of the cabinet goes there to die! Seriously, I found a bunch of products and pills that had expired years ago.

I cut down my kitchen pantry several years ago and have never regretted losing that extra 12" of space. I like how the smaller cabinet opens up the kitchen a bit! And again, everything in the back of the cabinet had a tendency to expire before I got to it. (No, I don't have a picture of the pantry before I cut it down...that was "preblog!")

So I knew cutting down the depth of the cabinet in the bathroom was doable! 

The first thing I did was take EVERYTHING out of the cabinet and took inventory. Major purgefest! I made sure that what was needed or wanted would fit comfortably if I only had 6" of depth. Yep, all but the basket of old prescription medication and most of it had expired. 

Once I knew that cutting down the cabinet wouldn't pose a logistical problem, I removed the cabinets from the wall, cut them down, rebuilt the back and reinstalled them. (Did I take pictures of this process...of course not...who knew I would share something so mundane!)

Sounds easy...honestly, it wasn't. There was an electrical outlet to deal with and the trim detail and then of course there was the exposed sheetrock boo-boos from the old marble backsplash...curses. I always think a project will be easier than it is!

But again, it was doable, and after a day of cutting and cussing I had a smaller cabinet.

The sheetrock boo-boo was an easy fix...mud, sand and retexture. Since I am good about keeping old paint for touchups...no biggy. Except it had been so long since I painted the bathroom, the paint had hardened. So I got to repaint the entire bathroom! Yippee!

Fortunately I had a couple of left over gallons of paint from when I painted my living areas...

Now I am eyeballing my kitchen again. I am a sucker for the "power of suggestion" so when I read that big ole' hulking over-the-range microwaves are now a kitchen "faux pas" I decided I want to remove the microwave above the stove...which means I have to find a place for a smaller microwave. The counter is not an option since I have a small kitchen and limited counter space. Hum...the pantry...maybe I can put it in the pantry. Well, I could if it weren't so stinking shallow...remember I cut it down so now no microwave more than 13" deep will fit. Thank goodness for the internet...I spent days researching microwaves. Fortunately, I found a few that would work so that's one hurdle! Small little things but honestly the only thing I use a microwave for is to boil water, warm coffee and melt butter.

Hurdle #2...can I afford to loose shelf space in the pantry? Again, I pulled everything out and start measuring cans of beans and moving shelves around. 

Doable! Keep in mind we are now a family of two and I don't need the food storage space I use to!

Hurdle #3...when I take down the over-the-range microwave...what then?

Honestly, I didn't know.

And then I found a solution that changed my whole plan...

A compact over the range microwave by Whirlpool!

I would post a picture but the site won't let me steal the pictures so just go look at it!

How cool is THIS! It's only about 10" tall so I won't feel like I have a big ole' hulking appliance hanging above my head while I am cooking.

I ordered the black stainless even though my stove is black.

I hate to buy new appliances when they work perfectly fine so I thought I would live with my old black stove for the time being.

(Fortunately for me the ignitor went out on the oven this week. Yippeee! Perfect excuse to order the new black stainless stove I drool on every time I go to Lowe's! God forbid I fix it with the $30 part!)

Now I don't have to give up pantry space or counter space. I guess it is still technically a "kitchen faux pas" since it is an "over the range microwave." But you know what...I'm okay with it. I'm probably one of the few who hasn't painted my kitchen cabinets, I have no shiplap in my house and while I would love to retile my entire kitchen and dining area with beautiful, light travertine tile, it's not happening...so I'm okay with bucking the decor trends!

The only problem I have is the space that will have to be tiled after the big ole' hulking microwave is removed. Fortunately, I am a pack rat and kept all my scraps from when I retiled the kitchen backsplash! Yea me! Thank goodness because that stuff was E.X.P.E.N.S.I.V.E!

So when I get the new microwave and stove are installed and the tile work done I'll share...can't wait!


Cherry tv cabinet makeover....

I've said it before...I am a bad blogger and mediocre photographer at best.

Bad because I often get in such a hurry to start a project I completely forget to take a "before" picture. Mediocre photographer because...well, my photos speak for themselves.

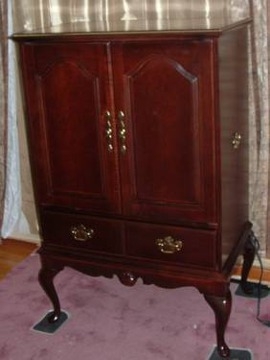
As is the case of this Queen Anne Cherry tv cabinet. Hello 1998! 

No, I did not take a "before" picture. So I did a little google search and found a cabinet that was SIMILAR to the one I acquired from my neighbor. Color and style are the same, but mine does not have a drawer. 

We have all seen this furniture style...many of us still have it in our homes! I had similar bedroom furniture...not the Queen Anne style, but heavy and dark. I painted my bedroom furniture a few years ago and honestly I don't give it a second thought these days!! In other words, update the outdated and you may stop feeling the need to spend thousands on new!

There are several problems with this tv cabinet. First, who still uses these cabinets for housing tvs? Most of us have transitioned to flat screens...I finally pitched my last hold out a few years ago. 

Second...it is dark and "heavy" looking. Not really the in thing right now.

But they are still good solid pieces that have use and purpose. Maybe not for their original intent, but who couldn't use more storage! 

It is super simple to give these pieces a little update. I know most will not want this piece for a tv cabinet but everyone is looking for storage pieces for crafts, linens or even clothing. Honestly, it could be used in a kitchen for pantry space or a bathroom for towels and such!

Again, it just needs a little facelift.

I removed the back...super simple since they are usually just stapled on.

I added a new shelf then primed the inside of the cabinet with Kilz, sanded, tacked and spray painted it with white paint (KTSP!)

I used bead board to make a new back to add a little "interest." I used THIS process to "stain" it. Normally I would use an accent color but this time I used the same latex paint I mixed up as chalk paint for the exterior.

Making your own chalk paint is super simple...thoroughly mix 3 tablespoons of water and 5 tablespoons of Plaster of Paris and then add 2 cups of FLAT latex paint. You can use satin or eggshell paint but I have found that the flat tends to "chalk" better when you sand.

Sand and seal! Again I never use wax on chalk paint...usually polyurethane or polycrylic. If you want the added character that you get with dark wax, try applying a dark "glaze" before you seal. Personally, I think you get the same affect without having to use wax. I have even used stain as a "glaze"...this mirror being a good example.

Finally, I added simple knobs.

Sealing the piece with poly makes it super simple to repaint when the "distressed" craze ends...and trust me it will eventually! 

Some of us remember when this dark "cherry" look was all the rage...

Essentials for a cozy guest room...

I did not realize how unprepared we were for guests until I began my quest for the perfect "guest room."

Sarah and her family are our most frequent "guests." She doesn't have her own room in this house since she had moved away for college the year I bought it...19 years ago! (Wow...where does the time go!) When her family visits they have no problem digging through my bathroom or closet when they need a Q-tip or soap or an extra blanket! I don't mind that they do, but you probably don't want most "guests" scrounging around your bath or closet!

The three youngest babies who grew up in this house have moved on with their lives and I am left with three bedrooms upstairs.

Now, this is where I tell you that when your children first go off to college, do NOT think you can immediately turn their room into "a naked room." (Again, you have to see the movie!) Because truth be told, they do eventually come home...at least for frequent and sometimes extended visits. And the worst is all the "stuff" they leave behind...clothes, books, trophies, high school momentos. Stuff they obviously can't take with them but don't want to get rid of (okay, so MOM doesn't want to get rid of their t-ball jerseys and "Where The Wild Things Are" books...but that's a whole nuther issue!)

But eventually the time comes and you know they will not be moving back.

For me that time has come.

I decided it was time to pull together a real "guest room." It all started here

I finally got Matt's room painted and all three rooms purged. For the most part...there are still a few framed momentos and childhood books scattered about!

Katie's room will be our official "gym"...there is a twin bed and room for the portable cot for the grandsons and it has the large tv so it is perfect for their "game room." 

Mitchell's room has been the unofficial "guest room" but right now it still has a lot of "stuff" in it that I just don't have the energy to deal with. And truthfully, the bed in his room isn't real comfy.

When Matt moved into his new home, he left only a bed and dresser...

...that room has the least to deal with so that will be the "official guest room." After the new paint and purge, it was time to start working on "this list"....

In the bedroom I made sure there where the essentials...comfortable bedding, a bedside table with a lamp, an alarm clock with USB ports (love that little thing!), a scented candle, a flashlight, reading materials, a notepad, a trash can, etc. (I moved the bedside table from Mitchell's room and the lamp from Katie's...it "pays" to shop at home!)

I gathered all the extra blankets and pillows and bought new hangers and put them in the closet....

I put white inexpensive pillow cases on all the spare pillows! Just a reminder that I am a huge fan of white bedding and towels!

In the bathroom I purged all the outdated products (used toothbrushes, old deodorant, expired meds) and stocked it with everything on the list...toiletries, ample towels and washcloths, a blow dryer, personal and oral hygiene products, a first aid kit and basic meds. 

I made sure I checked everything off the list!

I wanted a new bed frame and found the PERFECT one through a friend. 

Okay, so it wasn't really perfect. I added some height to the side rails because I don't like the box springs showing. I used my Kreg jig and wood glue to attach a 1x6 board to the side rails....

...then nailed a piece of trim across the joint...caulk and putty...

Then I painted it! First the KST...kilz, sand, tack...

Then paint. I went with my go-to off white...SW Swiss Coffee. I thought about doing the whole chalk paint and distress thing, but I know that will eventually fade out of favor and I want clean and classic...in other words, something I don't have to repaint in a few years.

I found an inexpensive "indoor/outdoor" rug that works perfect with a neutral color pallet. 

I'm not big on piles of decorative pillows on the bed, but since I don't have to make this bed every day I picked up some pretty decorative pillows!

I replaced the blue and brown curtains with fresh white panels. 

I found this message board in the craft section at Hobby Lobby.

Chalk painted it and then hand painted the wording on it, distressed a tad and sealed. Super simple and just a touch of "farmhouse." 

This little "message board" is the perfect spot for the wifi password info and our home address info. Keep in mind, if you don't have a land line and someone uses their cell phone in an emergency, emergency responders may not know your exact location. Guests should have your physical address! It is also the perfect spot for hanging spare charging cords for I-pads and phones! 

Fresh flowers are on the list, but it is a bit unrealistic to keep fresh flowers in a room I rarely enter...these were from Sarah for my birthday! 

If you do not have an extra bedroom specifically for guests, put together a guest basket...a little basket with all the "essentials" that can be stored in a closet until it is needed! I stocked this one with little "sample size" products. I also pulled items from my hotel stockpile...yes, I am one of those people who takes all the little shampoos, lotions and soaps from my hotel room!

Having a room ready (or even a little guest basket on hand) sure makes it easy to prepare for overnight guests...last minute or scheduled.

I have a large matted frame I intend to hang above the bed if I can find a print I like. The frame was a "silverish" color...not the least bit pretty. I have it primed and ready to paint (and share) when I finally put it all together. Wall decor is something that can take time...like Matt, I don't want "stuff" just to have "stuff." 

I put my dad's walnut chair in the corner and eventually I want to add a mid century dresser...Katie is using this one and I may get it back when she moves so I may hold out for it! I also want to find a luggage stand. When I get that all in place I will share that side of the room!

The "froo-froo" takes time but the absolute must-haves are in place! 

Que "sigh of relief!"

Sign post from old bed posts...

I have had these old bed posts for eons...they have been sitting in my garden cubby for...seriously, I have no idea how long! I can not tell you how many times I almost tossed them, only to stick them back in the cubby "just in case."

I love the blogs that post inspiration pictures with links...but there are just too many...and honestly, I'm kinda lazy! If you need or want more inspiration, just search "sign post" on Pinterest. I promise you will find something that trips your trigger.

I stumbled across one in my search for ideas for my guest room (I promise to share soon!) Light bulb moment. I have old posts! I have some old hooks....and scrap wood...and paint. 

I CAN DO THIS!!!!

So I did...

Super simple project...while I have all the necessary tools in my Tool Box, this really is a project that needs little more than a hammer, saw, screw driver, glue and nails. 

First I had to clean all the gunk off the posts...then I puttied the holes and built a sturdy base (just a scrap board screwed into the post and trim)...

....chalk...paint...distress...seal...add a hook!

Perfect for a little "Welcome" sign on the front porch....maybe a hanging basket of flowers. You could even add a few more hooks and use it as a coat rack or set it in your bathroom or by the pool for towels...the possibilities are endless!!!

Super simple. And a great way for me to purge another "just in case" thing from my garden cubby!

Bee Box Shelf....

Sometimes things get "stored" in my garage and I spend a few years kicking them around. 

My daughter started raising bees several years ago. She would occasionally bring home old "bee boxes" to paint. 

One has been hanging out in my garage for...oh, I would say at LEAST two years. Waiting to be painted. Never happened.

In my quest to "organize" my mess of a garage I decided to purge a few things...but it is always hard for me to toss anything wood. One of my few "hoarding" tendencies.

An old bee box...scrap pieces of bead board from another project...old dresser drawer pieces...hum....what to do, what to do!?

Yep...a "bee box" shelf.

I used one side of an antique dresser drawer as the shelf and the scrap bead board for the back. A little glue...a few nails. I sanded the box and the shelf to clean them up a bit. (I could actually smell the honey!)After sanding and assembling I sprayed the entire piece with a clear coat just to seal the "chippy" paint.

Easy, peasy. 

Not my style so of course it will be sold, but just a quick reminder that you can turn any old "scraps" into something pretty and functional with just a little imagination...this didn't take too much time or any expensive tools...just a saw to cut the shelf, a hammer and a little sand paper. 

Next week I'll share the project that produced all the scrap bead board...another "repurposing" project! 

Until then....

"Repurposed" oak dresser....

So many little projects happening...a tv console, a thrift store wall clock, an old love seat, some Eastlake chairs.

But today I want to share another "Trash to Treasure." As I have mention, I often find discarded, abused pieces of furniture at the apartments. They either get left behind in a unit or thrown on the trailer I keep out back for bulk trash. 

Someone had tossed this oak chest skeleton onto the trailer....

It wasn't in terrible shape but it was missing all the drawers. I hated to just toss it in the dumpster...I knew I could do something with it, just wasn't sure what. I brought it home and waited for inspiration to hit.

I did have to do a little bit of structural repair...nothing major...glue and clamps!

I decided to turn it into a little shelf....kitchen, bath, bedroom...wherever someone might need some extra storage for dishes, towels or even shirts...maybe add some cute baskets or boxes. 

I cleaned it up, chalkpainted and distressed the "skeleton," added some stained plywood shelves, and....

I thought about painting the inside but decided to let it be what it is...and old oak dresser repurposed. 

Sometimes less is more.

Drop door cabinet makeover....

Enough about my entry makeover FOR NOW! I'll get there eventually but I'm at the "wait" and "hum" stage...waiting on tile and stair treads and not quite sure what I want to do about trim and lighting...hum....

So in the meantime I thought I would share one of the wash stands I rehabbed. I went to an awesome auction several weeks ago and brought home 5 potentially beautiful dressers and wash stands. One just needed to be cleaned and oiled but the others needed some serious work.

On these older pieces I just can't bring myself to slather them entirely in paint. I always have to restore a little bit of the original wood. I know in today's world of home decor, paint is all the rage, but I need a good balance of paint and the "warmth" of wood. So no matter the condition of the top, if it is solid wood, I am going to strip it and refinish it. 

This little cabinet was originally a "wash stand." It wan't in terrible shape but it had seen better days!

It had a little mirror on the back, which when removed left a  "gap" along the back edge.

If I was going to paint the top, I could have filled it in with a strip of poplar and been done with it. But I knew I wanted to refinish the top so I added a piece of oak...

...just routed the edge, then attached it with glue and trim nails. I stripped the top with this process, applied a little walnut stain and sealed with poly!

I chalk painted and distressed the base and sealed with poly. The little drop front REALLY distressed, but sometimes I just let furniture do what it wants to do! A little update on the hardware and it is good to go!

The drawers on most antique pieces have some issues....remember GLUE AND CLAMP when repairing drawers! Not nails and screws! And since the drawers were pretty ratty and stained, I gave them a little KSTP treatment! (sorry, no pictures!) They look and smell much better if you will take the time to paint the inside of the drawers of these older pieces!

I think this would make an awesome bedside table or entry piece! Or even a tv cabinet!

I tried to "stage" this little piece with some of my auction finds....

....an old cheese box, some awesome scales and a wood duck decoy. But again, I am not the best photographer and I am definitely more about doing and less "froo-frooing." 

I have several dressers and another wash stand to share, so stay tuned!