The fireplace...putting the plan in motion!
If you have been following along you know I am in the middle of a major overhaul in my den. Here I shared "Finding Inspiration," "Making a Plan" and "Putting It All Together."
My plan is pretty extensive....the fireplace, flooring, and paint....
One of the things you have to do when putting a plan in motion is know what you can afford to do immediately and what will have to wait. I know I can afford to reface my fireplace, replace my flooring and paint.
Knowing what you CAN do will determine the ORDER in which you do it.
I need to do my fireplace and paint before I do my floors! So.....
The first thing I did was remove the old black marble and paint the wood mantel and surround.
I know I originally painted the surround with oil-based paint. I always paint trim with oil based but if you aren't sure, you can easily test paint with alcohol and a cotton ball. Just rub the paint with a cotton ball with alcohol on it. If the paint comes off it is latex...if not, oil based. This is important because if you are changing the type of paint, you need to prime with a good primer!
Fortunately I didn't need to prime. I sanded the entire surround just enough to knock off the shine. I added a little Penetrol to my oil based paint and used a really good quality brush! Not a huge change but the paint lightened and freshened the surround up a bit!
When I removed the black marble, the sheetrock was intact. But honestly, I know the tile I am putting up is super heavy so I decided to replace the sheetrock with durrock. Durrock is a "concrete board" that is often used in wet areas. My sheetrock is 1/2" and durrock comes in 1/2"...perfect!!!
Durrock is super easy to install...measure, mark and score the board with a utility knife and "snap" it just like you would cut sheetrock!
I cut out the sheetrock above and below the fireplace, making sure the vertical cuts were on studs. This allowed me to fit the durrock without having "scab" in any brace blocking! (I did add a little insulation below the fireplace!)
I put a little construction mastic (Liquid Nail) on the framing boards and then screwed the durrock to the studs with screws. Again, I am looking for the "strength" factor of the durrock because the tile I am installing is HEAVY!
Even though the walls behind the fireplace are insulated, I used silicone caulk to fill and seal all the "gaps" between the durrock and sheetrock and around the fireplace!
Now the fun part...installing the new tile!
I ordered a random travertine cut face tile from Wayfare.com.
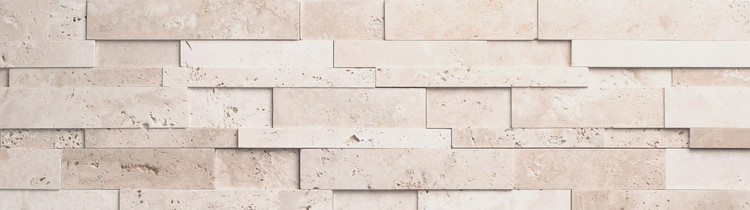
It is BEAUTIFUL but there was a little problem. When the tile arrived there were several broken pieces. Since it was a little pricey, I didn't order a lot of "waste" and I knew I might not have enough if I couldn't use several pieces!
I honestly don't think it was the fault of the packing or shipping. Travertine is a "soft" tile and has a lot of "character" in it...so I think it is more susceptible to cracking than solid porcelain or ceramic tiles.
Regardless, I immediately emailed Wayfare.com and explained the problem. In less than 2 hours they had responded and set up a replacement shipment. Now THAT is amazing customer service!!!!!
Most wall tiles are installed with a premixed "mastic" but travertine wall tile is installed on walls with a special "no sag" thin set mortar you have to mix. You can buy it at any tile store. Travertine, like porcelain, glass or ceramic tile, also cuts beautifully with a wet saw. I have one but if you don't and you want to DIY tile, you can rent a wet saw!
My travertine is a "random cubic mosaic." The individual pieces of tile are fused together into sheets with a web backing and the sheets of tile fit together like a little puzzle! It is a "dry stack" tile which means there are no gaps between the pieces and no grout.
I made a "layout plan" and worked that plan!
I started at the top. I knew I might have to cut the entire horizontal edge of the tile and I didn't want to do that at the top because it is a "focal" point. And I don't have my floor tile yet so being the impatient person I am...well, I had to start at the top.
This tile is heavy so when I installed the top section I "braced" it with little boards, leveled and secured into the studs with sheetrock screws. I let the top section dry overnight before installing the side tile.
To install, I spread the "no sag" mortar onto the wall with a 1/4" x 1/4" notched trowel....
...and then just pressed the tile in place! (By the way, I would recommend cutting and "dry fitting" your tile BEFORE applying the thin set. That way you know if the tile is going to "fit" before you get the adhesive all over it!!!)
The process is the same for porcelain, ceramic or glass tile...only you will probably use a premixed "wall mastic" and a smaller notched trowel (always use the mastic and trowel recommended by the manufacturer!) And again, since this is a "dry stack" tile and there are no grout joints, you don't have to use spacers to space the tile. If you are installing a tile that has "grout joints" you will want to get little rubber spacers so all your grout joints are equal!
I learned real quick that these sections of tile are indeed VERY heavy, so it is best to only do a few sections at a time, brace them and let the thinset set up before removing the bracing and applying the next few sections.
I want the wall tile to sit snug on the floor tile so I will install the floor tile before I install the bottom wall pieces! As you can see, I ran out of tile...again, because some of the pieces broke.
So when my floor tile comes in next week I will get that down and then I will finish the face.
I could have installed the floor tile first and then worked from bottom to top. But again, I was afraid I might have to cut the vertical width of the wall tile, and I didn't want to do that at the top. I THINK I have it measured out where I won't have to cut the bottom tiles...I should have 1" between the wall tile and floor tile...perfect for the 1" wide tiles.
Installing decorative tile (whether travertine, porcelain, ceramic or glass) is NOT hard. It is just a "puzzle" you have to put together...slow and steady! Using the proper tools to cut tile is important as well as using the proper mastic!
There are a million video tutorials for installing tile so don't be afraid to DIY tile installation. And as I have said before, a little decorative tile, whether on a back splash or around a fireplace can make a huge impact for very little money!
My original plan was to paint the fireplace wall a pretty soft teal and add teal accents here and there. Truthfully, I love this wall color and now that the fireplace is "brightened" I am rethinking my plan.
Before
After
What is the old saying..."The best laid plans..." Yeah, well, now I am rethinking some of my decisions (like the candlesticks I painted teal, only to repaint black! And I am not even going to show you the side table I painted teal...ick!)....and that is okay.
I know I still want new flooring and I am seriously thinking about getting those down before I make any decisions about paint colors. The flooring I picked out is a lot darker than what is there, so I may change my mind again!
