A rock water feature...

In my last house I had an amazing two tiered water pond with a fountain next to the back patio, outside my bedroom. I loved it. I could open the window at night or sit on the patio and drink coffee and hear the water.

If I believed in the whole Zodiac thing I’d say it is because I am an Aquarius…”water-bearer.” I don’t ….. I think I just like the soothing sound of water.

Truth is the sound of water is very tranquil…zen if you will. Calming. Destressing.

I can’t really have a open pond water feature here…too many leaves!

Then I ran across this tutorial on Instagram for a closed water fountain. THIS I can have!

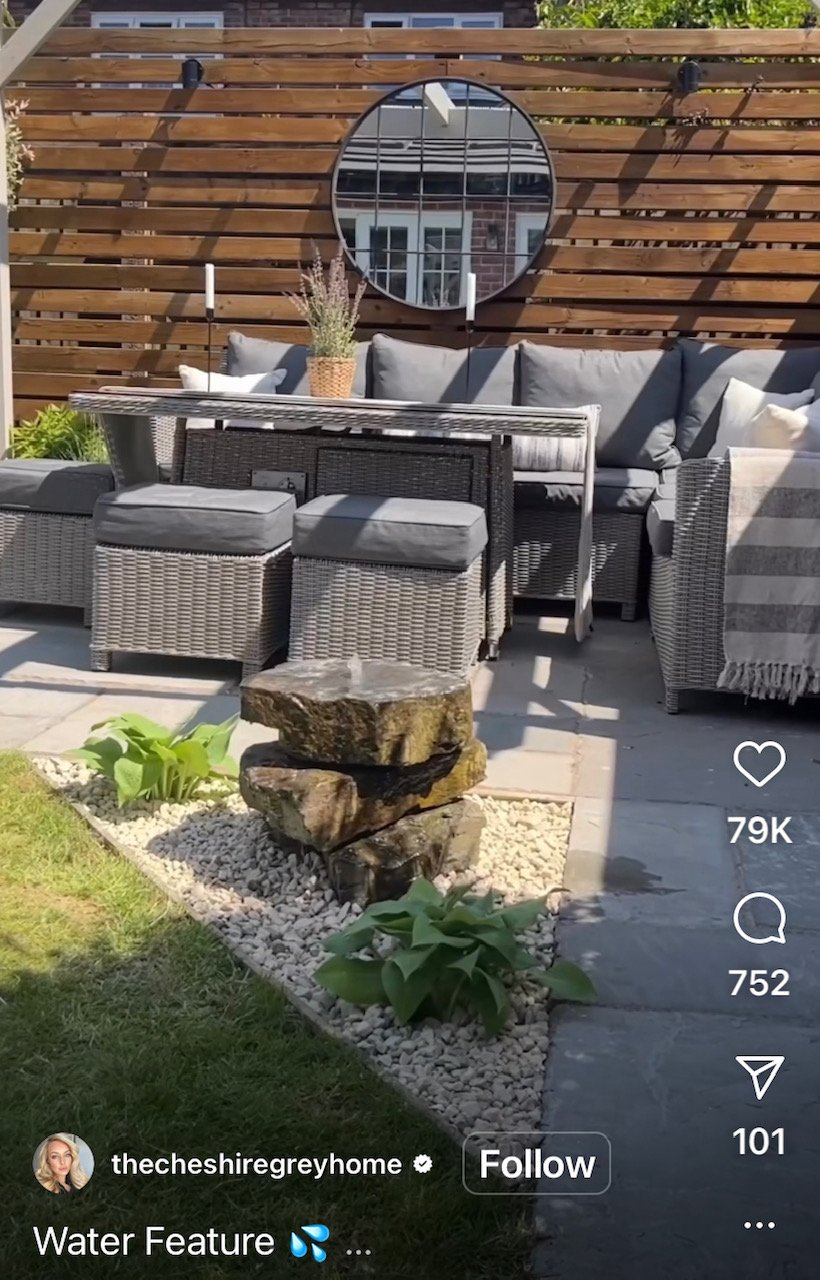
So I set out to build it.

Keep in mind, this is MY tutorial for my specific fountain. There are TONS of tutorials and designs on Pinterest so do a little research and find a tutorial or design that works for YOU!

I decided to place it in the corner of my front flower bed (shared my flower beds HERE). The first thing I had to do was move a few plants around…no biggy!

The tutorial calls for using a large plastic tub as the reservoir. I bought a livestock feed bin at the local livestock supply store…a 40 gallon tub that has an inside diameter of 26 1/2”. (Much cheaper than a tub designed specifically for a water feature that you can buy at the big box hardware stores.) That measurement is important when you go to buy rock because your base rock needs to be a few inches less than that in diameter so the water flows back into the reservoir. If you want a bigger rock, I suggest getting a bigger tub.

So, dig a hole…a BIG hole…large enough for the tub to sit in flush with the surrounding grade. I dug mine a few inches deeper so I could cushion the bottom of the hole with a few inches of sand (plain ole’ play sand). I think that is important for leveling and stability. It also ensures that no rocks will compromise the bottom of the tub.

Set the tub into the hole and make sure it is level…I used a 3’ level. If you don’t have a 3’ level, set a board across the top of the tub then use a shorter level on top of the board.

Once the tub is level and flush with the ground, back fill around the tub with dirt…checking for level as you go.

Water the back fill well so that all the dirt settles around and under the reservoir.

After I was certain all the dirt around the tub was well settled, I dug out the dirt around the tub about 2-3” deep about 5-6” around the tub. I filled that in with small rock I bought at Lowe’s.

I did this so that if the reservoir “flooded” there was less chance of dirt and silt back flowing into the reservoir…kind of a “french drain” thing.

As you can see, I created a little “bed within the bed” by using THIS plastic border material …keeps it nice and neat and separated from the mulch. (TIP..buy extra stakes…this kit does not come with enough!)

The next step is the metal grate across the top. I was going to have my son wield me a grate out of rebar but I found this little gate at Lowe’s and decided it would work fine.

Being the “overkill” kinda person I am and knowing this was going to have to support some super heavy rocks, I did attach three pieces of 3/8” rebar to the underside of it just to add a little strength.

I painted the rebar with Rust-oleum protective paint just so it wouldn’t continue to rust and leach down into the reservoir.

Then I lashed them to the gate using zip ties, making sure they would rest on the edge of the reservoir.

I set a square rock in the bottom of the reservoir to set the pump on…that way it wouldn’t suck in any dirt or sludge that settled in the bottom of the reservoir between cleanings. I put the pump in after the grate but before the mesh. (THIS is the pump I used)

After you lay the grate down, but before waterfall rocks, lay chicken wire or some other smaller metal mesh down on top of the grate. This is because you are going to surround the waterfall rocks with smaller decorative rock and you don’t want them falling through the grate.

I used a stainless wire panel I found at Lowes,. (can’t find it online to link). It is a 2x8 panel next to the rebar.

Cut the wire mesh to fit over the metal grate, and cut a small hole in the front so that you can get your hand down into the reservoir. Remember the mesh has sharp edges so give yourself a little room so that you don’t slice up your hand! (yes I learned that lesson the hard way!)

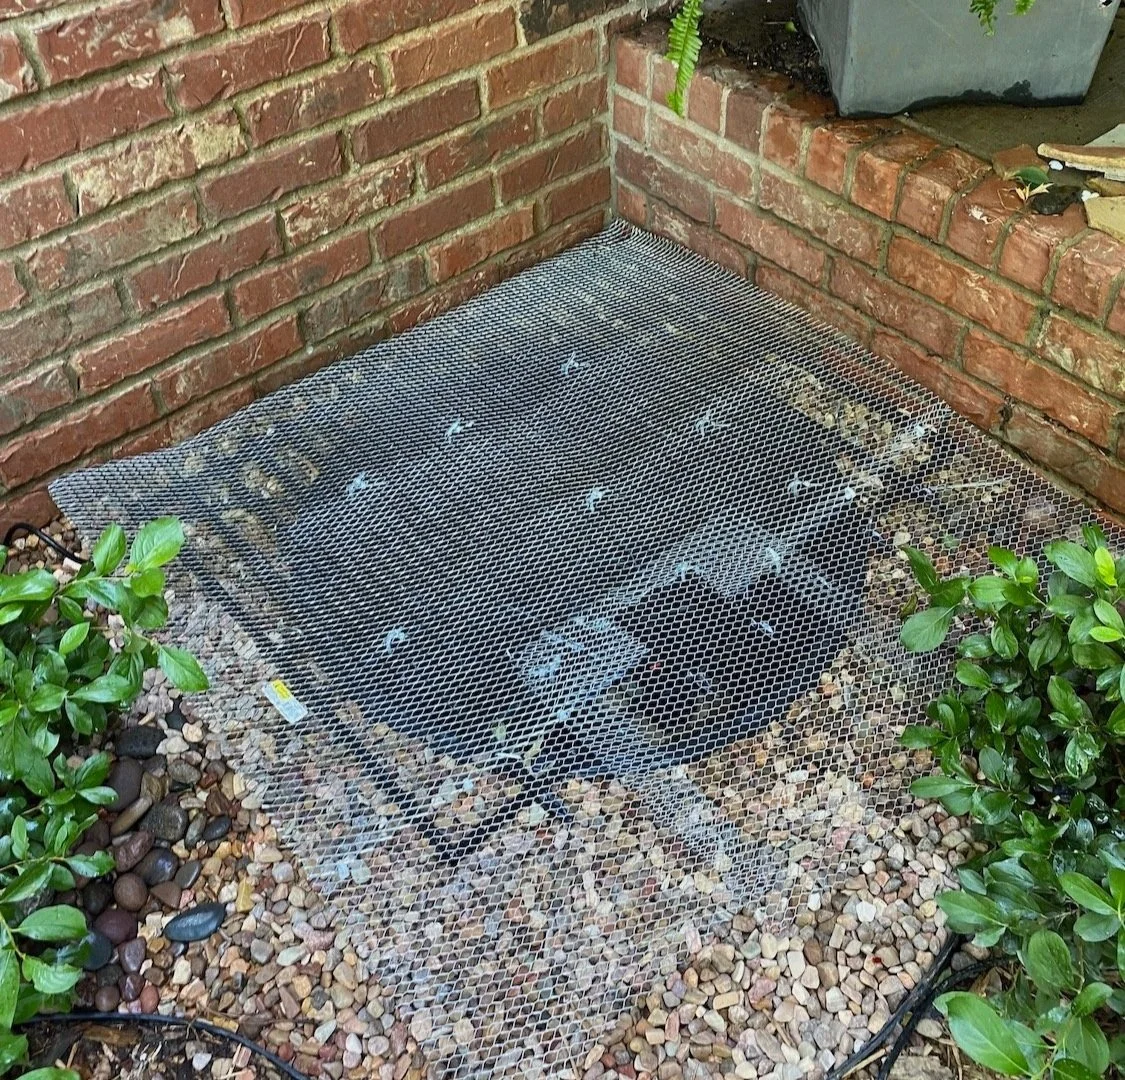
Then just lay a scrap piece of mesh over the hole before you set the waterfall rocks.

If you need to get to the pump, or when you want to clean out the reservoir, you can easily move aside the decorative rock and remove this panel and access everything.

Now the fun part…picking out your “water fall” rock and decorative rocks.

So off to the rock store I went.

Funny story…my daughter called one day and asked what I was doing. Told her I was headed to the rock store. She laughed…what’s a rock store?

A place where they sell rocks!!!! Big, small, gravel, pavers…the whole nine yards.

I picked out three large rocks I thought stacked nicely and would fit within the 26 1/2” diameter of the reservoir and would flow water. I took a picture of them at the rock store so I would know exactly how they stacked…

I picked out the decorative rock that will go around the large waterfall stones, on top of the wire mesh. It took about 10-5 gallon buckets, but I only fill the buckets about 1/2 full so I can actually carry them!!! You can also buy bags of decorative rock…to each his own.

I also picked up 4-5 rock shims that were scattered about…little slivers of flagstone rock that are about 1/4'“ thick…later you will understand their importance.

These larger rocks are super heavy…so make sure you have some muscle to help you load them and set them in place!

Stack the rocks like you want them next to the reservoir. Pour water over the top of the rocks to make sure the water will flow properly. You can make minor adjustments with shims later. It’s important that the water that comes up through the rocks will flow back into the reservoir. I stacked mine so that all the water flowed to the front and sides…again, personal preference.

Time to drill the hole. WOW! What a chore. I used a 12” 1/2” masonry bit to drill down through the top rock drilling far enough to “mark” the second rock. Move the top rock to the side, then drill the second rock and go far enough to “mark” the bottom rock. I drilled the bottom rock after it was moved into place on the grate…that way you drill through the wire mesh where the hose needs to go.

After the holes are drilled, stack the rocks and line up the holes….it is easier to line up the holes by using the 12” drill bit as a guide. Then snake a 1/2” water line that is attached to the pump through the holes and out the top, cutting it about 1/2”above the rock.

Clean out all the rock dust and muck from the reservoir. Just hose it down well and suck out the dirty water with a shop vac….you may have to do that a couple of times. That way it is all nice and clean and ready for fresh water.

This next step is super important.

Fill the reservoir with fresh water, just enough to cover the pump about 2”-3” and turn it on. (Oh yeah, you do need a power supply close by!)

You want to make sure that ALL the water is flowing from the top rock into the reservoir…if it isn’t, make adjustments to your rocks by using the rock shims. You may have to shim the rocks from side to side or back to front to get the water to flow properly.

Watch it for a bit…make sure it does what you want it to do! (For the record, the pump can be adjusted to flow lighter or stronger…read the instructions…I did not)

I did this before I added the decorate rocks…just made it easier to see. I did notice that once I added the decorative rocks that some “splashing” happened…no too worried about it because the reservoir will have to be filled from time to time anyway, so….

One suggestion…only fill the reservoir about 4”-5"” from the top. If you fill it to the top, there will be no where for rain water to go and you are more likely to have “flooding.” Just my thoughts.

Bingo…a relatively simple water feature!

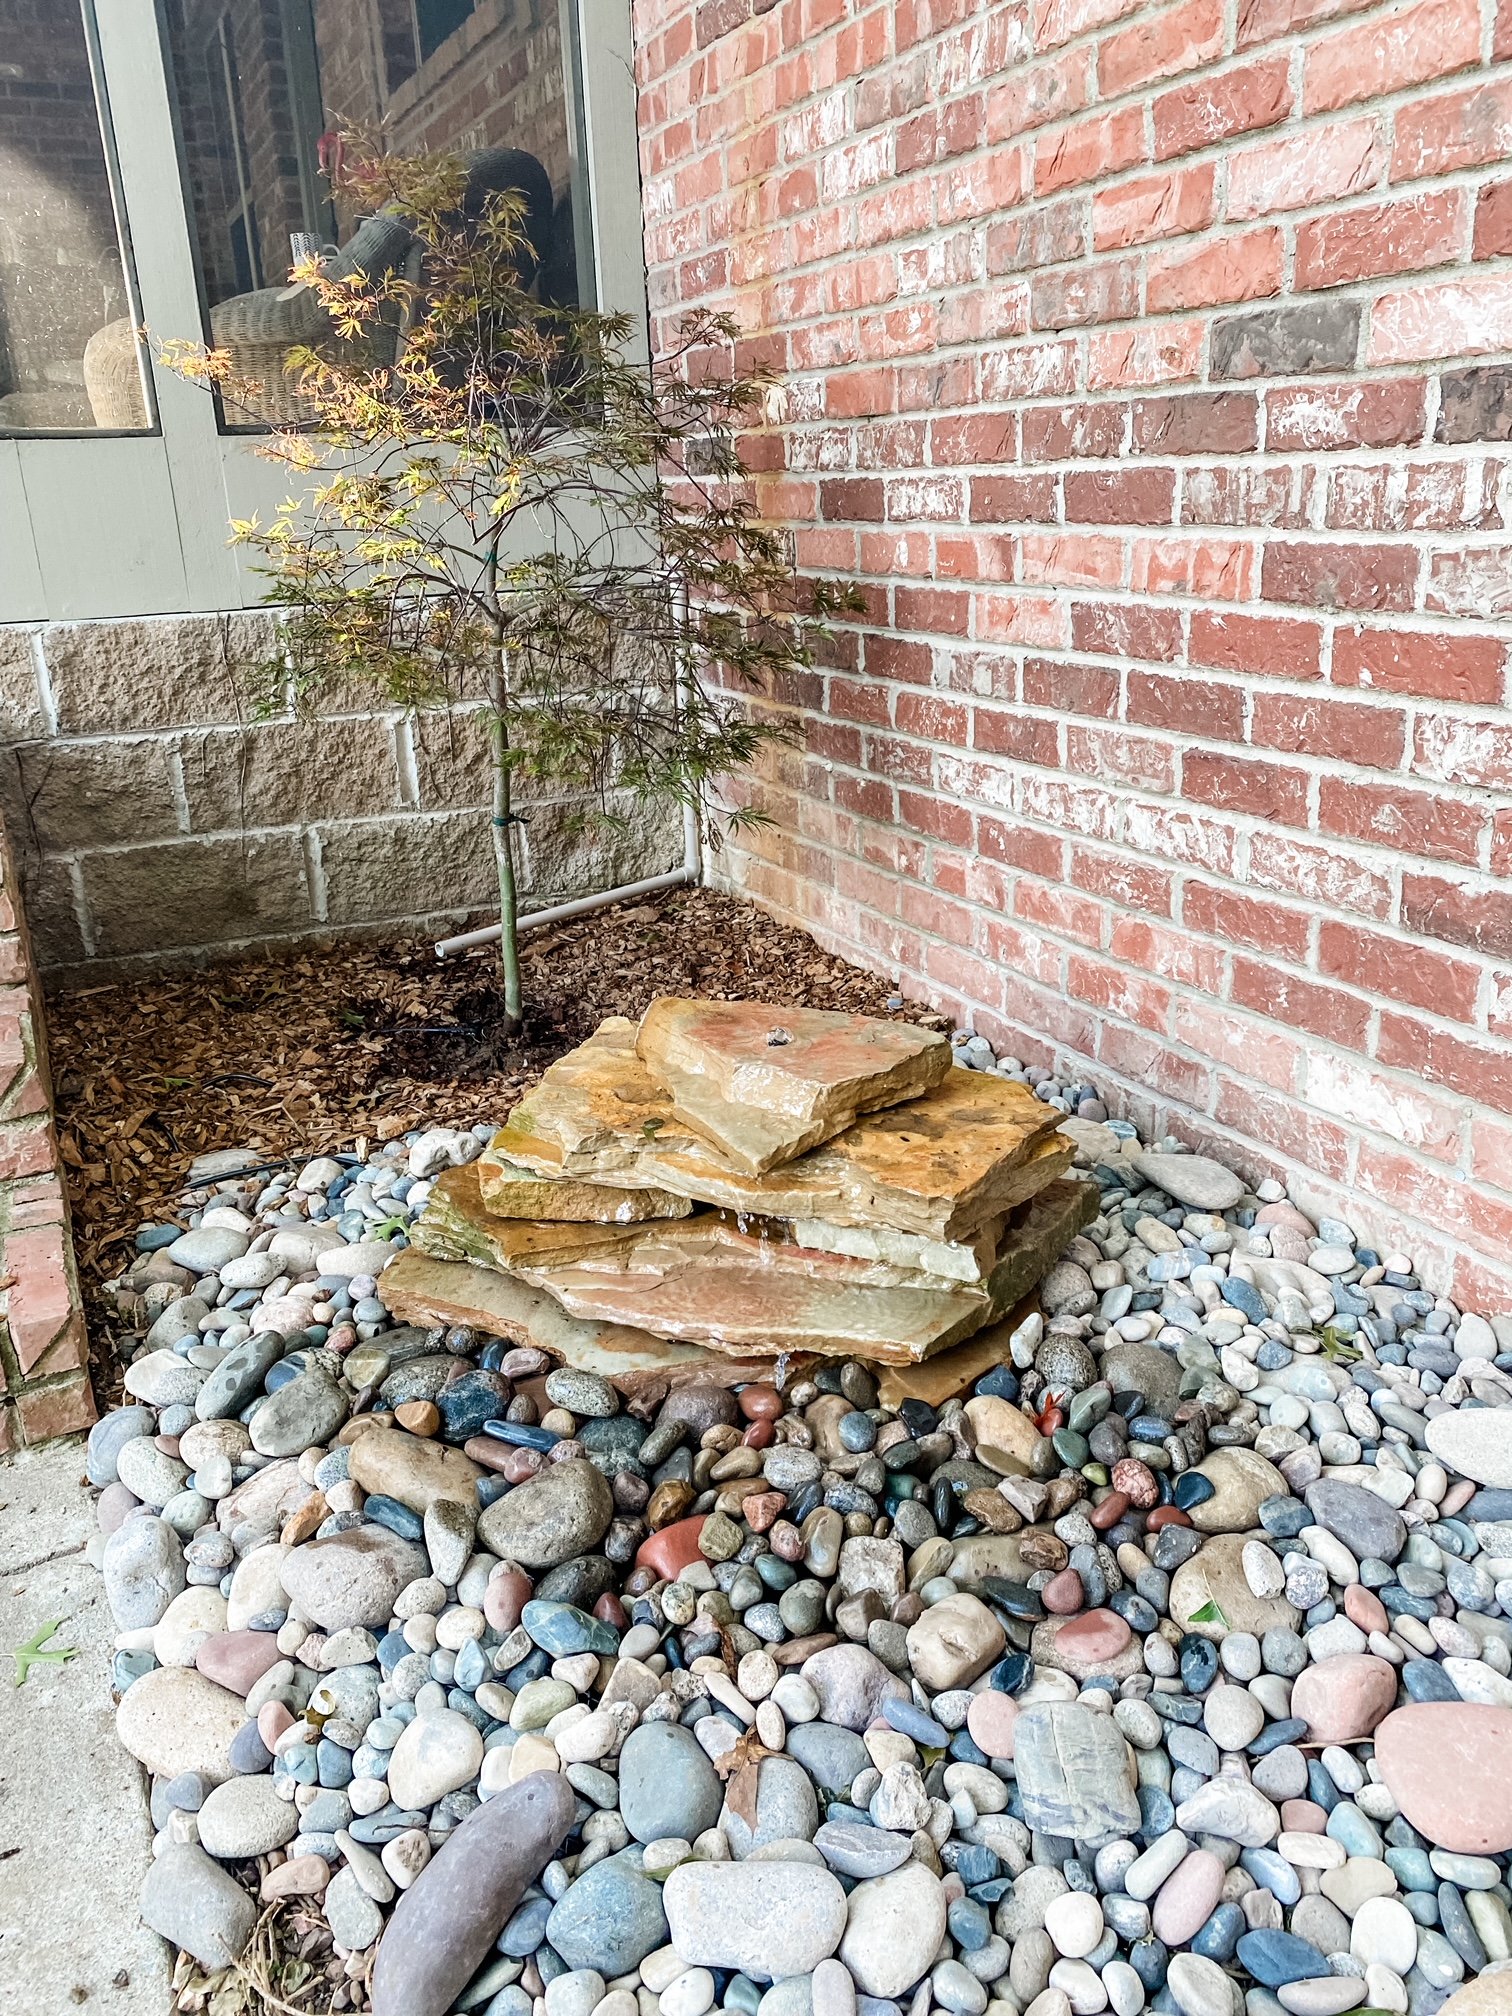
I added one of my Colorado decorative rocks and a piece of driftwood…

I loved this little things so much that Brian and I installed another one just off the screened porch so I could hear it when I am drinking my coffee in the mornings or having dinner on the porch…added a little Dwarf Japanese Maple….LOVE!!!!!

This is NOT a hard project. Yes, it takes some muscle…but it is relatively easy and probably cost me under $300.

Perfect for small areas or in areas where an open pond water feature isn’t feasible!!!

How to build a shop or garden cart...

I’m kinda bad at posting “tutorials.” There are SOOO many tutorials online for just about anything you want to do and my motto is to FIND THE ONE THAT MAKES THE MOST SENSE FOR YOU!!!!

That being said, I am going to TRY to post a tutorial for building a cart…for either your “shop” or maybe a deck or garden cart…or even a little portable kitchen island.

I shared here how I took an old shop cart I bought at an auction and cleaned it up for use as a kitchen island.

The function will dictate the materials you will want to use. If it is something that will be outdoors, you want to use pressure treated wood or even cedar. If it is something that will be in your garage or “shop” you can use plain ole’ pine…if you want something a little fancier, like maybe a kitchen island, you want to find some nicer wood that can be stained and oiled and used in food prep.

In this case, my daughter Katie, wanted something she could put her chop saw and tools on and roll in and out of the house. Kind of like my old shop cart….

…another auction find that I fixed up a tad to use in my garage. It holds my chop saw so when I need to use it I can just wheel it outside so sawdust doesn’t get all over the garage. And the bottom shelf holds many of my tools! Not pretty but super functional!

Since her cart won’t be stored outside, I decided to build the bulk of her cart out of pine 2 x 4s. The tops are 1 x 6 treated decking, but only because it is the perfect sizing…not because I necessarily needed the pressure treated wood.

So my shop cart is my “inspiration.”

The next thing I did was “make a plan.”

Again, whether you are building something simple, refinishing a dresser, or giving a room a makeover, you have to first find your inspiration, then make a plan.

In this case, “the plan” is a simple little drawing with dimensions and a material list.

Originally the plan was based on my cart dimensions…but Katie decided she wanted her’s a tad smaller, 20 x 30, so that altered the dimensions and materials just a tad. I ended up using only 1 of the 2x4x10s and 3 of the 1x6x8s.

Important reminder: a 2 x 4 is actually only 1 1/2 x 3 1/2…2x6 material is actually only 1 1/2 x 5 1/2….only the length is actual. This is important when designing any build so make sure you know what the actual dimensions are of any wood you buy. This chart can be super helpful….

I could have bought 4x4 material to make the “legs” but decided to just “stack” two 2x4s…personal preference. If you decided to use 4x4 material, skip this step and buy 2- 4x4x6 posts and cut them down to 31” each.

The legs will be 31” because I wanted the height of the finished cart to be around 35”. The wheels I used are 3” high and the top is 1” thick.

Again, I used 2 x4s to construct the legs….

I cut 8 pieces 31”, glued (SUPER important to glue ALL joints)….

….stacked, nailed with my new Mother’s Day gift (LOVE!)….

…then screwed them together with 2 1/2” screws.

I nailed them first just to hold them in place…then I added screws.

After each leg was built, I attached the wheels to one end of each using 2” screws!

Next I built the top and shelf “frames.” Since Katie wanted it to be 20” x 30”, I cut 4 boards 29” (the face) and four boards 16”….the 16” boards are the sides. (1 1/2” thickness of each of the face boards = 3”…basically a 19x29 frame allowing 1/2” for overhang on the top)

IMG_6447 copy.jpg

I used my kreg jig to construct the tops….

…if you don’t have a Kreg jig, get one! Or you can just glue and screw the top together.

Then it was time to attach the frames to the legs.

I used screws and glue to attach them and since I wanted the screw holes on the front to be a tad fancier, I used my little “hide the screw” trick.

In this case I used 3/8” wood plugs to cover each screw hole…first I drilled a hole with a 3/8” bit about 1/4” deep, then I used a 1/16” bit to finish drilling all the way through the board.

TIP: Predrilling holes will keep the wood from splitting when you use screws!

I attached the legs to the frames using 3” screws through the “predrilled” holes and glue (GLUE IS IMPORTANT! USE IT!)

On the sides, I just used screws…no fancy holes or plugs!

I added the little plugs…just a dab of glue in the little holds, then popped them in…super simple but a nice detail!

After the frame is constructed it is just a matter of adding the tops…again, I used 1 x 6 pressure treated decking boards. I cut them to fit, glued and nailed. Simple….

I added a little handle made from galvanized pipe and fittings….

You don’t have to add a handle or you can keep it simple by using a cabinet pull…I just like the “industrial” look of the galvanized material….

I also attached a power strip to the back…again, not something you have to do!

Super simple build! Seriously, this is not hard!

That being said, you do want a little chop saw and cordless drill to construct this project (nailer and kreg jig are option!).

But if you took my advice, you have these tools…and now you have a nifty place to store them!


Herringbone dresser top....

I would love to take credit for all my incredibly creative makeovers but truth is I get a lot of inspiration from a lot of sources…Pinterest, other DIY bloggers, and random website.

This time it was my son. He found a really awesome entry bench online and built one for himself!

I shared his entry makeover here.

His girlfriend loved it so much he made her a desk for Christmas!

So when this dresser top turned out super cruddy, I decided to put a herringbone top on it.

The top is a veneer and had some “bubbling.”

I was able to sand the “bubbles” so that the top was smooth, but when I sanded, it took the stain and finish off and the gel stain just wasn’t covering it.

I could have sanded the entire top and removed all the stain and finish…or I could have painted it…. but nah….I kinda wanted an excuse to do something “different.”

Matt was out of town and couldn’t help me so he sent me THIS link…AWESOME tutorial. These girls do a bang up job on the video tutorial…if you love the look, they tell you exactly how to do it!

The top of the dresser hung over the front quite a bit so I decided to use my Kreg rip cut guide to cut down the top a tad.

My daughter got it for me for Christmas and this is the first time I was able to use it…LOVE! I have always used my “yard stick” trick to make straight cuts with my skill saw…this was SOOOO much better!!!

Using the linked tutorial, I started laying out the top. I used white pine 1x4 for the top boards and 1x2 for the edge banding.

Now, this is where I had to deviate a tad from the tutorial. Because I was covering a dresser top and not making a new top that I could flip over to cut down, I had to cut the herringbone boards from the top. If I covered the entire top before the cut, I wasn’t going to be able to “see” the edges of the existing top to know where to make my cut. So I laid all but the corner boards, used my long metal guide to draw my cut marks on all four sides, and then cut those boards first. Then I nailed down the corner pieces, marked them, and cut them.

I used a palm sander to sand all the edges before applying the trim boards around all four sides.

I puttied the holes with wood filler, let that dry, then I sanded the top and sides smooth. Remember, stain will not adhere to glue, so you want to make sure you sand well and remove any glue residue!

After sanding I applied the stain…pine does not take penetrating stain well so I used General Finishes gel stain. There will be tiny gaps between the boards…to get the stain down in between those gaps, I used a small craft brush. I sprayed on a polycrylic finish to seal it!

I had kilzed and sanded the cabinet and the drawer fronts before working on the top. After the stain dried, I painted those a “steel blue.” (Again, don’t ask me the color…it is a mix of blues and black I had on hand!)

I wanted to use the existing hardware but I wasn’t digging the original finish. I primed them with metal primer and painted them flat black…soooo much better and far cheaper than replacing it with new.

Just another “ick” saved from a life of “yuck.”

Again, you don’t have to go all fancy…I could have easily painted the top…but the tutorial on “Shanty-2-Chic” is super easy to follow!

Gel stain tutorial on table makeovers...

I did it again...dove head straight into a project without taking a "before" picture. But at least this time I got an "inbetween" picture!

These little tables were simple makeovers. I picked up the side table at an auction a few weeks ago. Got it for a few dollars because, well, it was nasty, the color is pretty putrid AND the top had come unglued.

No biggy for me. I glued and clamped the top, then I sanded off the old finish on it. Yes, you heard me right, I sanded it. Two reason...first, I got glue on the top when I repaired it and stain will not adhere to glue. Second, it is solid wood and I knew I couldn't do a lot of damage to it. Light sanding...220 grit! Just enough to remove the old finish and glue residue.

I got the drop leaf table from my neighbors. I told you I am the dumping ground for neighborhood furniture...it just "appears." Again, the top is solid so I gave it a light sanding.

I knew I wanted to paint both tables but as always I have to have my fix of stained wood. So I used gel stain on both tops. 

Gel stain is SUPER easy to apply IF you use the right technique and product. As I have said before the ONLY gel stain I will use is General Finishes. It is not a brand the big box improvement stores carry so I usually order mine on Amazon. I have tried other gel stains and have not been happy with the results. The General Finishes brand never disappoints. I have used both the Java and Brown Mahogany colors.

I am going to share how I gel stain...it is a super easy application process and perfect for real wood or even that cheapo fake stuff you find on the ends of cabinets. Since it goes on fairly translucent, the wood grain (real or fake) will show through.

I have used this process on cabinets, tables, dresser tops and drawer fronts....some I have stripped down to bare wood, others I simply applied it over the existing finish.  It is a great process to use on any project where you want "stain" but know you might not get a good result by completely stripping the piece and applying penetrating stain!

First step for ANY makeover (after repairs of course)...give the piece a good cleaning. In this case, since both tops were solid wood, I also gave them a good sanding. Sanding is NOT necessary but you want to make sure that any old finish is stable and somewhat smooth. So if your old finish is flaking or a bit rough, sand it smooth with 220 grit paper.

You will need....

The gel stain...again, I ONLY use General Finishes. A quart will cost you around $30+ but it seriously goes a loooong way!!! If you just have a small project, get a pint. I have found that it doesn't store well.

The gel stain top coat...in this case I used the GF Poly wipe-on top coat. But I have used a spray on Polyurethane and Polycrylic and they work just as well. 

Disposable rubber gloves. I always have those on hand. Just the cheap latex gloves you buy in a box so you can toss when finished.

Old athletic socks. Again, I keep a stash on hand. Any time I find old socks at thrift stores or garage sales I buy them. They are perfect for applying any type of stain or finish and I can toss them when I am finished.

That's it...a relatively short list of supplies!

The trick to applying gel stain is to remember it is suppose to be somewhat "translucent." Put on a rubber glove, then an old sock over the glove...dip you finger tips into the gel stain and wipe the gel stain on the piece with the grain. The first coat will look like crud so don't try to get perfect solid coverage! Just wipe it on LIGHTLY WITH THE GRAIN....do not "glob" it or apply it thick...it is NOT paint. I usually wipe it on, then use the clean side of the sock to give it one final wipe WITH THE GRAIN...working edge to edge. 

THE FIRST COAT WILL LOOK LIKE CRUD!!!! I can not stress this enough...you are better to go light than to try to make the first coat look decent. It is not going to! If you can't see the grain through the coat of stain, it is WAY to thick.

Now, let that dry over night. Then do it again. New glove, new sock. Wipe on a second LIGHT COAT! The second coat will look a tad better, but not great. THAT IS OKAY. Keep it light and translucent! 

Let the second coat dry over night. Then with a new glove and sock, apply the third coat. NOW it should look good. The stain should allow the grain to show through!

If you feel like you have messed up....too thick, too streaky, just don't like it...you can still wash this stain off with mineral spirits if you haven't applied a top coat! 

Let the third coat dry overnight. If you are happy with the look, apply your top coat. Again, I used the GF gel wipe on poly on these tables...super easy to apply. Rubber glove, sock, wipe on. As simple as it sounds. You may want to apply 2-3 coats of the finish...especially on tops or cabinets that get a lot of use...just make sure you wipe it down with 0000 steel wool and tack cloth between coats. You will get a nice smooth finish that way!

Presto, bingo! This really is an easy application IF you don't overthink it and try to get a decent looking finish on the first and second coat...if you do, you will put the gel stain on too thick and I promise you won't be happy with it! My neighbor, Tammy, tried this process on a little side table...and sure enough she put the stain on too thick...it did not turn out well! Each coat should be light and "translucent." 

After I let the top coat dry well for a few days, I painted the rest with chalk paint...a light distressing with 220 grit sand paper and sealed with a spray on polyurethane. Again, sometimes I use polyurethane, sometimes polycrylic. I find that the urethane tends to "yellow" and give the piece a bit of an aged look...which is kind of what I was going for here. The polycrylic is a true clear coat and won't alter the color of the paint or yellow with time.

(As you can see the sun was very bright the day I tried to get decent pictures of these two tables...trust me that was the ONLY day this past week that it wasn't dreary, raining or cold as crud. I even had to cover my hostas this week to protect them from a freeze...and they are predicting another freeze this weekend...grrr!)

My recipe for chalk paint is 5 tablespoons of Plaster of Paris, 3 tablespoons of water, mix well then add two cups of flat latex paint. I usually paint two thin coats, then sand and seal.

Cute as a bugs ear and ready for another generation of use!

This week I decided I am getting too old and tired to paint my own house. I actually hired someone to paint my living room, kitchen and den! Ten years ago I would never have paid someone to do something like that! 

But just the process of getting ready to paint creates a mess and is exhausting!

This, my friends, is the reality of home improvement...normally we bloggers only share the beautifully styled and perfect "after." Truth is, most projects make a mess!

I'm a pretty clean person...or so I thought until I moved things that haven't been moved in years...yuck! 

I'm painting my living areas the same color I used in the master bedroom and guest room....SW Nuance. I'm a little nervous about painting these rooms a different color...I told you, change is hard for me. But I have lived with this color in those two rooms and I THINK I will like it! The painter will be here around 10 so there is no turning back now!

Hopefully the weather will take a turn for the better and I can finish and share a few fun projects I have waiting in the wings next week!

Until then....

More painted furniture projects and how you can get perfect paint results!

I know I share a lot of painted furniture projects. There was a time when I was a "paint snob." If it is wood, no paint.

But I have learned in my resell business that paint is often the best way to "enhance" a piece and give it new life. 

We all have "that piece." The one mom gave us or maybe we bought at a thrift store or garage sale because we needed a dresser or side table. A maple dresser from the 60s or one of those fake wood "cherry" tables from the 80s. We still need it for the storage or even to fill a space and buying new just isn't an option.

As I have said before, life is too short to live with ugly furniture and even the ugliest piece can benefit from a little "makeover" 

Updating an old dresser or bedside table isn't difficult. Yes, Pinterest is filled with precious stenciled and glazed projects...and we all envy. But simple is easy and the impact can be huge.  I have shared hundreds over the years and every week I complete at least 2-3 pieces that often do not get shared...either I forget to take pictures or they sell so fast I think "why bother." 

So today, again, I'm going to share a few simple little projects and how to get the best results.

Mini makeovers that can make a huge impact in any room!

This campaign dresser had seen it's better days....

As you can see, it had been seriously abused. But even the ugliest piece has potential....

Not the best "after" picture, but I didn't think to take a picture before I took it into 410 Vintage so I snapped one with my phone...but you get the idea. (If you haven't been to 410, GO!)

It sold the day I took it in! These "upcycled" dressers are perfect for a bedroom or even a tv and storage cabinet in the living room.

You might have noticed one piece of the hardware was missing. I happened to have one of the pulls from this project so I used the same method to retrofit it. You don't have to do anything that complicated...most home improvement stores have tons of hardware options. All the hardware was solid brass so I cleaned it up with some Brasso, steel wool and elbow grease. The point...the hardware doesn't have to be all matchy-matchy. 

This little bedside table had seen it's better days!

A simple little makeover...paint and new hardware....new life....

This is a typical hard rock maple dresser you can find for next to nothing at thrift stores and garage sales...

Usually sturdy as the day they were built, but seriously ugly and dated!

They obviously can benefit from a little love and attention...nothing fancy just a little paint and hardware update....

An inexpensive little "fake wood" side table......

And AGAIN...

I liked the brass hardware on this one so I just cleaned it up!

Sooooo...what do all these projects have in common. 

KSTP...Kilz (or any good primer!), sand with 220 grit paper, wipe down with a tack cloth and paint.

The two dressers were painted with latex paint using a 4" foam roller and paint brush. I used spray paint on the two little side tables.

So, here are a few TIPS for getting the best results when painting furniture.

1) Always clean the piece of any dirt or debris. Just wipe it down with a damp cloth and make sure you get all the "ick" off! If the piece is super grungy, you might want to clean it with ammonia or wipe it down with mineral spirits! (If it has a lot of flaking paint, you can sand it down a bit or better yet, strip it using this process...just make sure the existing paint or finish is stable!)

2) Make repairs. DO NOT waste your time making it pretty if it needs repairs. And remember, glue and clamps are your friend!!!! If you don't know how to repair something, google it or email me. MOST furniture repairs aren't that difficult...but if you do it wrong (or not at all) you will be wasting your time making it pretty! 

3) Primer....always a must if you are going to paint with spray paint or latex or oil paint. I swear by the oil-based Kilz. If you want your paint to stick and not chip or peel, prime. For smaller projects I use spray Kilz. For larger projects I roll on Kilz with a 4" foam roller. Even if your paint says "all in one paint and primer"...use primer.

4) Sand smooth after the primer has thoroughly dried. A 220 grit paper should do the trick...FEEL the surface...if you can feel it, the paint won't hide it. 

5) Use tack cloth. Most tutorials will tell you to wipe the piece with a damp cloth. That won't cut it! Tack cloth will pick up the finest grains of dust and debris you can't see until you paint the piece! Use it!

6) If you are going to brush on latex or oil, use a quality brush AND TAKE CARE OF IT! I have brushes I have owned for years because I am religious about cleaning them thoroughly after use. And don't even think about using those cheap disposable brushes (chip brushes). They are great for many things, but not for getting a smooth paint finish on furniture!!!! 

7) ALWAYS use an additive....Floetrol for latex, Penetrol for oil based paints. 

8) Use quality paint. Especially spray paint. I know it is cheaper at discount stores but pay the extra few dollars and buy a quality spray paint at your home improvement store. Cheaper will NOT be better if it doesn't hold up to wear and tear! I do 2-3 light coats (spray or brush) rather than trying to get solid coverage with one coat...trust me when I say, there is NO paint on earth that will get good coverage with just one coat!

9) Cure time is important. Seriously, I know they style their pieces on those HGTV shows within hours of painting a piece of furniture. Just don't! Just because the paint feels dry to the touch DOES NOT mean it has cured. Latex...a few days...oil...a week. Give your paint time to cure or it is going to peel or chip if you try to use it right away! Put the piece in place and chill!

10) Spray vs. Brush/roller. For me, it all depends. I have learned that large flat areas are tough to get an even coat of paint on with spray paint...and of course there is the expense factor for large pieces. A dresser can take 2-3 cans of spray paint. So it really depends of the piece. Sometimes I will spray the drawer fronts of a dresser and roll the top and sides. 

11) Keep a little spare paint for chips and dings...if you use latex or oil, just put a few tablespoons in a little container and stick it in the back of the drawer...just in case! If you are using spray paint, keep a can with a little paint. Manufacturer's change paint colors and you might not be able to find that awesome color in the future. Keep spare paint in the house...not the garage or storage shed!

Regardless of whether you spray or roll/brush, you have to follow the first rules of KSTP....Kilz (primer), sand smooth, then tack....then paint!

If you follow these simple guidelines, you can update a dated piece with just a little time and effort. 

Again, life is too short to live with ugly furniture...

How to install a window in an interior door!

I told you...when I am trying to avoid ripping into a MAJOR project, I start little ones.

I haven't had a lot of time to "project" around the house. Between the apartments and the furniture makeovers for the flea market, I've been a bit swamped. But I keep walking into my kitchen with a tape measure and graph paper and that is dangerous!!! 

So I decided to tackle a small project I have been mulling over for some time. I checked Pinterest and there weren't any tutorials for this project so I had to make it up as I went!

I wanted to add a window to my laundry door. It is a small room and while I am RARELY in there with the door shut, I thought it might open up this hallway a bit. And honestly, if I really like it, I may do all the doors. (I painted my interior doors black and shared that project here. It has been over two years and I STILL love them!)

As with many projects, I mull and plan and think and draw. I finally just took the door into the garage and cut a big ole' hole in it with my skill saw and jig saw. Solved the big problem...procrastination. Now I kinda had to do something with it...lol! 

I did make one critical error on this project. I neglected to get an estimate for the reeded glass I had fallen in love with. When I did call (AFTER I cut the hole!) I found out the glass was going to cost me THREE TIMES more than I "guestimated." To the tune of $160. Lesson learned...before you fall in love with an "idea," FIRST make a plan and get estimates! I could have gone with a cheaper decorative glass, but I wanted THIS glass.

Reeded glass!

My interior doors are typical "builder grade" six-panel, hollow core doors. When you cut into them you will find they are exactly what they say they are...hollow. Truth is, the only real wood bracing is around the edges and where the hardware attaches. 

So after cutting a big ole' hole in the door, I had to install wood bracing for my window frame. 

The bracing needed to be 1 1/8" thick to fit between the "skins." If you are familiar with wood cuts, you know that is not a standard cut. I could have stopped in the local door shop and asked for some wood strips to use for bracing around the cutout but I decided to use some wood I had on hand and rip it down to the width I needed.

Therein lies one of the problems I have when DIYing. I don't own a table saw...and never will. My father (who grew up in construction!) had 3 brothers and a brother-in-law...and he was the only one of the 5 who managed to get through his life with all his fingers intact. And someone once told me that if the wood got bound up in the saw, it would kick back and hit you in the face. Now I have never been on the cover of People Magazine's "most beautiful woman" issue, but I kind of like my face. One time I stupidly tried to use a utility knife to cut through vinyl siding...the knife slipped and the blade whacked me square in the nose. At the time my daughter was in diapers so I drove to the ER with a diaper on my face and demanded to see a plastic surgeon. After inspection in the bathroom mirror, I determined that it was a fairly superficial cut (dang, noses can bleed a lot!) and quietly left the ER without ever seeing a doctor (I do still have a scar!)

So I won't use a table saw. When I build cabinets or shelving, I have the awesome guys at Lowe's cut my plywood. But I have found a way to cut fairly straight lines for most projects.

I drilled little holes in a large metal yard stick. I measure for my cut and mark the line on the board, then I secure the yard stick with screws 1 1/2" from the cut line...this basically creates a "guide" to run my skill saw along and allows me to cut a straight line. 

Problem solved! Now if I could just figure out a way to get a flat tire changed since my father is no longer around and my favorite tire shop closed. Thank God I haven't had a flat in 20 years! Cuz I don't do that either!

Anywho, after cutting 1 1/8" bracing strips, I cut four pieces the length I needed for the four sides of the opening. I applied wood glue and slipped the strips between the door "skins." A little trick...set a screw on each end of the board before putting it in the door...that way if it slips to far into the door, you can use the screws to make adjustments. Then just back the screw out when you have finished clamping.

I measured from the inside edge of my strips to the outside edge of the door...all the way around....and adjusted the bracing strip so that I had the same distance from edge to edge.  My cutout was NOT the exact distance from the edges, but the strips need to be since I would be attaching my "frame" to it. I also measured the opening to make sure it was the same width and height all the way around.

After making adjustments to each strip and making sure each was in the proper position, I clamped them and let the glue dry.  

No need for nails...wood glue will do the trick if you let it dry well!

After the glue dried, it was time to add the "inside" framing. Fortunately the width of the strip and the skins combined was 1 1/2". That worked out perfectly for  1/4" x 2 (really 1 1/2") craft board (available at Lowe's) as my frame! 

I measured and cut them with my chop saw. I pre-primed my trim pieces with Kilz and sanded and then I installed them with glue and trim nails. 

Yes, I noticed the bottom frame piece was a tad off...my bad. I ended up "lifting" it, removing the nails and repositioning it so it was flush with the side piece!!! One of the many stupid frustrations of DIYing...the dreaded "oops."

I wanted a very simple and small trim since the real focal point of the entire project is the window! I thought I could use the 1/4" x 2 craft boards but they only came in 3' lengths and the height of the window was over 36". I ended up buying what is called "door stop" material....the piece of trim on the inside jamb of a door that actually stops the door. It is 1 1/2" wide and 1/4" thick and it comes with or without a decorative profile on one edge. I ended buying the one with a little decorative edge, just for a tiny bit of detailing! I trimmed both sides of the opening. (Forgot to take a picture after the trim was placed, but you can see it in the next picture! I secured it with glue and trim nails). 

I found a teeny tiny little decorative trim to use as a "frame" for the window. It's really tiny...1/4 wide. Since my frame is 1 1/2 wide, I marked the center (3/4") and then 1/8" on each side since glass inserts are usually 3/8 to 1/4" thick.

I cut and CAREFULLY glued and tacked the tiny trim on one line. 

I went ahead and caulked everything, puttied the holes, gave it a light sanding and painted it all. I did this so I would only have to tape off and paint one side of the window trim after I got the window set in place! (Mistake alert! I didn't prepaint the backside of the tiny trim I put on last...so you can see the white primer through the window now that it is installed! Paint the backside of your trim before you put it on!)

(Then I had to wait a week because I didn't think about the fact that they might just have to order the glass...which took "3-5 business days." Then I had to wait ANOTHER "3-5 business days" because they ordered the glass wrong...delays are inevitable!)

After the paint dried (and the glass FINALLY came in!) I applied a SMALL bead of silicone caulk all the way around the inside of the tiny trim and set the window in place. The silicone is important because it holds the glass in place and creates a "soft bed" for the glass so it won't rattle around in the frame.  Then I glued and tacked the tiny trim on the other side of the window. (Do this VERY carefully...if you hit the glass with a nail it WILL shatter!)

TA DA!!!! I absolutely LOVE it. The glass (reeded glass...google it!) is absolutely perfect. But it was NOT cheap. 

This is "rain" glass and it is about 1/3 the cost....

...a very pretty glass and a much cheaper option. But it wasn't the look I fell in love with so I paid the price for the glass I wanted. However, the odds of me doing the other doors is slim!

If you are installing glass in a door, I would strongly recommend getting a piece that is "tempered." It is about 4x stronger than "plain" glass and if shattered, it breaks into a bunch of tiny, relatively harmless pieces vs. the super sharp shards of regular glass!

Tempered glass really isn't that much more expensive...especially when you consider the safety factor! 

Also, the glass will be much heavier than the "hollow" door...so this is the time to replace the short hinge screws with longer screws that actually go into the framing of the door. You can buy longer hinge screws, but I just used black sheetrock screws. I will probably change them out next time I make a run to Lowe's. This is important because the weight can cause the door to "drag" or stick on the knob side. For that matter, if you have a door that drags or sticks, try replacing a few of the short hinge screws with longer ones! This door was sticking even before the new glass and using the longer screws worked like a charm! (In the picture above you can actually see where the black paint rubbed off on the door jamb!)

There you have it. A tutorial for dressing up an otherwise boring interior door! There are so many other things you could do with this same process...maybe a chalkboard insert or fabric or even a MUCH less expensive glass! 

You are only limited by your imagination!


Christmas pillows....

One of the great things about the "blogoshere" is all the great inspiration AND motivation!

This past week I was reading one of my favorite blogs, "The Interior Frugalista", and Marie was sharing her snowflake decorative pillows...only she calls them "toss cushions." Gotta love those Canadians...lol!

Anywho, it not only inspired me, it motivated me to do something I seriously dislike doing...sew! 

I have been scavenging down pillow forms. I wanted down forms for the decorative pillows that have poly-fill and a few extras for some holiday pillows!

As I mentioned before I like down forms because they are more comfortable and have a "designer" look! To me they just look "rich" but their price tag can reflect that and it is difficult for me to fork over twenty bucks for something I am going to have to make a cover for and something that is nothing more than a "doo-dad." 

This past week I found 6 awesome down pillow forms, in varying sizes, ALL for under $7...a few for as cheap as $5. Thrift stores and flea markets. Yep...I am buying ugly old designer pillows, removing the cover and sanitizing the forms for reuse! (just toss them in a hot dryer with a dryer sheet!) 

Since I had all these forms piled up, I knew it was time to drag out the old sewing cart and get busy!

TIP: If you have a 18 x 18 pillow form, you may be tempted to cut your cover fabric 19 x 19 to allow for the seams. DON'T. Cut the fabric 18 x 18...your cover will be about 1" smaller than the actual pillow form, but that is what will make them look super "puffy" and "full." I read that once on a designer website (no source, just info stored in the back of my brain!) and I tried it...makes a huge difference! 

I have shared "pillow tutorials" on several posts in the past (you will note I advocated cutting your cover fabric larger back then...again, don't)...you can check them out here, here, here, and here. 

There is no sense in rehashing the "how to." I've provided a tutorial and there are "how to" tutorials all over the internet. Marie does a great job of "tutorialing." (As I have said before, if you can sew a straight stitch, you can sew a decorative pillow...if you can't, now is the time to learn.) 

So I am going to share just to provide inspiration AND motivation and give you a few little tips on where you can find material to make inexpensive holiday covers. 

My first "inspiration"  came from a Pottery Barn knock-off I found on Pinterest....

This little pillow was super simple to make. I used two pillow shams that came with a white bedspread I ordered to put over my down comforter for the winter. I was never going to use them on the bed, so I decided to use the fabric for my decorative pillows. I didn't have enough for the back, so I used the leftover fabric from the tea towel pillows I will share in a bit....

As you can see, I changed things up from the "inspiration" pillow. I used green sparkly felt and rhinestones...both of which you can buy at your local craft store. I cut a bunch of "leaves" from the green felt, and used a bowl to guestimate a circle...

Then it was just a matter of filling in the "wreath" and placing a few rhinestones here and there...basically, I eyeballed it! I used fabric glue on the green leaves and "Jewel It" glue on the rhinestones and let it sit overnight before I constructed the pillow. I used a "premade" silver bias tape for the piping! 

I made this pillow out of tea towels I picked up at Hobby Lobby...

....they were around $4.50 (50% off!) for two!

One set of towels made TWO pillow covers and I used the leftover fabric for the backs of the wreath pillow! I spruced it up a bit by placing a rhinestone in the middle of each of the snowflakes and added a little piping around the edge. The piping is made out of bias tape and you can find a tutorial here on how to make inexpensive decorative piping from bias tape!

I made two pillows with this snowflake cutout table runner and a white table cloth I bought at TJ Maxx. (I would not suggest using inexpensive tablecloths for pillow projects...just seems too "thin" and tends to ravel quite a bit. Lesson learned.)

I centered the runner on the piece of fabric I cut out for the front of the pillow and basted the top and bottom to it with my machine to keep it in place. After I basted it, I used the fabric glue around the edges of the cutout to keep it "flat."

Again, I glued a rhinestone in the middle of each snowflake. I just love "sparkle!"

After making two white snowflake pillows, I had enough of the snowflake cutout to make one more pillow. I picked up a "burnt red" pillow and I kind of liked the color so I deconstructed it, made it a tad smaller so the pillow would be fuller and added the white snowflake cutout material.

I only have one, but I think it will look great in the den where I have more "fall" colors year round!

I also put zippers on all these pillow covers so I can easily remove them and reuse the forms!

I tend to be an "OCD/symmetry" kinda person so I made two of each of the decorative pillows so I will have one for each end of the couch when it is time to decorate for Christmas.

All these pillows are 18 x 18 and honestly, I don't like the three lined up together. I found two smaller pillow forms and plan on making Christmas covers for them and using one with two of the 18" pillows on each end of the sofa...maybe...someday...IF I get a little more motivation in the future! 

While I was making a mess, I decided to make another "floor pillow" for the den. I had two large poly-fill forms (actually they were Euro-pillows with ugly covers!) I bought at an estate sale and I thought they would be perfect to toss around on the den floor for tv watching! I had already made one large toss pillow and two smaller decorative pillows out of some leftover fabric from my dining chair project. 

I used the drop cloth material leftover from this chair project and an iron on graphic from The Graphic Fairy. Since the pillow was fairly large, I decided I wanted the graphic to be bigger so I pulled it up in Adobe Photoshop, enlarged it and then printed it out on four sheets of iron-on transfer paper.  Then it was just a matter of piecing the graphic together and ironing it on the fabric. There was a little "line" where two of the pages didn't quite fit together perfectly...I used a Sharpie to fill it in a tad.

I removed the "Grain" wording on banner in Photoshop and had intended to replace it with "Love Life." But I had a few issues with my printer so I ran out of transfer paper. Since I put zippers on all my pillow covers, I will just remove the cover and iron on the new words when my order of paper comes in. 

I still haven't shared my fall decor. Truthfully, it hasn't changed a whole lot from last year. But I have a few little additions and I thought it would be fun to do an entire post about the fall decor and update my Holiday Decor pictures. After all, Thanksgiving is less than three weeks away and the day after Thanksgiving, it all goes back in the attic! If you see anything that "inspires" you, it will be the PERFECT time to snag fall decor for pennies on the dollar!!! You may have to wait til next year to use it, but it is always fun to find things you forgot you bought last year!

Fall 2014

So this week...I promise! 


I'm Not a Trophy Wife


Swing into spring...

NOW is the time to do this project...too stinking hot in the summer and you will want to enjoy it during the lazy days of summer!​

I have built 5 of these swing pergolas...two at my house, one at my daughter's first home, one at her current home and one for a neighbor.  It is not a difficult project to built but one that requires two sets of hands and a little muscle!  ​And with everything, patience!!!

I have posted a tutorial HERE​.  It is not a terribly difficult project and one I think most DIYers could easily manage.

This is the SUPER sized pergola I built onto my house about 11 years ago...I won't even begin to tell you how it is constructed...but I can promise you, if the house is blown away, it will probably still be standing!  And notice the wisteria canopy...seriously, that stuff is CRAZY!​

Pathetic little shed no more....

Time flies... I didn't understand why my 4-5 year old shed looked so pathetic and was already showing signs of rot in places...then I realized that it was actually 9-10 years old and had never really had a makeover other than adding some little window planters!

I didn't want a "typical" storage building in my backyard.  So when I bought the "kit" at Meek's originally and contracted them to build it, I had them put a higher pitch on the roof and use architectural shingles.  I designed a cute little "cottage" style door for them to build and I also added two inexpensive windows and shutters. Cost a few pennies more, but is much more attractive than your typical storage building!!!  

But now it is time to spruce up the little place.​

I really just wanted to paint the shutters and door black, but as you can see, the door had a few issues....like a serious case of rot!  As did the siding on the side...and I have always wanted to add little "scallops" above the door and paint the hinges black and add cute little lantern style light fixtures...

Even the simplest little projects turn in to complete "rehabs" around here!!!​

But that is when you learn that doing this stuff is not THAT difficult! Sometimes the only thing stopping you from making a change is FEAR of it being too big....how do you eat an elephant...one bite at a time ;)  

How do you start a project....just be willing to take the first bite!!!!

So we begin...I took down the shutters...marked them on the back so I would know where they go (remember...paint fumes cause memory issues...this has nothing to do with age!) Gave them a good little bath and then used good ole' spray paint!  Beautiful!​

I also took all the screws from the shutters and the hinges, stuck them in an old styrofoam lid, and sprayed them with black paint!!  Easy way to paint screws to match!​

​I pre-primed and pre-painted all the trim I was going to be using on the building and door.  I still have to caulk and do paint touchup after it is installed, but it makes that job a little easier!!!

I took the door off and left the hinges attached to the trim on the building...but I have always wanted the hinges black, so I taped them off and sprayed them with black spray paint as well.  The siding on the side of the building had some "rot issues" from years of standing water, so I chipped away the rotted material and put a ​new piece of trim along the bottom of the building to "hide" the rot. (Before you do this, make sure the area is now VERY dry and there are NO termite issues...look for little ant creatures with wings or their little "tracks" in the wood.  If you see ANYTHING that is remotely suspicious, call your termite company!)

On to the fun part....rebuilding the door.  Unfortunately, I was so focused I didn't take pictures along the way.  But I basically used the old door as a "pattern."  Any time you need to replace or rebuild, examine closely what is there....what materials were used...how is it put together.  Fortunately, this door was a pretty easy read for me...so I bought the materials, measured, cut, glued and nailed.  And presto...I have a new door.​

After cutting the door out of the wood siding material, I had enough left over to make the little scallop things I wanted to put above the door.  This took a little creativity, but I had made a scallop fascia for a little cabinet I made for my daughter years ago, so I pretty much knew how to make it.  I took 6" strips of the leftover wood siding material, used a coffee can to mark the scallops and then cut them out with a jig saw!  I then installed them on the little building by overlapping one row on top of the other and painted them!   No biggy!​

I added some little lantern style fixtures! (they don't REALLY work....there is no electricity in the building...but they are kinda cute! But I think I need bigger ones) 

I still need to repaint the little porch railings...and I can't wait to get the planting done in the beds...but all in do time! ​

For now, the MAJOR work is done! And my little garden shed has new life!

This may seem like a HUGE and daunting task for a novice DIYer.  But seriously, if I can do this YOU CAN DO IT!  Before you can complete any rehab or makeover, you just have to START IT!  Take it slowly and examine what is already there...but conquer your fear and start!​

My father did not teach me to rebuild a storage building door.  He didn't teach me to make scallop siding...he didn't teach me to tile or sheetrock or install hardwood on my stairs.  He taught me to DO....to think...to look at something you want to change and figure out what you have to do to change it!  ​Really if you think about it, DIYing is kind of like life...if you don't like something change it...but you have to be willing to take the first bite! And honestly, if you get stuck, you have to be willing to ask for help when the going gets tough....but never quit or give up!

We are soooo fortunate to have the internet...you can Google just about anything and find a ton of places that will tell you how to do just about anything!  They may differ in some respects, but that is where you have decide what you are comfortable doing....and what makes sense for the project you want to complete!  ​

Dad didn't have internet...he just had a lifetime of experience and knowledge...I get very sad when I think of all he took with him.  I am grateful for the knowledge he gave me...but more than anything I am grateful for the confidence he gave me to start any project and figure it out!  ​

If I can give you just a "smidge" of that confidence, you will have received a tremendous gift!​

Window sills....

I've been working hard the last few days on my little garden shed...want to paint the shutters, but if I paint the shutters, I have to paint the door, but the door is rotten so it needs to be rebuilt, and while I'm doing that I might as well...blah, blah, blah.  NEVER ending.  But I'm almost done and I will share soon!​

In the mean time, I wanted to share a SIMPLE project... 

Marble window sills (or any solid surface material for that matter!)  Have you ever noticed the nasty black crud (i.e. mildew) on your window sills...or how the paint flakes and chips, especially after they get rained on a time or two.​​

IMG_8707.JPG

Easy solution!!!​ Cultured marble window sills.  Such an easy, inexpensive solution.  Now honestly, if you had to do them ALL at once, it would be a tad expensive.  But start with one or two...maybe the few that get left open the most in the spring (oops!) and over time replace all your sills with marble. I usually pay around $25 per sill.

It really is simple!  Take a VERY sharp utility knife and carefully "score" (cut through) all the caulk around the existing sill.  Basically between the existing window sill and the window, wall and trim.  ​Then take a flat tool (a chisel, flat screw driver, metal putty knife) and use a hammer to tap it between the sill and the trim under the sill.  Your objective is to lift the sill up...so however you can do that carefully....it doesn't matter if you scar up the sill, but you don't want to make too big a mess of the wall or trim.  Once you have the sill off take it to a culture marble manufacturer (easy to find in your phone book) and they can use it as a template for your new marble sill.  I usually get "white on white"...will match any white trim color.

If you are going to do more than one, make sure you number or somehow label your pieces so you will know what goes where!  You may THINK all your windows are 3' wide...trust me, there is a good chance there is a hair difference!​

IMG_8708.JPG
IMG_8709.JPG

To install your new marble sill, first "dry fit" it to make sure it fits properly!  You can make minor adjustments with sandpaper and even a skill/jig/tile saw IF you know what you are doing and feel comfortable doing so (cultured marble is NOT difficult to cut) If you can't make the adjustments yourself, mark where the cuts need to be on the marble with a permanent marker and take it back to the marble shop.

You will probably have a small gap (1/8" +/-)  all the way around...that's okay, you will fill that in with caulk.  If it fits properly,  just put a good thick "squiggly" of silicone caulk on the framing board the sill will sit on, install the sill and press firmly.   (If there is a gap between the actual window and "framing sill" you will want to run a nice heavy bead of silicone caulk to prevent air from getting in.  If the gap between the window and framing sill is BIG, you might consider stuffing it with insulation before installing your new sill!)

Now, here is the tricky part...you really should use silicone caulk to fill the gaps...and that stuff is NOT for the novice.  A 100% silicone will not clean up with water AND most are not paintable.  So if you are not a GREAT caulker, I would suggest using a "painter's caulk."  Easy clean up and you don't have to worry about it if it gets on the wall or trim...because it will hold paint.

IMG_8617.JPG

Remember my instructions about caulk...cut the tip small and at a 45 degree angle, with a very sharp razor blade.  When you caulk a gap, squeeze the gun trigger gently and keep it moving along the gap.  The deeper and wider the gap, the slower you will want to move the gun....the narrower or shallower the gap, the faster.  Again, it is a learned art....practice does make perfect.  But caulking is a necessity with MOST DIY projects!!!​

If you are really afraid you are going to make a big mess, take the time to tape off the area...run masking/paint tape along both sides of the "gap"...caulk...wipe with your finger...immediately pull up tape!!!  If you are going to attempt using silicone caulk, I would highly recommend doing this!!!  Keep mineral spirits handy for clean up!​

After you run a bead of caulk, take your finger and run it along the caulk/gap.  You want a nice, smooth "line."​

Caulk between the sill and the window/wall/trim...all the way around.​ If you are using painter's caulk, it will easily clean up with water...silicone caulk cleans up with mineral spirits. 

The entire process really isn't that difficult...and in the end you have a beautiful window sill that will never rot or chip, is super easy to clean and is very forgiving when you leave the window open during a thunderstorm!  

​BTW, if you are having a new solid surface installed in your kitchen or bathrooms I would highly recommend having the installer cut and install a new sill for any windows from the solid surface you are using...I had my granite installer cut a window sill for my kitchen window!  Looks beautiful and no more worries when I forget to shut the window before it rains!