Reupholstering the new living room chair...

I have said it before and I'll say it again...if you ever complain about the cost of reupholstering a piece of furniture, give it a shot! 

Trust me, you will never complain again...and there is a good chance you will just buy new! 

I spent over $200 just for the fabric for this chair!

It's not really "my style" but I wanted to use it to replace the big hulking brown leather chair in the living room and this one was a "freebie"...for obvious reasons. It had to be big enough for Cleo because that is "her chair." 

Perfect fit.

And honestly, with a down cushion and deep seat, it is super comfy! Not that I would have sat in it before it was completely stripped and covered with new batting...but it LOOKED comfy!

There are THOUSANDS of tutorials on line for reupholstering just about any style of chair so I am not going to do a blow by blow tutorial on how I reupholstered this one. Your best bet is to find a tutorial for a chair similar to the one you are going to do. Besides, it took me a day to strip it and removed 2,453,692 staples, a day to sew the cushion cover and all the piping, and another day to upholster the main frame....my hands were in no shape to hold a camera!

My advice...buy a new chair! HOWEVER, if you insist on reupholstering a chair, find a good tutorial and settle in for some serious work!

I do love how this one turned out. I really want to infuse some "lighter-brighter" furniture so I went with the teal/cream print. I like the texture of the fabric and I think it will be very durable which is important since Cleo immediately reclaimed her spot! 

Naturally the new chair means I will have to buy a new rug, but since Katie wants to take the existing rug to her new condo this summer, I have a valid excuse to buy a new one! 

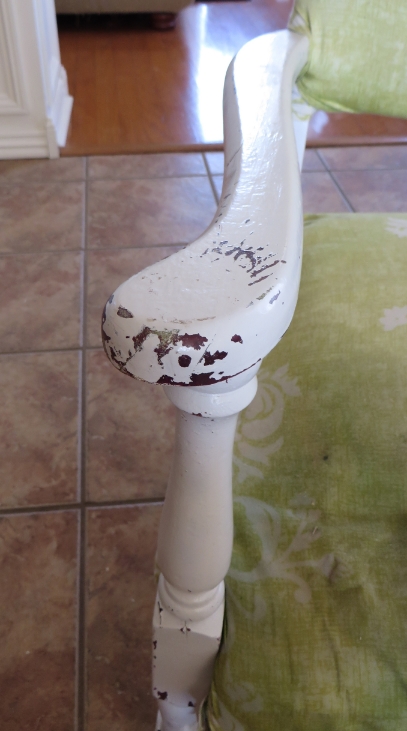
My next upholster project is this little MCM chair in my den....

Seriously, if I hadn't already purchased the fabric, I might have just said to heck with it and wait for the mauve and pale blue to come back in style. Or just buy a new one! But I adore this chair so when my hands regain their feeling, I'll move on to this project!

The weather has been pretty amazing so I have managed to finish up quite a few little projects, in spite of the fact I can barely grip a paintbrush, so I'll share a few in the coming weeks! 

Simple makeovers for the worst offenders...the KSTP treatment!

There is NO excuse for ugly furniture. With warmer weather just around the corner, it is time to start looking at your furniture with a critical eye and making a list of pieces that CAN be changed with just a little bit of work!

We all have it...those "cheapo" pieces of furniture that are, at the very least, offensive! Maybe they were given to you, maybe you bought them at a "discount" store...maybe you bought it at the thrift store to fill space in a room.

Pressed board construction, laminate tops, dated finishes, pieces you put together with a little allen wrench thingy that came with the worthless little "screws" that promptly strip out and leave the piece wobbly and worthless!

It's ugly and cheap, but seriously who has the money to buy "real wood" furniture when you are struggling from pay check to pay check and having to buy shoes for a kid whose feet seem to grow a size every month.

I get it...I've been there. Fortunately I have learned to shop resale and auctions for "quality" pieces...and even if they need a little TLC, I have the tools, knowledge and time. But not everyone has that...or the money to buy and refinish high quality pieces.

That is why I advocate the KSTP treatment. Let me explain....

First, before you even get to the KSTP treatment, ALWAYS give the piece a good cleaning. On the nastiest, I use ammonia water but some can just be wiped down with a little water and mild detergent. Whatever you need to do to get the gunk off the piece! If it is "stuck" on just scrape it off with a razor! No matter if you scratch the finish...you are going to paint it!

Second, make any and all repairs that need to be made...and if you don't know how to repair it properly, google it! 

Okay, now the KSTP treatment....

K- Kilz (my favorite primer but any QUALITY PRIMER will do! That is why this is the KSTP treatment and not the PSTP treatment!)

For smaller pieces I use a spray can only because it is easy and gives me a nice smooth finish. On larger pieces I use a brush and 4" foam roller! TIP! Always shake the can longer than the directions recommend. Kilz will spray on with a "grainy texture" if you don't shake the can well! No biggy since you are going to sand anyway, but just makes it a little easier! Also, pay attention to the temperature recommendations...it matters!

Many paints SAY they are a "primer and paint in one." Sorry, I am old school....I ALWAYS prime and I personally recommend it. If you want a superior finish that will hold up to use and abuse, prime! 

S-Sand. A 220 grit paper will usually smooth out the piece after it is primed. I wrap a piece around a sanding sponge block!

If you have "ornate" legs or detailing, use 000-0000 steel wool.

USE YOUR HANDS, not your eyes. Feel the piece.

Trust me, if it isn't smooth, it WILL show after you paint it! Sand it until it is smooth to the touch! If you cleaned the piece well, scraped off all the gunk, this step really should only take a few minutes.

T- Tack cloth. A MUST after you sand but before you paint (or apply any finish). Blow or brush off as much as you can, then use a tack cloth!

You can purchase it at your favorite home improvement store...usually in packages of 2 and relatively inexpensive (around $2)! You can wipe a piece down all day with a clean cloth, but you WILL leave "stuff" on the piece if you don't tack cloth it. Tack cloth will remove EVERYTHING. If you still feel "stuff," hit it with the sand paper again and then tack cloth again! 

P-Paint. This is where people usually freak out. My favorite for wood or laminate furniture is oil-based but it can be a tricky paint to work with for a novice and difficult to clean up. Fortunately latex paints have come a long way and are much more durable these days! QUALITY spray paint is probably your best bet for smaller pieces. I say quality because you can buy spray paint a tad cheaper at discount stores, but I am not a huge fan of cheap paint for ANY project! I usually buy Valspar or Rust-oleum from Lowe's.

On smaller pieces of furniture the difference will only be a few dollars but will be worth it in the long run. 

Each of the brands come in LOTS of great colors...just find the color you love! I have found very little difference between the two brands...the Valspar tends to dry a tad quicker....but both are quality paints! ALWAYS shake the cans well and follow the directions on the can!!! 

I have followed every tip in the book to get rid of the occasional "striping" on large, flat surfaces...like dresser tops or table tops. It doesn't seem to matter how I spray, what the temperature is or how hard the wind is blowing...sometimes I get stripes.

My solution has been to purchase the little "sample pots" of paint custom mixed to match the spray paint I am using and roll it on the large flat surfaces with a 4" foam roller! 

Penetrol and Floetrol are a MUST any time you roll or brush on paint...oil or latex!

Use it. It will eliminate the brush and roller marks and give you a MUCH smoother finish! 

These are just a VERY few projects using the KSTP treatment (I have done hundreds!)....world of difference for a little bit of work! I am working on a piece right now that is in the S stage...primed and sanded but now I need to figure out what color I want to paint it...soon!


Even light fixtures and paddle fans can be spray painted!!! On metal pieces and furniture hardware, I use metal primer primarily for the "rust retardant" factor!

One last important TIP when using ANY technique to paint anything....ALWAYS give the piece time to cure before you put it to work! 

I was always skeptical of those "two day" makeovers they did on tv where they would paint something and then "stage" the pieces with all kinds of stuff within hours of putting a final coat on. (Kind of like getting your nails painted at the salon...even though you dry them for 10 minutes, you are still going to ding them if you dig in your purse for your keys! Unless you get gel polish...awesome stuff!) Trust me, that is the fasted way to ruin a finish! Don't do it...be patient and give the paint time to harden (cure) before you set a lamp on it or try to hang the fixture (trust me...I have had to repaint many pieces because of impatience!) 

One dated, nasty, cheapo piece of furniture can ruin an entire room. Toss it or paint it! YOU CAN DO IT!

*I have not been compensated for pimping these products! These are the products I use and work for me!!!*

Dining room table makeover and my recent angst!!!!

Choosing fabric for a piece for "resale" is a tad easier for me than when I have to make a decision for my own home! It is still a struggle, but not nearly as difficult as choosing a fabric for myself.

Primarily because I know how much work goes into reupholstering a piece and I know if I go too "trendy" I will end up having to redo it in a few years. It is one reason I "stay safe" with bigger pieces like couches and chairs...then I use throw pillows, blankets and rugs to pull in the "in" colors. Those things are easy to change...and I don't cringe too much if I have to donate a $15 pillow vs. a $2000 couch! 

Example...I bought this ugly table and chair set at an auction....

In this condition, not appealing in the LEAST and not fit for any space...very dark and dated! But this is the kind of thing I know I can work a little "DIY magic" and make it perfect for another lifetime of use!

Not that I don't struggle with deciding paint colors and fabric for these pieces...this one sat for a while. I knew I would have to paint the top...it is laminate so it couldn't be "refinished." The legs on the table and the chairs are solid wood and in halfway decent shape but the vinyl brown seats had seen better days....that had to go!

I chalkpainted and distressed the table legs, primed and painted the top a flat black and painted the chairs a "steel blue." I found an awesome black/grey tweed upholstery fabric for the seats.

I saw several tables on Pinterest with this upholstery nailhead detailing and knew immediately I wanted to do it when I found the perfect table...and this table is perfect!

That little detail really makes all the difference, was relatively inexpensive (about .50 each!) and was not difficult. I just measured and marked where I wanted each nailhead to go, drilled a tiny hole, then hammered them into place! Cute as a bug's ear!

Obviously someone else thought it was cute as a bug's ear...it sold the day after we took it to 410 Vintage.

Which brings me to my recent angst! Chairs for my own home!!! 

When I remodel my den last year, I knew I wanted to add a teal club chair. I bought this little MCM style chair a year ago and it has sat in my den since, waiting on time and inspiration! It is the perfect size and style for this space, but of course the upholstery is all wrong!

I finally went to the fabric store last week and pulled a bunch of fabric samples that caught my eye. I THINK I have decided I like this teal tweed fabric. This fabric works well with the style of the chair and is pretty much the color I was leaning towards.

I found this chair just last week and I THINK I want to use it to replace my big fat leather chair in the living room!

It is a tad more "traditional" than what I really like but that is okay...again, that is the great thing about having a mosh-pot of styles...or "eclectic" as they say!

One of the reasons I want to replace this chair is because it has become "the dog's chair." In other words, Cleo has claimed it as her own. She sleeps in it, sits in it and jumps on it when anyone comes to visit her (and EVERYONE is coming to visit HER!) As a result, it is in pretty bad shape.

So naturally, she has to check out the new chair to make sure it is comfortable FOR HER!

Not nearly as roomy as the leather chair, but she looks pretty comfy!

Again, fabric samples and nail biting choices....

I kinda sorta like the idea of doing a "two fabric" design. The grey geo on the sides and back, and the black for the cushion. But then again, I worry about being "trendy" with something that is going to require a lot of time and work, so I am leaning towards the simple, one fabric choice in blue. 

What to do, what to do. For now I am taking my own advise. Looking to Pinterest and Google search for "inspiration."  Looking for chair upholstery I LOVE that will work with this style and in my space! 

It is the ONLY way I know how to make a decision and know it will be one I will be happy with for many years. 

June 2015...and MORE chairs!

June 2015 will go down as an eventual month for me. 

For the first time in 34 years, I have no minor children. Katie turned 18 this week and it is official...ALL my children are old enough to vote, be drafted and be sentenced to an adult correctional facility.

We finally had to put our wonderful lab, Ginger, to sleep. She was 13. It was time but that didn't make it any easier. This is the second precious pet we have lost this year. Heart breaking.

Ginger and Cleo....Christmas 2014

And for the first time in years I really felt the sting of Father's Day. My dad has been gone for 20 years but this year was, for some reason, tougher than normal. He died exactly one week before Father's Day so this time of the year is always kind of a "double whammy."

Then there is the accidental "new member" of the family....and may explain some weird typos in my posts. 

I keep a trailer at my apartments for abandoned furniture. A mama cat set up household in the furniture with her 4 babies. A few weeks ago, we THOUGHT we made sure all the kitties were off the trailer before we took it to the dump....only to find two of them still on the trailer when we got there. I managed to grab one and throw it in the truck, but the other ran under the truck. We spent 30 minutes crawling around on the nasty red clay/garbage ground trying to get that stupid kitten, only to have it bolt. Gone. I was heart broken. But to make matters worse, I could not find the other kitten ANYWHERE in my truck. Both Matt and Katie helped me darn near dismantle the interior of the truck...it was not there. I left the windows down the entire day and even put out some food just in case. 

THREE VERY HOT DAYS LATER I went to the truck in the evening...and there was that silly kitten sitting on the back of the seat. It had been in a hot truck, with no food or water, for THREE DAYS! I couldn't believe it survived and neither could the vet.

Soooooo....we have a new "miracle kitty." And being the softy that I am, I can't bring myself to take it to the shelter. Especially with all the guilt I feel for losing her sibling and in spite of my puffy, itchy eyes.

Yes, she is a she. About 8 weeks, according  to the vet, but if that is the case, she is a tiny kitty.

Cleo thinks it is hers and tries desperately to carry it around in her mouth...which means the poor kitten is constantly soaked in dog slobber. It is pathetic, but she tolerates it for some reason. And typing on the computer is like a game to her...hence the typos. She's a funny kitty! 

We haven't named her yet...I keep hoping someone will want her and take her so I will quit itching and sneezing. Why bother...if the three other cats haven't killed me by now, this little half pint won't either! I like Mimi...Katie does not. Mitchell suggested Kitty, but we have a Ms. Kitty because she was another "rescue" that was only suppose to be here until I had time to take her to the shelter...around 9 years ago. So he suggested Little Kitty...so maybe "Litty."

ANYWHO!!!!! When I am having "emotional turmoil" my tolerance for some things is darn near nil. So when I went up to my booth last week, I was annoyed by a few things that have been sitting in there for MONTHS...specifically two chairs. So I threw them in the back of the truck, brought them home and gave them a quick makeover! 

The first is a little folding chair I chalk painted eons ago...I had two and sold one, but this one has hung around far too long. I gave it a little KSTP (Kilz/sand/tack/paint) treatment with white spray paint...then I covered the seat with some leftover fabric from this chair makeover!

The other is a walnut mid-century chair. It is really difficult for me to paint over walnut...but the chair has been in my booth for months as is, and if I am going to sell it, I have to give it a little "pow treatment." Again, a KSTP treatment and new upholstery...someone is going to love it!

I know I make these little chair makeovers sound easy. And usually they are! Chairs are one of the easiest pieces of furniture to "update"...especially ones that just need a little paint and fabric on the seat.

But OCCASIONALLY I bring home a real kicker. One I KNOW is going to take a LOT of time and attention! This chair is a prime example!

I know...it is a HOT MESS!!! I have NO doubt that several people at the auction where thinking "What the heck?" (Including Brian...but again, I think he now trusts my judgment!) But I was so excited I couldn't stand it! 

I was pretty sure, from a quick inspection on a broken piece (that was there, thank God!), that it was most likely mahogany. At this point, after just a tiny bit of research, I THINK it is a Victorian Eastlake arm chair. But I honestly don't know because so far I haven't found anything just like it...only similar. Castors on the front legs and not on the back and hand carvings and stamps on the wood.

And of course the BILLIONS of little nails that were used for the upholstery! ALL of which had to be removed!

I knew the finish was masking some beautiful wood so I couldn't wait to start stripping it! In this picture you can see where I applied the stripper (used in this tutorial) on the left....

Here is the "before" and "after" of the side...

The intricate carvings require some real work, but as I have said before, the very best tool for stripping old finish out of carvings and corners is a good ole' toothbrush! I still have a lot of stripping and scrubbing to do but after two afternoons, I have all 100,398,365,003 nails out and a tiny bit of the frame stripped! 

The fabric is in such bad shape, I honestly don't know what it is...and I wonder if it didn't originally have another fabric on it since there are SOOO many nail holes. Many of the Victorian chairs I have seen have a velvet fabric....what to do, what to do!

My point...not all chairs are easy...some require a little more time and attention. I am going to take my time with this one and there is a good chance I won't sell it. At least not until the next little treasure comes along!

A few simple chair makeovers!

I usually have several chairs piled in my garage waiting on a makeover. The reason they get "piled" is because most require, at the very least, a smidge of sewing. My LEAST favorite thing to do! (Okay, root canals are pretty bad, but at least they give you drugs!) I usually wait until I have 2-3 projects that need sewing before I drag out the sewing table and get it all done at once! 

Right now I still have two of the mid century dining chairs waiting to be refinished...no sewing needed, but they are small and tend to get pushed aside...time and again.

And honestly, I had intended to refinish these and keep them but that plan didn't work out so I refinished and sold two of them! 

I have a mid century lounge chair I desperately want to refinish and reupholstery, but I bought it to keep so I have no doubt the selection of an appropriate upholstery will take months!

I did manage to get two chairs finished over the last few weeks.

The first is a simple little maple chair I picked up at Salvation Army.

A "tired and tattered" little thing to say the least. 

I decided to go simple...a little chalk paint and distress on the frame (followed by a coat of poly to seal it) and drop cloth for the seat. This is the first time I have used gimp for trim, but it turned out nice. I just hot glued it over the gathered skirt. 

I didn't even bother to make a back cushion...I like the look of the wood slats!

This cain chair was a tad more complex. Naturally I completely forgot to take a "before" picture until I had already started deconstructing it! But I have no doubt you have run across them in thrift stores and garage sales...a dime a dozen and pretty much what they are worth in their current state! The real gem is finding one with all the caning in tact!

I really was at a loss as to what to do with this chair...until my daughter suggested I do it in blue and gold! Actually, she suggested teal, but I found this blue and white material I really loved! She was right about the gold...it is all the "rage" right now and becoming very popular!

After removing the seat and all the upholstery, I primed the entire chair with Kilz, sanded and wiped it down with tack cloth. Then I sprayed it with white spray paint! After that had cured well, I taped off the legs and sprayed them with metallic gold spray paint. I wasn't sure whether I wanted to keep the tufting on the back but I sprayed the buttons and reused them. They didn't really turn out "gold" like I had hoped...more a "brownish" color, but honestly, close enough. I used metallic gold bias tape to make the piping and the double welting (Here is a tutorial on making piping out of bias tape!) A simple little process, but again, it does require hauling out the sewing machine (ick!) 

Again, I could provide a step by step tutorial on "reupholstering" these simple little chairs, but there are dozens of tutorials on line (including video tutorials) that are ten times better than anything I can do. And every chair is different, so find a tutorial that makes sense to you AND has a chair similar to what you have! This is the very first chair I ever tackled. Knowing what I know now, I can do better. I can honestly say that I learn something new every time I tackle a project like this and regardless of the little imperfections here and there, they always end up WAY better than what I started with!

I tend to be a tad on the OCD side when it comes to projects...but I have learned that nothing is ever going to be perfect! And again, as my very wise Daddy use to say "You'll never notice it on a passing train!"

Which reminds me...Happy Father's Day Daddy! It has been twenty years (this month), but some days it seems like we just talked yesterday. I wish you were here to see all the things I have learned to do. All because you taught me that working with my hands (and my head) and making something out of nothing really can be rewarding! I know you would be proud! Thank you.... and I miss you! 

Happy Father's Day to all the great men out there who are blessed with kiddos!!! Be the man you want your son to be and be the man you want your daughter to marry ;) 

When the mouse is away...

This has been a week of MAJOR work so I will have lots of goodies to share. I had tons of projects piled up in my garage. I even skipped a potentially awesome auction this weekend because I knew I did not need to haul anything else home until I cleared out some projects.  Even though I know I put a huge dent in it, there is still so much to do.

Saturday and Sunday I painted outside. Brian (affectionately, the mouse) went out of town Monday so I rolled out my handy-dandy "sewing cart" and went to work on a few sewing projects! Seriously, I LOVE this sewing cart!!!!

I know it looks fairly organized in the picture, but truth is I had stuff strung all over the dining and living rooms for three days...compressor, staple gun and staples, fabric, piping, pillow stuffing, etc. When I project, I go all out. That is one reason I waited until Brian was gone for a few days...because the house was a disaster (I NEED A SHOP!) and I stayed pretty focused.

Painting and reupholstering. For me, they are time consuming projects because I firmly believe in doing it right, even if I do plan to sell the piece! Whether I am keeping it or selling it, I treat it the same. Maybe that is why it is so hard for me to step out of my comfort zone and go bold on some upholstery projects.

When I rehabbed this side chair and rocking chair a few weeks ago, I picked a very nice and neutral pallet and meticulously painted and reupholstered them. Only to have the person who bought them ask how much I would charge to REupholster them...go figure!

Completed this week..six throw pillows, four upholstered chairs,  three wood folding chairs, two antique oak school desks, one small table...if I had a partridge in a pear tree I would have painted and stuffed it!

The BIG chore is always the upholstered chairs. My first mental block is the fabric choice. I want something that will appeal to a lot of people, but is unique and interesting as well!

I dropped a little tease about this chair here! 

Again, note the grass...dormant...that tells you how long this chair has been stuck in limbo!

When I pulled the back upholstery off this old chair, I found layers of old fabric...including a really cool piece of hand stitched quilt someone had used as padding at one point. I am always amazed at the history these old chairs reveal!

Several of you were fired up about the prospect of PURPLE! Truth is, I'm a tad too boring and conservative to actually paint the entire chair purple. I bought purple paint, but in the end, I just couldn't bring myself to do it. 

But purple is the "color of the year" (or so the ads at Lowe's say!) so I wanted to use a bit on this chair!

I chalk painted and distressed the frame an "off-white" and then covered the back and seat (yes, I had to make a seat!) with this awesome fabric!

Since the fabric had purple in it, I went with purple trim! Aren't I just a wild and crazy gal!

So many other projects completed and I will share a few "before and afters" over the next few weeks. I made a large note and stuck it on the table to remind myself to take pictures before I hauled anything away!

Unfortunately, I don't have the space right now in my booths...so now the question becomes, WHAT DO I DO WITH ALL THESE STINKING CHAIRS!?

I guess I could throw a party...Lord knows there would be enough seating for everyone!!!

IMG_1493.JPG

AWESOME RECIPE PERFECT FOR GARDEN VEGGIES!!!

I haven't shared a recipe in a while but I tried this totally awesome CRISP CUCUMBER SALSA and it is TOO. DIE. FOR! And it is low cal for those who care!

                                                                       Photo and recipe curtesy of tasteofhome.com

Usually I try a recipe verbatim and then mix it up a bit to my own tastes. This recipe has cumin and honestly, I'm not a fan...so I was certain I would change it after the initial try.

Nope. Not changing a thing (except I added a little more tomato.) It is wonderful and perfect for chips or on a salad.

Give it a try...this is a perfect time of the year for fresh cucumbers and tomatoes and there isn't a better way to prepare them! (Okay, sliced with salt is pretty awesome!)


HAPPY BIRTHDAY KATIE!!!! Tales of a teenagers room...

First, I want to say happy birthday to my baby girl! Seventeen...wow! I can't believe you are 17! 

In honor of her birthday, I am going to share her room. She is a teenager so it is rarely this organized and clean! But it is her creation and she loves her "stuff" and her space.

I featured the mural on Katie's wall here....and her "unstuffy" wing back chair here. Since we remodeled her room, she has added a lot of her own touches that make the space her own.

As with most teens, her room in a constant state of OH MY GOSH...CLEAN YOUR ROOM!!!! Dirty dishes, dirty clothes in the clean clothes basket (with the clean clothes still in it!), make-up and hair covering  the floor and trim, dust bunnies EVERYWHERE! Just a mess.

She is a busy girl. She is an outstanding student (4.2 this last semester...she rocks), she works part-time and she was the lead in the spring musical. (Seriously, the girl has some crazy chops!) 

So in spite of all my pleading, begging and bribing, her room stays in a constant state of "mess." Usually the result of just too much "stuff." So a few weeks ago, I decided to take action and tackle the mess.

Since it was in a half-way decent state, I decided it would be a good time to share pictures of ONE of the rooms upstairs! 

I also came up with an idea that MIGHT give her incentive to get rid of "stuff." Keep in mind, kids lack the ability to organize and like most of us, they hang on to stuff that they really don't need or want any longer. It is important to "purge" on a regular basis!

I left this bag on her trunk. I told her I would pay her $20 for every large trash bag she fills with clothes, shoes, books....stuff! What many don't know is you can donate "stuff" to your local non-profit thrift store (Salvation Army, church organizations, etc) and get a receipt for a nice tax deduction. So $20 for a bag of things they no longer want or need benefits both you AND your teen...you get a nice little tax deduction and they get pocket change (or gas money!)

Younger kids can be enticed into "giving" their unwanted toys to kids who NEED them. Start them young! 

I have learned that teenagers tend to be a bit more myopic and aren't as eager to clean out closets and drawers for the benefit of those in need...sad, but true! They want hard, cold cash!

So far I haven't seen the bag...we'll see. This is why I don't give parenting advise. 


Bedroom makeover...part 2? 3?

I don't know how many times I have griped about my master bedroom. So this past month I began chewing away at a few little things I dislike.

It is my favorite room in the house AND my least favorite. My favorite because it is an awesome room...big, bright, cozy. Least favorite because after 13 years, I STILL haven't decorated it the way I REALLY want it.

I blame it on the furniture.

Ornate, heavy, dark, veeeery traditional! I paid entirely too much for it, so I can't bring myself to get rid of it. One bad thing about furniture...no matter how much you paid for it, chances are you are only going to get pennies on the dollar. 

There are a few pieces I would never get rid of...my dad's walnut chair and my grandparent's old trunkThe rest of it...honestly, if I had unlimited funds, it would all go.

But I don't...so it won't. The next best thing is to change it up a bit with a little bit of paint! 

I featured the beside tables and the high boy here!

The next big project was the bed! 

Honestly, this set would be perfect for a chalkpaint and distress treatment. I painted it with Kilz and sanded it and it was so cool looking. But alas, that is not my "thang" so I just went with my go-to Valspar Dune color.

I did finally paint the top of the Duncan Phyfe drum table...bye, bye beautiful mahogany!

I still need to do some kind of little vingette around this table...in time!

I'm not real thrilled with the bed. I had originally planned on painting all the raised part of the head board and just leaving the inset stained but Brian talked me into just painting the top scrolly part...which is really the part I disliked and it seems the paint just highlighted it. (See, I take his advise!) Oh well...it is different and that will do for now!

I also picked up this darling little antique fan at an auction. I'm not really into "froo-froo" stuff just sitting around and eventually it will probably go to one of my flea booths. But I like the color and retro style and it looks kinda cool on top of the highboy...for now! Until I have to dust it!

Now that all the furniture is painted, I REALLY want to install hand-scraped laminate flooring. And I really want to reupholstery the big chairs. Someday!

I found this AWESOME color chart on Pinterest....

I have some white and tan in the throw pillows and bedding but the majority of my white is a little more "off-white" and my walls are more of a "cream" than a tan. I can live without the grey...I like black better. But the blue is the color of my fireplace wall and I am itching to throw the cranberry color in there somewhere. Maybe in the upholstery on the chairs or a large rug on my new floors!

The paddle fans? Hum...might have to do a little a little paddle fan treatment!

So much I WANT to do.

That is one thing one has to understand about home decor. Unless you have A LOT of money and can afford to have a professional designer come in and do it top to bottom (my choice would be Candice Olson!) the best approach is a little bit at a time. 

Don't be afraid to buy used and do a little work to make it your own. As much as I disliked this furniture when it was all stained and matchy-matchy, I'm kind of digging it now! Still want something different, but I like it a lot more now than I did two weeks ago! The floors will come in time and I know someday a piece of upholstery fabric for the chairs will "speak to me" ...someday.

I always tell my kids...it's a good thing we don't have a lot of money...think of all the great things we would never have learned to do had we had the money to pay someone else to do it!

Seriously how much personal satisfaction could one get from having a bazillion dollars and being able to design, built and decorate your "dream" house without concern for costs?

See what paint fumes do to you....

Ivy and Elephants

Precious little metal "ice cream" chairs before and after!

I bought these pathetic little chairs at an auction last fall....

...neglected for who-knows how many years in an old outbuilding. Rusted, rotten...so sad. 

Then they were neglected for months in my garage because of the "rust issue" I just had no desire to tackle. But I did...and truthfully, it is not that big of a deal (check out how to deal with rust here)....

Then they sat in my garage for ANOTHER month.

They are so darling and I knew I wanted to do something bright and fun with them...I just didn't know what. I get serious mental blocks on upholstery projects!

(I can always tell how long a "project" has been around just by the grass...in the "before" pictures my bermuda is dormant...now it is lush and green and needs to be mowed twice a week!)

So I went to the fabric store and found the brightest and most colorful fabric I could find! 

Red for the frame...red is cheerful and fun and since the fabric had every color imaginable, it was perfect!

After dealing with the rust and giving them a good dose of primer (and of course the primer had to cure for a month while I mulled over colors), I sprayed the frames with red spray paint. I cut new seats and backs out of 3/8" plywood and covered them with new batting and the bright fabric .

Here is a little hint...if the "frame" where the back goes is 11", do not cut a new board 11", cover it with new fabric and batting, and expect it to fit. It won't.

The big button (almost) dead center in the flower was a fluke! The original back had a big button and I knew I wanted a button.

So this gives me the perfect opportunity to share how to make buttons for any project...chairs, pillows, headboards! Anything that has or needs a button...you can MAKE one out of any fabric!

Just buy a button kit...they have them at the fabric stores and most hobby stores. There is a template on the back for the fabric cutout and they come in all different sizes....

They are super easy to make! Just follow the directions on the back of the package!

TIP...put a dab of hot glue on the back of the front of the button before you hammer the back on and then put a dab of hot glue on the little U hook on the back of the button. A few times the back has separated from the front or the little U hook has come off the back...the glue just reinforces them a bit!

To attach the button, I measured and located the center of the board, drilled two small holes, threaded wax covered string on a large upholstery needle from back to front, through the front padding and fabric, slipped the button on the string, then threaded it back through and tied it off. Then I put a little dab of hot glue on the knot. Super simple!

I padded the back with a little batting and covered it with red fabric!

I love these little chairs...if I had somewhere to put them, I would keep them! Darling!

When I step outside my comfort zone and go with bright and colorful, I am never disappointed...maybe I should take that into consideration next time I makeover something I intend to keep!

And here is a little "upcycle" hint. I had an old outdoor chair cushion that was thrown in a pile of things I picked up at an auction. The fabric was crud but the batting inside was good. I took the fabric off and used the batting that was inside for this chair and saved the rest for future projects. Free padding!

Nasty little chair makeover...PART I!

My INTENT was to get this chair done this week so I could feature it. The weather and a bum back kind of slowed me down.  But I got it done...but I am still going to break this up into a "Two Part Series" because the work that had to be done was pretty extensive. If you just want to see the before and after, check out Part II and scroll to the bottom!

This gives me a great opportunity to stress the importance of TAKING YOUR TIME and DOING IT RIGHT! 

The simplest little makeover takes time.  You can't rush the process.  Strip it properly, sand it properly, prime it properly, paint it properly!  Otherwise you are wasting your time and money!

My newest project is very similar to a chair I did for Sis....it was one of my first "features" here. (I wish I had taken better pictures to show all the detail!) The paint part was a tad easier because it didn't have to be stripped first.  But it was one of my first upholstery jobs, and the more experience you get, the easier it is. Okay, it doesn't get easier...you just know it is going to be a challenge.

One thing I have learned about upholstery...no two pieces are the same and ALL have their challenges. You learn to be creative, take your time, and use the proper tools...more on that when we get into the actual upholstery process!

I spied this pathetic little chair sitting outside an apartment...obviously it was being neglected and unloved! And then it was abandoned! So I tossed it in the back of my truck and brought it home. As with most projects, it sat and waited for inspiration (and time).

I know many tout the virtues of chalk and plaster paint.  No sanding, no prep, no prime.  But 1) I am old school and 2) the paint on this chair was literally crumbling off and I could scrape the white paint off with my fingernail!

IMG_0214.JPG

I wasn't going to risk painting this chair only to have the old paint flake off! Besides, I have to have a nice smooth "template." So my best bet was to strip, sand, prime and paint.

First I had to remove the old upholstery.  I'm not sure what is worse...a seriously botched attempt to "cover" the old upholstery or doing so and leaving the old upholstery intact. Which means I had to remove the 8,324 staples someone used to haphazardly attach the disgusting green fabric and the 6,352 upholstery nails (these are just estimates) used on the original disgusting fabric.

Regardless of what you are removing...good or bad...I always suggest taking TONS of pictures while you deconstruct.  You THINK you will remember how something was constructed, but you may not.  It is always good to have pictures to refer back to! When I took my first shot at reupholstering a chair I took hundreds of pictures as I deconstructed it...boy was I glad later when I got stuck on something and wasn't sure what to do! I just referred back to the picture of the original and I knew exactly what I needed to do!

After hours of pulling, prying and cursing, I was down to bare bones (both the chair and my hands!)

Once I got all the old upholstery off, I addressed the little "wobbles." This chair was in pretty good shape structurally but it is important to make sure all the joints are secure and tight. Glue and clamps! Don't move forward on a project like this until you make sure everything is in tip-top shape. You don't want to be glueing and clamping after you have a shiny new finish on!

Now it was time for a little strip job.

I used Citristrip jel to remove the multiple layers of paint! It actually took 2 applications. An old toothbrush on all the nocks and crannies. I used a mineral spirit wash to remove all the "goo." Then I let it all dry thoroughly.

I know stripping old finish and paint is a tedious, nasty, back-breaking process...and I have no doubt it is the reason someone came up with the idea of mixing plaster and paint.  But again, my "old-school" mentality just won't let me move forward without properly stripping all the old paint off.  

I don't paint over wallpaper, I don't tile over vinyl, I don't upholster over old upholstery.  I just don't. Call me crazy. 

Then I sanded....and sanded....and sanded! Getting all the old paint out of the grooves in the legs was not an easy task...but absolutely essential! This is exactly why I always keep old toothbrushes with my shop tools!

After sanding, I primed it with Kilz.  I like Kilz for several reasons.  For me, it is my personal preference after years of experience. Others swear by Zinsser. This is just one of those things you need to experiment with and do what works best for you! Regardless, I will ALWAYS recommend an oil-based primer!

Nine times out of ten I am going to prime a piece before I paint it.  I am not willing to take the risk of "bleed through", I want a smooth finish and I want my paint to stick!  On rare occasions I will not apply a primer if I am going to use chalk/plaster paint and plan to distress the piece.  But even then I prime areas I suspect might bleed through or cause problems.

Anywho, after I got MOST of the old paint off and sprayed on the primer, I let it dry thoroughly. Then I sanded, and sanded, and sanded...again. I started with a 80-120 grit, and finished with a 220.

I like to sand. Or rather I like how the piece feels and looks after it has been primed and sanded.  And in my opinion, "feeling" is the key! 

Funny story...years ago I was feeling quite smug about the fact that I had not gotten all those nasty little wrinkles all my friends had around their eyes and mouths and on their neck.  Until I put my readers on one day to pluck my eyebrows...and there they were.

Even though I finally broke down and got prescription glasses, I still don't trust my eyes to see all the imperfections...but I do trust my hands.  As I sand, I "feel."  If you can feel it, it will show through a coat of paint!!! Sanding transforms the piece and if done properly, it can mean the difference between having a piece that is beautiful and professional or one that looks like an inexperienced DIYer threw it together!

After priming and sanding, I used my compressor to blow the dust off and then tack cloth to get rid of all the little smidges of dust and debris! I know I harp on using tack cloth...I can not stress how important this step is!

My original plan was to paint the chair a "blush/salmon/coral" color and then upholstery it in black damask. I saw a chair almost identical to this one in those colors SOMEWHERE...and then I couldn't. What I could find was a lot of teal and damask...and since this is a piece that will be sold, I decided I had to go with what is obviously "in." A "pink" chair can be risky! Pretty, but risky!

So teal it is....

The trick to spray painting anything (besides the prep work) is to do 3-4 VERY light coats...let it dry for 30-45 minutes between coats. If you get a drip or run (which you shouldn't if you do LIGHT coats) let it dry OVER NIGHT and then carefully and lightly sand it with a VERY fine grit sand paper! Tack and then lightly spray it again.

After the paint dries I gave it a good coat of clear poly finish.  Probably overkill considering the Valspar spray paint I use SAYS it is an "all in one."  Again, I'm old school.  You clear coat everything. 

The key now is to WAIT.  Wait and let the paint dry and cure for a few days. Upholstery can put a lot of wear and tear on a piece so you want the paint to be cured before you begin working on the upholstery.  

And as you can see, this piece has some serious reconstruction to do before I can ever begin to put the fabric on! I'll make sure I take good pictures and share step-by-step instructions on how to reconstruct and reupholster this chair!

IF YOU WANT IT DONE RIGHT....TAKE YOUR TIME!

Stay tuned! Part II is on its way!