Nasty little chair makeover...PART I!
My INTENT was to get this chair done this week so I could feature it. The weather and a bum back kind of slowed me down. But I got it done...but I am still going to break this up into a "Two Part Series" because the work that had to be done was pretty extensive. If you just want to see the before and after, check out Part II and scroll to the bottom!
This gives me a great opportunity to stress the importance of TAKING YOUR TIME and DOING IT RIGHT!
The simplest little makeover takes time. You can't rush the process. Strip it properly, sand it properly, prime it properly, paint it properly! Otherwise you are wasting your time and money!
My newest project is very similar to a chair I did for Sis....it was one of my first "features" here. (I wish I had taken better pictures to show all the detail!) The paint part was a tad easier because it didn't have to be stripped first. But it was one of my first upholstery jobs, and the more experience you get, the easier it is. Okay, it doesn't get easier...you just know it is going to be a challenge.
One thing I have learned about upholstery...no two pieces are the same and ALL have their challenges. You learn to be creative, take your time, and use the proper tools...more on that when we get into the actual upholstery process!
I spied this pathetic little chair sitting outside an apartment...obviously it was being neglected and unloved! And then it was abandoned! So I tossed it in the back of my truck and brought it home. As with most projects, it sat and waited for inspiration (and time).
I know many tout the virtues of chalk and plaster paint. No sanding, no prep, no prime. But 1) I am old school and 2) the paint on this chair was literally crumbling off and I could scrape the white paint off with my fingernail!
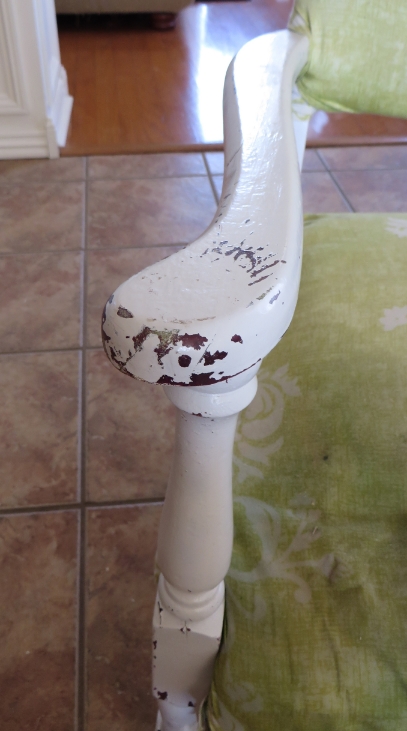
I wasn't going to risk painting this chair only to have the old paint flake off! Besides, I have to have a nice smooth "template." So my best bet was to strip, sand, prime and paint.
First I had to remove the old upholstery. I'm not sure what is worse...a seriously botched attempt to "cover" the old upholstery or doing so and leaving the old upholstery intact. Which means I had to remove the 8,324 staples someone used to haphazardly attach the disgusting green fabric and the 6,352 upholstery nails (these are just estimates) used on the original disgusting fabric.
Regardless of what you are removing...good or bad...I always suggest taking TONS of pictures while you deconstruct. You THINK you will remember how something was constructed, but you may not. It is always good to have pictures to refer back to! When I took my first shot at reupholstering a chair I took hundreds of pictures as I deconstructed it...boy was I glad later when I got stuck on something and wasn't sure what to do! I just referred back to the picture of the original and I knew exactly what I needed to do!
After hours of pulling, prying and cursing, I was down to bare bones (both the chair and my hands!)
Once I got all the old upholstery off, I addressed the little "wobbles." This chair was in pretty good shape structurally but it is important to make sure all the joints are secure and tight. Glue and clamps! Don't move forward on a project like this until you make sure everything is in tip-top shape. You don't want to be glueing and clamping after you have a shiny new finish on!
Now it was time for a little strip job.
I used Citristrip jel to remove the multiple layers of paint! It actually took 2 applications. An old toothbrush on all the nocks and crannies. I used a mineral spirit wash to remove all the "goo." Then I let it all dry thoroughly.
I know stripping old finish and paint is a tedious, nasty, back-breaking process...and I have no doubt it is the reason someone came up with the idea of mixing plaster and paint. But again, my "old-school" mentality just won't let me move forward without properly stripping all the old paint off.
I don't paint over wallpaper, I don't tile over vinyl, I don't upholster over old upholstery. I just don't. Call me crazy.
Then I sanded....and sanded....and sanded! Getting all the old paint out of the grooves in the legs was not an easy task...but absolutely essential! This is exactly why I always keep old toothbrushes with my shop tools!
After sanding, I primed it with Kilz. I like Kilz for several reasons. For me, it is my personal preference after years of experience. Others swear by Zinsser. This is just one of those things you need to experiment with and do what works best for you! Regardless, I will ALWAYS recommend an oil-based primer!
Nine times out of ten I am going to prime a piece before I paint it. I am not willing to take the risk of "bleed through", I want a smooth finish and I want my paint to stick! On rare occasions I will not apply a primer if I am going to use chalk/plaster paint and plan to distress the piece. But even then I prime areas I suspect might bleed through or cause problems.
Anywho, after I got MOST of the old paint off and sprayed on the primer, I let it dry thoroughly. Then I sanded, and sanded, and sanded...again. I started with a 80-120 grit, and finished with a 220.
I like to sand. Or rather I like how the piece feels and looks after it has been primed and sanded. And in my opinion, "feeling" is the key!
Funny story...years ago I was feeling quite smug about the fact that I had not gotten all those nasty little wrinkles all my friends had around their eyes and mouths and on their neck. Until I put my readers on one day to pluck my eyebrows...and there they were.
Even though I finally broke down and got prescription glasses, I still don't trust my eyes to see all the imperfections...but I do trust my hands. As I sand, I "feel." If you can feel it, it will show through a coat of paint!!! Sanding transforms the piece and if done properly, it can mean the difference between having a piece that is beautiful and professional or one that looks like an inexperienced DIYer threw it together!
After priming and sanding, I used my compressor to blow the dust off and then tack cloth to get rid of all the little smidges of dust and debris! I know I harp on using tack cloth...I can not stress how important this step is!
My original plan was to paint the chair a "blush/salmon/coral" color and then upholstery it in black damask. I saw a chair almost identical to this one in those colors SOMEWHERE...and then I couldn't. What I could find was a lot of teal and damask...and since this is a piece that will be sold, I decided I had to go with what is obviously "in." A "pink" chair can be risky! Pretty, but risky!
So teal it is....
The trick to spray painting anything (besides the prep work) is to do 3-4 VERY light coats...let it dry for 30-45 minutes between coats. If you get a drip or run (which you shouldn't if you do LIGHT coats) let it dry OVER NIGHT and then carefully and lightly sand it with a VERY fine grit sand paper! Tack and then lightly spray it again.
After the paint dries I gave it a good coat of clear poly finish. Probably overkill considering the Valspar spray paint I use SAYS it is an "all in one." Again, I'm old school. You clear coat everything.
The key now is to WAIT. Wait and let the paint dry and cure for a few days. Upholstery can put a lot of wear and tear on a piece so you want the paint to be cured before you begin working on the upholstery.
And as you can see, this piece has some serious reconstruction to do before I can ever begin to put the fabric on! I'll make sure I take good pictures and share step-by-step instructions on how to reconstruct and reupholster this chair!
IF YOU WANT IT DONE RIGHT....TAKE YOUR TIME!
Stay tuned! Part II is on its way!
