More wood window decor....

Recently I featured the old wood windows I have repurposed here.

They are a really neat design element if you can get your hands on a few.  Not terribly difficult to repurpose since there isn't much you could do to "enhance" them.  I just put a little paint on them, distressed a bit, reinstalled the glass and put on a chain to hang it!  The hardest part is getting the old glass out, but you really wouldn't even have to do that!​

I bought a wreath to hang over the one on my porch.​

IMG_8975.JPG

I wasn't sure I really "loved" the look of the original wreath...it's pretty, but seemed a bit "heavy" for the window.  So I went back and got the "lighter" wreath...

IMG_8996.JPG

Not a humungus difference but one I like a lot better.​

This is a prime example of decorating with what you LOVE.  I didn't LOVE the first wreath, but I do this one.  And while most wouldn't even notice the difference, I did...every time I looked at my front porch!  ​

So if you don't LOVE what you have done, change it!  Having something in your world that isn't what you really LOVE is like having a chipped nail...it will bug you until you do something about it!​ (My roots can be showing, my clothes are a mess...but I can get real bent about a fingernail...lol!)

Kaitlyn took one of the windows home and she is going to do some kind of paint technique on the glass.  I can't wait to see what she does...very crafty girl!  And my daughter Sarah has a window waiting for her that I painted black.  She is going to feature it in their remodeled game room!  And I just thought this stained one was kinda "interesting" behind my swing!

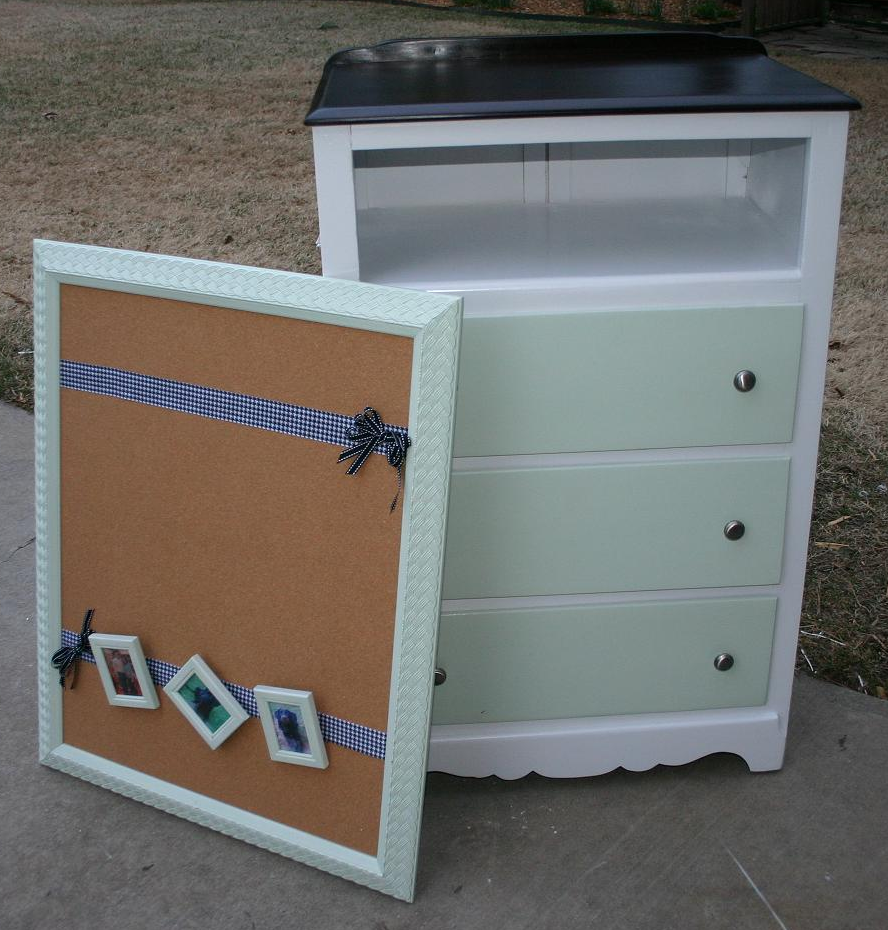
I've made a couple of cork boards out of a few of them.  They will be in my mall booth.  I'll make sure I post pictures when I get it all set up!

Hopefully THIS week.  Today is "organizing and pricing" day...I am exhausted from yesterday but there is much work to be done before the grand opening Saturday!​

I am SOOOOOO excited!​

So stay tuned...more inspiration to come!​

Mid century side tables...

I have been working hard to find pieces I know others will just love!  Problem is every once in a while I find pieces I absolutely fall in love with and I know I will have a hard time letting go!  Especially after working on them all day! 

I believe these tables are black oak.  The tops, sides and drawers were veneer, but the bases were solid.  Really beautiful tables with great "bones."  

I primed and painted the boxes. Then I stripped and stained the drawers and bases and coated them with 4 coats of tung oil.  

Honestly, it will be tough letting go of these two.   

But someone, somewhere will love them....hopefully as much as I do! 

FOLLOW BECKWITH'S TREASURES ON FACEBOOK!  Now if I can just figure out how to put one of those little Facebook widgets on this blog! 

Little stool...

I have bought so much at auctions and sales that I sometimes forget to take before pictures of the little items!​

I bought a little stool at an estate auction a few weeks ago.  Unfortunately, I wasn't paying attention and hadn't really looked at the little guy...just saw it from a distance and before I knew it, I bought it.​

Unfortunately, it was poorly constructed so it required some reconstruction.  The wood base was MDF which doesn't hold up well to a lot of wear and tear.  So the legs were major wobbly and the fabric was, well, blah.  And it had this really disgusting "fringe" stuff on it.​

But it had good iron legs....and the nice thing about buying something like this is the "template" is already there.  So I deconstructed it, used the MDF base as a template for a new wood base, painted the legs black  and recovered the whole thing in a brighter, cheerier fabric!  ​

Cute as a bug.  This is one of those items I doubt I recoup my time and materials, but it is a cute little piece that will draw attention and hopefully will go to a home where it will be loved...now that it is sturdy enough to actually sit on!​

I also made a little cork board to match the stool.  I painted a frame a pretty yellow and covered cork board and backing with the stool fabric!​

Getting ready to go retail....

Wow...getting ready to go "retail" is a LOT of hard work.  I have been going to auctions and garage sales every weekend.  And if I was a hoarder, I would be in deep doody  because there is a whole world of really nifty stuff out there. ​

I have tried to focus on things others will LOVE!  I know I love most of what I bought...but since it is all piled in my garage and I have NO place to put it, I won't have a problem parting with it.​

This weekend I scored big time on July 4th and Christmas decorations, a big mirror, frames, planters, milk glass, candle holders...you name it, I found it!  Anything I can find that I think is wonderful, at a price that hopefully will let me make a few pennies...or at least break even!!!  I don't plan on getting rich on this little endeavor.  Again, I need an outlet for my creative juices and it is wonderful to find things I know others will take home and LOVE!

And honestly, this gives me an excuse to do something I use to love to do...go to auctions!!!  I forgot how much fun they are!  Even Brian has gotten into it so it is something else he and I can do together....that is always the BEST part of any hobby...sharing it with your best friend!​ And Matt, my youngest son, comes when he is free!  Family fun!

I have found a few pieces of furniture that are inexpensive enough for me to put my "spin" on.  It is hard to pay a premium for a piece of furniture and then come home and put a lot of money and hours into it.  I probably devalue my time and labor way too much, but when I go out and buy $100 worth of upholstery for a little ottoman it makes it tough to sell it for $75...especially when it took me all day to recover it!​

So I have to be very careful when bidding on and buying furniture.​ I found a wonderful Duncan Phyfe table that would have been beautiful...but the top was in pretty bad shape and I knew it needed a great deal of time and attention!  So I set a max in my mind and I tried not to groan too loudly when it sold for $15 above my maximum! But I knew if I paid more than that, I would NEVER recoup my time and expense.  

I also have to be very cognizant of what buyers want vs. what I personally like.  I am not that big into the shabby chic/plaster paint thing...but I know the buyers love it.  ​

This oak chair is a prime example.  Kinda dated before so I knew I would have to do something with it...​

When I first started my plan was to prime, paint with high gloss black and then recover in a black and white damask...very "formal."​

But I had to do some sanding on the paint coat and before I knew it, it had a "shabby chic" flair that everyone LOVES!​

So there you have it...a little shabby chic chair flair!  

I already featured the 3-legged table with the plaster paint legs...but I also have a nifty little oak table and a few other projects I will share over the next few weeks as I get ready to fill my booth!

Course at this point, I think I have enough to fill an entire store...not just a booth.  Typical me...at some point I will learn moderation...or just quit going to to auctions and stopping at garage sales....because honestly, I am running out of room in my garage!!!!

​Love this fabric!

Biting the flea market bullet....

Well...I have finally talked myself into doing the flea market thing!  As in SELLING at a flea market...getting a booth and actually expanding my "business" to the resale world.​

A new flea market/consignment store is opening here in town.  It is a "high end" type thing and the only reason I am considering it is because she has promised to keep the "junk" out!  Not that I don't love the "junk."  After all, another man's trash can always become our treasure! ​

I desperately need an outlet for all my "creative juices"....a place were I can sell all these little pieces I have spent so much time transforming.  I know I won't make any money on them.  But I might recoup some of my costs to "repurpose" and I like the thought of these pieces going to a home where they will be loved and cherished.  And to be honest, I am plum out of room to keep this stuff!!!!​

My biggest fear is that the need to cover the cost of the booth will turn this "hobby" of mine into work...and that is NOT what I want to happen.  I want to enjoy the process and I don't want to think about how much I can make off of it or if I will recoup my expenses.  After all, I normally just give my pieces away or try to cram them into my house!  ​

Friday and Saturday I went to a few garage sales and flea markets...in the snow!!  It was cold and dreary but I forgot how much I enjoy pilfering through other peoples "stuff."  Sunday, Brian and I spent the entire afternoon at an estate auction...man-oh-man can I do some serious damage at an estate auction!!

I was looking for things I could use to decorate and fill my booth.  I came up with a few things and I think if I go in with my ever-so-crafty neighbor Trish (she is out of town and doesn't know I have already planned a new business for her!) we could put together a really fun and creative space! ​Trish is a "hoarder" of all things seasonal...wreaths, garland, yard ornaments...anything and everything for every holiday of the year.  And she use to work for a flower shop as a floral design tech.  So I really think she can create a beautiful space....I will do all the heavy repurposing and she can do all the froo-froo stuff.  I can't wait for her to get home next week so I can share the news!!!

In the meantime, I have a lot of stuff to organize and go through!  The hardest part for me is going to be the mess in my garage for the next month until the new market opens!  Again, just a tad too OCD to have this stuff piled in my garage for very long.  I didn't think parking my truck in the driveway would be an issue...after all it is spring! Hahahahahahahaha!  Who would have thought I would have to get snow off the truck in MAY!!​

Sometimes when I go to estate auctions I see things I really love and I just have to have!  This estate had some really beautiful yard ornaments and I couldn't resist these three pieces.  I will pay more for things like this because I know I am going to keep them...probably not the smart way to approach it, but I'm pretty sure I would never sell these!​

This little guy is perfect for the swing pergola!​

Beautiful little cast iron bird bath!!!​

I have wanted a little table and chairs for some time...this was the right price and perfect for my deck!​

Ahhhhh....a lab puppy....who could resist!​

Stay tuned for updates on the flea market adventure!  ​

In memory of Mrs. Betty Simco...it is obvious she found treasures all around her and it is an honor to ​display the things she once cherished in my home!  Thank you Simco family for sharing her beautiful home and cherished possessions with us!

Pretty in pink....and a little zebra....

Earlier I posted this "before" picture of a little dresser I brought home from the apartments.....​missing a drawer and really not attractive! (I found it, and this one, in the same unit!)

​But it was relatively sturdy and I knew I could install a shelf where the drawer was missing...perfect for little decorative baskets! Or books...or whatever!

​I never posted a before picture of this chair....and unfortunately, I forgot to take a picture BEFORE I took it all apart.  But basically it was just a little gray chair I found at the apartments...kinda nasty as usual and veeeery boring.

Both have been in my garage for months...kilzed and ready to go.  What to do, what to do.  I just couldn't get "inspired."  I don't have a problem doing this stuff, I just have a problem deciding exactly WHAT to do.  But the other day I was walking through Hobby Lobby and I saw all this pink and zebra stripe little girl's decor, and I thought "Oh MY!"  Inspiration at last. Keep in mind, I have NO place in my home for this but some little girl somewhere is going to love this stuff....​

The zebra stripes on the drawer fronts are hand painted.  Don't get too impressed.  While I have a tad of artisticness and creativeness in me, I'm honestly not THAT talented.  Here's a little secret...if you see a design or picture you want to put on a piece of furniture, trace it onto a piece of wax paper.  Then place the wax paper on a piece of sewing trace paper and trace it onto your piece.  (TIP: use sewing trace paper...it doesn't "smudge" as badly as other traceable papers and the markings are easy to remove with a damp cloth!) You can do this on ANYTHING...walls, glass, furniture, anything!!!  I painted the drawers white, traced the fabric design on wax paper and then traced that onto the drawer fronts....then painted them with black latex paint.  And with everything, I sprayed it with a clear coat!​

You can even print things off the computer and trace that...if the printed picture is too small for the project you are working on, just take the picture into any edit program and break it up in sections that can be printed off and then taped together.  If it is REALLY big, you can always project it onto the object with a projector.  We did that with a mural on my daughter's wall...if she EVER gets her room clean enough for me to take pictures, I will share her mural...totally awesome.  Ever hear of a "fail whale?"  Google it...it really is awesome!!​

Anywho....animal print is not really my cup of tea...evident by the fact that I pretty much hated my bathroom when I decorated with "leopard print" in a failed attempt to decorate around my ugly gold shower doors!  

But after seeing a little inspiration and how "fun" it can be, this was a fun little project. 

Sew awesome....

I really want, and honestly need, a sewing desk...some place I can store and use my sewing machine without having to set it up on my dining room table.  I found this sewing desk in a thrift store and man-oh-man was this thing seriously ugly!  

 I knew this desk could be a little treasure after the cruddy paint job was stripped away!​

And even to my surprise, what a treasure it is...what I found under two layers of paint was beautiful mahogany. Initially someone had painted it a really disgusting green and then I guess they tried to improve it by painting it a flat black.  

This is a prime example of hurting a piece in a failed attempt to "enhance" it!  Truth be told, I felt a little guilty painting the base and drawers white.  But I could never live with myself had I not restored the top to it's prior glory!​

Before I started refinishing, I cut the opening a little bigger to accomodate my sewing machine.  TIP ALERT:  when cutting veneer mark the cut with a pencil and then score the veneer with a utility knife. Then use a jig saw with a very sharp blade to cut  "inside" the score...if you don't, the veneer with split and splinter and you will make quite a mess! 

Normally I use Formby's Furniture Refinisher to strip latex paint and old varnish...but two layers of paint needed a little more muscle....so I used a citrus stripper. I will not use anything stronger on veneer (always use any stripper per the instructions and in a VERY well ventilated area!)    This piece didn't have a single chip in the veneer and I didn't want to risk hurting the piece by using industrial strength stripper!​  Took a little more time and more than one application but it was worth it.  

After removing all the old paint, I took 0000 steel wool and mineral spirits and gave the wood a "bath."  When stripping wood, regardless of what you use to strip it, always "wash" the piece with mineral spirits to remove all the "crumbs."  After it dries, take VERY fine sand paper or 0000 steel wool and sand lightly before applying stain or a finish.

TIP ALERT...keep old toothbrushes on hand to get into groves and corners when stripping furniture.  DIYers never throw away old toothbrushes, coffee cans, socks, old tshirts or towels...trust me, you will need them!

IMG_8918.JPG

Since I knew I was painting the base and the drawers, I didn't strip them but I did sand and prime well before painting.​

And again...ALWAYS USE TACK CLOTH BEFORE PAINTING OR APPLYING FINISH...AND BETWEEN EVERY COAT!!  ​I seriously can not stress this enough! So many DIY tutorials tell you to "wipe down"...again, I challenge you...wipe down your piece with a clean cloth, and even some mineral spirits...then wipe it with a tack cloth!  You will be shocked at how much crud was still there!

Two coats of gloss white paint on the base and drawers.  A light coat of walnut brown stain on the wood to even out the color and give it a little more depth....4 coats of my favorite Formby's Tung Oil. New crystal knobs. Total awesomeness!​

I can not stress how beautiful this wood is....I wish I was a better photographer.  And I wonder if I should have stripped and stained the drawer on the right...but then again, I kind of like the paint/stain contrast...I think I would love it either way!

I REALLY love tung oil.... it allows the grain of any wood to just shine!  And it is sooo easy to take care of and touch up when needed!  (Now I know why my father refused to use polyurethane)​  I think so many use polyurethane because they are concerned about durability....that is honestly not an issue with tung oil!  Try it...it is almost impossible to mess up the application (unlike poly) and it is extremely easy to touch up scratches in the future if necessary!  

This project was pure joy!  Anytime I can take something that has been so abused and turn it into a treasure it just makes me happy!  

Maybe now I will enjoy sewing just a little more!  ​

Before and After dresser....

Yesterday Brian and I took off and went trout fishing for the day!  OH MY!  I am sore and sunburned...and I loved every minute of it!  Sometimes you just have to say to heck with the yard work and go have a little fun! Awesome day with my best friend!​

But Saturday was a busy day.  My neighbors came over to show off their new grandson and I found a perfect home for a precious little dresser I have been working on!  Just so happens they NEED a dresser and I NEED to find it a good home.  Done!​

As you can see, it was missing a drawer so I added a shelf...perfect spot for little storage baskets.  I painted the "box" white, the drawers a pretty green and stained the top with my favorite java gel stain.  I originally put little crystal knobs on the drawers, certain it would go to a little girl, but when I found out it was going into a boy's room I changed the knobs to brush nickle...just thought it was more appropriate for a little boy!  And I am going to throw in a cute little cork board I made up and featured earlier!  ​

IMG_8900.JPG

The great thing about these little dressers is the fact that as the little boys grows, the drawers will be easy to paint to match any decor!  ​

Another "trash to treasure"...a piece of furniture destined for the dumpster but given new life and new home with just a little time and attention!  ​

Framing memories....

I think four days of remodeling my closet and painting trim has taken a toll...I am woooorn out.  So today I will do a little coupon shopping! I HATE clothes shopping but give me a good coupon for shampoo or detergent and I am all over it!

So today I thought I would quickly feature some tidbits from past projects...framing memories!

We all frame pictures and diplomas, but frames come in all shapes and sizes and they are a great way to display a collection of things that have great sentiment...and a great way to decorate!

Master closet makeover....

​I'm almost too tired to type...this was a chore but the reward is being able to swipe "master closet" off the dry erase board on the fridge!!!

That and soooo much more storage in my closet.  ​

When both the boys left for college, I basically gutted their rooms.  I decorated with all their "stuff" and organized everything they left in their closets, but the entire room was made-over...new paint, flooring, bedding, window dressings!  Everything.​  And I even had a tad bit of space to store some of MY stuff!

And then they moved home.  And they brought more stuff!​

Anyone who thinks they are going to gain more storage or a hobby or craft room when their kid goes off to college is delusional.  Trust me...first, they leave all their "stuff" and second, they WILL come home!  And that is fine...the rule:  no kids, no spouse, no animals.  As long as they follow THE rule, they still have a room!  ​

So my closet has to stay pretty organized because it is storage central.  I built a large pantry where I keep all my office/business stuff and our personal "coupon stash."  Yes, I am one of those coupon people...but to my credit I only keep what I know my family  will use in the near future.  The rest is donated to the elementary schools!  Last year I donated over $7000 worth of products!  ​

I had a few issues with the closet...first, the flooring.  After 13 years, it was pretty nasty.  And I pretty much hate carpet!  So that had to go.  Second, I have 9' ceilings but all the shelving was standard.  So I basically had a TON of wasted space and plenty of room to add another self all the way around the closet.  I had too much "long" hanging space and not enough "double" hanging space.  Honestly, if I would move all my coats to the coat closet, I probably wouldn't need any long hanging space!  I seriously do not own a dress any more.​  

So here is the before and after...and then I will add some "in between" pictures in the tutorial.....​

Before....​

IMG_8545.JPG
IMG_8547.JPG
IMG_8548.JPG

It wasn't THAT bad...I'm pretty good at cleaning out closets every so often.  My GOAL was to only put back about 1/2 of what I took out.  But honestly, I clean out my closets and donate about twice a year...so there wasn't that much pack-ratted away!  I just needed more shelving and it was due for a good makeover....​

After....​

IMG_8841.JPG
IMG_8842.JPG
IMG_8843.JPG
IMG_8847.JPG
IMG_8845.JPG
IMG_8846.JPG
IMG_8848.JPG

So I have new laminate flooring, 25 l.f. of new shelving, paint,  more hanging space and new lighting.  And a backache, headache and feetache...and I still have a bit of a mess in my office.  But in the long run, I think it is ALL worth it!

I have posted a tutorial here... it will fill you in on exactly what I did!​