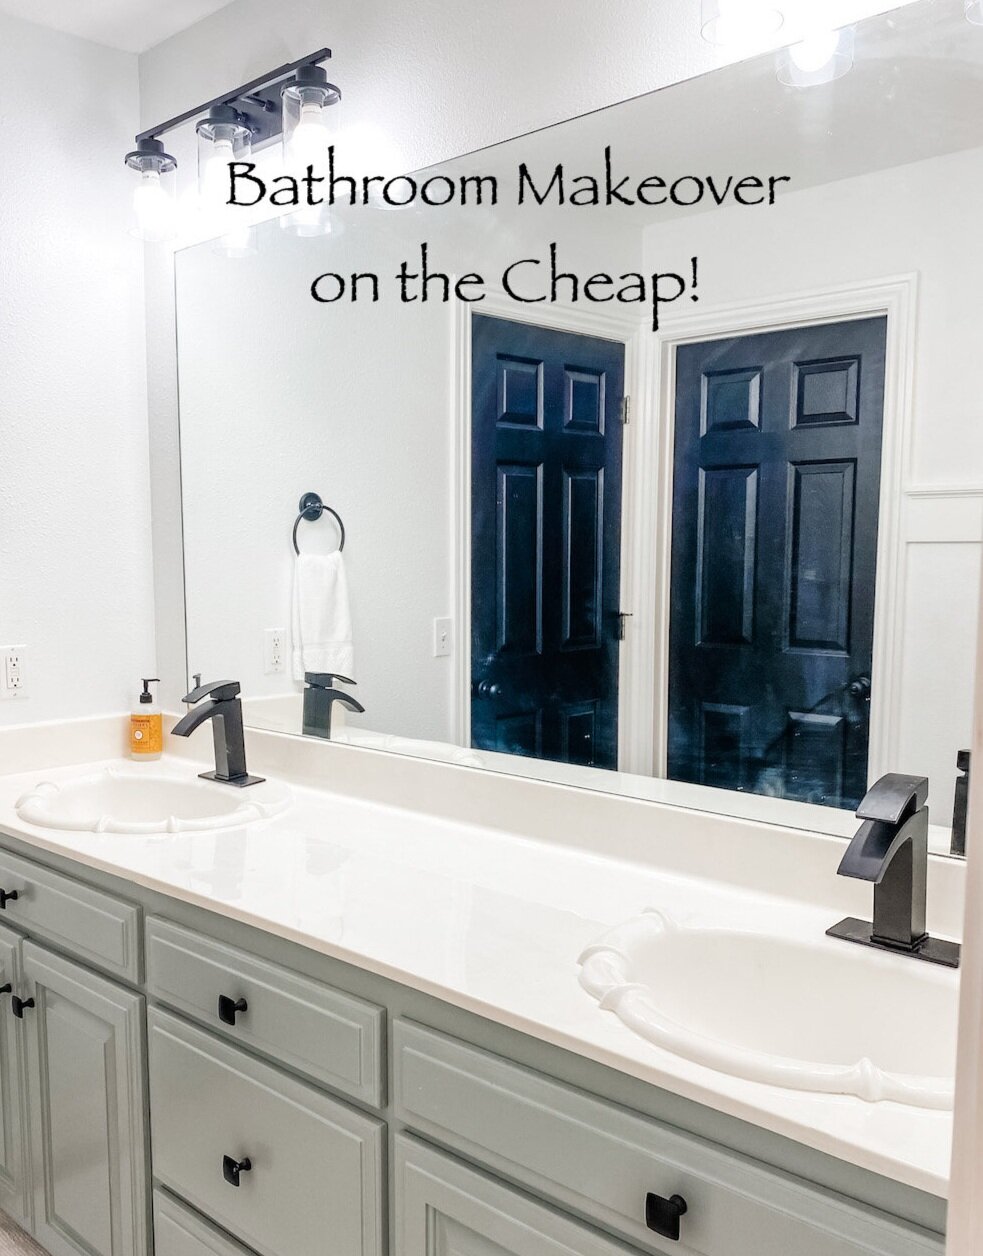
Bathroom makeover on the cheap....

IMG_1880.JPG

I consider myself “apolitical.” In other words, I have an opinion, a personal “ideology,” but I really try to avoid all the political “fodder.” It’s just too depressing, stressful, overwhelming…

It eats into my personal happiness.

But with all that is going on, I found myself sitting on the couch mesmerized by the news ALL DAY FOR AN ENTIRE WEEK!

I was so overwhelmed.

I HAD to get moving and my little morning walk and ride wasn’t cutting it…just too much time left in my day.

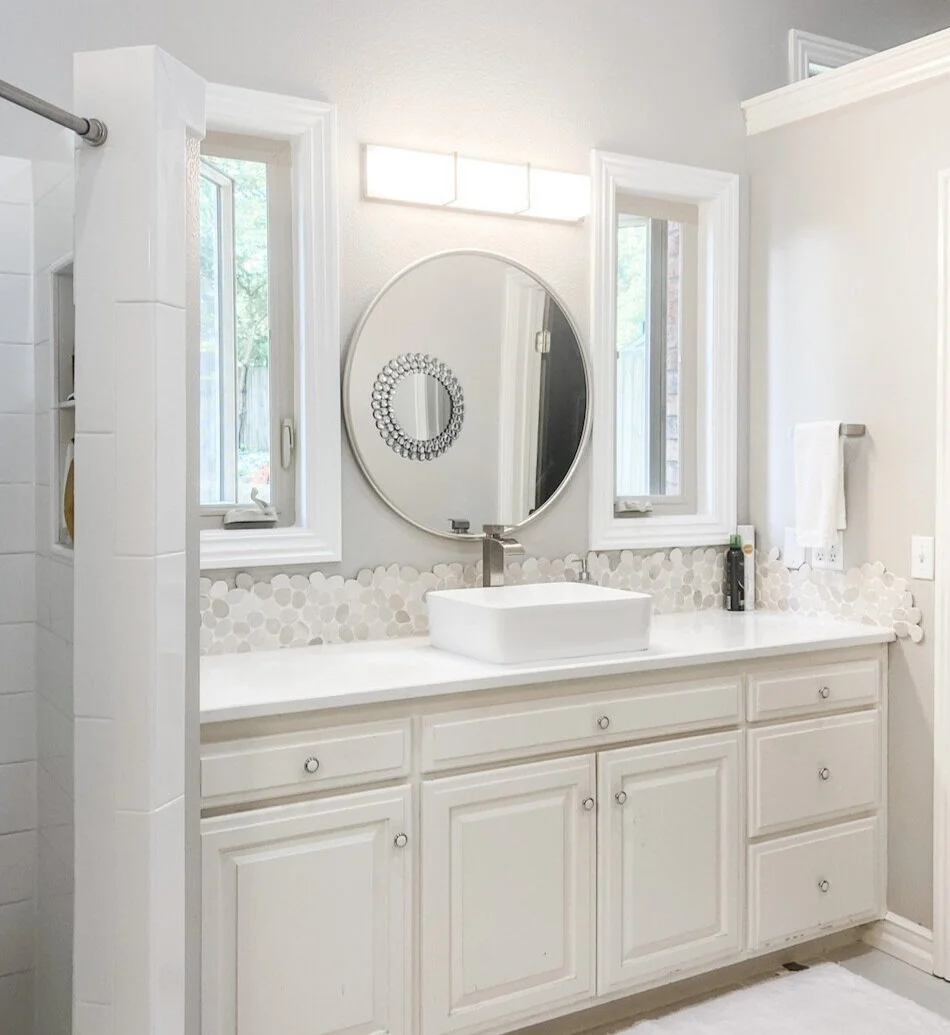
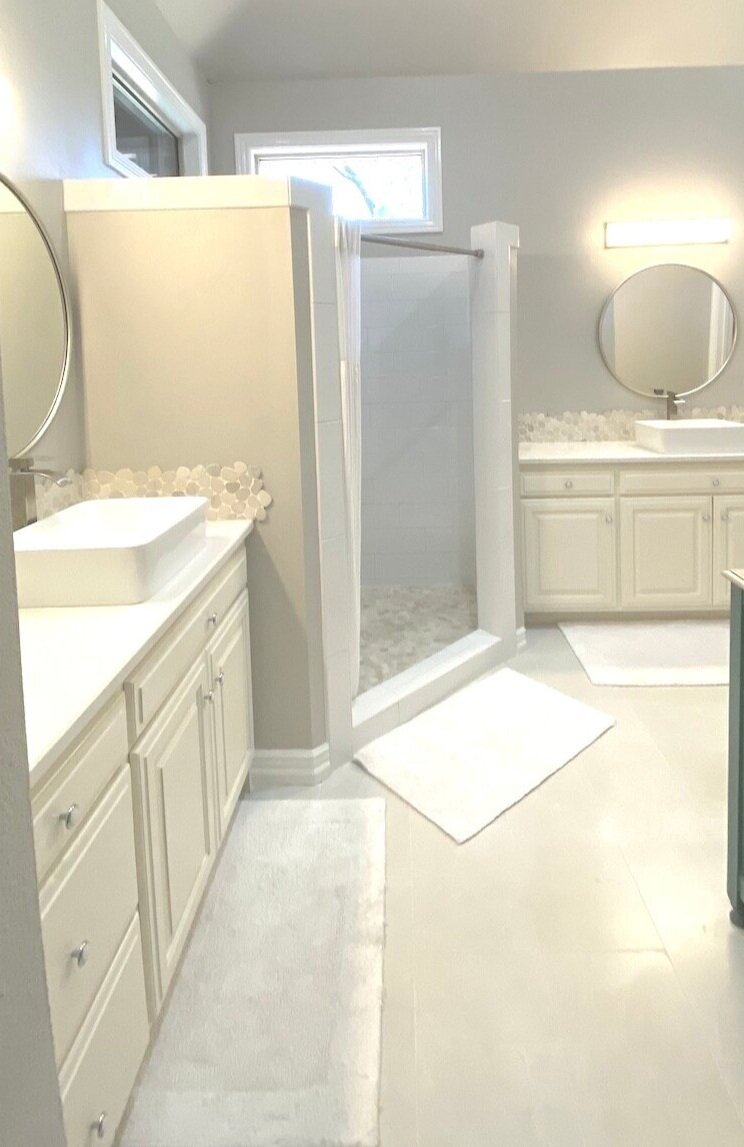
So I tackled a project I could not have cared less about lifting a finger or spending a dime on…the guest bath.

It gets used MAYBE 2-3 times a year when the kids come for overnight visits. I threw down a few comfy rugs, stocked it with “guest necessities” (this stuff is important) and hung a nice curtain. I would clean it when I knew we were going to have over night company…other than that…out of sight, out of mind.

The fact that few used it or saw it on a regular bases was just fine by me.

It wasn’t completely offensive.

It was just “blah.” Beige walls, off-white cabinets, dated, boring lighting and fixtures…just blah.

Again, who cares…

But I needed to get moving and put my body in motion. And this was the perfect project. Inside in the AC but away from the TV.

Inspiration…anything “unblah.”

My plan…”unblah” it.

Budget…as little as it takes to “unblah” it.

IMG_1843.jpg
IMG_1844.jpg
IMG_1842.jpg

Usually I am all for finding an inspiration, making a plan, and working with a sound budget. In my opinion, it is the only way to attack a big project like this.

But I need to move and I didn’t have the time or patience to sit and think about this for weeks. I decided my MAIN objective was to use the materials I have on hand and try to make a few changes that would “unblah” the space without breaking the bank.

First on the list…get rid of all the gold fixtures. The style wasn’t TOTALLY offensive but they are gold…gold towel and hand towel bars and gold TP holder. I decided to “repurpose” the hand towel holders and TP holder by painting them black. A little primer, a little black paint…both in my stash. Cost…zero.

IMG_1875.JPG

I also replace the faucets…the existing weren’t totally offensive but these were pretty inexpensive on Amazon…less than $50 each.

I removed the towel bar and added a little bit of board and batten with hooks for towels. Similar to my entry….super simple…again look for a tutorial that makes sense to you! Less than $50.

IMG_1886.JPG

I used some leftover trim paint to paint the board and batten and all the trim. Cost…zero.

I painted all the doors in the main part of the house before we moved in…but again, this space got completely ignored! I even ordered black door knobs but never put them on these doors. I used the left over black paint and the knobs I bought over a year ago. Cost today…zero.

The cabinets….I used the leftover paint from my master bath cabinets. Cost…zero.

I did buy new inexpensive hardware. About $4 each so less than $40. (But I could have painted the existing hardware with black paint I had on hand.)

IMG_1880.JPG

The ceiling needed to be painted. Big water spot around the HVAC vent. I sprayed the spot with some Kilz I had on hand and dug out the leftover ceiling paint! Cost….zero.

IMG_1839.jpg
IMG_1869.jpg

The beige walls needed to be “deblahed.” I painted them white…plain ole’ pure white. I only needed about a gallon and my son had some leftover from their house. Cost…zero.

IMG_1881.JPG

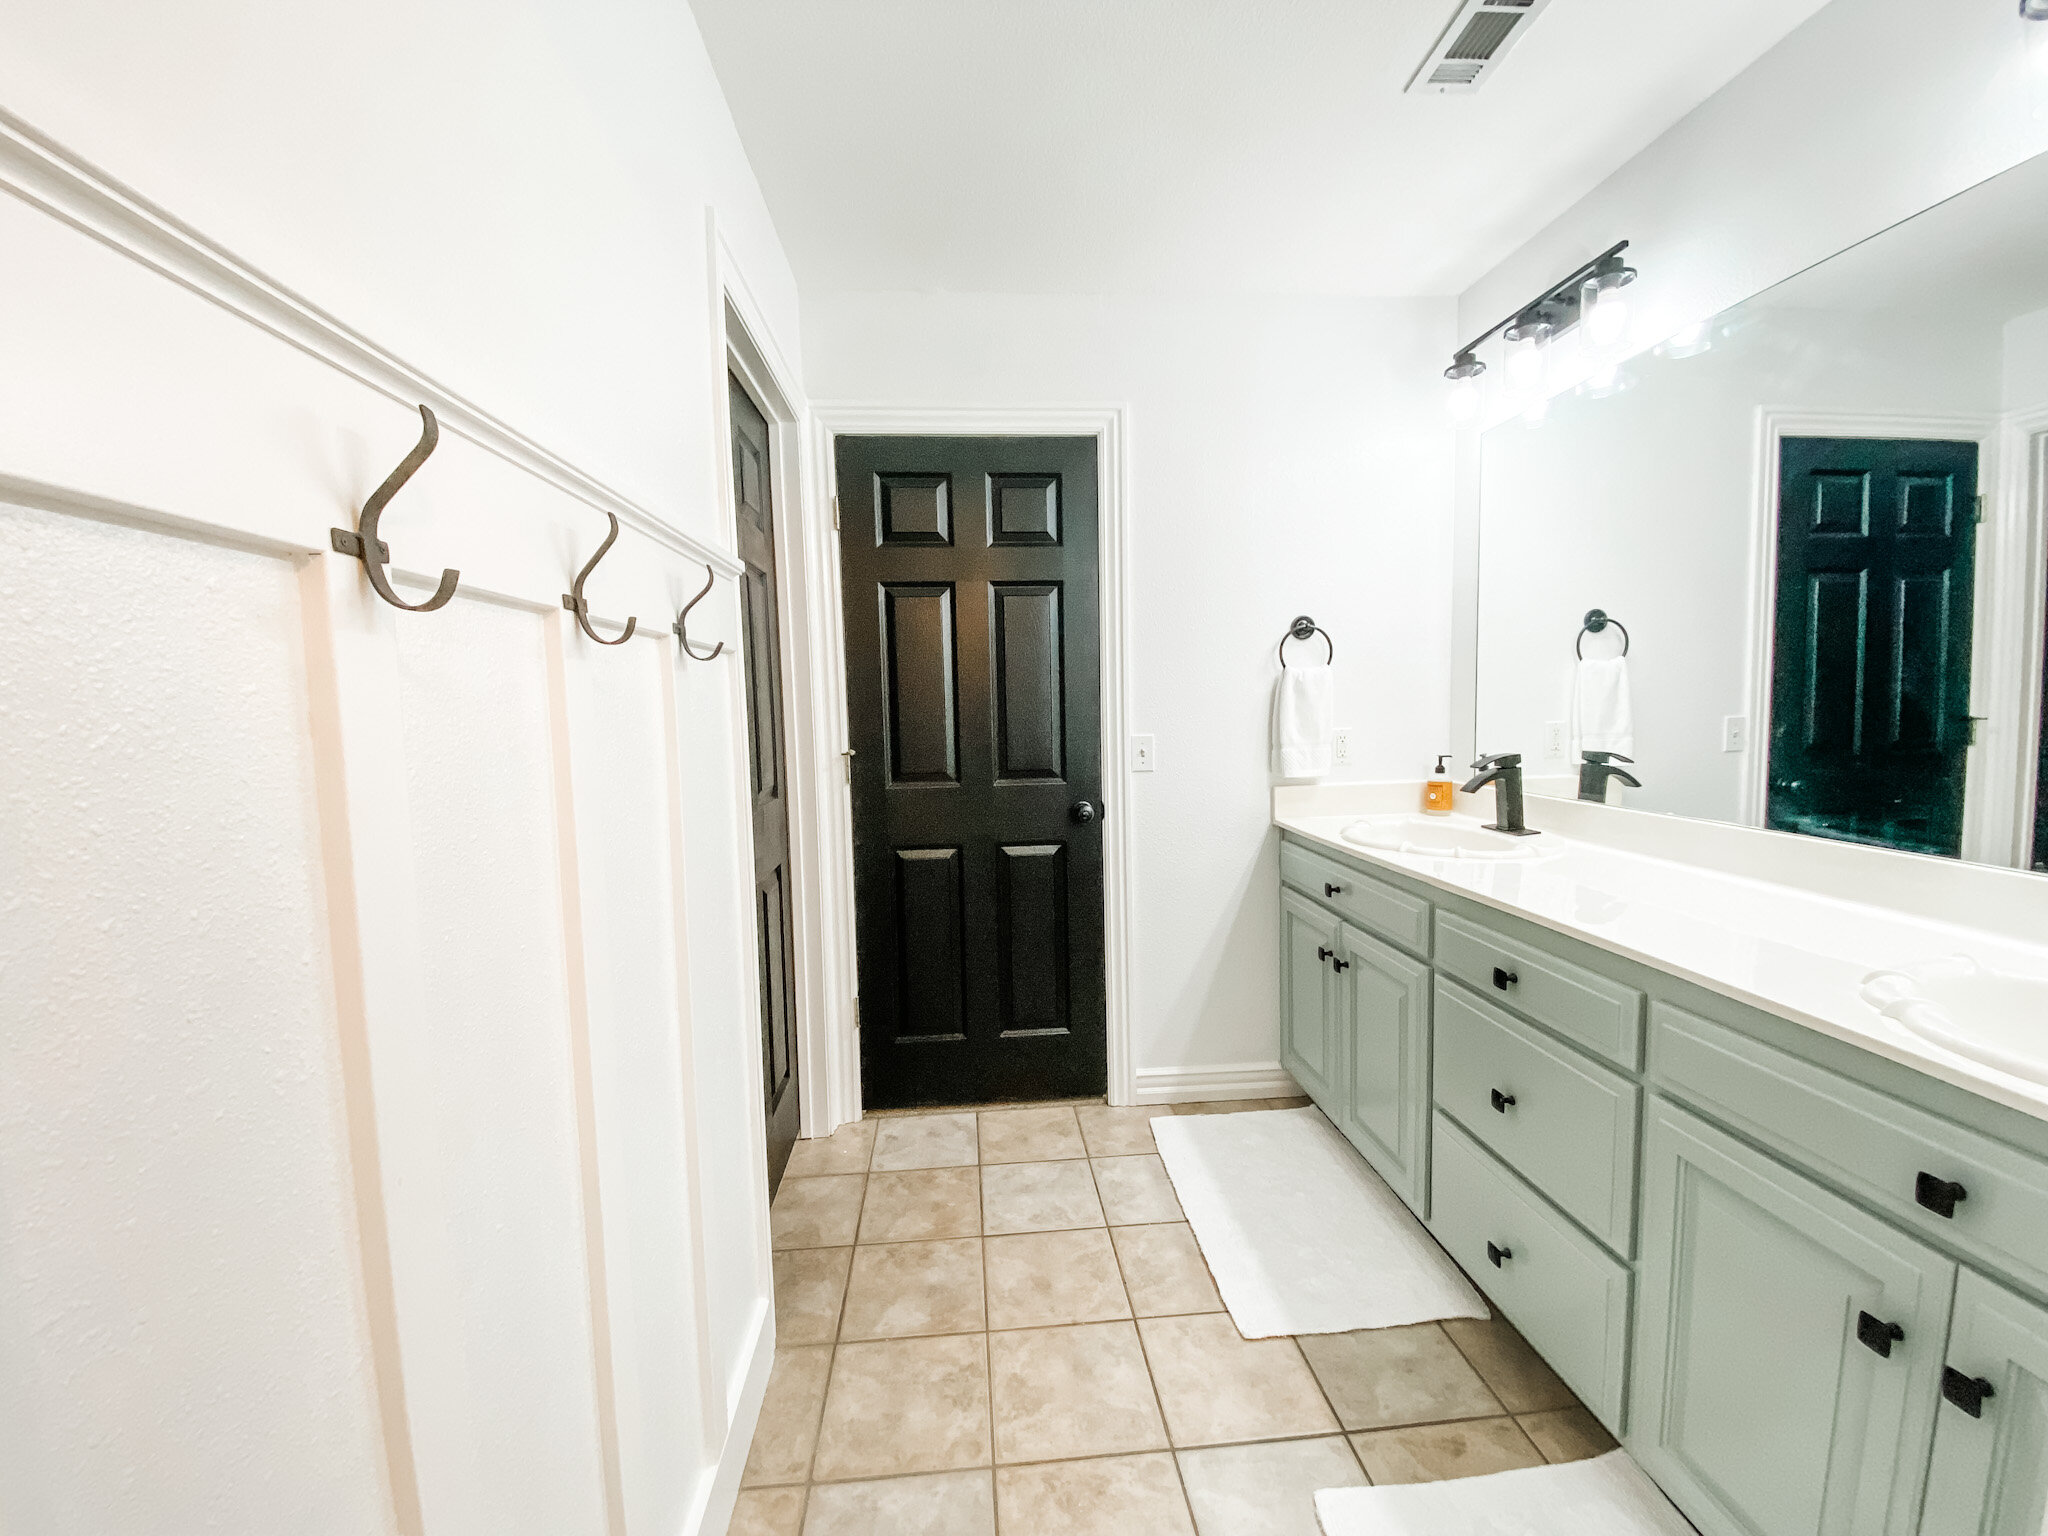
I would have loved to change out the 23 year old tops…maybe add a pretty tile backsplash…but the tops aren’t terribly offensive (just a bit dated) so for now they stay. Just added the new faucets.

Three new light fixtures…two vanity lights and a pendant light…again, Amazon. All three for less than $250.

IMG_1884.JPG

I could have repurposed the lights that where there with a little paint but the new were worth the investment.

Again, this space only gets used 2-3 times a years so it’s not like I need something expensive.

The flooring could stand to be changed…but again, this is a room that is rarely used….soooooo…..

The only other thing I would love to do in this room is change out the mirror…or at least frame it. I found THIS tutorial for a wall treatment I absolutely LOVE….

KM_DIYMirrorUpdate_0015.jpg

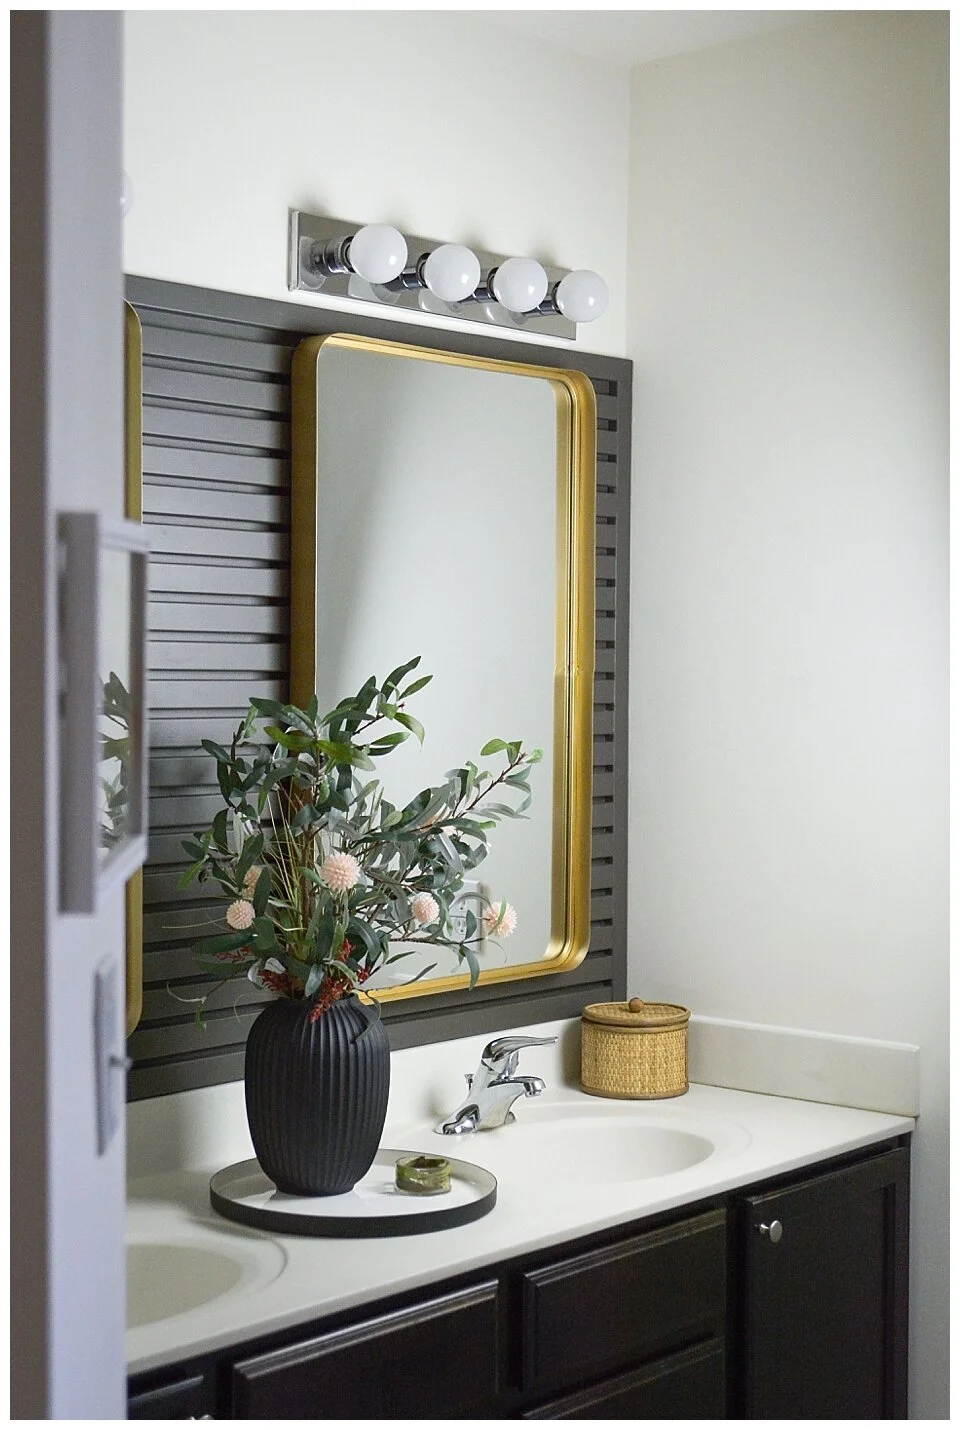
Not necessarily the gold mirrors…I think I would go with round wood framed. But I love the wood slate treatment and I may eventually tackle that project…someday…maybe when we have another national crisis and I need to focus on something constructive.

Sadly at the rate our country is going, that may be next week.

With all the negative looming over our heads…fires, hurricanes, Afghanistan, Covid, inflation….I can not stress enough how important it is to stay focused on the positives in your life. Believe me when I say I GET IT. It is hard to stay positive when people we love are sick and dying, our retirements are swirling the drain, you can’t meet you monthly financial obligations, the very fabric of our great country is being shredded.

Turn off the tv…shut down your computer….turn your radio dial. I’m not advocating bathing yourself in complete ignorance….just turn off and tune out the onslaught of negativity and focus on something that makes you happy.

The laughter of your children as they play.

The sound of the the crickets and birds on your morning walk around the neighborhood. (Get out and breath fresh air…EVERY DAY)

The babble of a brook in a nature park.

Coffee on the porch early in the morning before the heat and humidity sets in.

A tiny bit of “quiet time.” (Whether you do yoga, meditate, read your bible, just sit and stare…ALWAYS carve out a little bit of quiet, alone time EVERY DAY.)

A stroll down the aisles of Hobby Lobby…fall and Christmas are just around the corner!!!

I’ll admit it…my life isn’t all roses and peach fuzz. Somedays I really struggle to find something positive to focus on. But as I said HERE, you choose your “hard.”

Choose wisely.

Coffee Bar...

IMG_1824.JPG

When I looked to Pinterest for inspiration for a coffee bar I realized that there are some super serious coffee connoisseurs out there. I just wanted a nice organized place for a few coffee necessities.

My stove top area in the kitchen is a bit tight for a “coffee station”…

IMG_0684.jpg

…but we managed because I have TONS of prep space on my island. Regardless, I wasn’t happy with having my coffee maker in this area….and I didn’t want to have a full sized coffee pot taking up even more space so we would have to remake coffee all morning in our little 4 cup maker.

I decided to utilize a corner of the counter top in the laundry room for a “coffee station.”

IMG_1826.jpg

Even though we make coffee every morning, the distance from the kitchen trash can and water source was almost equal so it really was no biggy to put it in there vs. on the kitchen counter.

Right now I am on a quest to use up some of the wood and materials I have accumulated over the years. It would have been real easy to go out and buy new materials to make shelves but I decided to get resourceful.

When I remodeled Katie’s room eons ago I removed the black floating shelves she used as her makeup station….

(Man my photo skills sucked!!!!)

(Man my photo skills sucked!!!!)

I’ve kicked those things around for YEARS thinking I would eventually use them.

They weren’t the size I wanted for my “coffee station” and not even the style. But I decided I would try to make them work.

The first thing I did was cut them down. Not difficult since they are constructed out of fake wood and cardboard. I did have to take a metal grinder to one of the metal support brackets to make it shorter, but that was seriously no biggy.

I did add some wood support inside the corners of the cut down shelves because my next step was to clad them in wood.

I had some leftover “bead board planks” from another project…similar to this…

…so I used that to clad the tops and bottoms of the shelves (just glue and a few nails). Then I used some 1”x3” pine boards I had for the fronts and sides. A little stain…a little polycrylic to seal.

IMG_1822.JPG

Repurposed floating shelves…they didn’t cost me a dime because I used scrap materials I had on hand.

My goal was “rustic” shelving…I think I accomplished that.

I did purchase a few new canisters…one for coffee, decaf, and cocoa.

The old silver tureen has held my filters for years…love it.

IMG_1820.JPG

I found this cute little office supply thingy…originally labeled for paperclips, rubberbands, erasers, stamps etc.

IMG_1825.JPG

I decided it would be perfect for all the different sweeteners my family insists on…God forbid they use the one I use. I relabeled each space for my purposes.

A fake plant. (BTW I keep reading fake plants are a decor faux pas…ask me if I care!)

We did purchase a larger coffee pot.

Again, this space is right off the kitchen so it really isn’t a bother. I like that it freed up a little bit of kitchen counter space.

I would like to add that 1) I now have a HUGE laundry room and 2) it is just Brian and me so rarely are there piles of laundry demanding my attention. I can see where some may not have the room or desire to use the laundry room for this purpose! But for us, it worked out perfectly.

I am a HUGE proponent of looking to Pinterest for inspiration…but sometimes we get a little intimidated by what we see online and forget we don’t NEED all that froo-froo or even have the space for it….

783f7a78d45c3e595640ffaf03ff1841.jpg

Don’t get me wrong…I think these spaces are amazing…but for YOU are they realistic? Hopefully my tiny little corner will inspire you to “think outside the box” if you need to create a space. Know that you don’t need a huge space for a basic coffee bar if you just need a place for a few basics.

static1.squarespace.png


Lessons in DIY....

One of the things I love about this house is the irrigation system…no more dragging hoses and sprinklers around the yard all summer.

In theory.

The system has been severely neglect for years so it has been a total rework. We finally got the two zones (there are four) working for the bulk of the front and back yard.

As usual, I did what I always do when I want to learn something new. I hover. Followed the irrigation guy around watching every move he made (for a $100 an hour I figure I should get a lesson).

I googled how irrigation systems work and how to repair and replace malfunctioning and broken heads.

I installed the Zone 3 drip system for the flower beds. Yay me!

Now I think I am an expert and thought I could tackle Zone 2 which wasn’t working at all.

Zone 2, the zone on the north side of the yard, has been a total bust. I knew there HAD to be a break in the main water line some where, I just couldn’t find it.

I am tenacious…the darn thing was broken and come hell or high water I was going to fix it.

After WEEKS of digging around and tracing lines, I found not ONE, not TWO, but THREE breaks in the water lines…..curses!

Needless to say my newly sodded yard looks like it has been hit with mortar shells.

IMG_1689.jpg

The first two breaks were relatively easy fixes….the third has been a total booger. It took three full days and at least 6 or 7 trips to Lowe’s…I repaired the same spot SIX times before I finally got it right…I think…I hope…unless one of the connections broke loose again when I covered it with dirt.

Today’s lesson on DIY. As I have said before, my daddy didn’t have time to teach me EVERYTHING I need to know about DIY. But what he did teach me was a valuable lesson. If you want something fixed, repaired, built, or changed, be willing to do the research and put in the time and muscle to do what needs to be done.

I didn’t have a clue about irrigation systems. Zip, zero, zilch. But I am not about to pay someone $100 an hour to do something as simple as change out busted heads. So I learned…and am still learning

The water line repairs….that’s another story. This was one of those times when after 3 days of crawling around in the mud and AT LEAST six trips to Lowe’s, I began to wonder if it was time to call in a professional.

I suspect it would take them all of about an hour to do what took me three days!

DIY lesson number two….know your limitations.

That’s a tough one for me.

I do get to share one little project I managed to complete while I was waiting on water line repairs to dry.

Years ago I bought these old metal wheels at an auction. Thought I might sell them but never have so they just sat in the yard with no real purpose.

This is the picture I took to post on Facebook Marketplace eons ago….

28336456_10213705878788595_1856686047250220767_o.jpg

I’m not really a “yard ornament” kinda person so the fact that I had these big ole metal wheels just sitting in my yard was, well, just not my jamb.

I moved them to the new house and set them in the back corner of the yard and thought MAYBE I could find something to do with them…..eventually.

Now I do like “sitting” areas….and the more I looked at these wheels, the more I thought, “Hum, just MAYBE I can figure out a way to turn this into some kind of bench or something.”

So last week Brian and I went out to this ratty little old “hobby mill” and picked up a live edge board, brought it home, power washed it and made a bench…I really like how it looks tucked away in the back corner of the flower garden.

IMG_1691.jpg

(The concrete “bench” in the forefront of the photo was there when we bought the house…we were told it was part of the old farmhouse that sat here originally…that sucker isn’t going anywhere! Makes a great place for squirrel food in the winter!)

IMG_1693.jpg
IMG_1694.jpg

Presto, bingo! Now instead of having some big ole’ honkin’ metal wheels in my yard that cause me confusion and grief, I have this nifty one of a kind bench in my back flower garden.

I haven’t decided whether to seal it or leave it natural.

LOVE!

We picked up another piece of milled wood just in case we needed another piece…I decided to use it to make a another bench. The concrete bases were from a bench in my Mother’s yard. It use to have a concrete top but someone (who I shall not name since it might embarrass my oldest daughter) sat on it and busted it. So these bases have just been sitting around waiting for inspiration.

I think I will seal these boards. I love how you can see the mill marks and a sealant will really make those “pop” like it did on this old wood I used to make a table.

IMG_1696.jpg
IMG_1697.jpg

Irrigation system is (fingers crossed) fixed and I managed to get a few little projects complete.

Makes for a good week!

static1.squarespace.png

Painted bathroom cabinets...

As I mentioned in the first two reveals of my master bathroom (HERE and HERE), it is one of those ever evolving rooms.

This is where we last left off…

…the addition of the operable windows. I can not express how much I love these.

The cabinets….not so much. They are actually kind of an off-white-yellowed-ick kind of color. And the hardware was pretty blah and cheapo. Cheapo is great if it has just a tiny bit of character, but these didn’t.

I debated changing out the drawers and doors to mission style doors but honestly I don’t want to spend the money on them right now. Someday I may do some major magic on these cabinets but for right now I just want to give the room a more “polished” look.

Paint…hum. An inexpensive way to give a space a little facelift.

So the debate raged…white or color…and if color, what color.

You would think as much as I do this kind of thing paint color would be no big deal for me.

WRONG!

This is just a few of the paint samples I brought home.

This is the trick to finding the right paint color. Go to the store and pick up every sample you THINK you might like…then take them home and look at them in your light. You would be surprised at how much a paint color can change in different lighting. If you still find yourself drawn to 2-3 colors, buy sample pots…they are well worth the investment. Also, if you are torn between a light color and just a tad darker, go light. First, the bigger the area, the darker a paint will look. Second, if you still think you want darker you can always go back and have them mix it the darker shade. Once you have the darker shade mixed, you really can’t do much more than buy another gallon.

I finally landed on one I think I kinda sorta like. I ordered simple brushed nickel hexagon hardware…inexpensive but with a tiny bit of character.

IMG_1656.JPG
IMG_1657.JPG

The two vanities took all of about 1/10th of a gallon of paint. I should have bought a quart but custom colors tend to be a smidge off in the quarts.

All in all I’m not UNHAPPY with it, but not sure I am over the moon thrilled. For the time and money you can’t beat slapping a coat of paint on a wall or a piece of furniture or cabinets to change the entire look.

Now, I want to share my latest “find.” I am, as I have said before, “old school.” Primer and oil-based on furniture, trim and cabinets and latex on walls.

I have experimented with a relatively new (to me) product and I have decided I kind of like it.

It is a “hybrid” paint….will go over latex OR oil-based without the need to strip or prime. I do knock off the shine and any rough spots just a tad with 220 grit sandpaper and wipe it all down with tack cloth, but other than that it takes very little prep. And the super cool thing is it doesn’t matter if the old paint is oil-based or latex…usually that matters A LOT. This hybrid paint needs no additive, brushes on super easy, “levels” beautifully (which is great if you are brushing or rolling on wood), cleans up with soap and water and so far seems super durable.

The only problem I have with it is it seems to be a tad thinner than most paints and you need to watch carefully for drips and runs…but because it levels so nicely they are easy to manage!

Both Sherwin Williams and Benjamin Moore carry it and I have used both…with great results.

So if you are not sure what type of paint your trim/cabinet/furniture is and you don’t want to go to all the trouble of priming, try this product. So far, so good.

So that’s that for this bathroom…for now. I really don’t have any more MAJOR changes I want to make in there. But knowing me, I’ll find something. This week my project has been my utility room. A necessary change that I will share next time….

static1.squarespace.png

Master bathroom windows...FINALLY!!!

IMG_1509.JPG

At last!

This isn’t the first master bath reveal and it won’t be the last.

This room is one of those “processes” that will take time, money and a lot of of “humming.”

By that I mean I’m still not sure what i want to do with the cabinets. But I knew from day one I wanted operable windows in this room. Why I didn’t do it when I did the major remodel before we moved in is beyond me.

I had the perfect spot….

IMG_0455.jpg

On either side of my vanity mirror. This wall is adjacent to the back yard and over looks the flower garden I put in under the humungus oak trees.

I learned in my last home that an operable window in the master bath is a MUST!

It is the mustiest, stuffiest room in the house and there are just times when you need to throw open a window and let the fresh air in!

Adding a window will entail cutting sheetrock, removing brick, framing and in my case moving both plumbing and electrical.

Like every major project, the best way to start is to just start…and in this case that meant cutting two big ole’ holes in the wall.

That was when I discovered the plumbing in the left opening. Okay, no biggy. I can manage that. I didn’t discover the electrical issues in the right window until I removed the insulation a few days before my windows arrived. CURSES!!!!

Again, no biggy for me. Just a few junction boxes, new wiring , relocate a light fixture…. blah, blah, blah. Fortunately I have a few basic skills (and a SIL electrician on speed dial) so I was able to do what needed to be done. But If I were without those skills and planning a “little remodel” like this, I would certainly budget for professionals. If you don’t need them, kudos…but be financially prepared.

IMG_1509 2.JPG
IMG_1507.JPG

They let in a ton of natural light!!!! (This is with NO lights)

IMG_1506.JPG

I can not even express how much I love these windows.

I thought adding a window in my laundry room was the best decision I made in this house. Hum…may be a tie! The extra light and ventilation in both is a must!

Even through the screens, I love the view of the back flower garden!

IMG_1512.jpg
IMG_1504.jpg

Now on to the next head scratching project. The bathroom cabinets. It may be difficult to tell in the photos but they are kind of a blah off-white.

I have contemplated refacing the fronts and replacing the doors and finishing it all in a light stain. I like the “concept” but when I searched Pinterest I kind of don’t care much for the look.

This is just a few examples of a bazillion I have put in my “inspiration” file….

a5a48166a2fd9000b6bf16011990d19d.jpg
fce0f15bf4f9aa2fd15d91ab2e960d5c.jpg

I like, but I don’t love.

I kind of like the look of a color…

8bcf39527809249718d4f65e500c4114.jpg
75df4049c026a2d7d83548afdc2e15ca.jpg

Again, liking but not sure I am loving. (And again I can not give proper credit because I stole them from Pinterest and dropped them in my inspiration file…my sincerest apologies!!!)

As much as I dislike the thought of the “sterile” look of all white in this bathroom, I think in reality I would really like it.

So right now I am leaning towards painting the cabinets a brighter white and definitely replacing the hardware.

That is the nice thing about paint… if I eventually find a color that really trips my trigger, it’s just another gallon of paint, a couple of hours of time and a back ache.

Until next week…

static1.squarespace.png

Patriotic Wreath....

PATRIOTIC WREATH

PATRIOTIC WREATH

I saw this wreath on Facebook and loved it…

IMG_1372.jpg

But as I have mentioned before, I learned the hard way NOT to order from unknown sites and always pay close attention to reviews….this one got bad reviews on Amazon.

So I decided to make one.

First, I had to create the “bunting.” I decided to sew together three fabrics I found.

IMG_1394.jpg

I also picked up all the goodies I wanted to adorn the wreath with…

IMG_1479.jpg

….ribbon, floral pics, the wreath. Since Hobby Lobby only has select stuff on sale every other week, this can take some time. For the record, the grapevine wreaths never go on sale, but they are only around $9. For that matter, if you have a wreath you are no longer in love with, deconstruct it and reuse it, or pick up a cheap one at a garage sale!

IMG_1450.jpg

I bought two yards of each fabric, cut the widths in thirds, then sewed each together. I actually got three buntings so I made a few extra wreaths. Two yards would be 72” so you could also use a table runner or a long scarf if you want to avoid the whole sewing thing.

I folded the fabric in half and kind of gathered it by hand then laid it onto the grapevine wreath….

IMG_1481.jpg

After getting it pulled super tight, I secured it with a zip tie. After adjusting it by hand I hot glued the edges of the bunting at the top just to give it a little bit more security,

Next I made a spray and my funky bow. I have linked to THIS tutorial several times since I discovered it at Christmas. I LOVE how easy she makes this process! I have now made dozens of these decorative sprays for every holiday, big and small, and I just love them.

IMG_1482.jpg

I made my floral spray and made sure it was the size and fullness I wanted. Then I made my bow. I chose these three ribbons for my bow…

IMG_1483.jpg

These bows may look intimidating, but trust me, the tutorial I linked makes it SUPER simple!

After making the bow, I secured it to the spray with floral wire then attached it to the wreath with small zip ties and floral wire!

IMG_1487 2.jpg
IMG_1486.jpg

I absolutely love this wreath and it will work perfectly from Memorial Day through July 4th! In a few weeks I will swap out my spring pillows on the porch for my patriotic pillows! I already have my red, white and blue candles on the table and last week I swapped out the little ribbon on my welcome sign….

IMG_1451.jpg

All part of my plan to stay festive year round. Who said decorating for the “holidays” is only for Thanksgiving and Christmas.

My bathroom windows are finally installed and the only thing left to do is the brick…but the inside is trimmed and painted and I LOVE IT! Can’t wait to share!

Until next week….

static1.squarespace.png

Adding glass to an interior door...

IMG_1434.JPG

As I mentioned before there are certain things that made this house instantly feel like home.

Like my master bath….

IMG_0439.jpg

Almost identical to the master bath in my last house.

IMG_4031.jpg

Same backsplash, floor tile, vessel sink, shower tile…right down to the same ole’ shower curtain and rugs. And I am waiting on windows that are pretty much identical to the window I had in my old bathroom. Still not sure what I want to do with the cabinets but I have always liked the stained and open shelving look of the last house…

….who knows. I may do a little cabinet makeover at some point.

My black doors….

after.png

Loved them in the old house, love them here…it was one of the first things I did to make this house feel more like my home.

IMG_0716.jpg

The entry…

IMG_1171.jpg

Same board and batten, same mirror and wreath, same rug…black door…

IMG_5981.jpg

I like what I like…and these are just a few of the design elements I really loved in my old house.

Then there are the paint colors, plants, shelving….sooooo much more!

One project I did at the old house that I always loved was the reeded glass door in my laundry room…

IMG_5030-1.jpg

I absolutely loved this project and it was one time I actually posted a pretty good tutorial. Mainly because when I went looking for a tutorial, I couldn’t find one!

I have known from day one I wanted another door like this in my new house. I debated whether to do it with the pantry door or laundry room door.

I finally decided to start with the pantry door….

IMG_1005.jpg

Primary because I used the reeded glass in the upper cabinets and I thought it would look good to have matching glass in the pantry door.

IMG_1434.JPG
IMG_1435.JPG
IMG_1432.JPG

I LOVE it! I love this pantry and the door is just the cherry on top! Eventually I may do the laundry room door as well because then the light from the window in the laundry room can filter into the breakfast room. For now I am perfectly content with the one door.

This is a MUCH less expensive option than purchasing a new glass door…and you get the option to choose the type of glass you want vs. having to get whatever “frosted” glass is in the door you purchase. And it is seriously NOT a difficult project to complete.

YOU CAN DO IT!!!!

A kitchen makeover and painting a refrigerator...YOU CAN DO IT...and sometimes should!

My friends, Tammy and BR, have lived in their home for over 20 years…and like me they are constantly “projecting.” Tammy is the designer ( a.k.a.instigator,) BR is the muscle and craftsman, and usually I am just an advisor and cheerleader.

A few months ago, they started a HUGE project…remodeling their kitchen.

It is a project they have dreamed about and we have discussed and one their 1990s house desperately needed for years!

63279344411__FAECBF4B-CD0D-4684-9D1D-C641426B6A4A.jpg

This picture was taken after they replaced the head scratching paddle fan over the bar with a thrift store upcycled light fixture. MUCH better but as you can see, there was soooo much more to do.

Remove the funky over-the-cabinet florescent lighting and add can lighting, paint the cabinets, replace dated hardware, a new venthood, new tops and backsplash and replace the ORIGINAL almond stove.

A major list on a tight budget.

During one of our “advisory sessions” (again, my advice and opinions are always free) Tammy mentioned she couldn’t wait for her black refrigerator to go out so they HAD to replace it.

With all the other “must have now” expenses, like replacing the dated almond stove with a stainless, replacing the black refrigerator just wasn’t in the budget. They had already replaced the dishwasher and like most people (including myself) the expense of replacing all our appliances at once is often cost prohibitive.

Light bulb moment.

PAINT IT!!!

I know they have “stainless” spray paint but I seemed to recall a product specifically made for painting refrigerators to look stainless. So I started googling and found this product on Amazon….

The product had good reviews. And like I told Tammy, if it doesn’t turn out great, you can still probably sell the refrigerator on Craiglist for a hundred bucks.

So this is what we started out with…a plain ole’ black refrigerator….

IMG_1096.jpg

The first thing I did was read ALL the directions but most importantly, the Amazon reviews. The people who have used the product gave some pretty solid advise.

After reading all the reviews, we went to work. I removed the handles (even if you want to paint them, remove them), cleaned the doors thoroughly, and taped off the water dispenser and inside around the rubber gaskets. One of the sagest pieces of advice was to apply THIN coats…so after the first coat this is what it looked like…

IMG_1100.jpg

While this might not instill confidence in one’s ability to do this, I know how important it is to “trust the process.”

The second coat, a tad better….

IMG_1101.jpg

By the third coat we were all amazed at how great it looked!

BR did a great job of working Tammy’s list…he removed the over head florescent lighting and capped off the cabinets with crown and installed can lights, painted the cabinets and added new hardware,…

…. removed the old venthood and cabinet above the stove and installed a new stainless vent…

IMG_1239.jpg

….and removed the old tile backsplash and installed new.

IMG_1231.jpg
IMG_1238.JPG
IMG_1236.jpg

Quartz counter tops were a little bit out of the budget but they were able to achieve a very similar look with new formica.

Beautiful!

Tammy LOVES her new kitchen and fortunately she loves her “new stainless” refrigerator.

Would she be happier with a brand new REAL stainless fridge? Wouldn’t we all!!!! But this is a prime example of changing an element in a room that will stop the growling (and the envy and frustration) until you can afford to do what you really want to do. I have done it over the years with furniture and now I can say I have successfully done it with a refrigerator.

If you don’t love it, CHANGE IT!!!!

Swing pergola tutorial....

The past few months have been super busy and honestly a little over-whelming. (When I can, I will share.)

As a result I haven’t had a lot of time to do many DIY projects around the house. Which of course explains my absence last week. For now, the best I can do is link back to some of my all-time favorite projects!

One of my all time favorite projects was the swing pergola. As I mentioned in the earlier post, I have built several over the years!

This is a picture of one of the pergolas pre storage building update and we now have a privacy fence along the back of the lot. I meant to take a “current” photo, but see above!

With so many people at home looking for “projects,” this little build is perfect!

It takes a few days and will require a few sets of hands, but it is doable.

Trust me, you will get HOURS of enjoyment out of it! And maybe even a few naps!

(And remember, wear a mask when you pick up materials!)

How to paint your front door properly...

I have been super busy with things other than DIY projects. But one project I did manage to do this past week was repaint my front door…just a quick little one coat “refresher.”

My tutorial for painting an exterior door gets a lot of traffic so I though I would link back to that post just in case you need a little help.

image-asset.jpg

I also painted house numbers on the door and I shared that tutorial HERE.

Remember, not everyone will see you newly remodeled bathroom or organized linen closet…but almost every guest will see your front door…keep it nice!!!

This is just one of the little projects I managed to get worked in this past week in the midst of some “big stuff” that I will share when I can.

In the meantime, I may be linking back to some little projects ANYONE can do! So if you are new around here you might want to stay tuned for some basic tutorials!