Antique china hutch before and after....

I have had this china hutch in my booth at Midtown for several months.

Sadly, I probably paid WAY to much for it...first auction of the season and everything was going for WAY more than what they normally do. I bought it because I think it is beautiful, but truth be told, it really isn't the "style" people look for these days, as is.

I have debated for some time whether I should bring it home and paint it. I just wasn't sure that would be the answer.

Just this weekend I decided to go ahead and bite the bullet but I was still uncertain. Until I saw this....

Marian at MissMustardSeed featured this beautiful piece she painted. You can see the "before and after" on her site!

Sometimes when we see what others do, it is all we need to find our own inspiration and relieve any fears we might have of doing what needs to be done to enhance a piece!

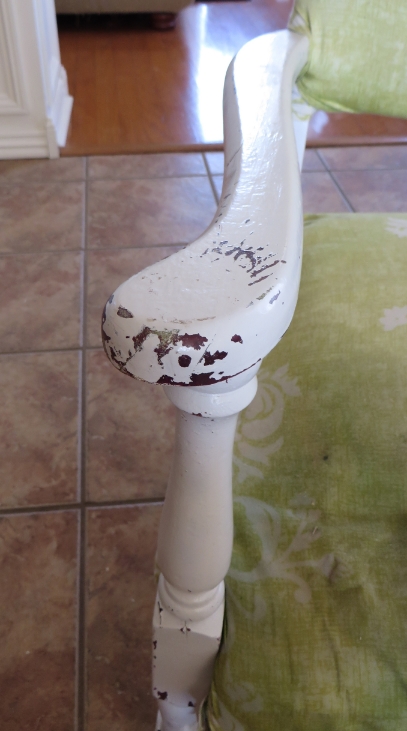
I love the grey against the mahogany, but right now everyone around here seems drawn to the "whites" so that is what I went with!

I used my favorite off-white, Swiss Coffee, for the "plaster paint." I did not sand or prime before painting it with the plaster paint...no need unless the piece you are working on is really rough! I distressed it just a bit (220 grit sand paper) to bring out the detailing and sprayed the exterior with poly to seal it!

I had originally planned to leave the inside stained...but it still seemed a bit dark so I removed the shelves and painted the inside a soft "teal." I taped and papered off the exterior and primed the interior with Kilz, sanded, tacked and then applied two coats of spray paint! I left the shelving the original stain finish.

I absolutely adore the original hardware so I left it!

One thing Marian does is beautifully style her pieces for photos. I rarely have the energy (or back!) to haul a piece inside and "pretty it up" before I take pictures. As I have said before I am more about the process than the pretty. HOPEFULLY someone else can envision the piece in their home and can find their own inspiration for staging it! Someday I may have the energy and space to make a pretty "backdrop" in my shop (okay, so it is really my garage!) Until then, the best you are going to get is a halfway decent "before and after" shot and maybe a little bit of instruction. 

The two top shelves are a little "bowed." They are thin enough that I think I can lay them out with some weights on them to flatten them!

The debate raging right now is whether to reinstall the door (I did not paint it!) or leave it open. 

Hum....

If this gives you a little inspiration to "makeover" a piece in your own home you have fallen out of love with, I have accomplished my goal!

The den makeover reveal...

Honestly, on the surface it doesn't look like much of a reveal.

I had plans...BIG plans. New couch and rug, paint, new flooring, fireplace makeover...teal, greys, whites. 

I found my inspiration, made a plan and started the plan.

When it was all said and done, it really doesn't look like I have changed much. My back and checking account say otherwise!!!!

Two huge projects did get completed. I painted and refaced the fireplace with travertine tile...

....and installed new wood flooring!

A little TIP for wood or laminate flooring. This is an "engineered wood flooring" you glue down. The transition pieces for this flooring were about $50 for a 6' stick, and I need three pieces! I went to Lowes and found unfinished transition pieces for around $15 a stick and stained them to match the flooring. Much cheaper! When I did my master bedroom floors in laminate, I did the same with the existing transition pieces...just gel stained them to match the new flooring!

Those two projects alone made a world of difference!

I did what I always do when looking for the perfect paint color ...I painted two samples on the wall and looked at it...for weeks.

But when it came right down to it, even with the new flooring, I really love the original color. This is my "fall room." Fall is my favorite time of the year and I just love the colors associated with the season...burnt reds, oranges, yellows, etc! 

So off to Sherwin Williams I went to see if they could mix a 15 year old color. God bless 'em...they mixed it right up. I painted over the "test patches" and gave the entire wall a fresh coat of the same exact original color.

I did infuse a few splashes of "teal" here and there. It all started with these little birdies I picked up at Midtown several months ago...

I THOUGHT I would like this table in teal...

Boy was I wrong....I really disliked it so when I cleared out the furniture to install the flooring, it went straight to the garage for another makeover...

I originally painted these candle sticks teal...nope, not happening. So again, back to the garage for a second makeover. 

I did paint this lamp a soft "teal." 

It's not really "my style" but it is different and I like that. And the shade is actually brass with a black exterior. I got a great deal on it at a design studio auction. It had the original $450 price tag on it. A little pricey even for a heavy brass lamp...but for my $15 bid it was worth it! Believe it or not, you can paint brass!! A little metal primer and a little spray paint!

After dinner with my super awesome girlfriends, we made our usual TJMaxx run! I found these awesome pillows and decided they will look perfect on the grey couch I want to eventually get for this room...eventually...someday.

Not sure they are "all that" on the old yellow couch, but they will inspire me to eventually "transition" this room into the vision I had in the beginning...greys, teal, whites. For now, I will leave the original pillows...they have a little bit of teal in them...just for the sake of the ratty old couch!

Not all "makeovers" happen over night. Sometimes, you have to take your time and do what your back and budget allow. 

So yes, I still want to buy a new couch...and a new rug...a few new club chairs. 

In time. For now, I will just enjoy the new floors and the "new" fireplace!

I party with Remodelaholic

Walnut MCM dresser makeover...Part 2!

You can see "Part 1" of this makeover here...a tutorial on stripping and oiling these amazing pieces!

Okay, I have to admit...EVERY time I work on one of these walnut pieces, two things happen...I fall madly in love with it and I am reminded of how much I LOVE walnut!

This little table is a prime example!

Solid walnut and an absolute true treasure! It certainly didn't LOOK like a treasure when I brought it home, but with a little time and effort, these pieces can become breathtaking additions to any home decor.

I know painted furniture is ALL the rage right now and I agree whole-heartedly that there is indeed a time and a place for painted furniture. My decorating motto...if you can ENHANCE the piece by painting it, go for it! 

Some people aren't real keen on stained furniture...and that is okay. But I believe every decor needs the warmth and beauty of a quality natural wood piece...whether it is a table or chair or whatever! Not every piece needs to be painted and no decor should have ONLY painted furniture. Of course, no decor should have ONLY stained furniture either...even I throw in painted pieces here and there...probably not enough for some people's taste, but I do like to "lighten and brighten" occasionally. I painted my bedroom furniture and my office desk and even the little side table in my den. But you may note one common element on all these pieces...I left a little bit of natural wood! (Wow, looking at these old posts I realize my photography skills have come a long way! Still a ways to go, but definitely better!) 

I decided to go with both paint and natural wood finish on this dresser. I like the way the painted "box" seems to frame the wood drawers! In my opinion, the results are A.M.A.Z.I.N.G!

So get ready for a BUNCH of pictures...because I am loving this piece!!!!

As I mention in the first post, the top had some pretty serious ink stains...

With a little "chemical" magic, gone!! When you find yourself faced with wood stains, hit the internet and search for a chemical solution. Trust me, sanding is NOT the answer, especially if you are working with veneer.

Can you even believe that this.....

...could become this. No stain...just a simple strip job and 4 coats of tung oil finish! Walnut in all it's natural glory! 

I put this dresser in my oldest son's room. He doesn't actually LIVE here, but he still has a lot of stuff here. His room serves as a guest room and a place to keep all his "stuff." The other kids call it the "museum"...trophies, jerseys, plaques, certificates..high school and college mementos covering pretty much every square inch of the wall space.

Sooooo...it was time. Time for a fresh coat of paint. Time to box up most of the "stuff." Just time. 

So later this week I will share his room makeover. 

Want to know a little secret? For the first time ever I didn't stress over paint chips trying to pick the perfect paint color. I chose a color that everyone has been raving about on Pinterest and decor blogs. I literally called the paint store and told them to mix up 2 gallons, sight unseen...and I LOVE it!

I can't wait to share!

I am sharing this project with Christine at MustLoveHome.com as well as all my favorite Link Parties!

You can see the full room makeover here!


Ugly laminate dresser before and after...

Like old maple furniture, they are a dime a dozen...old "laminate" furniture. The pieces aren't constructed near as sturdy as the old maple furniture (Here, here and here are a few maple pieces I have featured) but if you have a "boring" old laminate dresser sitting around or if you stumble across one at a thrift store or garage sale for next to nothing, it takes little time and effort to bring them back to life! 

Like most of these pieces, the top and sides (basically the "box") were all laminate. The drawer fronts were wood veneer.

What is the difference you ask? Basically, laminate is a "plastic" type material over particle board...then a "grain" is printed on to give it a "wood look." Veneer is generally constructed of a real wood top layer glued onto a wood base. It is pretty easy to tell the difference...if it looks and feels like "plastic" it is probably a laminate...if it looks and feels like real wood (but it is not a solid piece of wood) it is probably a veneer.

The biggest difference for me when redoing one of these pieces is I always prime and paint the laminate...usually spray paint. I use a chalk paint treatment on the veneer because I can "distress" it and the "real" wood grain will peek through. 

On this little dresser, both the laminate and veneer were in pretty good shape. Sometimes you will see "chipping" on either the veneer or the laminate. Both are relatively easy to repair. First, scrape away any loose pieces. Apply wood filler with a putty knife and then sand it smooth after it dries. 

Since we are in the heart of "Razorback country" I decided to give it a black and red treatment. I thought it would look cute in a boy's room or maybe in someone's "man cave" as a tv console. 

Again, super simple transformation. I removed all the drawers and then removed the hardware. Replacing hardware can get real expensive, real fast so I decided to give these little pulls a makeover as well. After I removed the pulls from the drawers, I put the screws back in them and stuck them in some old styrofoam (here is a picture example). I primed them with a metal primer and then I sprayed them with the same spray paint I used on the box. 

I sprayed the "box" with Kilz, sanded, tacked and then gave it two coats of red spray paint. I painted the drawers with homemade black chalk paint (two coats) and then distressed them a bit. I sealed all the pieces, including the hardware, with clear spray on poly. 

If you have an old dresser like this and need inspiration for color or styling, check out Pinterest. There are sooo many inspiration pieces. Some even remove a few of the drawers and add a shelf in the space so it can be used as an entertainment center for a tv and video equipment. I have done that with an old maple dresser and it turned out super cute and perfect for a living room.

I had the chest that matched this dresser...I painted the "box" off-white and the drawer fronts a pretty tealy blue. I redid it months ago and it is long gone! This poor little guy has languished in my garage for months and was one of the many projects I managed to get completed this week during our little warm spell...along with cleaning out the pond (AGAIN!) and washing exterior windows!

Good thing I got a lot done the last few days because today it feels more like winter again. 

Christmas pillows....

One of the great things about the "blogoshere" is all the great inspiration AND motivation!

This past week I was reading one of my favorite blogs, "The Interior Frugalista", and Marie was sharing her snowflake decorative pillows...only she calls them "toss cushions." Gotta love those Canadians...lol!

Anywho, it not only inspired me, it motivated me to do something I seriously dislike doing...sew! 

I have been scavenging down pillow forms. I wanted down forms for the decorative pillows that have poly-fill and a few extras for some holiday pillows!

As I mentioned before I like down forms because they are more comfortable and have a "designer" look! To me they just look "rich" but their price tag can reflect that and it is difficult for me to fork over twenty bucks for something I am going to have to make a cover for and something that is nothing more than a "doo-dad." 

This past week I found 6 awesome down pillow forms, in varying sizes, ALL for under $7...a few for as cheap as $5. Thrift stores and flea markets. Yep...I am buying ugly old designer pillows, removing the cover and sanitizing the forms for reuse! (just toss them in a hot dryer with a dryer sheet!) 

Since I had all these forms piled up, I knew it was time to drag out the old sewing cart and get busy!

TIP: If you have a 18 x 18 pillow form, you may be tempted to cut your cover fabric 19 x 19 to allow for the seams. DON'T. Cut the fabric 18 x 18...your cover will be about 1" smaller than the actual pillow form, but that is what will make them look super "puffy" and "full." I read that once on a designer website (no source, just info stored in the back of my brain!) and I tried it...makes a huge difference! 

I have shared "pillow tutorials" on several posts in the past (you will note I advocated cutting your cover fabric larger back then...again, don't)...you can check them out here, here, here, and here. 

There is no sense in rehashing the "how to." I've provided a tutorial and there are "how to" tutorials all over the internet. Marie does a great job of "tutorialing." (As I have said before, if you can sew a straight stitch, you can sew a decorative pillow...if you can't, now is the time to learn.) 

So I am going to share just to provide inspiration AND motivation and give you a few little tips on where you can find material to make inexpensive holiday covers. 

My first "inspiration"  came from a Pottery Barn knock-off I found on Pinterest....

This little pillow was super simple to make. I used two pillow shams that came with a white bedspread I ordered to put over my down comforter for the winter. I was never going to use them on the bed, so I decided to use the fabric for my decorative pillows. I didn't have enough for the back, so I used the leftover fabric from the tea towel pillows I will share in a bit....

As you can see, I changed things up from the "inspiration" pillow. I used green sparkly felt and rhinestones...both of which you can buy at your local craft store. I cut a bunch of "leaves" from the green felt, and used a bowl to guestimate a circle...

Then it was just a matter of filling in the "wreath" and placing a few rhinestones here and there...basically, I eyeballed it! I used fabric glue on the green leaves and "Jewel It" glue on the rhinestones and let it sit overnight before I constructed the pillow. I used a "premade" silver bias tape for the piping! 

I made this pillow out of tea towels I picked up at Hobby Lobby...

....they were around $4.50 (50% off!) for two!

One set of towels made TWO pillow covers and I used the leftover fabric for the backs of the wreath pillow! I spruced it up a bit by placing a rhinestone in the middle of each of the snowflakes and added a little piping around the edge. The piping is made out of bias tape and you can find a tutorial here on how to make inexpensive decorative piping from bias tape!

I made two pillows with this snowflake cutout table runner and a white table cloth I bought at TJ Maxx. (I would not suggest using inexpensive tablecloths for pillow projects...just seems too "thin" and tends to ravel quite a bit. Lesson learned.)

I centered the runner on the piece of fabric I cut out for the front of the pillow and basted the top and bottom to it with my machine to keep it in place. After I basted it, I used the fabric glue around the edges of the cutout to keep it "flat."

Again, I glued a rhinestone in the middle of each snowflake. I just love "sparkle!"

After making two white snowflake pillows, I had enough of the snowflake cutout to make one more pillow. I picked up a "burnt red" pillow and I kind of liked the color so I deconstructed it, made it a tad smaller so the pillow would be fuller and added the white snowflake cutout material.

I only have one, but I think it will look great in the den where I have more "fall" colors year round!

I also put zippers on all these pillow covers so I can easily remove them and reuse the forms!

I tend to be an "OCD/symmetry" kinda person so I made two of each of the decorative pillows so I will have one for each end of the couch when it is time to decorate for Christmas.

All these pillows are 18 x 18 and honestly, I don't like the three lined up together. I found two smaller pillow forms and plan on making Christmas covers for them and using one with two of the 18" pillows on each end of the sofa...maybe...someday...IF I get a little more motivation in the future! 

While I was making a mess, I decided to make another "floor pillow" for the den. I had two large poly-fill forms (actually they were Euro-pillows with ugly covers!) I bought at an estate sale and I thought they would be perfect to toss around on the den floor for tv watching! I had already made one large toss pillow and two smaller decorative pillows out of some leftover fabric from my dining chair project. 

I used the drop cloth material leftover from this chair project and an iron on graphic from The Graphic Fairy. Since the pillow was fairly large, I decided I wanted the graphic to be bigger so I pulled it up in Adobe Photoshop, enlarged it and then printed it out on four sheets of iron-on transfer paper.  Then it was just a matter of piecing the graphic together and ironing it on the fabric. There was a little "line" where two of the pages didn't quite fit together perfectly...I used a Sharpie to fill it in a tad.

I removed the "Grain" wording on banner in Photoshop and had intended to replace it with "Love Life." But I had a few issues with my printer so I ran out of transfer paper. Since I put zippers on all my pillow covers, I will just remove the cover and iron on the new words when my order of paper comes in. 

I still haven't shared my fall decor. Truthfully, it hasn't changed a whole lot from last year. But I have a few little additions and I thought it would be fun to do an entire post about the fall decor and update my Holiday Decor pictures. After all, Thanksgiving is less than three weeks away and the day after Thanksgiving, it all goes back in the attic! If you see anything that "inspires" you, it will be the PERFECT time to snag fall decor for pennies on the dollar!!! You may have to wait til next year to use it, but it is always fun to find things you forgot you bought last year!

Fall 2014

So this week...I promise! 


I'm Not a Trophy Wife


An easy little cutting board project...

What an awesome weekend...it is finally fall...cool temps and rain. LOVE IT!

I'm really looking forward to next weekend. Fall craft fairs, so far no chance of rain and the leaves may be peaking...or darn near close! It is going to be great!

I didn't mind standing around in the cold drizzle Saturday. We started out at a farm auction, bought a few things and then came back to town to an "in town" estate auction. I bought some nifty pieces and I hope to find a little time this week to work on them.

I did finish up a few little projects last week.

Pinterest and the blogisphere are great places to find inspiration. 

I had picked up a few butcher boards here and there! I love the old wood and they are relatively easy to strip and refinish! (See a tutorial here and here!)

I refinished the three smaller boards but I wasn't quite sure what to do with the big square one. I found a little "inspiration" on Pinterest....


Source

I knew I had some wood bowls stuck back in my "stash" somewhere. I think I picked them up at an auction eons ago and just wasn't quite sure what to do with them! 

I cut a simple handle on the cutting board with my jig saw, drilled a hole for the hanger, sanded it down a bit and then stained it. I stripped the finish off the bowls, cut them in half with my chop saw and then glued them onto the cutting board.

After the glue dried, I applied three coats of butcher block oil. If you know you are never going to use it for food prep, you can just spray it with a little poly!

Perfect place for fruits or veggies...maybe peppers! Or a great place to throw your keys and "stuff." 

The tutorial I link to suggested using finishing nails and glue to secure the bowls. I didn't even use nails...just Gorilla glue. It is an awesome glue for repairing or affixing wood...I've never had a problem with it setting up and holding well! 

Simple little project! 

Happy fall!

Arch window covering and temporary window coverings!

It's that time of the year...time to put up the blinds and shades to keep out the blazing sun and cool down the house a bit!

This past week Brian and I put up the outside roll-down blinds that cover the west-facing windows in my den! I love all the natural light, but when the sun hits those windows around 4:00 on a hot summer day, oh my! 

Hanging the blinds on the OUTSIDE makes a huge difference...and honestly it makes this room much more comfortable in the summer! (As you can see, I turn the couch around in the summer!)

The arch window in my living room is another story! I know....arch windows are soooo 90s. But that was when this house was built so that is what is there! It is a great place for fall and Christmas displays!

It would be very difficult to put a blind on the outside of the this window...so I had to settle with putting something on the inside. 

This is how bright it is BEFORE I put up a blind....

And AFTER...

Seriously, no Photoshop and no camera tricks. Before and After...within a few minutes. That is how much difference there is and it makes a huge difference in the temperature of the living room!

Fortunately my living room is two stories, so it still FEELS bright and airy, I just don't have the blazing sun heating up the room!

I couldn't really afford a "custom" blind for this arch. When I was searching for a solution, I stumbled across a "temporary" pleaded blind...maybe $15.00. It is perfect! When I put my fall decor up in the fall I take it down, fold it up and store it away until late spring. It has a clear plastic "base" that sits in the middle of the window and you just drop one end of the pleated blind into the holder, "fan" it out and secure the outside ends. It came with a "peel and stick" adhesive on the base of both sides, but that was pretty much shot after the first year. So now I either tape it or tack it down. Even though it is just a cheap little thing, it has lasted a good 5-6 years! Worth the small investment!

So if you have a room that is uncomfortable because of the heat generated by the summer sun, think about using temporary window treatments! You just might find the room a little more enjoyable and you will help cut down your cooling bills. 

Antique glass lamps.....to hot glue or not to hot glue...

Several months ago I bought two antique glass lamps at an auction.  They are amazing! So simple yet elegant.  Kind of a "Grace Kelly" lamp if you ask me...lol!

They have a faint decorative etching in the glass that is difficult to see...very subtle...but so pretty. 

The exposed metal on the lamps have a little "corrosion" but I have decided to leave that be for the time being. Amazingly, they don't have a chip anywhere on the glass!

I decided to keep one and replace the little round crystal lamp I have in my office.  But I wasn't real keen on the lamp shade, so I decided to keep the lamp shade from the crystal lamp....

I have some pearl froo-froo trim I bought after Christmas last year for pennies.  I decided I would gussy up the lamp shade with trim...just to give it a little more glam.  

That is where the question of hot glue vs. tacky glue comes in. 

I think hot glue has a time and place.  But whenever possible, especially on fabrics and upholstery, I always use a quick drying tacky/fabric glue.  It takes a tad longer to set up but it holds better in the long run. Sometimes I will put a tiny bit of hot glue on something just to help it hold until the tacky/fabric glue dries completely. I do the same for wood working projects...apply a little bit of hot glue just to hold something in place that can't be clamped until the heavy duty mastic or wood glue can dry completely. But hot glue can break down in extreme hot and cold temps or even with too much "stress" from use. So I rarely use it exclusively...I just think, long term, tacky/fabric glue (and liquid nail or wood glue for wood projects) is a better option. 

I see upholstery tutorials suggest hot glue for piping and trim.  I personally think that is a mistake!

On this lamp shade, I applied a line of the tacky glue along the edge and then pressed the decorative trim in place....

Again, subtle...but it is the little subtle changes and additions that can make a difference in the "big picture." 

HINT: If you use tacky/fabric glue, go back after the glue has "tacked" (10-15 minutes) and press the trim down again!  At that point the glue will have a better "grip" and the trim will press flat and adhere better.

(Yes, that is a piece of driftwood on the table...I picked it up on our fishing trip in Colorado last year and I just love the texture of driftwood...I have another piece on my mantel in the den that I picked up off a frozen lake in Georgetown, Colorado 10 years ago!)

Lamps can be an expensive accessory in a room.  But they are soooo easy to spruce up or change...just by painting or changing the shade. Several years ago I got a bit tired of my bedside lamps...too dark. So I painted the base AND the shades.  

Not a humungus difference...and I am still not real keen on the style.... but it is enough to keep me from running out and paying $200 for the two lamps I wanted.

Painting light fixtures and lamps is a great way to personalize and update a space on the cheap! I featured painted light fixtures and paddle fans here and outdoor fixtures here.

Again, give it a shot...what's the worst thing that can happen...you don't like it. So what...you don't like it as it is...before you toss it, paint it or trim it. It will fetch the same price in the garage sale regardless...lol!


Growing Knock Out roses

Knock Out roses are hardy little plants and super easy to grow!! 

Two years ago I built a flower bed in an area where I have trouble getting grass to grow because of the drainage in my side yard and planted 5 little rose bushes.

After the first year!

They get plenty of sun throughout the day and evening, and when they bloom...OMGosh...A.M.A.Z.I.N.G.

Today...two years later!

I planted these two light pink bushes years ago next to two "real" rose bushes. They too were just tiny little "bushes" when I first planted them!

(This gate door is actually the neighbors...it bores me! I am searching Pinterest for some inspiration to doll it up...maybe a pergola kinda thing....someday!)

The "real" rose bushes died long ago...probably because I have NO idea (or interest) how to maintain a "real" rose bush. Just too tedious and fininicky for my gardening tastes. They did produce beautiful roses perfect for cutting. I always thought they were something I could manage until I read my grandmother's old letters to my great-grandmother and she wrote about all the pruning and fungus and pest control and special fertilizers and blah, blah, blah.... I wasn't real torn up when they finally bit the dust. Nor did I feel terribly guilty.

I want plants that need a little sun (or shade), water and occasional fertilizer....not prima donnas that have to be properly pruned and groomed and constantly attended to. (I have enough problems battling slugs, heat and crown rot just to get my hostas through the year!) 

Knock Out roses fit the bill and have amazing blooms all spring, summer and fall! The flowers are not something you will cut and use in the house...I tried...they wilt pretty quickly, but they are beautiful plants in the yard. 

One word of warning...they will NOT naturally climb...and as they get bigger they can get "leggy" so it is best to put them somewhere where you can tie them up. I use plain ole' string or burlap ribbon to stand them up along my fences. I do have to prune them back in the fall and remove the dead "wood." No biggy as long as you wear gloves.  Unlike "real" roses, there really is no "murderous" way to prune them...one year I took a weedeater to a few (probably not advisable!)

This is one I rescued from my apartments last year...it was still in it's original pot and was pretty much dead....

I brought it home, planted it in my flower bed...some decent soil, lots of water and a little fertilizer and presto....beautiful!

(I thought Cleo was being sweet and smelling the roses....she wasn't...she was eating them!)

If you have a fence that needs "screening" or a full sun bed that needs a pop of color, this is a perfect plant! They can easily be pruned back if you want to keep the plant smaller and more compact!

I did lose a beautiful pink tea rose bush this year I had in my side bed. Not sure what got it...maybe old age, maybe disease or bugs, harsh winter...it was over 12 years old...who knows. No biggy...Katie got me a beautiful hydrangea for Mother's Day and it filled the spot perfectly!

As I have shared before, the BEST time to buy any perennial is in the early summer...usually after they have lost their "forced blooms" and aren't nearly as attractive. Most garden and home improvement centers will mark them down considerably...just plant them in a well composted spot, water well and watch them grow and bloom year after year! 

When planting any flower or bush, whether it is an annual or perennial, make sure you pay close attention to what type of "sun" or "shade" they prefer. I have found that, more than anything, it makes the biggest difference on whether the plant with thrive or struggle long-term! 

Get out and enjoy your yard...even if you have a small yard or just a little patio or porch area, get out and get your hands dirty. Even if you just start with one little container plant!  Gardening is honestly something you LEARN to love. Truth be told, I don't have a live plant in my house, and I have even managed to toss most of the fake stuff!

For me, flower gardening is a natural "anti-depressant" and spending time tending to my plants is always time well spent!

Nasty little chair makeover...PART I!

My INTENT was to get this chair done this week so I could feature it. The weather and a bum back kind of slowed me down.  But I got it done...but I am still going to break this up into a "Two Part Series" because the work that had to be done was pretty extensive. If you just want to see the before and after, check out Part II and scroll to the bottom!

This gives me a great opportunity to stress the importance of TAKING YOUR TIME and DOING IT RIGHT! 

The simplest little makeover takes time.  You can't rush the process.  Strip it properly, sand it properly, prime it properly, paint it properly!  Otherwise you are wasting your time and money!

My newest project is very similar to a chair I did for Sis....it was one of my first "features" here. (I wish I had taken better pictures to show all the detail!) The paint part was a tad easier because it didn't have to be stripped first.  But it was one of my first upholstery jobs, and the more experience you get, the easier it is. Okay, it doesn't get easier...you just know it is going to be a challenge.

One thing I have learned about upholstery...no two pieces are the same and ALL have their challenges. You learn to be creative, take your time, and use the proper tools...more on that when we get into the actual upholstery process!

I spied this pathetic little chair sitting outside an apartment...obviously it was being neglected and unloved! And then it was abandoned! So I tossed it in the back of my truck and brought it home. As with most projects, it sat and waited for inspiration (and time).

I know many tout the virtues of chalk and plaster paint.  No sanding, no prep, no prime.  But 1) I am old school and 2) the paint on this chair was literally crumbling off and I could scrape the white paint off with my fingernail!

IMG_0214.JPG

I wasn't going to risk painting this chair only to have the old paint flake off! Besides, I have to have a nice smooth "template." So my best bet was to strip, sand, prime and paint.

First I had to remove the old upholstery.  I'm not sure what is worse...a seriously botched attempt to "cover" the old upholstery or doing so and leaving the old upholstery intact. Which means I had to remove the 8,324 staples someone used to haphazardly attach the disgusting green fabric and the 6,352 upholstery nails (these are just estimates) used on the original disgusting fabric.

Regardless of what you are removing...good or bad...I always suggest taking TONS of pictures while you deconstruct.  You THINK you will remember how something was constructed, but you may not.  It is always good to have pictures to refer back to! When I took my first shot at reupholstering a chair I took hundreds of pictures as I deconstructed it...boy was I glad later when I got stuck on something and wasn't sure what to do! I just referred back to the picture of the original and I knew exactly what I needed to do!

After hours of pulling, prying and cursing, I was down to bare bones (both the chair and my hands!)

Once I got all the old upholstery off, I addressed the little "wobbles." This chair was in pretty good shape structurally but it is important to make sure all the joints are secure and tight. Glue and clamps! Don't move forward on a project like this until you make sure everything is in tip-top shape. You don't want to be glueing and clamping after you have a shiny new finish on!

Now it was time for a little strip job.

I used Citristrip jel to remove the multiple layers of paint! It actually took 2 applications. An old toothbrush on all the nocks and crannies. I used a mineral spirit wash to remove all the "goo." Then I let it all dry thoroughly.

I know stripping old finish and paint is a tedious, nasty, back-breaking process...and I have no doubt it is the reason someone came up with the idea of mixing plaster and paint.  But again, my "old-school" mentality just won't let me move forward without properly stripping all the old paint off.  

I don't paint over wallpaper, I don't tile over vinyl, I don't upholster over old upholstery.  I just don't. Call me crazy. 

Then I sanded....and sanded....and sanded! Getting all the old paint out of the grooves in the legs was not an easy task...but absolutely essential! This is exactly why I always keep old toothbrushes with my shop tools!

After sanding, I primed it with Kilz.  I like Kilz for several reasons.  For me, it is my personal preference after years of experience. Others swear by Zinsser. This is just one of those things you need to experiment with and do what works best for you! Regardless, I will ALWAYS recommend an oil-based primer!

Nine times out of ten I am going to prime a piece before I paint it.  I am not willing to take the risk of "bleed through", I want a smooth finish and I want my paint to stick!  On rare occasions I will not apply a primer if I am going to use chalk/plaster paint and plan to distress the piece.  But even then I prime areas I suspect might bleed through or cause problems.

Anywho, after I got MOST of the old paint off and sprayed on the primer, I let it dry thoroughly. Then I sanded, and sanded, and sanded...again. I started with a 80-120 grit, and finished with a 220.

I like to sand. Or rather I like how the piece feels and looks after it has been primed and sanded.  And in my opinion, "feeling" is the key! 

Funny story...years ago I was feeling quite smug about the fact that I had not gotten all those nasty little wrinkles all my friends had around their eyes and mouths and on their neck.  Until I put my readers on one day to pluck my eyebrows...and there they were.

Even though I finally broke down and got prescription glasses, I still don't trust my eyes to see all the imperfections...but I do trust my hands.  As I sand, I "feel."  If you can feel it, it will show through a coat of paint!!! Sanding transforms the piece and if done properly, it can mean the difference between having a piece that is beautiful and professional or one that looks like an inexperienced DIYer threw it together!

After priming and sanding, I used my compressor to blow the dust off and then tack cloth to get rid of all the little smidges of dust and debris! I know I harp on using tack cloth...I can not stress how important this step is!

My original plan was to paint the chair a "blush/salmon/coral" color and then upholstery it in black damask. I saw a chair almost identical to this one in those colors SOMEWHERE...and then I couldn't. What I could find was a lot of teal and damask...and since this is a piece that will be sold, I decided I had to go with what is obviously "in." A "pink" chair can be risky! Pretty, but risky!

So teal it is....

The trick to spray painting anything (besides the prep work) is to do 3-4 VERY light coats...let it dry for 30-45 minutes between coats. If you get a drip or run (which you shouldn't if you do LIGHT coats) let it dry OVER NIGHT and then carefully and lightly sand it with a VERY fine grit sand paper! Tack and then lightly spray it again.

After the paint dries I gave it a good coat of clear poly finish.  Probably overkill considering the Valspar spray paint I use SAYS it is an "all in one."  Again, I'm old school.  You clear coat everything. 

The key now is to WAIT.  Wait and let the paint dry and cure for a few days. Upholstery can put a lot of wear and tear on a piece so you want the paint to be cured before you begin working on the upholstery.  

And as you can see, this piece has some serious reconstruction to do before I can ever begin to put the fabric on! I'll make sure I take good pictures and share step-by-step instructions on how to reconstruct and reupholster this chair!

IF YOU WANT IT DONE RIGHT....TAKE YOUR TIME!

Stay tuned! Part II is on its way!