Adding glass to an interior door...

IMG_1434.JPG

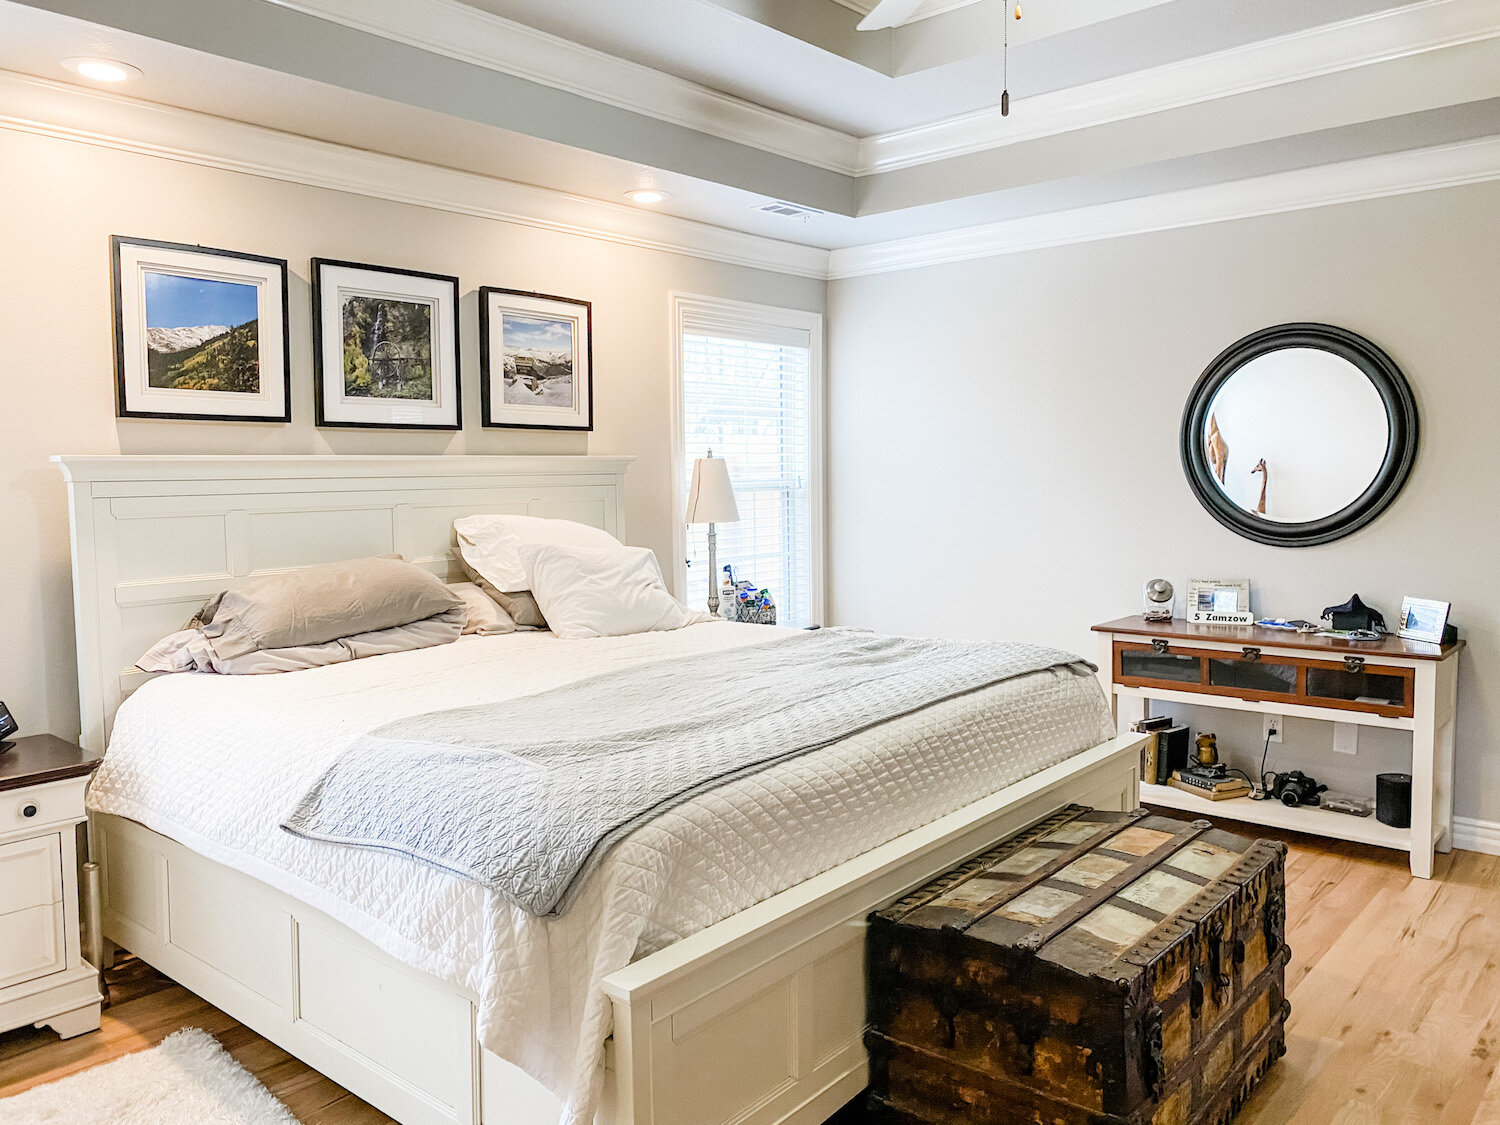
As I mentioned before there are certain things that made this house instantly feel like home.

Like my master bath….

IMG_0439.jpg

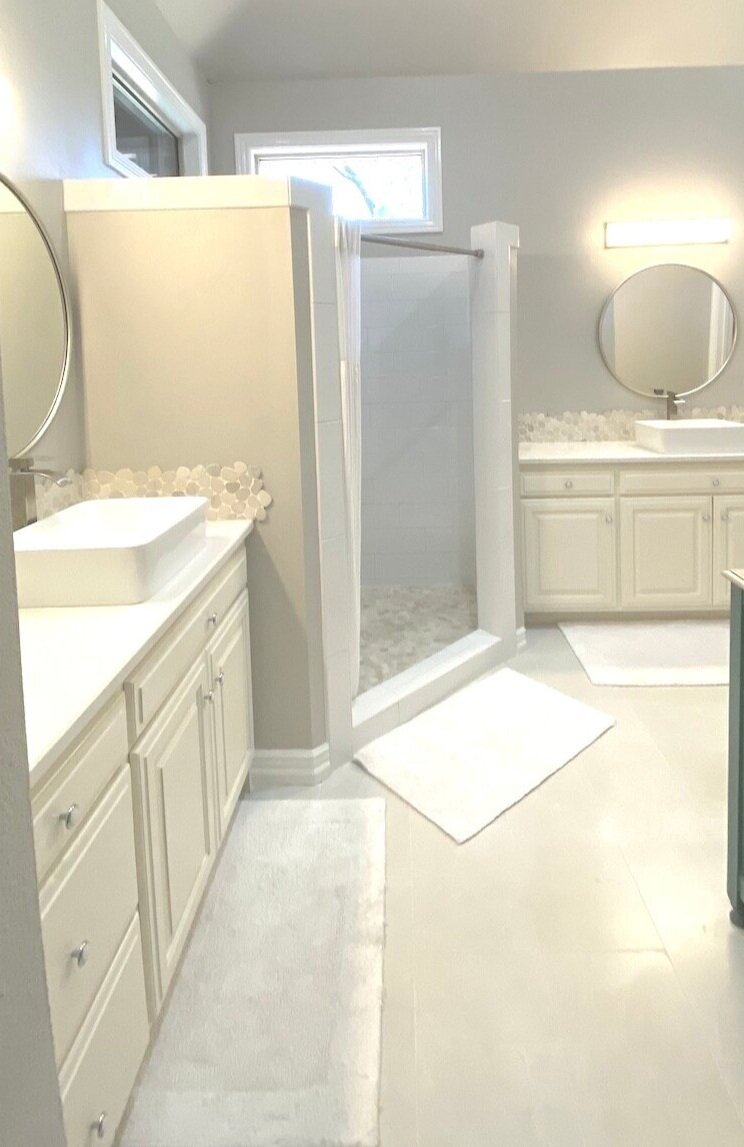
Almost identical to the master bath in my last house.

IMG_4031.jpg

Same backsplash, floor tile, vessel sink, shower tile…right down to the same ole’ shower curtain and rugs. And I am waiting on windows that are pretty much identical to the window I had in my old bathroom. Still not sure what I want to do with the cabinets but I have always liked the stained and open shelving look of the last house…

….who knows. I may do a little cabinet makeover at some point.
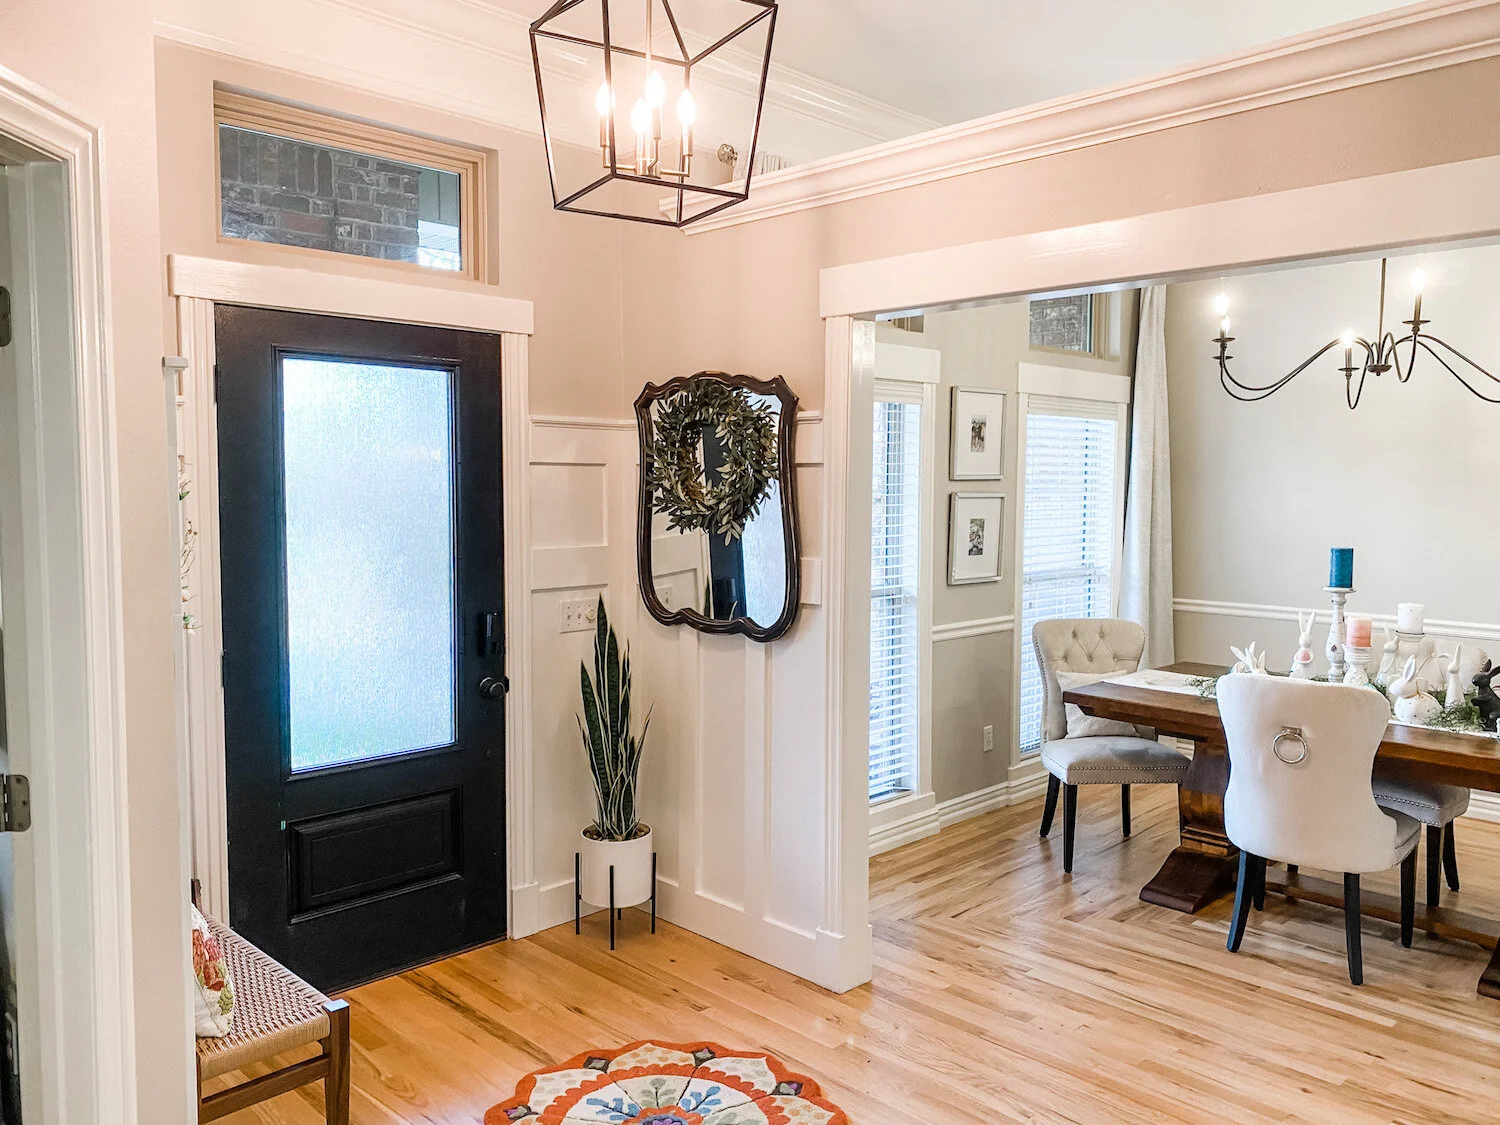
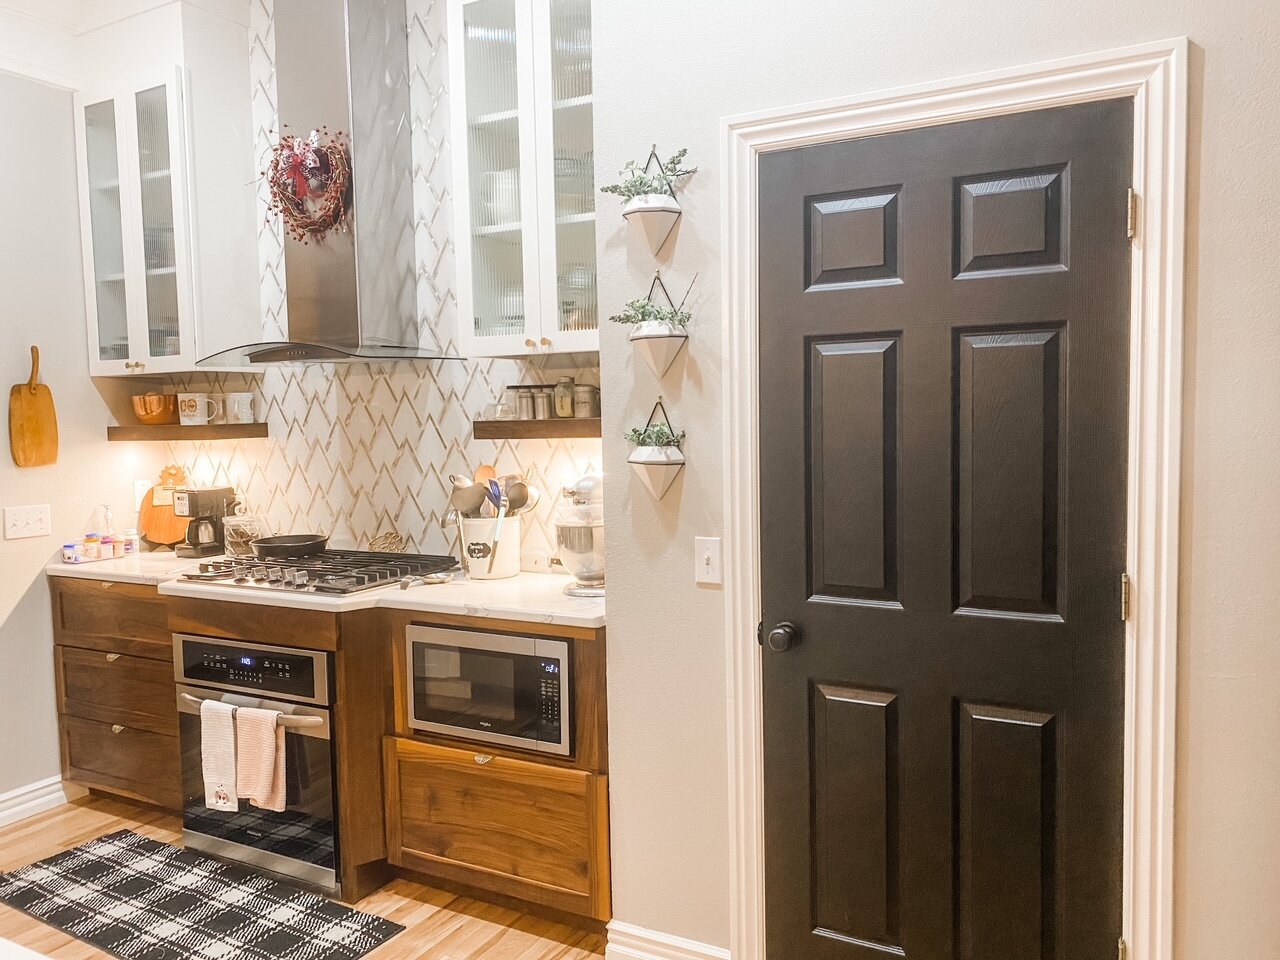
My black doors….

after.png

Loved them in the old house, love them here…it was one of the first things I did to make this house feel more like my home.
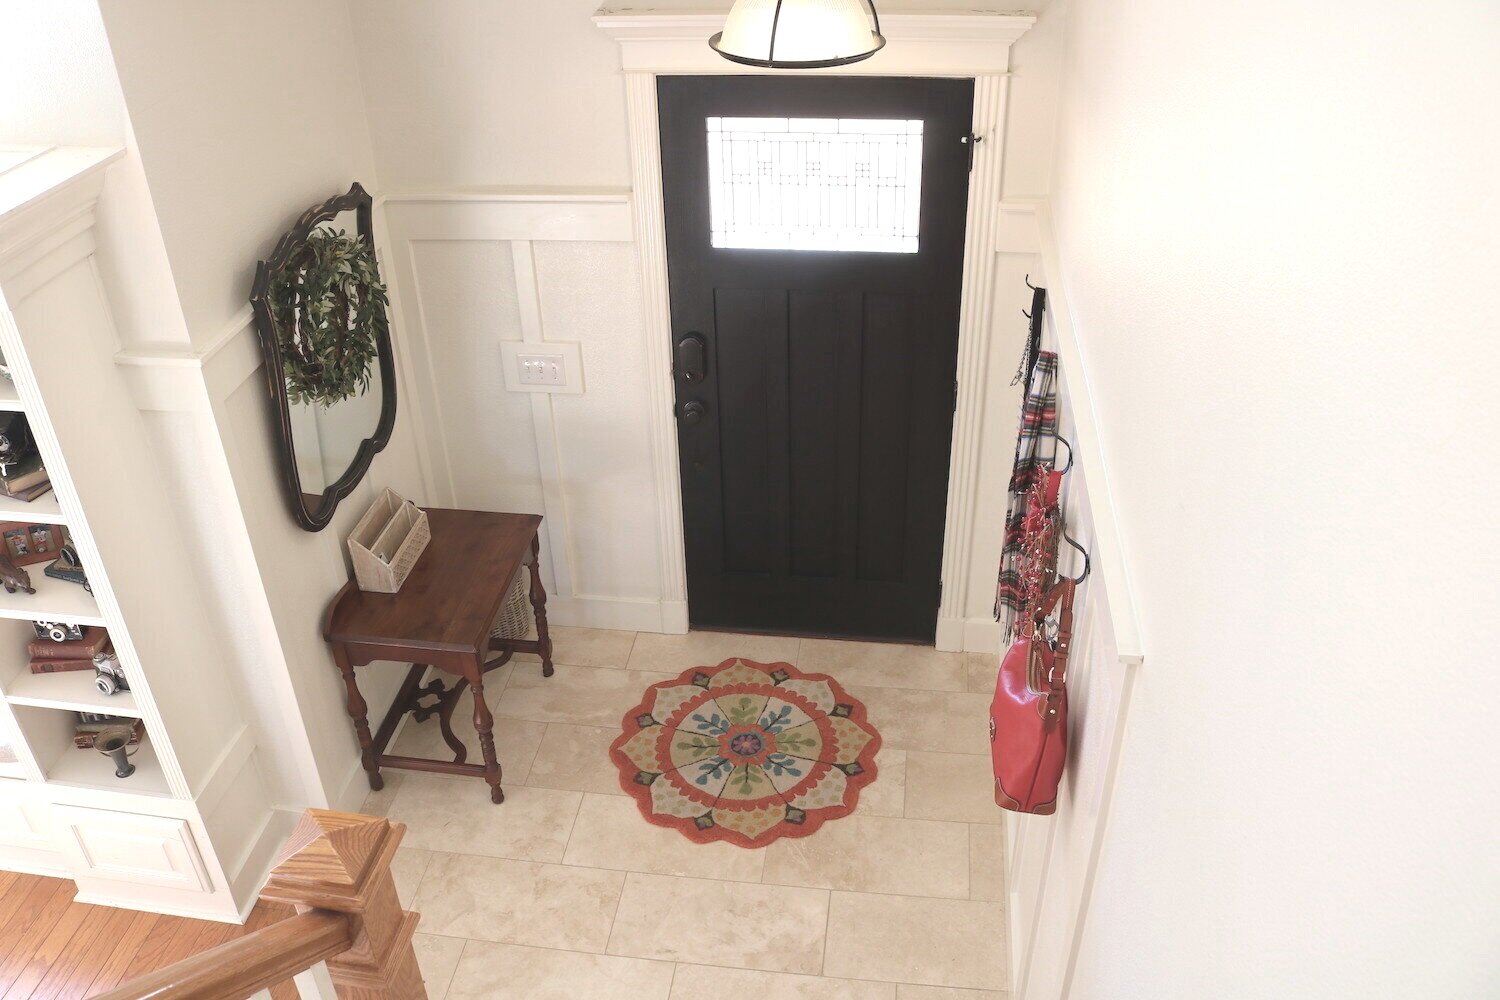
IMG_0716.jpg

The entry…

IMG_1171.jpg

Same board and batten, same mirror and wreath, same rug…black door…

IMG_5981.jpg

I like what I like…and these are just a few of the design elements I really loved in my old house.

Then there are the paint colors, plants, shelving….sooooo much more!

One project I did at the old house that I always loved was the reeded glass door in my laundry room…

IMG_5030-1.jpg

I absolutely loved this project and it was one time I actually posted a pretty good tutorial. Mainly because when I went looking for a tutorial, I couldn’t find one!

I have known from day one I wanted another door like this in my new house. I debated whether to do it with the pantry door or laundry room door.

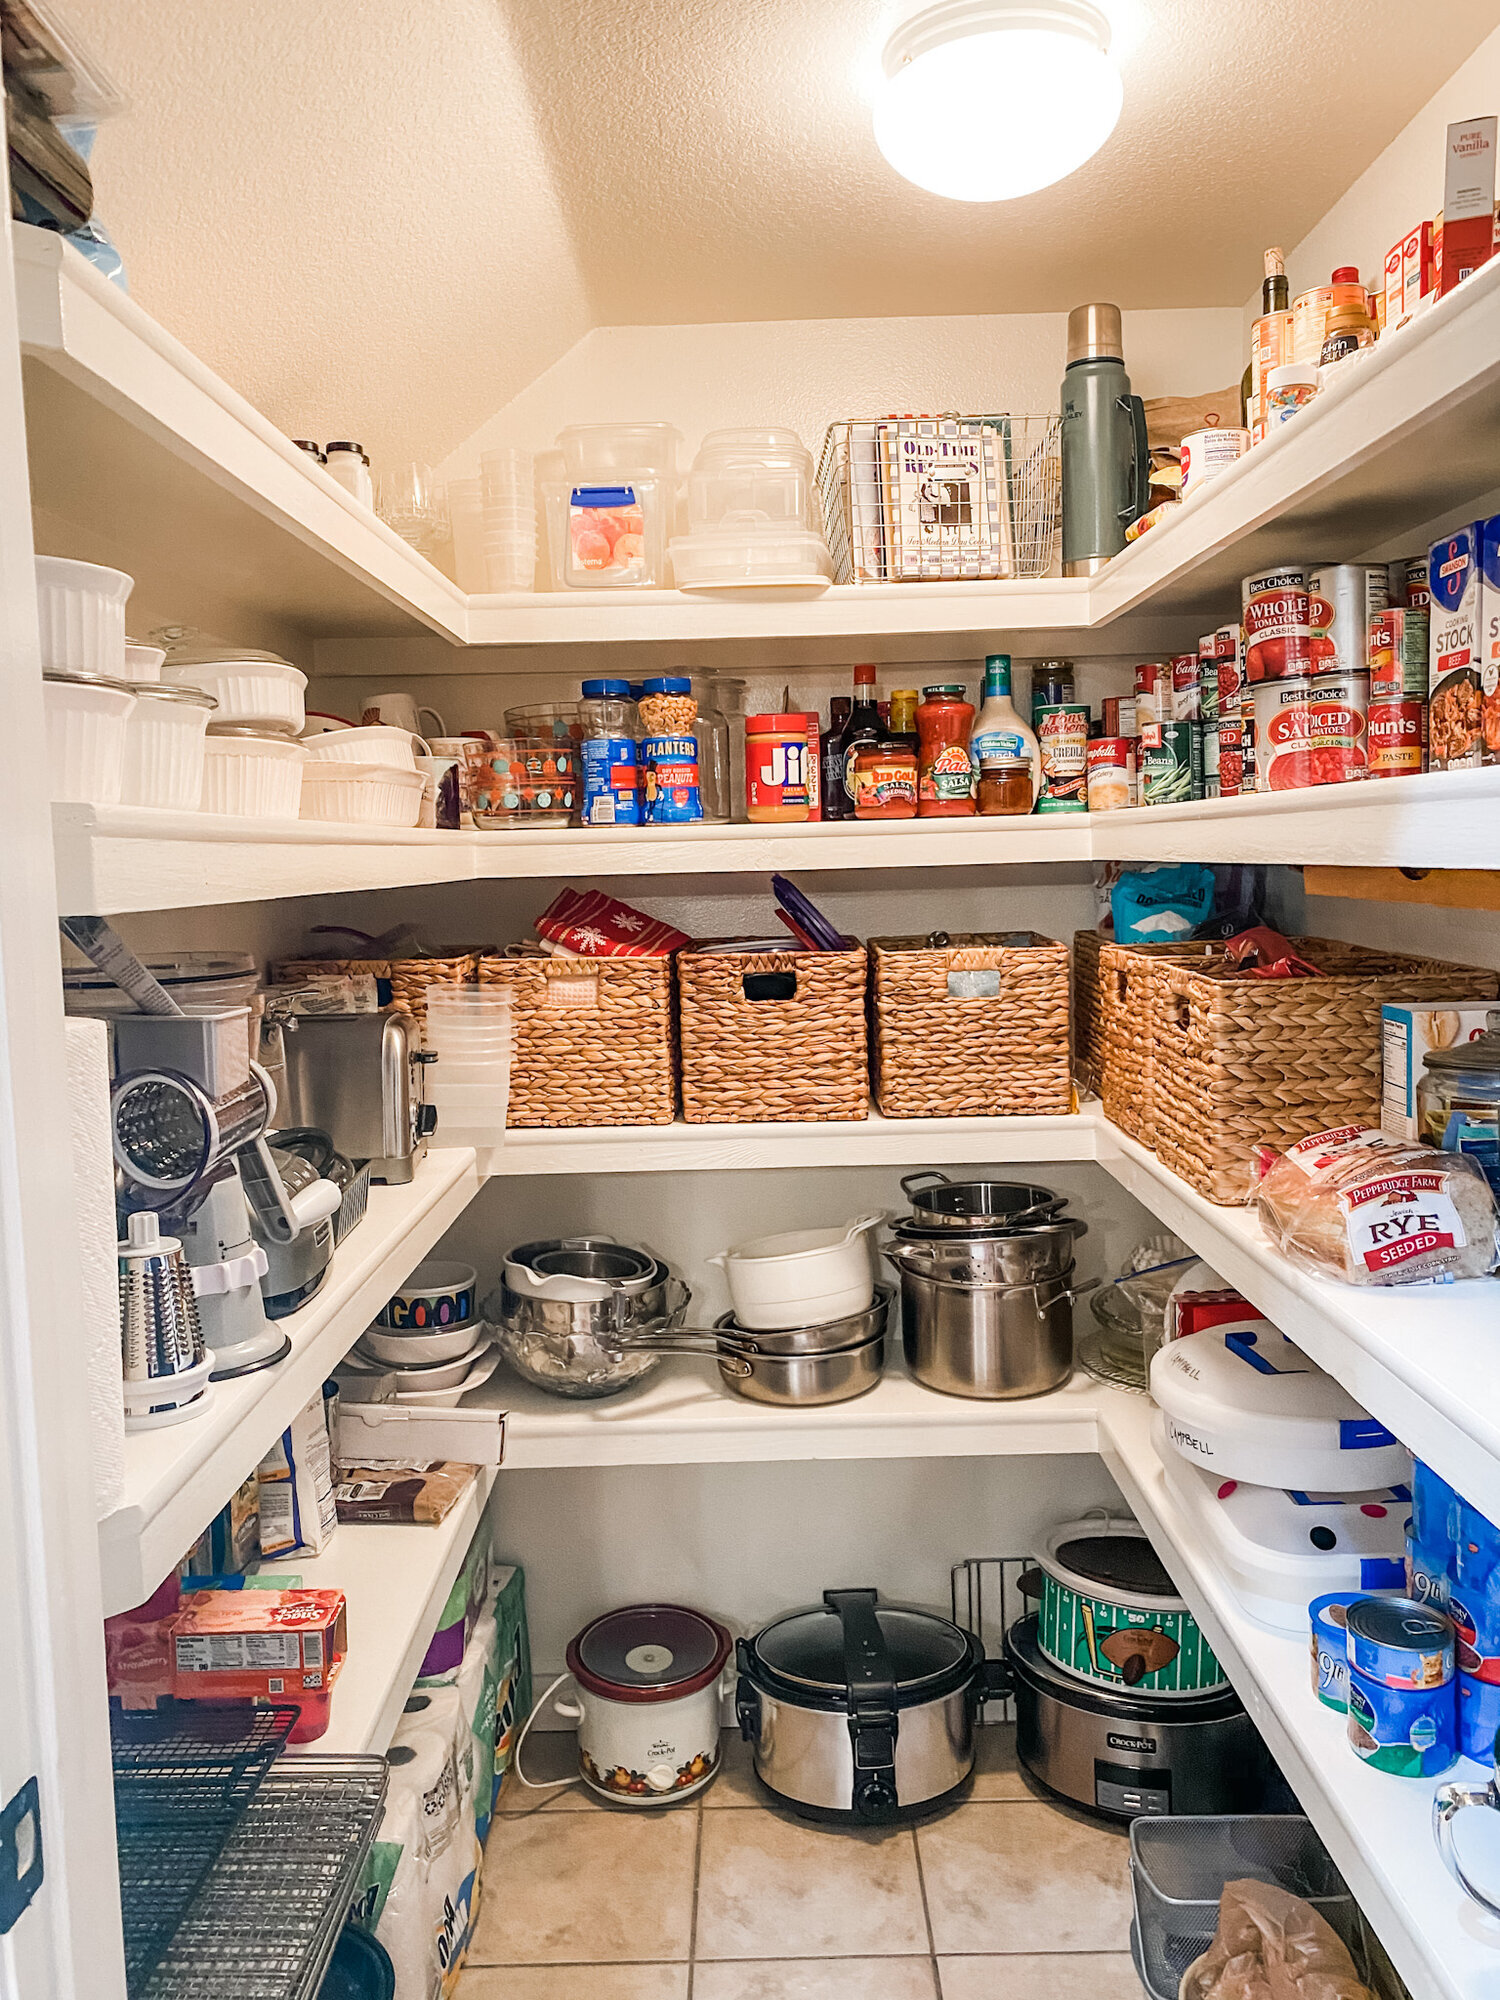
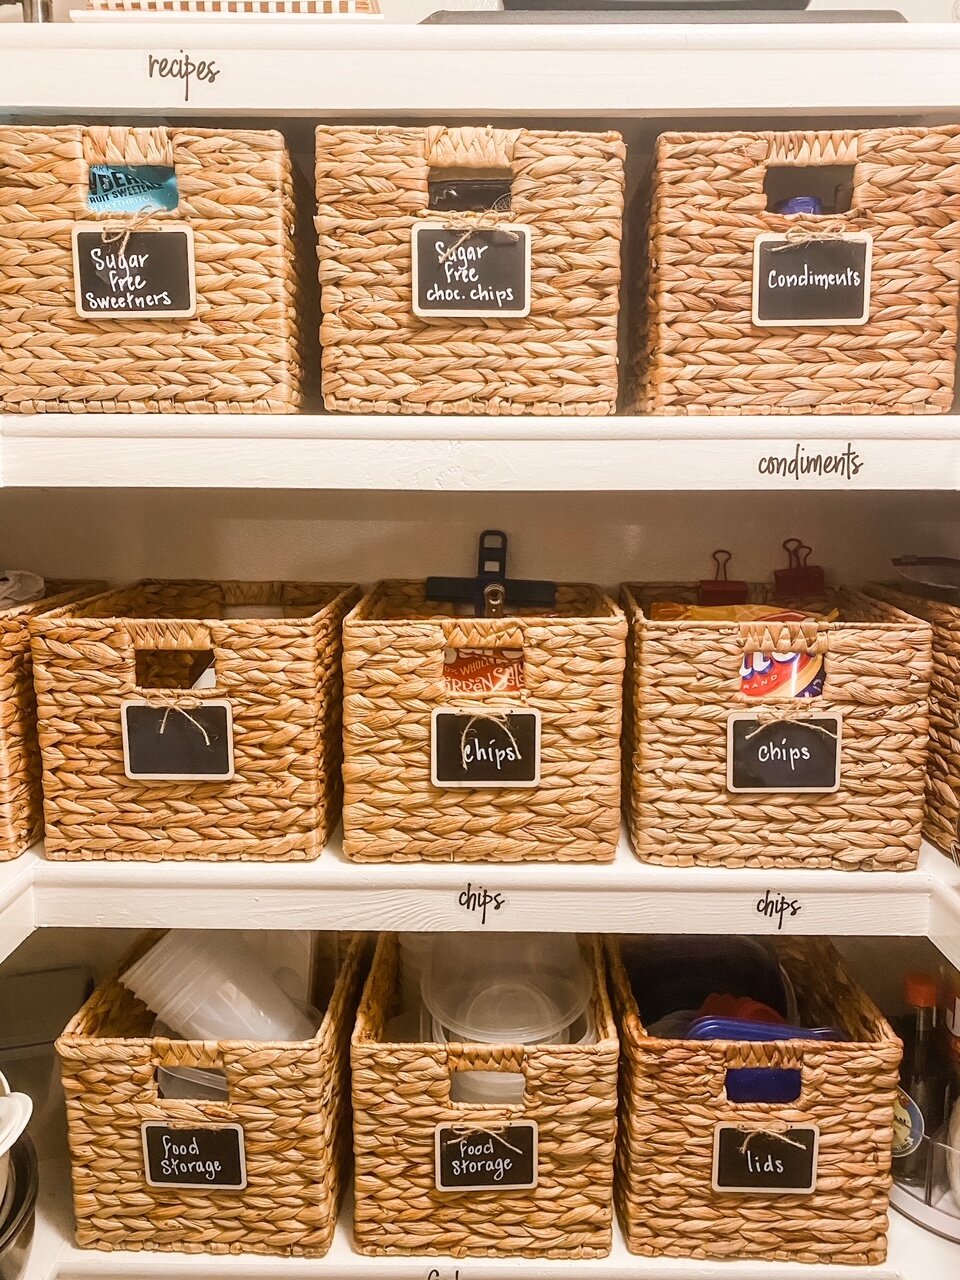
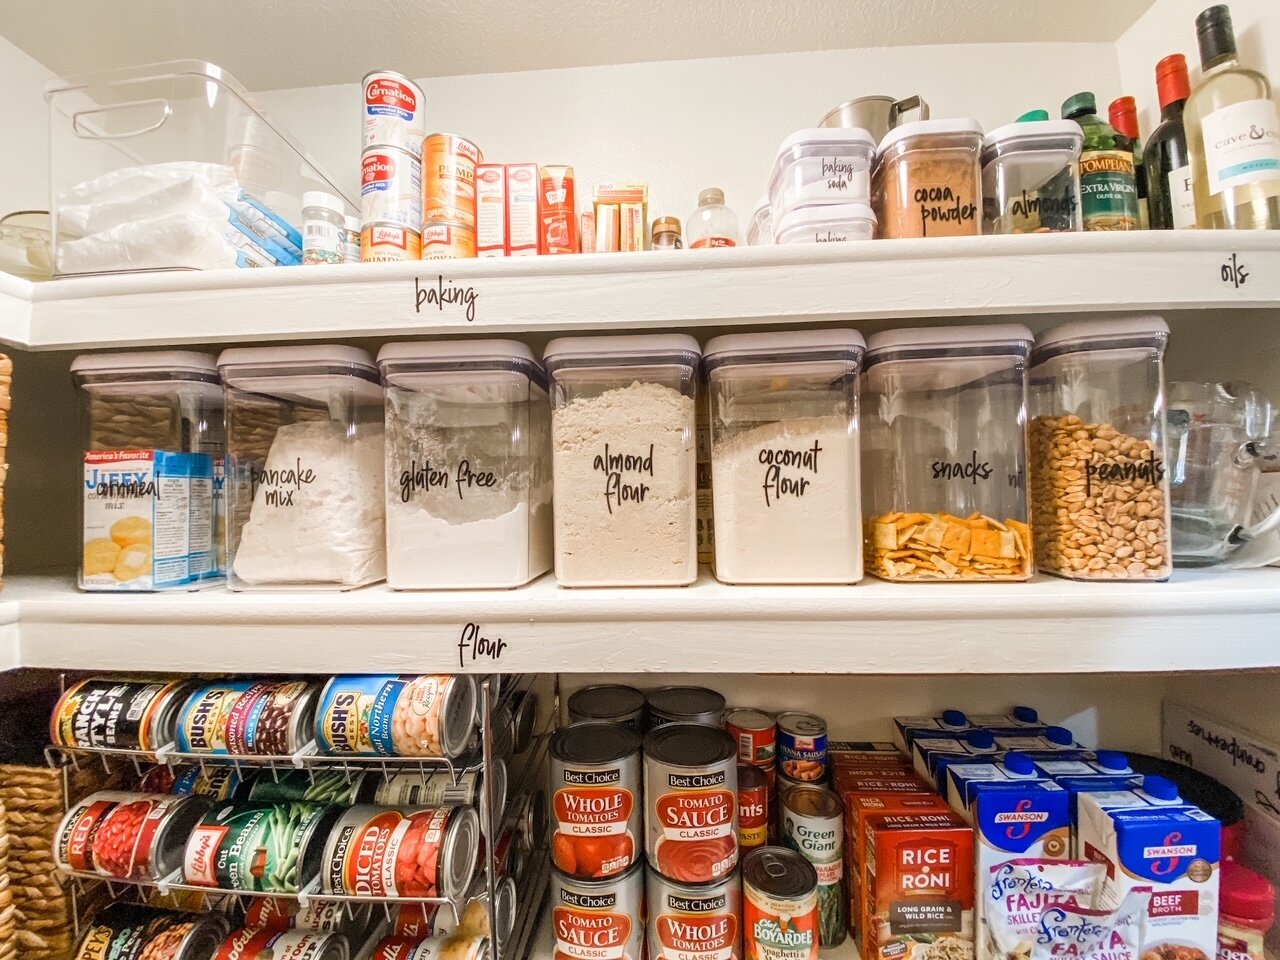
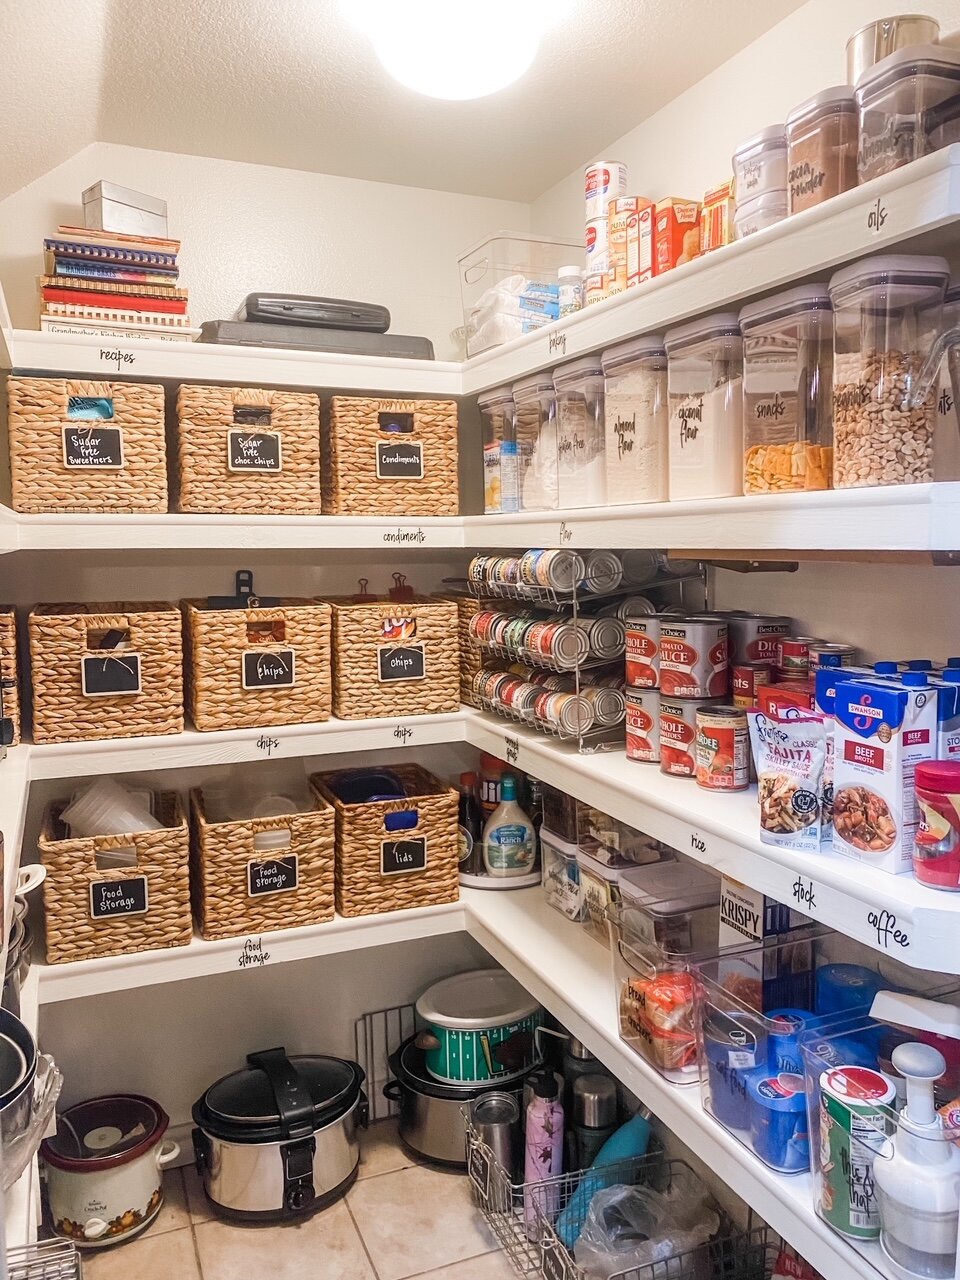
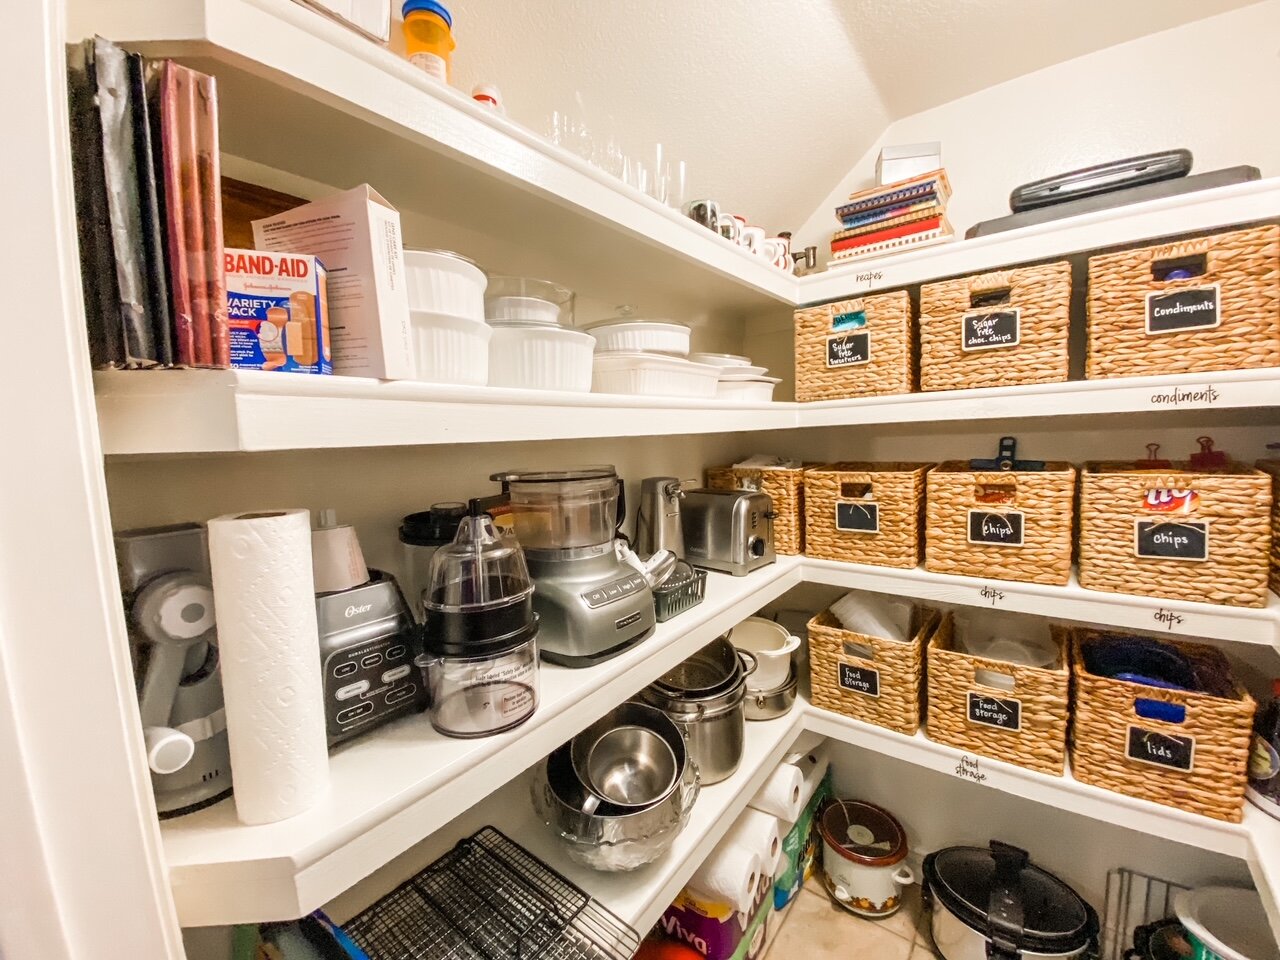
I finally decided to start with the pantry door….

IMG_1005.jpg

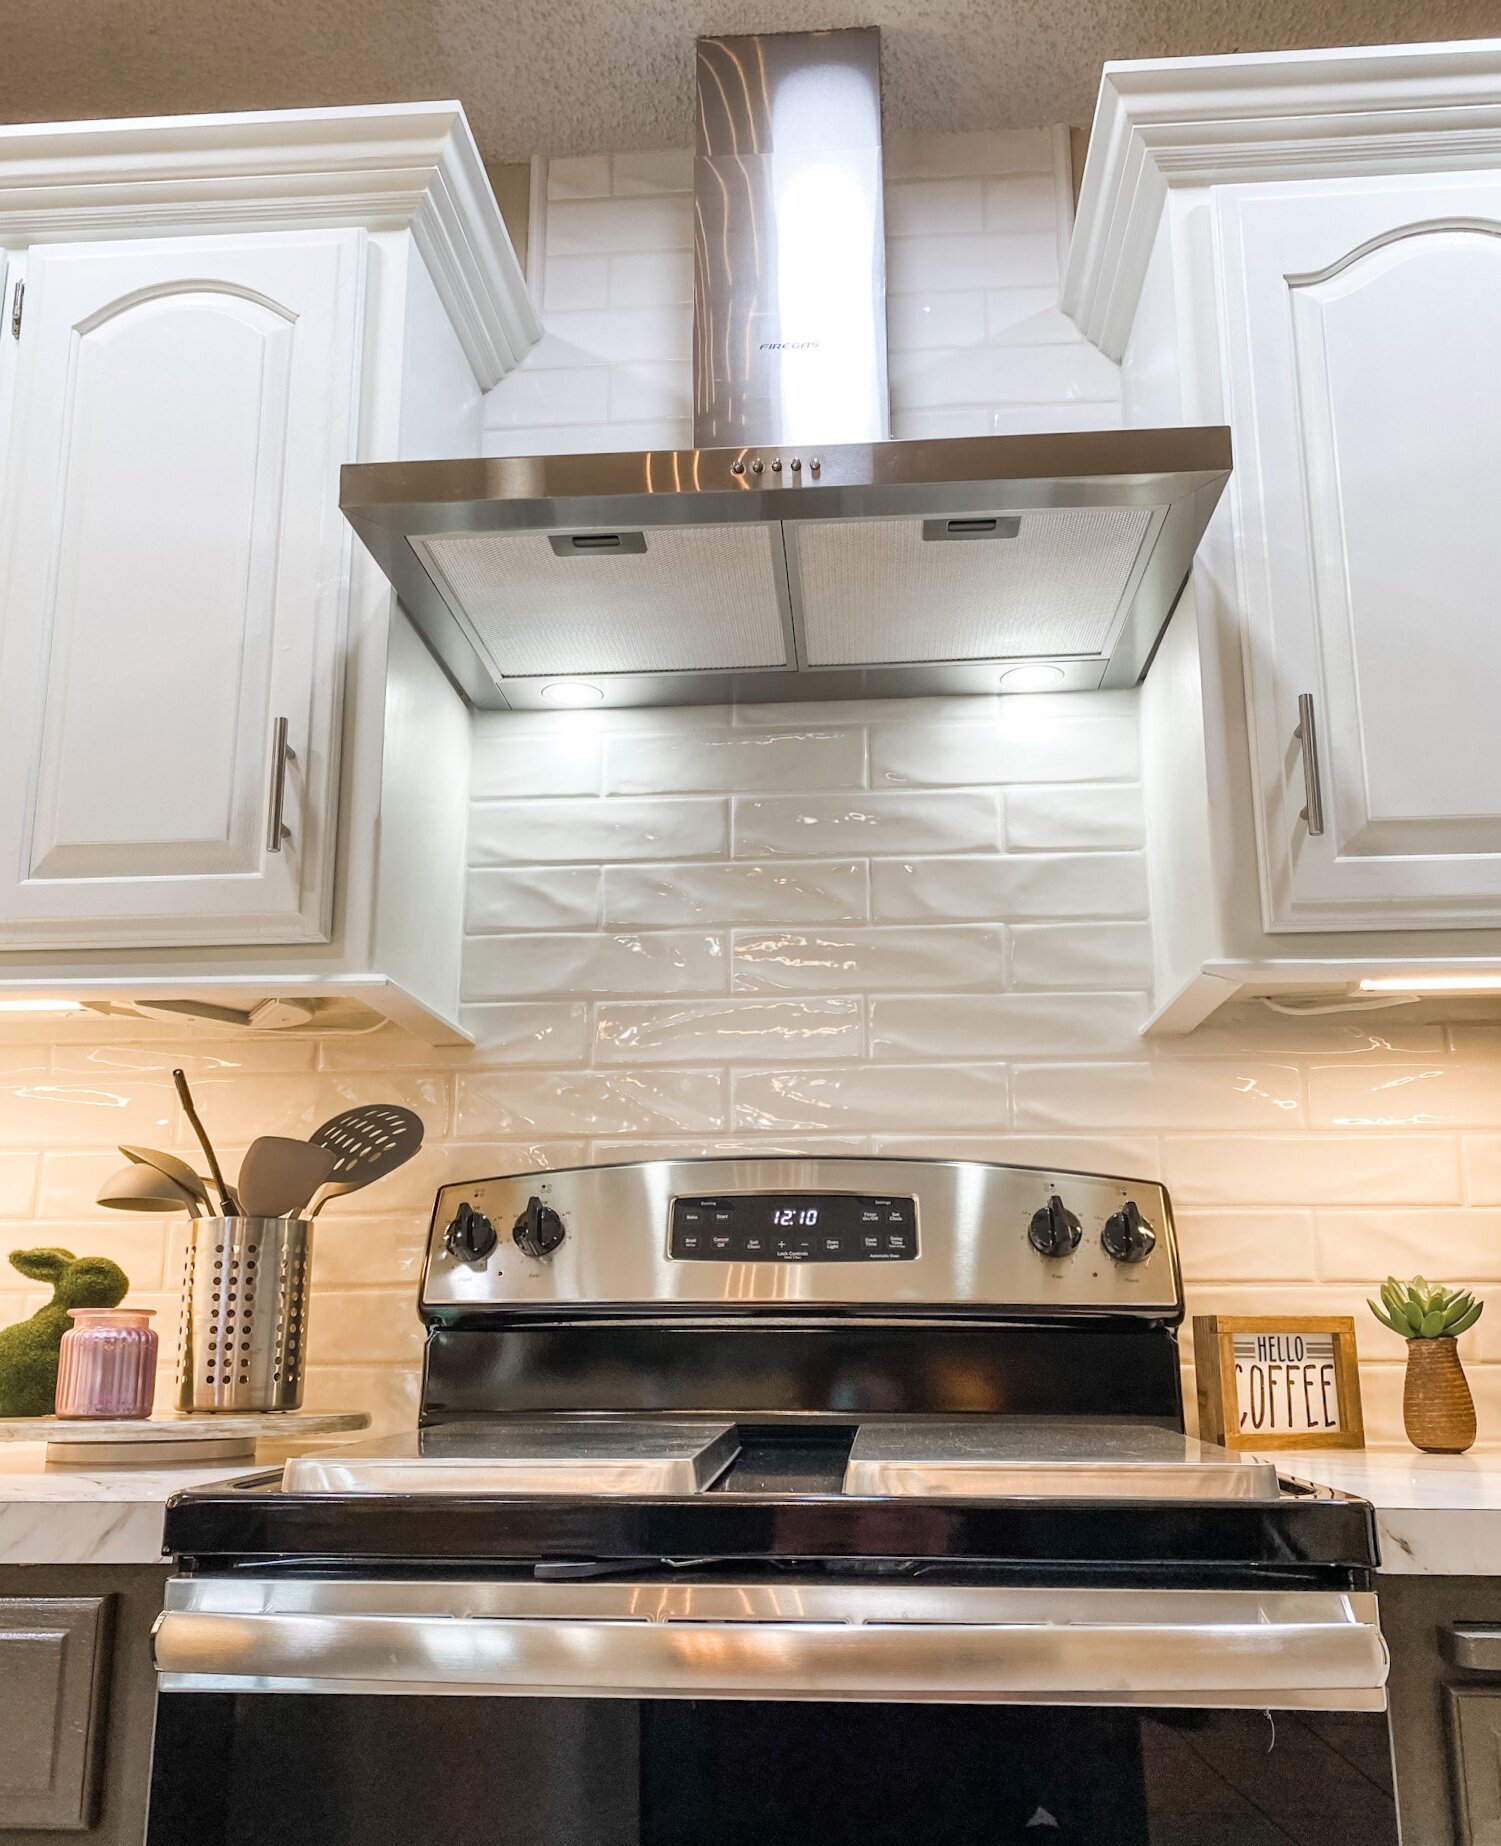
Primary because I used the reeded glass in the upper cabinets and I thought it would look good to have matching glass in the pantry door.

IMG_1434.JPG
IMG_1435.JPG
IMG_1432.JPG

I LOVE it! I love this pantry and the door is just the cherry on top! Eventually I may do the laundry room door as well because then the light from the window in the laundry room can filter into the breakfast room. For now I am perfectly content with the one door.

This is a MUCH less expensive option than purchasing a new glass door…and you get the option to choose the type of glass you want vs. having to get whatever “frosted” glass is in the door you purchase. And it is seriously NOT a difficult project to complete.

YOU CAN DO IT!!!!

DIY and Cinderella...

At this moment I am sitting in my “all-season” room drinking my coffee and watching it rain.

IMG_0254.jpg

Heaven.

There is so much I love about this house and honestly, I can’t t think of a thing I don’t. We have spent a great deal of time the past few weeks working outdoors and many of our neighbors have stopped to tell us how wonderful it is looking. (Probably more a testament to how badly the place looked to begin with.)

Making a home beautiful after years of neglect, for me, is like the Cinderella story. Abused, neglected, mistreated…until someone who cares comes along and waves a magic wand and makes everything beautiful again.

Simple analogy…seriously, who waves a magic wand and makes a home beautiful. Truth is, it takes a lot of work to turn an abused and neglected home or piece of furniture into something beautiful and useful.

My blog friend Cristina shared a chair she recently transformed. Abused, neglected, dated and something no one really wants in their home anymore was completely transformed into a piece of furniture fit for a ball!

A super simple project for someone like her and me and not so difficult that someone with minimal DIY skills couldn’t tackle. The hardest part would be the sanding and staining, but just a simple KSTP treatment (Kilz, sand, tack, paint (search on this site for examples) would completely transform this simple chair. How cute would it be paint lavender for a little girl’s room. Or bright royal blue for a little boy’s room. (Yes I am a “gender snob”…raised 4 kids like that and they are killing it…so get over it)

After sitting and watching it rain for a few hours I finally decided to tackle the trim and cabinets in the laundry room. As I mention I am painting all the trim a whiter-white…BM Chantilly Lace. Not so “yellow”…just a pure white.

I have drug my feet on the laundry room because I really dreaded painting the cabinets. But I did and they are now done. All except the new hardware and that should be here next week. The only other thing I want to do in that room now is replace the dated ceramic tile. That chore is WAAAAY down the bottom of the list.

Still waiting on the master bath windows. Built a dining table and bench for Brandon and Taylor’s new house…just waiting on the legs we ordered. Waiting on a few final touches before I FINALLY share my shop transformation. The glass for the pantry door should be here today. In other words, lots going on to share…just nothing quite ready.

Cinderella may have transformed with the wave of a wand…unfortunately most DIY projects take a little more time and patience. But the result is often the same…magical!

static1.squarespace.png

Master bedroom reveal....

When we moved into this house in September we basically moved our old bedroom into this new house. Nice fit, but zero thought put into the “design” of the room…I basically just put furniture on the floor and a few pictures on the walls.

A few weeks ago my daughter sent me a picture of a well designed bedroom similar to ours.

IMG_0694.jpg

That’s when I realized our current master bedroom has ZERO “design character.” I hadn’t even taken the time to paint all the trim the “new” white.

IMG_1317.JPG

Twenty year old lamps, white and brass paddle fan, stacks of pillows in bleach spotted pillow cases, no curtains, scuffed and dinged furniture, clutter…

IMG_1318.JPG

The picture was perfect inspiration! The push I needed to work this space to it’s potential.

So last week my goal was to to tackle the room. Paint the trim and furniture, new curtains, throw pillows, a few little touches here and there, and declutter.

I painted my bedroom furniture (HERE) almost 7 years ago and while I still love the pieces, they have gotten quite dingy looking. Remember, whites yellow over time and of course there are chips and scratches from normal wear and tear. So it was time to give them a little paint refresher! And the side table tops…holy crud they have gotten nasty. So it was time to strip and restain the tops as well.

Of course the little “room refresh” became a three day chore!

In the end, worth every minute.

New curtains (I still need to hem them), a little wall art and a plant and new throw pillows.

IMG_1315.JPG

I stuck with my tried and true white bedspread…with a big dirty dog I need something I can bleach every week. It covers a down comforter in the cold months.

I have always loved the larger throw pillows in the guest room so I bought new for that room and put the guest pillows on our bed.

IMG_1308.JPG

(The giraffes? They were made in Africa from the root of a tree…they are Brian’s…they are different…what can I say!)

I painted the high boy and bedside tables and stripped and restained the tops of the bedside tables. ..the dark java stain has pretty much run its course. New lamps (finally!!!)

I love the look of chandeliers in bedrooms but as I have said before, I HAVE to have a paddle fan above the bed. Brandon gave us a paddle fan he took out of his house and it worked perfectly in our room.

Decluttering is always a must in any room makeover so a lot of stuff was put away.

One thing I loved in the inspiration room picture was the bed bench. My trunk belonged to my grandparents so it has to stay. You can still see my granddad’s name stenciled on the side.

I love the basket and pillows on their bench but our big dog uses this trunk as a spring board so that wouldn’t have worked out well. Sometimes you have to change up a plan to fit YOUR life-style (a.k.a. accommodate animals and kids!)

I still want to do more on the “tv side” of the room. I repainted and stripped and stained the top of THIS little side table…

Maybe add a plant…a little more wall art….a wall leaning mirror.

IMG_1306.jpg

It only took me a few decades to style the master bedroom in my last house so again, already working at warp speed here.

My next big project are the master bathroom (reveal HERE) windows…

Oh, it’s happening. I cut big holes in the wall to kind of “force the issue.” Windows are on order and the brick guy is on call.

This was the one thing I neglected to do, and my BIGGEST regret, when I remodeled this house…no operable windows in the master bath. I know from my last house that an operable window in the bathroom is a must. I have ordered two casement windows (the kind that crank out) and hope to have them by the end of the month. I have some plumbing to move (WHY IS NOTHING EASY!!!) and framing to do. These windows will look out at the large flower garden out back…I CAN’T WAIT!!!!

Wait I will though…it has been warm enough to plant a few larger perennials like azaleas and Kimberly ferns, but the threat of a freeze until mid-April prevents me from going all out with the annuals. So I sit…and wait…patiently. Okay, not so patient, but I learned the hard way not to rush the early spring planting! Pay attention to your “last freeze date”….then add a few weeks. Ours is the middle of April, but a few years ago it snowed the first week of May!

Until next week…

A kitchen makeover and painting a refrigerator...YOU CAN DO IT...and sometimes should!

My friends, Tammy and BR, have lived in their home for over 20 years…and like me they are constantly “projecting.” Tammy is the designer ( a.k.a.instigator,) BR is the muscle and craftsman, and usually I am just an advisor and cheerleader.

A few months ago, they started a HUGE project…remodeling their kitchen.

It is a project they have dreamed about and we have discussed and one their 1990s house desperately needed for years!

63279344411__FAECBF4B-CD0D-4684-9D1D-C641426B6A4A.jpg

This picture was taken after they replaced the head scratching paddle fan over the bar with a thrift store upcycled light fixture. MUCH better but as you can see, there was soooo much more to do.

Remove the funky over-the-cabinet florescent lighting and add can lighting, paint the cabinets, replace dated hardware, a new venthood, new tops and backsplash and replace the ORIGINAL almond stove.

A major list on a tight budget.

During one of our “advisory sessions” (again, my advice and opinions are always free) Tammy mentioned she couldn’t wait for her black refrigerator to go out so they HAD to replace it.

With all the other “must have now” expenses, like replacing the dated almond stove with a stainless, replacing the black refrigerator just wasn’t in the budget. They had already replaced the dishwasher and like most people (including myself) the expense of replacing all our appliances at once is often cost prohibitive.

Light bulb moment.

PAINT IT!!!

I know they have “stainless” spray paint but I seemed to recall a product specifically made for painting refrigerators to look stainless. So I started googling and found this product on Amazon….

The product had good reviews. And like I told Tammy, if it doesn’t turn out great, you can still probably sell the refrigerator on Craiglist for a hundred bucks.

So this is what we started out with…a plain ole’ black refrigerator….

IMG_1096.jpg

The first thing I did was read ALL the directions but most importantly, the Amazon reviews. The people who have used the product gave some pretty solid advise.

After reading all the reviews, we went to work. I removed the handles (even if you want to paint them, remove them), cleaned the doors thoroughly, and taped off the water dispenser and inside around the rubber gaskets. One of the sagest pieces of advice was to apply THIN coats…so after the first coat this is what it looked like…

IMG_1100.jpg

While this might not instill confidence in one’s ability to do this, I know how important it is to “trust the process.”

The second coat, a tad better….

IMG_1101.jpg

By the third coat we were all amazed at how great it looked!

BR did a great job of working Tammy’s list…he removed the over head florescent lighting and capped off the cabinets with crown and installed can lights, painted the cabinets and added new hardware,…

…. removed the old venthood and cabinet above the stove and installed a new stainless vent…

IMG_1239.jpg

….and removed the old tile backsplash and installed new.

IMG_1231.jpg
IMG_1238.JPG
IMG_1236.jpg

Quartz counter tops were a little bit out of the budget but they were able to achieve a very similar look with new formica.

Beautiful!

Tammy LOVES her new kitchen and fortunately she loves her “new stainless” refrigerator.

Would she be happier with a brand new REAL stainless fridge? Wouldn’t we all!!!! But this is a prime example of changing an element in a room that will stop the growling (and the envy and frustration) until you can afford to do what you really want to do. I have done it over the years with furniture and now I can say I have successfully done it with a refrigerator.

If you don’t love it, CHANGE IT!!!!

Board and Batten Entry....

IMG_1171.JPG

The entry…the one place in your home EVERY guest will see. They may not see your awesome pantry…or even your darling guest bath or amazing kitchen, but when you open the door they will see your entry.

It is one reason I really stressed about what to do with this space. I wanted it to be warm and welcoming, and while it is a big space, there is very little “wall space” to allow for big credenzas or entry storage. I really don’t need either since we usually enter from the garage into the laundry room…great “drop zone” for our packages, coats, purses, shoes, etc….but I like the look of both in entry spaces!

Of course the first course of business was replacing the dated door, window and light fixture….relatively easy fixes and something I did before we moved in!

IMG_6549.jpg
This was after the window was replaced but before the door, light fixture and flooring!

This was after the window was replaced but before the door, light fixture and flooring!

I debated on the board and batten for some time…

IMG_0580.jpg

I just felt it needed a little “something.”

It only took me 16 years to get the entry in my last house the way I wanted it…I feel like I am moving at warp speed on this one…lol!

At one point I tried a larger rug…but I didn’t like it…I honestly like the little dinky rug that is probably too small for the space. This is a prime example of doing what I LOVE vs. doing what the “design experts” tell me I am suppose to do.

A hint of trouble came when winter hit and we needed a place for visitors coats…other than putting them in the closet in the office, there really was no place to hang them.

Coat racks are a bit out dated and just hanging a wall mount coat rack didn’t trip my trigger.

Board and batten allowed me to put a few hooks on the wall.

IMG_1172.jpg


But that led to a little problem with the table. I LOVED the little walnut table, but you can’t hang coats above a table.

IMG_1084.JPG

Again, it is NOT my style HOWEVER it was my grandparent’s and it is walnut…heirloom and walnut…my two favorite elements.

Truthfully I like the look of an entry table…but I really need the hanging space so I went looking for a simple bench.

And I found it….

IMG_1172.JPG

I LOVE this bench I found on Etsy. Not the least expensive bench out there (and I paid a tad more for walnut) but the quality and craftsmanship made it worth the investment.

Since the table is a family heirloom I didn’t want to get rid of it. The little wickerish bedside table in the guest room had no sentimental value so it got hauled to the bunk room and the table is now a bedside table in the guest room…perfect!

I love the look and feel of this entry now…warm, inviting, functional.

IMG_1173.JPG

I am currently playing around with the dining room table.

When it was set the other way, facing the living room….

….there was no room on the only large wall for a buffet or credenza.

So I have turned the table the “other” way, which gives me room for a buffet or credenza along the wall…

IMG_1176.JPG

But I am not sure I like it “that way.” So it will sit while I ponder.

That is just how I roll…sometimes I have to sit and ponder, like whether to put up board and batten or whether I should turn my table a different way. Sometimes I know almost immediately I am not going to like it. Prime example, the “river rock” I put in a flower bed for drainage. I knew immediately I did not like the white rock I put down originally!

So out came the white rock and I found some that I liked better…

IMG_1174.JPG

Sometimes it is okay to sit and “ponder.” I have learned that the more I really think about something, the more I tend to like it long term. When I just jump right in and start on a project without really visualizing it, living with it in my mind for a while, I tend to not like it as well. And that is a waste of time, energy and money!

Until next time….

Pantry storage....

Winter has truly arrived and it is literally FREEZING outside…no bad winter precipitation, but frigid temperatures make going outside brutal. So inside where it is toasty warm is where I have been for the better part of the last week!

I started working on my awesome pantry and this week I finally put up some board and batten in the entry. The latter I will share when the paint dries and I am able to reset a few things.

The pantry…MAN OH MAN!!!

As I mentioned HERE I don’t need a lot of upper cabinet space because I have a super awesome walk in pantry.

IMG_0654.jpg

As organized as my pantry seemed to be (for ME) I decided to give it a little “facelift”….more baskets, some storage containers, labels…all the froo-froo stuff I normally don’t even bother with. But again, I am “semi-retired” now and looking for things to do until I can’t go outside and dig in the dirt!

In my last house I only had a small cabinet pantry and didn’t see the need for all the bins and boxes and “stuff.” But since I store more in this pantry, everything from food to serving dishes to cookware, I decided I wanted to get super organized.

The first thing I did was pull out everything I wanted to put in containers and baskets. Everything that wasn’t going to be put in a basket, container or bin was organized. (I also took the time to wipe down all the shelving even though it had only been 6 months since it was last cleaned!

Here is my #1 tip for organizing ANY space…figure out what storage containers you need for the items you have FIRST, then go buy your storage containers…don’t go buy a lot of baskets and bins and containers.

In my case, I already had a few wicker baskets…perfect for holding chips, storage containers and lids, seldom used sweeteners, seasonal dish towels, cookie cutters, etc. I had 7 but based on the stuff I knew I wanted to store in them, I needed a few more. Fortunately I got them at Lowe’s and they still have them!

IMG_0999.JPG


I love these little chalkboard labels I got HERE….super cute! They have a little string but I tied the string in a bow and just hot glued them directly onto the basket.

I have a lot of different flour…almond, coconut, gluten free, pancake mix, etc. I knew I would need proper storage for the flours and such.

My initial plan was to put everything in the Heritage Anchor Hocking jars…I just LOVE the look of a pantry filled with glass jars. But here’s the deal…they are heavy…and I am getting too stinking old and clumsy to be lugging around 1 gallon glass jars filled with flour.

So I wanted pretty to serve my purpose….

I found some nifty OXO storage containers at Home Goods…similar to these. I love them….I bought different sizes for the flours and mixes, baking soda and powder, cocoa powder, cornmeal, nuts, etc. The varying sizes stack neatly.

IMG_1001.JPG

I also bought three sets of labels…small for the spice jars and medium and small for the pantry containers….I got them HERE! (I went a little over board labeling the actual shelves…I’ll probably take those off.)

The can food rack is a nifty little gadget to store canned food…in theory. In the picture on Amazon it shows that it holds four cans in each section…but it really doesn’t without one of the cans being all womper jomped…meh…whatever…it will do for now!

I bought a few clear containers… the baskets are great for hiding open chip bags and random storage containers and lids but I wanted clear bins for things I use daily like cat food, bread, and a few odds and ends.

IMG_0998.JPG

As you can see I store a lot of stuff on the floor…bulky items like crock pots and big bags of animal food! I had some wire baskets I originally bought for my holiday wrapping station…perfect for holding water bottles, thermos’, potatoes and critter treats.

The left side of the pantry is for cooking ware…casserole dishes, mixing bowls, appliances and spare pots and pans…

One thing I LOVE about this panty…it has an outlet…so I can leave my toaster and can opener in the pantry rather than take up counter space.

While I was organizing and labeling I decided to do all my spices as well….

IMG_1004.JPG

I had the milk glass jars but didn’t use them because they weren’t properly labeled…now they are!

At some point in the future I really want to add glass to the pantry door like I did to my laundry room door HERE.

IMG_1005.JPG

No earth shattering reason…I just think it would look awesome with the glass cabinets.

But again, winter is here and there is NO way I can do any work outside…so that little “to do” will have to wait until warmer days!

Hopefully I can share my entry next week. I THINK I like the board and batten…maybe when I get it all staged I will know for certain.

So until next week….

static1.squarespace.png


New house update and little about choosing paint...

The new house is progressing nicely. As normal, there have been a few hiccups along the way but everything eventually gets worked out and we keep moving forward.

My current home is finally under contract and we have a September 18th closing date so timing is critical at this point. I printed off a calendar , penciled in when everyone must complete their tasks….Paint, cabinets, tops, plumbing, floor refinish, etc….and I shared that schedule with all the subs. Funny things about subs….they sometimes think they work in a vacuum…they forget that 5 other people have to come in AFTER them and if they are one day late it creates a domino affect. And sadly they don’t seem to care! Unfortunately because of our moving schedule I don’t have a day to spare so I am just hoping and praying everyone follows my schedule….guess we will find out! What is the old saying about making plans and God laughs…..

On to my paint choices…. I am not one to anguish over paint choices. I usually find what is all the rage and go with it.

This past month I did learn a valuable lesson about paint though. NEVER have paint mixed at a big box store. I picked a very popular grey for a rent house ….it was a Sherwin Williams color but I had it mixed at a big box store that carries SW…no harm, right. Wrong.
It is blue. I mean like nursery blue. I suspect the person who mixed it put a tad too much of some color in the formula and so it has a “blue” tint so on the wall it is BLUE! If it where a house I was going to live in I would have had to repaint the entire house.

So lesson learned ….have custom paints mixed at a paint store….not that they don’t make mistakes, but that is what they do….they don’t float to every department in a store… they just do paint.

Anywho, in the new house the walls were Accessible Beige…. but I’m not really a “beige” kind of person. I have read a lot of great things about Agreeable Grey, which is very close to Accessible Beige but more on the warm grey spectrum.
So I bought a sample pot, painted a big swatch on the wall, and went with it!
I love it. It really is a great color. And two days after the paint was complete, I found THIS article …. https://theflooringgirl.com/painting/agreeable-gray-neutral-gray-paint-color/ (MY COMPUTER IS AT THE ACCOUNTANTS AND I AM USING AN IPad…clearly there are things I do not know how to do on this thing…like post links and phots!)

The laundry room and guest baths are the exact same color as the last makeovers in this house! ( search it in this site….I can’t post links on this stupid thing!)

The only paint choice I am agonizing over is the big kitchen island… I am leaning towards a warm charcoal grayish color but just don’t know…. at some point inspiration will strike me and I’ll know exactly what I want!

Based on my printed in stone schedule cabinets are due to be delivered and painted Monday….so I guess I better get inspired real quick!

My little signature graphic is on my other computer so until next week…

LIVE THE LIFE YOU LOVE1

BECK


Designing a room....

Everything seems to progressing nicely at the new house…knock on wood! Wood floors are going in, walk in shower is being built, sheetrock repair is being done.

Today I want to talk about “design features.”

As I mentioned before, I kind of “wing it” when it comes to design. Some people need a visual like a design board that shows all the elements of a room.

Me…I find one thing I absolutely love and then go from there.

In the new kitchen, it was this tile….

I can not tell you how much I LOVE this tile. (It was delivered this week…even more beautiful in person!)

I have one space in the kitchen that is about 8’ long…it is the perfect “cubby” for a cooking center…cook top, oven and microwave. My vision is walnut lowers with two painted uppers to the ceiling, walnut floating shelves, white quartz tops, stainless vent hood and this tile.

This tile has a “brushed gold” accent in it so to tie in the gold with the rest of the kitchen I have decided to go with these simple pendant lights above the island….

They kind of coordinate with the light fixture I have in my dining room…the exact same one I have ordered for the breakfast room in the new house.

What can I say, I love what I love!!!

Some really funky gold hardware.

A touch of “whimsy.” I’m not a big “cabinet hardware” person…I don’t even have them on my cabinets here…but I am going with shaker style cabinets and they will need hardware. I just thought these were fun and different.

The appliances are all stainless. I LOVE my black stainless appliances, but I fear that will be one of those “fad” things. I think in the long run I will be happy with stainless. Also, there is Carrara marble accents in the tile backsplash and greyish veining in the quartz tops…I think the stainless will blend right in.

I have a two door/two drawer refrigerator. I went with a side-by-side.

First, I will NEVER buy another Samsung product. Love the other appliances but the ice maker on the fridge hasn’t worked right since the second year… I actually have to go buy ice every week. Evidently it is a “design flaw” not covered by their warranty. Rampant problem and no real fix. Not cool Samsung.

Second, while I love the drawers, I am just getting too old to bend down and dig through a big ole’ drawer for a frozen chicken. I know side-by-sides are not nearly as energy efficient and they aren’t the “in thing” right now, but I loved the one I had years ago so I am going back with one!

I read reviews and decided to go with either Kitchen Aide or Whirlpool. Considering the price difference, I went with Whirlpool.

The bar stools…I have struggled with that one because I have had mine for 20 years and I still love them especially after this little “makeover”…truth is if I needed “bar height” vs “counter height” I would just take them with me.

Unfortunately they are not counter height and they are iron so cutting them down is not feasible… so I had to find new counter height bar stools. The minute I saw these I knew they were exactly what I want….

Super simple and I think the walnut color will tie in beautifully with the walnut base cabinets and floating shelves!

This is my “design board”….I drop pictures of what I like into a computer file…each has at least one element I like. I may not like everything in the picture, but there is one thing in each I am drawn to…

I know I am drawn to walnut cabinets…but I don’t want ALL of them walnut so I am going to have walnut lowers in the “cooking center” and painted uppers. The entire island will be painted. The tops are white quartz with greyish/taupish veining. I was able to go to the quartz place and actually pick out the slabs of quartz I wanted.

Some people HAVE to have a design or “mood” board….

…something that allows them to see every element of their design (This is not my design board, just one I plucked off Pinterest.)

I get it…and it isn’t hard to make…just find what you want on line and drop it into a file, then create a “board” on a program like Photoshop. You are able to see all your elements and determine if they coordinate.

Personally, I can see every detail in my “minds eye.” I wake up at 3 a.m. every morning and visualize every single element. Probably drives my subs nuts because if I “see” something I like, I will text or email them at 4 a.m. with my idea. (Hopefully they mute their phones at night or the “ding” of my text will wake them at this unGodly hour!)

My motto…YOU DO YOU! If you need a design or mood board, go for it. Do what works for YOU! Probably would have been a lot easier on my cabinet guy had I had a design board rather than 30 random pictures of cabinets and kitchens and having to go through each one to show him the one element in each pictures I love. I only hope and pray he has the same vision as I do!

Guess we’ll see in a few weeks. In the meantime I will continue to micro-manage the poor guys who have to work at the house every day…lol!

Today I muse about the stress of Remodels....

“Working the plan” can take A LOT of patience…especially on a massive remodel.

It always gets worse before it gets better…in this post I talked about the calm AFTER the storm. Right now I am in the middle of the storm.

The good news is most of the demo is done on the new house and now, little by little, we are putting it back together. Out with the old and in with the new.

In the next few weeks a new walk in shower will be built. New hardwood flooring will go down, new transom windows will be installed. New paint, tops, tile, front door.

It all takes time and a lot of patience. Most of all it takes “working the plan” and clinging to the vision of what will be.

That’s hard to do when the house looks like a bomb went off . Or a sub doesn’t show up when they say they will. Or materials you painstakingly selected have been discontinued. Or the new window in your laundry room is obstructed by a vent pipe smack dab in the middle of the cutout! (All snags I encountered last week!)

It doesn’t matter if you are painting a dresser or remodeling a room or even an entire house. There will be snags…the unexpected will pop up…something will not go as planned.

All part of the process but these hiccups can really stress you out…and stress causes a physiological reaction that hinders your ability to think clearly and make sound decisions.

Last week I expressed a little “impatience” with the plumber who was clearly working his tail off, even though it wasn’t at the pace I personally expected. The next morning I apologized for being so short. While I thought things should have been happening at a faster pace, he didn’t deserve my “grouchiness.”

Prime example of how stress can cause you to say and do things that are NOT COOL.

Stress is not an excuse for bad behavior. While it may explain why you behave the way you do, it is not an EXCUSE for behaving like a jerk.

Remind yourself repeatedly “this too shall pass,” take a deep breath and remember that diamonds are created as a result of tremendous pressure and time.

All that being said, I highly over estimated what I could get done this week…and the most pressing “projects” I need to tackle inside the house entail paint, which is not something I can do while they are repairing sheetrock.

I decided to tackle something I thought I might enjoy…organizing this “shop” so I can move all my tools out of my garage this weekend.

It has good bare bones so for the time being I don’t plan a major overhaul. Just going to work with what is there and make a few additions. I have no doubt I will eventually “gut” it. Just the way I roll!

I need my tools at the new house more than I will need them at this one. I have so many things I want to build for the new house in the next few weeks, I decided it would be good to have this space relatively organized and all my tools handy.

Besides, it is good to “declutter” spaces when your house is on the market. Closets and shelving may seem obvious but a cluttered garage (even though it makes sense to me) may be a tad off-putting to potential buyers as well.

I’m off to take another bite of the elephant!

Slow but steady progress...

The first week of “semi-retirement” has been brutal! I closed on two rental houses last week as well as the house we will be living in. I close on another rental house Friday!

The rental houses need my attention…blinds, a little paint, cleaning, etc. I spent one day this week cleaning carpets and painting trim.

The house we are going to live in also requires my attention. Meeting with sub-contractors, ordering tile and windows, selecting appliances, supervising the demo guys.

I’m exhausted.

But that is okay…it is a “good” exhausted and everything is moving along nicely.

My “demo guys” are on day four of demo. Little by little tubs and showers, trim, old appliances, the wall between the kitchen and living room are all making their way to the curb or into the garage for resale.

So far the bathroom and kitchen are gutted, the transom windows have been exposed for replacement, all the trim has been removed in the rooms I am adding hardwood, the crown above all the windows and doors have been removed, the new laundry room window has been framed, and all the replacement items have been ordered. HOPEFULLY, the plumber will show up today to move all the plumbing so we can start putting everything back together.

(Yesterday, this wall came down…LOVE!!!!)


I am so glad our community has “bulk trash” pickup!

The good news is I love what I love…and while I would kinda sorta like to take this opportunity to make some changes, I love the tile in my recently remodeled master bath and I love my new kitchen counter tops. I am going back with the exact same quartz top and tile backsplash in the laundry room that I used in the guest bath makeover. The wall paint color is the one I used in my laundry room here when I remodeled it recently.

That is how I know I made good decisions the first time!!!

As much as I tried to shake things up, I am basically going back with a lot of the same things I have in this house…including the black painted interior doors!

Right now, it is a MESS. But every morning when I wake up at 3 a,m, I can clearly visualize the finished design…and of course I have to map out my entire day which explains why I can not go back to sleep.

That’s okay…eventually I might get back to sleeping until 5:00 a.m. again. As much as I would love to recoup all this lost sleep, I have often said if I had the opportunity to recoup all the sleep I’ve have lost in this life time from kids, pets, and “stress” I would go to sleep and never wake up!