A dresser makeover and a few changes to an "heirloom"

As I mentioned here I am no longer doing the whole “resale/flea market” thing. I am still working on a few projects here and there because it is what I love to do!

This piece is one I bought eons ago and has sat in my garage waiting on inspiration and time.

I bought it and the matching chest of drawers at a barn auction. Yes, it had been sitting in a barn…yes, I could tell it had been infested with mice at one time. No, I was not expecting to find two mouse carcasses while cleaning it. GAG!!!!

The ONLY way I have found to rid old furniture of old furniture smells (mice, cigarettes, moth balls, etc) is to first scrub with ammonia and then vinegar (do not do them at the same time!). Sometimes I will spray the inside of the piece with diluted vinegar and just let it dry. If that doesn’t do it, then I suggest you prime and paint the inside of the drawers. Fortunately, the heavy duty cleaning on this piece worked and I did not have to paint the drawers!

The top and drawer fronts are cherry veneer. The veneer was in pretty good shape and really just needed to be stripped and oiled…I used THIS process to strip the old finish. Tried and true! I know I link to this tutorial a lot, but it works!

After stripping the veneers, I applied three coats of tung oil finish and chalk painted and distressed the cabinet!

The hardware was in pretty good condition…just icky. So I primed them with metal primer and painted them with flat black paint.

AGAIN, another example of how a very few dollars and some elbow grease can turn the ickiest piece into something pretty awesome!

While I had the “farmhouse white” chalk paint mixed up I decided to give some old frames a little makeover.

When I visited my uncle this summer he gave me two old framed portraits of my great-great grandmother and my great-great-great grandmother.

They do tend to be on the “goulish” side…but I NEVER turn down family heirlooms. When he offered me THIS china cabinet….

…I knew it wasn’t “my style” but as I said, heirlooms trump everything. So I made a few changes to make it a little more appealing…I removed the red paper on the back, added glass shelves and cabinet lighting. Then I filled it with the great’s and grand’s china…it is what it is…and heirloom piece filled with heirlooms.

I decided I might be able to make the portraits a little less “goulish” by painting the frames…they were just so “heavy and dark.”

I hung them in the GUEST ROOM….

Meh…not swooning over them but again, they are family heirlooms. (I think they need to be closer together!)


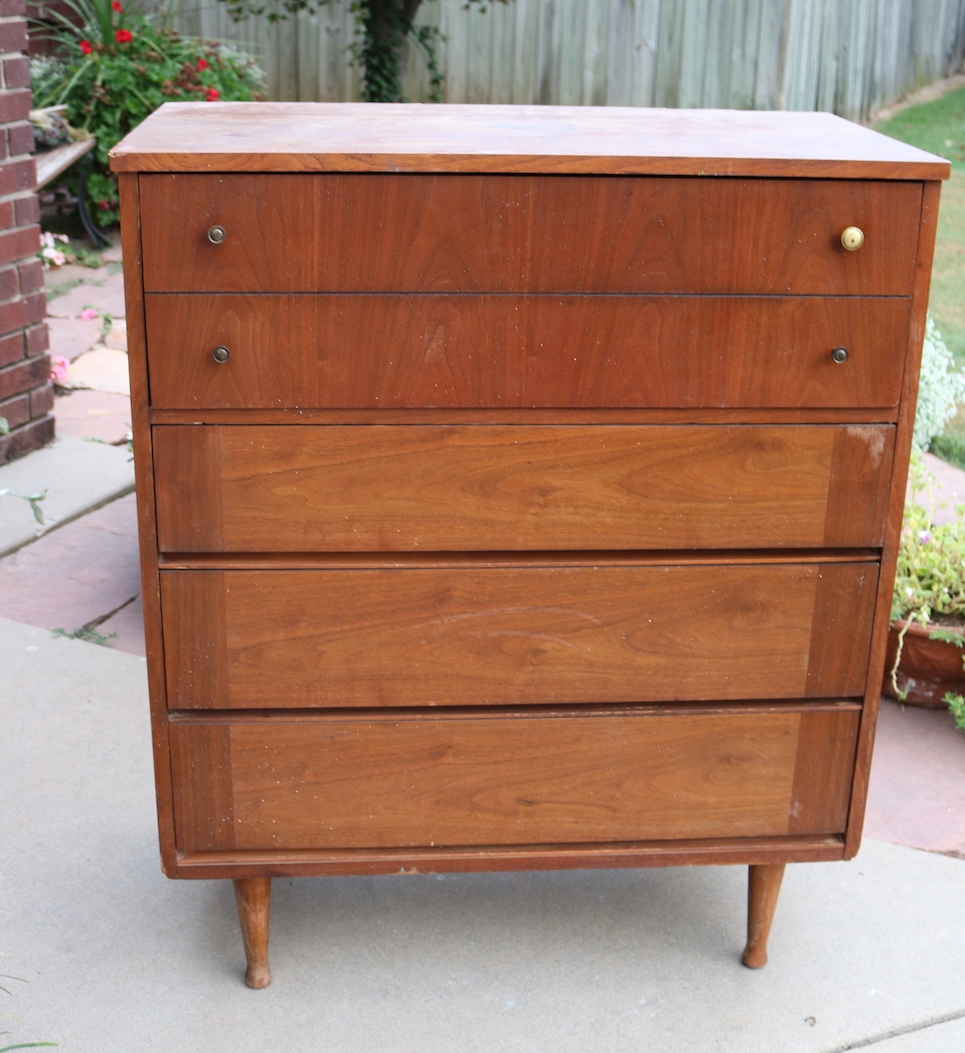
A mid century chest of drawers makeover...Part one!

While my master bathroom remodel is still progressing (yea!) I finally found time to tackle an amazing mid century dresser I found!

This chest of drawers was pretty shady. Nasty finish, chipped veneers, busted veneers, mismatched hardware…just not something you really want in your home!

It had many of the problems you may encounter with old pieces so it is the perfect project to share a little “step-by-step” tutorial on turning a trashed dresser into something you will want front and center in your home!

First, there was a busted drawer! (Which reminds me, ALWAYS number your drawers on the underside as you take them out!)

This is NOT a huge issue.

I can not stress enough the importance of making proper repairs to any piece before you start making it pretty. Glue and clamps people…NOT silicone, not screws, not nails…just plain ole’ wood clue and clamps.

This one really wasn’t too bad…there have been some I had to completely tear apart and rebuild!

One drawer was missing the wood slide like this one…

Kinda necessary if you want your drawer to not be all whomper jomped. Again, no biggy. You can buy slides online but I used some scrap 1/4” plywood and scrap trim to make one. Again, glue and clamps and good as new!

TIP: If you have a drawer with wood slides that seems to be difficult to pull out, try rubbing a wax candle on the wood slide. If you have a metal slide, make sure it isn’t bent…if it is, just take a pair of pliers and manipulate the metal.

Also, if you find the drawers to be a tad smelly, first wipe them down with ammonia and water, then spritz them with vinegar water and let them sit. Truthfully, I have found a few that smelled no matter how well I cleaned them….in that case I taped off the fronts and painted the interior and exterior of the drawer with Kilz and latex paint (here is an example!)…sometimes you have no choice!

Next up chipped and scratched veneer.

A lot of the older furniture is veneered. If it is chipped or scratched, take the time to remove any loose veneer and repair it with a little wood filler.

The first few coats don’t have to be pretty…you just want to make sure you fill all the boo-boos well. Don’t rush this process…it may take two or even three coats to get a smooth repair!

In this case it took two coats (sand between each coat) and a lot of sanding with a fine grit paper (220) to get a smooth repair, but in the end it will be worth all the effort!

I have found that after I prime and sand, I can often see how well the “patch” will look and can add more filler and do more sanding if needed. If it looks and feels rough after priming, it’s going to look bad with paint…so do a little more work on it after the primer if needed!

My plan originally was to strip and oil the top since it is a walnut veneer, but I did a number on it dragging it out of my truck…so repair and paint it is.

I would like to stress (again!) the importance of sanding and FEELING! You want it smooth to the touch. If you can feel it, you will see it when you paint it! So sand it smooth.

The veneer on the drawer fronts were in mint condition…the finish just looked old and “muddy.” I removed the mis-matched hardware and then stripped the old finish (using this process). It took me less than 30 minutes to strip all four drawers.

The two on the right have been stripped…the two on the left have not…as you can see, they weren’t THAT bad, but this quick step brightens the color and really allows the grain to shine.

On veneers it is important to use chemical stripping as opposed to sanding. Veneers can be very thin and if you sand through the veneer there is no salvaging it…you will have to putty and paint!

After stripping them I applied three coats of Formby’s tung oil finish. I love this stuff and it is my “go-to.” No stain, just a clear finish!

(It was pointed out to me by a kind reader that the original Lane Acclaim tables came with a “toned lacquer” finish….true of many mid century pieces. That may be the case but again, this is the process that works for me and the one I prefer…do your research and do what works for YOU! I prefer the “easy to wipe on and freshen in the future” tung oil finish over lacquer)

I also stripped and oiled the legs since they were in pretty good condition. Same process, same finish.

If your drawer fronts have MINOR chipping like this one did, I would suggest carefully removing or glueing any “loose” veneer (I use a toothpick to slide a bit of glue under any loose veneer and wipe the glue residue with mineral spirits) and then apply the finish. As my daddy use to say, you will never notice it on a passing train! Any time I can salvage and feature a beautiful walnut veneer, I do!

Again, my apologies…this will have to be one of those “to be continued” posts. We had rain and a cold front roll in (yea! it really is fall now!) and since I don’t have a nice cozy shop I am at the mercy of the elements.

Priming, paint and reveal will have to wait until next week!

This process may SEEM daunting and time consuming but in the end it is all worth the time and effort to bring these sturdy old pieces back to life!

Take your time and do it right and you will have a piece fit for another lifetime of use! Hopefully next week you will get to see the results of all this prep work!


Live edge tile backsplash and a dresser makeover reveal...

In my quest to make changes in my master bath, I FINALLY decided on the a sliced white pebble tile for the shower floor and niches. One decision down...too many more to go!!!

When I first remodeled the master bath, I did a glass tile backsplash on the vanity...I like it, but honestly I am no longer in LOVE with it.

And to be honest, I think the glass tile backsplash craze is running it's course. In other words, it is a fad that is fading...at least in my opinion. Besides, it had brown in it and I am moving away from browns!

Since it is such a tiny bit of tile, I decided to change it up a bit.

AGAIN WITH THE DECISIONS!!!! But I got to thinking...I love live edge wood countertops, coffee tables, benches..."live edge" wood anything is just beautiful! If you don't know what I am talking about, google it!

Why can't I make a "live edge" tile backsplash?

The pebble tile I picked out for the shower floor has a "live edge."

In other words the pebbles are laid on the sheet in such a way that the edges of each section of tile are "natural."

This vendor carries a tile border but it is only 4" tall. You can also remove each individual tile from the netting and place each individually...nah, way to much work for me!

Since I have a small backsplash, I cut each 12x12 sheet of tile in half with a wet saw. I only needed 3 sheets of tile...less than $40!

Then I had to set it on the vanity for a few days to see if I was really going to like it!

LOVE!!!

So here is a tutorial for making a "live edge" tile backsplash...

First, I had to remove the old tile. There are times when the easiest thing to do is to cut the sheetrock along the tile down to the studs and remove the whole kit-and-kaboodle! That was an option, but I decided to remove the tile and scrape the old mastic....

Since that tore up the sheetrock AND the new tile wasn't going to cover the entire section I removed, I had to do some sheetrock repair.

No biggy!

If you decide to cut the sheetrock down to the studs, here is a super simple way to "patch" the section you remove!

I didn't have to do any patching, but the basic rules apply...mud, sand, texture and paint!

Apply a coat of mud, let it dry overnight, then sand. Then another coat, let it dry and sand again. I can not stress the importance of sanding sheetrock mud smooth...FEEL IT! If you can feel it, you are going to see it when you paint it! Sand, feel, sand, feel! I used an 80 grit paper. You are better off sanding too much and having to apply more mud!

This product is one of my favorite little DIY "hacks." Sheetrock texture!

If you have properly sanded, this stuff will blend old with new! Just make sure you shake it WELL and always test spray it before you start spraying your wall. On more than one occasion I have had to wipe off the wall and start over because the texture came out to thick or too thin...so take time to test it before you start spraying it on your wall! The knob adjusts for different "textures." Follow the directions on the can.

Let the texture dry WELL before you paint!

And again, I can not stress the importance of keeping spare paint on hand. Fortunately, I just repainted my bathroom a few months ago so I had fresh paint on hand...

So, on to the fun stuff...tiling!

First, this is a "natural" stone tile (if you don't know if your tile is a "natural stone" vs. ceramic or porcelain tile, ask!) The very first thing you want to do is seal it with an "impregnator sealer." Ask...they have it at most home improvement and tile stores. Super simple to apply...brush it on...let it sit for about 5 minutes, then wipe it with a clean cloth.

I would suggest doing this before you cut it with a wet saw, but definitely before you install it and grout it!!!

Since the top edge of the backsplash is going to be the "live edge" it was important to remove any "netting" from the edge...

The net backing is what is holding all the little pebbles in place so you don't want to get carried away...just trim the netting away from the edge that will be exposed!

I used a utility knife and my little sewing scissors (and I wonder why I can't keep a decent pair of sewing scissors!)

I used a premixed tile mastic. Mastic is for small tiles...thinset for large tiles. Always use the adhesive and trowel recommended by the tile manufacturer. I coated the back of the sheet with mastic using a properly sized trowel. I used a small craft brush to apply mastic to the edge pebbles...it is okay for the mastic to "squish out" between the pebbles a tad, but you don't want it squishing out on the edge pebbles...I kept Q-tips on hand "just in case." Just make sure you get enough mastic on the back of the edge pebbles for good adhesion. 

TIP! Never set a tile backsplash directly onto the countertop...always use spacers and then after you grout you will run a small bead of caulk between the backsplash and the top. In this case I wanted a very small space so I used dimes as spacers! Thank goodness we keep a change jar and I was able to fish out a few bucks worth of dimes!

Let the mastic dry over night before grouting! 

Now this is where I tell you to "tune in next week" for grouting instructions. Why? Well because as I mentioned I needed 3 sheets of tile to complete this task and I only had the two I ordered as samples. So now I am waiting on the other sheet to be delivered so I can finish this little project. 

I know...it's annoying to get engrossed in something only to be told "to be continued." But I promise...next week I will share how simple it is to grout, seal and caulk the new tile backsplash.

Until then, I will share something I promised last week I would share!

(The grouting tutorial is up…take a look!)

A DRESSER!

I shared last week that I have been in "dresser mode" recently. I currently have FIVE dressers and chests sitting in my garage ready to roll! 

Last week I took a dresser in and it sold that day! I think it has been in my garage for over 6 months...I just never took the time to work on it.

It wasn't in horrible shape...just a really bad paint job (you could see all the brush strokes) and the hardware was pretty chippy!

I didn't change it up too much...KTSP...kilz, sand, tack and new oil based high gloss white!

The hardware got a little makeover...I primed it with metal primer and sprayed them with high gloss black lacquer.

Again, not a huge change but enough to give it a new life!

Maybe next week I'll share another one...if I can dig them out of the garage!

Well, that and the "to be continued" of the tile saga! 

Twofer...

What is a twofer...well, in this case it was one chest of drawers made into two...twofer-the-price-of-one.

Clever, huh?

The chest was obviously "dated" and too tall...

....but it appeared to be three separate sections. I pulled the drawers out and did some sloothing and found that it was indeed three sections stacked on top of each other, secured with screws. No biggy! I just removed the screws attaching the top two drawer section and presto-bingo, I had two chests...one with four drawers and one with two.

The top had a little boo-boo...a little "wood sculpting" and it was good as new.

I wish I had taken a picture of the finished repair, but honestly I forgot all about it it! Just know that it takes a little wood putty and patience to "sculpt" a repair....but not impossible!

I removed the hardware on the sides and puttied the holes.

I removed all the drawer hardware and puttied the holes I knew I wouldn't use with the new hardware

I chalk painted and distressed the four drawer chest and replaced the dated hardware with nice cup pulls.

I am a "hoarder" of legs so I took a set I had stocked away and attached it to the two drawer section.

I KSTPed (kilz, sand, tack cloth and paint) the two drawer section and painted it with a high gloss white lacquer....simple new hardware!

Twofer....

Another Drexel Accolade addition to the family....

It has actually been in the garage for months...but when I needed a large piece in my space at 410 Vintage Market and dug it out,I couldn't bring myself to turn loose.

A Drexel Accolade dry bar/server. The top actually flips open.

It isn't the first piece I bought for resale that wormed it's way into my heart...no secret that I love mid century pieces.

But this Drexel Accolade bar is more of the "Hollywood Regency" style. Identical to this little Drexel side table I painted with a high gloss lacquer and love in my den....

There is a good chance I will paint it if I decide to keep it...for now I have shined up the brass hardware and will leave it at that.

Over the years I have snagged some amazing bargains at auctions and on Craigslist...a little DIY magic and they are stunning additions to any home!

This Drexel coffee table....

My growing collection of mid century dressers...

This one is Matt's...I just don't have any more room!

My never ending collection of side tables!

I started collecting Lane Acclaim tables years ago...I think between the kids and I we are up to 10! That doesn't include the 2 walnut Lane coffee tables and the end table I just refinished for Katie and Matt!

Chairs...

Odd little bookcases are always fun!

If you walked through my home you might think I lean more towards the "traditional" side of home decor at a glance...but all these pieces have blended in to created a cohesive "eclectic" style. This "style" of home decor allows me to infuse pieces I love without worrying too much about whether I am breaking a "decorating rule" for a specific style!

So...back to the amazing Drexel Accolade console/bar...

In my opinion, there is too much "wood tone" in this space...I absolutely love the wood grain on this piece but there has to be a good balance...it just doesn't feel "balanced."

So there is a good chance that IF it stays, it will get painted. Again, that is a big "if." I think I have had no less than 5 different buffets and hutches in this space at one time or another and I always end up moving them out and moving the table back against the wall...as I mentioned before my toes tend to find anything out of place, and since the dining table has been against the wall for the better part of 19 years, it may not work well in the middle of the dining room where it REALLY belongs!

We'll see...that is one of the beauties of learning to DIY furniture...you can buy it cheap, paint, upholstery or refinish it and promptly move it out if it doesn't suit your needs. Without the guilt of having to live with something you hate because you paid a fortune for!!!!

OR it can find a permanent home where it can shine for another lifetime!

Just ANOTHER mid century dresser!

I can't help myself...when I see one, I just gotta have it!!!

A mid century bedroom set...Fashion Trend by Johnson Carper. I couldn't find a maker's mark anywhere on the set so I googled "mid century dresser" and found a picture of one like it!

(Look at the curves on this lady!)

I ended up having to buy the entire set at an auction...dresser, chest of drawers and full size bed frame. I sold the chest to off set the cost of the dresser...which is the piece I really wanted! I have a full size bed in  Mitchell's room so I might use the bed frame in there.

I decided not to strip and oil the drawers...they really are in excellent condition....I wiped them down with Restor-a-finish just to clean and brighten a bit. I painted the "box" (KSTP...high gloss white) only because the top was laminate... I did that with Matt's dresser and I love how it turned out!

My original plan was to put the new dresser in the guest room until I get this one back from Katie in a year or so...

But then I got to thinking...why would I hide a beautiful piece like this in a guest room? 

So I took the dresser out of my room and put it in the guest room and put the new one in my room!

LOVE!!!

The only other thing I have added to my "proper" guest room is this little rattan table (bought two and sold one) and the magazine rack from the living room. 

Again, you will not find AFFORDABLE new furniture that is built as well and with woods like walnut, teak, rosewood and mahogany! There is a reason vintage and antique furniture have managed to survive decades of use!

When I walk around my house and look at some of the beautiful vintage pieces I have collected I am amazed at just how little I have paid for them. Keep in mind MOST were in much need of a little care and attention but if you are willing to roll up your sleeves and do the work, you can create a home filled with beautiful pieces too! 

That is why I have this blog...to show you just how easy it can be!!!

Stop drooling and start doing!!!

Another mid century dresser...

I love vintage mid century furniture! Love it. The style is my absolute favorite to refinish and as I have said before, I try to infuse as many pieces as I can into each room. Beautiful wood...clean lines...sturdy as the day it was built!

These are just a few of the dressers and chests I have refinished over the years...

Here....

Here....

Thank goodness my kids have inherited my passion for this style of furniture...because when I found this awesome dresser and matching chest on Craigslist, Matt had no problem taking them off my hands (AFTER I had worked a little makeover magic on them!)

As you can see I couldn't wait to start stripping the old finish before I remembered to get the camera.  And the finish on this sucker...it was a booger! Usually my 1/2 and 1/2 mixture melts old finish right off! I dang near had to blast this stuff off...I finally had to break out the heavy duty stripper and break my cardinal rule against sanding veneer (DO NOT attempt to sand veneer unless you have some serious experience.)

The top is laminate so I decided to paint the cabinet and refinish the drawers and legs....

Stripped and oiled the drawer fronts and legs...KSTP the cabinet and tops...drum roll....

I usually add a piece of protective glass on painted dressers...just to be on the safe side!

I love these pieces...and they are perfect for Matt's new home. He is using the dresser in his master bedroom and the chest in his guest room! Because these pieces were so well built, they will last another life-time!

I have several projects in Matt's house to share! He has already started "projecting" and I try to sneak in and take pictures when I can! So stay tuned for a cute little breakfast table makeover and his updated brick fireplace.

What's my "style"....

As I have said time and again (and evident by my Home Tour) my "style" is very eclectic. What exactly does that mean?

It means I like what I like and because my home is not all "farmhouse" or "traditional" or "mid century" I can pretty much find a place for any piece I fall in love with. 

As I mentioned in my last post my son Matt is buying his first home so I have been on the hunt for pieces that can be transformed and used in his house. Taylor, my daughter-in-law, asked me what Matt's decor style is...hum...not sure I ever asked him. Fortunately, like me, he likes what he likes and doesn't restrict himself to a specific style. He loves the mid century Lane Acclaim tables, but he also loves the farmhouse table I refinished several months ago! I promised him that if it didn't sell, he could have it for his dining area. I have picked up a few chairs and a round oak pedestal table for his breakfast nook. I'll share them when I get their "facelift" done! 

In the meantime I want to share this nifty dresser. Seriously horrid in it's original condition, but I could see the potential. 

Solid wood and very well built...and unique!

I think it could be an awesome piece in his bedroom, along with this little dresser, but I'm not sure I have convinced him it is worthy....but then again, he hasn't seen it finished! 

I absolutely LOVE this piece, especially the old rusty hardware. Matt asked if I could put cup pulls on it like the little dresser, but honestly, this hardware too cool... so unique and amazing. I cleaned them up and reattached them...rust and all! I just think they are awesome!

I chalk painted and distressed the cabinet and gel stained the top. The drawer fronts are latex paint. 

As I said before, if he still doesn't love it, someone else will! 

That is the great thing about being "eclectic"...to each his own! 

MCM dresser makeover AGAIN!

I featured my personal dresser make over here!

I really love this dresser but as I mentioned in the original post, I have always regretted painting the drawer fronts. They have a little slant and as you can see in the linked post, they have a little "inlay" detail! Looking back, I wish I had stripped the drawer fronts, oiled them and just painted the cabinet and top....kind of like what I did with this dresser!

I guess I could have rolled up my sleeves and taken on the task of stripping the fronts...but honestly, you can't go back and easily undo what has been done...or can you?

If you find the exact same dresser, YES YOU CAN!!!

I happen to be driving down the street this past weekend and spotted a dresser and chest of drawers sitting out in a driveway. It just so happens they were the EXACT same style I have. I couldn't stop fast enough (annoying to the person behind me since I was hauling my 14' trailer) but was disappointed when told someone was coming to pick them up later that evening. I asked them to call me if they weren't picked up...that is when I found out they were GIVING them away...would I be willing to PAY for them? YOU BET YOUR BAZOOKA!!!! I couldn't get them in my truck fast enough. Do I feel a tad guilty that someone showed up later that evening to pick up their free furniture...only to find it gone...naaaaaa...okay just a tad.

So this is what the dresser looks like in it's original glory! A "Ward Furniture Manufacturing" dresser. It is identical to my blue one before I gave it a little makeover.

Hardly a scratch on it and the veneer was all intact and in good condition. I am always amazed when a 50 year old piece of furniture is in such amazing condition...I wish this 53 year old had faired as well!

I removed all the drawers and stripped the fronts using this process...never fails and a pretty quick process! Even though the finish was near perfect, old finishes "muddy" and "amber" over time and just removing the old finish really brings out the beauty of the piece!

TIP! When you remove drawers from a chest or dresser, make sure you label each drawer (I mark them on the underside with a pencil!) 

The drawers may look identical, but truth is they may not fit properly in a different place...age and wear can make drawers "stick" if they aren't put back where they were originally! 

I gave the cabinet a little KSTP treatment...Kilz, sand, tack and paint! I applied 4 coats of tung oil finish to the drawer fronts and legs...sanding (with 0000 steel wool) and tack between each coat. 

I. LOVE. WALNUT. AND I. LOVE. MID CENTURY! 

And now I. LOVE. THIS. DRESSER! 

I didn't "dislike" the original dresser, but again, I did regret that I didn't restore the drawer fronts. Now...perfect! 

As much as I would love to keep the matching chest, it will be sold. Can't keep every piece and since these aren't "valuable" MCM pieces, I don't feel too bad letting it go!  

Painting dressers today so until next week....

"New" barstools and a few dresser makeovers!

Last week I shared the prep work on the "chest of drawers from hell."  

This week I was able to get it painted and the hardware installed! Precious!

I kept the paint treatment fairly neutral with one of my favorite off-whites...."Swiss Coffee." The white and teal combo has been selling VERY quickly, but I decided to stay simple and neutral with this one! Partially because I absolutely adore this hardware and I didn't want to do anything to distract from it!!

As I mentioned last week, I painted the interior of the drawers to seal in the "funk" and make them look a little better! I used some leftover paint I had from another project...takes a few extra minutes but honestly, well worth the time and effort!

As you can see, the extra time I took to repair the damaged veneer on the top and the side really paid off!

I took this little chest to 410 Vintage...it lasted all of about 4 hours! Confirmation that all the hard work was well worth it!

I did paint one old dresser I had with the teal and white combo...

Just one of those old maple dressers...a little paint, a little gel stain on top, some new hardware and this baby sold within two hours of taking it in! (I didn't even bother to take a photo before I delivered it...this is one I snapped with my phone!)

 I also finished up another little project waiting in the wings...these old bar stools!

Certainly not something you would want in your kitchen which might explain why I was able to pick them up for a few bucks each at an auction. Pretty ratty!

But with a little KSTP treatment and a simple reupholstery job on the cushions, beautiful!

After I disassembled them, I cleaned them up, sprayed them with Kilz, sanded smooth, wiped with a tack cloth, and then I sprayed them with a satin white spray paint. I had some leftover grey herringbone material from Sister's tufted chair project (will share that soon!) so I used that to recover the seats.

Recovering barstool seats and dining room chair seats are one of the simplest "reupholstery" jobs a DIY newbie can tackle. And it can completely change the look of a stool or chair. Again, TONS of great tutorials online for this simple project!

Again (and again and again) if you have a "ratty" piece of furniture that just doesn't trip your trigger any more, CHANGE IT! Life is too short to live with ugly furniture!

YOU CAN DO IT!