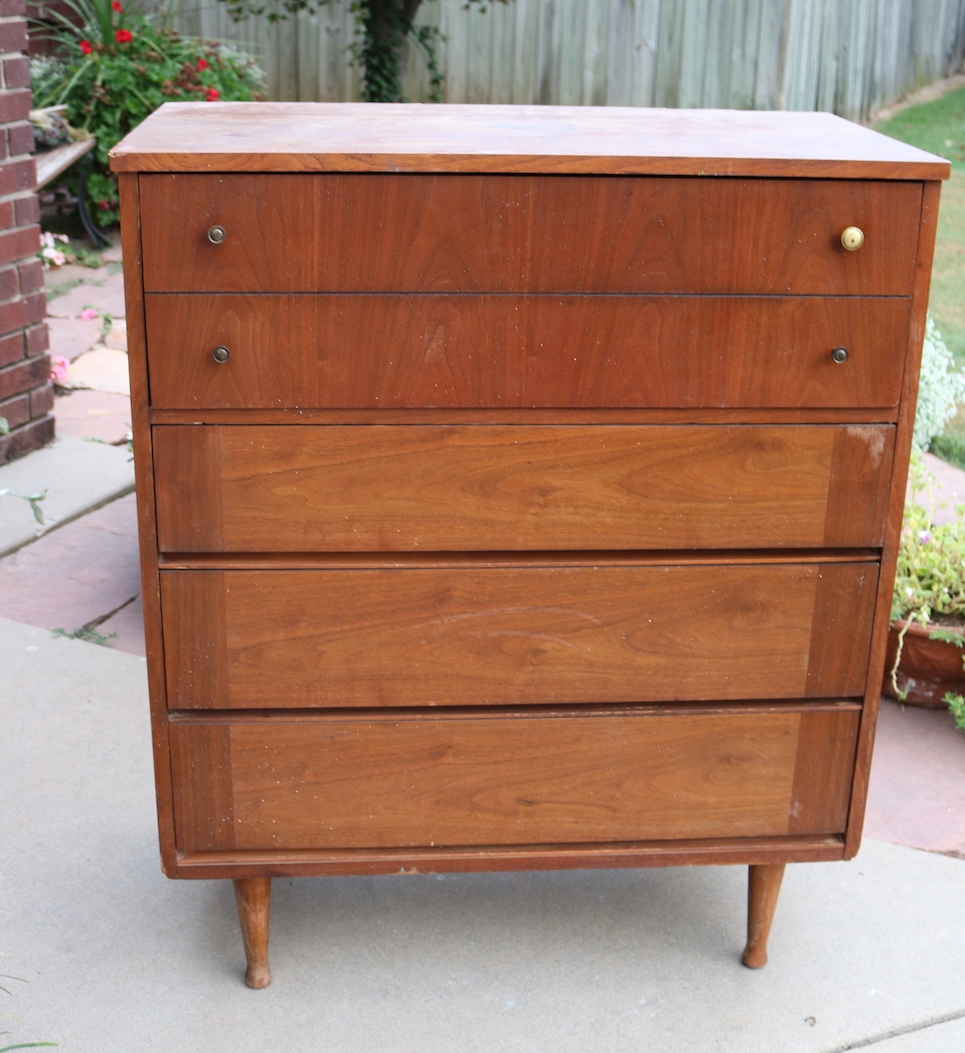
A mid century chest of drawers makeover...the reveal!

When last we spoke, I shared a little “step by step” tutorial for repairing and prepping this “less-than-desirable” chest….

I can not stress enough the importance of “prep work” on any project. Again, if you don’t take the time to make repairs and properly prep (regardless of whether it is a dresser or a wall or a floor) all the “pretty” is going to be wasted.

(BTW, while cruising Pinterest I found this super awesome tutorial for repairing chipped corners with wood filler! Great suggestions!)

Make proper repairs, sand patches smooth, use the right tools and materials! Do the repairs and prep or you are wasting your time and resources making it pretty.

After all the patching and repairs, the next step is properly priming! (I had already stripped and oiled the drawers and set them aside!)

I primed the cabinet of the chest with Kilz. That is usually my go-to primer since it sands smooth and holds up well. Primer is a SUPER important step on most paint projects…unless you are chalk painting! Since this was a relatively small project I used the spray Kilz…one can.

TIP: I know a lot of paints SAY they are a “paint and primer” in one…I may eventually change my tune but I don’t believe them. I ALWAYS use a primer…always!

After the Kilz had dried well (usually overnight but several days is best), I sanded it smooth with 220 grit paper.

After sanding I checked all the areas I had repaired…there were a few little spots that needed additional putty and one I missed on the first go round…

…no biggy….I just filled them again, let it dry, sanded smooth, spritzed on a little more primer and then sanded it again after that had dried.

Tack cloth…it is an absolute necessity on any paint job. I see tutorials all the time that recommend wiping the piece with a damp cloth or even mineral spirits. Forget about it! USE TACK CLOTH! It will pick up the finest grains of whatever and will make a huge difference in the final look and feel of your paint job!

I’m kind of obsessed with white lacquer these days. i just love the high gloss finish. Spray paint is always a great option for smaller projects and you can find a multitude of colors and sheens! Just make sure you use a quality brand! You can also brush and/or roll alkyd (oil based) or latex (water based) paint. ALWAYS use an additive and use a high quality brush and 4” foam roller to apply the paint. Pay attention to the manufactures recommendation for temperature and application…it matters!

Regardless of whether you use a spray paint or lacquer, latex or oil, always apply 2-3 THIN coats, allowing dry time as recommended. Thinner is better. If you try to get a one coat finish, you will likely be disappointed and make a HUGE mess!

Spray, roll, and/or brush on the paint…a thin coat…let it properly dry, lightly sand the boogers AFTER it has properly dried with a fine grit paper (IF needed), tack and recoat. Regardless of whether you need to sand between coats, always use tack cloth before applying additional coats. I usually apply at least two coats and sometimes three.

Most paints do not need a top coat but if your piece will be getting a lot of use, I recommend a light coat of polycrylic. Polyurethane is some good stuff but it tends to “yellow” so polycrylic works great.

So…before….

…and the oh-so-better after….

You may have noticed one little missing element. The hardware! Why? Well because I didn’t pay attention when I ordered new brass cone knobs and they are coming from CHINA!!! So I should have them someday…maybe…who knows! The hard work is done…knobs are no biggy!

One of the patched areas after paint…

Dry time…IT MATTERS. I cringe when I watch DIY shows and they immediately stage all the pretty pieces they just painted. There is a huge difference between “dry to touch” and “dry to USE.” Truth is, paint and finishes need time to cure before you put all your pretties on it. You can move it in place, but give latex paint AT LEAST a week or two to cure and oil based paints a good 3-4 weeks. Otherwise you may find that your heavy lamp or knick-knacks will stick to the finish or leave a mark!

This is another dresser I finished up a few weeks ago. It didn’t have near the issues the first had, but the refinish process was the same…KSTP the cabinet and refinish the drawer fronts…presto-bingo…

Again, I know this sounds like a daunting and time consuming task…but if you take the time to do it right, you will have a piece that will last another lifetime and one you will be proud to use in your home!

Next week I hope to share my bathroom remodel. In the meantime, you can check out Cristina’s master bath…it will knock your socks off!

Until then….

A mid century chest of drawers makeover...Part one!

While my master bathroom remodel is still progressing (yea!) I finally found time to tackle an amazing mid century dresser I found!

This chest of drawers was pretty shady. Nasty finish, chipped veneers, busted veneers, mismatched hardware…just not something you really want in your home!

It had many of the problems you may encounter with old pieces so it is the perfect project to share a little “step-by-step” tutorial on turning a trashed dresser into something you will want front and center in your home!

First, there was a busted drawer! (Which reminds me, ALWAYS number your drawers on the underside as you take them out!)

This is NOT a huge issue.

I can not stress enough the importance of making proper repairs to any piece before you start making it pretty. Glue and clamps people…NOT silicone, not screws, not nails…just plain ole’ wood clue and clamps.

This one really wasn’t too bad…there have been some I had to completely tear apart and rebuild!

One drawer was missing the wood slide like this one…

Kinda necessary if you want your drawer to not be all whomper jomped. Again, no biggy. You can buy slides online but I used some scrap 1/4” plywood and scrap trim to make one. Again, glue and clamps and good as new!

TIP: If you have a drawer with wood slides that seems to be difficult to pull out, try rubbing a wax candle on the wood slide. If you have a metal slide, make sure it isn’t bent…if it is, just take a pair of pliers and manipulate the metal.

Also, if you find the drawers to be a tad smelly, first wipe them down with ammonia and water, then spritz them with vinegar water and let them sit. Truthfully, I have found a few that smelled no matter how well I cleaned them….in that case I taped off the fronts and painted the interior and exterior of the drawer with Kilz and latex paint (here is an example!)…sometimes you have no choice!

Next up chipped and scratched veneer.

A lot of the older furniture is veneered. If it is chipped or scratched, take the time to remove any loose veneer and repair it with a little wood filler.

The first few coats don’t have to be pretty…you just want to make sure you fill all the boo-boos well. Don’t rush this process…it may take two or even three coats to get a smooth repair!

In this case it took two coats (sand between each coat) and a lot of sanding with a fine grit paper (220) to get a smooth repair, but in the end it will be worth all the effort!

I have found that after I prime and sand, I can often see how well the “patch” will look and can add more filler and do more sanding if needed. If it looks and feels rough after priming, it’s going to look bad with paint…so do a little more work on it after the primer if needed!

My plan originally was to strip and oil the top since it is a walnut veneer, but I did a number on it dragging it out of my truck…so repair and paint it is.

I would like to stress (again!) the importance of sanding and FEELING! You want it smooth to the touch. If you can feel it, you will see it when you paint it! So sand it smooth.

The veneer on the drawer fronts were in mint condition…the finish just looked old and “muddy.” I removed the mis-matched hardware and then stripped the old finish (using this process). It took me less than 30 minutes to strip all four drawers.

The two on the right have been stripped…the two on the left have not…as you can see, they weren’t THAT bad, but this quick step brightens the color and really allows the grain to shine.

On veneers it is important to use chemical stripping as opposed to sanding. Veneers can be very thin and if you sand through the veneer there is no salvaging it…you will have to putty and paint!

After stripping them I applied three coats of Formby’s tung oil finish. I love this stuff and it is my “go-to.” No stain, just a clear finish!

(It was pointed out to me by a kind reader that the original Lane Acclaim tables came with a “toned lacquer” finish….true of many mid century pieces. That may be the case but again, this is the process that works for me and the one I prefer…do your research and do what works for YOU! I prefer the “easy to wipe on and freshen in the future” tung oil finish over lacquer)

I also stripped and oiled the legs since they were in pretty good condition. Same process, same finish.

If your drawer fronts have MINOR chipping like this one did, I would suggest carefully removing or glueing any “loose” veneer (I use a toothpick to slide a bit of glue under any loose veneer and wipe the glue residue with mineral spirits) and then apply the finish. As my daddy use to say, you will never notice it on a passing train! Any time I can salvage and feature a beautiful walnut veneer, I do!

Again, my apologies…this will have to be one of those “to be continued” posts. We had rain and a cold front roll in (yea! it really is fall now!) and since I don’t have a nice cozy shop I am at the mercy of the elements.

Priming, paint and reveal will have to wait until next week!

This process may SEEM daunting and time consuming but in the end it is all worth the time and effort to bring these sturdy old pieces back to life!

Take your time and do it right and you will have a piece fit for another lifetime of use! Hopefully next week you will get to see the results of all this prep work!


Grouting the live edge pebble tile backsplash....

Last week I shared the installation of my "live edge pebble tile" backsplash. This week I will continue that little tutorial...specifically the grouting and caulking!

Remove all your spacers and clean off any excess mastic that might have squished out or is on the face of the tile. Run a piece of tape along the counter, slipping it a tad under the tile.

It is important that you NOT get a lot (if any) grout in the space between your counter and the backsplash...again, you will run a small bead of caulk in that space when the grout is dry...caulk is flexible...grout is not. If you barely slip the tape under the tiles, it will pull out any grout that might slip in that gap when you pull up the tape.

Grouting is not hard! Quick tip...in general SANDED grout is for floors with larger grout lines...UNSANDED grout is for backsplashes and small tiles. Here is a good outline of the difference between the two...but as always I would suggest going with the manufacture recommendation for your specific tile or the advice of a PROFESSIONAL (not the kid at Lowes!)

In this case I used sanded grout. Why? Well, because that is what I had on hand and there are some pretty substantial gaps between the pebbles and it is in a wet area. But if you have small, uniform spaces between the backsplash tile or a tile that would scratch easily, I would go with unsanded grout.

Mix your grout the consistency of say, really thick peanut butter.

TIP: A little water goes a long way with grout so add a little water at a time and mix well. I used my shop spatula. I never dump ALL the grout in...save some in case you add too much water...otherwise you will have to go get more grout...trust me, been there, done that. 

Use a grout float to mash the grout between the pebbles/tiles, then wipe off the excess with the float. Make sure you fill the gaps well. I even use my fingers to mash in the grout in hard to reach areas. Again, TRY to avoid getting grout in the gap between the tile and the counter! Fear not...if you get grout in this gap it will pull out when you pull the tape up while the grout is still wet!

After you have filled all the gaps well and removed the excess with your float, use a tile sponge to gently wipe the pebbles/tiles. DO NOT use a plain ole' kitchen sponge...they "shed" and you will get little flecks of sponge in your grout...from experience. Buy a sponge specifically for this purpose.

TIP: I set aside a "gloob" of wet grout just in case I need to go back and fill in little spots here and there...just smash it in the gap, then wipe it with the sponge. 

On your first wipe, your goal is to get rid of the excess grout on the tiles...if you "gouge" the grout between the tiles just smash some more in and wipe.

After all the excess is removed, peal up the tape...it should remove any grout from the gap between the tile and counter. I take a utility knife or toothpick and "flick out" any that is still lurking. Then wipe again with your sponge!

I have found that using a "swirling" motion tends to "buff" the grout and give it a smother, more uniform finish.

Wipe well, let it sit for about 30 minutes, then go back and wipe again...keeping your sponge clean. You will want to do this repeatedly, every 30 minutes or so, until there is no more "grout film" on the pebbles/tile. 

I personally think grouting is one of the things that sets a “professional look” install apart from a “DIY” job…so take your time with this process. You want the grout to be uniform, smooth and even with or just a hair below the edge of the pebbles/tiles. You don’t want it on the face of the tile. Again, it never hurts to go back and add wet grout, then wipe again. Once the grout is dried and set, it’s a little tough to make adjustments…so take your time and do it right!

TIP: Just from past experience...don't rise your sponge in the sink...not saying it WILL clog your sink, just saying. Use a bucket, changing the water often!

After you have finished removing all the excess grout and the pebbles/tiles are sparkling clean, and you are happy with the grout lines, let it dry overnight.

After the grout has dried, put down another fresh line of tape to protect the counters and coat everything with the "impregnator sealer" (if you have natural stone) Brush on, let it dry for about 5 minutes, then wipe with a clean cloth. That will seal both the stones and the grout. Or apply a grout sealer (per the directions) if your tile is ceramic or porcelain. Let that dry well.

Then caulk...here I give you a pretty decent tutorial on caulking! Super important so make sure you do this one final step! 

Again, silicone caulk can be tricky for a novice and really not necessary in this area. I am a pretty proficient caulker, but if you are a novice I would suggest using this tape trick.

CAREFULLY tape both the tile and the counter...only leaving the "gap" exposed.

Apply the caulk, smooth away all the excess with your finger, pull the tape, and then smooth again with a clean, damp finger...you SHOULD get a nice smooth grout line.

I used white grout so I used white caulk. Most grouts have a matching caulk and you want your caulk to match your grout...worth the small investment.

And presto-bingo...a live edge pebble backsplash!

I LOVE it!

I know not everyone will love the "natural" look of a live edge backsplash...so many seem to prefer the structure of a "straight line" application. But as I look around my house I realize I really gravitate to a "natural" and random flow....

The dry stack fireplace tile....

The "randomness" of the tile kitchen backsplash...

Maybe it is all a part of my "go with the flow" attitude! I would like to think that in a world of structure and symmetry we all need a little randomness in our lives!

My son said it looks very "Coloradoish!" BINGO! That is exactly what it kind of reminds me of!

We leave next week for our annual fall trip out west! I finally get to check “a float trip down the Black Canyon" off my bucket list...we have a guided fishing trip scheduled! And then we will do our annual guided trip on the Colorado River with Cutthroat Anglers. This is a trip I look forward to every year!

I'll break out all the fall decor before we leave so I will be ready to kick back and enjoy the fall season when we get home! Hopefully the summer heat will have gone away and I will be able to pack up the shorts and flip flops for the year.

Live edge tile backsplash and a dresser makeover reveal...

In my quest to make changes in my master bath, I FINALLY decided on the a sliced white pebble tile for the shower floor and niches. One decision down...too many more to go!!!

When I first remodeled the master bath, I did a glass tile backsplash on the vanity...I like it, but honestly I am no longer in LOVE with it.

And to be honest, I think the glass tile backsplash craze is running it's course. In other words, it is a fad that is fading...at least in my opinion. Besides, it had brown in it and I am moving away from browns!

Since it is such a tiny bit of tile, I decided to change it up a bit.

AGAIN WITH THE DECISIONS!!!! But I got to thinking...I love live edge wood countertops, coffee tables, benches..."live edge" wood anything is just beautiful! If you don't know what I am talking about, google it!

Why can't I make a "live edge" tile backsplash?

The pebble tile I picked out for the shower floor has a "live edge."

In other words the pebbles are laid on the sheet in such a way that the edges of each section of tile are "natural."

This vendor carries a tile border but it is only 4" tall. You can also remove each individual tile from the netting and place each individually...nah, way to much work for me!

Since I have a small backsplash, I cut each 12x12 sheet of tile in half with a wet saw. I only needed 3 sheets of tile...less than $40!

Then I had to set it on the vanity for a few days to see if I was really going to like it!

LOVE!!!

So here is a tutorial for making a "live edge" tile backsplash...

First, I had to remove the old tile. There are times when the easiest thing to do is to cut the sheetrock along the tile down to the studs and remove the whole kit-and-kaboodle! That was an option, but I decided to remove the tile and scrape the old mastic....

Since that tore up the sheetrock AND the new tile wasn't going to cover the entire section I removed, I had to do some sheetrock repair.

No biggy!

If you decide to cut the sheetrock down to the studs, here is a super simple way to "patch" the section you remove!

I didn't have to do any patching, but the basic rules apply...mud, sand, texture and paint!

Apply a coat of mud, let it dry overnight, then sand. Then another coat, let it dry and sand again. I can not stress the importance of sanding sheetrock mud smooth...FEEL IT! If you can feel it, you are going to see it when you paint it! Sand, feel, sand, feel! I used an 80 grit paper. You are better off sanding too much and having to apply more mud!

This product is one of my favorite little DIY "hacks." Sheetrock texture!

If you have properly sanded, this stuff will blend old with new! Just make sure you shake it WELL and always test spray it before you start spraying your wall. On more than one occasion I have had to wipe off the wall and start over because the texture came out to thick or too thin...so take time to test it before you start spraying it on your wall! The knob adjusts for different "textures." Follow the directions on the can.

Let the texture dry WELL before you paint!

And again, I can not stress the importance of keeping spare paint on hand. Fortunately, I just repainted my bathroom a few months ago so I had fresh paint on hand...

So, on to the fun stuff...tiling!

First, this is a "natural" stone tile (if you don't know if your tile is a "natural stone" vs. ceramic or porcelain tile, ask!) The very first thing you want to do is seal it with an "impregnator sealer." Ask...they have it at most home improvement and tile stores. Super simple to apply...brush it on...let it sit for about 5 minutes, then wipe it with a clean cloth.

I would suggest doing this before you cut it with a wet saw, but definitely before you install it and grout it!!!

Since the top edge of the backsplash is going to be the "live edge" it was important to remove any "netting" from the edge...

The net backing is what is holding all the little pebbles in place so you don't want to get carried away...just trim the netting away from the edge that will be exposed!

I used a utility knife and my little sewing scissors (and I wonder why I can't keep a decent pair of sewing scissors!)

I used a premixed tile mastic. Mastic is for small tiles...thinset for large tiles. Always use the adhesive and trowel recommended by the tile manufacturer. I coated the back of the sheet with mastic using a properly sized trowel. I used a small craft brush to apply mastic to the edge pebbles...it is okay for the mastic to "squish out" between the pebbles a tad, but you don't want it squishing out on the edge pebbles...I kept Q-tips on hand "just in case." Just make sure you get enough mastic on the back of the edge pebbles for good adhesion. 

TIP! Never set a tile backsplash directly onto the countertop...always use spacers and then after you grout you will run a small bead of caulk between the backsplash and the top. In this case I wanted a very small space so I used dimes as spacers! Thank goodness we keep a change jar and I was able to fish out a few bucks worth of dimes!

Let the mastic dry over night before grouting! 

Now this is where I tell you to "tune in next week" for grouting instructions. Why? Well because as I mentioned I needed 3 sheets of tile to complete this task and I only had the two I ordered as samples. So now I am waiting on the other sheet to be delivered so I can finish this little project. 

I know...it's annoying to get engrossed in something only to be told "to be continued." But I promise...next week I will share how simple it is to grout, seal and caulk the new tile backsplash.

Until then, I will share something I promised last week I would share!

(The grouting tutorial is up…take a look!)

A DRESSER!

I shared last week that I have been in "dresser mode" recently. I currently have FIVE dressers and chests sitting in my garage ready to roll! 

Last week I took a dresser in and it sold that day! I think it has been in my garage for over 6 months...I just never took the time to work on it.

It wasn't in horrible shape...just a really bad paint job (you could see all the brush strokes) and the hardware was pretty chippy!

I didn't change it up too much...KTSP...kilz, sand, tack and new oil based high gloss white!

The hardware got a little makeover...I primed it with metal primer and sprayed them with high gloss black lacquer.

Again, not a huge change but enough to give it a new life!

Maybe next week I'll share another one...if I can dig them out of the garage!

Well, that and the "to be continued" of the tile saga! 

Old typewriter cart upcycled....

I am in "dresser" mode these days...lots of dressers and chest of drawers being "refinished" but after 5 years, I still can't remember to take good "before and after" pictures! So while I have refinished 4-5 dressers in the last few weeks, I have no good pictures to show for it! CURSES!

My garage is packed with dressers and chests I am working on now so MAYBE I will remember to take pictures when they are done so I can share!

One little project I DID remember to take pictures of is this old metal typewriter table....

I shared here the first little table I refinished. I have found they are perfect for my portable sewing machine. I commented on the first makeover that I wish I had one with a little drawer...low and behold I found one!

It wasn't in bad shape...just a really bad paint job. So I primed it with metal primer, sanded smooth, wiped it with tack cloth and painted it with a few coats of black lacquer....

This little table makes it super simple to store away my sewing machine until I need it...

...then I can just roll it out and set it up anywhere in the house! Just roll it out and put it anywhere...no more scratching my dining room table.

If you find one of these little metal tables that has a bit of a "rust issue" I shared here how to deal with that

I think these old metal tables can be used for many things...a portable sewing table, coffee bar, maybe even a little portable "prep" table for the laundry room, garage or kitchen. Roll it out then tuck it away when you no longer need it!

Simple!

A new bar top and Wayfair light fixture...

As I mentioned here, change is tough for me...which is why these things haven't changed much in 19 years.

I painted the dining room light years ago (antique bronze to black)...as much as I really didn't love the actual fixture, I loved what I could do with it during the holidays....

One year I removed the little shades and I liked that a bit better, but I still wasn't digging the light fixture itself.

Just too ornate and "heavy."

But I could never find one that would allow me to decorate it for the seasons...until I did!

(As you can see, I still have the Drexel buffet...love the piece...just not the color...waiting on "inspiration.")

The install was super simple...here I share how to install a new light fixture!

Not a huge fan of the Edison bulbs, but I think those can easily be changed out...eventually. For now I can live with them knowing that come fall (right around the corner...yea!) and Christmas, I can still decorate the fixture!

I think it is more of a "farmhouse" look but the nickel accents tie in with the more "modern style" brushed nickel bar lights. So it works for me....

Which brings me to the bar top....

...it wasn't totally offensive, but in my quest to go "light and bright" in my kitchen without painting all my kitchen cabinets, I impulsively ordered a white quartz top.

Truth is, I wasn't really loving it after it was installed. Just too "stark" and soooo white! 

I painted the little support corbels the same color as the trim...more "white." (They were originally black but since I didn't damage them when I removed the old top I just primed them and painted them with the trim paint...BM Swiss Coffee.)

This is what we refer to in the design world as "OMGosh what have I done" moments.

I decided what was really bugging me was the dingy old bar stool seats. They had certainly seen their better days. The bar stools are 18 years old and I still love the style dearly...heavy iron and super sturdy...but the "grey tweed" upholstery just didn't cut it any more!

Choosing fabrics is something I really struggle with...but I know I LOVE the fabric I used on this little chair makeover

Light and bright with just a touch of grey! So I ran out and bought enough fabric to recover the bar stool seats. About 1 1/2 yards for four seat cushions. If you don't know how to figure for fabric, take your measurements with you and they will help you figure it...just make sure you add 2" on each side! (Or better yet, just take a seat with you!)

Pay CLOSE attention to the direction of the fabric. This fabric doesn't APPEAR to have a "right or wrong" way, but it does. I put a pin in the top of each piece so I would know which way to lay the fabric on the seats!

Reupholstering chair seats is a super easy DIY project...probably one of the simplest DIY projects one can tackle! And this easy little project is an excellent way to make a pretty dramatic change in any room without breaking the bank or dragging out the sewing machine! There are thousands of great tutorials online...so again, do your research and find one that makes sense to you and use it!

In this case I had no desire to paint the stools...I like the black iron...but if you want to paint a dining chair or stool, do it after you have removed the seats but BEFORE reattach them. Again, super simple project! Use the KSTP method (kilz, sand, tack, paint...here is a pretty good paint tutorial.)

I removed the seat cushions! In this case, 4 little screws! I also scrubbed down the stools...pretty nasty after 18 years of use!

Then it was just a matter of wrapping the seats with the new fabric...I didn't even remove the old fabric or bother with applying a new underside....and reattaching them.

I guess that might be an issue if you are laying on the floor looking up at the underside.

Here I do share a few helpful tips on upholstering...pretty much applies to the simplest project!

While I had the camera out I played around with a few different "centerpieces" for the bar with knick-knacks I had on hand...

But honestly, with mischievous cats who insist on knocking everything off the bar, we are better off leaving it clutter free! Same with the dining table...too many broken vases and scattered flowers!

A few relatively minor decor changes that made a subtle but significant difference! 

Breaking the "rules"....

I don't know if it is an actual "rule" or if it is something I made up in my head.

But who made the "rule" that pots and pans have to be stored in a lower cabinet next to the stove?

For years my pots and pans were in a small lower corner cabinet next to the stove. Total nightmare to dig out a pot or pan....something I use EVERY day!

A few years ago, I installed this nifty pull out for my casserole dishes and mixing bowls and eventually moved the pots and pans to the space to the left...across from the stove. (The crock pots and extra casserole dishes went into the nightmare cabinet!)

Accessing them still required that I move this little stool...

...and crawl around on the floor to get to them all.

(This is one advantage to having a small kitchen...you can put anything anywhere and still access it in just a few steps!)

When I was shuffling things around in my pantry thinking I MIGHT put a microwave in there I found that I had a bit more room than I thought! Again, I am not cooking for a family any more, so food storage is not as big a deal as it was years ago!

Truth be told, there are food items I rarely use (like my daughter-in-law's gluten free flour and boxes of dry goods) as opposed to the pots and pans I use every single day. So that got me to thinking...WHY do I store things I use daily in an inconvenient place? Is there some kind of "kitchen rule" I would be breaking and risk being fined by the kitchen police? Can I not move the things I use EVERY day to an easier space to access and store the stuff I only use occasionally in their place?

ABSOLUTELY! So I did....

I moved the pots and pans to the pantry...eye level and easy to access. I installed another slide out shelf and use it for boxed and dry goods I only need to access to occasionally.

And you know what...I LOVE it!

I guess if the kitchen police show up to inspect I will have to move it all back. In the meantime I will enjoy being just a tad rebellious.

Keep in mind I have "purged" down to the daily essentials...that is something you need to take into consideration when you feel cramped for space! Do you really use 4 identical casserole dishes...or 3 egg pans...or 2 full size crock pots on a regular basis. If you only need them during the holidays or for family gatherings, consider moving them out of the kitchen. I store my large three crock cooker in my laundry room because I only use it during Thanksgiving...no need for it to take up valuable kitchen real estate year round. 

Think about it...are rarely used items taking up valuable space...are you storing every day items in a space that is "proper" but just doesn't work for you? MOVE IT! 

Simple "before and afters"...

Some of the simplest "befores" turn out to be my favorite "afters."

Which explains why I often don't have decent "before" pictures...I think "oh, that's no biggy" and dive right in to giving them a simple little makeover. Then they turn out so stinking cute I wonder why I didn't take time to take "before" pictures.

They are a reminder of why do this blog...to show you how easy it is to take a simple, boring, out-dated, dark piece of furniture and turn it into something you will want in your home rather than in your yard at the next garage sale!

We DIYers live for those hidden treasures...pieces of furniture that people want to get rid of... they drop them at their local thrift store or sell them for pennies in garage sales or just set them out on the curb...we take them home, clean them up and work a little DIY magic. 

The worst...you live with the ugly, dark furniture because you can't afford to replace it!

I get it...you paid a small fortune for your "matchy-matchy" bedroom furniture so you can't bring yourself to get rid of it.

I've shared "makeovers" hundreds of time...too many times to link ALL the pieces I have "upcycled" over the years. But I would bet money you still have a few pieces lurking around your house that serve a purpose or are "family heirlooms" or you paid too much to get rid of it...so you just live with it.

Don't fret...take the plunge...buy some primer and some paint AND CHANGE IT!

LIFE IS TOO SHORT TO LIVE WITH UGLY FURNITURE!

This shelf was your typical Target cheapo...dark finish...no I did not take a picture of it "before." Honestly, I think it was a piece someone left at the apartments so I loaded it up and brought it home.

I removed the back panels...primed and painted the frame and shelves with one of my "sample" pots of white (KSTP). I painted the back panels with a sample pot of teal and then reattached them.

Super simple and too stinking cute!

This little bedside table came with a set I bought at an auction. Someone bought the dresser, chest and bed but didn't want this little table.

Meh....

Simple makeover! I removed the drawer and simply brightened it up with some Restorafinish. I primed the cabinet, sand, tack and white gloss paint. It was missing a knob so I ordered two new ones...

....again, SUPER SIMPLE and so stinking cute!

This old oak dresser...the finish and the little applique' really dated the piece.

I popped off the appliques using a chisel...lift carefully...chances are they are applied with a little bit of glue and a few tiny nails.

... sanded the old glue, stained the top with gel stain (no need to strip the old finish) and chalked painted the rest of it....distressed and sealed the whole thing with poly...

Too stinking cute!

Simple...simple...simple! 

Nothing earth shattering on any of the pieces...just super simple little makeovers that updated the pieces and gave them new life! 

Walk around your house...what simple little piece can you haul out to the garage and work a little "DIY magic." Trust me...if you don't like it when you are done, you won't get any less for it at a garage sale! 

Another Facelift for the storage shed....

A few years ago (okay so it's been FIVE YEARS!!!!) I gave my storage shed a little facelift! I rebuilt the door, added little scallops in the gable and added some trim to cover up some siding boo-boos!

At the time I primed and painted most of the trim with some paint I had on hand...most of it...not all of it. I figured I would eventually find the time to pick up some quality exterior paint and paint the rest of it. I didn't. 

So when Brian hit it with the power washer a few weeks ago much of the old paint and primer came right off! Fortunately the siding color held tight so I didn't have to repaint that!

Some of the trim around the door had cracked so I used wood filler to repair it. Caulked the gaps between the trim and siding.

The hard part, scrapping peeling paint, was taken care of with the power washer. I used a metal brush to remove what little peeling paint was left.

I had a little bit of leftover deck stain so I decided to freshen the deck as well!

A high quality exterior primer and exterior white paint...

Not only did a good coat of paint freshen it up a bit, it seals the wood to prevent the wood from deteriorating!

It is important to use a high quality "exterior" paint and primer on exterior projects. Exterior paint is specifically formulated to resist mildew and fading from sunlight. I would bet that I did not use a good quality exterior paint and primer on the trim a few years ago...which would explain why it could not withstand the beating from a 2800 PSI power washer!

Modifying a cabinet...

When I first remodeled my master bathroom, I loved it...honestly, I still do! But someday soon I want to make some major changes just for practical purposes. Specifically, I want to remove the whirlpool tub (seriously, I think I have used it 3 times in the last 20 years!) and add a walk in shower.

As much as I love the existing tile, I know that will mean picking new tile for the shower....which means I will want to go ahead and replace the floor tiles...you know, while there is already a mess! But picking a tile that will carry me through another 20 years is tough for me...I know people say this or that is "timeless" but I can assure you NO home decor is timeless.

This will all happen as soon as I can find the perfect tile person to construct the shower. I do not want to hire someone who isn't VERY experienced because one of the worst things that can happen would be a shower that leaks! 

There is one other tiny detail that kinda bugged me...the "medicine cabinet."

While I love the look, it just wasn't practical. Why? Because everything in the back half of the cabinet goes there to die! Seriously, I found a bunch of products and pills that had expired years ago.

I cut down my kitchen pantry several years ago and have never regretted losing that extra 12" of space. I like how the smaller cabinet opens up the kitchen a bit! And again, everything in the back of the cabinet had a tendency to expire before I got to it. (No, I don't have a picture of the pantry before I cut it down...that was "preblog!")

So I knew cutting down the depth of the cabinet in the bathroom was doable! 

The first thing I did was take EVERYTHING out of the cabinet and took inventory. Major purgefest! I made sure that what was needed or wanted would fit comfortably if I only had 6" of depth. Yep, all but the basket of old prescription medication and most of it had expired. 

Once I knew that cutting down the cabinet wouldn't pose a logistical problem, I removed the cabinets from the wall, cut them down, rebuilt the back and reinstalled them. (Did I take pictures of this process...of course not...who knew I would share something so mundane!)

Sounds easy...honestly, it wasn't. There was an electrical outlet to deal with and the trim detail and then of course there was the exposed sheetrock boo-boos from the old marble backsplash...curses. I always think a project will be easier than it is!

But again, it was doable, and after a day of cutting and cussing I had a smaller cabinet.

The sheetrock boo-boo was an easy fix...mud, sand and retexture. Since I am good about keeping old paint for touchups...no biggy. Except it had been so long since I painted the bathroom, the paint had hardened. So I got to repaint the entire bathroom! Yippee!

Fortunately I had a couple of left over gallons of paint from when I painted my living areas...

Now I am eyeballing my kitchen again. I am a sucker for the "power of suggestion" so when I read that big ole' hulking over-the-range microwaves are now a kitchen "faux pas" I decided I want to remove the microwave above the stove...which means I have to find a place for a smaller microwave. The counter is not an option since I have a small kitchen and limited counter space. Hum...the pantry...maybe I can put it in the pantry. Well, I could if it weren't so stinking shallow...remember I cut it down so now no microwave more than 13" deep will fit. Thank goodness for the internet...I spent days researching microwaves. Fortunately, I found a few that would work so that's one hurdle! Small little things but honestly the only thing I use a microwave for is to boil water, warm coffee and melt butter.

Hurdle #2...can I afford to loose shelf space in the pantry? Again, I pulled everything out and start measuring cans of beans and moving shelves around. 

Doable! Keep in mind we are now a family of two and I don't need the food storage space I use to!

Hurdle #3...when I take down the over-the-range microwave...what then?

Honestly, I didn't know.

And then I found a solution that changed my whole plan...

A compact over the range microwave by Whirlpool!

I would post a picture but the site won't let me steal the pictures so just go look at it!

How cool is THIS! It's only about 10" tall so I won't feel like I have a big ole' hulking appliance hanging above my head while I am cooking.

I ordered the black stainless even though my stove is black.

I hate to buy new appliances when they work perfectly fine so I thought I would live with my old black stove for the time being.

(Fortunately for me the ignitor went out on the oven this week. Yippeee! Perfect excuse to order the new black stainless stove I drool on every time I go to Lowe's! God forbid I fix it with the $30 part!)

Now I don't have to give up pantry space or counter space. I guess it is still technically a "kitchen faux pas" since it is an "over the range microwave." But you know what...I'm okay with it. I'm probably one of the few who hasn't painted my kitchen cabinets, I have no shiplap in my house and while I would love to retile my entire kitchen and dining area with beautiful, light travertine tile, it's not happening...so I'm okay with bucking the decor trends!

The only problem I have is the space that will have to be tiled after the big ole' hulking microwave is removed. Fortunately, I am a pack rat and kept all my scraps from when I retiled the kitchen backsplash! Yea me! Thank goodness because that stuff was E.X.P.E.N.S.I.V.E!

So when I get the new microwave and stove are installed and the tile work done I'll share...can't wait!