Master bedroom reveal....

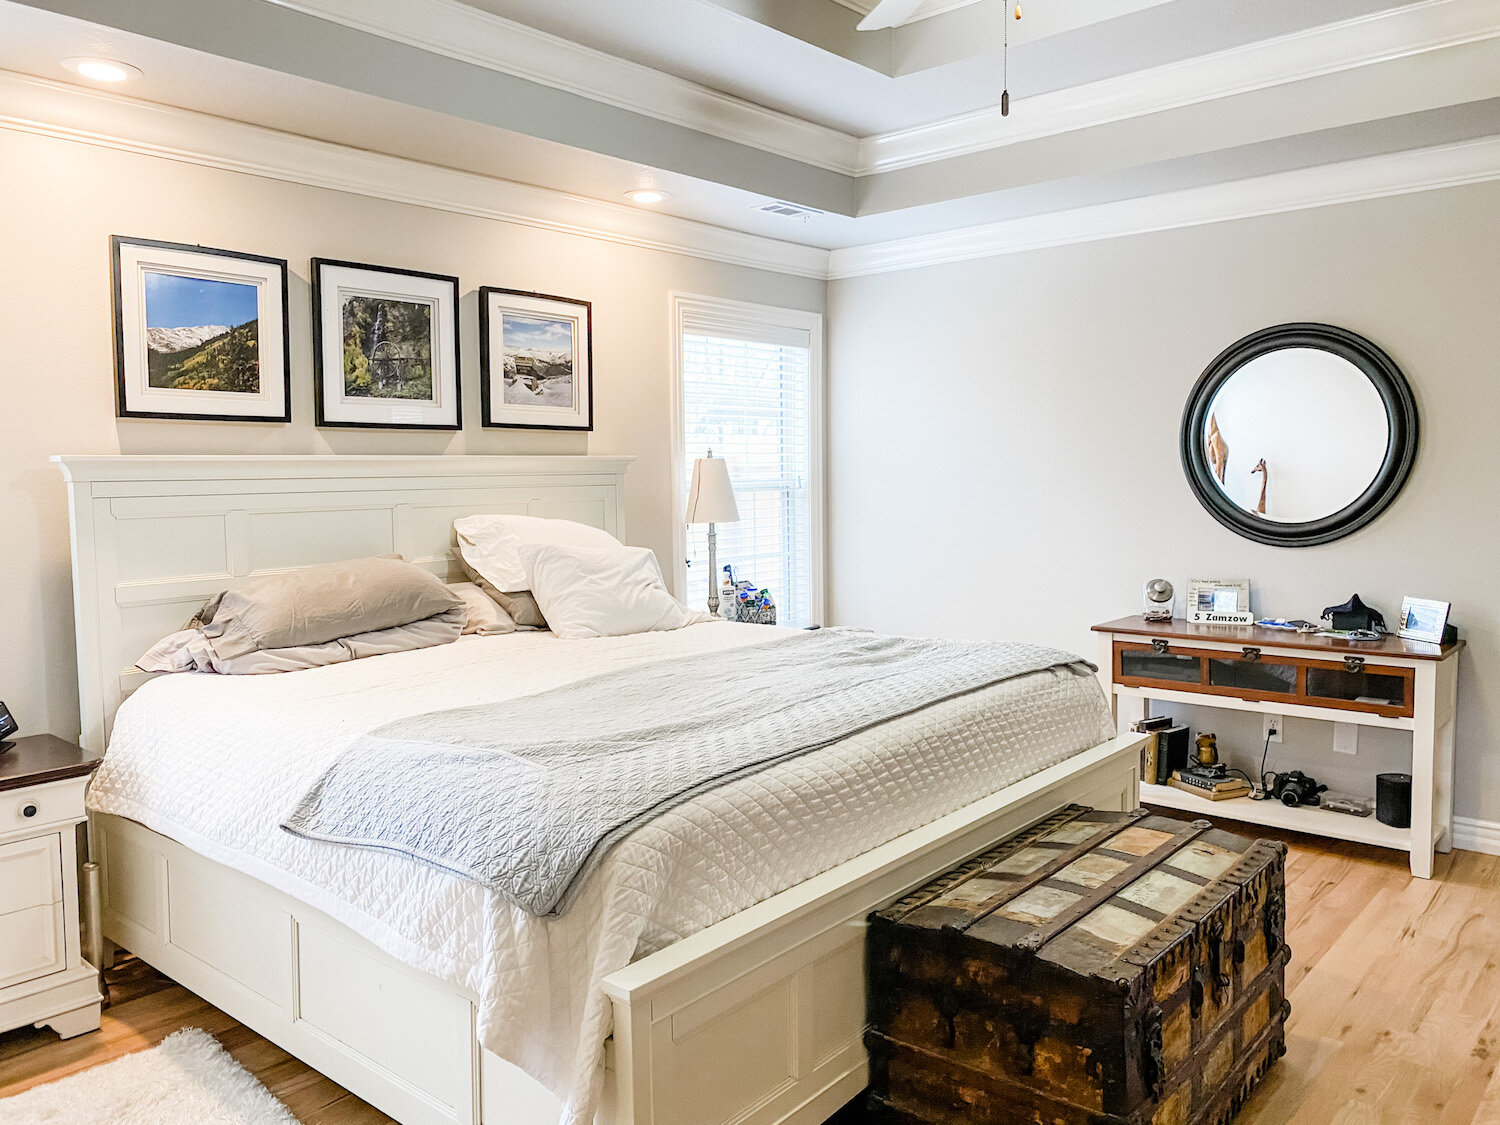
When we moved into this house in September we basically moved our old bedroom into this new house. Nice fit, but zero thought put into the “design” of the room…I basically just put furniture on the floor and a few pictures on the walls.

A few weeks ago my daughter sent me a picture of a well designed bedroom similar to ours.

IMG_0694.jpg

That’s when I realized our current master bedroom has ZERO “design character.” I hadn’t even taken the time to paint all the trim the “new” white.

IMG_1317.JPG

Twenty year old lamps, white and brass paddle fan, stacks of pillows in bleach spotted pillow cases, no curtains, scuffed and dinged furniture, clutter…

IMG_1318.JPG

The picture was perfect inspiration! The push I needed to work this space to it’s potential.

So last week my goal was to to tackle the room. Paint the trim and furniture, new curtains, throw pillows, a few little touches here and there, and declutter.

I painted my bedroom furniture (HERE) almost 7 years ago and while I still love the pieces, they have gotten quite dingy looking. Remember, whites yellow over time and of course there are chips and scratches from normal wear and tear. So it was time to give them a little paint refresher! And the side table tops…holy crud they have gotten nasty. So it was time to strip and restain the tops as well.

Of course the little “room refresh” became a three day chore!

In the end, worth every minute.

New curtains (I still need to hem them), a little wall art and a plant and new throw pillows.

IMG_1315.JPG

I stuck with my tried and true white bedspread…with a big dirty dog I need something I can bleach every week. It covers a down comforter in the cold months.

I have always loved the larger throw pillows in the guest room so I bought new for that room and put the guest pillows on our bed.

IMG_1308.JPG

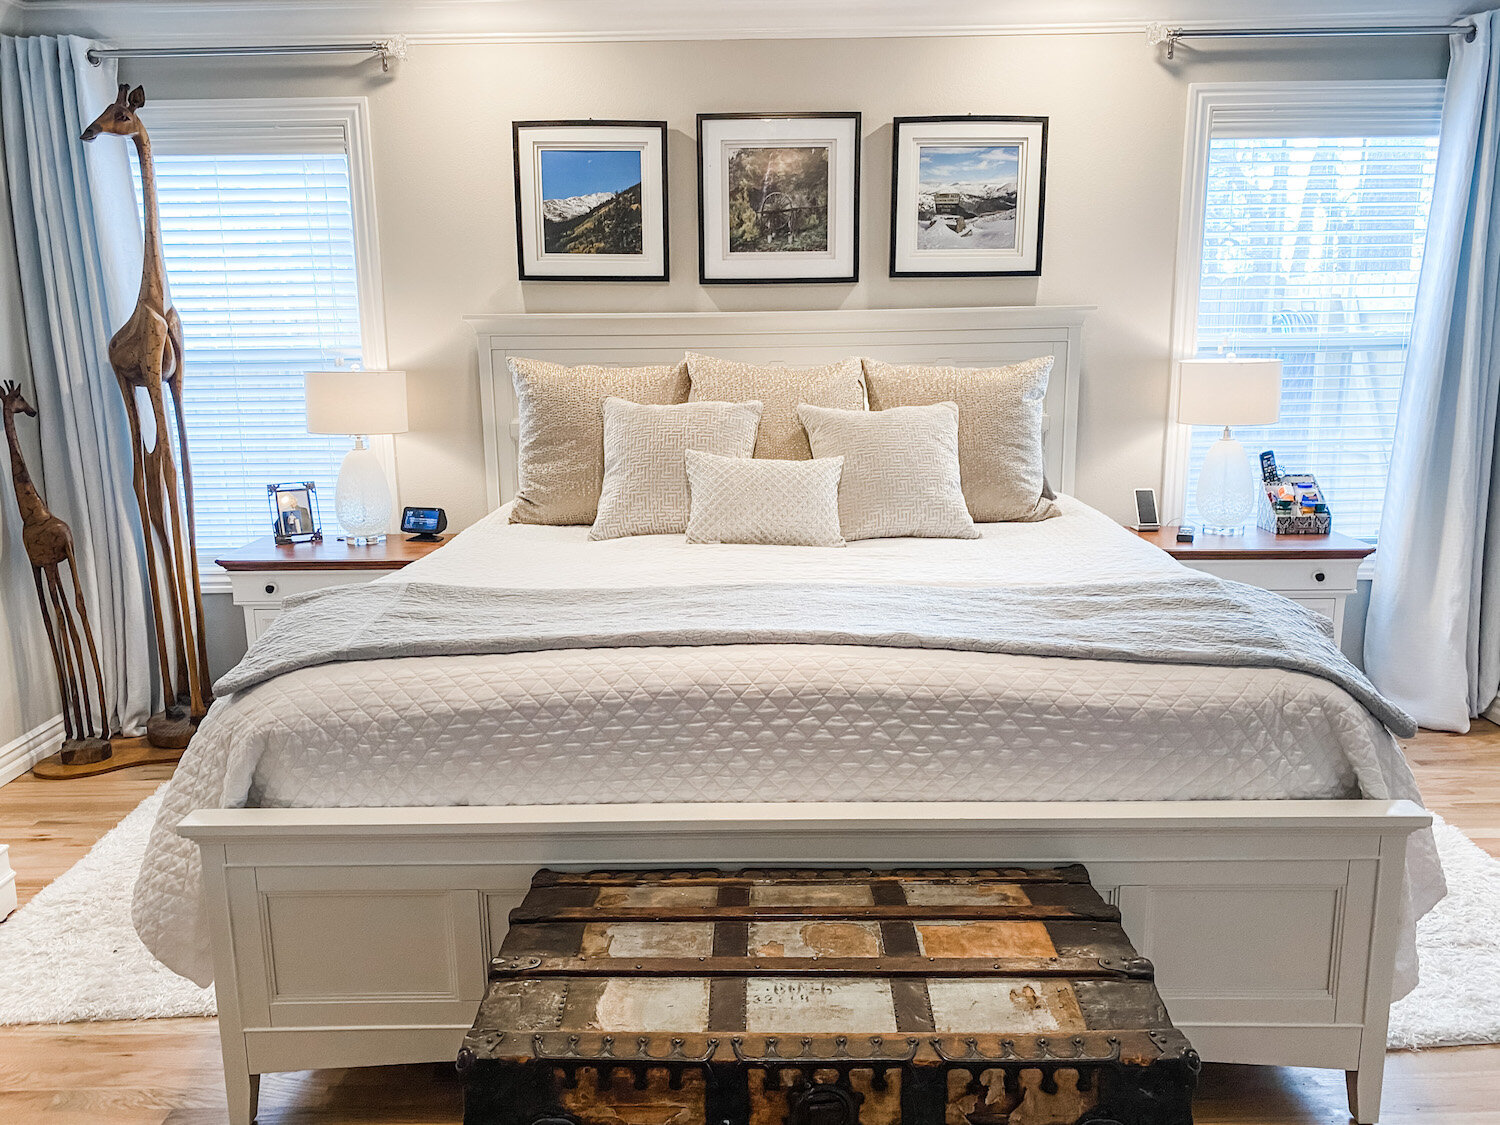
(The giraffes? They were made in Africa from the root of a tree…they are Brian’s…they are different…what can I say!)

I painted the high boy and bedside tables and stripped and restained the tops of the bedside tables. ..the dark java stain has pretty much run its course. New lamps (finally!!!)

I love the look of chandeliers in bedrooms but as I have said before, I HAVE to have a paddle fan above the bed. Brandon gave us a paddle fan he took out of his house and it worked perfectly in our room.

Decluttering is always a must in any room makeover so a lot of stuff was put away.

One thing I loved in the inspiration room picture was the bed bench. My trunk belonged to my grandparents so it has to stay. You can still see my granddad’s name stenciled on the side.

I love the basket and pillows on their bench but our big dog uses this trunk as a spring board so that wouldn’t have worked out well. Sometimes you have to change up a plan to fit YOUR life-style (a.k.a. accommodate animals and kids!)

I still want to do more on the “tv side” of the room. I repainted and stripped and stained the top of THIS little side table…

Maybe add a plant…a little more wall art….a wall leaning mirror.

IMG_1306.jpg

It only took me a few decades to style the master bedroom in my last house so again, already working at warp speed here.

My next big project are the master bathroom (reveal HERE) windows…

Oh, it’s happening. I cut big holes in the wall to kind of “force the issue.” Windows are on order and the brick guy is on call.

This was the one thing I neglected to do, and my BIGGEST regret, when I remodeled this house…no operable windows in the master bath. I know from my last house that an operable window in the bathroom is a must. I have ordered two casement windows (the kind that crank out) and hope to have them by the end of the month. I have some plumbing to move (WHY IS NOTHING EASY!!!) and framing to do. These windows will look out at the large flower garden out back…I CAN’T WAIT!!!!

Wait I will though…it has been warm enough to plant a few larger perennials like azaleas and Kimberly ferns, but the threat of a freeze until mid-April prevents me from going all out with the annuals. So I sit…and wait…patiently. Okay, not so patient, but I learned the hard way not to rush the early spring planting! Pay attention to your “last freeze date”….then add a few weeks. Ours is the middle of April, but a few years ago it snowed the first week of May!

Until next week…

Board and Batten Entry....

IMG_1171.JPG

The entry…the one place in your home EVERY guest will see. They may not see your awesome pantry…or even your darling guest bath or amazing kitchen, but when you open the door they will see your entry.

It is one reason I really stressed about what to do with this space. I wanted it to be warm and welcoming, and while it is a big space, there is very little “wall space” to allow for big credenzas or entry storage. I really don’t need either since we usually enter from the garage into the laundry room…great “drop zone” for our packages, coats, purses, shoes, etc….but I like the look of both in entry spaces!

Of course the first course of business was replacing the dated door, window and light fixture….relatively easy fixes and something I did before we moved in!

IMG_6549.jpg
This was after the window was replaced but before the door, light fixture and flooring!

This was after the window was replaced but before the door, light fixture and flooring!

I debated on the board and batten for some time…

IMG_0580.jpg

I just felt it needed a little “something.”

It only took me 16 years to get the entry in my last house the way I wanted it…I feel like I am moving at warp speed on this one…lol!

At one point I tried a larger rug…but I didn’t like it…I honestly like the little dinky rug that is probably too small for the space. This is a prime example of doing what I LOVE vs. doing what the “design experts” tell me I am suppose to do.

A hint of trouble came when winter hit and we needed a place for visitors coats…other than putting them in the closet in the office, there really was no place to hang them.

Coat racks are a bit out dated and just hanging a wall mount coat rack didn’t trip my trigger.

Board and batten allowed me to put a few hooks on the wall.

IMG_1172.jpg


But that led to a little problem with the table. I LOVED the little walnut table, but you can’t hang coats above a table.

IMG_1084.JPG

Again, it is NOT my style HOWEVER it was my grandparent’s and it is walnut…heirloom and walnut…my two favorite elements.

Truthfully I like the look of an entry table…but I really need the hanging space so I went looking for a simple bench.

And I found it….

IMG_1172.JPG

I LOVE this bench I found on Etsy. Not the least expensive bench out there (and I paid a tad more for walnut) but the quality and craftsmanship made it worth the investment.

Since the table is a family heirloom I didn’t want to get rid of it. The little wickerish bedside table in the guest room had no sentimental value so it got hauled to the bunk room and the table is now a bedside table in the guest room…perfect!

I love the look and feel of this entry now…warm, inviting, functional.

IMG_1173.JPG

I am currently playing around with the dining room table.

When it was set the other way, facing the living room….

….there was no room on the only large wall for a buffet or credenza.

So I have turned the table the “other” way, which gives me room for a buffet or credenza along the wall…

IMG_1176.JPG

But I am not sure I like it “that way.” So it will sit while I ponder.

That is just how I roll…sometimes I have to sit and ponder, like whether to put up board and batten or whether I should turn my table a different way. Sometimes I know almost immediately I am not going to like it. Prime example, the “river rock” I put in a flower bed for drainage. I knew immediately I did not like the white rock I put down originally!

So out came the white rock and I found some that I liked better…

IMG_1174.JPG

Sometimes it is okay to sit and “ponder.” I have learned that the more I really think about something, the more I tend to like it long term. When I just jump right in and start on a project without really visualizing it, living with it in my mind for a while, I tend to not like it as well. And that is a waste of time, energy and money!

Until next time….

Designing a room....

Everything seems to progressing nicely at the new house…knock on wood! Wood floors are going in, walk in shower is being built, sheetrock repair is being done.

Today I want to talk about “design features.”

As I mentioned before, I kind of “wing it” when it comes to design. Some people need a visual like a design board that shows all the elements of a room.

Me…I find one thing I absolutely love and then go from there.

In the new kitchen, it was this tile….

I can not tell you how much I LOVE this tile. (It was delivered this week…even more beautiful in person!)

I have one space in the kitchen that is about 8’ long…it is the perfect “cubby” for a cooking center…cook top, oven and microwave. My vision is walnut lowers with two painted uppers to the ceiling, walnut floating shelves, white quartz tops, stainless vent hood and this tile.

This tile has a “brushed gold” accent in it so to tie in the gold with the rest of the kitchen I have decided to go with these simple pendant lights above the island….

They kind of coordinate with the light fixture I have in my dining room…the exact same one I have ordered for the breakfast room in the new house.

What can I say, I love what I love!!!

Some really funky gold hardware.

A touch of “whimsy.” I’m not a big “cabinet hardware” person…I don’t even have them on my cabinets here…but I am going with shaker style cabinets and they will need hardware. I just thought these were fun and different.

The appliances are all stainless. I LOVE my black stainless appliances, but I fear that will be one of those “fad” things. I think in the long run I will be happy with stainless. Also, there is Carrara marble accents in the tile backsplash and greyish veining in the quartz tops…I think the stainless will blend right in.

I have a two door/two drawer refrigerator. I went with a side-by-side.

First, I will NEVER buy another Samsung product. Love the other appliances but the ice maker on the fridge hasn’t worked right since the second year… I actually have to go buy ice every week. Evidently it is a “design flaw” not covered by their warranty. Rampant problem and no real fix. Not cool Samsung.

Second, while I love the drawers, I am just getting too old to bend down and dig through a big ole’ drawer for a frozen chicken. I know side-by-sides are not nearly as energy efficient and they aren’t the “in thing” right now, but I loved the one I had years ago so I am going back with one!

I read reviews and decided to go with either Kitchen Aide or Whirlpool. Considering the price difference, I went with Whirlpool.

The bar stools…I have struggled with that one because I have had mine for 20 years and I still love them especially after this little “makeover”…truth is if I needed “bar height” vs “counter height” I would just take them with me.

Unfortunately they are not counter height and they are iron so cutting them down is not feasible… so I had to find new counter height bar stools. The minute I saw these I knew they were exactly what I want….

Super simple and I think the walnut color will tie in beautifully with the walnut base cabinets and floating shelves!

This is my “design board”….I drop pictures of what I like into a computer file…each has at least one element I like. I may not like everything in the picture, but there is one thing in each I am drawn to…

I know I am drawn to walnut cabinets…but I don’t want ALL of them walnut so I am going to have walnut lowers in the “cooking center” and painted uppers. The entire island will be painted. The tops are white quartz with greyish/taupish veining. I was able to go to the quartz place and actually pick out the slabs of quartz I wanted.

Some people HAVE to have a design or “mood” board….

…something that allows them to see every element of their design (This is not my design board, just one I plucked off Pinterest.)

I get it…and it isn’t hard to make…just find what you want on line and drop it into a file, then create a “board” on a program like Photoshop. You are able to see all your elements and determine if they coordinate.

Personally, I can see every detail in my “minds eye.” I wake up at 3 a.m. every morning and visualize every single element. Probably drives my subs nuts because if I “see” something I like, I will text or email them at 4 a.m. with my idea. (Hopefully they mute their phones at night or the “ding” of my text will wake them at this unGodly hour!)

My motto…YOU DO YOU! If you need a design or mood board, go for it. Do what works for YOU! Probably would have been a lot easier on my cabinet guy had I had a design board rather than 30 random pictures of cabinets and kitchens and having to go through each one to show him the one element in each pictures I love. I only hope and pray he has the same vision as I do!

Guess we’ll see in a few weeks. In the meantime I will continue to micro-manage the poor guys who have to work at the house every day…lol!

Guest room decor and a little history.....

Last fall I shared a little “makeover” of the frames of these portraits of my great-great-great and my great-great grandmother. They hung in the guest room above the bed…

I never really LOVED these portraits and my daughter swears they gave her nightmares when she came to visit. I have to admit, they are a tad on the “ghoulish” side even with lighter and brighter frames.

Before I reveal the changes I made, I have to share this “small world” story!

A friend of mine tagged a friend of his on Facebook on an article about a house his friend owns…a house he now runs as a B&B in Arkansas City, Arkansas.

The minute I saw it, I knew it was the house my great-great grandparents (Hubert and Ionia Furr) built in 1910…the house my great grandmother grew up in and my grandmother was born in! (My great great grandmother is the portrait on the right, her mother on the left!)

I immediately contacted the owner…he had very little history on the house other than what was written up in the National Register bio. I, being the keeper of the family photos and documents, have sooooo much more!

Poor guy…I flooded his email with pictures of my great great grandparents, the house and all the documents I could find.

I think one of the neatest things I have is a picture of the house while it was being constructed…

I won’t bore you with all the pictures and documents I have about this home and my ancestors and the little town in southeast Arkansas.

But this house and the people who resided there have a tremendous amount of history.

It is the house where my ancestors lived during the 1918 pandemic. A flu pandemic that killed almost 700,000 in the United States and 50 MILLION world wide.

The house also survived the great flood of 1927 that wiped out most of the town and actually changed the course of the Mississippi River.

While I was digging through all the family documents looking for more information on the house to share, I ran across this letter…written by my great-great grandmother during the flood of 1927 to my great-grandmother….


I won’t post pictures of the entire letter, but this is the transcript…

Arkansas City, Sat ? (postmarked May 3, 1927)

Dear children-

Am going to make this do for both you girls. Haven’t heard from you in more than 2 weeks and twill be 2 weeks Tues. since we have had a newspaper. Everything is closed here on account of water-we have 85 inches inside the house only 5 steps of the stairway being visible. You can imagine my state of mind as the South Bend break will give us more water by tomorrow I suppose. We go in and out of the house through the middle bedroom window in your old bedroom. I step off the roof onto a floating dock where I keep the chickens. Only lost two by drowning.

Water came in town last Sunday 2:30 and was 2 ft deep in 20 minutes. I waded above my knees getting up the hens and by dark it was in the house. It has been raining ever since til today when it has fallen ½ in. to get ready for the next rise. The wood shed and garage bucked up and Daddy has wired them to keep them from floating off in a storm. The teacherage is entirely under water and lots of other houses.

The town is simply ruined. An airplane takes the mail and your telegraphs were sent by radio by way of Memphis and so had to be sent collect.

I am so worried because we can’t send Gladys’s board money and do hope the matron will wait on her or that you will take her to your house for this last month. We have no way to get the money tho the levee board owes Daddy $125 or $150 which will be paid when this strain is over. The youngsters run bateaux on the bank porch so of course the bank is closed for the time. Please help us out in this pinch and we will make it up to you some way. I do hope the next rise will not be much for 2 ft. will ruin the ceiling.

The Matthews are upstairs in 2 small rooms. 2 of the boys sleep over here and they seem to be having a good time. Of course all my flowers are done for the crude oil is killing the vine on the house. Most every one lost their chickens. Lawrence Demarke (?) must have lost over 1000 also Emmat Furlong. The water came too fast to let them be picked up.

I suppose all Watson is nearly washed away. Mr. Kemp’s house disappeared as did everybody elses. The little Dollar house is on the Pike if it hasn’t fallen to pieces.

The break at Scott Miss. Saved us from the Miss. R. as we would have broken either at Chicot or Fulton inside of 3 or 4 hours. The river fell here nearly 2 ft. the first day and is much lower now than it is on the inside of the levee. Several hundred tents are on the levee and it is a queer sight. The govt is feeding them and the negros seem so happy.

We will have no more school this term. The girls left for Memphis and I guess they finally got to Conway. Betsye is at the hotel tho’ Daddy and I both invited her to stay with us. Bro. Still’s furniture is in the water upon a scaffold not high enough. All Mrs. Cunningham’s furniture and best clothes are in her house with the water up to the roof. I left most of my dishes downstairs so I guess they will be lost.

Well I hope you girls and your girls also Bill are well and happy. Want to hear from you soon and find how Gladys arranges for her board. Daddy is well and busy helping the distressed.

Granny Muff died this afternoon in a box car. Will be buried on the mound.

Love to you all and if we are washed away dispose of the remains as you please, Mother

I share all this for one reason.

To remind you…our country and our ancestors have survived pandemics and floods and wars.

Like our ancestors we too will survive…and we will thrive. We just have to stay positive and focused on our future! In 100 years our great great grand children will be sharing stories of our strength and endurance during difficult times….we are living proof!

So now the changes…heirlooms in their own right and a bit more cheerful.

These prints are from Hawaii and Bermuda…my parents traveled there in the 80s and these have been in my mother’s home for 30+ years. She is in the process of distributing a few things in her house so I took them and reframed them and decide they would be perfect in the guest room!

They are a tad off-center so at some point I probably need to rehang them. Someday…nice thing about this room, I literally only go in it a handful of times a year, before and after guests. Unlike wall decor in my living room or bedroom, this isn’t going to keep me up nights…lol!

Maybe I can find a narrow something-or-another to hang on the left to balance it out.

Not sure what I will do with the ancestral portraits…but I will find some where perfect for them…eventually.


How to set stone in your lawn...

My first love is flagstone…I share HERE how I created a little flagstone patio in the front of the house…

This was a massive project and required “excavating” a large area.

My project this week is the same process but “small scale.”

My mother offered my Granddad’s grindstones that my dad had set in their yard as a pathway.

There are a few things I have that make me see “old ladyish”…my grandmother’s china and hutch, an old camera collection, a few knick knacks here and there…and certainly a grindstone pathway in the yard would qualify. Truth be told, I can not pass up anything that is a family heirloom.

If you don’t know what a grindstone is, google it.

Nifty stones that were originally used to sharpen tools. I have no idea if my grandfather actually used them for their intended purpose but I believe they were set in his yard as stepping stones…and my dad got them and did the same.

So now I have moved them to my house…and this past weekend I set them in the yard.

I had already set a few of them when I realized it would be a great way to show you how I create a path set in the ground…no worries about having to mow around it.

Whether you use grindstones, slabs of wood, bricks or flagstone…this is the way to property set them individually to create a “stepping path.” I have found that this method creates the least destruction to existing turf. You can even do it before you seed or lay sod.

The first thing you want to do is lay them out where you want them.

Look at them from every angle…maybe walk on them to see if they “step right.”

Once you have them laid out where you want them, it is time to get down to the REAL work. (I will refer to “stone” because that is what I used…again, you can create a path with just about any durable material!)

First, take a shovel and go around the stone… about 1'“-2” from the edge of the stone…keep the shovel straight and go into the ground at least 4”. (My stones were about 2” thick and I want at least a 2” bed of sand and soil to set the stone on.) You are basically using the stone as a template.

Once you have gone around the entire stone, just flip it out of the way for the time being.

Since my yard was sodded, I wanted to salvage the sod and use it to fill in a few bare spots here and there…so I used my shovel to carefully remove the sod…

I used a little hand rake to remove the bulk of the dirt off the piece of sod and relocated it to the bare spots.

Then I used the shovel and my hands to remove all the excess dirt in the hole. I put it in a bucket and used it in an area of the yard that need a little fill.

I made the hole about 4” deep, then I added sand.

You can buy bags of “play sand” or even “paver base.” Just make sure you put some kind of sand or base in the hole to create a stable, level bed free of rocks and debris. .

I would suggest hosing down the sand just to make sure it is packed well…your goal here is to create a level, compact bed for the stone to set on.

Once the sand is leveled, replace the stone and make any adjustment by lifting and filling where needed.

I used the dirt I removed from the hole to fill in around the stone.

Once all the stones were set, I saturated them…this forces the dirt around the stones to seep under the stones and also lets you see which ones may need to be lifted and additional sand toss under.

Step on them and make sure they seem “firm.” I had one that “rocked” so I lifted it and added sand. As the dirt around the stones seeped underneath I added more and plugged in a few pieces of sod.

With a little water and sun I expect the grass to fill back in nicely over the next few weeks!

(You can see HERE how I dolled up the storage shed a bit!)

I saved a little dirt in the bucket because I know some of the soil around the stone may compact a bit. Also, this part of my yard is fescue so I may have to over-seed a bit…but that is okay! I like the look and even though it may be a little “old ladyish” I have a walking path that has a little bit of sentimental value.

Perfect!

Another family heirloom...a desk makeover.

As I have mentioned a bazillion times I am all about family heirlooms.

So when my mother offered me “dad’s desk” I didn’t hesitate…even though I have absolutely no use or room for it.

If I remember the story right my dad built this desk when he was 12…he would have been 79 this year…that makes the desk 67 years old…something my dad made when he was a boy….yes, I want it!

Fortunately my son Matt loves family heirlooms as well and since he just moved into a larger home, he has the space and need.

The desk was sporting green. I THINK it is green because at some point I did have it and I painted it green for Matt’s room. When the boys were younger everything in Mitchell’s room was blue and everything in Matt’s was green!

I guess at some point I gave it back to Mom.

Originally the desk would probably have been stained. I remember a time in the 70s when it was red. Then there was the “mauve” phase in the 80s. In other words, I knew there were at LEAST four layers of finish on it!

My original plan was to strip it down to bare wood and stain it.

What is the old saying about “best laid plans….” Yeah…that wasn’t happening.

There was the green…then the mauve…something white I suspect is a primer that was painted over the red…the red was painted over the original finish…whatever that may have been

I used every trick in my arsenal and still could NOT get all the paint off. Industrial stripper, my 1/2 and 1/2 mixture and even sanding.

One thing I will say about both my dad and I…when we do something, we do it to last!

After a few days of stripping and sanding I was able to get all the paint off the top but finally gave up on the rest of it…it wasn’t happening without doing serious damage to the wood itself.

I decided to stain the top and paint the base.

I sanded everything as smoothly as possible, primed it, sanded again, rubbed it down with tack cloth then painted it with a white enamel.

I stained the top with a java stain and sealed it with poly.

It is not exactly what I wanted but Matt and I both love the way it turned out. Right now he is using it as a tv stand in his den.

I was only able to snap a quick picture with my phone but as you can see, it turned out pretty cute.

We are in the process of making some major changes in his new house…new flooring, paint, shelving, etc.

Our plan is to eventually makes some major changes to his kitchen and den and when we do, hopefully I can get some good, staged pictures!

Until then I just wanted to share what one can do with older pieces…and also show that even we “old pros” get stumped occasionally…and when we do, we just drop back and punt!

A dresser makeover and a few changes to an "heirloom"

As I mentioned here I am no longer doing the whole “resale/flea market” thing. I am still working on a few projects here and there because it is what I love to do!

This piece is one I bought eons ago and has sat in my garage waiting on inspiration and time.

I bought it and the matching chest of drawers at a barn auction. Yes, it had been sitting in a barn…yes, I could tell it had been infested with mice at one time. No, I was not expecting to find two mouse carcasses while cleaning it. GAG!!!!

The ONLY way I have found to rid old furniture of old furniture smells (mice, cigarettes, moth balls, etc) is to first scrub with ammonia and then vinegar (do not do them at the same time!). Sometimes I will spray the inside of the piece with diluted vinegar and just let it dry. If that doesn’t do it, then I suggest you prime and paint the inside of the drawers. Fortunately, the heavy duty cleaning on this piece worked and I did not have to paint the drawers!

The top and drawer fronts are cherry veneer. The veneer was in pretty good shape and really just needed to be stripped and oiled…I used THIS process to strip the old finish. Tried and true! I know I link to this tutorial a lot, but it works!

After stripping the veneers, I applied three coats of tung oil finish and chalk painted and distressed the cabinet!

The hardware was in pretty good condition…just icky. So I primed them with metal primer and painted them with flat black paint.

AGAIN, another example of how a very few dollars and some elbow grease can turn the ickiest piece into something pretty awesome!

While I had the “farmhouse white” chalk paint mixed up I decided to give some old frames a little makeover.

When I visited my uncle this summer he gave me two old framed portraits of my great-great grandmother and my great-great-great grandmother.

They do tend to be on the “goulish” side…but I NEVER turn down family heirlooms. When he offered me THIS china cabinet….

…I knew it wasn’t “my style” but as I said, heirlooms trump everything. So I made a few changes to make it a little more appealing…I removed the red paper on the back, added glass shelves and cabinet lighting. Then I filled it with the great’s and grand’s china…it is what it is…and heirloom piece filled with heirlooms.

I decided I might be able to make the portraits a little less “goulish” by painting the frames…they were just so “heavy and dark.”

I hung them in the GUEST ROOM….

Meh…not swooning over them but again, they are family heirlooms. (I think they need to be closer together!)


Another new dining room table and the greatest Mother's Day gift....

ANOTHER dining room table…obviously I have a soft spot for chairs and tables. When I saw this pathetic trestle table at a barn auction a few weeks ago, I just knew she had some serious potential….

The top was in pieces and the finish was crud…but oh the potential. And it wasn’t until I got her home that I discovered her little hidden secret…

She has this super nifty fold out “leaf.”

Just too fricking cool!

In spite of the fact that I have been up to my earballs in work at the apartments, I couldn’t wait to start working on her. The first thing I did was strip all the old finish…HERE is the process I used. This is a tried and true process that makes quick work of a daunting task!

After all the old finish was stripped off I had to glue and clamp the table top back together….

I always make my repairs AFTER I strip but before paint or finish…and I always make sure I make all the necessary repairs. No sense in making it pretty if it is just going to fall apart…glue and clamps!!!

The top was solid (vs. veneers) so the pieces were a tad warped…no biggy…I clamped it as well as I could and then I sanded the joints smooth…starting with the finer grit (220) and working my way down to a rougher grit (150) and then back up to a finer grit, before applying a tung oil finish.

Tung oil finish is my “go to” finish for many reasons…it is super easy to apply, it is super durable and it is super easy to reapply when the finish gets scratched or begins to dull!

So, when all was said and done, this little table will now take her place in the dining room….at least for the time being….it is no secret I swap out tables on a regular bases….here are just a few I have featured over the years…

A Duncan Phyfe….I gave it a little makeover HERE before selling it….

An antique trestle I featured here

An oak farmhouse table featured here…..

The most recent…an antique draw leaf table…

All these tables have one thing in common…they are relatively “compact” but can be expanded to handle Thanksgiving dinner. Basically once a year I need a large table…and these all fit the bill.

The newest little trestle table is compact, expands, and beautiful!

So get ready for a few pictures…..

I just LOVE the new light fixture from Wayfair I featured here….

I love how it can easily be expanded. No more having to find a place to store leaves or hauling them out for one dinner…just slide open the top and fold out the insert…simple (especially after a little WD40)

One huge problem….I REALLY dislike the Duncan Phyfe chairs with it…they just don’t look right…and sadly I know exactly what chairs I want for it and I have had them and sold them a few times over. The good news is I will eventually find what I want….

Until then I bought this little piano bench at the same auction. Again, pretty cruddy…

…but I stripped and oiled the top, scrubbed up the brass feeties and painted the base with my new favorite blue…the same one I used on the buffet (here)

Meh….not really “swooning” over it, but it will serve the purpose for now…until I can find the chairs I want or another pathetic little table catches my eye. I wouldn’t take bets on which happens first!

THE GREATEST MOTHER’S DAY GIFT

This year I received the absolute best Mother’s Day gift!!! Another college graduate.

My youngest daughter, Katie, graduated from the University of Arkansas with a degree in Bio-Engineering.

She is beautiful, smart, and talented…and I could not be prouder.

She, as well as her brother Matt (Masters 2015), are fourth generation Arkansas graduates….my great grandmother graduated in 1920, my grandfather graduated in 1943, and I graduated in 1987.

Brian and I are now 5/5….five kids, five college graduates. And the fact that all five were here for Katie’s big day, which happen to be Mother’s Day weekend, made my day extra special!


Visiting history...

This past week we traveled to Phoenix to visit my oldest son. While we were there we decided to do a little sight seeing.

First we headed north to the south rim of the Grand Canyon.

I’ve seen pictures but no matter how beautiful the photos are, they do not do it justice. It is one of those places you have to see in person. And while you stand on the rim of this vast canyon and TRY to wrap your brain around the fact that the lowest level of exposed rock is TWO BILLION years old, you suddenly realize how “minute” your time on this earth truly is. My mind just can not comprehend that span of time but it can certainly appreciate the beauty of this marvel.

If you have not seen it, go.

We spent one day shopping around Old Scottsdale…okay, so I am not big on shopping so we walked around peaking in windows, exploring the history of the town! We pretty much ran through the Phoenix zoo while killing time before the Cubs game. Brian is from Chicago so he thoroughly enjoyed the game and his Chicago hot dog….a treat from his past.

Tuesday we drove south to Tombstone. The movie “Tombstone” is one of our all time favorites so it was fun to see the Grand Hotel (now the Big Nose Kate Saloon)….

Boothill Cemetery, where the McLaury brothers and Billy Clanton, killed during the OK Coral Shootout, are buried.

The old county courthouse has been beautifully preserved as a museum.

One thing I found interesting was this display of ironstone and old scales, considering today’s decor trends….

Compared to TWO BILLION YEARS, the 140 year history of Tombstone seems like it happened yesterday. It is a time in history that interests us and we enjoyed exploring the little town.

Which brings me to MY history. The day we came home, a friend posted on Facebook that an old building downtown was being torn down. It is the building that first housed the company my dad worked for from 1972 until his death in 1995.

This old building is part of MY history…I was 7 when we moved here in 1971 and this is company my dad worked for through out my childhood and for much of his adult life.

It is soooo sad to see old historical buildings disappear….

….this one is being bulldozed for a parking lot.

I knew I wanted a “momento” from the old building so I contacted the company that was hired to demolish it.

Frank from SSi Construction was SO helpful…much of the building had already been torn down but he patiently picked through the piles of ruble and pulled out a few splintered boards. I pulled all the nails and cut off the splintered ends and hope to clean them up and make a table or bench out of them…reclaimed wood with some serious “sentimental value.”

Forty years…140 years…two billion years. History is relative. Regardless, it is fun to explore. Most importantly, cherish and preserve.

Funky little chair makeover and a few upholstery tips....

Another auction buy that languished in the garage for months until I pulled it out and thought..."Hum, I kinda think that is cool!"

It may not LOOK cool, but it is a funky little chair...and I like "different." Not really my style (Hollywood Regency maybe?) but since my style is "eclectic," I can find a place for it! 

I'm not sure exactly what wood it is...my guess is walnut. But the finish was the typical dark stain with black flecks I see on a lot on furniture from the 70's...not really attractive...


After I stripped all the old fabric, I used my 1/2 and 1/2 mixture and stripping process to strip the old finish and stain...then I applied 4 coats of tung oil finish (no stain)! I like the warmth of natural wood.

As always, if one comes in, one must go out. So this little chair in my office was moved upstairs into the guest room until I have room in my space at 410 Vintage! I bought it 25 years ago at an estate auction and it was my first real reupholstery project.

Fabric is always a tough one for me...maybe because I know how hard it is to reupholster a piece and I don't want to do something I will tire of and have to redo. I found several fabrics I thought I might like, brought samples home and did what I always do...stare at it for a few days. In the end I went with this fun but somewhat conservative "geo" pattern...I like that it is relatively neutral and could be spiced up with a pillow or throw...

And spice it I did. When I was looking at fabrics I found an awesome pink velvet. I was briefly tempted to cover the chair in the fabric but I knew it would be a "fad color" I would later regret. But I couldn't stop obsessing over the pink so I decided to find a pink accent pillow.

Naturally, I couldn't find a pillow I like so I ended up buying a little bit of the pink velvet and made a little pillow. Instead of cording, I decided to go with tassels on the corners but couldn't find any I liked...so I made little "tufts" out of feather cording...just too stinking cute!

A simple but fun little detail that brings in the pink I was drooling over without the huge commitment of covering an entire chair in it! I would advise taking this approach on all "big ticket items." Couches, chairs, bedding...keep them neutral and add the "fad" details and colors with pillows, throws, curtains and rugs...accents that are relatively inexpensive to change out when the color falls out of favor in a few short years!

By the way, you may have noticed I changed the curtain...I went with white just to lighten the corner a bit!

I could never post a good tutorial on how to upholstery YOUR piece of furniture...there are so many great video tutorials online for just about any style of chair/couch/ottoman/etc and I strongly suggest you do a lot of research before you start your project. Find a tutorial that best suits YOUR needs.

I will share a few tips that will make your job a tad easier. It doesn't matter if you are recovering a chair or couch or ottoman...these rules apply!

First, learn to sew. Every DIYer should know how to use a sewing machine if for no other reason than to sew pillows or curtains or do basic upholstery or even hem a pair of pants. If you don't know how to sew a straight stitch, learn! I was fortunate that my mother made me take sewing lessons when I was young but I know a lot of local county extensions and hobby stores offer cheap (if not FREE) lessons! Take them...learn! And don't think you need an expensive sewing machine...I have a basic cheap machine that is at least 30 years old! 

Start simple. Before you tackle an heirloom wingback chair with expensive fabric, try something simple like this ottoman....

The drop cloth material I used was relatively inexpensive and super easy to sew. And I used a premade bias tape for the cording.

Take your time! I always think a project will take a lot less time than it actually does...so know that reupholstering anything isn't a "rainy day project!" Maybe a rainy WEEK...but deconstructing alone will take time and a lot of patience and you want to do it right!

Take LOTS of pictures while you deconstruct! Just snap random pictures as you strip the piece. If you are like me you THINK you will remember, but you won't...and you will find yourself sitting there wishing you knew how in the world it was originally put together. So take pictures!

It is always good to have a visual reference!

TRY to keep the pieces of the old upholstery intact so you can use them as a pattern for the new. If the old is really stinky and ewwwy, make a "pattern" with them out of butcher block paper or old newspaper. Make sure you label each pattern piece or old fabric so you know where it goes! And keep in mind that the fabric you remove has been trimmed...so add a few inches on each side of the piece...you can always trim after it is attached!

If you are going to strip and stain or paint, do it after you strip the old upholstery but before the new! 

Take time to make repairs! Make any repairs that need to be made BEFORE you start painting/stripping/staining and reupholstering! Do not spend the time and money reupholstering a chair if it wobbles or needs new strapping. If you don't know how to repair something property, Google it! Or email me! And remember, glue and clamps are your friend...not silicone, not sheetrock screws, not nails. Do it right or you are wasting your time!!!

Remove ALL the old upholstery nails and staples...all of them. And honestly, I have bought every tool on the market to make the job easier and I always revert back to a plain ole' flat screw driver, a hammer and a pair of good needle nose pliers!

Which reminds me...wear shoes! I don't care how careful you are, those nails and staples fly all over the place and you WILL find them with your bare feet!

Speaking of tools, I think I have tried every electric and manual stapler on the market. I have found that MOST will not set a staple flush or securely. So now I use a pneumatic stapler, similar to this one.  Best. Stapler. Ever!!!!  But word of warning...don't make a mistake and don't plan on recovering the piece any time soon because those staples aren't coming out!

Alway cover old batting with new. Even if the old batting seems to be in good condition, cover it with new batting. Always! If it has old horse hair stuffing replace it...if it has old "strapping," now is the time to replace it!!! On a few chairs, I have actually stripped everything down to the bare wooden bones and added new everything. Trust me, that is better than getting it all back together and discovering that the seat still sags or is lumpy and it smells!

Buy enough material! When you buy material make sure you account for any piping (welt cording) you might have to make. You can buy premade cording, but if you are going to make it out of the upholstery fabric it MUST be cut on the bias...in other words, diagonal across the fabric. To give you an example, on this little chair, I needed less than two yards for the seat and back, but I needed another yard just so I would have enough to make the welting. Again, google welt cording/piping and you will find great tutorials that will show you exactly how to make it. 

Make sure you have enough fabric to complete the project before you start. Lay ALL your "pattern pieces" out on the fabric and account for the welting before you start cutting. Nothing is worse than getting half way through the project only to discover you don't have enough fabric...and you bought the last bit of it! If all else fails you can always use two different fabrics on the project like I did on these little tuffets...but PLAN for it!


Google, google, google. I learned a lot at the elbow of my dad but today we have the world at our finger tips and you can find a good tutorial for just about any project...even upholstering furniture! I always advise watching as many tutorials as you can find and use the one that makes the most sense to you and your project! Watching DIY tutorials is also a great way to decide if you even want to tackle the project...advisable before you buy a wingback chair at a garage sale for $20 with the intent of "learning to upholstery!" 

Until next week when I hope to share Matt's entry makeover...