Christmas pillows....

One of the great things about the "blogoshere" is all the great inspiration AND motivation!

This past week I was reading one of my favorite blogs, "The Interior Frugalista", and Marie was sharing her snowflake decorative pillows...only she calls them "toss cushions." Gotta love those Canadians...lol!

Anywho, it not only inspired me, it motivated me to do something I seriously dislike doing...sew! 

I have been scavenging down pillow forms. I wanted down forms for the decorative pillows that have poly-fill and a few extras for some holiday pillows!

As I mentioned before I like down forms because they are more comfortable and have a "designer" look! To me they just look "rich" but their price tag can reflect that and it is difficult for me to fork over twenty bucks for something I am going to have to make a cover for and something that is nothing more than a "doo-dad." 

This past week I found 6 awesome down pillow forms, in varying sizes, ALL for under $7...a few for as cheap as $5. Thrift stores and flea markets. Yep...I am buying ugly old designer pillows, removing the cover and sanitizing the forms for reuse! (just toss them in a hot dryer with a dryer sheet!) 

Since I had all these forms piled up, I knew it was time to drag out the old sewing cart and get busy!

TIP: If you have a 18 x 18 pillow form, you may be tempted to cut your cover fabric 19 x 19 to allow for the seams. DON'T. Cut the fabric 18 x 18...your cover will be about 1" smaller than the actual pillow form, but that is what will make them look super "puffy" and "full." I read that once on a designer website (no source, just info stored in the back of my brain!) and I tried it...makes a huge difference! 

I have shared "pillow tutorials" on several posts in the past (you will note I advocated cutting your cover fabric larger back then...again, don't)...you can check them out here, here, here, and here. 

There is no sense in rehashing the "how to." I've provided a tutorial and there are "how to" tutorials all over the internet. Marie does a great job of "tutorialing." (As I have said before, if you can sew a straight stitch, you can sew a decorative pillow...if you can't, now is the time to learn.) 

So I am going to share just to provide inspiration AND motivation and give you a few little tips on where you can find material to make inexpensive holiday covers. 

My first "inspiration"  came from a Pottery Barn knock-off I found on Pinterest....

This little pillow was super simple to make. I used two pillow shams that came with a white bedspread I ordered to put over my down comforter for the winter. I was never going to use them on the bed, so I decided to use the fabric for my decorative pillows. I didn't have enough for the back, so I used the leftover fabric from the tea towel pillows I will share in a bit....

As you can see, I changed things up from the "inspiration" pillow. I used green sparkly felt and rhinestones...both of which you can buy at your local craft store. I cut a bunch of "leaves" from the green felt, and used a bowl to guestimate a circle...

Then it was just a matter of filling in the "wreath" and placing a few rhinestones here and there...basically, I eyeballed it! I used fabric glue on the green leaves and "Jewel It" glue on the rhinestones and let it sit overnight before I constructed the pillow. I used a "premade" silver bias tape for the piping! 

I made this pillow out of tea towels I picked up at Hobby Lobby...

....they were around $4.50 (50% off!) for two!

One set of towels made TWO pillow covers and I used the leftover fabric for the backs of the wreath pillow! I spruced it up a bit by placing a rhinestone in the middle of each of the snowflakes and added a little piping around the edge. The piping is made out of bias tape and you can find a tutorial here on how to make inexpensive decorative piping from bias tape!

I made two pillows with this snowflake cutout table runner and a white table cloth I bought at TJ Maxx. (I would not suggest using inexpensive tablecloths for pillow projects...just seems too "thin" and tends to ravel quite a bit. Lesson learned.)

I centered the runner on the piece of fabric I cut out for the front of the pillow and basted the top and bottom to it with my machine to keep it in place. After I basted it, I used the fabric glue around the edges of the cutout to keep it "flat."

Again, I glued a rhinestone in the middle of each snowflake. I just love "sparkle!"

After making two white snowflake pillows, I had enough of the snowflake cutout to make one more pillow. I picked up a "burnt red" pillow and I kind of liked the color so I deconstructed it, made it a tad smaller so the pillow would be fuller and added the white snowflake cutout material.

I only have one, but I think it will look great in the den where I have more "fall" colors year round!

I also put zippers on all these pillow covers so I can easily remove them and reuse the forms!

I tend to be an "OCD/symmetry" kinda person so I made two of each of the decorative pillows so I will have one for each end of the couch when it is time to decorate for Christmas.

All these pillows are 18 x 18 and honestly, I don't like the three lined up together. I found two smaller pillow forms and plan on making Christmas covers for them and using one with two of the 18" pillows on each end of the sofa...maybe...someday...IF I get a little more motivation in the future! 

While I was making a mess, I decided to make another "floor pillow" for the den. I had two large poly-fill forms (actually they were Euro-pillows with ugly covers!) I bought at an estate sale and I thought they would be perfect to toss around on the den floor for tv watching! I had already made one large toss pillow and two smaller decorative pillows out of some leftover fabric from my dining chair project. 

I used the drop cloth material leftover from this chair project and an iron on graphic from The Graphic Fairy. Since the pillow was fairly large, I decided I wanted the graphic to be bigger so I pulled it up in Adobe Photoshop, enlarged it and then printed it out on four sheets of iron-on transfer paper.  Then it was just a matter of piecing the graphic together and ironing it on the fabric. There was a little "line" where two of the pages didn't quite fit together perfectly...I used a Sharpie to fill it in a tad.

I removed the "Grain" wording on banner in Photoshop and had intended to replace it with "Love Life." But I had a few issues with my printer so I ran out of transfer paper. Since I put zippers on all my pillow covers, I will just remove the cover and iron on the new words when my order of paper comes in. 

I still haven't shared my fall decor. Truthfully, it hasn't changed a whole lot from last year. But I have a few little additions and I thought it would be fun to do an entire post about the fall decor and update my Holiday Decor pictures. After all, Thanksgiving is less than three weeks away and the day after Thanksgiving, it all goes back in the attic! If you see anything that "inspires" you, it will be the PERFECT time to snag fall decor for pennies on the dollar!!! You may have to wait til next year to use it, but it is always fun to find things you forgot you bought last year!

Fall 2014

So this week...I promise! 


I'm Not a Trophy Wife


Duncan Phyfe table makeover...

I never dreamed I would paint my antique Duncan Phyfe table. Just last year I shared how I "rehabbed" it by applying a new finish!

But times are a changin' and when you do "retail" you have to go with the flow and that means coming to terms with painting furniture....even antique furniture!

I shared the need to paint two of my Duncan Phyfe chairs after a repair!

I kept these two chairs and paired them with my new dining table after a little "seat makeover."

Last week I finally broke down and painted and reupholstered the two captain chairs!

When I found my new dining room table, I knew the beautiful Duncan Phyfe table would have to find a new home. I honestly loved this set...bought it twenty years ago at an antique store. Tough to let go of!

I put the table and two captain chairs (pre-makeover) in my booth but the youngens just don't appreciate beautiful mahogany. Can't imagine why...but as I said before I am coming to terms with the fact that "warm and cozy" can sometimes equate to "dark and dank." And I have to admit...this set felt a little "dark and dank" in it's native state. 

Not sure is someone will want both the chairs and table, but just in case, I used the same "off-white" chalk paint on the base of the table. I used black latex paint on the underside of the table top, then mixed up a batch of black chalk paint for the top so I could distress it and let the mahogany peak through. Then I sealed the base and the top with poly.

I have to admit, I love it. 

I took the pictures after I had set it in my booth so they are a tad dark. I had a set of ironstone dishes and Currier and Ives dishes and mixed them up to create a pretty tablescape that I hope will be inspiration for someone for their holiday table! 

IT'S TIME FOR HOLIDAY PILLOWS!!!

I spent the day making Christmas pillows! As I have mentioned before, I REALLY dislike sewing, but as with many DIY projects, I love the results! And having my sewing machine on a little portable table makes it sooo much easier to manage these all day sewing projects!

I mention this because I found an awesome resource for down pillow forms. I like down forms MUCH better than poly-fill forms because they are softer and way more comfortable! And they just look nicer!

I could not find any down forms for under $15-20 a piece, depending on the size. But in the last two weeks I have snagged 6, all for under $7! How? Thrift stores and the flea market! I have been buying ugly decorative pillows just for the down forms inside!!! 

I remove the ugly (or just dated) cover, stick the form in a hot dryer with a dryer sheet to fluff, sanitize and freshen and BINGO!!! Cheap forms!

I tell you this because it is a great time to keep an eye out for them in thrift stores, flea markets and resale shops! I put zippers on all my holiday covers and when the holidays are over, I will be able to remove the covers and reuse the forms! 

I made three different styles of holiday pillows using a snowflake table runner, inexpensive tea towels and sparkly felt! They are soooo stinking cute!

Can't wait to share!


Just paint it!!!!

Sometimes I forget to share the simple little projects...shelves, tables, chairs. They are relatively easy to "update" and truthfully, they usually sell as fast as I can get them in! 

This little table was one of those "pressed board" veneered oak pieces. Nothing special and honestly something you probably wouldn't give a second look just because it is so "dated."

Do you have a dated little piece like this that is ready for the curb...PAINT IT! 

A little chalk paint, a little distressing, poly seal and a new little knob. (The little shelf was chalk painted and distressed as well...I didn't even take an "after" picture and I don't think it lasted a day.)

So simple. Perfect for a little corner or nook that needs "something." Or a bedside table in the guest room.

I can not tell you how many little tables I have "rehabbed" over the years...and no matter how out-dated or ratty they are, they always turn out darling. 

Do you have a simple table in your house you really don't like? Give it a little makeover...you might just find that you love it again. And if not, trust me, it probably won't fetch any less at a garage sale!

For chalk paint I use a "homemade" recipe....

2 1/2 tablespoons of Plaster of Paris dissolved in 1 1/2 tablespoons of hot water.

Mix with one cup of latex paint. Mix well!

I tried the calcium carbonate recipe. I seriously disliked it. It was "gritty" even when I dissolved it in hot water. So for now, I'm sticking with the Plaster of Paris recipe!

After painting the piece with chalk paint, I distress it a tad and then I seal with a spray on poly. I know a lot of people are using wax, but I'm not a fan of wax as a furniture finish for several reasons! 

Today I started painting my old Duncan Phyfe dining room table. It's not that I don't like the table, I just like this one a little bit better.

But honestly...after chalk painting the base an off-white and painting the top black, I'm kind of digging it again. 

Painting an antique Duncan Phyfe table is something I thought I would NEVER do. But I am finding that there is just not a high demand for that "style" in their native mahogany. So for the sake of "resale," it is getting a makeover...and I know someone will LOVE it!

I will share the makeover as soon as I finish it up this week!

"The Graphics Fairy" chair....

I love bloggers who "share." No strings attached! That is what The Graphics Fairy does...they share their totally awesome graphics...anything and everything you could possibly want is there for the taking! They even provides graphics in reversed printable PDFs for transfers! 

I have my favorites and I have used them on several projects.

This is a little chair I picked up at an auction MONTHS ago. I stripped the upholstery, chalk painted it, and then it sat...and sat...and sat. I had no idea what I wanted to do with it.  

I finally decided that it needed something simple, no frills.

The simplest fabric to use for upholstery are paint drop cloths you can buy at your local DIY store. I used it here on an ottoman....

Drop cloth material is very easy to work with and super durable. I wash them in bleach first and then dry. A quick ironing and you have a lot of fabric for a little money. And the best part is you have a "blank slate" to add any graphic or design you want. Well, that, and if you mess up, you aren't kicking yourself because you just ruined fabric that cost $30 a yard...ON SALE!

I used the material here for my little painted bird pillows!

I went with the vintage French graphic for the back....

...and black piping and a few black nail heads just to give it a tiny bit of flare!

The side table was another simple little project. It is a very pretty walnut table, but it had little "do-dads" on the top...those little railing thingies (did I think to take a picture...no!)...and honestly, it was kind of "dark." I put it in my booth as it was, but it didn't sell so I brought it home, removed the little do-dads, filled the holes, sanded, and then gave it a little chalk paint/distress treatment. I don't expect it to last long now! 

Simple cutting board clipboards and APPLE PIE RECIPE!

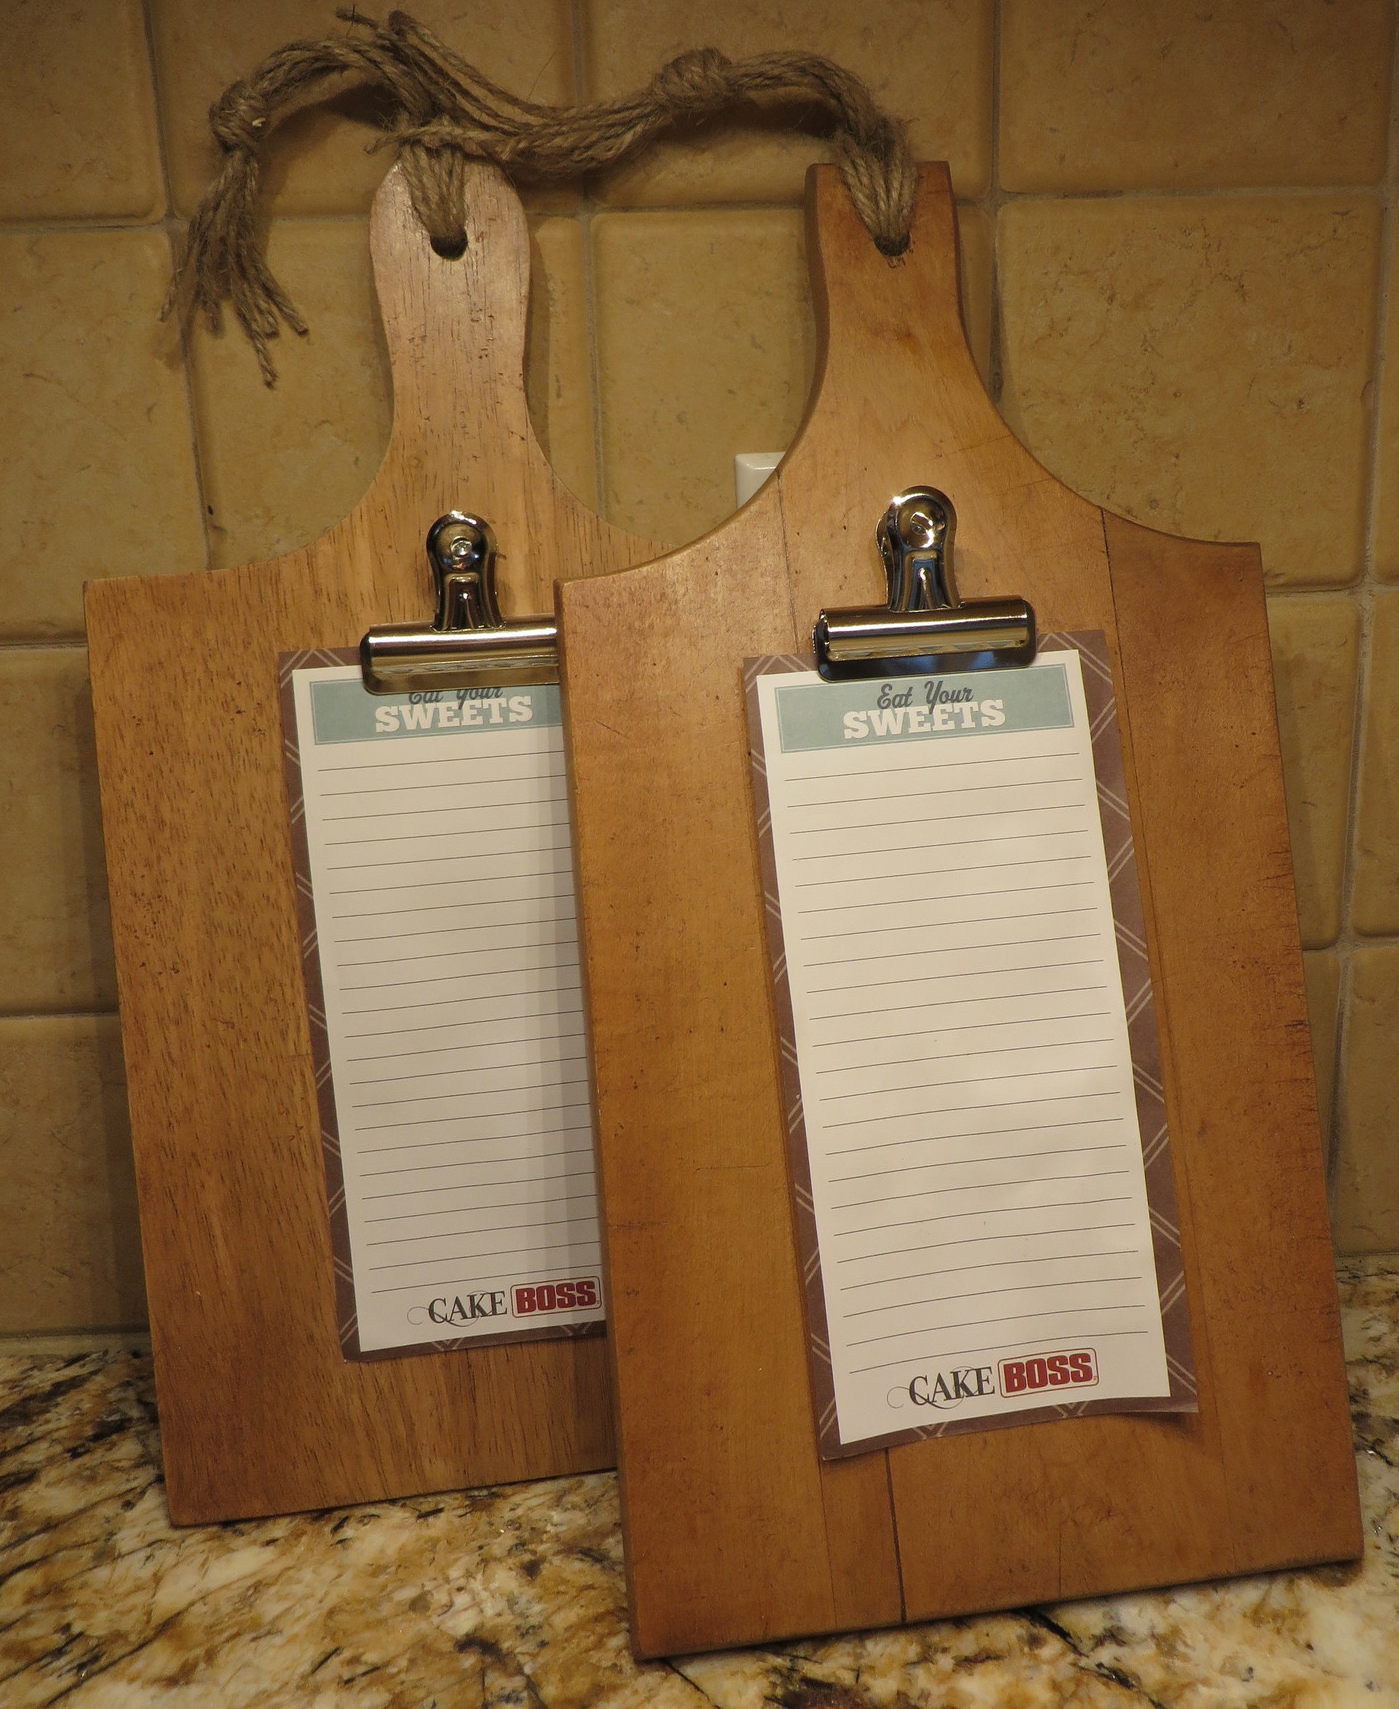
I picked up a few more old cutting boards at an auction recently. I don't intentional set out to buy them but occasionally I find them in a box of goodies I purchased. 

I shared here and here how simple it is to "refinish" these simple little pieces of wood. And since I am not real fond of using them for their original intended purpose, I am always on the lookout for a simple way to repurpose them. The older boards can be beautiful refinished and displayed on your counter or wall.

"Newer models" need to be dolled up a bit and given a new purpose....

IMG_2720.JPG

I scrubbed the boards with a 1/2 acetone and 1/2 lacquer thinner mixture and steel wool just to remove all the old oil and finish. Washed them down with mineral spirits and then I applied a stain to darken them a bit. Since I am not going to be using them for food prep, I sprayed them with clear poly. Then I attached a little metal "clip" with a wood screw. You can buy the clips at Hobby Lobby or probably any craft store. I think they were around $3 for 3. 

(TIP: ALWAYS use a stain that does not "seal"...that way if you don't like the color you can layer on another coat of stain or use a different color. If you use one that "seals" you are pretty much stuck with that color unless you strip it again!)

You could hot glue magnets to the back so you could hang it on your refrigerator. Maybe display it on a plate holder on your counter...or just hang it the wall...whatever works for you! 

It is the perfect way to keep note paper handy in your kitchen...just tie a pen or pencil to the clip. Maybe even use it to display old recipes or hold recipes while you bake! 

I think it would be a precious housewarming gift or holiday gift for a teacher!

Super simple and inexpensive! Keep an eye out at garage sales and thrift stores for old cutting boards...trust me, they are there. 

CARAMEL-PECAN APPLE PIE

I originally posted this recipe here!

As I noted in the original post, it is TO. DIE FOR! Definitely a recipe to put in your holiday arsenal!

I have tweeked it a bit...so here is my version! 

CARAMEL-PECAN APPLE PIE

PIE FILLING

5-6 cups peeled and sliced tart apples (I use Granny Smith...about 5)

1 teaspoon vanilla

1 teaspoon lemon juice

3/4 cup chopped pecans

1/3 cup packed brown sugar

3 tablespoons sugar

4 1/2 teaspoons ground cinnamon

1 tablespoon cornstarch

1/4 cup caramel ice cream topping, room temperature

1 unbaked deep dish pastry shell (I buy the frozen kind!)

3 tablespoons melted butter

* In a bowl, toss apples with lemon juice and vanilla.  Combine the pecans, sugars, cinnamon and cornstarch; add to the apples and toss to coat.  Spread caramel topping over the bottom of the pie shell; top with apple mixture (shell will be really full!) Drizzle with the butter!

TOPPING:

3/4 cup all-purpose flour

2/3 cup chopped pecans

1/4 sugar

6 tablespoons cold butter (I zap mine for about 13 seconds just long enough to soften it a bit!)

1/4 cup (or more) caramel ice cream topping, room temperature

* In a small bowl, combine the flour, pecans and sugar.  Cut in the butter until mixture resembles coarse crumbs. Sprinkle over filling. (I kind of "pack" it on top of the apples with my hands)

BAKE AT 350 DEGREES FOR 60 MINUTES or until filling is bubbly and topping is browned. Immediately drizzle with the caramel topping when you take it out of the oven. 

Cool or serve hot right out of the oven. 

It's great with ice cream. If any lasts past the first day, zap it in the microwave for a few seconds...warms it right up just like fresh out of the oven. 

Slow but steady change...MY secret to decorating...

I love to change things up but some change is kind of hard for me. I refinish furniture ...I paint walls...I install new flooring...I build entire rooms. But simple wall decor and knick-knacks tend to hang around for years...sometimes decades. 

This doesn't distress me too terribly much. As I have said before, I decorate with things I love and have meaning...naturally, I am not going to be swapping heirloom pieces out for meaningless knick-knacks! 

I like my living room. I've changed a few things here and there...a new coffee table...the new living room rug...the walnut side table. And I usually go all out for the holidays! Everything else has pretty much been here for a loooong time!  One of my favorite things is my funky little mid-century leaf clock...and of course I always love pictures of my kiddos.

I'm pretty sure the photos are from 6 years ago. Pretty pathetic.

Anywho, several months ago I picked up an awesome mid-century mirror. (Did I think to take a "before" picture...no...and this sucker is super heavy so I wasn't going to pick it up again to take a decent picture...this is as good as it gets.)

I just love that it is "different. It is walnut and well, me and walnut. But truth is, I am trying to "lighten and brighten" and I already have a lot of natural wood in this room so I decided to paint it.

Naturally, I painted it a plain ole' off white (BORing!)...but the fact is, I painted it. Yea me! I even "distressed" it. Yea me!

A little cloudy today so it is tough to get a "bright" picture!

I think the fall wreath adds a nice little element and dimension. I have a perfect Christmas wreath I will hang when I do my holiday decorations and I may check into one of those simple boxwood wreaths to put up after Christmas. If I can find the perfect frames, I may even update the kiddo's pictures and hang them on each side of the mirror.

The MCM leaf clock? Not sure...I love it, but it has no sentimental value so it could go. Who knows. 

So, I have updated my dining area a tad...and put up a PAINTED mirror...and I even made a few new little pillows for the sofa. 

Slow but steady progress.

I spent two days this week working on projects in the garage.

I have been really busy at work the last few weeks so projects had really piled up. My booths are stocked right now but things sell fast this time of the year so I need to have items ready to go on a minutes notice! And with the weather turning cooler, it is important to take advantage of nice days!

A dresser, bedside table, end table, lamps, primitive bookshelves...just to name a few. Lots to share in the coming weeks!

Parlor table before and after and a new crock pot recipe...

I ran across pictures of a table I forgot to share. It is a prime example of something that was in ratty shape and became something special with just a tiny bit of effort. No surprise...it sold within days!

I picked this table up at Salvation Army....

Overall, the table was in pretty sturdy shape and I loved the turned legs and detailing. The top was veneer, but it was blistered and loose so I scraped it off.

A lot of these older pieces have veneered tops and sometimes it is in rough shape. No biggy...there is usually good, solid wood beneath the veneer. You may have to do some scraping and sand a bit, but the wood is good for stain or paint. I removed the veneer on this oak table and you would never know it...stained beautifully!

The table also had a little veneered decorative doo-dad on the bottom. I pried it off and used wood filler to fill the hole.

I chalk painted the bottom and distressed it a bit. I used Kilz and spray paint on the top but I had a few paint boo-boos so I ended up using mineral spirits to "distress" the top as well.

That is a little trick I learned recently. You would think spray paint and oil based paint would not be "distressable." Well, it is. Take a shop rag, saturate it with mineral spirits and then rub the edges to give it that distressed look. I did it on the top of this table and recently on some shelves I painted for my booth. I wanted to use oil based paint because it holds up a little better, but I wanted the "distressed/worn" look. Perfect.

This table is a tad ornate for my tastes but it is the perfect example of taking an abused and neglected piece and giving it new life! 

SQUASH SOUP RECIPE

It is that time of the year...soups and stews! I like anything I can throw in the crock pot and serve up for dinner! I don't know why I think the crock pot is a "fall/winter" thing...truth is, it would probably be best to use it in the summer when you don't want to heat up the house. Maybe it is a "comfort" food thing!

Anywho, this is a recipe I found in Ann Rule's murder novel "Too Late To Say Goodbye". It's called "Jenn Corbin's Squash Soup." That is the lady who was murdered and this was one of her favorite recipes. (Macabre, but great recipe! And great book!)

As usual, I made it "by the book" the first time and then I tweeked it to my tastes.

So here is my take on "Jenn Corbin's Squash Soup." Hope you enjoy!


Finding treasures in the world around you...

I featured this little bookcase here....

As I have said MANY times, I look for pieces that grab my attention and are "unusual." Rarely am I looking specifically for something that has great value...I want "different" with style, function and durability.

As I mentioned when I featured this piece, I could not find any information about it...which of course tells me it is indeed "unusual." But this week I was cruising around the Internet trying to find information about another walnut piece I bought and discovered this....

Wow...seriously? I paid $45 for mine in a flea market! 

I bought this little cabinet at an auction for $1 and featured here...

IMG_0295.JPG

For the longest time I couldn't find anything about it! I eventually found it on 1stdibs.com for $2200.

The Lane tables, Drexel coffee table, mid century chairs, my office chair...all pieces I picked up for a fraction of their value, but it is never the "value" or potential profit that motivates me. It is the potential they have to be beautiful additions to my home.

HOWEVER, finding they have a great "value" is validation that these are desirable pieces and are worth the time and effort to bring back to life! Real treasures....

This week I picked up this little walnut table at an auction....

That is NOT a shadow on the top...that is the finish from it sitting in the sun!

Fortunately it still has this little paper label on the underside so I hope eventually I can find out some information on it! So far, no luck.

IMG_2584.JPG

Is that not a beautiful description of walnut? You would never know it based on the current condition of the table, but once you strip away all the abuse and neglect it is indeed a warm, inviting color.

This is exactly why I love working with walnut...a little time and a little effort brings it back to all it's glory and the dignity, permanence, strength and beauty of this wood is evident again! 

My original plan was to refinish the table and sell it...but honestly, as I worked on it I knew it would be making a home right here. 

Just this week a fellow blogger was having issues with "stripping" furniture. The process I use is not easy, but there is no easy way to remove decades of use,  neglect or abuse. But if you take your time, use a proven process AND do it RIGHT, the pride you will feel in yourself and the joy you will feel bringing an old piece back to life will make it ALL worth the time and effort! Trust me!

I used the 1/2 acetone and 1/2 lacquer thinner mixture to strip the old finish. It really does just melt the old finish right off. I scrubbed it with steel wool and used a toothbrush in the fluted groves and corners. After all the old finish was off, I "washed" it down with mineral spirits. (I can not stress enough how important it is to keep a good stockpile of old towels handy if you are going to strip furniture!)

After stripping...before oil finish!

I did have to sand the top a bit but no harm since it is solid and not veneer. Someone had evidently tried to spruce up the top at some point and sanded "across the grain," leaving marks. You can kind of see it in the "before" picture. Trust me...if you can see the sanding marks before you stain or apply a finish, you are definitely going to see them after! Take time to remove them BEFORE you apply stain and finish!

Again, ALWAYS start with a fine grit, sanding WITH the grain, and only work your way down to a courser grit if needed...then work your way up and finish with a fine grit. I used a 220 grit and some serious elbow grease, sanding with the grain, to remove the cross grain marks!

After the mineral spirits dried, I wiped the entire piece with a tack cloth and then applied the first coat of tung oil finish. I did not stain this piece...I love the natural color of walnut! Between each coat, I "buffed" lightly with 0000 steel wool and then wiped it down with a clean tack cloth. I know I stress this step, but it is SO important!!! I applied 3 coats to the base and 4 to the top.

From this....

...to this!!! What a difference!

One of the great advantages to using an oil finish is the ability to easily recoat pieces when they begin to show a little wear or look worn and dull. While I had the oil out and a sponge saturated I applied another coat to my coffee table (I keep scrap foam and old socks in my stash to make oil applicators. It had a few scratches from our new puppy and the cats. I just rubbed it down with 0000 steel wool, wiped it with a tack cloth and then wiped a coat of tung oil finish on it...looks brand new! You can't do that with poly!!! 

Walnut is one of my favorite woods...it is absolutely stunning when oiled. There is no way I could part with this table.

SOOOOO....

Golden rule, if something comes in, something has to go out. 

Yep, now I have to part with a Duncan Phyfe drum table I have had for 25 years...wow...that's going to be a tough one!

But honestly, the new table is more "my style"...

An easy little cutting board project...

What an awesome weekend...it is finally fall...cool temps and rain. LOVE IT!

I'm really looking forward to next weekend. Fall craft fairs, so far no chance of rain and the leaves may be peaking...or darn near close! It is going to be great!

I didn't mind standing around in the cold drizzle Saturday. We started out at a farm auction, bought a few things and then came back to town to an "in town" estate auction. I bought some nifty pieces and I hope to find a little time this week to work on them.

I did finish up a few little projects last week.

Pinterest and the blogisphere are great places to find inspiration. 

I had picked up a few butcher boards here and there! I love the old wood and they are relatively easy to strip and refinish! (See a tutorial here and here!)

I refinished the three smaller boards but I wasn't quite sure what to do with the big square one. I found a little "inspiration" on Pinterest....


Source

I knew I had some wood bowls stuck back in my "stash" somewhere. I think I picked them up at an auction eons ago and just wasn't quite sure what to do with them! 

I cut a simple handle on the cutting board with my jig saw, drilled a hole for the hanger, sanded it down a bit and then stained it. I stripped the finish off the bowls, cut them in half with my chop saw and then glued them onto the cutting board.

After the glue dried, I applied three coats of butcher block oil. If you know you are never going to use it for food prep, you can just spray it with a little poly!

Perfect place for fruits or veggies...maybe peppers! Or a great place to throw your keys and "stuff." 

The tutorial I link to suggested using finishing nails and glue to secure the bowls. I didn't even use nails...just Gorilla glue. It is an awesome glue for repairing or affixing wood...I've never had a problem with it setting up and holding well! 

Simple little project! 

Happy fall!

Why I paid too much for an antique child's rocker!

I pride myself in being "auction savvy." I set bid limits and usually stick to them. Rarely do I see anything at an auction that I HAVE to have. I am there to buy for resale....no emotion or personal attachments allowed...just business! 

Occasionally I am lucky enough to score a really nice piece for myself...like here, here and here!

Most of these pieces are things I love and want to add to my home decor. Naturally I will pay a tad more for something I want for myself, but I always consider the amount of time and work they will take to bring them up to par and I bid accordingly! (I have never walked away upset that I didn't get something...but I always regret paying too much!)

On very RARE occasions something throws me back in time and I get caught up in "sentimental bidding!" That is the WORST thing you can do at an auction. Absolutely THE worst. 

Which is why I paid WAY too much for this....

...a silly little child's rocking chair. 

I have no little children at home and both my grandsons are way too big for this thing! 

So why would I pay WAY too much for this chair (seriously, I am too embarrassed to even tell you how much I paid for it!)

Because....

Yes, that is me and I remember that chair. Sometimes I wonder if I only remember it because of the pictures, but I really do remember that chair...and that house. It was one my dad built when I was around 2 1/2 and we lived there until he went into the hospital with TB when I was 4.

The chairs aren't identical but the style of the one I bought was very similar, so I just had to have it.

Why? I don't know. I have no need for it and honestly no place to put it...but I literally felt myself flush with nostalgia that propelled me into a "sentimental" bidding war. 

I knew I couldn't keep it and I knew I could never sell it and recoup my costs. So for the past few months it sat in my garage. I worked on it a little at a time...first the paint, then the upholstery. 

But it can't languish in my garage forever so it is now ready for another little girl to cherish...and hopefully have very fond memories of when she is all grown up with children of her own....

Last year I shared this little rocker here....

I bought it at a garage sale and it was broken and abused. I didn't understand my nostalgic draw to it...after all, it was only a little rocker.

When I saw the rocker at the auction, it hit me. I finally understood why I loved these little chairs so much!

And that, my friends, is why I paid WAY too much for a silly little rocker!