Getting ready to go retail....

Wow...getting ready to go "retail" is a LOT of hard work.  I have been going to auctions and garage sales every weekend.  And if I was a hoarder, I would be in deep doody  because there is a whole world of really nifty stuff out there. ​

I have tried to focus on things others will LOVE!  I know I love most of what I bought...but since it is all piled in my garage and I have NO place to put it, I won't have a problem parting with it.​

This weekend I scored big time on July 4th and Christmas decorations, a big mirror, frames, planters, milk glass, candle holders...you name it, I found it!  Anything I can find that I think is wonderful, at a price that hopefully will let me make a few pennies...or at least break even!!!  I don't plan on getting rich on this little endeavor.  Again, I need an outlet for my creative juices and it is wonderful to find things I know others will take home and LOVE!

And honestly, this gives me an excuse to do something I use to love to do...go to auctions!!!  I forgot how much fun they are!  Even Brian has gotten into it so it is something else he and I can do together....that is always the BEST part of any hobby...sharing it with your best friend!​ And Matt, my youngest son, comes when he is free!  Family fun!

I have found a few pieces of furniture that are inexpensive enough for me to put my "spin" on.  It is hard to pay a premium for a piece of furniture and then come home and put a lot of money and hours into it.  I probably devalue my time and labor way too much, but when I go out and buy $100 worth of upholstery for a little ottoman it makes it tough to sell it for $75...especially when it took me all day to recover it!​

So I have to be very careful when bidding on and buying furniture.​ I found a wonderful Duncan Phyfe table that would have been beautiful...but the top was in pretty bad shape and I knew it needed a great deal of time and attention!  So I set a max in my mind and I tried not to groan too loudly when it sold for $15 above my maximum! But I knew if I paid more than that, I would NEVER recoup my time and expense.  

I also have to be very cognizant of what buyers want vs. what I personally like.  I am not that big into the shabby chic/plaster paint thing...but I know the buyers love it.  ​

This oak chair is a prime example.  Kinda dated before so I knew I would have to do something with it...​

When I first started my plan was to prime, paint with high gloss black and then recover in a black and white damask...very "formal."​

But I had to do some sanding on the paint coat and before I knew it, it had a "shabby chic" flair that everyone LOVES!​

So there you have it...a little shabby chic chair flair!  

I already featured the 3-legged table with the plaster paint legs...but I also have a nifty little oak table and a few other projects I will share over the next few weeks as I get ready to fill my booth!

Course at this point, I think I have enough to fill an entire store...not just a booth.  Typical me...at some point I will learn moderation...or just quit going to to auctions and stopping at garage sales....because honestly, I am running out of room in my garage!!!!

​Love this fabric!

Walnut chair reveal.....

Well, it is done....and while I know where the little "goofs" are, I have to keep in mind one of my father's pearls of wisdom...​

"You'll never notice it on a passing train!"

As I have mentioned before (here), Mom told me she and Dad found this chair in a field when I was a baby.  When they found it, it was bleached white from being in the sun...and she is pretty sure it originally had a cane seat and back.  Dad knew it was walnut so he took it home, repaired it and refinished it.  I would bet the upholstery in the "before" picture was probably the second time he refinished it.  This looks more like something he would have done in the 70s or 80s.

I pulled the 5,486 nail heads (so I exaggerate a tad) and removed the old upholstery, nails and padding.  Dad wouldn't have touched polyurethane so stripping the original varnish finish with my favorite Formby's varnish stripper was not a real challenge.  I repaired a few loose joints with glue and clamps!

Even with a new coat of dark walnut stain, it was very "uneven" in places so I had to do some patch-work staining.  Then I put 4 coats of tung oil on it.  And then it sat...and sat...and sat....

I just didn't know what fabric to get.  I knew I wanted something a little more formal and neutral. I let Brian pick from 7-8 fabric samples...wouldn't you know he picked my least favorite, but in all honesty, it turned out beautiful!  I opted for the double welting vs. the nail heads.  I contemplated having it recaned....but decided against it...maybe next time! ​ And I have just enough leftover material for a little pillow!

Every chair in this house has been bought or repurposed to uphold to "abuse" from kids and animals.  But this chair is special and it will be tucked away in the corner of my room where the worst thing that can happen to it is one of the cats will find it!

Maybe someday, when I am long gone, one of my children will cherish it as much as I do....thanks Dad!​

Wall murals....

Decorating with wall murals is not that difficult....and it is an awesome way to instantly add a big impact to any room, especial a play room or kid's room!​

A few years ago I decided to surprise my youngest daughter with a full room makeover while she was at choir camp.  Paint, new side table, lamp, desk chair makeover, bedding, rug...everything.  She was all into Betsy Johnson at the time so I used her design as a touch of "inspiration."  Katie's first words when she walked in...."I hate it."​

I wish I had all the "before the before" pictures handy.  When I first bought this house she was only 3 so decorating with the pastel pinks and blues was easy (imagine castle walls with trellises of ivy!) ....so precious.  Then she went through the teal/purple/lime green stage.  That was really awesome and it last a few years.

But as she entered her teens she wanted something a little more "mature."  Unfortunately, I learned the hard way that one should not assume what ones teenager will like. Better to let them have a hand in any design decisions, especially as she reminded me, it is  "MY personal space."​

Unfortunately, I knew our "design tastes" were on total opposites of the spectrum when she told me she wanted "dark grey," specifically chalkboard grey.  No way in this world was I painting a room "dark grey." ​ The last thing I wanted was my spunky, cheerful daughter getting swallowed up in the dark dank world of goth doom and gloom which I was certain would happen if we painted her room such a depressing color.

But then she told me she wanted a "fail whale" mural.  Huh?  What the heck?  So she googled it....I thought it was pretty neato!  She picked out the red and blue accent colors.  And as her "vision" became a little clearer, I realized she had a pretty awesome plan in her mind.

We painted the "fail whale" mural on one wall and painted her study cubby with the brighter blue and red.  (Originally the study cubby had a built in twin bed with a trundle...it is an addition I built years ago...rather cute but I took her bed out of it when I did the Betsy Johnson inspired room...it was the only thing she liked!)​

I had a hand in the basic paint design (okay, so I was a common laborer) but I let her add her own little design elements...posters as a headboard and art, Christmas lights, ​knick-knacks....after all it is indeed her "personal space."   And I want her to love her space as much as I want others to love theirs!

We agreed on a nice grey for three walls....we used Valspar flat paint.  It works beautifully as a "chalkboard!"  She loves it and she writes her inspiration quotes on it!  ​

Okay, the mural....there are a several ways to get a mural on a wall.  

If your design element is small enough, you can actually trace it onto the wall by taping sheets of sewing trace paper together.  I like the sewing trace paper because it isn't "messy" and it wipes off easily!​

You can free-hand the piece...which I did here....​

This is a mural of Mitchell's high school mascot...it is on the garage wall.  There use to be one on his bedroom wall, but I painted over it when I remodeled his room after he went off to collage. (Be prepared to paint several coats of primer over these things when the time comes to paint over them!)  ​

Or you can use a large "stencil" like Sarah did in my grandson's "Monster" themed game room.  She has a friend who is a graphic designer and they have the machines to print off and cut out large murals...might be worth the money it would cost! 

Or you can use a projector like we did in Katie's room.  In all honesty, the "fail whale" was a tad too big for the size we wanted on the wall, so I projected his head onto the wall to get the scale and then I free-handed the rest.  I made a little cardboard template for the birds and traced them.​

Regardless of the method you use to get your design on the wall (templates, tracing paper, projector, free-hand) first paint your base color and allow it to dry well.  Then use a sewing pencil to lightly mark your design and then use latex paint and small brushes to paint the details.  The little "sample pots" of latex paint at Lowes are the PERFECT size for these projects and VERY affordable (around $3 each) when you need several colors!  ​You can have ANY color mixed in the sample sizes so don't limit yourself to the premix colors! 

Again, murals are a GREAT way to add a huge impact in any room!  You are only limited by your own imagination.   Anything you can think of that you LOVE can be painted on a wall.  

And remember too, there are a LOT of wall mural inspirations on line...Google it! ​

And the great thing about paint...if you don't like it, paint over it!!!  ​

Biting the flea market bullet....

Well...I have finally talked myself into doing the flea market thing!  As in SELLING at a flea market...getting a booth and actually expanding my "business" to the resale world.​

A new flea market/consignment store is opening here in town.  It is a "high end" type thing and the only reason I am considering it is because she has promised to keep the "junk" out!  Not that I don't love the "junk."  After all, another man's trash can always become our treasure! ​

I desperately need an outlet for all my "creative juices"....a place were I can sell all these little pieces I have spent so much time transforming.  I know I won't make any money on them.  But I might recoup some of my costs to "repurpose" and I like the thought of these pieces going to a home where they will be loved and cherished.  And to be honest, I am plum out of room to keep this stuff!!!!​

My biggest fear is that the need to cover the cost of the booth will turn this "hobby" of mine into work...and that is NOT what I want to happen.  I want to enjoy the process and I don't want to think about how much I can make off of it or if I will recoup my expenses.  After all, I normally just give my pieces away or try to cram them into my house!  ​

Friday and Saturday I went to a few garage sales and flea markets...in the snow!!  It was cold and dreary but I forgot how much I enjoy pilfering through other peoples "stuff."  Sunday, Brian and I spent the entire afternoon at an estate auction...man-oh-man can I do some serious damage at an estate auction!!

I was looking for things I could use to decorate and fill my booth.  I came up with a few things and I think if I go in with my ever-so-crafty neighbor Trish (she is out of town and doesn't know I have already planned a new business for her!) we could put together a really fun and creative space! ​Trish is a "hoarder" of all things seasonal...wreaths, garland, yard ornaments...anything and everything for every holiday of the year.  And she use to work for a flower shop as a floral design tech.  So I really think she can create a beautiful space....I will do all the heavy repurposing and she can do all the froo-froo stuff.  I can't wait for her to get home next week so I can share the news!!!

In the meantime, I have a lot of stuff to organize and go through!  The hardest part for me is going to be the mess in my garage for the next month until the new market opens!  Again, just a tad too OCD to have this stuff piled in my garage for very long.  I didn't think parking my truck in the driveway would be an issue...after all it is spring! Hahahahahahahaha!  Who would have thought I would have to get snow off the truck in MAY!!​

Sometimes when I go to estate auctions I see things I really love and I just have to have!  This estate had some really beautiful yard ornaments and I couldn't resist these three pieces.  I will pay more for things like this because I know I am going to keep them...probably not the smart way to approach it, but I'm pretty sure I would never sell these!​

This little guy is perfect for the swing pergola!​

Beautiful little cast iron bird bath!!!​

I have wanted a little table and chairs for some time...this was the right price and perfect for my deck!​

Ahhhhh....a lab puppy....who could resist!​

Stay tuned for updates on the flea market adventure!  ​

In memory of Mrs. Betty Simco...it is obvious she found treasures all around her and it is an honor to ​display the things she once cherished in my home!  Thank you Simco family for sharing her beautiful home and cherished possessions with us!

Sew awesome....

I really want, and honestly need, a sewing desk...some place I can store and use my sewing machine without having to set it up on my dining room table.  I found this sewing desk in a thrift store and man-oh-man was this thing seriously ugly!  

 I knew this desk could be a little treasure after the cruddy paint job was stripped away!​

And even to my surprise, what a treasure it is...what I found under two layers of paint was beautiful mahogany. Initially someone had painted it a really disgusting green and then I guess they tried to improve it by painting it a flat black.  

This is a prime example of hurting a piece in a failed attempt to "enhance" it!  Truth be told, I felt a little guilty painting the base and drawers white.  But I could never live with myself had I not restored the top to it's prior glory!​

Before I started refinishing, I cut the opening a little bigger to accomodate my sewing machine.  TIP ALERT:  when cutting veneer mark the cut with a pencil and then score the veneer with a utility knife. Then use a jig saw with a very sharp blade to cut  "inside" the score...if you don't, the veneer with split and splinter and you will make quite a mess! 

Normally I use Formby's Furniture Refinisher to strip latex paint and old varnish...but two layers of paint needed a little more muscle....so I used a citrus stripper. I will not use anything stronger on veneer (always use any stripper per the instructions and in a VERY well ventilated area!)    This piece didn't have a single chip in the veneer and I didn't want to risk hurting the piece by using industrial strength stripper!​  Took a little more time and more than one application but it was worth it.  

After removing all the old paint, I took 0000 steel wool and mineral spirits and gave the wood a "bath."  When stripping wood, regardless of what you use to strip it, always "wash" the piece with mineral spirits to remove all the "crumbs."  After it dries, take VERY fine sand paper or 0000 steel wool and sand lightly before applying stain or a finish.

TIP ALERT...keep old toothbrushes on hand to get into groves and corners when stripping furniture.  DIYers never throw away old toothbrushes, coffee cans, socks, old tshirts or towels...trust me, you will need them!

IMG_8918.JPG

Since I knew I was painting the base and the drawers, I didn't strip them but I did sand and prime well before painting.​

And again...ALWAYS USE TACK CLOTH BEFORE PAINTING OR APPLYING FINISH...AND BETWEEN EVERY COAT!!  ​I seriously can not stress this enough! So many DIY tutorials tell you to "wipe down"...again, I challenge you...wipe down your piece with a clean cloth, and even some mineral spirits...then wipe it with a tack cloth!  You will be shocked at how much crud was still there!

Two coats of gloss white paint on the base and drawers.  A light coat of walnut brown stain on the wood to even out the color and give it a little more depth....4 coats of my favorite Formby's Tung Oil. New crystal knobs. Total awesomeness!​

I can not stress how beautiful this wood is....I wish I was a better photographer.  And I wonder if I should have stripped and stained the drawer on the right...but then again, I kind of like the paint/stain contrast...I think I would love it either way!

I REALLY love tung oil.... it allows the grain of any wood to just shine!  And it is sooo easy to take care of and touch up when needed!  (Now I know why my father refused to use polyurethane)​  I think so many use polyurethane because they are concerned about durability....that is honestly not an issue with tung oil!  Try it...it is almost impossible to mess up the application (unlike poly) and it is extremely easy to touch up scratches in the future if necessary!  

This project was pure joy!  Anytime I can take something that has been so abused and turn it into a treasure it just makes me happy!  

Maybe now I will enjoy sewing just a little more!  ​

Before and After dresser....

Yesterday Brian and I took off and went trout fishing for the day!  OH MY!  I am sore and sunburned...and I loved every minute of it!  Sometimes you just have to say to heck with the yard work and go have a little fun! Awesome day with my best friend!​

But Saturday was a busy day.  My neighbors came over to show off their new grandson and I found a perfect home for a precious little dresser I have been working on!  Just so happens they NEED a dresser and I NEED to find it a good home.  Done!​

As you can see, it was missing a drawer so I added a shelf...perfect spot for little storage baskets.  I painted the "box" white, the drawers a pretty green and stained the top with my favorite java gel stain.  I originally put little crystal knobs on the drawers, certain it would go to a little girl, but when I found out it was going into a boy's room I changed the knobs to brush nickle...just thought it was more appropriate for a little boy!  And I am going to throw in a cute little cork board I made up and featured earlier!  ​

IMG_8900.JPG

The great thing about these little dressers is the fact that as the little boys grows, the drawers will be easy to paint to match any decor!  ​

Another "trash to treasure"...a piece of furniture destined for the dumpster but given new life and new home with just a little time and attention!  ​

Framing memories....

I think four days of remodeling my closet and painting trim has taken a toll...I am woooorn out.  So today I will do a little coupon shopping! I HATE clothes shopping but give me a good coupon for shampoo or detergent and I am all over it!

So today I thought I would quickly feature some tidbits from past projects...framing memories!

We all frame pictures and diplomas, but frames come in all shapes and sizes and they are a great way to display a collection of things that have great sentiment...and a great way to decorate!

Master closet makeover....

​I'm almost too tired to type...this was a chore but the reward is being able to swipe "master closet" off the dry erase board on the fridge!!!

That and soooo much more storage in my closet.  ​

When both the boys left for college, I basically gutted their rooms.  I decorated with all their "stuff" and organized everything they left in their closets, but the entire room was made-over...new paint, flooring, bedding, window dressings!  Everything.​  And I even had a tad bit of space to store some of MY stuff!

And then they moved home.  And they brought more stuff!​

Anyone who thinks they are going to gain more storage or a hobby or craft room when their kid goes off to college is delusional.  Trust me...first, they leave all their "stuff" and second, they WILL come home!  And that is fine...the rule:  no kids, no spouse, no animals.  As long as they follow THE rule, they still have a room!  ​

So my closet has to stay pretty organized because it is storage central.  I built a large pantry where I keep all my office/business stuff and our personal "coupon stash."  Yes, I am one of those coupon people...but to my credit I only keep what I know my family  will use in the near future.  The rest is donated to the elementary schools!  Last year I donated over $7000 worth of products!  ​

I had a few issues with the closet...first, the flooring.  After 13 years, it was pretty nasty.  And I pretty much hate carpet!  So that had to go.  Second, I have 9' ceilings but all the shelving was standard.  So I basically had a TON of wasted space and plenty of room to add another self all the way around the closet.  I had too much "long" hanging space and not enough "double" hanging space.  Honestly, if I would move all my coats to the coat closet, I probably wouldn't need any long hanging space!  I seriously do not own a dress any more.​  

So here is the before and after...and then I will add some "in between" pictures in the tutorial.....​

Before....​

IMG_8545.JPG
IMG_8547.JPG
IMG_8548.JPG

It wasn't THAT bad...I'm pretty good at cleaning out closets every so often.  My GOAL was to only put back about 1/2 of what I took out.  But honestly, I clean out my closets and donate about twice a year...so there wasn't that much pack-ratted away!  I just needed more shelving and it was due for a good makeover....​

After....​

IMG_8841.JPG
IMG_8842.JPG
IMG_8843.JPG
IMG_8847.JPG
IMG_8845.JPG
IMG_8846.JPG
IMG_8848.JPG

So I have new laminate flooring, 25 l.f. of new shelving, paint,  more hanging space and new lighting.  And a backache, headache and feetache...and I still have a bit of a mess in my office.  But in the long run, I think it is ALL worth it!

I have posted a tutorial here... it will fill you in on exactly what I did!​

Painting light fixtures and paddle fans....

See, I'm not even trying to be clever with my titles anymore...just too much brain work!​

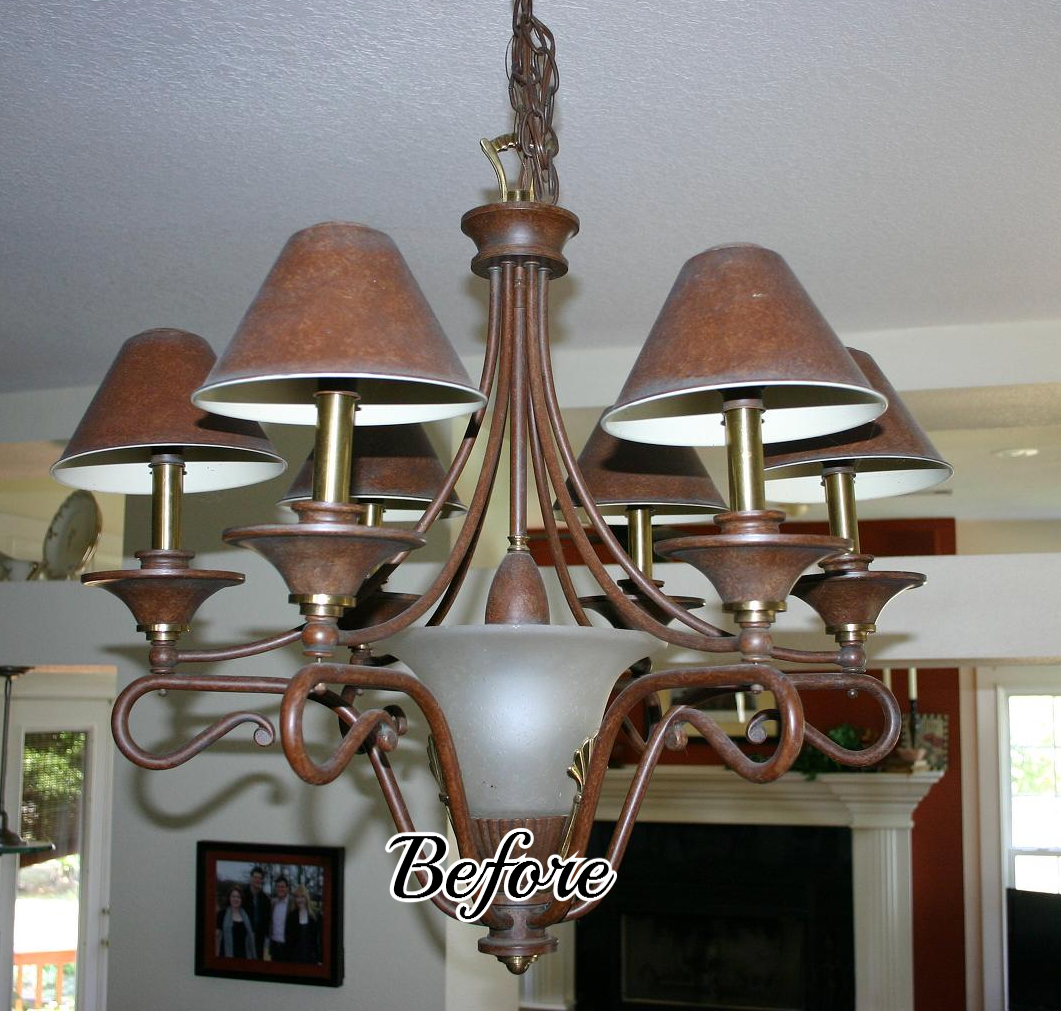
When I bought this house 13 years ago, the "bronzed" look was all the rage...not so much now, or at least not to my taste!  I'm more into light, bright and somewhat "modern" looking! 

But who can afford to change out ALL their light fixtures when the old trends sour.  Not me...so it was time to get "creative."​

Paddle fans and dining chandeliers are probably the two biggest expenses in lighting.  And naturally, those are often the most noticeable!  

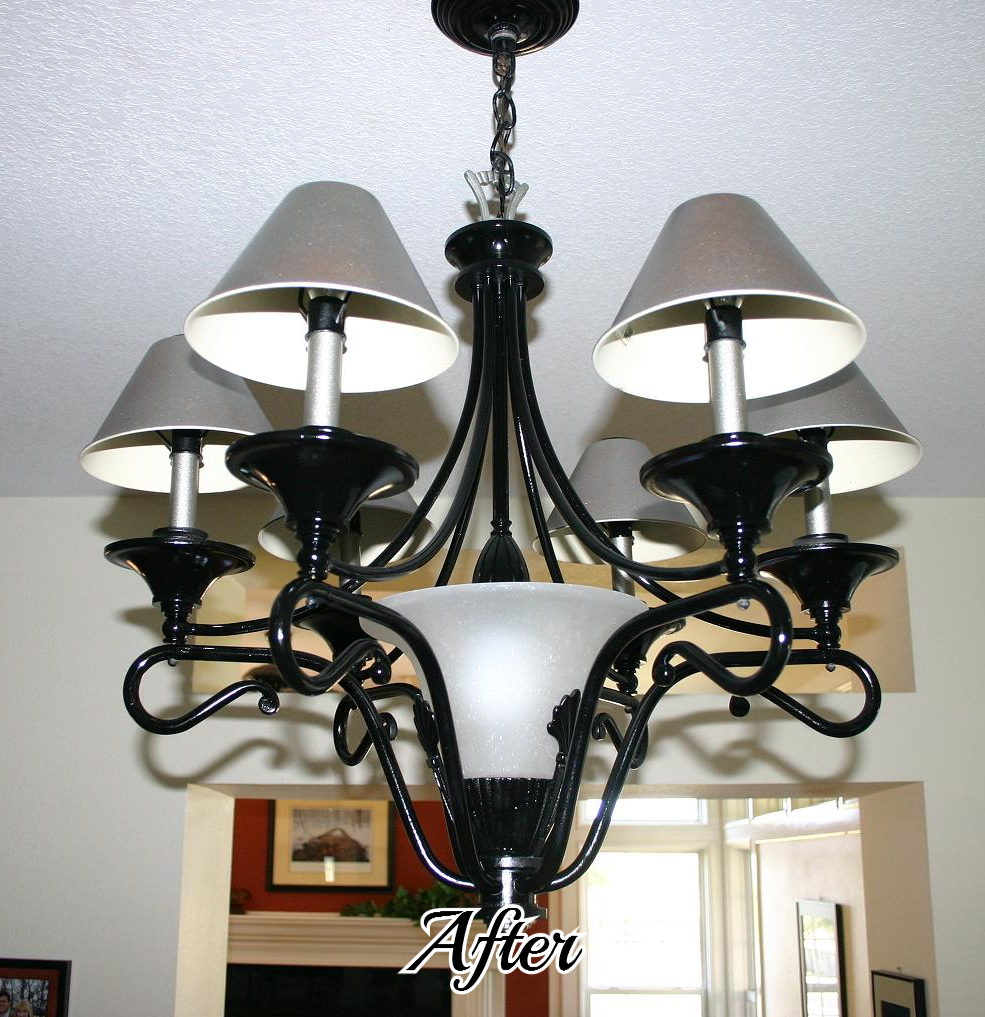
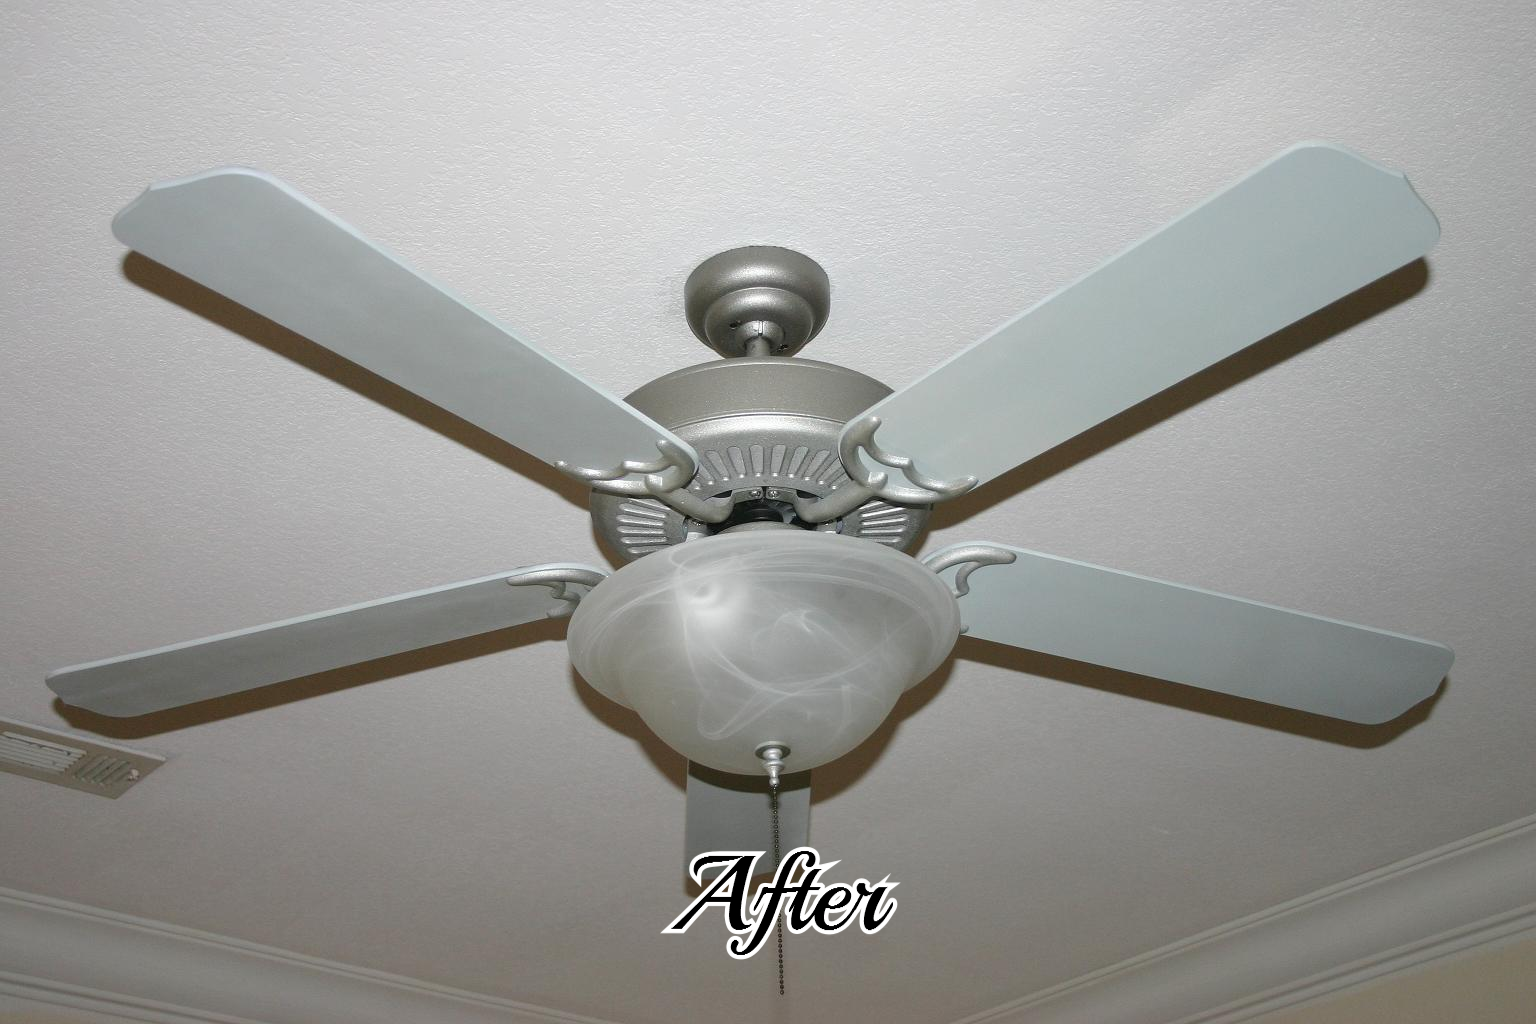
Since I was somewhat tired of the dining room light and the paddle fan in my office (and both would be expensive to replace), I didn't think I could do much damage if I took a can of spray paint to them...what is the worst that can happen...I have an excuse to buy new ones, right? ​

IMG_8223.JPG
IMG_8226.JPG
THE OFFICE AREA (3).JPG
IMG_8149.JPG

As with everything I paint, I first cleaned them and then "primed" them.  On metals, I use a metal primer...or even Kilz!  Just spray it on and then after it dries hit it lightly with 0000 steel wool...and then of course tack cloth it well before painting. (ALWAYS TACK BEFORE PAINTING!)

On the dining room light I used gloss black spray paint and the "brushed nickel" spray paint on the shades.  I used blue/grey spray paint on the fan blades...the same color I used on my dresser... and brushed nickel on the body and hardware of the fan.  I also added a new light globe to the paddle fan, just to update it a tad.

​The trick to painting light fixtures or paddle fans is taking them down and basically taking them apart...once you "disassemble" them, they are easy to paint!  BUT MAKE SURE YOU KEEP ALL THE HARDWARE AND SCREWS!  That is why I have plastic baggies on my materials list.  Any time you take ANYTHING apart, you need to put all the screws and hardware in plastic baggies and make sure you label them!  (Again, just trust me on these things!)  If you have never assembled light fixtures, and you don't feel real comfortable with the thought of getting it all back together, just take LOTS of pictures while you disassemble it.  I did that with my first upholstery job, and it helped a lot!

IMG_8141.JPG

I found that my swing pergola made the perfect spot to hang the fixtures (with a dog leash) while painting...see, you don't need anything "fancy."​

Note, I also used blue tape on both the fixture and the wires coming out of the ceiling to label what wires went where so I would know how to rewire it...AND DON'T FORGET TO TURN OFF THE POWER TO THE FIXTURE BEFORE TAKING IT DOWN OR PUTTING IT BACK UP!!!​

After 2-3 coats of paint on each of the components, I put 1-2 coats of spray on clear coat, just to give it a durable finish that would allow me to dust and clean them periodically! ​

This easy process allows you to be REAL creative!  It would be fun to paint the fan in your kid's room a fun and funky color...maybe with some interesting design element, like a chevron pattern or polka dots!  Just "think outside the box" and remember my motto...YOU CAN DO IT!  If you don't have the most creative mind, do what I do...Google it!  People post pictures of their projects...and no one is going to be offended if you "copy" their creativity!  It really is the greatest form of flattery! ​

I was kind of sick of my bedside table lamps too...and until I can afford the really awesome crystal lamps at TJMaxx, I got a little creative with those too!

IMG_8219.JPG
IMG_8220.JPG

As much as I had tired of this dining room light, it really did turn out great. And it has always been one of my favorite things to decorate during the holidays.  During Christmas it is perfect for the gold shades I painted and the garland and red berries!!  Sometimes, old is good...it just needs a little facelift from time to time!​

IMG_8312.JPG

Swing into spring...

NOW is the time to do this project...too stinking hot in the summer and you will want to enjoy it during the lazy days of summer!​

I have built 5 of these swing pergolas...two at my house, one at my daughter's first home, one at her current home and one for a neighbor.  It is not a difficult project to built but one that requires two sets of hands and a little muscle!  ​And with everything, patience!!!

I have posted a tutorial HERE​.  It is not a terribly difficult project and one I think most DIYers could easily manage.

This is the SUPER sized pergola I built onto my house about 11 years ago...I won't even begin to tell you how it is constructed...but I can promise you, if the house is blown away, it will probably still be standing!  And notice the wisteria canopy...seriously, that stuff is CRAZY!​