Sew awesome....

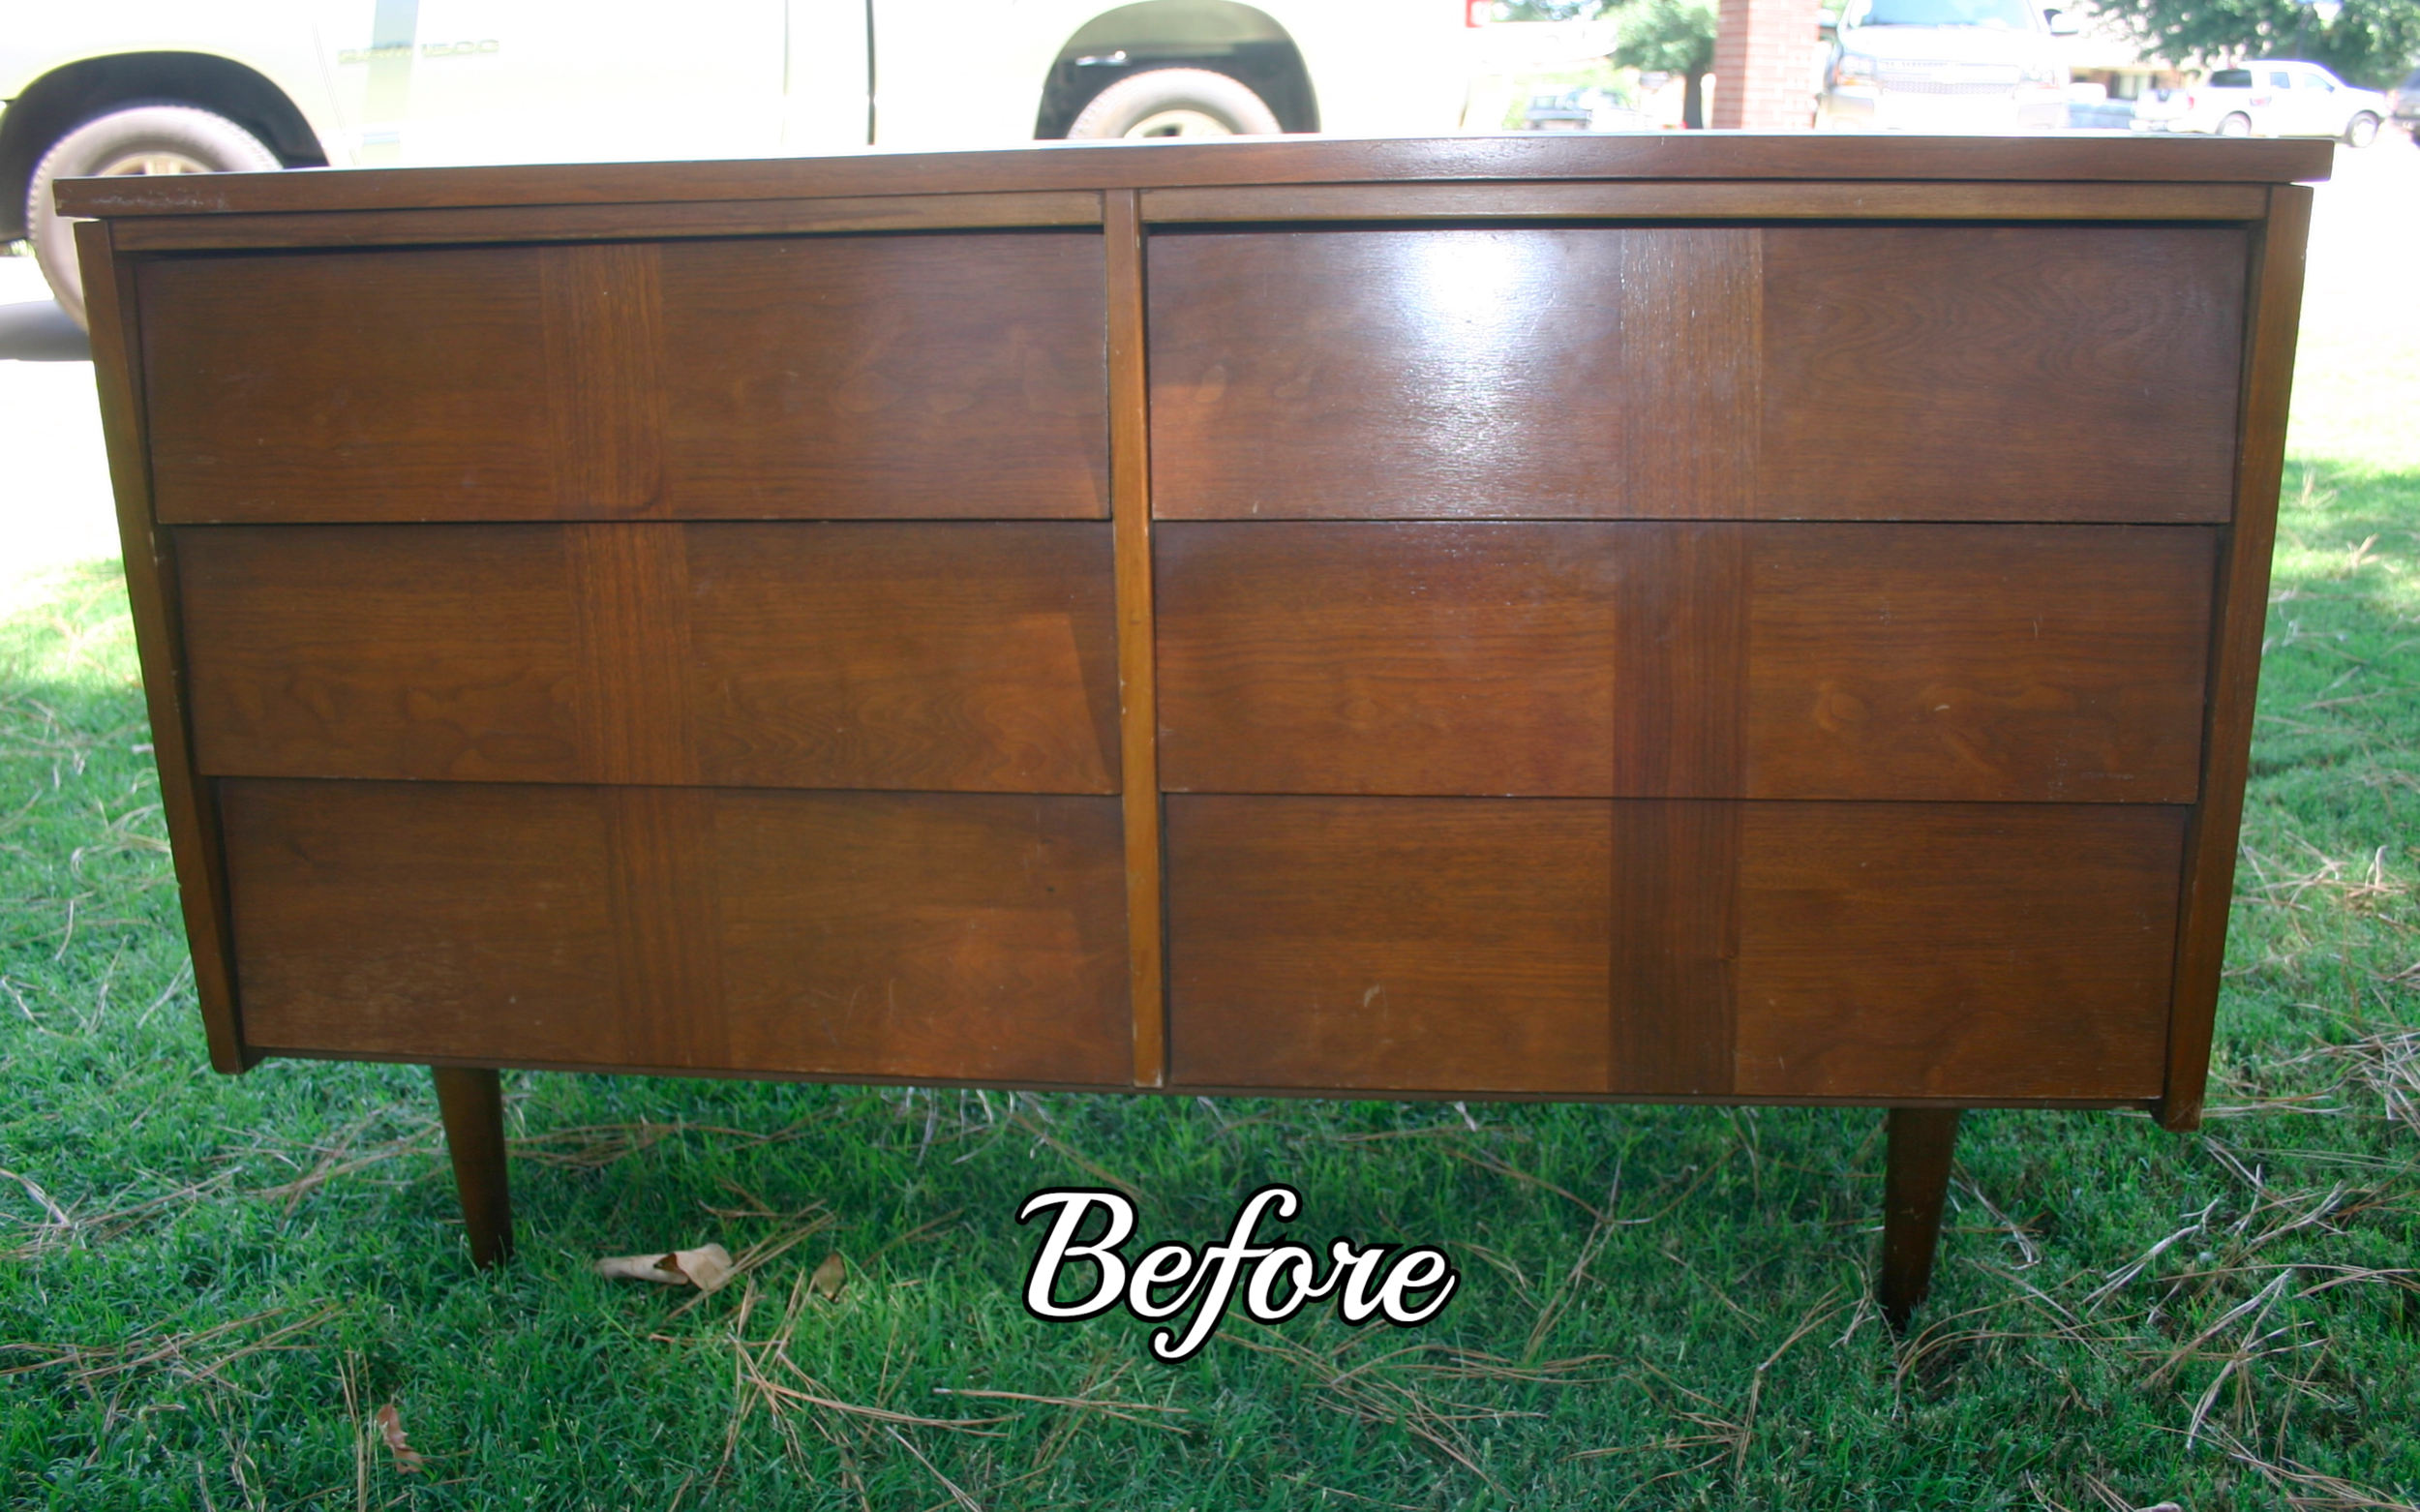
I really want, and honestly need, a sewing desk...some place I can store and use my sewing machine without having to set it up on my dining room table.  I found this sewing desk in a thrift store and man-oh-man was this thing seriously ugly!  

 I knew this desk could be a little treasure after the cruddy paint job was stripped away!​

And even to my surprise, what a treasure it is...what I found under two layers of paint was beautiful mahogany. Initially someone had painted it a really disgusting green and then I guess they tried to improve it by painting it a flat black.  

This is a prime example of hurting a piece in a failed attempt to "enhance" it!  Truth be told, I felt a little guilty painting the base and drawers white.  But I could never live with myself had I not restored the top to it's prior glory!​

Before I started refinishing, I cut the opening a little bigger to accomodate my sewing machine.  TIP ALERT:  when cutting veneer mark the cut with a pencil and then score the veneer with a utility knife. Then use a jig saw with a very sharp blade to cut  "inside" the score...if you don't, the veneer with split and splinter and you will make quite a mess! 

Normally I use Formby's Furniture Refinisher to strip latex paint and old varnish...but two layers of paint needed a little more muscle....so I used a citrus stripper. I will not use anything stronger on veneer (always use any stripper per the instructions and in a VERY well ventilated area!)    This piece didn't have a single chip in the veneer and I didn't want to risk hurting the piece by using industrial strength stripper!​  Took a little more time and more than one application but it was worth it.  

After removing all the old paint, I took 0000 steel wool and mineral spirits and gave the wood a "bath."  When stripping wood, regardless of what you use to strip it, always "wash" the piece with mineral spirits to remove all the "crumbs."  After it dries, take VERY fine sand paper or 0000 steel wool and sand lightly before applying stain or a finish.

TIP ALERT...keep old toothbrushes on hand to get into groves and corners when stripping furniture.  DIYers never throw away old toothbrushes, coffee cans, socks, old tshirts or towels...trust me, you will need them!

IMG_8918.JPG

Since I knew I was painting the base and the drawers, I didn't strip them but I did sand and prime well before painting.​

And again...ALWAYS USE TACK CLOTH BEFORE PAINTING OR APPLYING FINISH...AND BETWEEN EVERY COAT!!  ​I seriously can not stress this enough! So many DIY tutorials tell you to "wipe down"...again, I challenge you...wipe down your piece with a clean cloth, and even some mineral spirits...then wipe it with a tack cloth!  You will be shocked at how much crud was still there!

Two coats of gloss white paint on the base and drawers.  A light coat of walnut brown stain on the wood to even out the color and give it a little more depth....4 coats of my favorite Formby's Tung Oil. New crystal knobs. Total awesomeness!​

I can not stress how beautiful this wood is....I wish I was a better photographer.  And I wonder if I should have stripped and stained the drawer on the right...but then again, I kind of like the paint/stain contrast...I think I would love it either way!

I REALLY love tung oil.... it allows the grain of any wood to just shine!  And it is sooo easy to take care of and touch up when needed!  (Now I know why my father refused to use polyurethane)​  I think so many use polyurethane because they are concerned about durability....that is honestly not an issue with tung oil!  Try it...it is almost impossible to mess up the application (unlike poly) and it is extremely easy to touch up scratches in the future if necessary!  

This project was pure joy!  Anytime I can take something that has been so abused and turn it into a treasure it just makes me happy!  

Maybe now I will enjoy sewing just a little more!  ​

Before and After dresser....

Yesterday Brian and I took off and went trout fishing for the day!  OH MY!  I am sore and sunburned...and I loved every minute of it!  Sometimes you just have to say to heck with the yard work and go have a little fun! Awesome day with my best friend!​

But Saturday was a busy day.  My neighbors came over to show off their new grandson and I found a perfect home for a precious little dresser I have been working on!  Just so happens they NEED a dresser and I NEED to find it a good home.  Done!​

As you can see, it was missing a drawer so I added a shelf...perfect spot for little storage baskets.  I painted the "box" white, the drawers a pretty green and stained the top with my favorite java gel stain.  I originally put little crystal knobs on the drawers, certain it would go to a little girl, but when I found out it was going into a boy's room I changed the knobs to brush nickle...just thought it was more appropriate for a little boy!  And I am going to throw in a cute little cork board I made up and featured earlier!  ​

IMG_8900.JPG

The great thing about these little dressers is the fact that as the little boys grows, the drawers will be easy to paint to match any decor!  ​

Another "trash to treasure"...a piece of furniture destined for the dumpster but given new life and new home with just a little time and attention!  ​

Framing memories....

I think four days of remodeling my closet and painting trim has taken a toll...I am woooorn out.  So today I will do a little coupon shopping! I HATE clothes shopping but give me a good coupon for shampoo or detergent and I am all over it!

So today I thought I would quickly feature some tidbits from past projects...framing memories!

We all frame pictures and diplomas, but frames come in all shapes and sizes and they are a great way to display a collection of things that have great sentiment...and a great way to decorate!

Master closet makeover....

​I'm almost too tired to type...this was a chore but the reward is being able to swipe "master closet" off the dry erase board on the fridge!!!

That and soooo much more storage in my closet.  ​

When both the boys left for college, I basically gutted their rooms.  I decorated with all their "stuff" and organized everything they left in their closets, but the entire room was made-over...new paint, flooring, bedding, window dressings!  Everything.​  And I even had a tad bit of space to store some of MY stuff!

And then they moved home.  And they brought more stuff!​

Anyone who thinks they are going to gain more storage or a hobby or craft room when their kid goes off to college is delusional.  Trust me...first, they leave all their "stuff" and second, they WILL come home!  And that is fine...the rule:  no kids, no spouse, no animals.  As long as they follow THE rule, they still have a room!  ​

So my closet has to stay pretty organized because it is storage central.  I built a large pantry where I keep all my office/business stuff and our personal "coupon stash."  Yes, I am one of those coupon people...but to my credit I only keep what I know my family  will use in the near future.  The rest is donated to the elementary schools!  Last year I donated over $7000 worth of products!  ​

I had a few issues with the closet...first, the flooring.  After 13 years, it was pretty nasty.  And I pretty much hate carpet!  So that had to go.  Second, I have 9' ceilings but all the shelving was standard.  So I basically had a TON of wasted space and plenty of room to add another self all the way around the closet.  I had too much "long" hanging space and not enough "double" hanging space.  Honestly, if I would move all my coats to the coat closet, I probably wouldn't need any long hanging space!  I seriously do not own a dress any more.​  

So here is the before and after...and then I will add some "in between" pictures in the tutorial.....​

Before....​

IMG_8545.JPG
IMG_8547.JPG
IMG_8548.JPG

It wasn't THAT bad...I'm pretty good at cleaning out closets every so often.  My GOAL was to only put back about 1/2 of what I took out.  But honestly, I clean out my closets and donate about twice a year...so there wasn't that much pack-ratted away!  I just needed more shelving and it was due for a good makeover....​

After....​

IMG_8841.JPG
IMG_8842.JPG
IMG_8843.JPG
IMG_8847.JPG
IMG_8845.JPG
IMG_8846.JPG
IMG_8848.JPG

So I have new laminate flooring, 25 l.f. of new shelving, paint,  more hanging space and new lighting.  And a backache, headache and feetache...and I still have a bit of a mess in my office.  But in the long run, I think it is ALL worth it!

I have posted a tutorial here... it will fill you in on exactly what I did!​

Wicker chair fit for a little ballerina...

It is so hard to take a picture of a piece of furniture that was white but is now a PALE mist green...but I tried! 

IMG_8798.JPG
IMG_8808.JPG

It may not appear in the picture to be a huge difference, but it really is!  And it is perfect for a little girl's room!  Now if I only had a "little" girl....

What is truly amazing about the color I painted the little chair (Valspar,  Mellow Spring) is it matches the color of my 60+ year old Universal Ballerina Mist stoneware to a T! 

My paternal grandmother wasn't a "china" kind of lady...so this was really all she had.  My mom bought the gravy bowl and plate, the serving platter and the tea pitcher at the estate auction after Grandma passed....while she was carrying it back to her car she dropped the pitcher!!  So when mom gave me what she had, the pitcher was beyond repair.  So I did what I always do...I Googled the pattern!   

Turns out it isn't a real expensive stoneware pattern...but the color and style is really beautiful and very "mid-century" since it was probably made and acquired in the 50s.  It is a "mist green" with a platinum band...just awesome.  So when I found more pieces out there, I bought another tea pitcher, the milk pitcher, salt and pepper shakers, a serving bowl and the sugar and creamer set.   

IMG_8814.JPG

Being the "family historian" and "archive fanatic" that I am, I carefully wrapped the broken pitcher, put it in a box, and wrote the story of why there was a broken tea pitcher in it and how I acquired a replacement.... with a Sharpie...on the box!  Hopefully my family won't think their mom was crazy for keeping a broken tea pitcher in the attic (trust me, they have enough reasons!)   

This week while I was sniffing around a new antique shop in town, I found another set of salt and pepper shakers! 

IMG_8815.JPG

Now that I have two sets, I don't mind using one...at least I know I have a replacement if they get broken!   

Do not shop with men....

I love it when Brian will "flea shop" with me!  Normally he won't go in the thrift stores ...says they smell funny...but he does like the little flea markets and antique stores. He keeps me from buying stuff I really don't need.  But occasionally he stops me from buying something I really want AND is priced well.​

Several weeks ago we went "flea shopping" at one of my favorite little shops in Rogers.  One of the vendors was having a 50% off sale...so the ceramic crock I have been desperately wanting for outdoor planting, which was priced at $125, was only $62.50!  No chips, no cracks, no flaws...exactly what I have been looking for!

I REALLY wanted one of these crocks.  My mom has had one on her front porch for as long as I can remember.  And as I told you, I am constantly on the hunt for perfect, unique planters...and this fit the bill.​

But NOOOOOO, Brian talked me out of it...and being the kind and sweet person I am, I obliged.  (This is were I will remind you we are not married and I have my own money...we just have one of those respectful relationships...the kind that makes us not do things we want to do when the other poopoos the idea...at least while the other is around!)​

Last week when I was picking up my mega Brasilia find in Fayetteville, I found 2 of these crocks in their store...FOR TWO HUNDRED DOLLARS EACH!!!  I was rather annoyed that I didn't pick up the less expensive one, IN MINT CONDITION MIND YOU, weeks earlier!​

So today, having a few minutes to spare, I went back up to the flea market in Rogers...I was certain the crock would be gone since the vendor was selling out weeks ago...but there it was...waiting on ME!  I was sooooo thrilled!  ​

I bought it and promptly called Brian and told him that the bitterness and hostility I was secretly harboring was gone. He is one lucky guy!​

I also found this really cool mirror for $15.00...not sure what I am going to do with it...other than paint it!  I have this blank wall next to my front door that is crying out for SOMETHING and I am thinking this mirror might be a good "anchor" for some kind of wall decor thingy bopper....who knows.  I just liked it's "bones" and I know it will be nifty when I get it painted up! ​

IMG_8790.JPG

Painting light fixtures and paddle fans....

See, I'm not even trying to be clever with my titles anymore...just too much brain work!​

When I bought this house 13 years ago, the "bronzed" look was all the rage...not so much now, or at least not to my taste!  I'm more into light, bright and somewhat "modern" looking! 

But who can afford to change out ALL their light fixtures when the old trends sour.  Not me...so it was time to get "creative."​

Paddle fans and dining chandeliers are probably the two biggest expenses in lighting.  And naturally, those are often the most noticeable!  

Since I was somewhat tired of the dining room light and the paddle fan in my office (and both would be expensive to replace), I didn't think I could do much damage if I took a can of spray paint to them...what is the worst that can happen...I have an excuse to buy new ones, right? ​

IMG_8223.JPG
IMG_8226.JPG
THE OFFICE AREA (3).JPG
IMG_8149.JPG

As with everything I paint, I first cleaned them and then "primed" them.  On metals, I use a metal primer...or even Kilz!  Just spray it on and then after it dries hit it lightly with 0000 steel wool...and then of course tack cloth it well before painting. (ALWAYS TACK BEFORE PAINTING!)

On the dining room light I used gloss black spray paint and the "brushed nickel" spray paint on the shades.  I used blue/grey spray paint on the fan blades...the same color I used on my dresser... and brushed nickel on the body and hardware of the fan.  I also added a new light globe to the paddle fan, just to update it a tad.

​The trick to painting light fixtures or paddle fans is taking them down and basically taking them apart...once you "disassemble" them, they are easy to paint!  BUT MAKE SURE YOU KEEP ALL THE HARDWARE AND SCREWS!  That is why I have plastic baggies on my materials list.  Any time you take ANYTHING apart, you need to put all the screws and hardware in plastic baggies and make sure you label them!  (Again, just trust me on these things!)  If you have never assembled light fixtures, and you don't feel real comfortable with the thought of getting it all back together, just take LOTS of pictures while you disassemble it.  I did that with my first upholstery job, and it helped a lot!

IMG_8141.JPG

I found that my swing pergola made the perfect spot to hang the fixtures (with a dog leash) while painting...see, you don't need anything "fancy."​

Note, I also used blue tape on both the fixture and the wires coming out of the ceiling to label what wires went where so I would know how to rewire it...AND DON'T FORGET TO TURN OFF THE POWER TO THE FIXTURE BEFORE TAKING IT DOWN OR PUTTING IT BACK UP!!!​

After 2-3 coats of paint on each of the components, I put 1-2 coats of spray on clear coat, just to give it a durable finish that would allow me to dust and clean them periodically! ​

This easy process allows you to be REAL creative!  It would be fun to paint the fan in your kid's room a fun and funky color...maybe with some interesting design element, like a chevron pattern or polka dots!  Just "think outside the box" and remember my motto...YOU CAN DO IT!  If you don't have the most creative mind, do what I do...Google it!  People post pictures of their projects...and no one is going to be offended if you "copy" their creativity!  It really is the greatest form of flattery! ​

I was kind of sick of my bedside table lamps too...and until I can afford the really awesome crystal lamps at TJMaxx, I got a little creative with those too!

IMG_8219.JPG
IMG_8220.JPG

As much as I had tired of this dining room light, it really did turn out great. And it has always been one of my favorite things to decorate during the holidays.  During Christmas it is perfect for the gold shades I painted and the garland and red berries!!  Sometimes, old is good...it just needs a little facelift from time to time!​

IMG_8312.JPG

A new "before and after" by SIS....

Man oh man...what a difference a day...or just a few hours...can make in NW Arkansas.  Beautiful and warm this morning and now it is too cold to even work on my dressers.  Suppose to be in the 40s tomorrow, with a chance of snow...craziness!​

Anywho, since I can't project outside and I really don't want to do what I NEED to do IN the house because of this "spring fever" bug I have, I thought I would share one of Sister Sarah's projects.  As I have mentioned, Sarah (my oldest daughter) likes to "project" but with two active boys it is tough.  I remember (and MISS) those days!!  That time in your life when you want to be in the garage sanding and painting, but while you are doing that your youngest is locking himself in the dryer or taste-testing your sleeping pills (yes, that would be my youngest grandson!) 

But she does manage to get in a project or two...so I thought I would share this darling little nightstand she did...​

NIGHTSTAND BEFORE.png
NIGHTSTAND AFTER 2.jpg

See how a little Kilz and a little paint can make a world of difference!  ​

Great job Sis!!!​

She also used the gel stain I told you about on her bathroom vanity and wall cabinet (see here)...totally awesome transformation. 

Oh. My. Goodness....I can't believe I found one....UPDATE!

Okay, I told you about my absolute obsession with the mid century Lane Acclaim tables.  So in my quest for all things "mid century" I stumbled upon a line of furniture that literally makes me drool....Brasilia by Broyhill.  Manufactured in the 60s, this line of furniture is absolutely one of the most beautiful and desirable mid century designs floating around right now!   I have always wanted a piece of this line, but honestly I could never find one in my budget!

So when I found a Brasilia hutch online for an unbelievable price, I just knew something had to be wrong with it it!  It was at one of my favorite flea market haunts, White Elephant. Even though I was exhausted and already in my pajamas, I called my son, who lives a few blocks from the flea market, and told him to go stand guard in front of the hutch until I could get there and inspect it. 

Beautiful.  Near mint condition, less a few bumps and bings...but honestly, that is to be expected from someone in their 50s!  And even though I really don't NEED or even want a dining room hutch, I just couldn't pass it up!  Maybe I can trade it for the bedroom hutch I REALLY want!

I took a few days off this week but Monday morning, that puppy will be on it's way to my house! 

3I33Ma3pc5Fe5H45M9d3c9afd4fd51c4e17e5.jpg

It is now in my garage...it ended up costing me about $1200 damage to my truck!  The hutch is still in mint condition...the trailer I used to bring it home can handle a lot of abuse...but the truck...not so much! 

Today's lesson....do not forget you have a trailer on your truck and back out of the drive way.  The corner of the trailer can do some serious damage to a side panel.  Just another helpful hint. 

Dressing up an old dresser....

I'm tryin' here! Smarmy comes easy..."witty"...not so much! 

But it dawned on me....I have never posted my dresser makeover! 

I use to have this HUGE hulking dresser in my office/dressing room.  It was a "matchy-matchy" to my bed and highboy...which I love, but the dresser was seriously huge and just seemed to shrink the entire room.  So when I was out digging around for the desk (featured earlier) I found this sweet little dresser and said to myself "Why not!" 

I LOVE the style.....kind of a mid-century modern with walnut veneer.  The top was laminate, so I knew I was going to have to paint the entire thing...and I did.  But later I found a picture online of an identical dresser and they had painted the top and sides, but refinished the wood veneer drawers...GORGEOUS! And you know how I loooove anything wood, especially walnut!  Live and learn...maybe next time! 

As with most of my furniture, I had a piece of glass cut for the top...lets me clean it with Windex! 


IMG_8157.JPG
IMG_8522.JPG