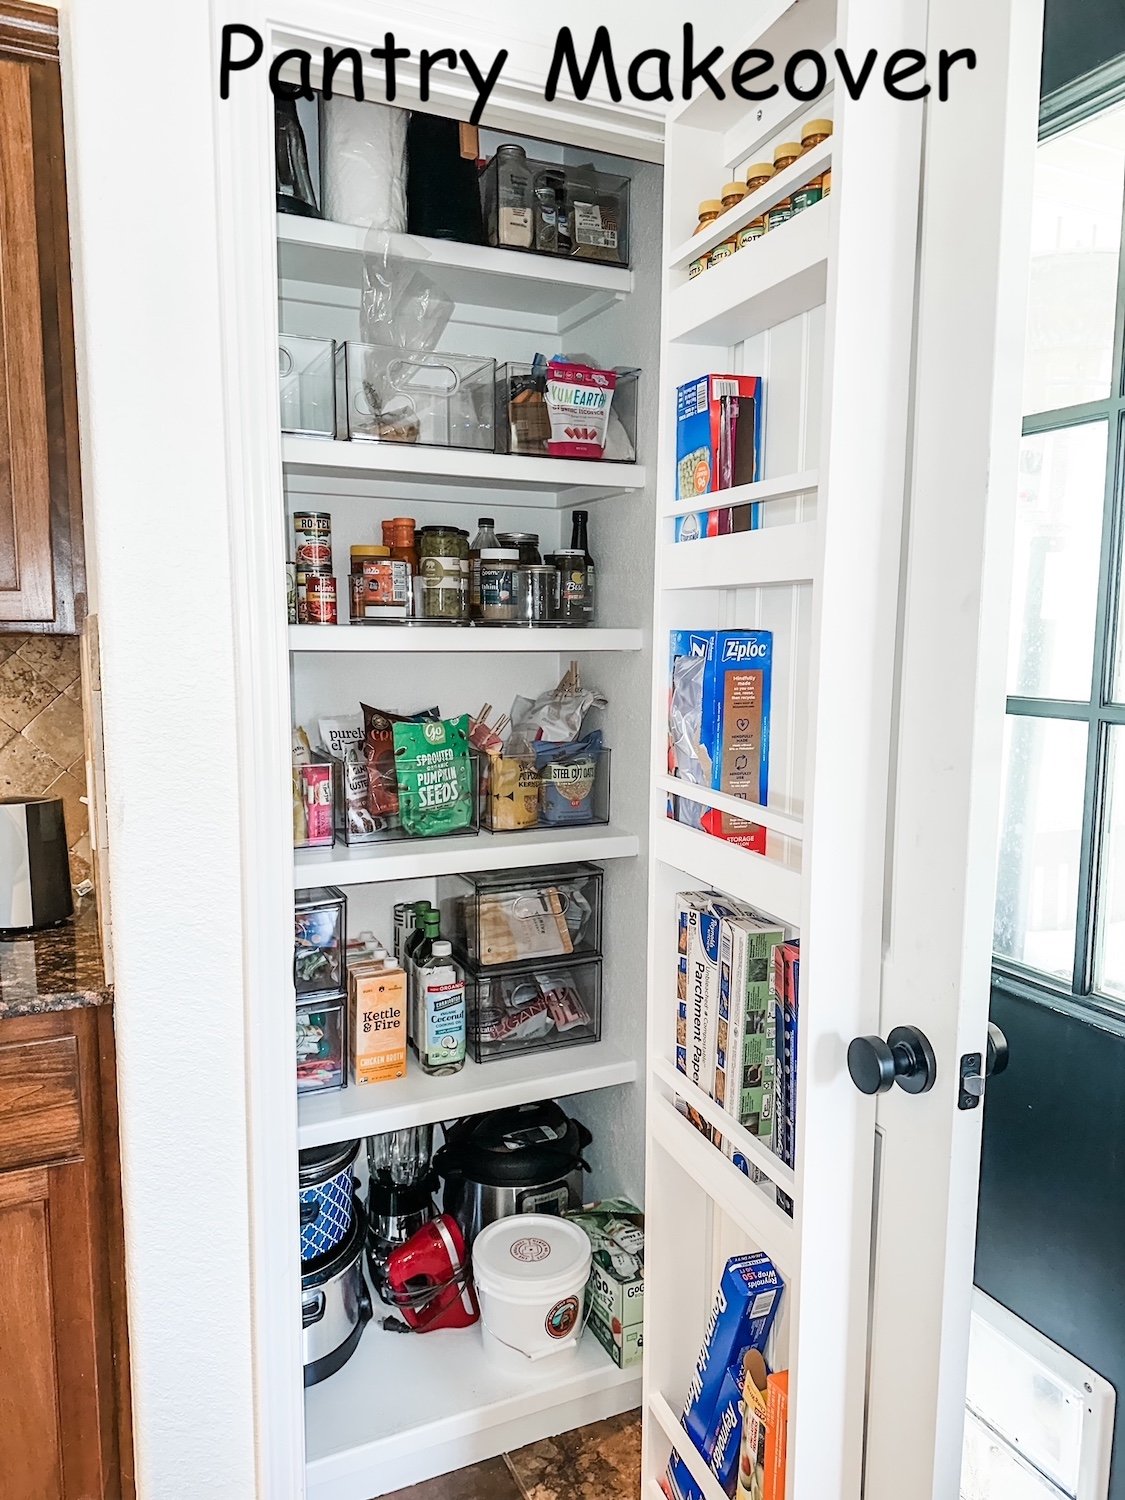
A small pantry makeover....

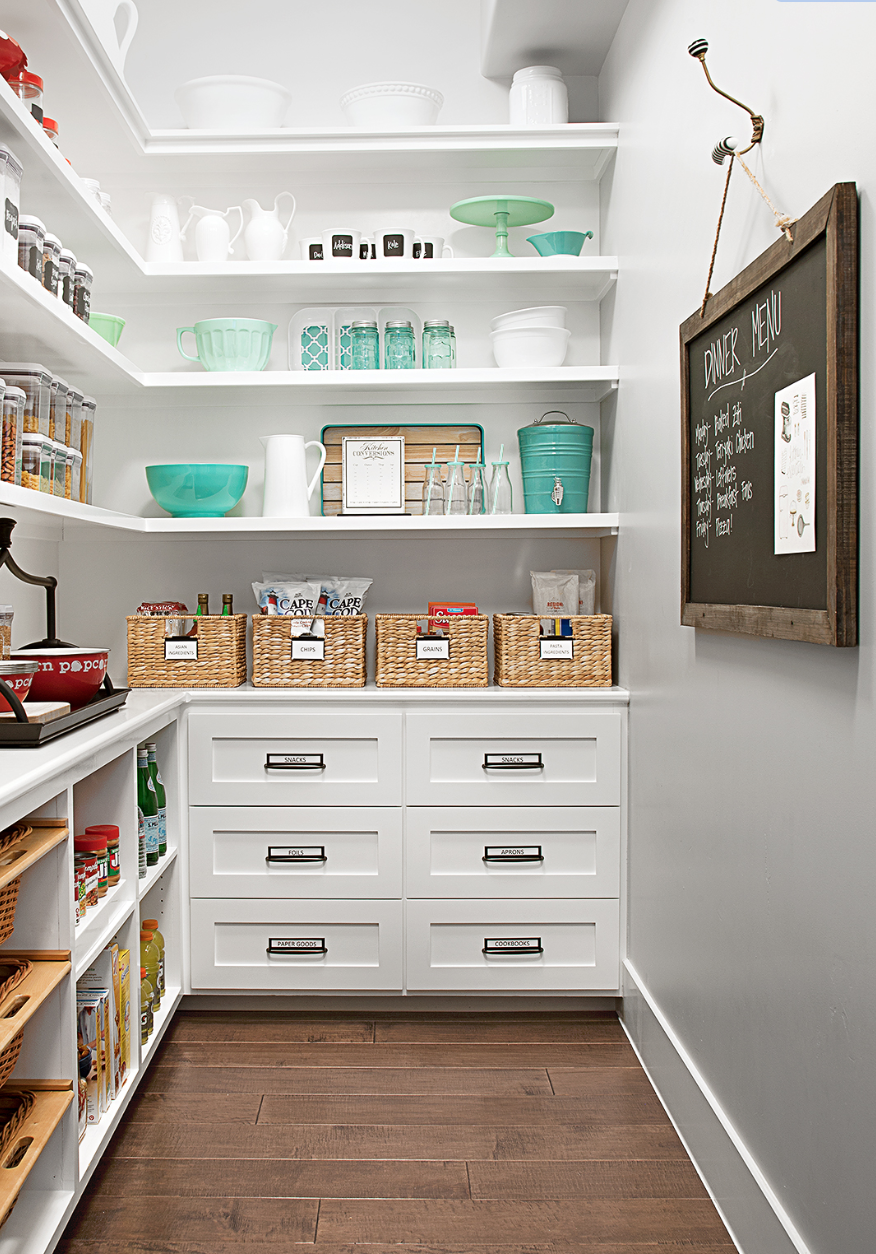
I love pantry projects…HERE I shared mine!

There is no shortage of inspiration on Pinterest for pantry makeovers…you will find one for every possible size and configuration!

My son and daughter-in-law, Hannah, have a great kitchen but a small pantry with typical poorly designed shelving placement…it was a MESS!

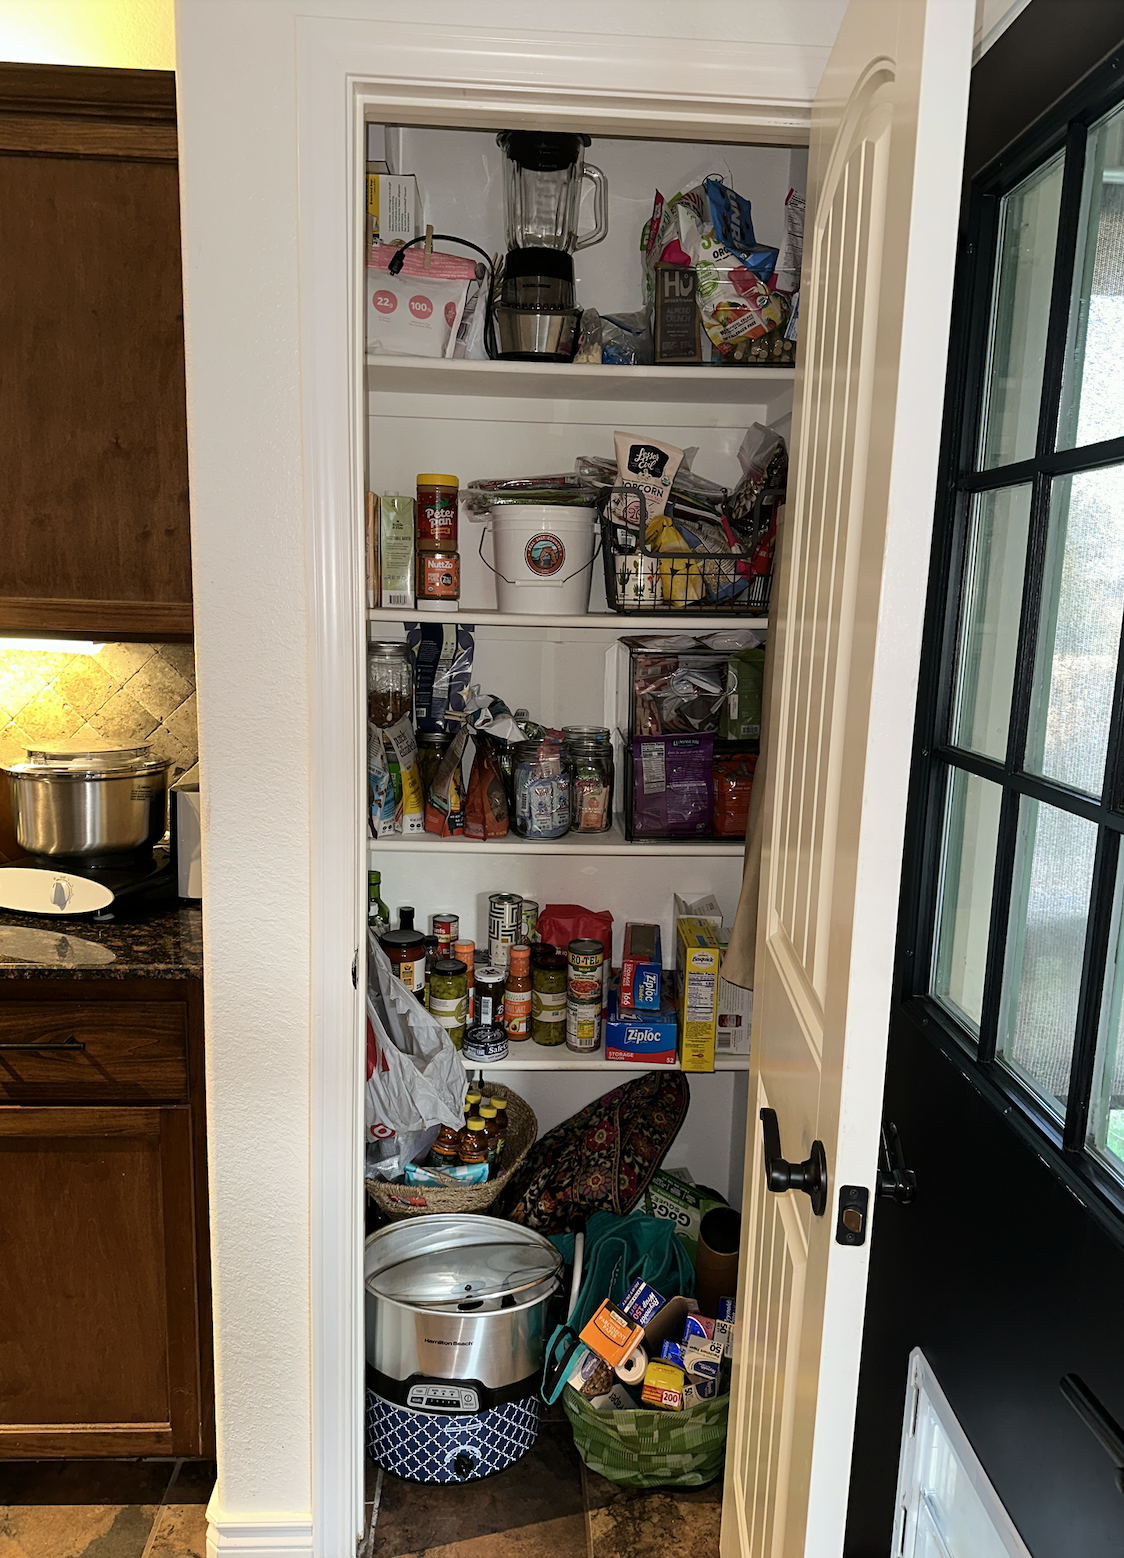
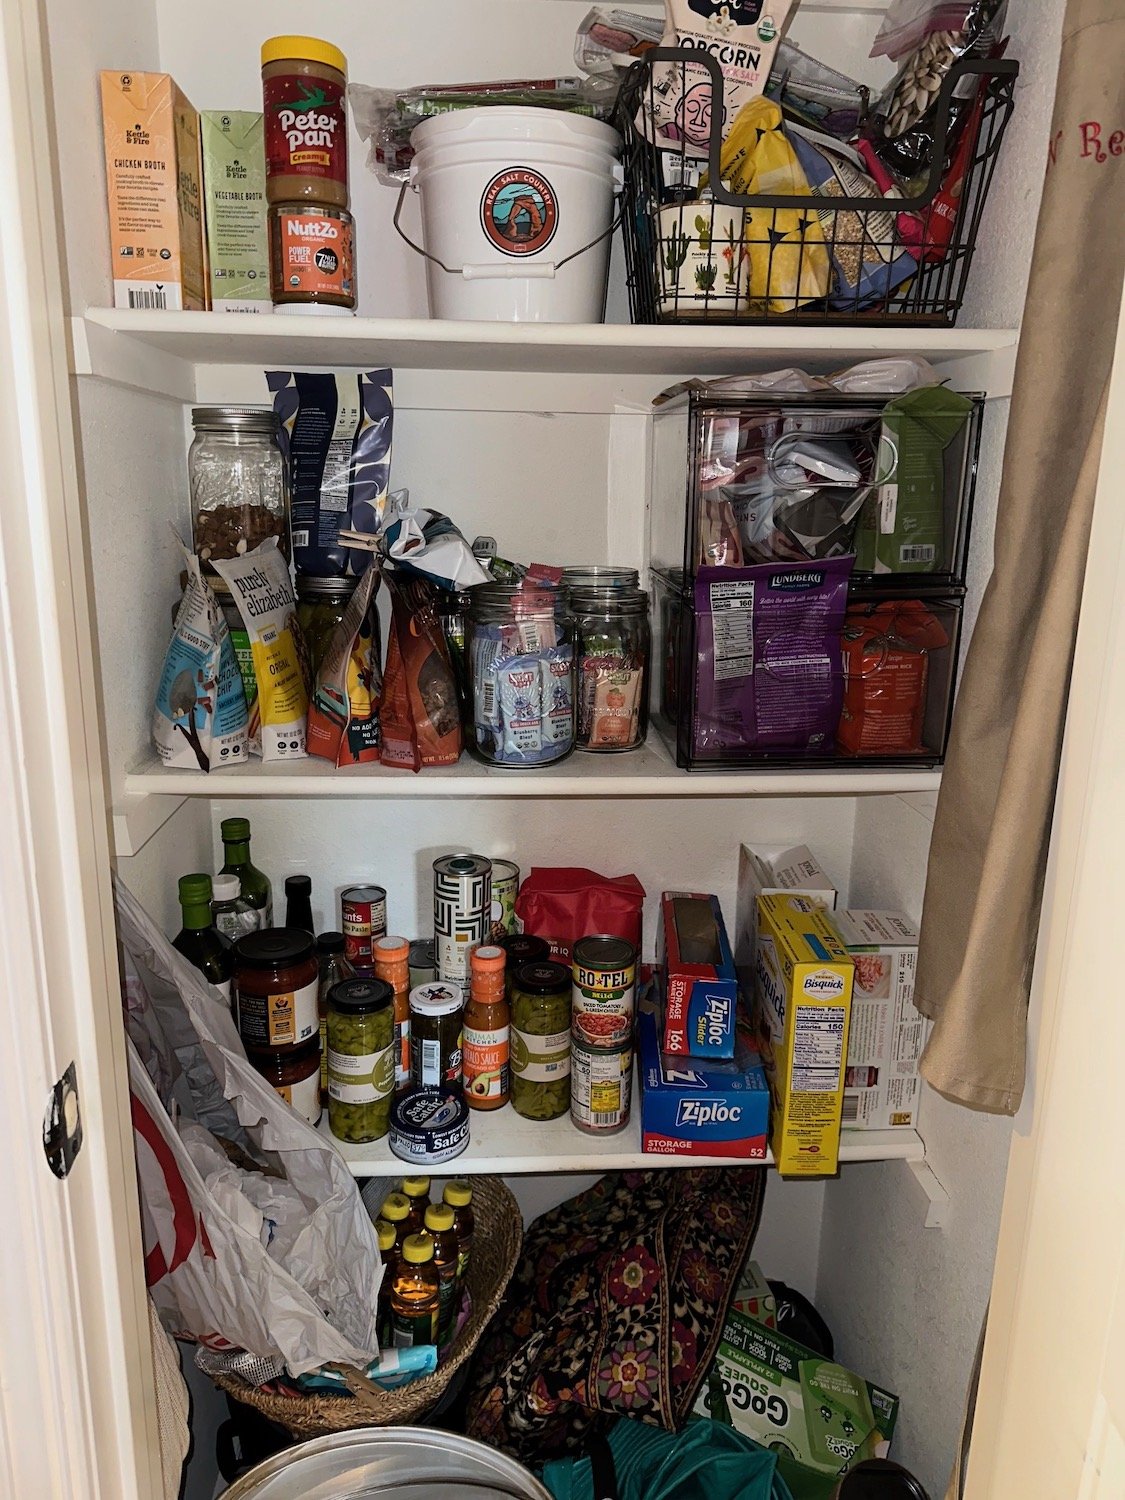
Soooo much wasted space!

For months we discussed giving it a little makeover, but they really wanted a house that is a tad bigger on a few acres further south. So there was a chance they would not be staying in this house.

Several months ago they found one, made an offer, got it accepted and were all set to rent their current home!

So the pantry project got nixed.

Unfortunately, the deal fell through because of a boundary dispute.

Hannah was bummed. (She had already started packing!)

So the pantry project was back on and a few weeks ago we tackled it!

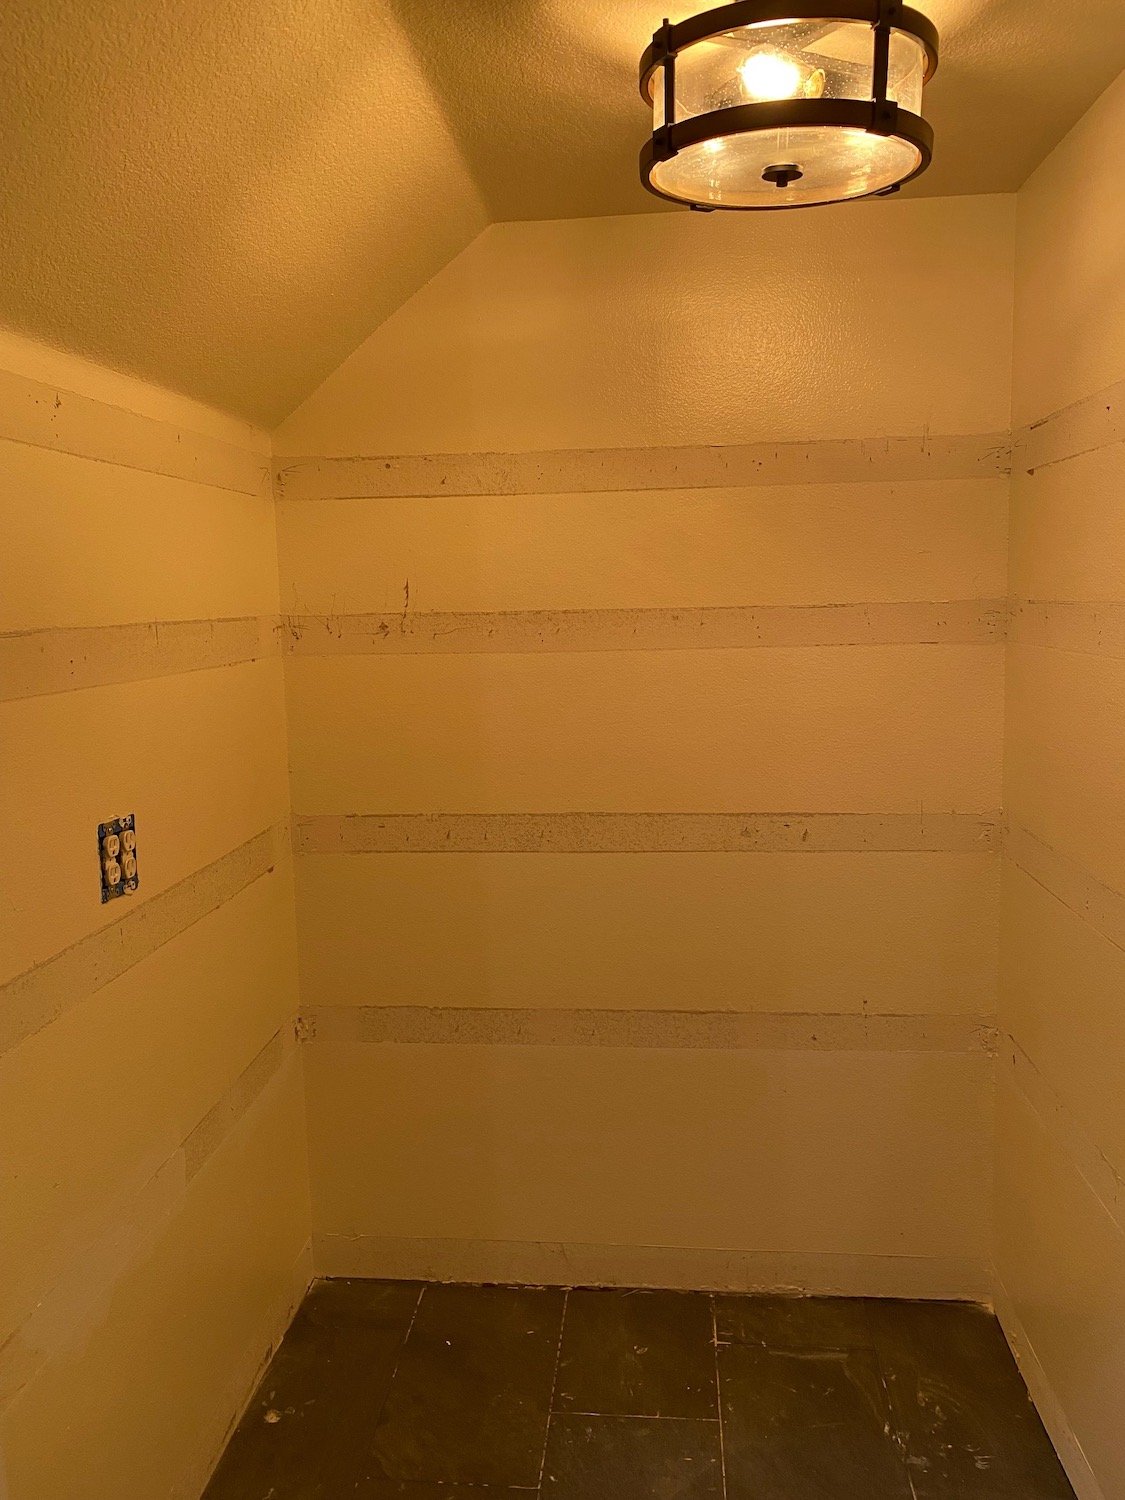
The first thing we did was empty everything that was in the pantry and took measurements.

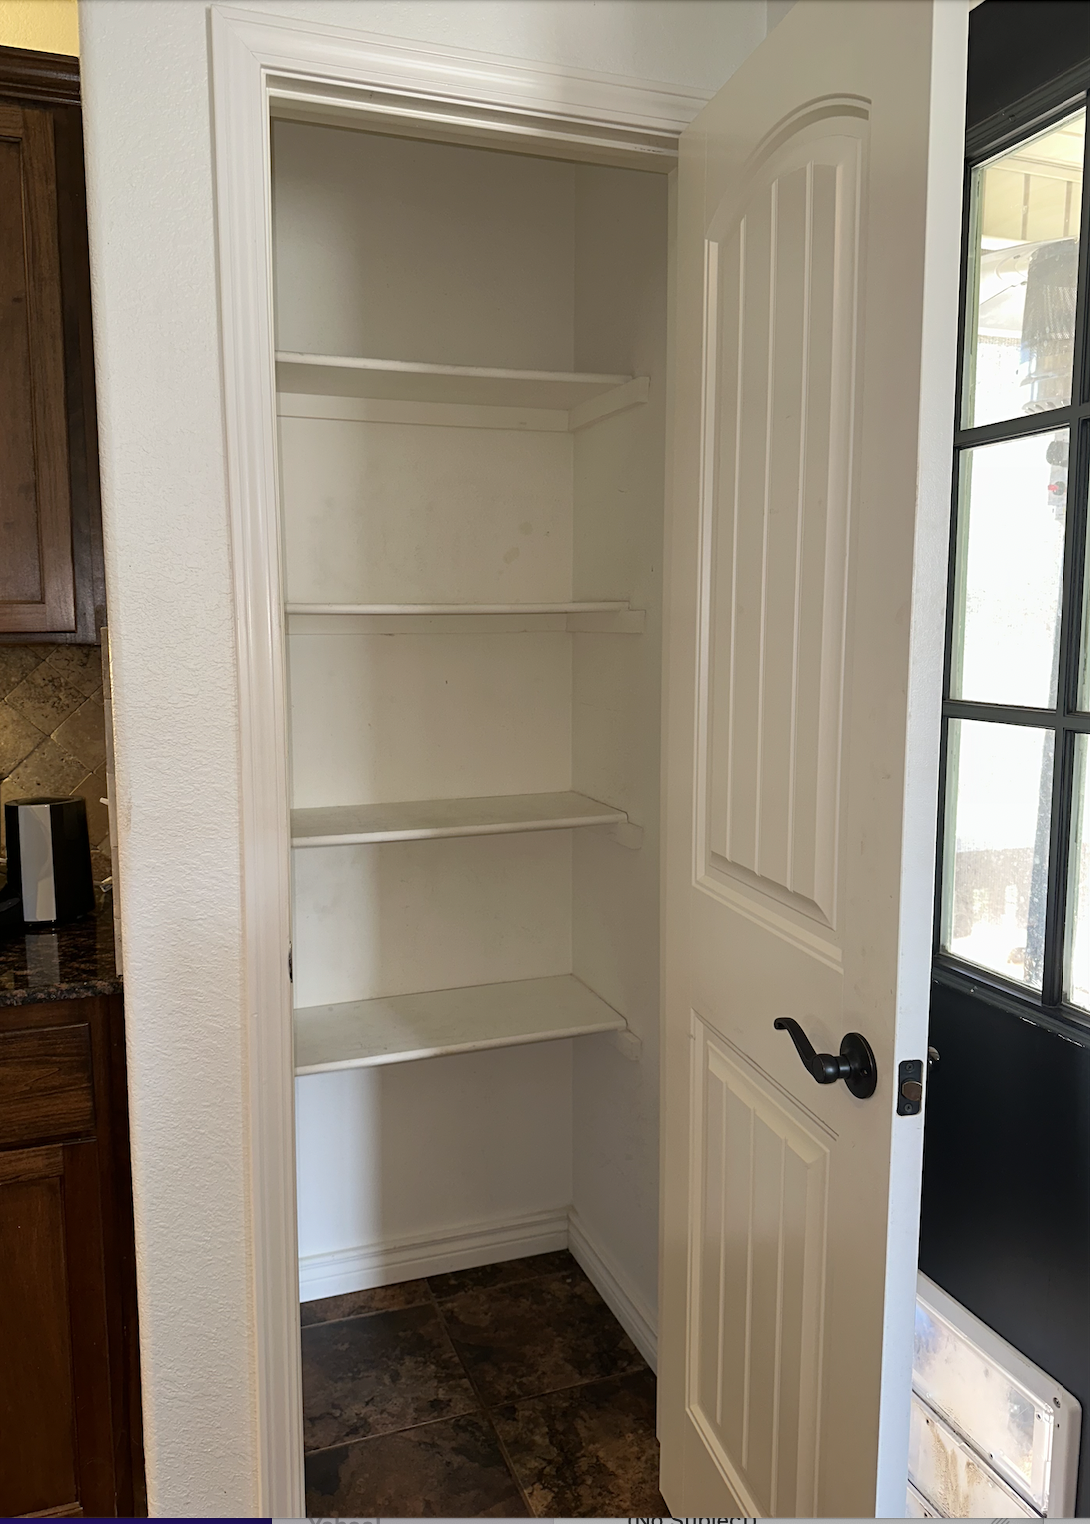
After emptying the pantry, we “demoed” EVERYTHING…shelving, supports, trim.

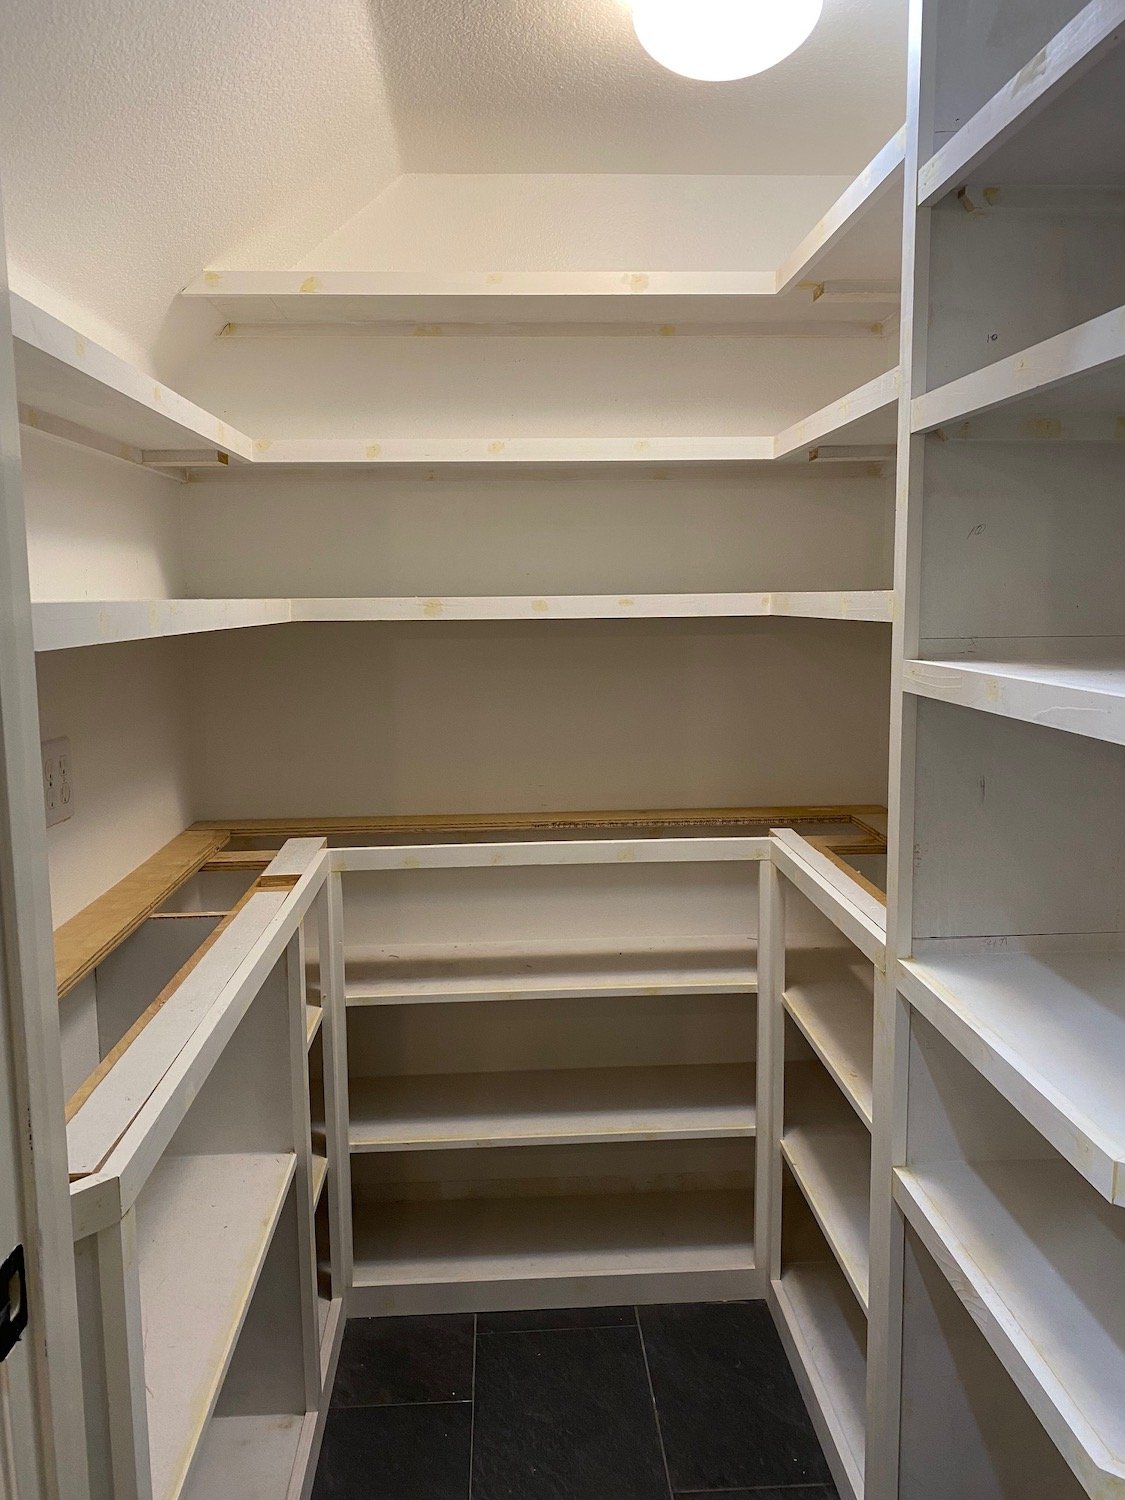
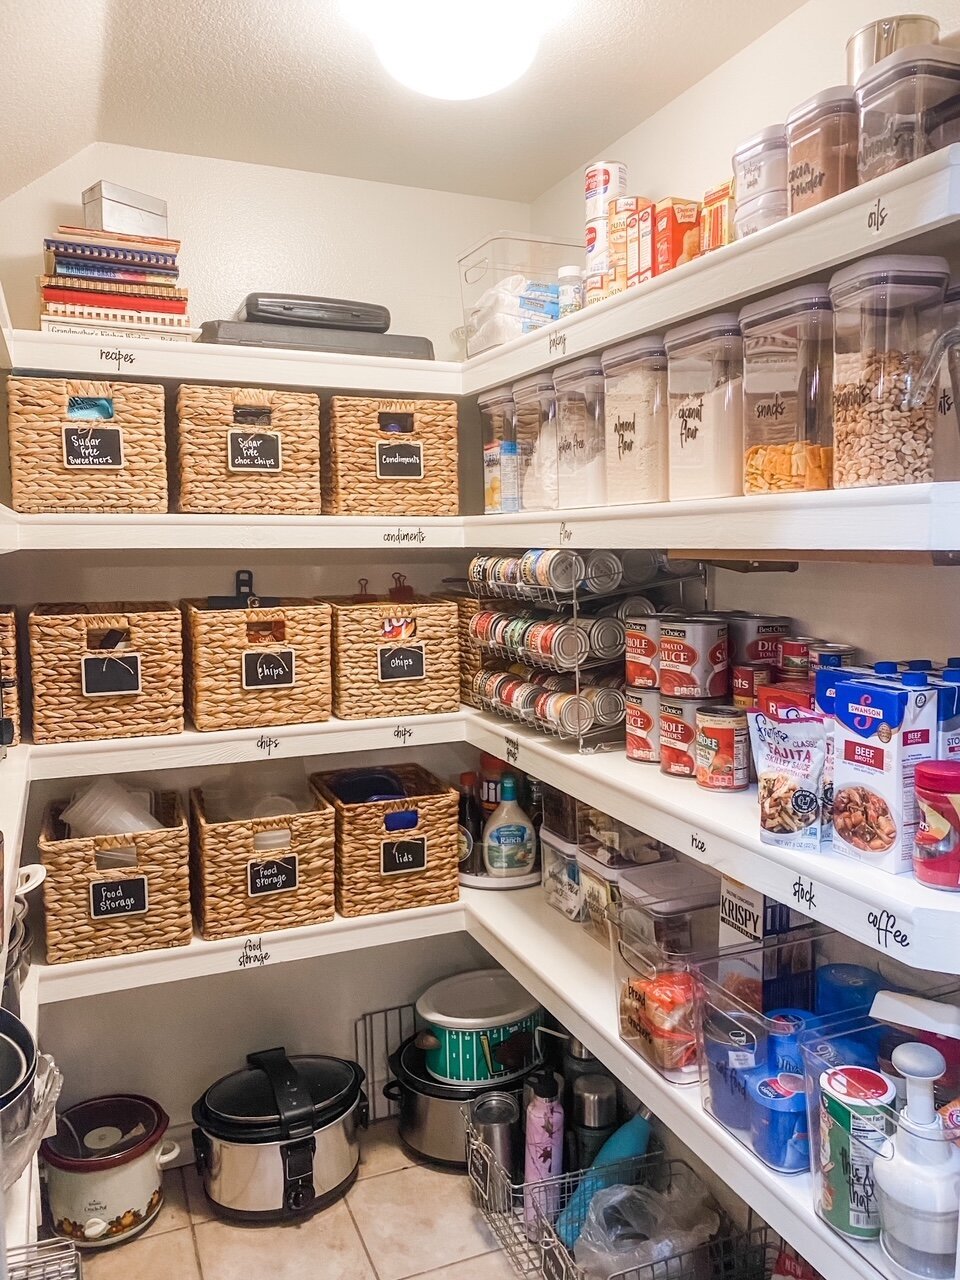
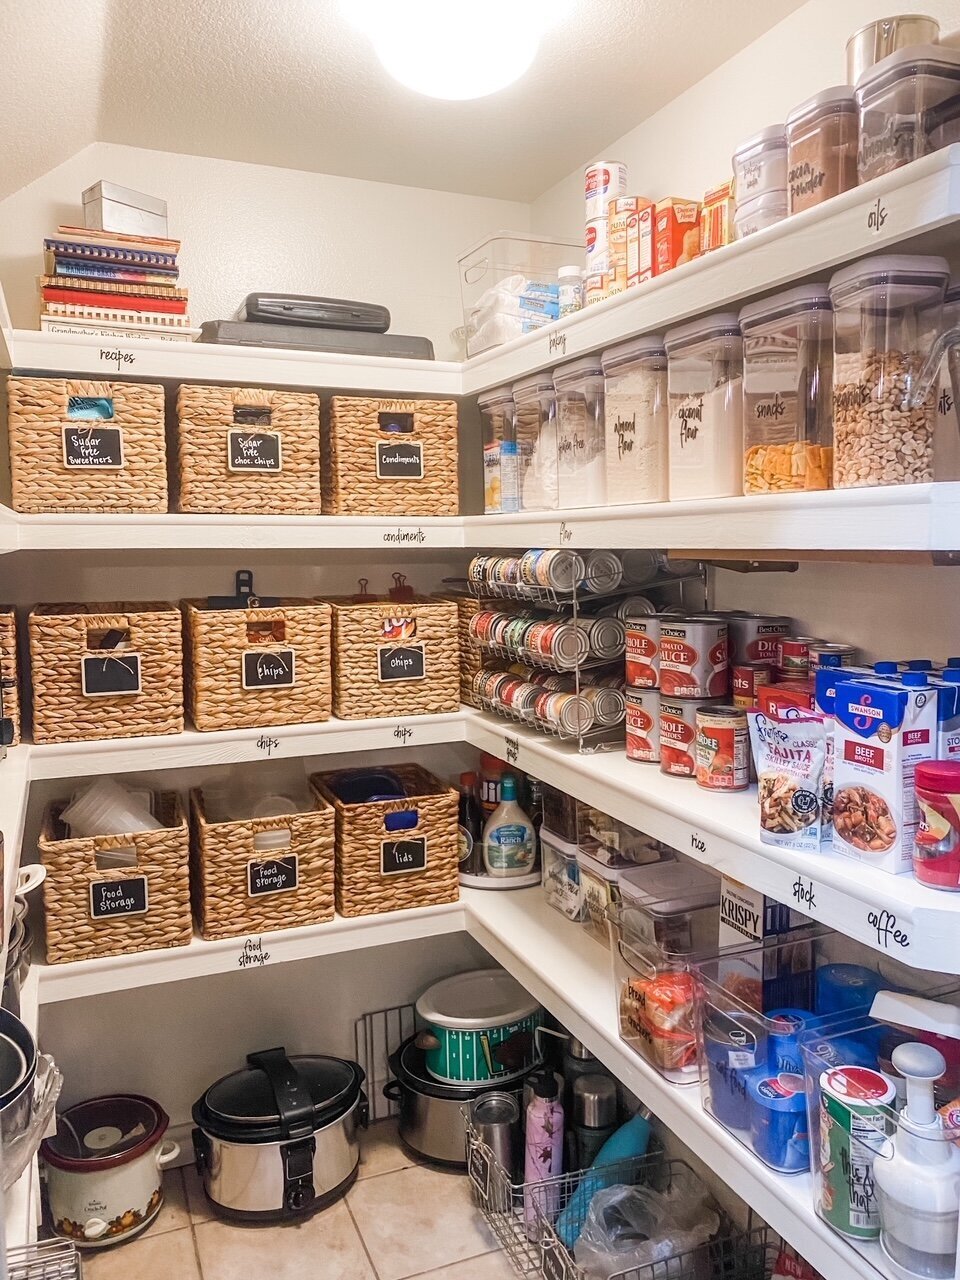
I usually repair and paint the walls, install the new shelving, caulk, putty, lightly sand, then paint the shelving. All the shelving is already primed and sanded before I install it so that I don’t have to do any heavy sanding in the house.

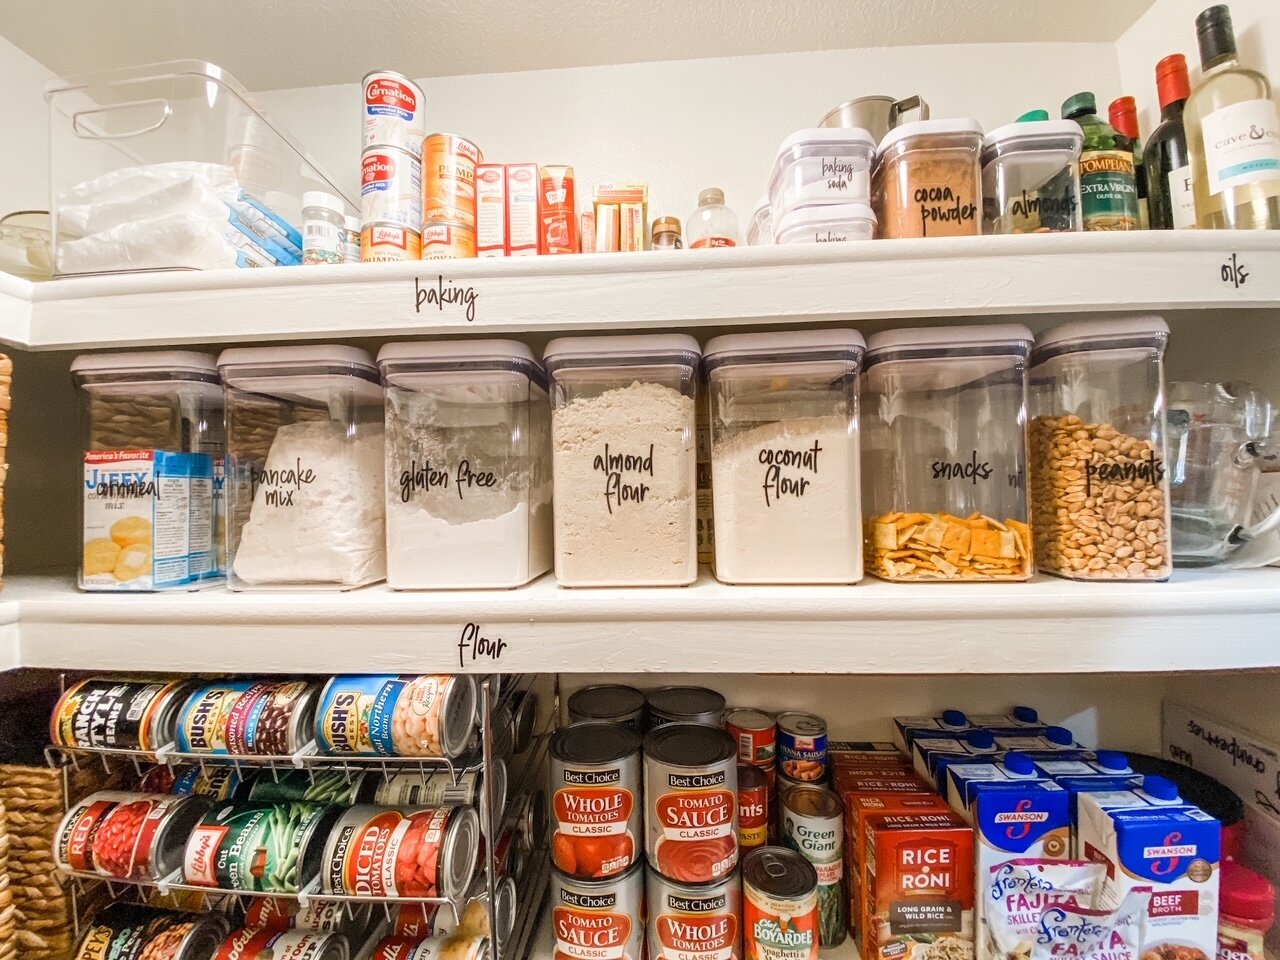
When designing the shelving placement in a pantry it is super important that you identify EVERYTHING you may want to store in the space and then measure it.

If you think you want baskets, bins or jars, figure out what will go in what and how many will fit in your space BEFORE you go buy them…or at the very least keep your receipt!

Take measurements of EVERYTHING!

These measurements are important because you can then design your shelving placement based on how tall everything is. You don’t want a bunch of wasted space.

Case in point…can goods stacked two high are less than 9” tall…why would you dedicate a shelf with 12” clearance for canned goods. Paper towels are generally 12” tall…why dedicate a 15” shelf for them.

Add up 3-4 shelves that are 3-4” taller than they need to be and next thing you know you have lost an entire shelf…critical storage space for a small pantry!

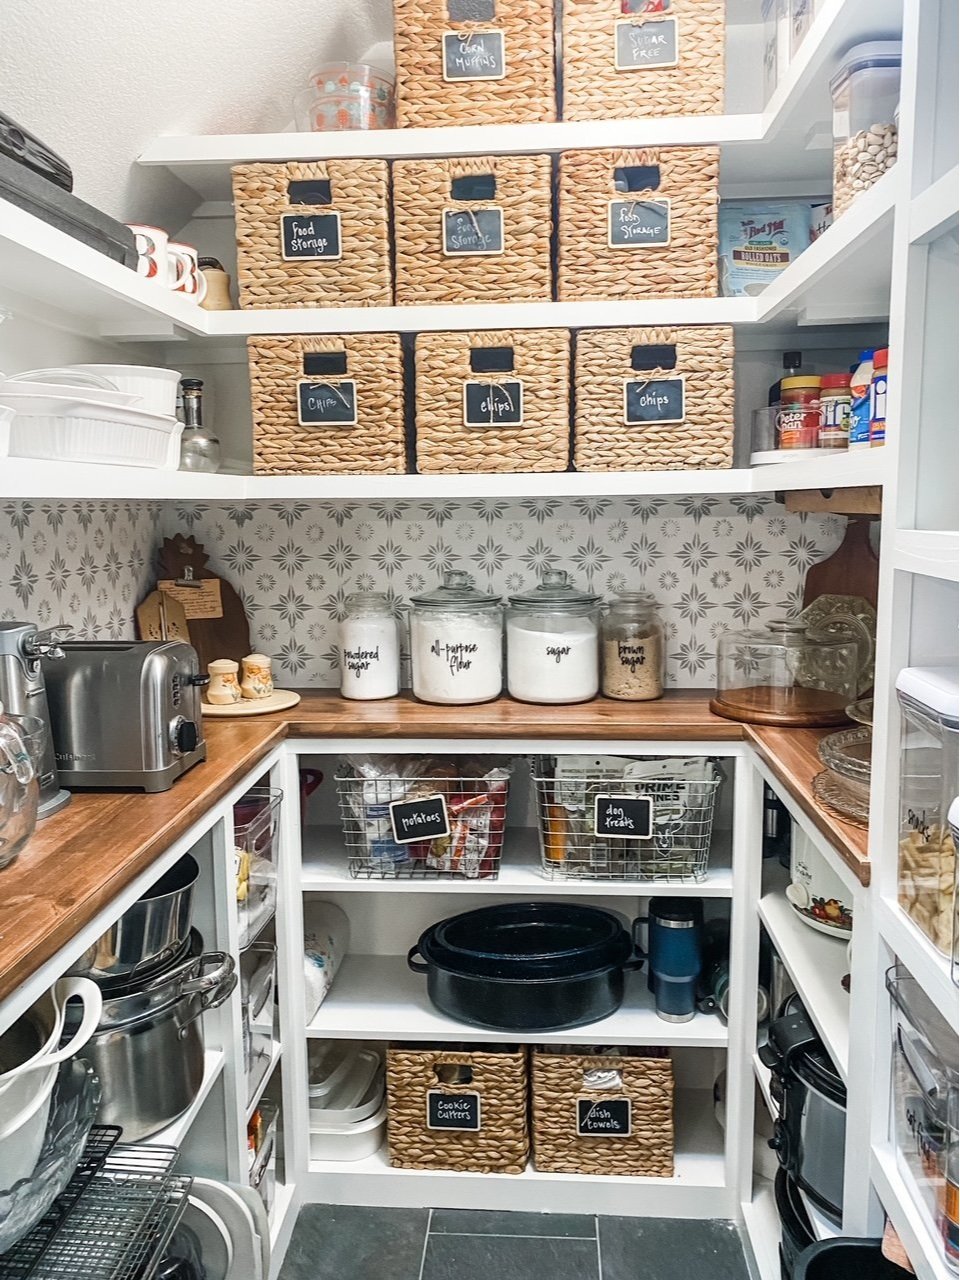
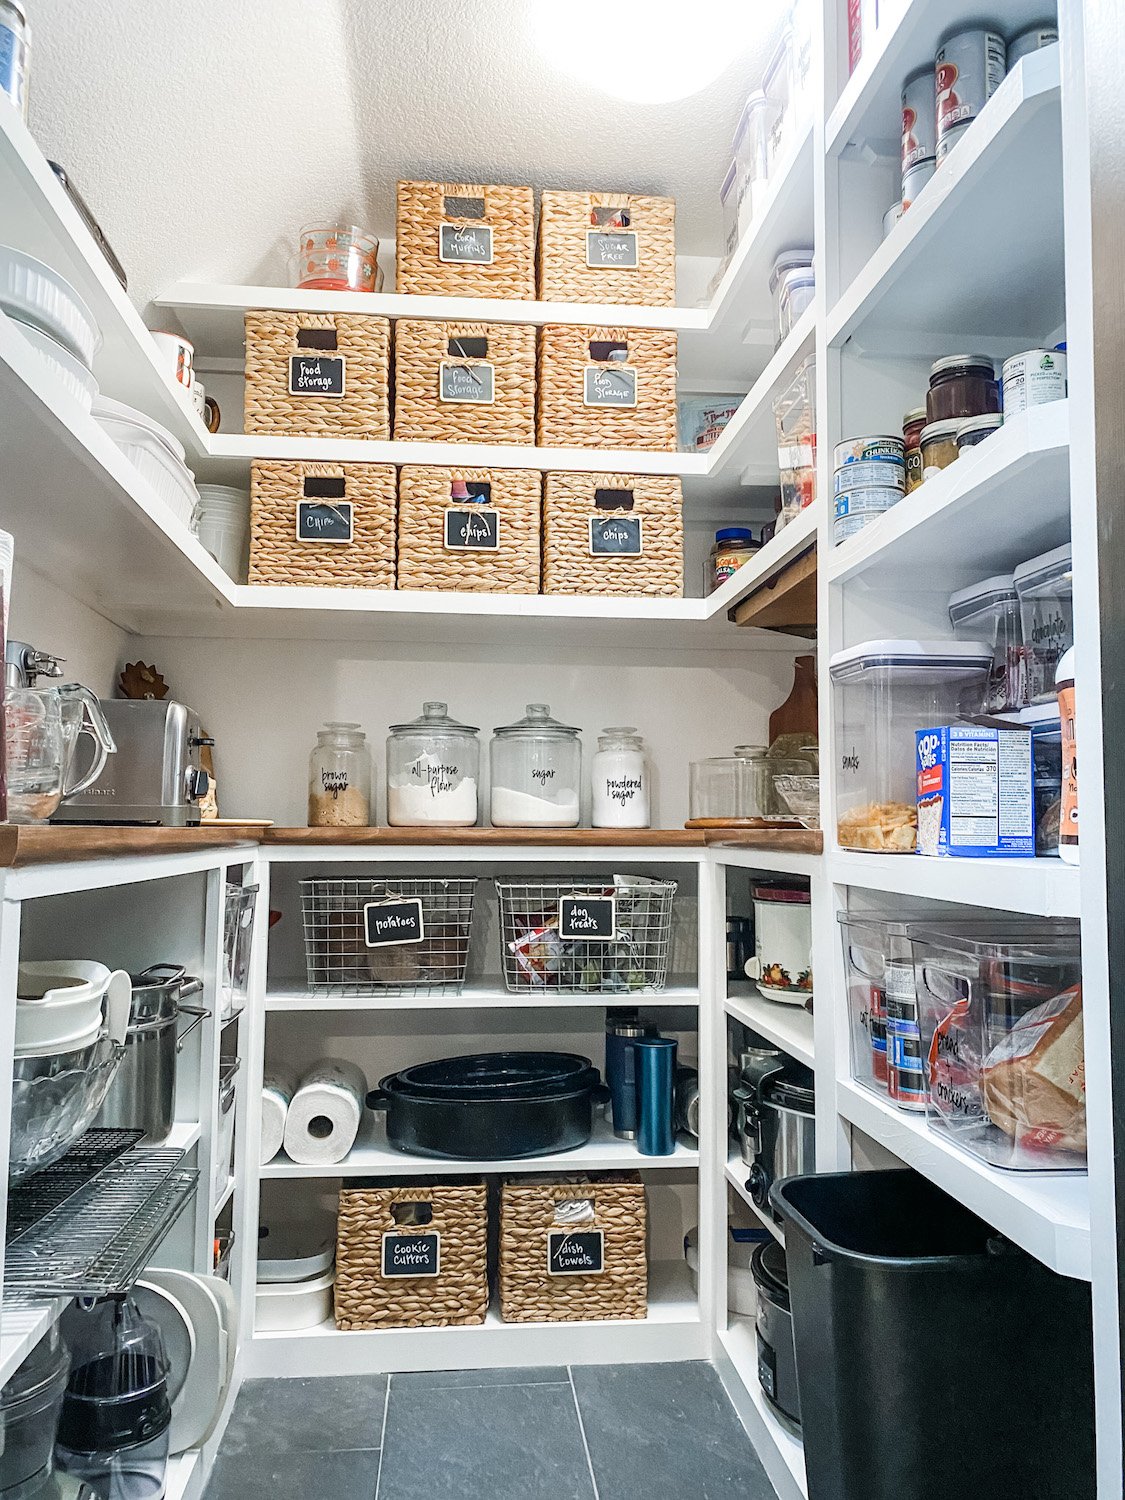
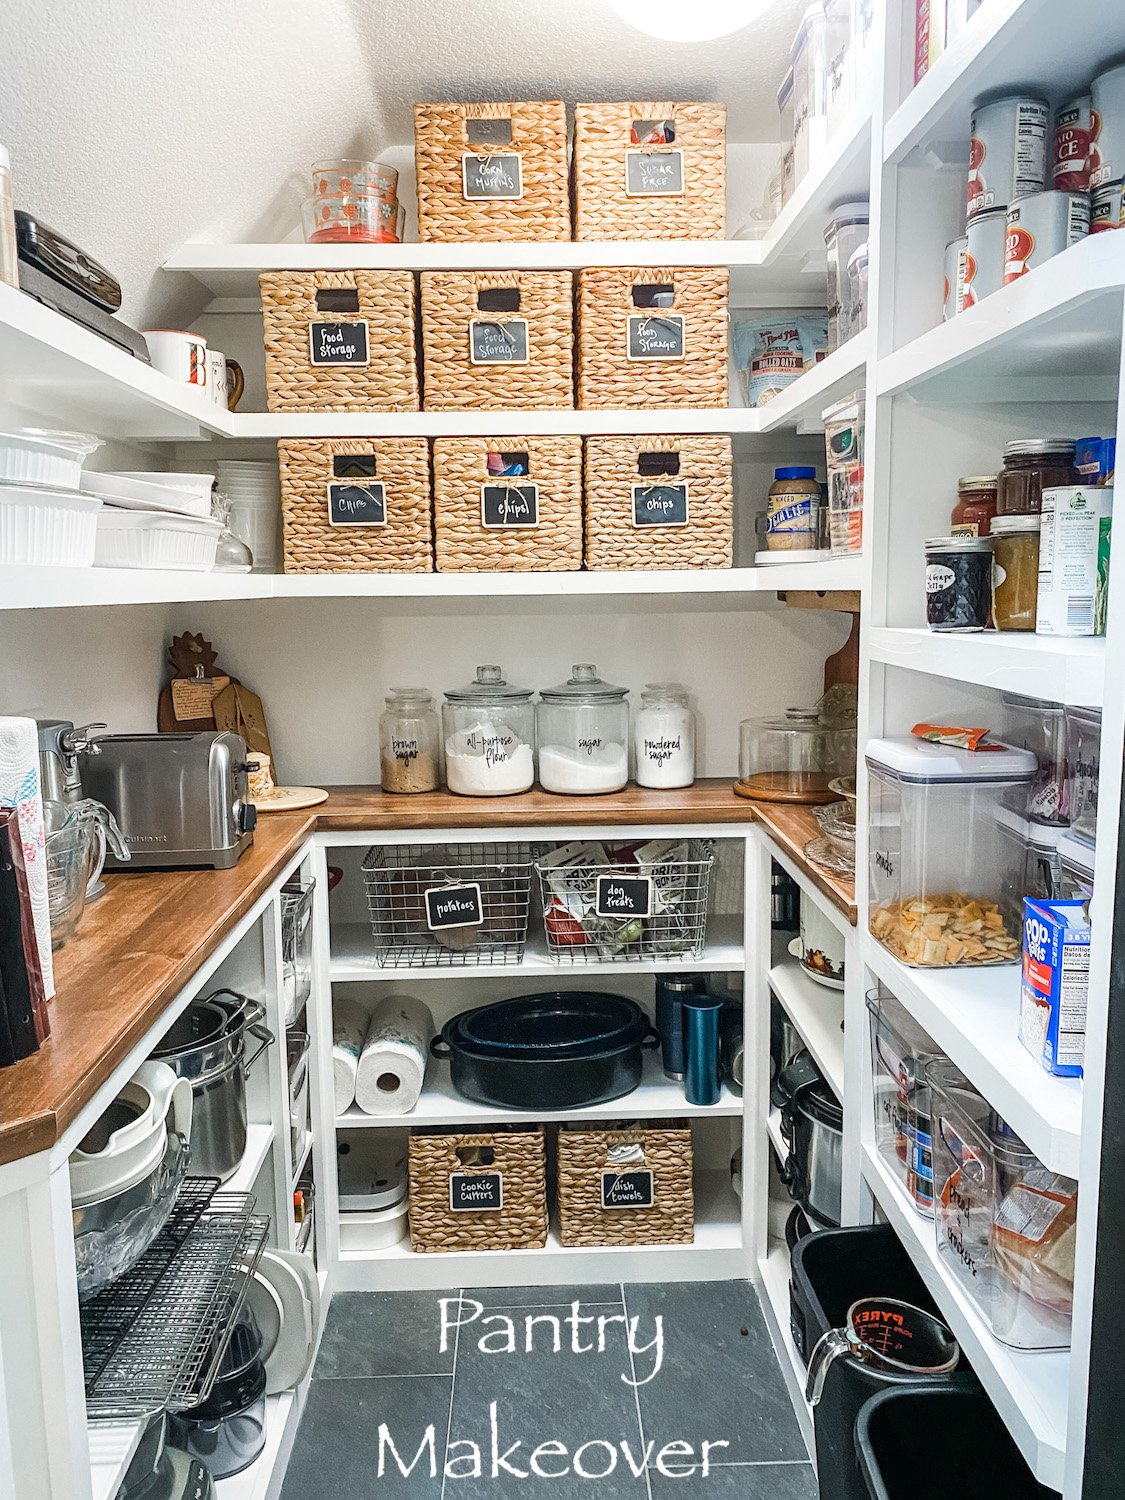
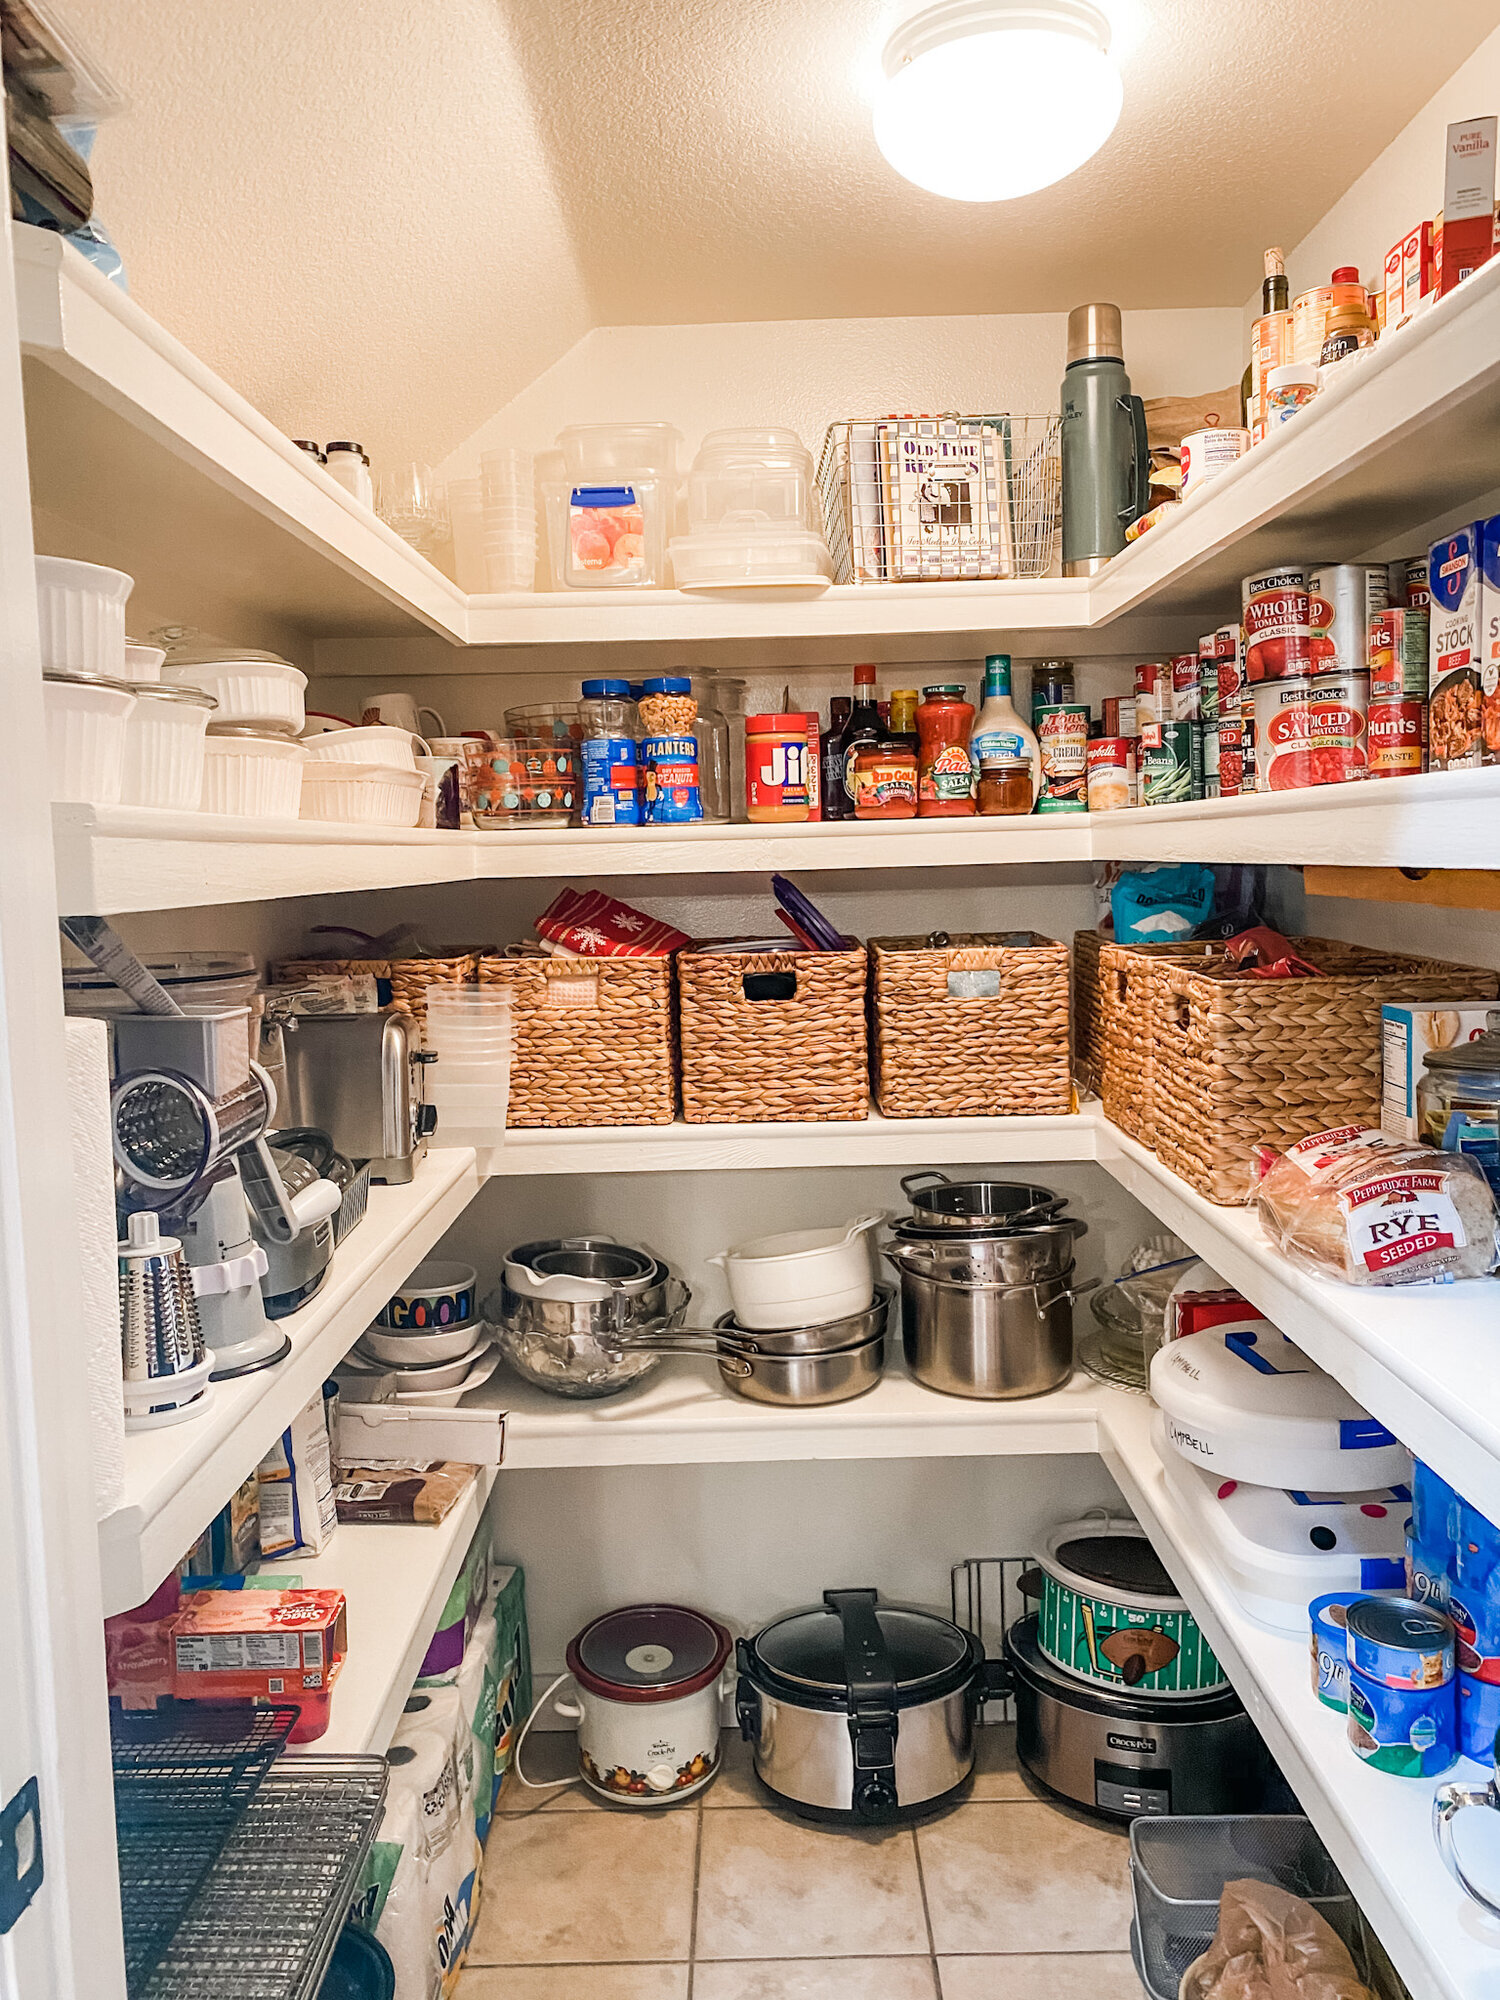
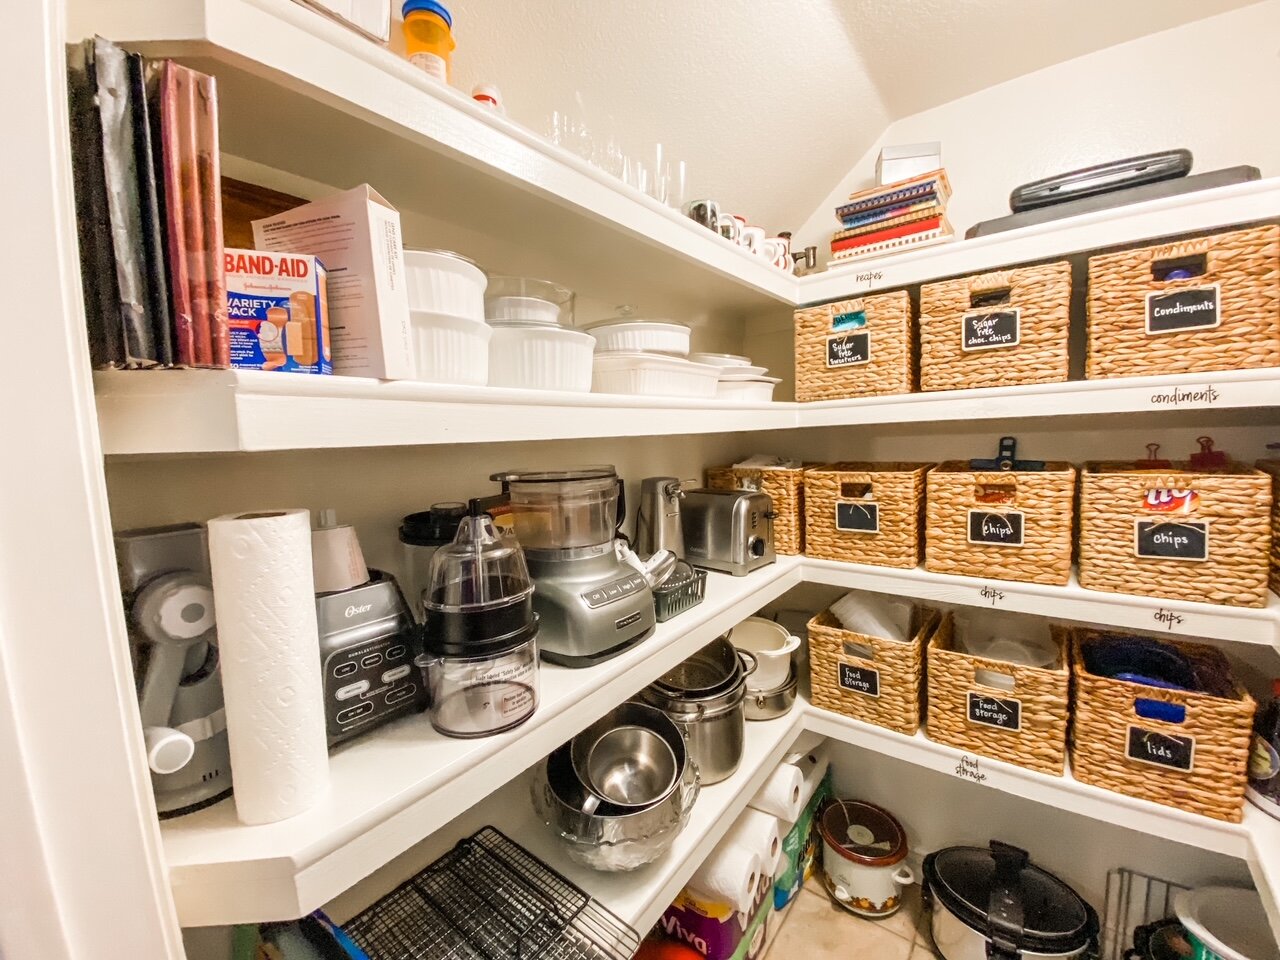
In this case we gained an entire shelf. Crock pots and the insta pot are stored low because they are heavy…the extra coffee pot and extra paper towels are stored up high.

We built a shelf 4” off the floor…not necessary for actual storage but they have a dog and her hair inevitably blew under the door and ended up all over everything that was sitting on the floor.

I made the shelving out of 1/2” plywood, the bullnose and supports out of pre-primed 1x2s. All the shelves were 14” deep, except the top…it was 12” deep.

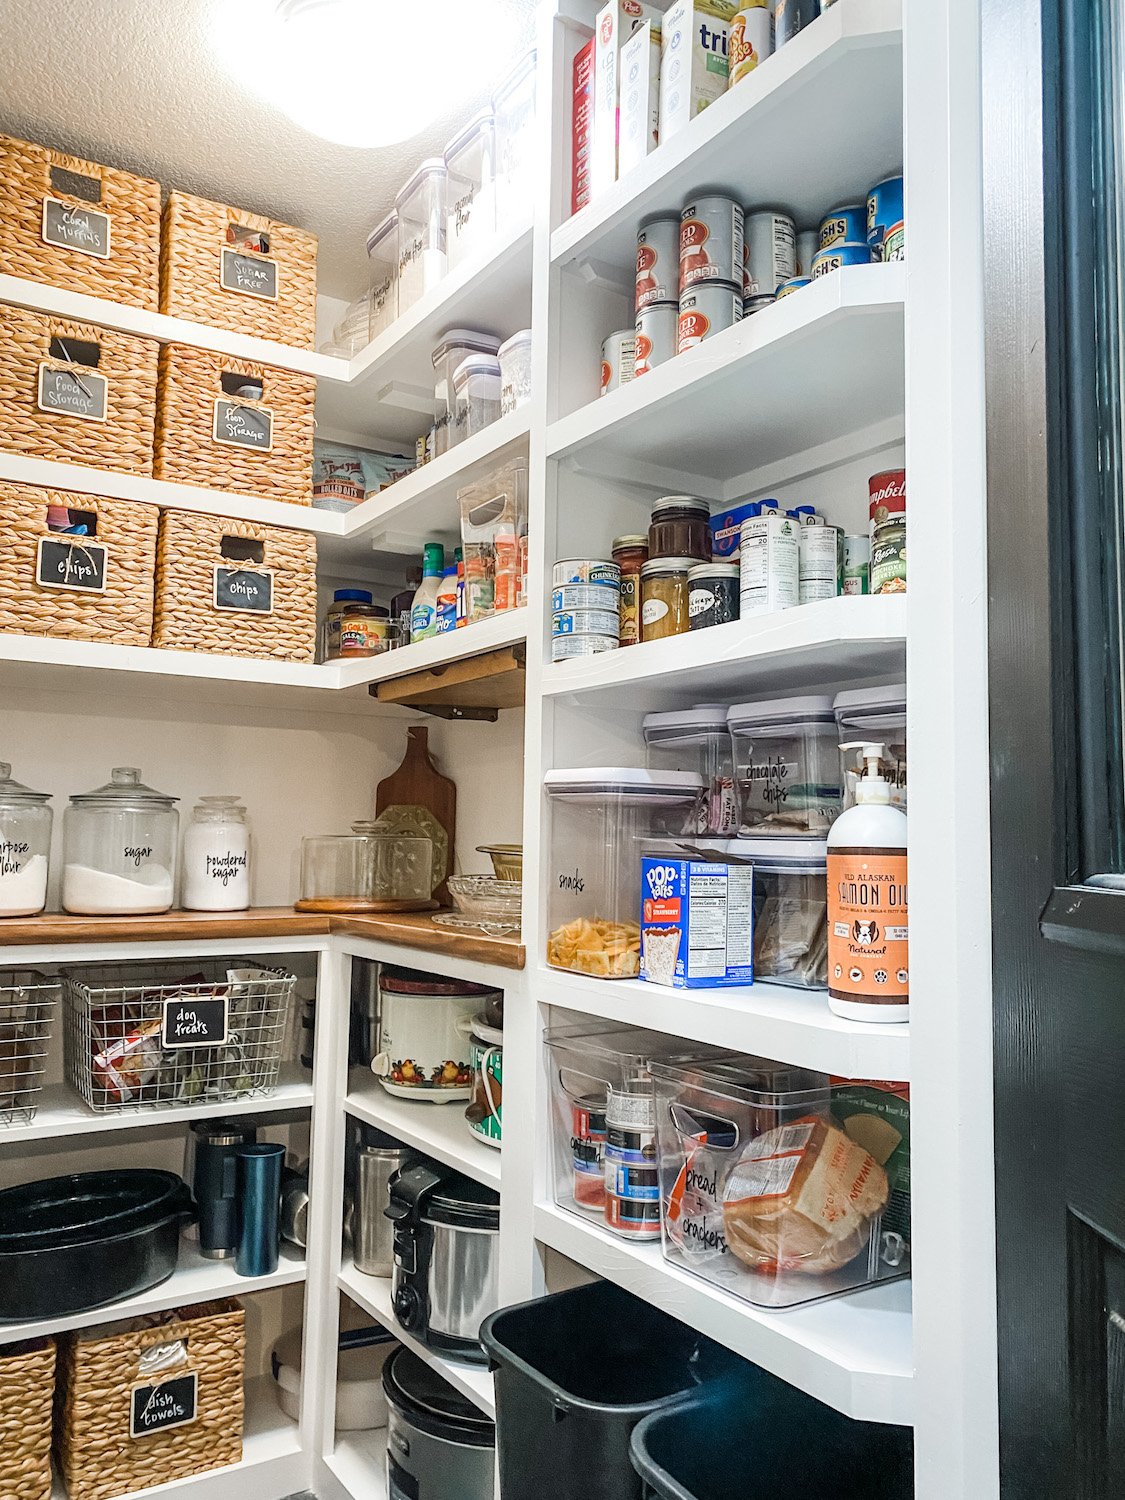
We also built a door shelf system that is perfect for aluminum foil, plastic wrap, storage bags, etc. (HERE I shared one I made for my house on Lankford…I built two for this house! One is in the garage and the other is used for my cake pans and baking supplies.)

You can buy wire door storage system but building one allowed us to place shelves as needed for specific items.

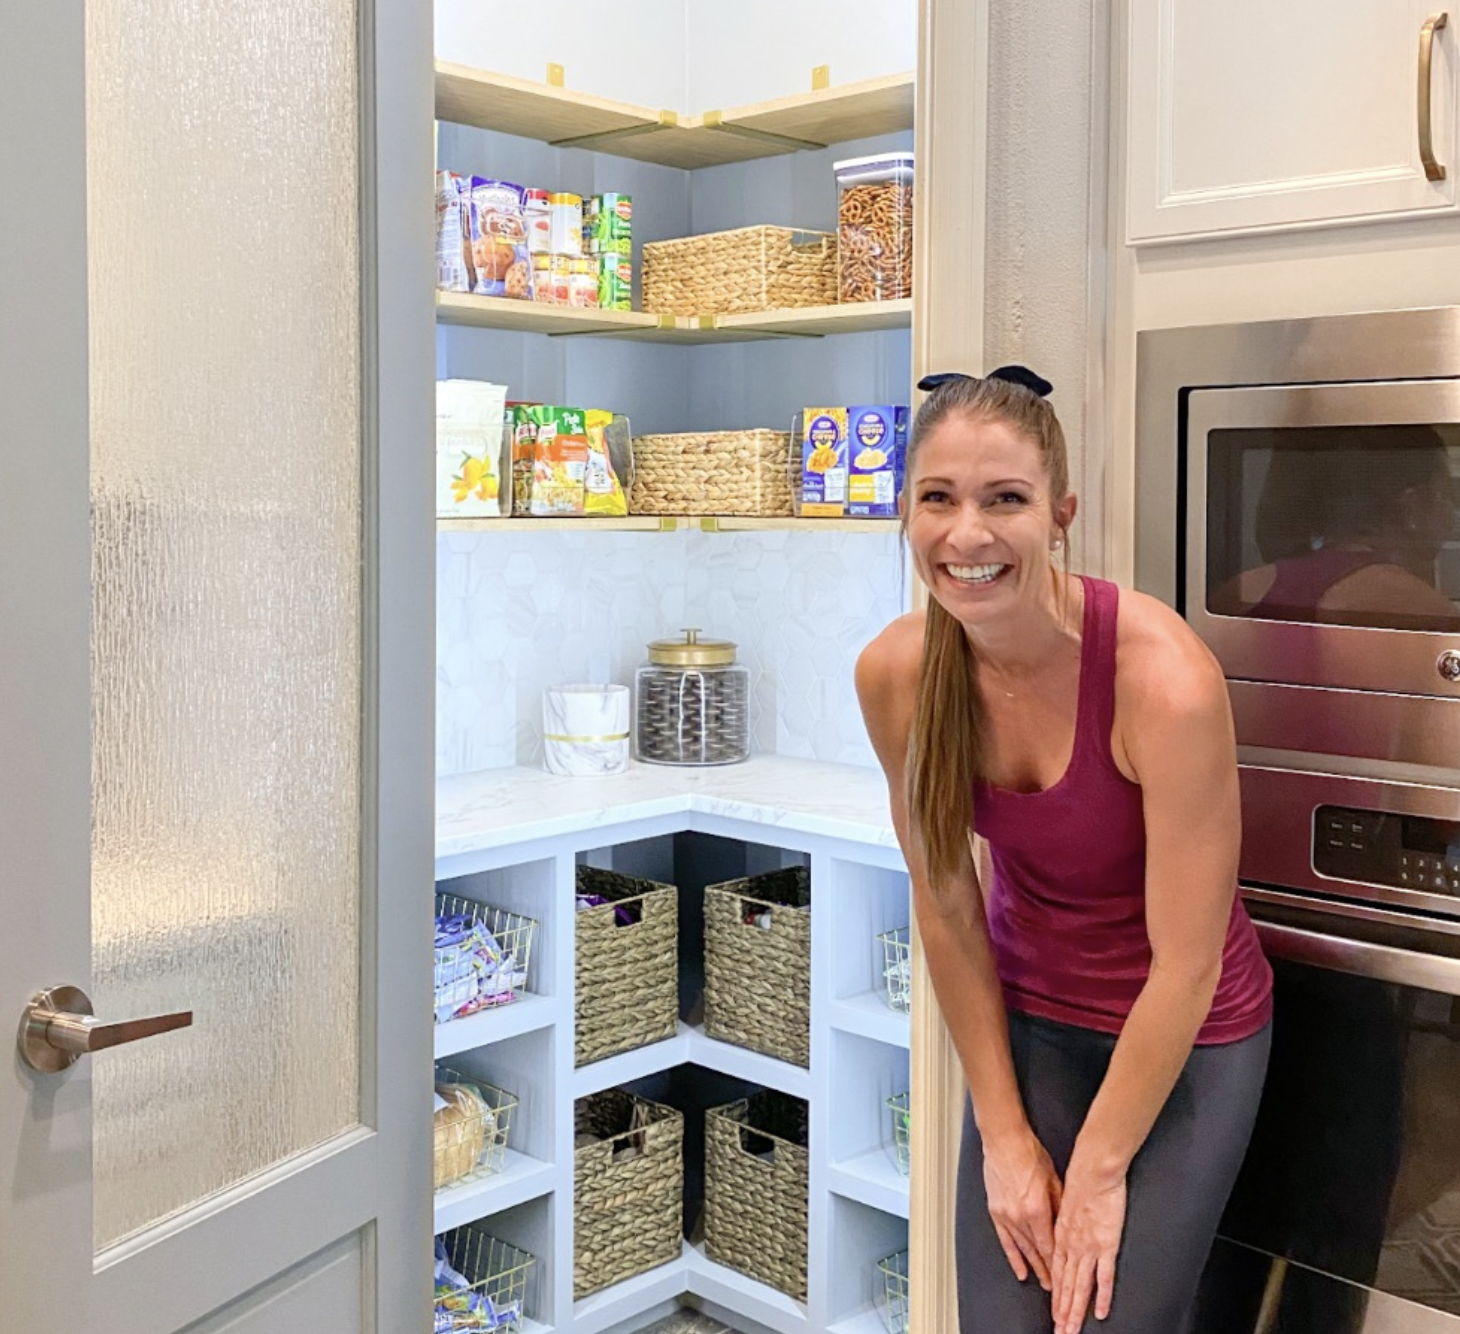
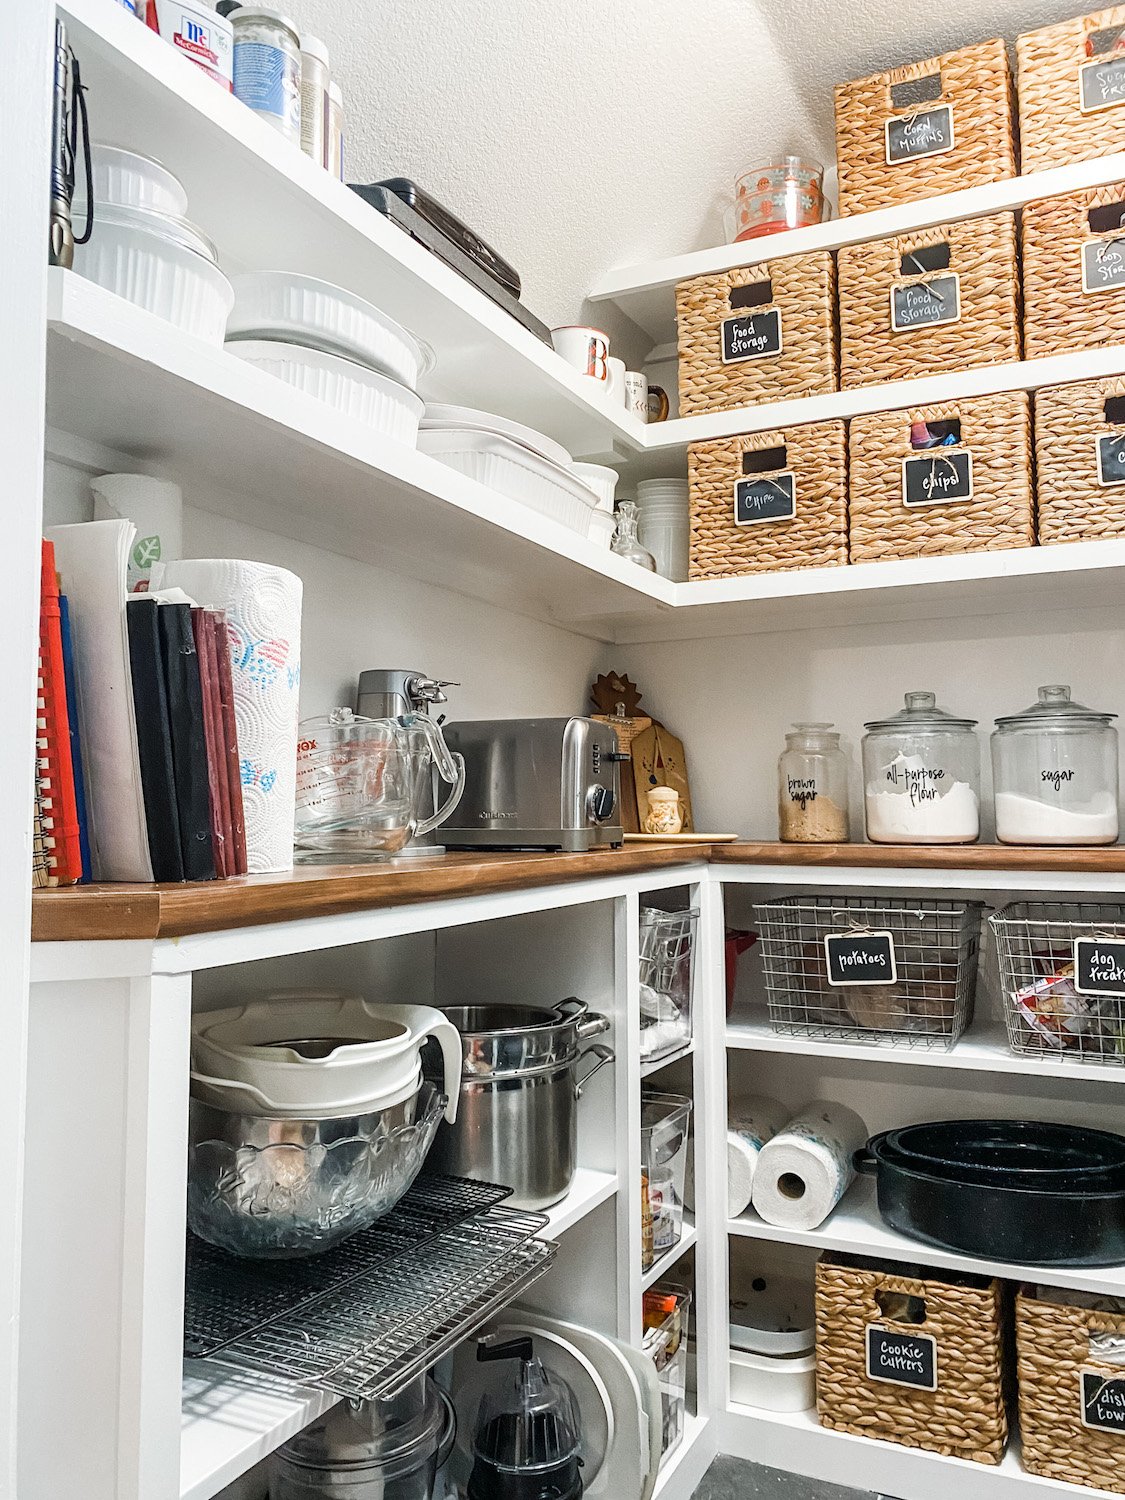
The end result is amazing! Neat, clean and organized!

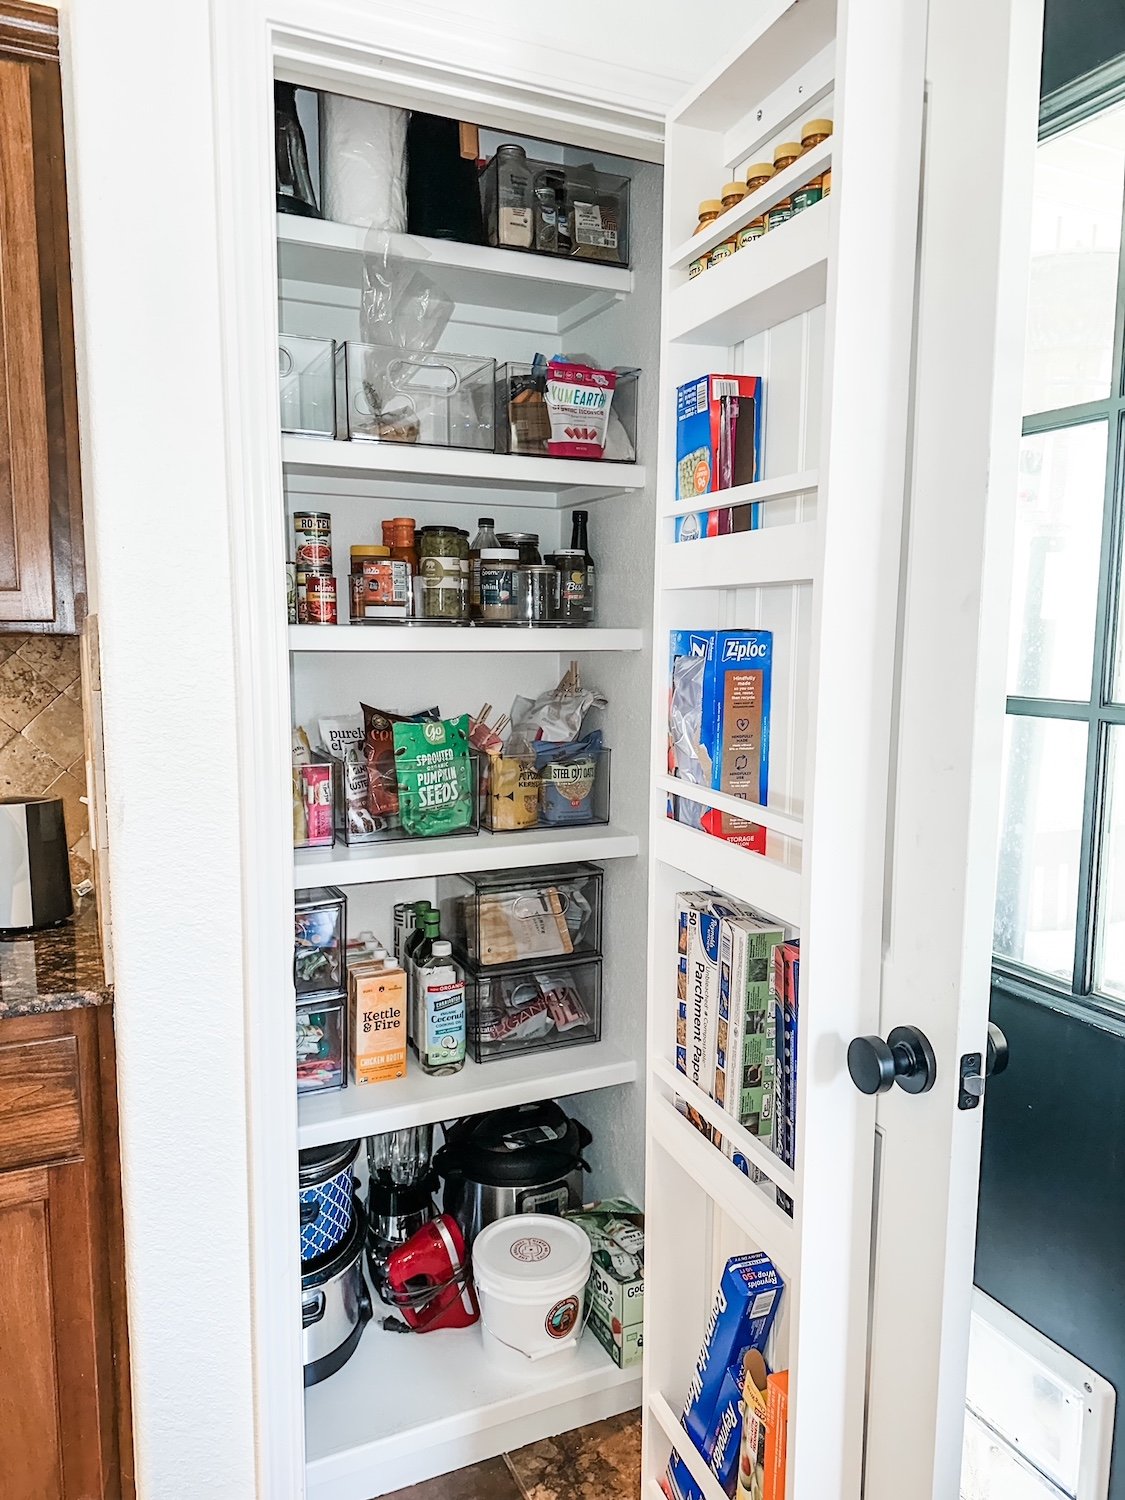
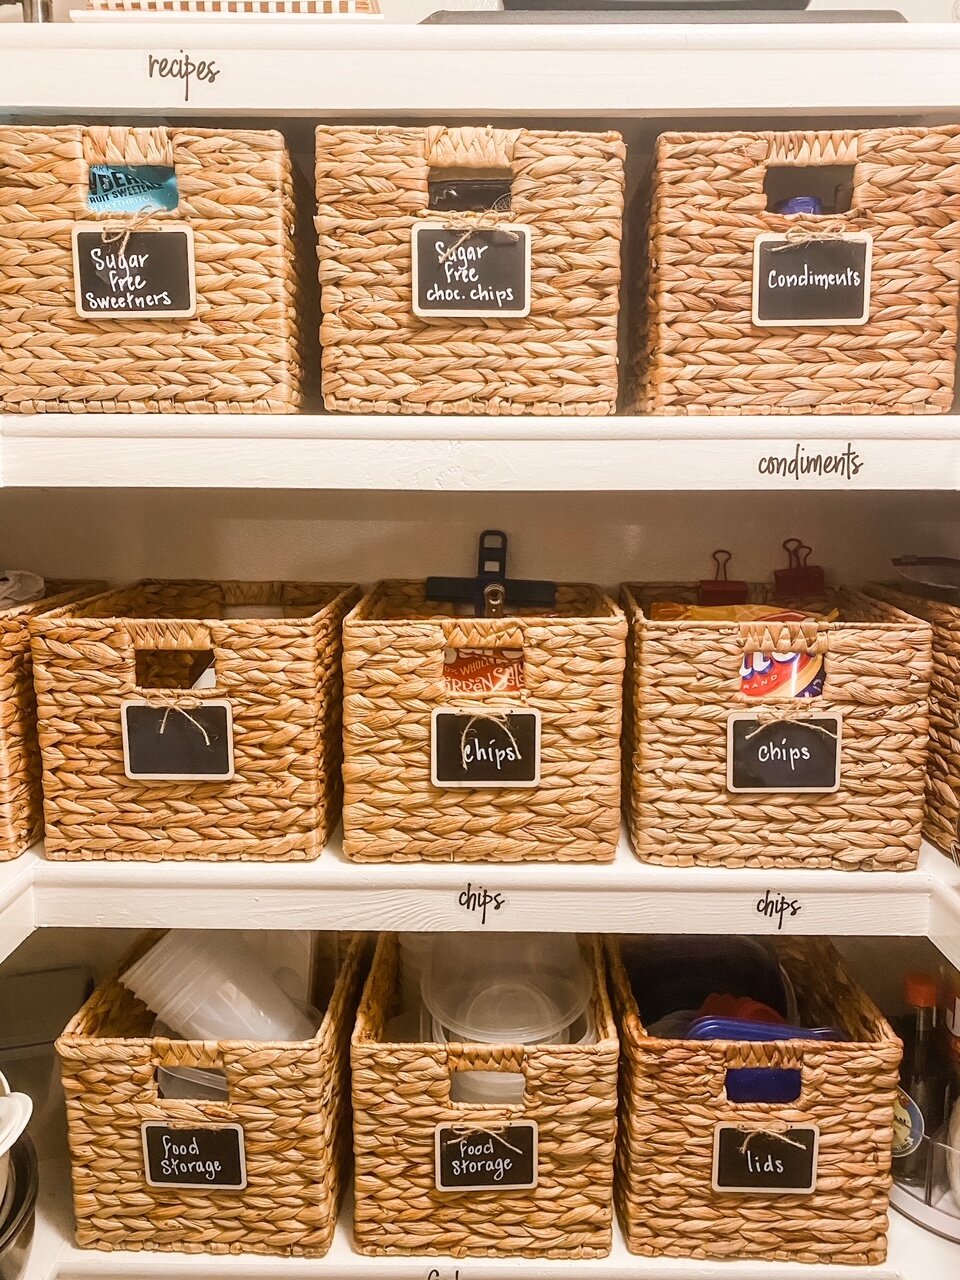
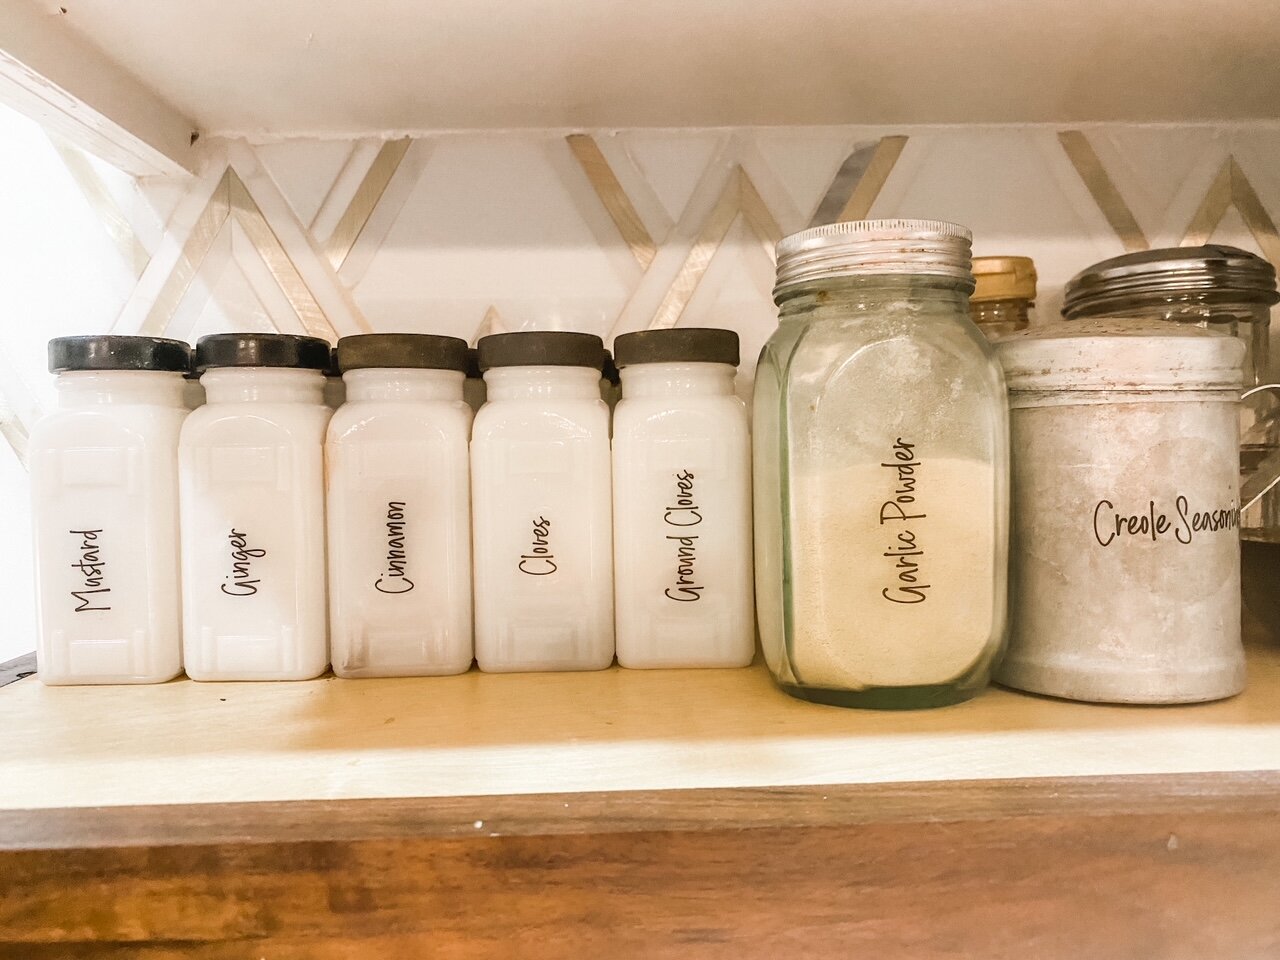
I am a big fan of clear plastic bins vs. baskets. I use both since there is some stuff I don’t want to see that can be stored in pretty baskets (open chip bags, storage containers, etc) but the baskets are labeled. (Again, check out my pantry HERE!)

She loved it so much she tackled her kitchen cabinets and organized them with storage bins and jars.

Organizing a space (whether it be a pantry, closet or drawer) not only frees up space, but I have learned that if a space is pretty, clean and organized I tend to want to keep it that way.

When everything has a place and everything is where it belongs it makes my life so much easier!

(HERE I share my trips and tricks to getting and staying organized!)

And remember, you don’t have to take on a big DIY project to get a space cleaned and organized…and not every space in your house needs to be done in a day, a week or a month.

Commit to take one space a month…or even every other month….purge, clean, organize. I think once you get started and realize how much easier it makes your life, you will want to keep organizing every space in your house…just like Hannah!

I may not be around for several weeks…this is our vacation month and this year we are going to take a VERY special vacations! Can’t wait to share!


A stencil backsplash...

Stenciling a backsplash!

A few weeks ago I shared my new kitchen pantry. I absolutely love how this space looks and functions.

I doubt too many people will ever see my pantry, but I want spaces I use all the time to be functional AND pretty. Like my laundry roomanother space I doubt too many people will see…but I really believe if you make normally mundane or “functional” spaces pretty you are more likely to enjoy the function they serve (like the dreaded laundry chore) and keep them clean and organized. Maybe it’s just me…but the more I love something, the more I am likely to take care of it!

So I remodeled my pantry! LOVE!!!

I knew when I was done that I would eventually add some kind of backsplash around the countertop. I normally would advocate for tile or other hard surface around a kitchen backsplash but this area gets no food prep so it doesn’t really need to be that durable.

I just didn’t know what I wanted. Something simple. Something easy to install. Something that would be easy to change when the bug hit.

Stencils.

My blog friend Cristina used a stencil in your guest bath makeover. I LOVE it…so easy and inexpensive but really finishes off a space.

So I decided to give it a shot.

THIS is the stencil I choose. Not too busy or fussy.

Next head banging decision…color.

I had some green paint I used in the laundry room…I had some black paint from my front door. I mixed the two together and got a greenish/grey…PERFECT!

Again, there are hundreds of stencil tutorials out there…again, find one that makes sense to you. It is a seriously simple project…and if you make a mistake you can take a wet rag and wipe it off (from experience!).

In the end I have a nice “tile look” backsplash that will be super easy to paint over when I no longer want it.

It took all of MAYBE two hours to do and cost me $12 for the stencil. If you need paint as well, I would suggest getting one of the sample pots of paint or even a couple of little bottles of craft paints. It does not take a lot of paint!!!

There were a couple of spots where I got paint where it shouldn’t be…that is where leftover wall paint came in handy. I just took a little craft brush and spare paint and did a little touch up!

Simple, inexpensive project that packs a punch.

My favorite!

The Pantry Makeover....

It has only been a little over a year since I “froo-frooed” my kitchen pantry. I love it and have found all the little storage elements I added to be very helpful. I have managed to keep it fairly organized.

After living with this space for a few years, it is time to reconfigure it and install new flooring.

First things first….find my inspiration. Same song, second verse…cruise the blogisphere and Pinterest and see what trips my trigger.

Once I had an idea of what I WANT, it was time to take some measurements and draw everything out on graph paper…inspiration + space = ”the plan.” Drawing the space to scale gives me the ability to play around with the elements I think I want on paper before I start sawing and nailing. It also gives me important measurements for cabinets, flooring and shelf material.

I wanted base cabinets to hide rarely used appliances (food processor, grinder, etc), dutch ovens, crock pots, etc.

I wanted a cute counter top for the flour/sugar jars, toaster and can opener.

Lauren’s pantry was most similar to my layout so I looked closely at what she did….

Like Lauren, I knew I wanted to use 12” wall cabinets as the bases. However, I decided to build my shelves a tad differently.

I liked the look of the shelving featured HERE….

Unfortunately I couldn’t find any wall cabinets to use as base cabinets…at least none that are affordable. It’s a pantry. With the cost of materials THROUGH THE ROOF I have to be conscience of the cost of this little project.

I wasn’t real keen on open base cabinets but Lindsey built some really awesome bases

She posted a great tutorial on building these base cabinets…pretty much exactly the way I built mine!

So all this got worked into “the plan.” Again, a fluid plan, but a plan none the less.

First up…the flooring. The flooring was the original tile and I decided to use the same tile I used in the laundry room. Tiling over the tile in the laundry room worked well so I decided to do that again.

I wanted to reset the shelving and build some additional “shelf towers” so I removed all the existing shelving….

I wanted a new light fixture so I found one I kind of liked. HOWEVER, it came with Edison bulbs. Kind of important since you can see the bulbs through the glass but I just don’t like the light…just too “yellow.”

One morning I woke up thinking “I really don’t like that light.” So I got up, took down the new one and put the old one back up. Again, it’s a pantry…functional is more important that pretty sometimes. Maybe I’ll eventually find something that is both pretty and functional…way down the bottom of the list at this point.

BTW, in case you want to see what “projecting” looks like around here….

I patched and painted the walls white (my new fav, BM Chantilly Lace), grouted the floor tile, then started building the base cabinets and adding the new shelves. I preprimed and sanded all the material so all I had to do after it was assembled was caulk and putty holes. A light sanding, wipe with tack cloth and it was ready for paint. Prepriming and sanding BEFORE you cut and install will save you a MAJOR dust storm in the house.

AGAIN, I am not going to go into a long drawn out tutorial…just so many great tutorials out there.

Some people go to the lake during Memorial Day weekend. I build shelves.

The countertop. I like wood since it is not an actual food prep space.

If I wanted to splurge I would have built walnut counters or even a butcher block. But again…it’s a pantry!

The question then is if I go with a less expensive wood do I stain it with a dark stain or just leave it natural.

SOURCE

I love the dark stain but I worry it is running it’s course. But you know what, I don’t care. I love the darker stain and since the walls and cabinets are white, dark it is! I decided to use the pine “project board” from Lowes, stain with a “brown mahogany” and then apply a couple of coats of polycrylic. (Remember, polyurethane has a tendency to yellow over time)

Floors done, walls painted, cabinets and shelves built and painted, top on. Now the hard part…letting it all sit and cure before I load everything back in. IT IS IMPORTANT PEOPLE!!!! Let your paint and finishes cure before you go all decor-crazy on it…otherwise you will scar and scuff and will have wasted all your time and money!

You may notice I actually gained a couple of shelves on the right and middle walls just by reconfiguring them. I also changed the upper shelves on the left to 10” and 8” deep shelves instead of the 12” that were there. I didn’t need the depth and it seemed to “open” up the space a tad.

I could have carried the top all the way around on the right and still had dog and cat food storage under it…but I needed a few shelves 14” tall so I decided to do a separate “shelf tower.” Perfect for taller items like the stacked storage containers, cereal boxes and wine bottles. All the other shelves have a 10” clearance which is ample tall enough for most of my stuff.

Right side….

Left side…

I love that we added an outlet in this pantry…perfect for the toaster and can opener so they don’t take up real estate in the kitchen.

I think my Kitchen Aide mixer would look cute in here but I like it on my kitchen counter. If it were in here I would have to haul it back and forth to the kitchen…it’s too heavy and I’m too old!

I was a bit bummed that I couldn’t originally find cabinets with doors but honestly I like this look better! While dutch ovens and crock pots aren’t really display worthy, the open shelves keep the room from feeling so small and claustrophobic. Believe it or not this space is only 5 x 5. Tiny but mighty!

I have no doubt that at some point I will add a backsplash…not sure whether it will be tile or wallpaper or something else…but something to give the space a little color and character. Right now I am worn out just getting to this point!

Last year I added glass to the pantry door. I LOVE it and I’m glad that is one chore I don’t have to do now!

The important thing I want to share is that reworking a space can make a huge difference. I now have a pretty pantry that works beautifully as an extension of my kitchen. Remember, I don’t have a lot of upper cabinet storage in my kitchen so this pantry is super important!

On a scale of 1-10? For me, not difficult because I have the tools and the know-how. For a novice DIYer, probably an 8. But there are a ton of tutorials out there for how to build simple shelving or how to use old cabinets to create a space like this. The first thing you have to do is find “inspiration” for the space you actually have and work from there. It is doable…YOU CAN DO IT!!!!!

On a blog board I am on someone said she was afraid to do something like this because she was afraid to mess up.

Don’t be afraid to “mess up.” That is how you learn…watch tutorials and read blogs. There are so many great resources at your fingertips these days.

Use them…and JUST DO IT!

The next project...

The pantry….

HERE I shared how I “organized” my pantry. I’ve even managed to keep it in order this past year.

I still love all the baskets and bins but now it is time to change things up a bit.

This will be a full fledged “gut job” so I need to crack some knuckles, stretch some muscles and dig out the crow bar!

So stay tuned…I’ll share my inspiration, my plan and the reveal!

It's time to get organized!

So it is a New Year (Happy New Year BTW) and I spent the early morning hours on Sunday organizing a few spaces and purging expired foods in the pantry. Fortunately I am a fairly organized person so this isn’t a huge task for me. I keep most closets, drawers and cabinets purged and organized.

Just last year I reorganized and purged my pantry so it really wasn’t too bad….

But if you are one who has that closet/drawer/room/pantry that is unorganized and full of unused or out dated things, this is the year to get it organized and purged.

HERE I share how I organize and purge (I reread it and I must say it is a MUST read)…and a few thoughts on the Marie Kondo method. Truth be told, purging and getting organized is more about “letting go” than anything….and of course finding the time.

Time…pick your spaces and then commit to doing one space a month. Don’t try to do your entire house in one day…you will feel overwhelmed and defeated. But one closet, one drawer, one room a month is doable. And getting that one space done may even motivate you to do the others.

As far as “letting go,” if there is an OUNCE of hesitation on whether you should keep it, put it in a box or bag, put in your car and immediately donate it. I PROMISE I have never said “Darn, I wish I hadn’t given that away.” I never think about it again and couldn’t even tell you all the things I have “purged” over the years.

A few suggestions…get a receipt for any donations, it is a tax deduction.

If you have towels, sheets, blankets or even old rugs, take them to the local animal shelter…they really need that stuff.

When my mom passed away, she had an entire hall pantry stuffed full of old sheets and blankets…stuff she had acquired when HER mother died 20 years ago. We took it all to the animal shelter and they loved it!!!

Most importantly, give yourself a break. Being a mom or working person make it really tough to find time to get organized…but I promise once you do it, your life will be so much easier.

One space a month…it is doable. But like ALL “honey dos” don’t beat yourself up if time slips by and you miss a month. The mess will still be there the next month!

I also posted HERE how I keep my house relatively clean and in order. No huge revelations but keeping a fairly “clean and orderly” house goes hand in hand with getting and staying organized. Another MUST read!

Pantry storage....

Winter has truly arrived and it is literally FREEZING outside…no bad winter precipitation, but frigid temperatures make going outside brutal. So inside where it is toasty warm is where I have been for the better part of the last week!

I started working on my awesome pantry and this week I finally put up some board and batten in the entry. The latter I will share when the paint dries and I am able to reset a few things.

The pantry…MAN OH MAN!!!

As I mentioned HERE I don’t need a lot of upper cabinet space because I have a super awesome walk in pantry.

IMG_0654.jpg

As organized as my pantry seemed to be (for ME) I decided to give it a little “facelift”….more baskets, some storage containers, labels…all the froo-froo stuff I normally don’t even bother with. But again, I am “semi-retired” now and looking for things to do until I can’t go outside and dig in the dirt!

In my last house I only had a small cabinet pantry and didn’t see the need for all the bins and boxes and “stuff.” But since I store more in this pantry, everything from food to serving dishes to cookware, I decided I wanted to get super organized.

The first thing I did was pull out everything I wanted to put in containers and baskets. Everything that wasn’t going to be put in a basket, container or bin was organized. (I also took the time to wipe down all the shelving even though it had only been 6 months since it was last cleaned!

Here is my #1 tip for organizing ANY space…figure out what storage containers you need for the items you have FIRST, then go buy your storage containers…don’t go buy a lot of baskets and bins and containers.

In my case, I already had a few wicker baskets…perfect for holding chips, storage containers and lids, seldom used sweeteners, seasonal dish towels, cookie cutters, etc. I had 7 but based on the stuff I knew I wanted to store in them, I needed a few more. Fortunately I got them at Lowe’s and they still have them!

IMG_0999.JPG


I love these little chalkboard labels I got HERE….super cute! They have a little string but I tied the string in a bow and just hot glued them directly onto the basket.

I have a lot of different flour…almond, coconut, gluten free, pancake mix, etc. I knew I would need proper storage for the flours and such.

My initial plan was to put everything in the Heritage Anchor Hocking jars…I just LOVE the look of a pantry filled with glass jars. But here’s the deal…they are heavy…and I am getting too stinking old and clumsy to be lugging around 1 gallon glass jars filled with flour.

So I wanted pretty to serve my purpose….

I found some nifty OXO storage containers at Home Goods…similar to these. I love them….I bought different sizes for the flours and mixes, baking soda and powder, cocoa powder, cornmeal, nuts, etc. The varying sizes stack neatly.

IMG_1001.JPG

I also bought three sets of labels…small for the spice jars and medium and small for the pantry containers….I got them HERE! (I went a little over board labeling the actual shelves…I’ll probably take those off.)

The can food rack is a nifty little gadget to store canned food…in theory. In the picture on Amazon it shows that it holds four cans in each section…but it really doesn’t without one of the cans being all womper jomped…meh…whatever…it will do for now!

I bought a few clear containers… the baskets are great for hiding open chip bags and random storage containers and lids but I wanted clear bins for things I use daily like cat food, bread, and a few odds and ends.

IMG_0998.JPG

As you can see I store a lot of stuff on the floor…bulky items like crock pots and big bags of animal food! I had some wire baskets I originally bought for my holiday wrapping station…perfect for holding water bottles, thermos’, potatoes and critter treats.

The left side of the pantry is for cooking ware…casserole dishes, mixing bowls, appliances and spare pots and pans…

One thing I LOVE about this panty…it has an outlet…so I can leave my toaster and can opener in the pantry rather than take up counter space.

While I was organizing and labeling I decided to do all my spices as well….

IMG_1004.JPG

I had the milk glass jars but didn’t use them because they weren’t properly labeled…now they are!

At some point in the future I really want to add glass to the pantry door like I did to my laundry room door HERE.

IMG_1005.JPG

No earth shattering reason…I just think it would look awesome with the glass cabinets.

But again, winter is here and there is NO way I can do any work outside…so that little “to do” will have to wait until warmer days!

Hopefully I can share my entry next week. I THINK I like the board and batten…maybe when I get it all staged I will know for certain.

So until next week….

static1.squarespace.png


Breaking the "rules"....

I don't know if it is an actual "rule" or if it is something I made up in my head.

But who made the "rule" that pots and pans have to be stored in a lower cabinet next to the stove?

For years my pots and pans were in a small lower corner cabinet next to the stove. Total nightmare to dig out a pot or pan....something I use EVERY day!

A few years ago, I installed this nifty pull out for my casserole dishes and mixing bowls and eventually moved the pots and pans to the space to the left...across from the stove. (The crock pots and extra casserole dishes went into the nightmare cabinet!)

Accessing them still required that I move this little stool...

...and crawl around on the floor to get to them all.

(This is one advantage to having a small kitchen...you can put anything anywhere and still access it in just a few steps!)

When I was shuffling things around in my pantry thinking I MIGHT put a microwave in there I found that I had a bit more room than I thought! Again, I am not cooking for a family any more, so food storage is not as big a deal as it was years ago!

Truth be told, there are food items I rarely use (like my daughter-in-law's gluten free flour and boxes of dry goods) as opposed to the pots and pans I use every single day. So that got me to thinking...WHY do I store things I use daily in an inconvenient place? Is there some kind of "kitchen rule" I would be breaking and risk being fined by the kitchen police? Can I not move the things I use EVERY day to an easier space to access and store the stuff I only use occasionally in their place?

ABSOLUTELY! So I did....

I moved the pots and pans to the pantry...eye level and easy to access. I installed another slide out shelf and use it for boxed and dry goods I only need to access to occasionally.

And you know what...I LOVE it!

I guess if the kitchen police show up to inspect I will have to move it all back. In the meantime I will enjoy being just a tad rebellious.

Keep in mind I have "purged" down to the daily essentials...that is something you need to take into consideration when you feel cramped for space! Do you really use 4 identical casserole dishes...or 3 egg pans...or 2 full size crock pots on a regular basis. If you only need them during the holidays or for family gatherings, consider moving them out of the kitchen. I store my large three crock cooker in my laundry room because I only use it during Thanksgiving...no need for it to take up valuable kitchen real estate year round. 

Think about it...are rarely used items taking up valuable space...are you storing every day items in a space that is "proper" but just doesn't work for you? MOVE IT!