A stencil backsplash...

Stenciling a backsplash!

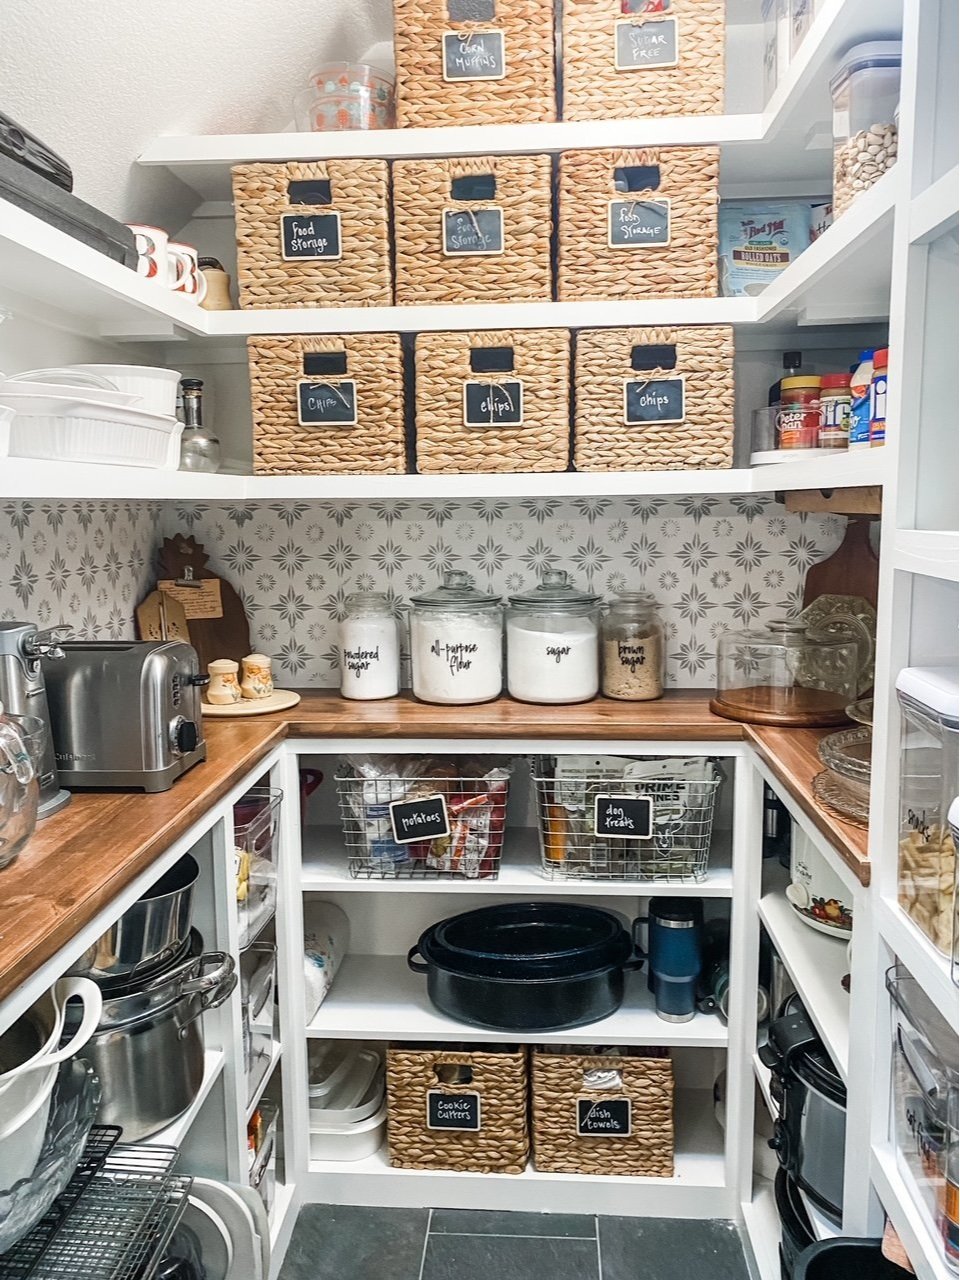
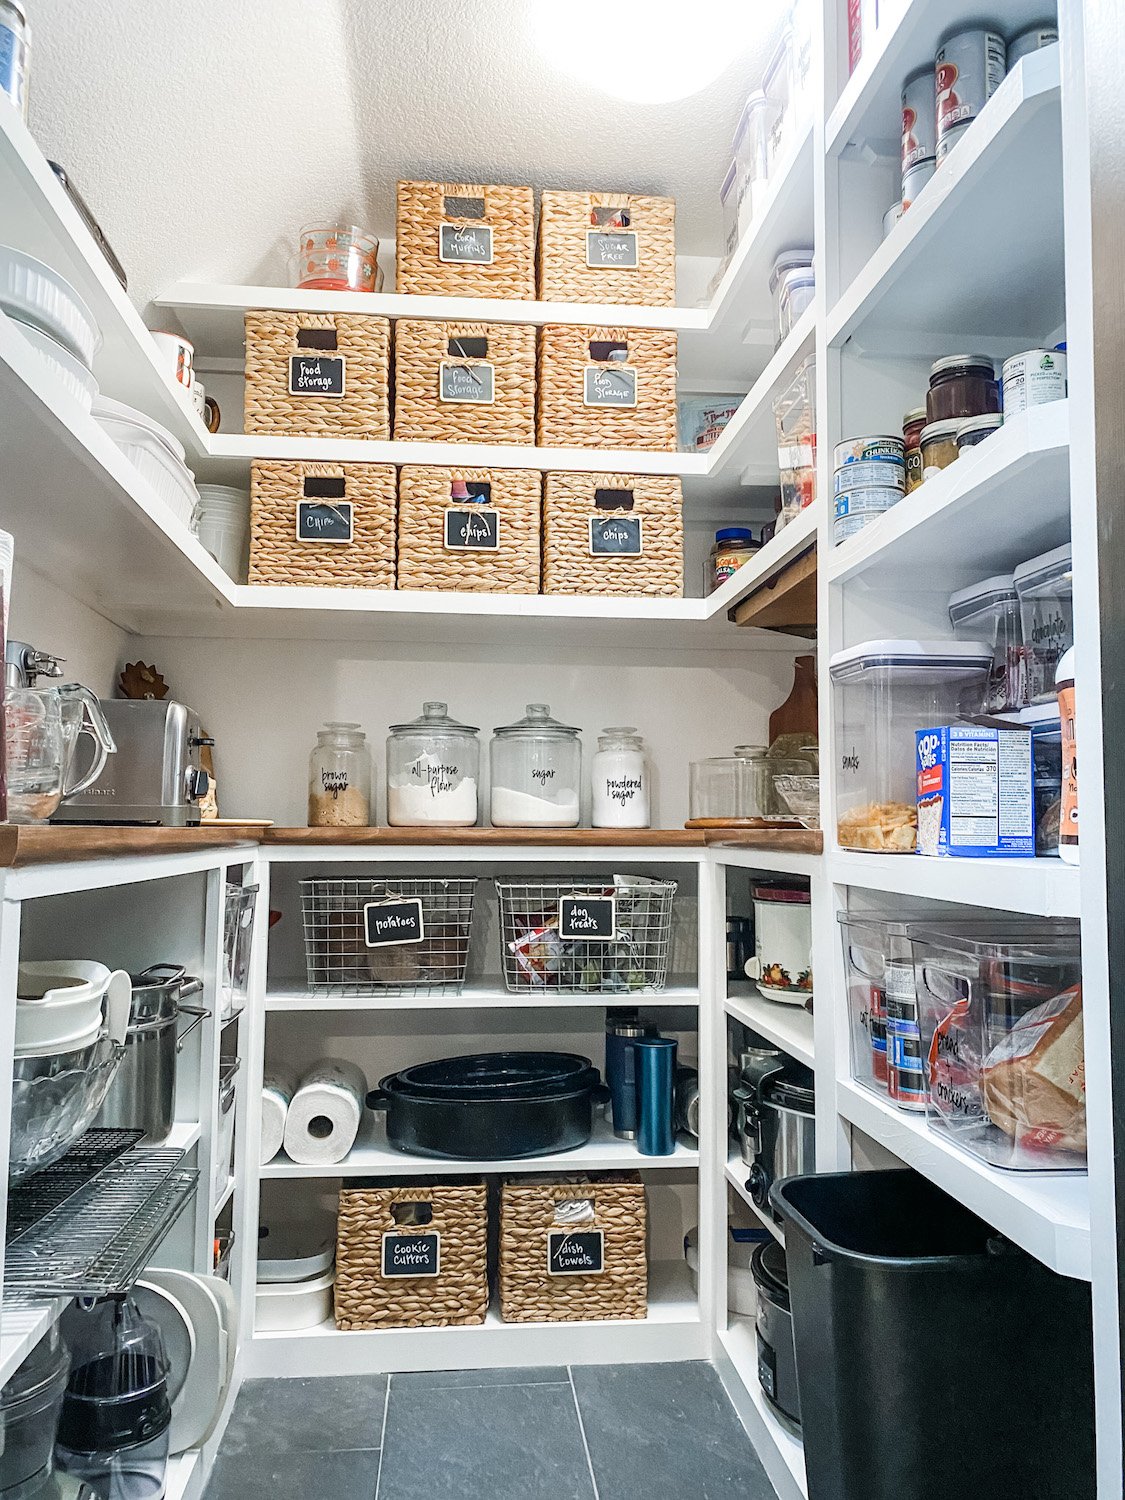
A few weeks ago I shared my new kitchen pantry. I absolutely love how this space looks and functions.

I doubt too many people will ever see my pantry, but I want spaces I use all the time to be functional AND pretty. Like my laundry roomanother space I doubt too many people will see…but I really believe if you make normally mundane or “functional” spaces pretty you are more likely to enjoy the function they serve (like the dreaded laundry chore) and keep them clean and organized. Maybe it’s just me…but the more I love something, the more I am likely to take care of it!

So I remodeled my pantry! LOVE!!!

I knew when I was done that I would eventually add some kind of backsplash around the countertop. I normally would advocate for tile or other hard surface around a kitchen backsplash but this area gets no food prep so it doesn’t really need to be that durable.

I just didn’t know what I wanted. Something simple. Something easy to install. Something that would be easy to change when the bug hit.

Stencils.

My blog friend Cristina used a stencil in your guest bath makeover. I LOVE it…so easy and inexpensive but really finishes off a space.

So I decided to give it a shot.

THIS is the stencil I choose. Not too busy or fussy.

Next head banging decision…color.

I had some green paint I used in the laundry room…I had some black paint from my front door. I mixed the two together and got a greenish/grey…PERFECT!

Again, there are hundreds of stencil tutorials out there…again, find one that makes sense to you. It is a seriously simple project…and if you make a mistake you can take a wet rag and wipe it off (from experience!).

In the end I have a nice “tile look” backsplash that will be super easy to paint over when I no longer want it.

It took all of MAYBE two hours to do and cost me $12 for the stencil. If you need paint as well, I would suggest getting one of the sample pots of paint or even a couple of little bottles of craft paints. It does not take a lot of paint!!!

There were a couple of spots where I got paint where it shouldn’t be…that is where leftover wall paint came in handy. I just took a little craft brush and spare paint and did a little touch up!

Simple, inexpensive project that packs a punch.

My favorite!

Live edge tile backsplash and a dresser makeover reveal...

In my quest to make changes in my master bath, I FINALLY decided on the a sliced white pebble tile for the shower floor and niches. One decision down...too many more to go!!!

When I first remodeled the master bath, I did a glass tile backsplash on the vanity...I like it, but honestly I am no longer in LOVE with it.

And to be honest, I think the glass tile backsplash craze is running it's course. In other words, it is a fad that is fading...at least in my opinion. Besides, it had brown in it and I am moving away from browns!

Since it is such a tiny bit of tile, I decided to change it up a bit.

AGAIN WITH THE DECISIONS!!!! But I got to thinking...I love live edge wood countertops, coffee tables, benches..."live edge" wood anything is just beautiful! If you don't know what I am talking about, google it!

Why can't I make a "live edge" tile backsplash?

The pebble tile I picked out for the shower floor has a "live edge."

In other words the pebbles are laid on the sheet in such a way that the edges of each section of tile are "natural."

This vendor carries a tile border but it is only 4" tall. You can also remove each individual tile from the netting and place each individually...nah, way to much work for me!

Since I have a small backsplash, I cut each 12x12 sheet of tile in half with a wet saw. I only needed 3 sheets of tile...less than $40!

Then I had to set it on the vanity for a few days to see if I was really going to like it!

LOVE!!!

So here is a tutorial for making a "live edge" tile backsplash...

First, I had to remove the old tile. There are times when the easiest thing to do is to cut the sheetrock along the tile down to the studs and remove the whole kit-and-kaboodle! That was an option, but I decided to remove the tile and scrape the old mastic....

Since that tore up the sheetrock AND the new tile wasn't going to cover the entire section I removed, I had to do some sheetrock repair.

No biggy!

If you decide to cut the sheetrock down to the studs, here is a super simple way to "patch" the section you remove!

I didn't have to do any patching, but the basic rules apply...mud, sand, texture and paint!

Apply a coat of mud, let it dry overnight, then sand. Then another coat, let it dry and sand again. I can not stress the importance of sanding sheetrock mud smooth...FEEL IT! If you can feel it, you are going to see it when you paint it! Sand, feel, sand, feel! I used an 80 grit paper. You are better off sanding too much and having to apply more mud!

This product is one of my favorite little DIY "hacks." Sheetrock texture!

If you have properly sanded, this stuff will blend old with new! Just make sure you shake it WELL and always test spray it before you start spraying your wall. On more than one occasion I have had to wipe off the wall and start over because the texture came out to thick or too thin...so take time to test it before you start spraying it on your wall! The knob adjusts for different "textures." Follow the directions on the can.

Let the texture dry WELL before you paint!

And again, I can not stress the importance of keeping spare paint on hand. Fortunately, I just repainted my bathroom a few months ago so I had fresh paint on hand...

So, on to the fun stuff...tiling!

First, this is a "natural" stone tile (if you don't know if your tile is a "natural stone" vs. ceramic or porcelain tile, ask!) The very first thing you want to do is seal it with an "impregnator sealer." Ask...they have it at most home improvement and tile stores. Super simple to apply...brush it on...let it sit for about 5 minutes, then wipe it with a clean cloth.

I would suggest doing this before you cut it with a wet saw, but definitely before you install it and grout it!!!

Since the top edge of the backsplash is going to be the "live edge" it was important to remove any "netting" from the edge...

The net backing is what is holding all the little pebbles in place so you don't want to get carried away...just trim the netting away from the edge that will be exposed!

I used a utility knife and my little sewing scissors (and I wonder why I can't keep a decent pair of sewing scissors!)

I used a premixed tile mastic. Mastic is for small tiles...thinset for large tiles. Always use the adhesive and trowel recommended by the tile manufacturer. I coated the back of the sheet with mastic using a properly sized trowel. I used a small craft brush to apply mastic to the edge pebbles...it is okay for the mastic to "squish out" between the pebbles a tad, but you don't want it squishing out on the edge pebbles...I kept Q-tips on hand "just in case." Just make sure you get enough mastic on the back of the edge pebbles for good adhesion. 

TIP! Never set a tile backsplash directly onto the countertop...always use spacers and then after you grout you will run a small bead of caulk between the backsplash and the top. In this case I wanted a very small space so I used dimes as spacers! Thank goodness we keep a change jar and I was able to fish out a few bucks worth of dimes!

Let the mastic dry over night before grouting! 

Now this is where I tell you to "tune in next week" for grouting instructions. Why? Well because as I mentioned I needed 3 sheets of tile to complete this task and I only had the two I ordered as samples. So now I am waiting on the other sheet to be delivered so I can finish this little project. 

I know...it's annoying to get engrossed in something only to be told "to be continued." But I promise...next week I will share how simple it is to grout, seal and caulk the new tile backsplash.

Until then, I will share something I promised last week I would share!

(The grouting tutorial is up…take a look!)

A DRESSER!

I shared last week that I have been in "dresser mode" recently. I currently have FIVE dressers and chests sitting in my garage ready to roll! 

Last week I took a dresser in and it sold that day! I think it has been in my garage for over 6 months...I just never took the time to work on it.

It wasn't in horrible shape...just a really bad paint job (you could see all the brush strokes) and the hardware was pretty chippy!

I didn't change it up too much...KTSP...kilz, sand, tack and new oil based high gloss white!

The hardware got a little makeover...I primed it with metal primer and sprayed them with high gloss black lacquer.

Again, not a huge change but enough to give it a new life!

Maybe next week I'll share another one...if I can dig them out of the garage!

Well, that and the "to be continued" of the tile saga! 

The "compact" microwave and new stove....

It is done...the new microwave, stove and tile are installed.

And I LOVE them!

It all started with my quest to get rid of the over-the-range microwave.

As I mentioned here, it really became an issue for me when I read that over-the-range microwaves are now considered a kitchen "faux pas." Truth be told, it has bugged me for years...I hated the big ole' hulking thing hanging over my head while I cooked. 

And of course there was the whole issue of the black stainless refrigerator and the fact that the range, microwave and dishwasher were black. We bought the black stainless refrigerator almost two years ago, planning to transition all the other appliance to black stainless. Unfortunately I can't bring myself to buy new appliances when the old work just fine.

The microwave worked just fine...but my "obsession" with getting rid of the big ole' hulking appliance drove me to the point of madness...so I bought this awesome little thing. I guess technically it is still an "over-the-range" microwave, but it is really not much bigger than a vent hood and doesn't bother my aesthetic senses at all!

I ordered the microwave in black stainless, knowing one day I would break down and buy the black stainless stove I had been drooling on for several year. Low and behold my oven went out a few days after I ordered the microwave....curses! Now I HAD to buy a new stove. (Honestly, it was just the ignitor....a relatively easy and inexpensive fix...but that is beside the point!)

The only real issue I had with replacing the much larger microwave with a smaller one was the tile back splash. Several years ago I replaced the original tile backsplash with travertine.

I tiled to the bottom of the microwave...but the compact microwave is about 7" shorter than the original, which means I was going to have to add tile. Fortunately, I am a hoarder of "scrap construction crap" and managed to piece together enough scrap travertine tile to fill the gap.

All I had left from the original install were scraps...so to make sure I would have enough (and not have to order a few pieces of this extremely expensive tile!) I made a little template the size of the space and began laying out the scraps. I numbered each piece on the back so I could install it in the proper order!

If you do not have any scrap of your backsplash (and can't buy it), think about adding a little "decorative" accent...Pinterest is full of inspiration! 

Another little issue was the fact that I had tiled over the original tile (not something I normally do!)...as a result there was a 3/8" difference in thickness. No biggy really, I just put a piece of 3/8" board (scrap sheetrock) to fill the space then tiled with the travertine! 

I picked up a few sticks of travertine pencil liner at Lowe's to create little borders on the sides and under the microwave. Not a perfect match but close enough!

I have one really serious problem now...the dishwasher doesn't match.

Since it was replaced 5 or 6 years ago, I don't see it going out any time soon! Dang it! I'm trying to convince myself that I can live with this unsightly thing....trying! 

I have also ordered a new quartz top for the bar...

I have tired of the black and want something "light and bright." Again, I am always looking for a way to lighten the kitchen without painting the cabinets. The granite counter tops now seem a little "busy and dark" but that has to wait. I desperately want to make some serious changes to master bath and that has to be my next big project!

I haven't used either appliance enough to give a proper review but I can say I LOVE the look of both. The microwave is plenty large enough to do what I do...warm leftovers and melt butter. (Whirlpool is the only company that currently makes a "compact" microwave and their "black stainless" blends well with the Samsung black stainless stove and refrigerator.)

I love the new stove top but I have one minor beef...no drip pans. Not a huge problem...I ordered silicone "cut to fit" drip mats from Amazon. Not sure how happy I will be with this solution but I guess I will find out. It has a "wok grate" but I don't have a wok so whatever! The middle griddle is a neat feature but I'm not sure I will use it much...again, we'll see! The oven has both a "traditional bake" as well as convection...and it will automatically calculate the conversion...which is nice for someone who has been cooking with a regular ole' stove for 40 years! 

I want to share Matt's entry...he is having his kitchen cabinet painted so he wants me to wait to take pictures until he has his kitchen finished...so MAYBE next week!

Until then...