A new bar top and Wayfair light fixture...

As I mentioned here, change is tough for me...which is why these things haven't changed much in 19 years.

I painted the dining room light years ago (antique bronze to black)...as much as I really didn't love the actual fixture, I loved what I could do with it during the holidays....

One year I removed the little shades and I liked that a bit better, but I still wasn't digging the light fixture itself.

Just too ornate and "heavy."

But I could never find one that would allow me to decorate it for the seasons...until I did!

(As you can see, I still have the Drexel buffet...love the piece...just not the color...waiting on "inspiration.")

The install was super simple...here I share how to install a new light fixture!

Not a huge fan of the Edison bulbs, but I think those can easily be changed out...eventually. For now I can live with them knowing that come fall (right around the corner...yea!) and Christmas, I can still decorate the fixture!

I think it is more of a "farmhouse" look but the nickel accents tie in with the more "modern style" brushed nickel bar lights. So it works for me....

Which brings me to the bar top....

...it wasn't totally offensive, but in my quest to go "light and bright" in my kitchen without painting all my kitchen cabinets, I impulsively ordered a white quartz top.

Truth is, I wasn't really loving it after it was installed. Just too "stark" and soooo white! 

I painted the little support corbels the same color as the trim...more "white." (They were originally black but since I didn't damage them when I removed the old top I just primed them and painted them with the trim paint...BM Swiss Coffee.)

This is what we refer to in the design world as "OMGosh what have I done" moments.

I decided what was really bugging me was the dingy old bar stool seats. They had certainly seen their better days. The bar stools are 18 years old and I still love the style dearly...heavy iron and super sturdy...but the "grey tweed" upholstery just didn't cut it any more!

Choosing fabrics is something I really struggle with...but I know I LOVE the fabric I used on this little chair makeover

Light and bright with just a touch of grey! So I ran out and bought enough fabric to recover the bar stool seats. About 1 1/2 yards for four seat cushions. If you don't know how to figure for fabric, take your measurements with you and they will help you figure it...just make sure you add 2" on each side! (Or better yet, just take a seat with you!)

Pay CLOSE attention to the direction of the fabric. This fabric doesn't APPEAR to have a "right or wrong" way, but it does. I put a pin in the top of each piece so I would know which way to lay the fabric on the seats!

Reupholstering chair seats is a super easy DIY project...probably one of the simplest DIY projects one can tackle! And this easy little project is an excellent way to make a pretty dramatic change in any room without breaking the bank or dragging out the sewing machine! There are thousands of great tutorials online...so again, do your research and find one that makes sense to you and use it!

In this case I had no desire to paint the stools...I like the black iron...but if you want to paint a dining chair or stool, do it after you have removed the seats but BEFORE reattach them. Again, super simple project! Use the KSTP method (kilz, sand, tack, paint...here is a pretty good paint tutorial.)

I removed the seat cushions! In this case, 4 little screws! I also scrubbed down the stools...pretty nasty after 18 years of use!

Then it was just a matter of wrapping the seats with the new fabric...I didn't even remove the old fabric or bother with applying a new underside....and reattaching them.

I guess that might be an issue if you are laying on the floor looking up at the underside.

Here I do share a few helpful tips on upholstering...pretty much applies to the simplest project!

While I had the camera out I played around with a few different "centerpieces" for the bar with knick-knacks I had on hand...

But honestly, with mischievous cats who insist on knocking everything off the bar, we are better off leaving it clutter free! Same with the dining table...too many broken vases and scattered flowers!

A few relatively minor decor changes that made a subtle but significant difference! 

Breaking the "rules"....

I don't know if it is an actual "rule" or if it is something I made up in my head.

But who made the "rule" that pots and pans have to be stored in a lower cabinet next to the stove?

For years my pots and pans were in a small lower corner cabinet next to the stove. Total nightmare to dig out a pot or pan....something I use EVERY day!

A few years ago, I installed this nifty pull out for my casserole dishes and mixing bowls and eventually moved the pots and pans to the space to the left...across from the stove. (The crock pots and extra casserole dishes went into the nightmare cabinet!)

Accessing them still required that I move this little stool...

...and crawl around on the floor to get to them all.

(This is one advantage to having a small kitchen...you can put anything anywhere and still access it in just a few steps!)

When I was shuffling things around in my pantry thinking I MIGHT put a microwave in there I found that I had a bit more room than I thought! Again, I am not cooking for a family any more, so food storage is not as big a deal as it was years ago!

Truth be told, there are food items I rarely use (like my daughter-in-law's gluten free flour and boxes of dry goods) as opposed to the pots and pans I use every single day. So that got me to thinking...WHY do I store things I use daily in an inconvenient place? Is there some kind of "kitchen rule" I would be breaking and risk being fined by the kitchen police? Can I not move the things I use EVERY day to an easier space to access and store the stuff I only use occasionally in their place?

ABSOLUTELY! So I did....

I moved the pots and pans to the pantry...eye level and easy to access. I installed another slide out shelf and use it for boxed and dry goods I only need to access to occasionally.

And you know what...I LOVE it!

I guess if the kitchen police show up to inspect I will have to move it all back. In the meantime I will enjoy being just a tad rebellious.

Keep in mind I have "purged" down to the daily essentials...that is something you need to take into consideration when you feel cramped for space! Do you really use 4 identical casserole dishes...or 3 egg pans...or 2 full size crock pots on a regular basis. If you only need them during the holidays or for family gatherings, consider moving them out of the kitchen. I store my large three crock cooker in my laundry room because I only use it during Thanksgiving...no need for it to take up valuable kitchen real estate year round. 

Think about it...are rarely used items taking up valuable space...are you storing every day items in a space that is "proper" but just doesn't work for you? MOVE IT! 

Change is tough....

All change...changing a hairstyle (which is why mine hasn't in 15 years!), kid's going off to college (dang near killed me), losing weight (still going slow but steady)...and then the ever dreaded "decor" changes.

That one gets me every time. I don't do big change well. But occasionally something will bug me for so long I finally take that first bite (how do you eat an elephant...one bite at a time!)

I know I need to make a change...it's all the decisions that go into it that get me every time.

Take my master bath for example.

I NEED to make a change...specifically, remove the whirlpool tub that hasn't been used in decades and put in a walk in shower. We need to do that now while we can still walk upstairs to use the other bathroom during the reno. If we wait until we break a hip, we would just have to sit around and smell for a few months. Not a good plan.

And of course if I am going to change out the wall tile, I might as well change the floor tile. Thank goodness I am still happy with my vanity and cabinets (after a recent little modification!

Years ago I replaced my carpeted stairway with hardwood...I did it knowing there would come a day when I would not want (or be able to) drag a vacuum up and down the stairs. As much as I now dislike the color of the wood stain, I am grateful I made the change when I could...because dragging a vacuum up and down the stairs just isn't something I would want to do on a regular basis.

So where do I start. I outlined that process here a few years ago when I changed up my den a bit.

First, I had to find my inspiration. I searched the internet, Pinterest and blogs. The only thing I found that I really like is this....

I love the "river rock" look and I like the "light and bright" of the white tiles. I found some other "inspirations" I like but most have painted cabinets. I MIGHT change my doors to a shaker style and paint the vanity a lighter color...might...maybe...we'll see. But for now I am planning around the darker "modern" style vanity that is there.

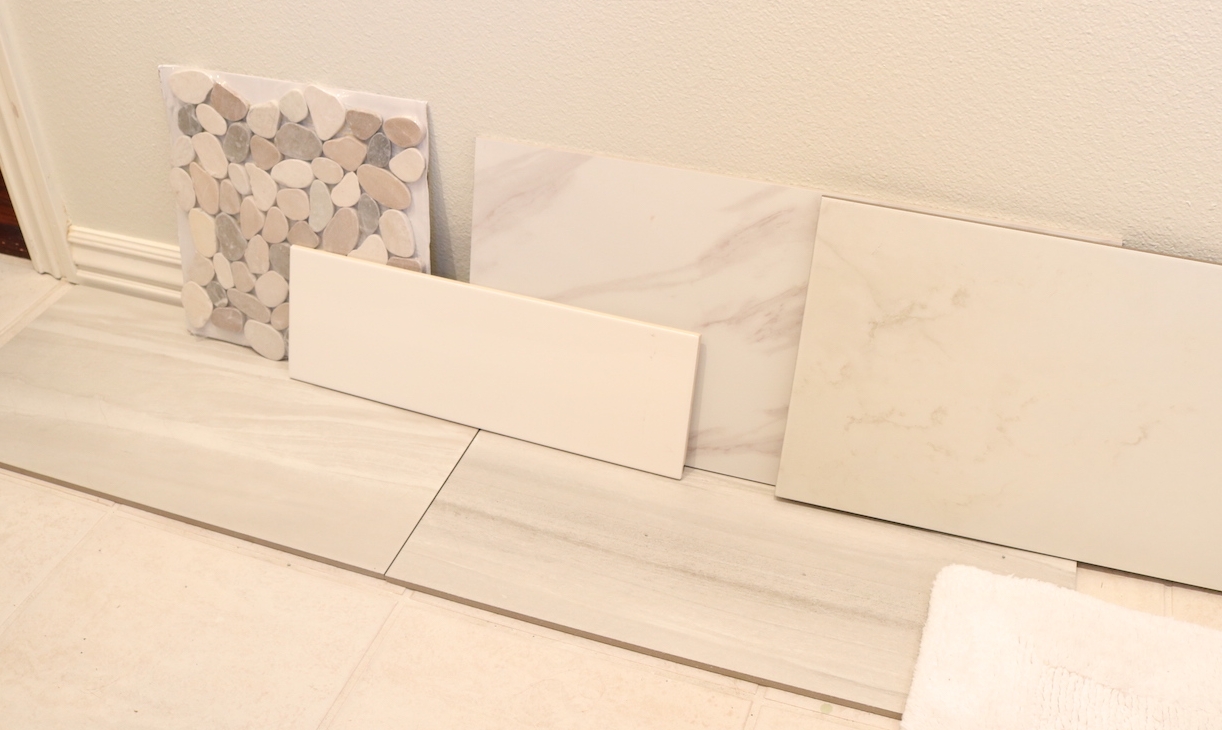
So really the wall tile (large white subway) and the shower floor and niche accent tile (pebble) are pretty easy choices. What is hanging me up is the floor tile.

As I said before, I like the tile choices I made 19 years ago. Not really liking the ole' 12x12 with a 1/4" grout line that was popular 19 years ago, but I like the color and the texture of the tile itself. 

Picking a new tile has been a real challenge. Some people can do design boards...me, I have to bring home every sample I think I MIGHT like and lay it on the floor...these are the last three choices...the first four have already been returned....

And I have ordered a few more online...so we'll see!

Hopefully I can make a decision in the next week. I am actually hiring this done so I am meeting with two contractors this week for bids. 

My half bath hasn't had a real "makeover" in years.

So I was thinking I might want to change it up a bit...I'm just kind of "bored" with it. It is a tiny space and wouldn't take much to change it up! But truthfully, I still like the color of the walls and the vanity. 

I was digging around in 410 Vintage a few weeks ago and found these two vintage prints by "M. Devoe." A tad more than I usually spend on art, but I like the style and I like that they were vintage. I know they are a tad quirky (or as my daughter said...ewwww!) But I like "different" and they are that....

I had two "ho-hum" prints hanging on this wall for Lord-knows-how-long...just a change in the wall decor freshened up the space...now I don't feel an itch to change the entire space. (I ordered a new wreath...I think boxwood wreaths have run their course!)

Sometimes change is as easy as changing the wall decor or moving a few pieces of furniture around. Sometimes it requires weeks of fretting and nail biting over expensive and long-term choices....

Good thing I have trained my self to take things in stride and I quit biting my nails!

Simple "before and afters"...

Some of the simplest "befores" turn out to be my favorite "afters."

Which explains why I often don't have decent "before" pictures...I think "oh, that's no biggy" and dive right in to giving them a simple little makeover. Then they turn out so stinking cute I wonder why I didn't take time to take "before" pictures.

They are a reminder of why do this blog...to show you how easy it is to take a simple, boring, out-dated, dark piece of furniture and turn it into something you will want in your home rather than in your yard at the next garage sale!

We DIYers live for those hidden treasures...pieces of furniture that people want to get rid of... they drop them at their local thrift store or sell them for pennies in garage sales or just set them out on the curb...we take them home, clean them up and work a little DIY magic. 

The worst...you live with the ugly, dark furniture because you can't afford to replace it!

I get it...you paid a small fortune for your "matchy-matchy" bedroom furniture so you can't bring yourself to get rid of it.

I've shared "makeovers" hundreds of time...too many times to link ALL the pieces I have "upcycled" over the years. But I would bet money you still have a few pieces lurking around your house that serve a purpose or are "family heirlooms" or you paid too much to get rid of it...so you just live with it.

Don't fret...take the plunge...buy some primer and some paint AND CHANGE IT!

LIFE IS TOO SHORT TO LIVE WITH UGLY FURNITURE!

This shelf was your typical Target cheapo...dark finish...no I did not take a picture of it "before." Honestly, I think it was a piece someone left at the apartments so I loaded it up and brought it home.

I removed the back panels...primed and painted the frame and shelves with one of my "sample" pots of white (KSTP). I painted the back panels with a sample pot of teal and then reattached them.

Super simple and too stinking cute!

This little bedside table came with a set I bought at an auction. Someone bought the dresser, chest and bed but didn't want this little table.

Meh....

Simple makeover! I removed the drawer and simply brightened it up with some Restorafinish. I primed the cabinet, sand, tack and white gloss paint. It was missing a knob so I ordered two new ones...

....again, SUPER SIMPLE and so stinking cute!

This old oak dresser...the finish and the little applique' really dated the piece.

I popped off the appliques using a chisel...lift carefully...chances are they are applied with a little bit of glue and a few tiny nails.

... sanded the old glue, stained the top with gel stain (no need to strip the old finish) and chalked painted the rest of it....distressed and sealed the whole thing with poly...

Too stinking cute!

Simple...simple...simple! 

Nothing earth shattering on any of the pieces...just super simple little makeovers that updated the pieces and gave them new life! 

Walk around your house...what simple little piece can you haul out to the garage and work a little "DIY magic." Trust me...if you don't like it when you are done, you won't get any less for it at a garage sale! 

The death of the rose bushes....and a peak at the rest of my landscaping!

Que sad music...the knock out roses finally bit the dust.

They were beautiful little additions to the side yard when I first planted them....

I walked around the yard and took a few pictures a few months ago and they looked halfway decent then!

I built this flower bed and planted the knock out roses because it is an area of the yard I rarely tend to...

Rarely...as a result they were looking REALLY pathetic!

Two bushes died last year so I removed them and planted another. This year the another died and two were near death.

In their defense, knock out roses tend to stop blooming in the heat of the summer...but they obviously had other issues!

So this past weekend we decided to pull them all out...except for the one little bush I planted last year. It may eventually get transplanted when it is cooler if I decide to go another direction with this bed.

I'm not sure what caused their demise. Age, disease, neglect...maybe a combination of all. I did throw a little fertilizer down on them occasionally but I can honestly say I probably didn't tend to them like I should have...a weed eater is probably not the proper tool to use to prune rose bushes.

Knock out roses don't make the best "cut flowers." Cute in a little ironstone creamer...but certainly not something you plant for the purpose of creating indoor arrangements....

Que sera...

I think I will leave the bed "vacant" for the time being...let it winter just incase it is harboring disease or fungus.

Besides, I can't decide what I want to plant in their place and honestly, it is really too hot to plant right now.

I would love to plant hydrangeas but evidently they don't take well to direct afternoon sun...and that is exactly what this bed gets...hot afternoon sun. Curses. I like crepe myrtles but they get very full and bushy and are probably not ideal for a narrow bed against a fence. 

When planning your plantings pay attention to what sunlight and care the plants will need. Do your research!

Maybe I will just resort to more potted plants...those tend to do well but they certainly can't be neglected this time of year. Right now I am watering every day.

I will leave you with a few pictures of areas of the yard I don't neglect...

After YEARS of struggling to landscape this front bed, I finally resorted to flagstone and potted annuals..I love it!

Hostas are a super simple perennial that require little maintenance! They can easily be split every spring which explains why I have TONS of them in my yard! I have even started planting some in containers!

Planting in containers has become my "thang." I'll scatter a few annuals around in the ground, but just about all annuals go in containers these days!

Make your yard an extension of your home...

BTW, last year I shared here the new fescue sod...I thought the "difference" between the fescue and bermuda would bug the heck out of me...not so much! I see the difference...but I can live with it! As you can see, it made it through the winter and that is a good thing!

Until next week....

The "compact" microwave and new stove....

It is done...the new microwave, stove and tile are installed.

And I LOVE them!

It all started with my quest to get rid of the over-the-range microwave.

As I mentioned here, it really became an issue for me when I read that over-the-range microwaves are now considered a kitchen "faux pas." Truth be told, it has bugged me for years...I hated the big ole' hulking thing hanging over my head while I cooked. 

And of course there was the whole issue of the black stainless refrigerator and the fact that the range, microwave and dishwasher were black. We bought the black stainless refrigerator almost two years ago, planning to transition all the other appliance to black stainless. Unfortunately I can't bring myself to buy new appliances when the old work just fine.

The microwave worked just fine...but my "obsession" with getting rid of the big ole' hulking appliance drove me to the point of madness...so I bought this awesome little thing. I guess technically it is still an "over-the-range" microwave, but it is really not much bigger than a vent hood and doesn't bother my aesthetic senses at all!

I ordered the microwave in black stainless, knowing one day I would break down and buy the black stainless stove I had been drooling on for several year. Low and behold my oven went out a few days after I ordered the microwave....curses! Now I HAD to buy a new stove. (Honestly, it was just the ignitor....a relatively easy and inexpensive fix...but that is beside the point!)

The only real issue I had with replacing the much larger microwave with a smaller one was the tile back splash. Several years ago I replaced the original tile backsplash with travertine.

I tiled to the bottom of the microwave...but the compact microwave is about 7" shorter than the original, which means I was going to have to add tile. Fortunately, I am a hoarder of "scrap construction crap" and managed to piece together enough scrap travertine tile to fill the gap.

All I had left from the original install were scraps...so to make sure I would have enough (and not have to order a few pieces of this extremely expensive tile!) I made a little template the size of the space and began laying out the scraps. I numbered each piece on the back so I could install it in the proper order!

If you do not have any scrap of your backsplash (and can't buy it), think about adding a little "decorative" accent...Pinterest is full of inspiration! 

Another little issue was the fact that I had tiled over the original tile (not something I normally do!)...as a result there was a 3/8" difference in thickness. No biggy really, I just put a piece of 3/8" board (scrap sheetrock) to fill the space then tiled with the travertine! 

I picked up a few sticks of travertine pencil liner at Lowe's to create little borders on the sides and under the microwave. Not a perfect match but close enough!

I have one really serious problem now...the dishwasher doesn't match.

Since it was replaced 5 or 6 years ago, I don't see it going out any time soon! Dang it! I'm trying to convince myself that I can live with this unsightly thing....trying! 

I have also ordered a new quartz top for the bar...

I have tired of the black and want something "light and bright." Again, I am always looking for a way to lighten the kitchen without painting the cabinets. The granite counter tops now seem a little "busy and dark" but that has to wait. I desperately want to make some serious changes to master bath and that has to be my next big project!

I haven't used either appliance enough to give a proper review but I can say I LOVE the look of both. The microwave is plenty large enough to do what I do...warm leftovers and melt butter. (Whirlpool is the only company that currently makes a "compact" microwave and their "black stainless" blends well with the Samsung black stainless stove and refrigerator.)

I love the new stove top but I have one minor beef...no drip pans. Not a huge problem...I ordered silicone "cut to fit" drip mats from Amazon. Not sure how happy I will be with this solution but I guess I will find out. It has a "wok grate" but I don't have a wok so whatever! The middle griddle is a neat feature but I'm not sure I will use it much...again, we'll see! The oven has both a "traditional bake" as well as convection...and it will automatically calculate the conversion...which is nice for someone who has been cooking with a regular ole' stove for 40 years! 

I want to share Matt's entry...he is having his kitchen cabinet painted so he wants me to wait to take pictures until he has his kitchen finished...so MAYBE next week!

Until then...

Another Facelift for the storage shed....

A few years ago (okay so it's been FIVE YEARS!!!!) I gave my storage shed a little facelift! I rebuilt the door, added little scallops in the gable and added some trim to cover up some siding boo-boos!

At the time I primed and painted most of the trim with some paint I had on hand...most of it...not all of it. I figured I would eventually find the time to pick up some quality exterior paint and paint the rest of it. I didn't. 

So when Brian hit it with the power washer a few weeks ago much of the old paint and primer came right off! Fortunately the siding color held tight so I didn't have to repaint that!

Some of the trim around the door had cracked so I used wood filler to repair it. Caulked the gaps between the trim and siding.

The hard part, scrapping peeling paint, was taken care of with the power washer. I used a metal brush to remove what little peeling paint was left.

I had a little bit of leftover deck stain so I decided to freshen the deck as well!

A high quality exterior primer and exterior white paint...

Not only did a good coat of paint freshen it up a bit, it seals the wood to prevent the wood from deteriorating!

It is important to use a high quality "exterior" paint and primer on exterior projects. Exterior paint is specifically formulated to resist mildew and fading from sunlight. I would bet that I did not use a good quality exterior paint and primer on the trim a few years ago...which would explain why it could not withstand the beating from a 2800 PSI power washer!

Modifying a cabinet...

When I first remodeled my master bathroom, I loved it...honestly, I still do! But someday soon I want to make some major changes just for practical purposes. Specifically, I want to remove the whirlpool tub (seriously, I think I have used it 3 times in the last 20 years!) and add a walk in shower.

As much as I love the existing tile, I know that will mean picking new tile for the shower....which means I will want to go ahead and replace the floor tiles...you know, while there is already a mess! But picking a tile that will carry me through another 20 years is tough for me...I know people say this or that is "timeless" but I can assure you NO home decor is timeless.

This will all happen as soon as I can find the perfect tile person to construct the shower. I do not want to hire someone who isn't VERY experienced because one of the worst things that can happen would be a shower that leaks! 

There is one other tiny detail that kinda bugged me...the "medicine cabinet."

While I love the look, it just wasn't practical. Why? Because everything in the back half of the cabinet goes there to die! Seriously, I found a bunch of products and pills that had expired years ago.

I cut down my kitchen pantry several years ago and have never regretted losing that extra 12" of space. I like how the smaller cabinet opens up the kitchen a bit! And again, everything in the back of the cabinet had a tendency to expire before I got to it. (No, I don't have a picture of the pantry before I cut it down...that was "preblog!")

So I knew cutting down the depth of the cabinet in the bathroom was doable! 

The first thing I did was take EVERYTHING out of the cabinet and took inventory. Major purgefest! I made sure that what was needed or wanted would fit comfortably if I only had 6" of depth. Yep, all but the basket of old prescription medication and most of it had expired. 

Once I knew that cutting down the cabinet wouldn't pose a logistical problem, I removed the cabinets from the wall, cut them down, rebuilt the back and reinstalled them. (Did I take pictures of this process...of course not...who knew I would share something so mundane!)

Sounds easy...honestly, it wasn't. There was an electrical outlet to deal with and the trim detail and then of course there was the exposed sheetrock boo-boos from the old marble backsplash...curses. I always think a project will be easier than it is!

But again, it was doable, and after a day of cutting and cussing I had a smaller cabinet.

The sheetrock boo-boo was an easy fix...mud, sand and retexture. Since I am good about keeping old paint for touchups...no biggy. Except it had been so long since I painted the bathroom, the paint had hardened. So I got to repaint the entire bathroom! Yippee!

Fortunately I had a couple of left over gallons of paint from when I painted my living areas...

Now I am eyeballing my kitchen again. I am a sucker for the "power of suggestion" so when I read that big ole' hulking over-the-range microwaves are now a kitchen "faux pas" I decided I want to remove the microwave above the stove...which means I have to find a place for a smaller microwave. The counter is not an option since I have a small kitchen and limited counter space. Hum...the pantry...maybe I can put it in the pantry. Well, I could if it weren't so stinking shallow...remember I cut it down so now no microwave more than 13" deep will fit. Thank goodness for the internet...I spent days researching microwaves. Fortunately, I found a few that would work so that's one hurdle! Small little things but honestly the only thing I use a microwave for is to boil water, warm coffee and melt butter.

Hurdle #2...can I afford to loose shelf space in the pantry? Again, I pulled everything out and start measuring cans of beans and moving shelves around. 

Doable! Keep in mind we are now a family of two and I don't need the food storage space I use to!

Hurdle #3...when I take down the over-the-range microwave...what then?

Honestly, I didn't know.

And then I found a solution that changed my whole plan...

A compact over the range microwave by Whirlpool!

I would post a picture but the site won't let me steal the pictures so just go look at it!

How cool is THIS! It's only about 10" tall so I won't feel like I have a big ole' hulking appliance hanging above my head while I am cooking.

I ordered the black stainless even though my stove is black.

I hate to buy new appliances when they work perfectly fine so I thought I would live with my old black stove for the time being.

(Fortunately for me the ignitor went out on the oven this week. Yippeee! Perfect excuse to order the new black stainless stove I drool on every time I go to Lowe's! God forbid I fix it with the $30 part!)

Now I don't have to give up pantry space or counter space. I guess it is still technically a "kitchen faux pas" since it is an "over the range microwave." But you know what...I'm okay with it. I'm probably one of the few who hasn't painted my kitchen cabinets, I have no shiplap in my house and while I would love to retile my entire kitchen and dining area with beautiful, light travertine tile, it's not happening...so I'm okay with bucking the decor trends!

The only problem I have is the space that will have to be tiled after the big ole' hulking microwave is removed. Fortunately, I am a pack rat and kept all my scraps from when I retiled the kitchen backsplash! Yea me! Thank goodness because that stuff was E.X.P.E.N.S.I.V.E!

So when I get the new microwave and stove are installed and the tile work done I'll share...can't wait!


And another campaign dresser makeover...

I shared the "before" of this Dixie campaign dresser here....

A very desirable piece that I knew needed the perfect makeover.

I spent hours cleaning the brass hardware. One of the little doodad brackets was missing so I had to order two on Etsy....they didn't match the original hardware exactly but as my Daddy use to say "You'll never notice it on a passing train!"

A few minor repairs but all in all, it was in outstanding condition for a 50+ year old piece!

A KTSP treatment...kilz, sand, tack cloth and a high gloss oil based paint!

Gorgeous!

This was a tough one to let go! I took it to 410 Vintage at around 3:00 Tuesday afternoon and they texted me at 5:00 that it was sold....I'm so glad someone else loved it as much as I did!

These vintage pieces can be brought back to life with a little elbow grease...if you can find one, don't let the grungy old finish and dingy hardware deter you! You won't be disappointed!


A mind blowing wedding alter!

Well this certainly isn't something I normally share! This post serves two purposes...it lets me brag on one of my amazing children and there is a "moral" to this story.

So Matt sends me a text..."How hard would it be to build something like this."

His friend, Tanner and his bride-to-be, found this nifty little thing on Pinterest and decided it is exactly what they want for their wedding alter (again, I have no way to credit this picture!)

My first thought was...well that's no biggy! Until I realized it had SEVEN sides...this is a "heptagon." What the frick...I didn't even know such thing existed....how do you calculate the angles for something like this.

One time I asked my mega smart daughter (the one who got a 4.0 in engineering this semester!) how to calculate the circumference of a circle if I only knew the diameter. She then proceeded to give me a 2 hour geometry lesson....OH MY GOSH...all I want to do is make a stupid pillow not fry my brain!

I kinda felt that way with this monster...I can cut the boards and screw them together.... but figure the proper angles to make 7 sticks of wood fit together? That wasn't happening.

So what did Matt do? He did what I have taught him to do...he figured it out.

No, he couldn't find any tutorials on how to build a seven sided wedding arbor, but he calculated the lengths and angles of each board.

He even built a little "model" out of scrap wood to test his calculations....

They bought the wood and set up on the driveway to build it!

They used wood glue and the Kregjig to join the corners!

They built a base so it could stand upright and HOPEFULLY not blow over during the ceremony. The heptagon slips into it and can be secured with a couple of screws during setup! Cover them with a pretty rug and floral arrangements and you will never know they are there!!

Goofballs...this one's going in the family Christmas letter...lol!

(I love Tanner's shirt..."It takes a village!")

There are so many things I wish my dad would have had time to teach me...but one of the most valuable life-lessons he taught me was that if I want something...figure it out. It may take some research or brain storming or sleepless nights...but figure out how to do it, roll up your sleeves and just do it!

And he gave me the confidence to do just that! 

Sitting in the garage (on my hands because it is real hard for me to sit and watch while others use my chop saw and kregjig!) watching my son calculate, cut and construct was one of those "proud parent" moments...my son was using a life-lesson my dad taught me and I passed on to him! If you want something built, figure it out and just do it!

Last week was Father's Day and marked the 23rd anniversary of his death. 

He would be proud!

I know I am!