Dad's old tool bench....

One big "fad" right now are the old wood benches and tool boxes...."primitives."  I've had a few in my booth and they fly out the door. Like this one I featured here....

I'm not really in to all the "primitive" decor...including old wood benches and tool boxes.  But it dawned on me a while back that I had my dad's old wood work bench stored in one of my supply buildings at the apartments.  And while I am not big on "vintage" or "primitive," I am a huge fan of "heirlooms!"

He built this little bench and for as long as I can remember he carried his tools in it and even used it as a step stool!

When I finally dug it out, I found that it was in worse shape than I remembered....covered in some serious gunk, oil, filth and old paint!  The top board and one of the cross boards had cracks!  (Again, my photography skills just don't do it justice!)

Probably to be expected...I remember my dad using this bench when I was little.  And I know I used it for many years.  While I was stripping it I discovered old royal blue paint all over it...royal blue paint?  Then I remembered...25 years ago I painted my sons' bunk beds royal blue...and evidently I used this old bench during the process.

It took some serious time and chemicals to strip off all the old paint and gunk.  I didn't want to sand it because I want to retain all the "character" beat into the wood from decades of use! 

I don't know if dad used a skill saw to cut the boards when he built this, but I have no doubt he used a hand saw to cut the Vs in the legs...you could actually see the saw marks!

IMG_1463.JPG

After removing all the old paint and gunk, I even found where someone (me?) had carved tic-tac-toe markings in the wood!

IMG_1458.JPG

After removing all the paint and gunk with chemical removers, I scrubbed the wood with lacquer thinner and steel wool and then washed it with mineral spirits. Then I let it dry out for several days.

I really debated what to do with the little bench at this point.  I know it would be really pretty with a nice coat of paint...maybe distressed a bit. But the "character" in the wood is amazing and I really hesitate to do anything to cover any of it!

So for now I just coated it with some tung oil finish. Maybe someday I will get a stroke of inspiration and do something different. Until then I will just admire it for what it is...an old tool bench that my dad built and used. 

That, in my book, makes it priceless just as it is!

This is a prime example of WHY you should take anything and everything someone in your family gives you...it may seem like trash at the time, but someday it will be a true treasure.  My dad has been gone 19 years...anything I have of his is a treasure!

signature.jpg

Reflecting on 50 years of "decorating" life....

I started a post entitled 'Reflecting on 50 years of life."  I thought I might share all my "pearls" of wisdom. Really?  I, of all people, do not need to be giving life lessons...I'm 50 and still learning something new every day! Although I think if others would learn from MY mistakes, their lives would be a lot easier and pleasant. But truth is, everything you need to know to live a fulfilling life is either in the Bible or on Pinterest. Choose wisely (that is ONE of my "pearls"...ALWAYS choose wisely)

Anywho, I decided that I would be better off giving advice on how to make your home a place you will love. I'm not going to give you "decorator tips" because I am not a decorator...I am just a mom who has found a balance by trial and error. Besides, you can find REAL decorators all over the internet who will tell you how to decorate a room!

So here is some of what I know about "home interior decor".....

1) You won't ever wake up and say "THIS is perfect."  Your home is ever changing...families grow, kids get older, stuff gets out of date or worn...so embrace the ebb and flow of your changing life and go with it!

2) I give the same advice about major home decor purchases as I do cars...if I show you a stock and tell you that you will pay $40,000 for it today and I can GUARANTEE you it will be worth $20,000 next year, would you buy it?  Nope.  So why would you buy a brand new car or brand new anything? Personal property (furniture, cars, appliances) WILL depreciate.  Keep that in mind when making a home interior purchase.  Let someone else take the depreciation "hit" unless it is a piece you are madly in love with and you KNOW it will be in your home until...well, forever!  Here is a little trick I use sometimes...take the purchase price, divide it by the REAL number of years you think you will use that item...for example, my living room couch cost me $1500.  I knew I loved it and would use it for years...so far, I am going on 10.  So basically I paid $150 a year for this couch.  Yep, that is reasonable in my book! But the fact I have had it for 10 years is VERY unusual! Most people don't keep couches that long! Do the math...spend your money wisely!

3) With that advice in mind, whenever you can, buy used and make it your own!  Learn to paint...learn to refinish...learn to reupholster.  And if you just don't want to do that...or feel you can't...learn patience! Because I can promise you, that "vision" you have in your head for a new tv cabinet or bedroom set or chair will be out there at a garage sale or on craigslist or at a flea market....or seriously reduced at some point! 

I have wanted a coffee table like this for...well, decades.  But I never could find the EXACT coffee table I had in my mind...and when I did finally find it, it needed some attention!  But my patience and ability to DIY paid off...big time!

4) And with that in mind, NEVER BUY IT OR BRING IT HOME IF YOU DON'T SERIOUSLY LOVE IT! Or will love it with a little "tweeking," Because if you can look at it and say "Wow, I really love that!" there is a good chance it will be something you will still love years from now...you won't ever regret that purchase! My rule...if I have to think about it for more than 10 seconds, I don't need it! 

This tv cabinet was expensive...but I love it...it is 8-9 years old and I have NEVER regretted it or questioned the purchase. Great story. When I first fell in love with it, I really couldn't justify spending what they were asking...HOWEVER, they had one that was a "customer cancellation" and had a few VERY minor dings...at HALF the price of a new one. SOLD!  And the great thing was they had one of their experts fix the "dings!"

5) Use "fads" sparingly. Pillows, rugs, inexpensive pictures... basic accessories...can all be easily changed. So use "accessories" as a way to infuse "fads."  The big stuff...primarily furniture...should be something you LOVE and something you know you will probably love 10 years from now.  The only time I break that rule is if it is a second hand piece of furniture that is free or cheap that I am going to "repurpose" or "refinish"...knowing that next year I will pass it along to someone else, or repurpose or refinish it again!

As you can see in my living room I use pillows, framing and the rug to infuse the "blue and brown" that is currently all the rage.  In my den, I bought this little inexpensive side table at Salvation Army and stained and painted it.  

All can be changed or given away when I "change my style" without breaking the bank!

6) Keep "collecting" to a minimum.  Seriously, if you collect more than 1 or 2 things, choose one. Otherwise, it just becomes "clutter."  I collect hard back books.  And Lane Acclaim table...but those are part of my "timeless furniture" so I don't count them as a "collection." My point, "collections" can quickly become "clutter." 

7) If someone offers you a "family heirloom"...china, photos, knick-knacks, furniture...take it! Find a way to infuse it into your decor!  And if you just can't right now, store it away.  But take it!  My grandfathers' tools and leather case...my grandmothers' china...just a few heirlooms and THINGS I LOVE! and decorate with!

8) Pictures.  Photos of you, your family, your ancestors...surround yourself with them.  Find frames at garage sales and thrift stores and paint them...glue things to them...display them in groupings!  They are the people you love...surround yourself with them!

9) Pay attention to tips from designers.  There is a proper height for hanging pictures and a proper size rug...know them and follow those hard fast rules! I have a rug that is too small in my living room...I know it is too small and it bugs the heck out of me...which is why I just ordered a new, larger rug...can't wait to share!!!

10) Make your bedding a part of your "bedroom decor" and make it beautiful. You can buy beautiful, inexpensive bedding on Overstock and at T.J. Maxx and Marshall's. But more than anything keep it simple...and make your bed EVERY DAY! Simple is the key because if you have too much froo-froo and too many pillows you might be tempted to NOT make it because it is a tiresome chore!

IMPORTANT TIP!  Make your bedroom a "haven."  It should not be the room where you do book work, sew, fold clothes, scrapbook, etc...you should never go to bed or wake up to "work."  No matter how small your house is or how cramped you are for space, make it the one room in your house where you can "escape!"

11) Don't be afraid to TRY IT!!! If you see something you like on Pinterest, give it a shot! And if you just aren't the crafty/buildy/DIYER kinda person, find a few awesome flea markets and second hand stores to cruise through every so often...trust me, others are doing the DIY/Pinterest thing and usually you can find what you are looking for...but be PATIENT! 

12) Paint...there are so many tips and tricks to painting....again I could type a hundred posts on how to properly paint anything and everything...but they are already on the world wide web! But my best suggestion is to CHOOSE WISELY. And the only way to do that is to buy the samples pots and paint BIG swatches on your walls...then look at it...for days...or weeks...or whatever it takes to KNOW it is the color you want! I think I have shared how I choose my paint for my bedroom fireplace wall.  I THOUGHT I loved one color...but I kinda liked another too.  So I bought little samples of both, painted one half of the wall with each...and looked at it...for days.  Turns out, I liked the one I "kinda" liked better.  Had I gone with the one I thought I loved, I would have never been happy!

13) Shop thrift stores, flea markets, second hand stores, garage sales, auctions...be picky...be patient....you WILL find what you really love eventually!!!

14) DECLUTTER!!!  Clean out your closets, drawers, cabinets, pantries...GET RID OF STUFF! Don't have "stuff" just for the sake of having "stuff."  A few years ago, I opened up the cabinets under my book shelves...seriously, I bet I hadn't looked in there in 10 years.  You know what I found?  A lot of STUFF...and spiders...lots of spiders! I got rid of the stuff AND the spiders!

And before you bring more stuff home, or order it off QVC or Amazon, ask yourself..."Do I REALLY need this." Learn to distinguish between "need" and "want." And if it really isn't a "utility" item that you need, do you truly LOVE it? 

I watch those "hoarder" shows on TV and I don't get the sheer magnitude of it...because I can't understand the "mental illness" aspect of the whole thing.  But I do understand that we can get soooo caught up in the "wanties" and "gimees" and "Igottahavees" that we surround ourself with STUFF we really don't need. Or even want at some point.

It is one reason I strongly suggest using "fad" stuff sparingly in your decor....trust me, Chevron and burlap WILL go out of style...and your house will look like someone puked 2013 in your living room! It's cute...it can be fun to accent with...but use it sparingly and don't invest so much money in it that you don't feel like you can't get rid of it when it does go out of style!

EVERY SINGLE ITEM in your house should somehow enhance your life or have purpose...if it does not, get rid of it.

Am I guilty of breaking my own rules?  Are you KIDDING?  I'm just like everyone else...I make, and hopefully learn from my mistakes. I know that if I buy really expensive bedroom furniture because I just HAVE to have it right this minute, someday I will be stuck with furniture I don't really like but can't bare to part with because I paid a fortune for it! 

What do I love?  Heirlooms, furniture I was patient and waited for until I found THE perfect piece and the right price, stuff I paid little or nothing for and won't feel guilty kicking to the curb when I don't want it any more. I love my home because I have been very careful about surrounding myself with things that are timeless, things that have meaning (pictures, heirlooms, etc) and things I love. I still have a few "warts" here and there...and honestly, they are things I bought "on a whim" and/or paid too much for. But slowly I am trying to weed those things out!

ALWAYS keep your receipts.  And if it is something you can't return (from a garage sale or thrift store) make sure you pay so little you won't think twice about turning right around and donating it! 

And the NUMBER ONE RULE OF DECORATING YOUR HOME SO YOU WILL LOVE IT...get it clean and organized. Amazing how much more enjoyable your home will be when it is clean, decluttered and organized! 

signature.jpg

Drexel Declaration Mid Century coffee table...

I know I am always talking about how AWESOME some of my furniture finds are, but this is truly an AWESOME piece!!! Mid century and walnut...my absolute favorites! (Check out some of my other mid century finds and makeovers here!)

We scored this coffee table at an auction.  I probably should have flipped it over and looked for markings before bidding, but it is pretty big and honestly, I didn't want to draw too much attention to it (gotta be "cool" at the auctions!) When I bid on it, I knew nothing about it other than it was walnut and mid century! Structurally, it was in mint condition and I knew it could be spectacular with a little elbow grease. The scratches and water sports were not too bad! We were told it had been stored in an old outbuilding for years....I believe it! 

The piece is marked on the bottom. It is a Drexel Declaration coffee table.  A relatively "rare" piece with a good value!

As I have said before, it is not the "profit value" that motivates me.  It is the absolute LOVE I have for this furniture.  

It has been in my garage for months. I just didn't have the time or space to mess with it! The first thing I had to do was strip it.  Keep in mind the finish on these pieces are 50+ years old so the old varnish has "yellowed" over time.  And of course there is all the wear and tear...scratches, water damage, worn finish! But you CAN NOT strip old paint or varnish inside. The chemicals are just too strong and stripping and sanding does make a bit of a mess so I made sure I got all stripping and sanding done before it got too cold to work outside! (I really need a heated shop!)

I almost always use Formby's furniture refinisher to strip old varnish.  I find that it really does a great job of "melting" the old finish off while hydrating the wood.  Occasionally I may have to use something a little stronger and on very rare occasions I will actually sand the piece.  I did take some sand paper to this piece only because there were several "water stains" that just couldn't be chemically removed.

I can not stress enough how important it is to CAREFULLY sand old furniture!  Veneers can be very thin and it is easy to get carried away!  Always start with a fine grain paper (220 grit) and work your way to a heavier grit ONLY if you need it.  Then work your way back to a fine grit!

You may not be able to remove every stain or imperfection.  And that is okay!  Old and antique pieces are going to have imperfections!  Embrace them!  My office desk I featured here is a prime example....

Try as I might, I could not get this old cigarette burn to go away...and that's okay.  It is a constant reminder of one of the many reasons I shouldn't start smoking again!

Fortunately I was able to get almost all the "imperfections" off the coffee table.

Also, most finishes were originally applied in a way to make the wood grain appear "uniform."  A multi-layer technique may have been used or the finish and stain were sprayed on. Once the original finish is removed, you are likely to find that the wood grain no longer has a "uniform" appearance. Again, embrace it! 

After making sure I removed ALL the old finish, I "washed" the entire piece with mineral spirits. This is an important step when refinishing furniture whether you are applying a clear finish or painting.  It removes all the gunk and oils. Then I hit is with a very fine sandpaper just to knock down the grain a bit.

The mineral spirit wash will also give you an idea of what color the wood will be when you apply a clear finish.  Most woods will be a completely different color stripped than it will after a clear finish has been applied. After you wash the piece with mineral spirits, the wood will eventually dry back to a natural color, but while it is wet you will be able to tell what color it will be after a clear finish is applied and whether you will want to apply a darker or different color stain.  I personally love the color of natural walnut after a clear finish is applied, so rarely will I apply a stain.

After wiping the piece down with mineral spirits, I wiped the entire piece down with tack cloth to remove dirt and dust.  Again, you can wipe down a piece all day with the cleanest cloth...I can promise you the tack cloth will find more!  Use it and use it between EVERY coat of finish or paint! 

After stripping, sanding and tacking, I began applying the Formby's tung oil.  I love this stuff...in my opinion it is a superior finish to poly!  Super easy to apply and much less room for error. If it gets scratches in the future, just hit it with 0000 steel wool, tack cloth and then apply another coat of tung oil.  Simple!

Because of the weather, I had to apply the tung oil inside.  The smell and fumes from tung oil is not that bad. Steel wool itself tends to crumble and create "dust" so I decided to try something new...which is NOT something I do easily! I picked up these little "finishing pads." They seem to work pretty well! I still favor the steel wool, but the pads produced far less "dust" than the steel wool!

A little trick when painting or refinishing...place aluminum foil under the feet/base after you are finished sanding and tacking.  Most paint and finish won't stick to aluminum foil (unlike paper) and it will protect your floor and keep dust from being dragged onto the base when applying the finish!

I usually apply 3-5 coats of tung oil.  I use a "stain sponge."  You can usually find them in the stain section at Lowe's. Three coats is usually enough, but if I still feel the finish is "uneven" I will continue to apply coats until I get an even "gloss" look.  ALWAYS rub it down with 0000 steel wool and tack cloth between each coat. 

Whether you use steel wool or finishing pads or sand paper, make sure you always sand WITH the grain.  

"Sanding" and tack cloth between each coat is VERY important.  I used tack cloth before I applied the first coat of tung oil and I could still see and feel "crumbs" after it dried!!! 


I love this piece.  I think it looks a tad too big for my living room, but I just can't bring myself to part with it! Honestly, I think I would like it a bit better if I had a bigger rug.  This one has always been a tad too small, but it was cheap and I just needed something to throw down to keep our toes warm! With an old kitty in the house, you don't invest too much in rugs.

So I have been looking...Joss and Main...Overstock...I'm looking!  Someday.

(UPDATE!  Yep, that is the NEW rug...featured it here...and I seriously love it! I am so honored to be featured on betterafter.net!  Gail asked to see the inside, so here is a picture with the top open. As you can see it has a little compartment with a sliding drawer. The inside was in mint condition, so I did not do anything to it!)

IMG_0224.JPG
signature.jpg

Hung up on guns....

If you are anti-gun, don't read this post! 

Actually, you might like this post...because I managed to "refurbish" a vintage gun in a way that makes it safe and fun! 

I know a lot of parents these days "don't like guns!"  But your husband or father may have an old shotgun, rifle or pellet gun they hold dear and wish they had a way to display without offending mom's good gun senses!   In the south, we cherish our old guns, even if we don't want our kiddos playing with them!

I bought this 1952-1954 (per their website) vintage Crosman 22 at an auction!  It was a mess...again, my photography skills are lacking.  But trust me, it was a mess.  And it was not functioning!

The metal parts on top where actually taped to the stock of the gun!  And it wouldn't hold any air pressure!  I guess someone could refurbish the gun and make it functional, but I decided to do what I do best and make it functional for my purposes!


Many vintage guns have the most beautiful wood stocks...usually walnut, and very easy to refinish.

IMPORTANT WARNING! This is where I am going to tell you the number one rule of gun safety and handling!  ALL GUNS ARE LOADED!!!  Even if someone tells you they are not, ASSUME THEY ARE!  Check and recheck...and until the gun has been checked and rechecked and disassembled with the barrel facing AWAY from any human or animal or window, just assume it is loaded!  Once you are satisfied there are no pellets, bullets or shells lurking in the depths of the gun somewhere should you handle it freely! 

After disassembling this air gun, I stripped the finish off the stock with laquer thinner...unfortunately it took the black off the barrel as well!  The metal barrel was in pretty bad shape and I was planning on doing something that would render it completely "useless" as a gun, so no biggy.  AND once I removed all the bluing (that's the black finish on the gun barrel) I found the model number and the manufacturer's name stamped on pretty brass!

After removing all the old finish, I sanded the stock with 220 grit sand paper. I also sanded the metal parts to remove all the rust spots. 

Three coats of tung oil on the wood stock (no stain, that is the natural finish!) and flat black spray paint on the barrel...then I glued the barrel to the gun, glued all the moving parts so the gun is not functioning, added a few little hooks, and....

WHALLA!!  

A nifty little hat/coat rack fit for a little cowboy...or cowgirl!  Or maybe a hunting cabin!  

This is not something you want to do to an heirloom gun...not without permission from the owner!  And it is NOT a toy!  I plan on putting wall hangers on the back so it can be secured to the wall.

But it is a relatively easy little project and a great way to "disarm" and display old guns lurking in the attic or back of the closet! 

Easy recipe book....

I love recipes.  I've collected a lot of recipe books over the years, including one my mother received as a wedding gift in 1961....a church recipe book.  It is awesome!  Best peanut butter cookie recipe EVER!

My uncle inherited my Grandmother's recipes and I brought them home and scanned EVERYTHING....every handwritten recipe, every newspaper and magazine clipping, every box recipe.  Anything she had in her recipe boxes, I scanned.  Someday I plan on making a recipe book with all the scans...someday.  They have been on my computer for over two years...but someday. 

So when I started cruising Pinterest I wanted to keep ALL the recipes that sounded even remotely good.  But I discovered that sometimes when you pinned a link, it was no longer there when you went back later.  So I had to find a way to organize all the recipes. 

I started printing them off, tacking them to the refrigerator and then if we liked them, I would put them in a "recipe book." 

I found the easiest way to do this was to "cut and paste" the recipe into an email, email it to myself and then print it off.  If it passed the family taste test, I would slip it into my recipe book. 

The book is a simple scrapbook with the little clear sleeves with paper inserts...50% off at Hobby Lobby.  I can add additional pages to it when I need to and the sleeves make it easy to slip the recipes in and keep them from getting cruddy when I splatter stuff on them.  

If I am feeling creative I will put holiday scrapbook paper in place of the white paper inserts.  

Pinterest and the internet are loaded with awesome recipes...and I really believe the secret to being a good cook is the willingness to try new recipes, even if you need to change them up a bit! 

Keeping up with all those recipes can be daunting and most of us rarely have the time to write them down on nice little cards and file them in nice little boxes like our mothers and grandmothers did.

Print, trim and slip....easy.  


Walnut chair reveal.....

Well, it is done....and while I know where the little "goofs" are, I have to keep in mind one of my father's pearls of wisdom...​

"You'll never notice it on a passing train!"

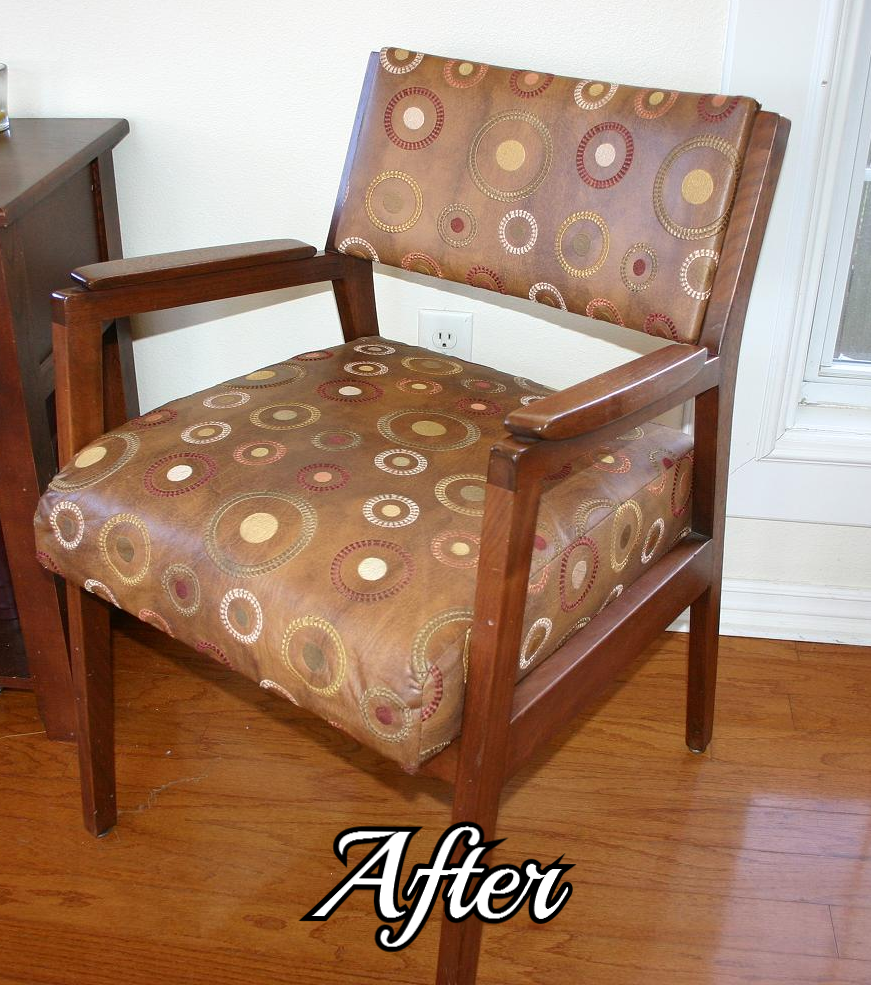
As I have mentioned before (here), Mom told me she and Dad found this chair in a field when I was a baby.  When they found it, it was bleached white from being in the sun...and she is pretty sure it originally had a cane seat and back.  Dad knew it was walnut so he took it home, repaired it and refinished it.  I would bet the upholstery in the "before" picture was probably the second time he refinished it.  This looks more like something he would have done in the 70s or 80s.

I pulled the 5,486 nail heads (so I exaggerate a tad) and removed the old upholstery, nails and padding.  Dad wouldn't have touched polyurethane so stripping the original varnish finish with my favorite Formby's varnish stripper was not a real challenge.  I repaired a few loose joints with glue and clamps!

Even with a new coat of dark walnut stain, it was very "uneven" in places so I had to do some patch-work staining.  Then I put 4 coats of tung oil on it.  And then it sat...and sat...and sat....

I just didn't know what fabric to get.  I knew I wanted something a little more formal and neutral. I let Brian pick from 7-8 fabric samples...wouldn't you know he picked my least favorite, but in all honesty, it turned out beautiful!  I opted for the double welting vs. the nail heads.  I contemplated having it recaned....but decided against it...maybe next time! ​ And I have just enough leftover material for a little pillow!

Every chair in this house has been bought or repurposed to uphold to "abuse" from kids and animals.  But this chair is special and it will be tucked away in the corner of my room where the worst thing that can happen to it is one of the cats will find it!

Maybe someday, when I am long gone, one of my children will cherish it as much as I do....thanks Dad!​

Framing memories....

I think four days of remodeling my closet and painting trim has taken a toll...I am woooorn out.  So today I will do a little coupon shopping! I HATE clothes shopping but give me a good coupon for shampoo or detergent and I am all over it!

So today I thought I would quickly feature some tidbits from past projects...framing memories!

We all frame pictures and diplomas, but frames come in all shapes and sizes and they are a great way to display a collection of things that have great sentiment...and a great way to decorate!

Wicker chair fit for a little ballerina...

It is so hard to take a picture of a piece of furniture that was white but is now a PALE mist green...but I tried! 

IMG_8798.JPG
IMG_8808.JPG

It may not appear in the picture to be a huge difference, but it really is!  And it is perfect for a little girl's room!  Now if I only had a "little" girl....

What is truly amazing about the color I painted the little chair (Valspar,  Mellow Spring) is it matches the color of my 60+ year old Universal Ballerina Mist stoneware to a T! 

My paternal grandmother wasn't a "china" kind of lady...so this was really all she had.  My mom bought the gravy bowl and plate, the serving platter and the tea pitcher at the estate auction after Grandma passed....while she was carrying it back to her car she dropped the pitcher!!  So when mom gave me what she had, the pitcher was beyond repair.  So I did what I always do...I Googled the pattern!   

Turns out it isn't a real expensive stoneware pattern...but the color and style is really beautiful and very "mid-century" since it was probably made and acquired in the 50s.  It is a "mist green" with a platinum band...just awesome.  So when I found more pieces out there, I bought another tea pitcher, the milk pitcher, salt and pepper shakers, a serving bowl and the sugar and creamer set.   

IMG_8814.JPG

Being the "family historian" and "archive fanatic" that I am, I carefully wrapped the broken pitcher, put it in a box, and wrote the story of why there was a broken tea pitcher in it and how I acquired a replacement.... with a Sharpie...on the box!  Hopefully my family won't think their mom was crazy for keeping a broken tea pitcher in the attic (trust me, they have enough reasons!)   

This week while I was sniffing around a new antique shop in town, I found another set of salt and pepper shakers! 

IMG_8815.JPG

Now that I have two sets, I don't mind using one...at least I know I have a replacement if they get broken!   

Pull up a chair...and another...and another...

I have a thing about chairs...and tables...unfortunately, I am running out of room.  But I can't help myself...I see an old battered and abused chair and I KNOW it can be beautiful again. ​

A few of these you have seen...but I thought I would share a few more.  As I have mentioned before, I was DIYing before it became vogue so I have many pieces I don't even have "before" pictures of...I just brought them home and did my thing....​

PA010076.JPG

I think I bought this little guy at a garage sale for $5.  Can't even remember what kind of fabric it had on it, but I bought it when I was remodeling my youngest son's room after he went off to college (it was the last room to get laminate...hence the green carpet)  The oak frame was in pretty bad shape, but a little cleaning, stripping and tung oil spruced it right up and the alligator vinyl is just awesome!​

Another apartment find...I remember it had orange vinyl and was in pretty bad shape...walnut maybe?  Again, strip and oil!  The seat was VERY uncomfortable so I added 4" foam and batting.  I expected the fabric to be "funky and whimsical" but it actually turned out kind of nifty looking and is perfect in my den!  What was really interesting about this chair was the little plaque I found on the underside....

IMG_8644.JPG
IMG_8642.JPG

Every piece has a story...I just wonder how this little guy made it all the way to Arkansas from a bank in Galveston, Texas!

IMG_8645.JPG

I told you at one time my taste was more "traditional."  I loved antiques....I bought a mahogany dining set at an antique store 18 years ago...I think it is all I have left of "that phase."  I have six of these chairs and the table...absolutely beautiful wood. I know a lot of people are painting these now, but I just can't! Over the years I have stripped and oiled them and just recently changed the seat cushions...again.  Nice thing about these chairs...the seat fabric are easy to change when your style changes!  I keep eying the "mid century modern" sets floating around but I'm just not ready to turn loose of this set!​ Yet!

IMG_1184.JPG

I found this nasty little oak creature when we were cleaning out a house...a little cleanup, Kilz and green and white paint and it is now a sweet little desk chair at Kaitlyn's!  Sometimes you have to be willing to look past the grunge!​

IMG_8502.JPG
IMG_8175.JPG

I have no idea where this chair came from.  I do know it has been in my attic since I moved here 13 years ago, and I remember moving it around for many years prior to that!   When I remodeled my office, I searched high and low for the perfect chair! 

IMG_8648.JPG

One day I found this lurking in the back corner of my attic and I pulled it down with the intention of cleaning it up and painting it.  But after stripping away all the ​nastiness I found a beautiful mahogany chair...so I put 4 coats of tung oil on it and recovered the seat....sometimes the very treasures we are looking for are hiding behind our Christmas decorations...lol!​

IMG_8363.JPG
IMG_8743.JPG

There was a reason this chair was 1/2 off at a thrift store...but I saw potential!  And I think it had a little!  ( I will not mention the horrendous mistake I made during the construction of the cushion because no one but me probably notices that a very important element of the fabric design is JUST ALL WRONG and is the perfect example of mistakes one can make even when they are being VERY careful and SOMEDAY when I have an extra 4 hours to spare I will redo the cushion...until then, I just keep hoping nobody notices!​  Grrrrrrr! )

I have posted these along the way...but they are just reminders of my obsession with chairs.  And it doesn't stop inside.  In my yard I have built two swing pergolas, one large patio pergola and have started collecting the old metal lawn chairs from the 50s and 60s...I may be constantly moving, but when it is time to plant it, I want something awesome to plant it on!!!!

wingback_before.jpg
office corner.jpg
houndstooth before.png
houndstooth after.jpg
BEFORE.JPG

And last but certainly not least, my dad's walnut chair.  It is currently sitting in the corner of my room and 

IMG_8574.JPG

every day I look at it and wonder what upholstery will do it justice.​  I've looked for fabric several times and I just haven't found "it."  I will...one day a fabric will just "jump out at me."  And it will be perfect.  Until then.....

Doing a project "right" is about being patient...taking your time..sometimes waiting for the inspiration! 

Off with its head...or upholstery...either one!

wingback_before.jpg

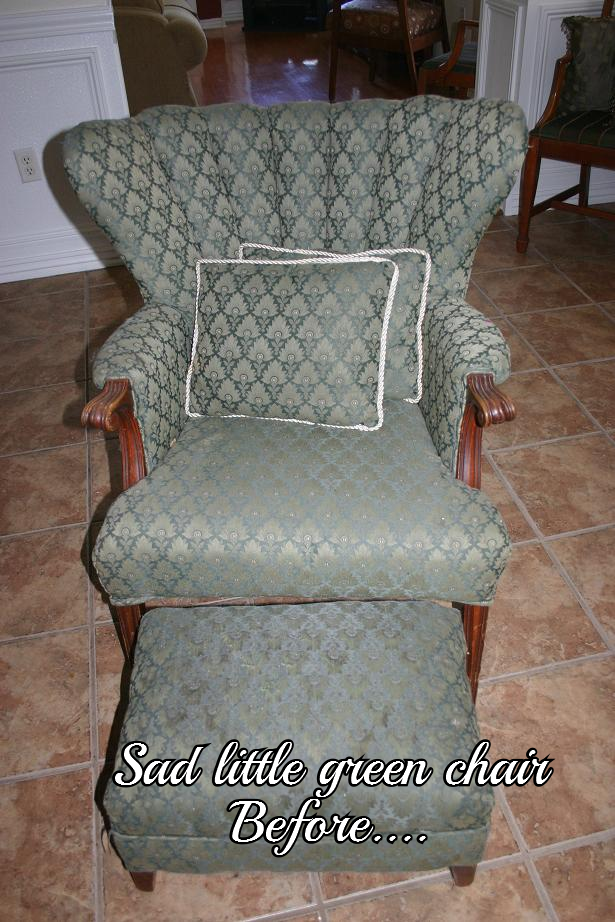
I promised to tell you the story of this sad little chair.​

I bought it YEARS ago at an estate auction.  I paid to have it reupholstered...​lots if I remember correctly.  And 15-20 years ago, the green fabric and the style was to my liking. 

But over the last few years, I have matured a tad and my taste has become more refined.  Okay, so I changed my mind about what I like and don't like.  Regardless, I didn't like it any more and I didn't want it.​

So, on Craigslist it went.  But for some reason, this pathetic little chair didn't seem to appeal to anyone...not even a little nibble. So one day in one of my manic "I CAN'T TAKE THIS CRAP AROUND HERE ANY MORE" moods, I picked it up to haul it to the curb.  See, in my neighborhood, if you set something on the curb of ANY value, it will be gone within an hour...I have done that with cabinets, vanity tops, light fixtures, furniture.  Gone.  Awesome.  Until you realize you could have taken it to Goodwill and gotten a tax write-off...but whatever.​

But then I got to thinking...if I can sew on a button and make a decorative pillow, why can't I upholster a chair?​

HAHAHAHAHAHAHAHAHAHAHA!  Seriously, what sane person thinks like that.​

Obviously ME!  Because that is exactly what I did.  I stripped the little thing naked, taking hundreds of pictures along the way, bought the amount of upholstery the little chart told me to buy for this style chair, Googled "how to upholstery a chair", found a great tutorial...and settled in to complete a project I was certain would take me a day at the most.  Lets just say, it took me MORE than a day just to get all the stinking nails and staples out of the thing.  I can't even remember how long it actually took to finish the job entirely. (My youngest daughter agreed to help initially but quit when her hands began to bleed...not me, I'm a trooper!)

office corner.jpg

This is now my little reading corner in my office...okay, so its really the cats' chair, but it looks good.  And a few side notes on the other items...the table is one of my Lane Acclaim tables I truly LOVE and adore...and buy whenever I can find one affordable. Hard to see, but on the bottom shelf are old wooden tape measures and a wooden level that were my great grandfathers and an old hand tooled leather briefcase that was my grandfathers. The wall is adorned with "things I love" as well....two original works of art by very talented artists (okay, my kids, but they are beautiful), my college diploma (nice to know it has some use) a cross stitch picture I did for my dad 20 years ago for Father's Day, and a picture of my BFF (my better half, Brian) and me on one of our first ski trips together! Things I love!​ The neeto mirror was a clearance at Hobby Lobby and the sweet little crystal lamp is a TJMaxx find!  And the red lantern was $1 at the thrift store and is filled with sea shells I picked up in California! 

Oh, and the pillow?  It was a lady's houndstooth jacket I bought at the thrift store for $2 and cut up for a pillow....sweet!​

And now you know the story of the sad little green chair that was headed for the curb when a demented women thought she could actually turn it into something beautiful....see, this stuff isn't hard...it just takes a bit of imagination and a tad of insanity! ​