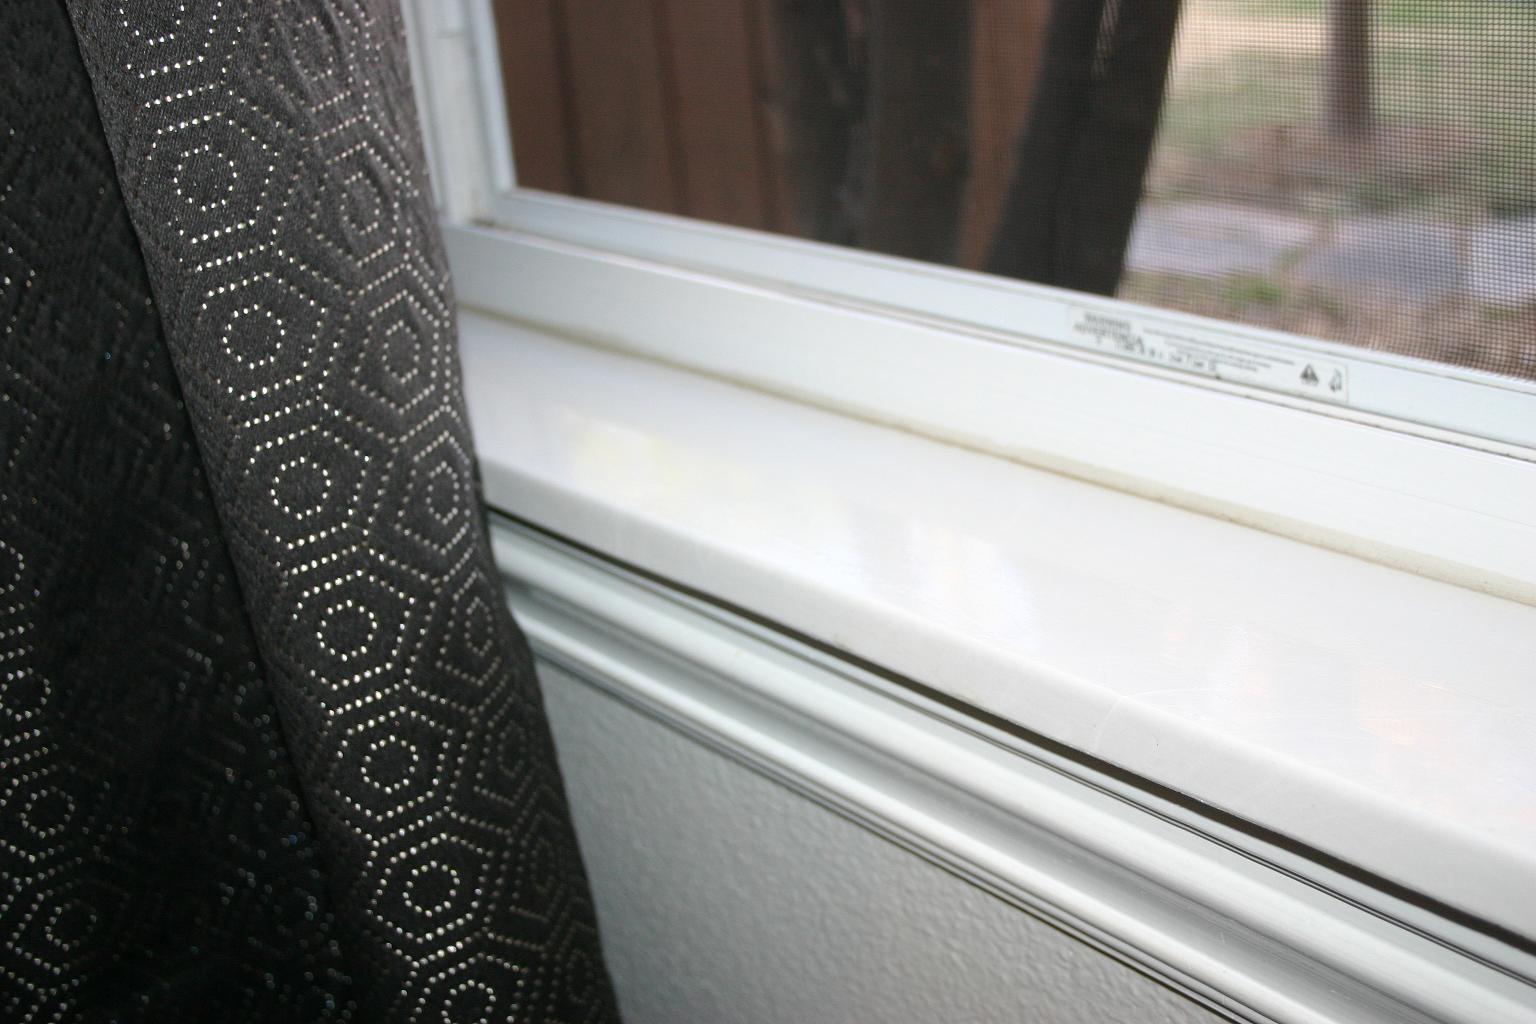
Window sills....

I've been working hard the last few days on my little garden shed...want to paint the shutters, but if I paint the shutters, I have to paint the door, but the door is rotten so it needs to be rebuilt, and while I'm doing that I might as well...blah, blah, blah.  NEVER ending.  But I'm almost done and I will share soon!​

In the mean time, I wanted to share a SIMPLE project... 

Marble window sills (or any solid surface material for that matter!)  Have you ever noticed the nasty black crud (i.e. mildew) on your window sills...or how the paint flakes and chips, especially after they get rained on a time or two.​​

IMG_8707.JPG

Easy solution!!!​ Cultured marble window sills.  Such an easy, inexpensive solution.  Now honestly, if you had to do them ALL at once, it would be a tad expensive.  But start with one or two...maybe the few that get left open the most in the spring (oops!) and over time replace all your sills with marble. I usually pay around $25 per sill.

It really is simple!  Take a VERY sharp utility knife and carefully "score" (cut through) all the caulk around the existing sill.  Basically between the existing window sill and the window, wall and trim.  ​Then take a flat tool (a chisel, flat screw driver, metal putty knife) and use a hammer to tap it between the sill and the trim under the sill.  Your objective is to lift the sill up...so however you can do that carefully....it doesn't matter if you scar up the sill, but you don't want to make too big a mess of the wall or trim.  Once you have the sill off take it to a culture marble manufacturer (easy to find in your phone book) and they can use it as a template for your new marble sill.  I usually get "white on white"...will match any white trim color.

If you are going to do more than one, make sure you number or somehow label your pieces so you will know what goes where!  You may THINK all your windows are 3' wide...trust me, there is a good chance there is a hair difference!​

IMG_8708.JPG
IMG_8709.JPG

To install your new marble sill, first "dry fit" it to make sure it fits properly!  You can make minor adjustments with sandpaper and even a skill/jig/tile saw IF you know what you are doing and feel comfortable doing so (cultured marble is NOT difficult to cut) If you can't make the adjustments yourself, mark where the cuts need to be on the marble with a permanent marker and take it back to the marble shop.

You will probably have a small gap (1/8" +/-)  all the way around...that's okay, you will fill that in with caulk.  If it fits properly,  just put a good thick "squiggly" of silicone caulk on the framing board the sill will sit on, install the sill and press firmly.   (If there is a gap between the actual window and "framing sill" you will want to run a nice heavy bead of silicone caulk to prevent air from getting in.  If the gap between the window and framing sill is BIG, you might consider stuffing it with insulation before installing your new sill!)

Now, here is the tricky part...you really should use silicone caulk to fill the gaps...and that stuff is NOT for the novice.  A 100% silicone will not clean up with water AND most are not paintable.  So if you are not a GREAT caulker, I would suggest using a "painter's caulk."  Easy clean up and you don't have to worry about it if it gets on the wall or trim...because it will hold paint.

IMG_8617.JPG

Remember my instructions about caulk...cut the tip small and at a 45 degree angle, with a very sharp razor blade.  When you caulk a gap, squeeze the gun trigger gently and keep it moving along the gap.  The deeper and wider the gap, the slower you will want to move the gun....the narrower or shallower the gap, the faster.  Again, it is a learned art....practice does make perfect.  But caulking is a necessity with MOST DIY projects!!!​

If you are really afraid you are going to make a big mess, take the time to tape off the area...run masking/paint tape along both sides of the "gap"...caulk...wipe with your finger...immediately pull up tape!!!  If you are going to attempt using silicone caulk, I would highly recommend doing this!!!  Keep mineral spirits handy for clean up!​

After you run a bead of caulk, take your finger and run it along the caulk/gap.  You want a nice, smooth "line."​

Caulk between the sill and the window/wall/trim...all the way around.​ If you are using painter's caulk, it will easily clean up with water...silicone caulk cleans up with mineral spirits. 

The entire process really isn't that difficult...and in the end you have a beautiful window sill that will never rot or chip, is super easy to clean and is very forgiving when you leave the window open during a thunderstorm!  

​BTW, if you are having a new solid surface installed in your kitchen or bathrooms I would highly recommend having the installer cut and install a new sill for any windows from the solid surface you are using...I had my granite installer cut a window sill for my kitchen window!  Looks beautiful and no more worries when I forget to shut the window before it rains!

Bathroom makeover on the cheap....

I told you earlier in the week this time change thing would be the death of me. I. AM. DYING.  It makes me work too late in the day.  Today I started rebuilding my storage building door and painting the shutters...a project I will share when I am done.  Funny thing is, with all the work I do, I threw my back out this morning WASHING MY TRUCK!  Immediately went the chiropractor, came home and started taking down shutters and building a new door...and I wonder why I feel like death tonight!!!  Geez.

But on to something fun!!! Since I didn't get today's project ready to share, I'll share an oldie but definitely awesome!​

When I first bought my 1800 s.f. 4 bedroom, 2 1/2 bath home it was plenty for my family then.  After a year I added a den and a year later I added a "master suite."  But I have always known that a big master bathroom was something I could easily live without.  I basically shower, primp and do "other" business in there...rarely do I have time to lounge around in my whirlpool tub with candles and a good book.  As a matter of fact, I think I have tried out the whirlpool maybe twice in 13 years.​  When my house was under construction I added a glass block window over the tub before I tiled. (I bought the house while it was being built but did a lot of the finish work myself!) The mistake I made was not adding an operable window at the time.

While they were installing the GOLD shower doors, I was thinking "EWWWWW! What was I thinking when I picked THAT!" I disliked it from day one...but I attempted (unsuccessfully) to decorate around them for 12 years!  ​I also tried to add much needed storage by adding a little white cabinet.  But try as I might, I could never get the bathroom to "feel" and work the way I needed it to.  The ONLY thing I liked about it were the beautiful maple paprika cabinets I have throughout my house...to this day I still love my kitchen cabinets!  But in the bathroom...not so much!

master before.JPG

So last year I decided to do a "semi" makeover in my bathroom.  I had just bought some beautiful granite at an auction...enough for my kitchen and all three bathrooms (again, I promise to tell you about that ubber sweet deal!) This is what I ended up with....​

IMG_5034.JPG
master after.JPG
IMG_5038.JPG

​Okay, where do I start.  Very tight budget so I had to spend wisely!

Paint, that is a given in any room makeover...light, clean...gallon at the most! I did paint the ceilings but after 13 years, it was time!​

​All the tile was fine. Thank goodness because that can be costly!  But the shower doors HAD to go...gold...seriously, what was I smoking?  Removing old shower doors is seriously the EASIEST and one of the biggest changes you can make in a bathroom.  Remove the doors. Just lift up and tilt out.  Take a hammer and carefully knock the top bar "up."  Be careful that it doesn't hit you in the head (yeah, I really do learn these things the hard way).  Now, MOST shower doors have just 3 little screws securing the side brackets to the wall/tile/insert.  So take the little screws out and "pop" the side rails off the wall.  Usually silicone is used as an adhesive, so you may have to do a little prying on the side rails and the bottom rail, but they will come up.  After all the rails are removed, take a razor blade and gently scrap the silicone off the walls/tile/tub.  The three little holes...just take a little bit of silicone and "fill" them.   Haul the entire insert to the curb and say "bye, bye!" Buy a pretty rod and spa curtain and say good bye to soap scum and that nasty black crud that grows in the rails!

Cabinets.  I bought new cabinets. Big expense. But in a bit, I am going to share a way to change the entire look of your cabinets and bathroom without spending a lot of money!!!​  Seriously...you WANT this!  

I was going for "modern" so I decided to go with brush nickel fixtures and hardware.  I priced the cabinet hardware at a local home decor store....$28 A PIECE...​I only needed 7 but really...$28 for a stupid little handle?  That is when I discovered myknobs.com  Found the hardware for around $8 a piece....SWEET!

Originally I was going to put in two mirrors...but I bought this one on sale at Hobby Lobby for the hall bath and  it didn't work in there so I hung it in the master bath and loved it....so I put in the totally awesome pendant light fixture instead! Well, okay, my totally awesome son in law installed it when he put in the recess lights (not pictures)! 

There is only me...and it's a small bathroom...so two sinks was a waste in my opinion. I decided to add much needed storage and just have one sink.  I got the sink and faucet on Overstock.com!  They have great prices on bathroom fixtures.  Always check them before you buy any fixtures or lighting!

Again, great deal on the granite top.​ Glass tile back splash...yum!  A small amount of glass block in a bath back splash can add A LOT of style and class for very little! (That will be a great tutorial...it's super easy!)

The biggest change was the new window.  That required some pretty serious construction and vinyl and sheetrock repair but it was doable.  ​And having an operable window in a small bathroom is a must have in my opinion!!!  I put in one of those nifty "crank out" kinds and I loooove it!!!  It is so nice to be able to air out the bathroom on nice days!

And of course when you do a "remodel" there are always those "little surprises."  Like the wad of pine needles and leaves I found in the HVAC vent....no air was getting through those vents....but some critter obviously had during construction.  I also discovered that when the plumber installed the wall plumbing behind the cabinets (tech term, rough in) he tore out the sheetrock and insulation, and then the cabinet guys just set the cabinets right over the gaping hole in the wall....you could literally see daylight when I removed the vanity.  I always wondered why the floor was soooo cold!!  And I never could figure out how water pipes I KNEW were in the floor managed to freeze when it was bitter cold. ​

So I promised an inexpensive cabinet makeover....a process that will change the entire look of your bathroom and is ubber easy!!!​  Seriously, it is soooo easy that it totally offended my "craftsman" senses.  Keep in mind, I just came to terms with painting wood furniture...so "refinishing" cabinets with this process really offended my senses.  But I tried it in my kid's bathroom and my guest bath and I LOVE it!  My daughter has refinished her bathroom cabinets, I have used it in the kitchen in my manager's house, and one of my friends just refinished her entire master bath!  It is amazing!

I found this process on Pinterest....which linked me to "Monica Wants It."  Monica gives a GREAT tutorial on refinishing cabinets...follow it to the T...do not deviate. ​(Monica used this on oak cabinets...I have maple...worked great on both! I also used it on unfinished oak and it worked just fine!)  I have used it three times, and it has never failed me!  Nor my daughter nor my friend!  Totally awesome.   (I wish my photography did it justice...but it doesn't!)

guest bath after.JPG
kids bath after.JPG
SARAHS CABINET AFTER.jpg

If you need to make an inexpensive change in your bathroom, use this tutorial to refinish the cabinets (don't forget the hardware!), get rid of that nasty shower door, give the walls a fresh coat of paint and update your lighting!  You would be surprised what a few little changes will make!  ​And YOU CAN DO IT!

Oh, and one personal tip...over the years I have changed all my towels to WHITE!  Why?  Because I can bleach them and they always smell fresh...no more musty towels.  And they look awesome in my new bathroom!​ Very "spa" like!  And TJMaxx or Marshalls always have great prices on shower curtains and bath rugs!!!

Bathrooms are a great place to learn to DIY.  You can go big and do big, or you can start small and do a little at a time!  ​Budget, time and desire dictate!  

Have questions on how you can "change" your bathroom...email some pictures and I will give you some suggestions!​ beckcampbell@cox.net

TDC Before and After

Another man's trash....

The other day I posted this picture of an old nasty dresser and three legged table I salvaged at the apartments.  People move and just leave their "stuff."  Most of the stuff is garbage and goes straight to the dumpster or trailer.  But eeeeevery once in awhile I will find something that is salvageable.


My new onsite manager and her husband are in need of furniture so when we ran across this rather nasty, yet very sturdy, oak dresser I promised her I could make it something she would love.  I asked her what "style" she wanted....she told me it would be going into her spare room which is also her husband's "Nascar" room...could I do something in black and white checkers?  Ummmmmmm....no.   That's okay, she has ​"checkered flag" knobs she can put on it.  (I guess my football and baseball decor is odd to some...but come on, those are REAL sports....lol!)

I will say, this piece was a challenge!  Some serious damage to the exterior as well as missing backs on two of the drawers....it took some serious "reconstruction" but that gives me an opportunity to share with you how easy this can be.​

Before beginning ANY rehab on old pieces, make sure you wipe them down with some type of disinfectant wipe.  Sometimes that means a little bit of scrubbing...but decades of grunge, oils and smoke can create problems down the road...not to mention, it's nasty!!!​

Glue, clamps and a nail gun are a must when repairing old furniture.  First and foremost you want your furniture to be sturdy and usable if you are going to invest time and money making it wonderful again!​​

First, you need to pry apart any "loose" joints, remove any old glue and fasteners and reglue and clamp.  Two drawers were missing the backs...so I took out the bottom, cleaned out the channel where the drawer bottom fit, reglued, cut a new back out of 1/2" plywood....​

and clamped and tacked it with some little nails.  Keep in mind, nails are not what holds a piece of furniture together....it's the glue.  The little nails just help secure it until the glue sets up!!  Glue well and clamp!  (Occasionally you will get a nail that does the above...pull it out from the back with needle nose pliers....and remember, nails WILL penetrate flesh (again, lesson learned the hard way) so keep your fingers out of the way!)

Also, many drawers on older pieces have dovetail joints....and in a perfect world we would all be able to dovetail new pieces to fit right back in with the old...but that is most often not the case.  If the "old" backs had been there, that is what I would have done....cleaned them up, reglued, fit them back together and clamped.  But since they weren't, I used my skill saw to cut off the dovetails from the sides and then just added a new back without dovetails.  If you don't know what a dovetail is (no, it is not the tail of a dove) Google it...​

This is also the time to repair any damage to the veneers and corners.  As you can see on this piece, a dog had used the corners as a chew bone and the veneer on the base was chipped badly.  Wood filler, a little sculpting and sanding do the trick.  This takes patience and may even take 2-3 attempts to "get it right."  Let the filler dry completely before attempting to sand. But in the end it is worth the effort....just sanding and painting damaged wood is NOT good.​

After all your repairs are made and everything feels sturdy, sand the entire piece with 120-220 sand paper, tack and get ready to prime.  I have posted a complete tutorial here on painting furniture that will help you through this process.  But I can not stress enough the importance of wiping down the entire piece with tack cloth before you spraying ANYTHING on it!  ​

If this piece were going in a more "formal" bedroom, I would glaze the carvings.  But they want a more "informal" piece...with checkered flag knobs...to each his own...lol!​

Regardless, it is a nice piece of furniture that was destined for the dumpster...instead it has been given new life and a new purpose....and will be much loved and appreciated for many more years!​

Please sir, may I have some more pillows....

I'm telling you, even when I try to be clever with my post titles, all I do is show my age...grrr.

Pillows....LOTS of pillows. And for a reason, not just because I LIKE to sew...because honestly, I REALLY dislike sewing.  I can do it...and IMO everyone should know how to do the simplest things on a sewing machine. Sew a hem, make a decorative pillow, make curtains.  Simple stuff...not necessarily make a tailored jacket or Easter dress, but simple stuff.  My mom had me take sewing lessons when I was a teenager.  Didn't necessarily like them, but I am grateful I can use a sewing machine now.  If you can't, sign up for a class at your local craft or fabric store and learn.  Buy the cheapest, simplest sewing machine and learn how to use it. My machine basically sews straight stitch and zig-zag.  I think it does button holes too, but I don't...

So back to WHY I had to make a bunch of pillows. First, last year I decided I didn't like the big fluffy cushions on my couch.  Haven't really liked them since I bought the couch.  But they were expensive and filled with down fill.  If you have ever bought stuffing for pillows, you know it is expensive....not something to waste.  So I bought some inexpensive white cotton material, measured out 19 x 19 and 13 x 21 squares for pillow forms ( allowing for a 1/2" seam all around), sewed them together and stuffed them with the down stuffing from the too fluffy cushions.  I think they call that upcycling now....much better adjective than cheapo. I ended up with 5 oblong and 5 square ones....wow!  he reason I made and stuffed forms, is because as you may know, some down feathers are "pokey."  Having the form in the pillow helps protect your guests from being speared by a feather.  If you are just using plain old "fill" (without feathers) no need for the forms. Just make the pillows and stuff them!

Once I had all these pillow forms, I started digging through my leftover material from past projects.  Mostly upholstery projects.  I found enough to make these pillows....

IMG_8672.JPG

I had material from the dining room chair recover, the peacock chair, my wingback chair and my daughter's houndstooth chair.  The white cable knit is actually a sweater I bought at Goodwill for $2, and used to make a pillow!  ​

Depending on the amount of material I had, I cut some 19 x 19 and some 13 x 21.  Two for each pillow.  ​

I trimmed all of them (except the cable knit) with piping.  YOU DO NOT HAVE TO DO THIS!  I just like the way it looks...start simple and forget the piping if this is your first attempt!

Now piping CAN be tricky.  You can buy it already made and ready to sew into your pillow....but that is a tad expensive....they have some inexpensive premade but they also have some really nifty ones with beads and all kinds of stuff!  If you have enough material, you can actually make your own piping.  But most people don't understand that piping material MUST be cut on the bias....which means it has to be cut at a 45 degree angle across the material or it puckers reeeeal bad...which means you have to have A LOT of material to make the bias for your piping.  Confusing, I know. 

Easiest, and by far the cheapest, is buy "premade" bias tape and cover piping with it.  It comes in all colors and you are sure to find one to accent any pillow you are making!

Just iron the bias tape flat, fold in 1/2 and sew in the piping with your zipper foot (seriously, learn to sew a straight line!) and then sew it onto one side of your pillow....then pin the other side of the pillow, face down, and sew again...leaving an opening to stuff the pillow form or batting.  Then just "whip stitch" the opening. Seriously, NO biggy if you can do the basic stuff on a machine!  ​(Seriously, take a lesson or have a friend teach you!)

God knew what he was doing when he decided I would not have a lot of money.  He knows I am a creative person and would miss out on the joy of learning to do things like refinish furniture, painting a room, and designing and building if I had money to PAY someone to do it.  And honestly, if I won the lottery tomorrow, I would still do those things because I enjoy them.​

But I probably would never sew again....I just really don't enjoy it.  But I do enjoy having nice thing...little treasures throughout the house...and decorative pillows are little treasures. ​

So I sew......​

Black doors...

todolist.jpg

​As you see from my "to do" list, I have a few things I need to get done around here.  Today I am finishing up the nasty dresser I brought home last week (not even on my list) and I am finally making the pillows that have been piled on my dining room table for a week.  So later, maybe tomorrow, I will post about those two projects...for today I thought I would post the project I STARTED last fall...by that, I mean I still have the entire upstairs to do, but ohhhh what a difference it made downstairs.

Just Google "interior black doors"!  Oh. My Goodness.  Beautiful!​

hall before.jpg
after.jpg

Last fall I saw a thing on Pinterest about painting door knobs.  Thirteen years ago, brass was fab...not so much now and at $20 a pop, I wasn't about to change out all my interior door knobs.  So I took them all off, primed and painted them black with spray paint.  Looked pretty cool...

....until I saw some pictures of ALL black interior doors.  Now THAT is cool!​

entry before.jpg
office before.jpg
entry after.jpg
office after.jpg

Painting ALL your doors may seem like a daunting task.  So start out slow...do one room at a time.​

All my doors were already painted with a good quality oil based trim paint (AKA alkyd paint)....so I choose to use oil base when I painted them black. If your doors are already painted with latex, use latex. Again, latex paints are MUCH better than years past!  (Word of advice, if you are every changing the "type" of paint, make sure you prime FIRST! You can "tint" your primer so you only have to do one coat of the actual paint) Black is a VERY difficult color to mix, so I bought a premixed black in SATIN finish at Sherwin Williams.  I used a foam roller and high quality paint brush.  I made sure to tape off all the hinges and knobs.  ​ Also, trust me...the first coat will look beyond AWFUL!  Patience...paint a second coat before passing judgment...one coat of black on white WILL NOT cut it.  

Regardless of what kind of paint you use, always put paper (newspaper works great!) or a drop cloth under the door....trust me, black oil based paint is TOUGH to get off any type of floor (which is why I have black speckles under my doors....grrrr)​

Both the boys (yes my adult boys still "claim" their rooms!) want their closet doors red....I think it will look awesome, so I will do all the upstairs bedroom doors in black and their closet doors in red...someday...maybe.  I am kind of hoping this fad passes before I actually get to it.  After all, the only people who go up there are the kids....I only go up to retrieve dishes and dirty clothes...and that's only because I run out of dishes and don't want to get hit with 10 loads of laundry all at once!​

Off to finish pillows and the dresser....busy day!  ​

This is the first time in three months I haven't been busting it every day at the apartments....nice to finally have a little time at home to get some things done!!!  ​

Type A personalities should not blog......

It's not that I haven't been doing DIY projects for decades, it's that I have SOOOOO many I want to do and share NOW.  So I am going in 50 different directions trying to get a dozen little projects done so I can post them.​  A dresser, an ottoman, an old office chair, pillows, the 3 legged table, ANOTHER table I picked up at Goodwill today (it has all it's legs intact), cork boards...you name it, I've got it going on here.  It's madness and my house is a disaster....NOT a good thing!

Seriously, I think I have a few years left in me....I mean honestly, eventually I'll run out of things to post if I try to do it all right this minute....typical "type-A" personality.  ​

IMG_8544.JPG
red before.JPG
IMG_8649.JPG

But I did get one project finished today....thank goodness.​

About a month ago my son asked me to spend a Saturday at an auction with him....I LOVE auctions but more than anything I love spending time with the kids when they actually WANT to spend time with me! And it was a cabinet shop going out of business...fun fun!!  Ask me how much of the stuff I bought I REALLY needed....ummm...probably NONE of it.  But I picked up a huge stack of cork board....and of course that stuff is not cheap and who doesn't need a cork board?​

So I set out searching for old frames...any interesting frame I could find.  Found most of them at Goodwill for next to nothing!

Pop the picture and glass out, cover the backing with cork board and paint the frame....PRESTO!!! Nifty cork board!

The large one is for Matt's girlfriend, Kaitlyn.  She is the mother of my grandpuppy, Beau.  Did you ever read "Marley and Me" or see the movie (OMG, if you want a good cry....)  That is Beau....silliest dog in the world but I just adore him.​

Anyway, when I went back to Hancock Fabrics today to buy the other THIRTY BOXES of pearl and bead strands (seriously, who could pass them up at 90% off....I just didn't realize they had soooo many left!) I found these nifty little 2 1/2 x 3 1/2 magnetic picture frames on clearance for .40....paint them up and they are cute as a bug on the cork board.  ​

IMG_8650.JPG

Now, here is where I ran into a "design" problem.  When you run into a design issue, or your "best laid plans" aren't panning out, do what I do....wing it.   My PLAN was to put a strip of magnetic tape across the board, cover with the cute houndstooth ribbon and then stick the magnet photo frames on it.  No dice.  The magnetic tape was crap and NOTHING would stick to it and the magnets on the frames weren't any better.  To top it off, I soon found out that hot glue is NOT a good medium for cork board.  ​

So, I used regular glue to attach the ribbon onto the board, glued 3 super powerful magnetic "dots" on the ribbon, hot glued magnetic dots to the back of the frames, and PRESTO....we have take off!!!  Or at least we have some cute little frames that can easily be changed out from time to time!​

There are soooo many things you could do to spruce up a cork board.  Cover the cork in fabric, attach vinyl lettering or even paint on the cork, cover with ribbons and bow....just so many ideas...Google cork board imagines and you will be surprised at the ideas that are out there. ​

I have some old window panes I took out of an old house...they have three divides in them and I am going to put cork in one, metal for magnets in one and chalk board in the one....I'll post that if I ever get to it....but before I do that project, I am bound and determined to get some of the others completed!​

Little Ms. Tammy's tuffet....

My friend Tammy is always in awe of all my little projects.  And I tell her the same thing I tell everyone.  YOU CAN DO IT TOO!!  But she always says she can't....​

So I was a bit surprised when she sent me a text last night with a picture of an ottoman she paid $10 for and a note saying she was going to recover it.  Honestly, I assumed she was fishing for help, so I was quick to reply that JR's funeral was last night....to which she replied "Who's jr?"​

SERIOUSLY!  I know she is not THAT much younger than me.  We are both "girls of the 80s."  Who's "jr"?  What, were you raised in the rain forest girl?​

Imagine my surprise when she sent me a picture of her completed project 3 hours later.​

YOU GO GIRL!!!  I am sooooo proud of her....she proved my point....YOU CAN DO IT!  ​​

IMG_1205.JPG
IMG_1206.JPG

Beautiful job Tammy!

Little house projects...

When you get your miter saws this year, let me know and we will start on the bookcases and fireplace surrounds.  I built all these over the years and have NO doubt you can whip one up in a matter of days....lol!  Just kidding...I would never expect the average person to tackle this size of a project...but my point is, if I can do THIS, you CAN do the smaller, simpler projects! 

And I will let you in on a little secret...when I had to do the "inside corners" of the large crown molding on the den fireplace, I went over to a house being built down the street and paid the trim guy to do it.  I know there is a trick to cutting inside corners on crown molding...something about backwards, upside down, stand on you head...but I haven't ever gotten the hang of it.  Outside miter cuts on crown...no problem.  So when I do the tutorial on building up your door trim, not a problem.  But maybe we can get a "guest"  to help us learn the art of cutting inside corners on crown molding!  Or better yet, I'll just teach you how to build those cool little corner doodads that look so classy!

In the next few days, I will post some pictures of my staircase...stripped the carpet and put in new treads and risers...seriously, it isn't THAT hard.  And when you get your new tools, you CAN do it.  I will also posts pictures of my master bath...with just a teeny effort, you can completely change the look of your bathroom.   And I promise to show you before and afters on my kitchen under counter lighting...seriously, you can't imagine the difference it makes in your kitchen!  

Until then....

My den...I painted this wall 12 years ago when I built this room...perfect example of "paint it a color you love and you will always love it!"  It is true!  I've never had any desire to change this color!   Now the TV stand...that's another story and a project I look forward to doing in the VERY near future...just have to find a piece that speaks to me...


IMG_5015.JPG

I built these built-in bookcases in my living room when the house was under construction.  Originally, there were just two walls with weird windows.  Had NO idea how to place furniture or decorate around them so I did the next best thing...just built some bookcases around them! Perfect spot for the Christmas tree, and I love decorating the arch window in the fall and at Christmas!

IMG_5021.JPG

Can you tell I read...A LOT...these are just a few!     

IMG_5025.JPG

Someday I MIGHT get around to putting up curtains...they are all the decorating rage. For now, I just enjoy waking up to the view...and the sun, if it is up before me...rare! 

Curses on the moles....

spring moles (3).JPG
spring moles (2).JPG

Spring is almost here and the daffodils are blooming.  I went to take pictures of a few beautiful blooms in my front flower bed, only to find the dreaded "mole runs" scattered about.  I know the little creep is in there...I have seen evidence of him in the last few weeks...mole runs...even saw him "bumping" along one time but even with my well honed, quick mole reflexes, I somehow missed him.  I believe there is a deep cavern under my front flower bed where they can quickly retreat.​ I expect my entire front porch to disappear into it one day.

If you are unlucky enough to have been cursed with moles, you completely understand my frustration, and subsequent obsession, with the little monsters!​ I spent years, and hundreds of dollars, pouring poison peanuts down mole runs, only to find out they are carnivorous and don't even eat that crap.

Myth buster #1...Nothing but a spade shovel (or pitch fork...I have both) and quick reflexes will kill the little monsters.   I have tried every old wives tale out there, mole traps, and treatments for grubs...you name it, I've tried it. Forget it...you are wasting your time and money.  And the more time you waste, the more time they have to construct an underground nation below your yard.

So I have found there is only ONE sure fire way of killing the little boogers.  Mind you, you will NEVER rid yourself of the creatures...once runs are established, you won't get rid of them...kill one, another moves in.  But on average, I kill 10-12 year.​

This process requires a great deal of skill and patience.  First, about an hour before you have an hour or two to spare (hahahaha!) smash down all the fresh mole runs. 

Myth buster #2...moles are NOT nocturnal and basically run all day.  So it doesn't matter when you do this.​

I use to take my coffee, cigarettes and paper outside every morning...walk down the runs, grab a lawn chair and my spade shovel, and settle in...in my bathrobe...and watch...and watch...and watch.  And when I saw the little booger "digging" I would pounce on him with my spade shovel, screaming and cursing at the ground.  I wasn't aware of what a sight that must have been until my new neighbor cautiously mentioned my frightening ritual.  She had NO idea what I was doing.  She thought I was "watching my grass grow" but had no idea why I was spearing it violently with a shovel while cursing at it. ​

I use to just pounce, spear the area where I knew the mole was digging, and leave it be.  The thought of digging up a bloodied corpse was more than I could stomach...but I discovered that sometimes even my best aim MISSED!!!!  So I started digging to make sure it was infact dead...only to find that sometimes it was only injured or worse, completely unscathed.  At first, I would humanely "relocate" the moles to large pastures where the only damage they could do would be to someone's livestock (JUST KIDDING! I took them out to the woods away from homes and livestock). ​

But honestly, after awhile I was so fed up with the creatures that it didn't bother me to pop them out of the ground alive and beat them to death with a shovel.  Problem solved...until their friend moved in.​ But I was waiting for them!  I was certain word would get out and they would stop coming to my yard.  Obviously they don't communicate with one another.

Myth #3...Lots of "runs" means tons of moles.  Nope.  They are pretty much territorial and usually there is only 1-2 moles per acre.  That means that one mole is tearing up your entire yard...seriously...one.  They can dig 100 or more feet in a day...so they are fast and constantly on a hunt for food.  As a matter of fact, the "runs" you actually see in your yard and flower beds are their "feeding runs."  They actually have other runs deeper and entire little caves even deeper...which is where they hang out in the winter (told you, an entire underground nation).  But they must eat a tremendous amount of food, thus the reason for their very active digging.​

Myth #4...Get rid of the grubs and the moles will go away.  WRONG.  Moles love grubs but they also eat a lot of earthworms.  And you DON'T want to rid your yard and beds of earthworms.  Several years ago I put down Milky Spore in my yard....it has made a HUGE difference in how much the moles run in the yard...usually they stay in the flower beds.  Well nourished soil, easy to dig.  Lots of worms and grubs. ​

Myth #5....​Moles kill your plants.  Wrong...again, they are carnivorous.  They eat meat, not plants.  If something is eating your roots, it is probably a vole or other rodent, not a mole.  Moles may inadvertently kill a plant by disturbing the roots, but most well established plants won't be bothered by them.  If your hostas or bulb plant roots are being eaten, you have a completely different problem.

I have a friend who has a few little Jack Russell terriers...there are some dogs who will hunt and kill moles.  I have a cat who I think is hunting them.  And if you have an animal that is proficient at hunting and killing them, you probably won't have much of a problem.  But then you have a problem with a dog who digs and big holes in your yard from that activity. 

If you ask me I think you should just use the mole hunting ritual as a way to take time to relax while enjoying your coffee and quiet time, communicate with nature (your grass) and work off some serious frustration.  After all, how often can you legitimately beat something to death without it being frowned upon by law enforcement. 

Off with its head...or upholstery...either one!

wingback_before.jpg

I promised to tell you the story of this sad little chair.​

I bought it YEARS ago at an estate auction.  I paid to have it reupholstered...​lots if I remember correctly.  And 15-20 years ago, the green fabric and the style was to my liking. 

But over the last few years, I have matured a tad and my taste has become more refined.  Okay, so I changed my mind about what I like and don't like.  Regardless, I didn't like it any more and I didn't want it.​

So, on Craigslist it went.  But for some reason, this pathetic little chair didn't seem to appeal to anyone...not even a little nibble. So one day in one of my manic "I CAN'T TAKE THIS CRAP AROUND HERE ANY MORE" moods, I picked it up to haul it to the curb.  See, in my neighborhood, if you set something on the curb of ANY value, it will be gone within an hour...I have done that with cabinets, vanity tops, light fixtures, furniture.  Gone.  Awesome.  Until you realize you could have taken it to Goodwill and gotten a tax write-off...but whatever.​

But then I got to thinking...if I can sew on a button and make a decorative pillow, why can't I upholster a chair?​

HAHAHAHAHAHAHAHAHAHAHA!  Seriously, what sane person thinks like that.​

Obviously ME!  Because that is exactly what I did.  I stripped the little thing naked, taking hundreds of pictures along the way, bought the amount of upholstery the little chart told me to buy for this style chair, Googled "how to upholstery a chair", found a great tutorial...and settled in to complete a project I was certain would take me a day at the most.  Lets just say, it took me MORE than a day just to get all the stinking nails and staples out of the thing.  I can't even remember how long it actually took to finish the job entirely. (My youngest daughter agreed to help initially but quit when her hands began to bleed...not me, I'm a trooper!)

office corner.jpg

This is now my little reading corner in my office...okay, so its really the cats' chair, but it looks good.  And a few side notes on the other items...the table is one of my Lane Acclaim tables I truly LOVE and adore...and buy whenever I can find one affordable. Hard to see, but on the bottom shelf are old wooden tape measures and a wooden level that were my great grandfathers and an old hand tooled leather briefcase that was my grandfathers. The wall is adorned with "things I love" as well....two original works of art by very talented artists (okay, my kids, but they are beautiful), my college diploma (nice to know it has some use) a cross stitch picture I did for my dad 20 years ago for Father's Day, and a picture of my BFF (my better half, Brian) and me on one of our first ski trips together! Things I love!​ The neeto mirror was a clearance at Hobby Lobby and the sweet little crystal lamp is a TJMaxx find!  And the red lantern was $1 at the thrift store and is filled with sea shells I picked up in California! 

Oh, and the pillow?  It was a lady's houndstooth jacket I bought at the thrift store for $2 and cut up for a pillow....sweet!​

And now you know the story of the sad little green chair that was headed for the curb when a demented women thought she could actually turn it into something beautiful....see, this stuff isn't hard...it just takes a bit of imagination and a tad of insanity! ​