Bedroom makeover...part 2? 3?

I don't know how many times I have griped about my master bedroom. So this past month I began chewing away at a few little things I dislike.

It is my favorite room in the house AND my least favorite. My favorite because it is an awesome room...big, bright, cozy. Least favorite because after 13 years, I STILL haven't decorated it the way I REALLY want it.

I blame it on the furniture.

Ornate, heavy, dark, veeeery traditional! I paid entirely too much for it, so I can't bring myself to get rid of it. One bad thing about furniture...no matter how much you paid for it, chances are you are only going to get pennies on the dollar. 

There are a few pieces I would never get rid of...my dad's walnut chair and my grandparent's old trunkThe rest of it...honestly, if I had unlimited funds, it would all go.

But I don't...so it won't. The next best thing is to change it up a bit with a little bit of paint! 

I featured the beside tables and the high boy here!

The next big project was the bed! 

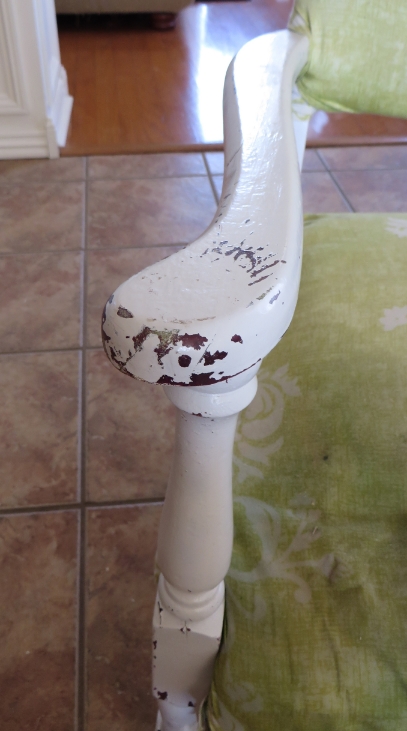
Honestly, this set would be perfect for a chalkpaint and distress treatment. I painted it with Kilz and sanded it and it was so cool looking. But alas, that is not my "thang" so I just went with my go-to Valspar Dune color.

I did finally paint the top of the Duncan Phyfe drum table...bye, bye beautiful mahogany!

I still need to do some kind of little vingette around this table...in time!

I'm not real thrilled with the bed. I had originally planned on painting all the raised part of the head board and just leaving the inset stained but Brian talked me into just painting the top scrolly part...which is really the part I disliked and it seems the paint just highlighted it. (See, I take his advise!) Oh well...it is different and that will do for now!

I also picked up this darling little antique fan at an auction. I'm not really into "froo-froo" stuff just sitting around and eventually it will probably go to one of my flea booths. But I like the color and retro style and it looks kinda cool on top of the highboy...for now! Until I have to dust it!

Now that all the furniture is painted, I REALLY want to install hand-scraped laminate flooring. And I really want to reupholstery the big chairs. Someday!

I found this AWESOME color chart on Pinterest....

I have some white and tan in the throw pillows and bedding but the majority of my white is a little more "off-white" and my walls are more of a "cream" than a tan. I can live without the grey...I like black better. But the blue is the color of my fireplace wall and I am itching to throw the cranberry color in there somewhere. Maybe in the upholstery on the chairs or a large rug on my new floors!

The paddle fans? Hum...might have to do a little a little paddle fan treatment!

So much I WANT to do.

That is one thing one has to understand about home decor. Unless you have A LOT of money and can afford to have a professional designer come in and do it top to bottom (my choice would be Candice Olson!) the best approach is a little bit at a time. 

Don't be afraid to buy used and do a little work to make it your own. As much as I disliked this furniture when it was all stained and matchy-matchy, I'm kind of digging it now! Still want something different, but I like it a lot more now than I did two weeks ago! The floors will come in time and I know someday a piece of upholstery fabric for the chairs will "speak to me" ...someday.

I always tell my kids...it's a good thing we don't have a lot of money...think of all the great things we would never have learned to do had we had the money to pay someone else to do it!

Seriously how much personal satisfaction could one get from having a bazillion dollars and being able to design, built and decorate your "dream" house without concern for costs?

See what paint fumes do to you....

Ivy and Elephants

Mid century chair SCORE!! And a Duncan Phyfe chair repair!

SCORE! Seriously, major score! 

Okay, so they don't look so hot right now and they didn't look any better piled on a trailer at the auction, covered in gunk and spider ick! 

Which is a good thing because nobody knew what they were...which means SCORE for ME! Baumritter mid-century dining chairs! Oh my!

I know they look rough right now, but let me work my magic on them! 

Truth is, mid-century furniture hasn't really hit the big time here like it has in other parts of the country and honestly, we don't see a lot of it around here. But occasionally I can find pieces here and there.

I love them...everything about them. The grain and color of the wood after it is refinished (usually walnut or teak), the clean lines, the incredible construction! I love the entire process of restoring these pieces because I know they will take my breath away when I am finished. I also know it is next to impossible to find solid walnut and teak furniture these days.

So...what is my hard-fast rule? If I bring one in, I have to take one out. So sacrifices have to be made and the sacrifice is going to be the rest of my antique Duncan Phyfe chairs! I have already sold 2 and have four left...two painted side chairs and two caption's chairs.

Last year I featured the chair I had to repairI was so proud of myself. I glued and sculpted the chair back that was broken and then painted the two side chairs, which kind of goes against my grain but they turned out beautiful. I didn't paint the caption's chairs....

The repair lasted all of about 6 months...and then the back busted again. CRAAAAAP! 

So this time I decided to "rebuild" rather than repair. 

This would have been SOOOO much easier had I just gone and bought a scroll saw. But oh no...I figured I could do this with my jig saw and Dremel. And I did...but next time I am going to buy a scroll saw!

First thing I had to do was deconstruct the chair to get to the "broken back." Fortunately, these chairs are constructed with dowel rods and the top pops right off...okay, you have to beat on it a bit and chip the paint...but it eventually comes off.

Then I had to find a little piece of wood the same thickness as the back...3/8". I figured that wouldn't be a big deal. It was. I ended up finding some 3/8" pine, but it wasn't wide enough...so I had to do the ole' clamp and glue thing to create a piece wide enough.

This is no big deal...truth is, most large wood slabs, and even smaller ones, are nothing but smaller pieces of wood glued and clamped together...most table tops are constructed that way!

After I let the piece sit for a day or so, (I was busy priming, sanding and painting my bedroom furniture...can't wait to finish and share!) I used wood filler to fill any gaps in the joints, sanded the piece smooth and traced the broken piece onto the wood...

....then I cut it out with a skill saw and dremel.

This is not a job for the faint of heart, impatient people or someone who has had more than 1 cup of coffee. You have to go slow and use a light, steady hand. I actually cut on the outside of my mark and then used sand paper to sand down to the mark. 

This process would have gone a bit quicker had the wood not split a time or two. It never split at the glued joints, just on the grain, which meant I had to glue and clamp the split and wait! Grrrr.....

Anywho, after hand sanding and sculpting for a few hours, I had a piece that was pretty darn close to the original! Then it was just a matter of priming, sanding and painting it.

I reconstructed the chair and hit the entire back with another light coat of paint and sealer.

Presto...ALMOST good as new! Can you tell which is which?

I can...the chair on the left is the repair. The big difference is the "lines" that are missing from the middle...after all the cutting and sculpting and sanding, I wasn't going to risk messing it up by trying to chisel lines in the wood. 

And I will be honest...fitting it all back together was NOT as easy as it sounds...there was some additional sanding and grinding and even a few curse words! But in the end it turned out pretty good!

Also, I noticed the paint has "yellowed" over time. That is pretty common for "whites." Something to keep in mind when contemplating "touch ups." There is a good chance you will have to paint the entire project if the color has faded, yellowed or changed over time!

Now that it is repaired and I feel good that it will hold up, I plan on selling this chair and the matching one and the two caption chairs so I will have room for my mid century chairs when I get them refinished.

If I bring one in, I have to take one out!!!

Hopefully I will get that done before Thanksgiving...or we may all be sitting on lawn chairs!


Arch window covering and temporary window coverings!

It's that time of the year...time to put up the blinds and shades to keep out the blazing sun and cool down the house a bit!

This past week Brian and I put up the outside roll-down blinds that cover the west-facing windows in my den! I love all the natural light, but when the sun hits those windows around 4:00 on a hot summer day, oh my! 

Hanging the blinds on the OUTSIDE makes a huge difference...and honestly it makes this room much more comfortable in the summer! (As you can see, I turn the couch around in the summer!)

The arch window in my living room is another story! I know....arch windows are soooo 90s. But that was when this house was built so that is what is there! It is a great place for fall and Christmas displays!

It would be very difficult to put a blind on the outside of the this window...so I had to settle with putting something on the inside. 

This is how bright it is BEFORE I put up a blind....

And AFTER...

Seriously, no Photoshop and no camera tricks. Before and After...within a few minutes. That is how much difference there is and it makes a huge difference in the temperature of the living room!

Fortunately my living room is two stories, so it still FEELS bright and airy, I just don't have the blazing sun heating up the room!

I couldn't really afford a "custom" blind for this arch. When I was searching for a solution, I stumbled across a "temporary" pleaded blind...maybe $15.00. It is perfect! When I put my fall decor up in the fall I take it down, fold it up and store it away until late spring. It has a clear plastic "base" that sits in the middle of the window and you just drop one end of the pleated blind into the holder, "fan" it out and secure the outside ends. It came with a "peel and stick" adhesive on the base of both sides, but that was pretty much shot after the first year. So now I either tape it or tack it down. Even though it is just a cheap little thing, it has lasted a good 5-6 years! Worth the small investment!

So if you have a room that is uncomfortable because of the heat generated by the summer sun, think about using temporary window treatments! You just might find the room a little more enjoyable and you will help cut down your cooling bills. 

Precious little metal "ice cream" chairs before and after!

I bought these pathetic little chairs at an auction last fall....

...neglected for who-knows how many years in an old outbuilding. Rusted, rotten...so sad. 

Then they were neglected for months in my garage because of the "rust issue" I just had no desire to tackle. But I did...and truthfully, it is not that big of a deal (check out how to deal with rust here)....

Then they sat in my garage for ANOTHER month.

They are so darling and I knew I wanted to do something bright and fun with them...I just didn't know what. I get serious mental blocks on upholstery projects!

(I can always tell how long a "project" has been around just by the grass...in the "before" pictures my bermuda is dormant...now it is lush and green and needs to be mowed twice a week!)

So I went to the fabric store and found the brightest and most colorful fabric I could find! 

Red for the frame...red is cheerful and fun and since the fabric had every color imaginable, it was perfect!

After dealing with the rust and giving them a good dose of primer (and of course the primer had to cure for a month while I mulled over colors), I sprayed the frames with red spray paint. I cut new seats and backs out of 3/8" plywood and covered them with new batting and the bright fabric .

Here is a little hint...if the "frame" where the back goes is 11", do not cut a new board 11", cover it with new fabric and batting, and expect it to fit. It won't.

The big button (almost) dead center in the flower was a fluke! The original back had a big button and I knew I wanted a button.

So this gives me the perfect opportunity to share how to make buttons for any project...chairs, pillows, headboards! Anything that has or needs a button...you can MAKE one out of any fabric!

Just buy a button kit...they have them at the fabric stores and most hobby stores. There is a template on the back for the fabric cutout and they come in all different sizes....

They are super easy to make! Just follow the directions on the back of the package!

TIP...put a dab of hot glue on the back of the front of the button before you hammer the back on and then put a dab of hot glue on the little U hook on the back of the button. A few times the back has separated from the front or the little U hook has come off the back...the glue just reinforces them a bit!

To attach the button, I measured and located the center of the board, drilled two small holes, threaded wax covered string on a large upholstery needle from back to front, through the front padding and fabric, slipped the button on the string, then threaded it back through and tied it off. Then I put a little dab of hot glue on the knot. Super simple!

I padded the back with a little batting and covered it with red fabric!

I love these little chairs...if I had somewhere to put them, I would keep them! Darling!

When I step outside my comfort zone and go with bright and colorful, I am never disappointed...maybe I should take that into consideration next time I makeover something I intend to keep!

And here is a little "upcycle" hint. I had an old outdoor chair cushion that was thrown in a pile of things I picked up at an auction. The fabric was crud but the batting inside was good. I took the fabric off and used the batting that was inside for this chair and saved the rest for future projects. Free padding!

Universal Ballerina Mist....

When I check on my flea booths I like to mill around and see if there are any goodies I want for ME! I try not to do this often because I do have a hard-fast rule...if I bring something in, I have to take something out. 

Every once in awhile I stumble on something I just have to have!

I featured my Grandmother's Universal Ballerina dishes here and hereThey are not "valuable" dishes, but ones I treasure because it was my paternal grandmother's. She was not a big "china" person and only had a few pieces of this style. I have added a few pieces here and there over the years.

I love the mist color and the platinum banding and the simple styling. Unlike my maternal great-grandmother and grandmother's very ornate and expensive china (also featured) it is very simple...kind of "mid century-ish" which makes sense since it dates around 1950...and I absolutely love it! 

I have never found any pieces in flea markets. I did find another salt and pepper shaker at an antique store one time. I bought it so I would have a set I would actually use! I didn't want to use the original for fear of breaking them! Good thing I didn't because sure enough, I broke one! All the other pieces I have added have been from Ebay or Replacements.com (both great sources for replacing stoneware and china.)

But today I scored a few pieces at the Tontitown flea market! 

Two refrigerator jars with lids...both in mint condition!

And a milk pitcher. It is actually the "ivory" color rather than the "mist" but I think it is a lovely little piece and thought it would look pretty next to the other I have in mist!

(Oops...still has the price tag string on it!!)

So today, I broke my hard-fast rule...there is absolutely nothing in this display case I can "take out" because they are all heirloom pieces that have great personal value. So I rearranged a few things and made room for them!

Good thing I don't have a huge china cabinet...

Nasty little chair makeover...PART I!

My INTENT was to get this chair done this week so I could feature it. The weather and a bum back kind of slowed me down.  But I got it done...but I am still going to break this up into a "Two Part Series" because the work that had to be done was pretty extensive. If you just want to see the before and after, check out Part II and scroll to the bottom!

This gives me a great opportunity to stress the importance of TAKING YOUR TIME and DOING IT RIGHT! 

The simplest little makeover takes time.  You can't rush the process.  Strip it properly, sand it properly, prime it properly, paint it properly!  Otherwise you are wasting your time and money!

My newest project is very similar to a chair I did for Sis....it was one of my first "features" here. (I wish I had taken better pictures to show all the detail!) The paint part was a tad easier because it didn't have to be stripped first.  But it was one of my first upholstery jobs, and the more experience you get, the easier it is. Okay, it doesn't get easier...you just know it is going to be a challenge.

One thing I have learned about upholstery...no two pieces are the same and ALL have their challenges. You learn to be creative, take your time, and use the proper tools...more on that when we get into the actual upholstery process!

I spied this pathetic little chair sitting outside an apartment...obviously it was being neglected and unloved! And then it was abandoned! So I tossed it in the back of my truck and brought it home. As with most projects, it sat and waited for inspiration (and time).

I know many tout the virtues of chalk and plaster paint.  No sanding, no prep, no prime.  But 1) I am old school and 2) the paint on this chair was literally crumbling off and I could scrape the white paint off with my fingernail!

IMG_0214.JPG

I wasn't going to risk painting this chair only to have the old paint flake off! Besides, I have to have a nice smooth "template." So my best bet was to strip, sand, prime and paint.

First I had to remove the old upholstery.  I'm not sure what is worse...a seriously botched attempt to "cover" the old upholstery or doing so and leaving the old upholstery intact. Which means I had to remove the 8,324 staples someone used to haphazardly attach the disgusting green fabric and the 6,352 upholstery nails (these are just estimates) used on the original disgusting fabric.

Regardless of what you are removing...good or bad...I always suggest taking TONS of pictures while you deconstruct.  You THINK you will remember how something was constructed, but you may not.  It is always good to have pictures to refer back to! When I took my first shot at reupholstering a chair I took hundreds of pictures as I deconstructed it...boy was I glad later when I got stuck on something and wasn't sure what to do! I just referred back to the picture of the original and I knew exactly what I needed to do!

After hours of pulling, prying and cursing, I was down to bare bones (both the chair and my hands!)

Once I got all the old upholstery off, I addressed the little "wobbles." This chair was in pretty good shape structurally but it is important to make sure all the joints are secure and tight. Glue and clamps! Don't move forward on a project like this until you make sure everything is in tip-top shape. You don't want to be glueing and clamping after you have a shiny new finish on!

Now it was time for a little strip job.

I used Citristrip jel to remove the multiple layers of paint! It actually took 2 applications. An old toothbrush on all the nocks and crannies. I used a mineral spirit wash to remove all the "goo." Then I let it all dry thoroughly.

I know stripping old finish and paint is a tedious, nasty, back-breaking process...and I have no doubt it is the reason someone came up with the idea of mixing plaster and paint.  But again, my "old-school" mentality just won't let me move forward without properly stripping all the old paint off.  

I don't paint over wallpaper, I don't tile over vinyl, I don't upholster over old upholstery.  I just don't. Call me crazy. 

Then I sanded....and sanded....and sanded! Getting all the old paint out of the grooves in the legs was not an easy task...but absolutely essential! This is exactly why I always keep old toothbrushes with my shop tools!

After sanding, I primed it with Kilz.  I like Kilz for several reasons.  For me, it is my personal preference after years of experience. Others swear by Zinsser. This is just one of those things you need to experiment with and do what works best for you! Regardless, I will ALWAYS recommend an oil-based primer!

Nine times out of ten I am going to prime a piece before I paint it.  I am not willing to take the risk of "bleed through", I want a smooth finish and I want my paint to stick!  On rare occasions I will not apply a primer if I am going to use chalk/plaster paint and plan to distress the piece.  But even then I prime areas I suspect might bleed through or cause problems.

Anywho, after I got MOST of the old paint off and sprayed on the primer, I let it dry thoroughly. Then I sanded, and sanded, and sanded...again. I started with a 80-120 grit, and finished with a 220.

I like to sand. Or rather I like how the piece feels and looks after it has been primed and sanded.  And in my opinion, "feeling" is the key! 

Funny story...years ago I was feeling quite smug about the fact that I had not gotten all those nasty little wrinkles all my friends had around their eyes and mouths and on their neck.  Until I put my readers on one day to pluck my eyebrows...and there they were.

Even though I finally broke down and got prescription glasses, I still don't trust my eyes to see all the imperfections...but I do trust my hands.  As I sand, I "feel."  If you can feel it, it will show through a coat of paint!!! Sanding transforms the piece and if done properly, it can mean the difference between having a piece that is beautiful and professional or one that looks like an inexperienced DIYer threw it together!

After priming and sanding, I used my compressor to blow the dust off and then tack cloth to get rid of all the little smidges of dust and debris! I know I harp on using tack cloth...I can not stress how important this step is!

My original plan was to paint the chair a "blush/salmon/coral" color and then upholstery it in black damask. I saw a chair almost identical to this one in those colors SOMEWHERE...and then I couldn't. What I could find was a lot of teal and damask...and since this is a piece that will be sold, I decided I had to go with what is obviously "in." A "pink" chair can be risky! Pretty, but risky!

So teal it is....

The trick to spray painting anything (besides the prep work) is to do 3-4 VERY light coats...let it dry for 30-45 minutes between coats. If you get a drip or run (which you shouldn't if you do LIGHT coats) let it dry OVER NIGHT and then carefully and lightly sand it with a VERY fine grit sand paper! Tack and then lightly spray it again.

After the paint dries I gave it a good coat of clear poly finish.  Probably overkill considering the Valspar spray paint I use SAYS it is an "all in one."  Again, I'm old school.  You clear coat everything. 

The key now is to WAIT.  Wait and let the paint dry and cure for a few days. Upholstery can put a lot of wear and tear on a piece so you want the paint to be cured before you begin working on the upholstery.  

And as you can see, this piece has some serious reconstruction to do before I can ever begin to put the fabric on! I'll make sure I take good pictures and share step-by-step instructions on how to reconstruct and reupholster this chair!

IF YOU WANT IT DONE RIGHT....TAKE YOUR TIME!

Stay tuned! Part II is on its way!

Nasty little chair makeover...before and after....PART II

(If you just want to see the "Before and After" just scroll to the bottom!)

Okay, so the frame is stripped, primed and painted....(see part 1 of this makeover here)

Now comes the fun part! Finishing it up with the fabric!

Before we start reupholstering, this chair had to have a little "reconstruction."

This chair had a "spring seat."  Some will have wood seats.  Those are a little easier, even if you have to cut a new piece of plywood.  But this one had springs and the twine holding them upright and in position had busted.  And one of the nails holding the brace had popped out.  So I had to reattach the brace and then restring the springs.  Not a biggy, but something you definitely want to get right or the seat will be all wonky. 

I used plain ole' twine to restring the springs and I removed the old nails and put in screws.  Just personal preference and besides, if the string broke at any time, it would be a lot easier to remove the screws and start over than pry out nails. 

If your chair has springs and they are in bad shape or you just don't want to mess with them, they are easy to remove. You can measure and cut a piece of plywood to put down in the base of the chair. Then screw the plywood on the frame of the chair and proceed with new foam and batting.

After fixing the springs, I covered them with a scrap fabric I have in my stockpile (I buy sturdy fabric at garage sales just for this purpose) and stapled it to the top of the seat frame. You can also use muslin or burlap. This fabric holds the springs in place and provides a base for the foam. Again, this is not something you would mess with if you have or add a wood seat base. 

Next, you want to measure and cut your new foam. I used 2" foam.

TIP: A few years ago I read a little tip about using an electric bread knife to cut foam.  I happened to stumble across one for $1 at a garage sale. For years I have used a utility knife and scissors to cut my foam. Man oh man....I can not tell you how easy it is to cut foam with a bread knife...it is like cutting butter and your cut is as straight as a factory cut....total awesomeness!  Why I didn't try this sooner is beyond me...typical "old school" stubborness. Live and learn!

After I cut the foam for the seat, I covered the foam with the scrap fabric and stapled it to the frame as well. Again, just to hold the foam in place and give it a smooth structure.

TIP: Many people try to reupholster using a manual or electric stapler.  Forget it. I don't care how hard you try, a plain staple gun (manual OR electric) is NOT going to work.  Old wood is just too hard for the staples to set well and you will spend half your time hammering the staples in...provided your hand doesn't fall off first. I STRONGLY recommend getting a small compressor and pneumatic staple gun. You won't regret it! It is one of items I highly recommend in my "Every Woman's Tool Box." Perfect for this kind of project!

The back of this chair is rather simple, but it needed new webbing and support. You can buy burlap upholstery strapping specifically for this type of project, but since I had some scraps of burlap on hand, I made some straps...I just folded it, ironed it and then stapled it place. Just make sure it is taunt.  Then I covered the entire back with the scrap fabric to give it a little more support....

Then I covered the back of the chair and the seat and frame of the chair with quilt batting. I use plain ole' quilt batting you can buy at the hobby or fabric store. Just staple the batting to the underside of the frame.

I picked up several rolls of batting after Christmas for 90% off...80 cents each! It doesn't have the "loft" of quilt batting but it works great on places where you want more structure than loft, like on the back of this chair. 

Now comes the fun part...actually covering the chair!

Before I began applying the fabric, I made sure I had the piping I wanted to use ready to go. I provided a little tutorial on how to make piping here but you may be able to find a better tutorial online. Use the one that you understand! I HIGHLY recommend using prepackaged bias tape rather than trying to make it out of the fabric you are using. Mainly because you have to cut your strips of fabric "on the bias" which means at a 45 degree angle across the width of the fabric...that takes a lot of work and a lot of fabric. Bias tape comes in a ton of colors! In this case I am using black pipping with a black and beige damask...nice contrast and super easy to make. You can also buy premade piping or trim, but honestly it is a tad expensive. 

Speaking of fabric.  You don't have to use upholstery fabric but you want to make sure you use a very sturdy fabric.  In order for an upholstery job to look "professional" you will be stretching it very tight and stapling it and if you use a light-weight fabric it can easily tear. The least expensive is duck fabric...you can find it at Hobby Lobby or most fabric stores.  It is the lightest weight fabric I would use. I have also used drop cloth fabric and it works pretty well!

I usually start with the back of my chair...only because in my opinion it is the hardest and I want to get the most frustrating part over first. Just my preference! 

There are a few areas that are a little tricky.  One is the arms...here is a little "picture tutorial" on how I deal with this....

To cover the "gap" created by cutting around the arms, I inserted a little "filler" piece.  I just folded down and iron the side adjacent to the arm, put a little fabric glue on the back, and stuck it on the chair and stapled. Then I wrapped the front fabric around the sides and stapled it to the back. 

I wrapped a double welt trim with fabric glue on the back around the arm and over the fabric where I cut it...and then stapled it to the back to secure it. Here is a great tutorial on how to make this welting. You will notice that the tutorial shows how to make it out of the upholstery fabric. Again, I recommend plain ole' bias tape! If you can sew a straight stitch, you can make this. If you can't, you can purchase it at the fabric or craft store! You won't need a lot for this type of project.

This may seem like a tricky thing to do....patience.  Take your time and THINK. And if you stripped the original upholstery and took lots of pictures (like I told you to!) you will have a great reference on how it was originally constructed. It really isn't as hard as it seems! The most important tip I can give at this point (other than be patient and work slowly) is make sure you keep your fabric pulled tight before you staple! 

Cover the front first and staple it to the back of the chair. After you have covered the front of the chair, you can add your piping by stapling it to the back of the chair, circling the entire edge. 

You may have noticed that this chair has a really pretty curve. There is NO substitution for PLY GRIP.  In order to upholster a chair, you have to have it. And you don't need a lot....just enough to go along the top of the chair because it is the only place you will use it.  I can tell you craft stores do not carry ply grip. When I reupholstered my wing back I stopped in an upholstery shop and bought about 5-6' for around $1 a foot. When I decided to get serious and do a few more projects I ordered a large roll online from DIY Upholstery SupplyI got 100 feet for $14.00, plus shipping.  This site is a great resource for all things upholstery! 

In this picture you can see how I stapled the trim around the edge.  Then I stapled a little batting at the edge of the trim.  Then I applied the ply grip.

This stuff "bites" so be careful. It comes with little holes in it so that you can use upholstery nails, but I just use my pneumatic stapler and staple it on, making sure that the edge of the ply grip is pushed tight against the piping. You only apply it along the top of the chair and about 1-2" down the side. It is very flexible and very easily follows the "lines" of the chair...whether it is curved or straight!

IMG_0386.JPG

I attached the back fabric along the BOTTOM first. I used upholstery cardboard tack strip to get a nice crisp line. Then I stretched the fabric to the top and shoved it into the ply grip with a putty knife.  Start in the middle and work you way to the edges...keep the fabric pulled tight as you work it into the ply grip. 

After you have the fabric pushed down into the ply grip, make sure there is no fabric ABOVE the depth of the grip...if there is, just trim it off.  Then take a hammer or rubber mallet and tap the ply grip shut. I would STRONGLY suggest putting a piece of scrap fabric between the hammer and the chair as you tap it shut. 

As I mentioned earlier, lighter weight fabrics can pose a few problems when used as upholstery.  Duck cloth does fairly well with the stress of the tugging and pulling and stapling...but occasionally even it might have a little "tear." I had this happen on the edge of this chair back. A tiny bit of the ply poked through. The only thing I could do (besides start over and that wasn't happening) was dab it with a little upholstery glue to keep it from tearing any more...and then I used a black sharpie to "hide" the little problem. (Again, I AM NOT A PROFESSIONAL!)

Before using ply grip, I strongly recommend spending a little time online googling as many tutorials as you can on how to apply it. You may be totally confused by my instructions...but completely understand another! It really isn't that difficult and seriously makes a huge difference!

"Professional upholsters" use metal tacking strip to fold over the outside edges on the back...not me. I just fold them over and use fabric glue. Probably not the smartest thing to do, but for me it is the easiest...and it holds! 

After the top is done, I tackle the seat.  In my opinion it is a tad easier. Just lay the fabric on the seat and make sure you have enough all the way around to staple it to the underside of the seat frame. You will have to cut slits on the corners to work around frame, but again, patience...take your time. And keep your fabric pulled tight before you staple. When working with a seat, whether it is a project like this or a simple dining room seat, it is always best to attach your fabric on all four sides FIRST...just put 2-3 staples in the middle of each side, and then start working your way towards the legs.

Also...PAY ATTENTION TO THE DIRECTION OF YOUR FABRIC!! Make sure it is all running in the right direction.  I used this damask on another project and discovered that I had applied it "upside down" on the seat. And one time I worked real hard to get a peacock smack dab in the middle of the seat of a chair...only to discover that it was upside down. Frustrating.  So check and double check before you start pounding in the staples! 

After my seat was completely covered, I edged the entire thing with trim...then I added a simple black fabric to the underside to hide all the innards. I use a cardboard edging on the front of the chair just to get a nice crisp line and then folded the fabric and stapled on the sides and back. 

Remember what we started with way back when....

And this is what we have today! Amazing....

IMG_0400.JPG

Before and After....

This truly is a "trash to treasure!" Now you know why I wanted to rescue the poor little thing!

Heirloom china...

Envy is a bad thing.  We all know that.  

But occasionally I stumble across a beautiful display of ironstone on a blog or Pinterest. The crisp, whiteness of the ironstone is just beautiful.  It just looks so "clean" and pretty. And for a second, I envy.  

Don't ask me why.  Truth is, I have no use for "knick-knacks" or non-useful items that require dusting...even if they do look pretty!

But heirloom pieces are another matter and I decorate with them whenever possible! I love the dishes and china I do display because every single one of them is an heirloom piece inherited from my grandmothers, great grandmother and mom, as well as a few pieces of my own.

As I have mentioned before, my decor taste has transitioned over the years from "traditional" to more "mid-century." But truth is, my home decor is probably more "traditional" than "modern." I describe it as "eclectic." Regardless of the style, I have worked hard to remove the things I don't particularly care for and fill my home with pieces I love.  

I seriously cherish the heirloom pieces I have inherited from family, and in spite of the fact most lean more towards "traditional," I display them with honor and pride.

That is what makes a house a home.....surrounding yourself with pieces you love and cherish and have meaning!

Several years ago I bought this curio cabinet so I would have a safe place to display my heirloom china. (I'm seriously thinking about painting it!) It is obviously not big enough to store ALL the china I have inherited, but I decided to display one place setting of each set.  The rest is carefully wrapped and packed and stored in clearly marked boxes in the attic. 

I have two sets from my maternal great-grandmother....

One of my maternal grandmother's....

My paternal grandmother's stoneware....(interesting story about the tea pitcher you can read about here) This is my favorite (right now) because it is pretty much "my style" right now.  Simple, soft "blue mist" color and platinum edge.

My china...I have THREE sets (One isn't even displayed).  Don't ask me why, other than the fact that I love china. And I hadn't inherited my grandmothers' yet so I felt I should have a set...or two...or three.  Funny (only now, years later!) story about the first set.  I bought a full set at an auction 25 years ago.  Years later, while in the process of moving, I had displayed the entire set in my china hutch...not realizing that the top shelf was not secure...and it ALL came crashing down. Naturally, it broke the least replaceable pieces...the tea pot, salt and pepper shakers, sugar and creamer set.  

Six years later, I went to an auction at a house my (ex) husband and I were buying...the lady was in her 90s and she had a beautiful set of china...identical to the one I had!!  She had all the "select" pieces I had broken. PAY DIRT!  

I bought this set at an auction as well. 

I have filled the cabinet with a few other heirloom pieces.

A Fenton tulip vase that was my mother's.  She has another that matches this one!

A pink carnival cream and sugar set...

...and more!

I run across beautiful pieces like this all the time in estate auctions.  Fine china, Fenton and carnival glass, painted porcelain and Wedgwood...all for ridiculously cheap prices.  Primarily because in today's world of decorating everyone wants the "clean, crisp" of stoneware and ironstone.  And let's be honest, who really USES these pieces any more?  Most of it is not even dishwasher safe...GASP!

But it is beautiful...and if they are pieces you have inherited from you family, you should display them with pride.  

signature.jpg

Dad's old tool bench....

One big "fad" right now are the old wood benches and tool boxes...."primitives."  I've had a few in my booth and they fly out the door. Like this one I featured here....

I'm not really in to all the "primitive" decor...including old wood benches and tool boxes.  But it dawned on me a while back that I had my dad's old wood work bench stored in one of my supply buildings at the apartments.  And while I am not big on "vintage" or "primitive," I am a huge fan of "heirlooms!"

He built this little bench and for as long as I can remember he carried his tools in it and even used it as a step stool!

When I finally dug it out, I found that it was in worse shape than I remembered....covered in some serious gunk, oil, filth and old paint!  The top board and one of the cross boards had cracks!  (Again, my photography skills just don't do it justice!)

Probably to be expected...I remember my dad using this bench when I was little.  And I know I used it for many years.  While I was stripping it I discovered old royal blue paint all over it...royal blue paint?  Then I remembered...25 years ago I painted my sons' bunk beds royal blue...and evidently I used this old bench during the process.

It took some serious time and chemicals to strip off all the old paint and gunk.  I didn't want to sand it because I want to retain all the "character" beat into the wood from decades of use! 

I don't know if dad used a skill saw to cut the boards when he built this, but I have no doubt he used a hand saw to cut the Vs in the legs...you could actually see the saw marks!

IMG_1463.JPG

After removing all the old paint and gunk, I even found where someone (me?) had carved tic-tac-toe markings in the wood!

IMG_1458.JPG

After removing all the paint and gunk with chemical removers, I scrubbed the wood with lacquer thinner and steel wool and then washed it with mineral spirits. Then I let it dry out for several days.

I really debated what to do with the little bench at this point.  I know it would be really pretty with a nice coat of paint...maybe distressed a bit. But the "character" in the wood is amazing and I really hesitate to do anything to cover any of it!

So for now I just coated it with some tung oil finish. Maybe someday I will get a stroke of inspiration and do something different. Until then I will just admire it for what it is...an old tool bench that my dad built and used. 

That, in my book, makes it priceless just as it is!

This is a prime example of WHY you should take anything and everything someone in your family gives you...it may seem like trash at the time, but someday it will be a true treasure.  My dad has been gone 19 years...anything I have of his is a treasure!

signature.jpg

Reflecting on 50 years of "decorating" life....

I started a post entitled 'Reflecting on 50 years of life."  I thought I might share all my "pearls" of wisdom. Really?  I, of all people, do not need to be giving life lessons...I'm 50 and still learning something new every day! Although I think if others would learn from MY mistakes, their lives would be a lot easier and pleasant. But truth is, everything you need to know to live a fulfilling life is either in the Bible or on Pinterest. Choose wisely (that is ONE of my "pearls"...ALWAYS choose wisely)

Anywho, I decided that I would be better off giving advice on how to make your home a place you will love. I'm not going to give you "decorator tips" because I am not a decorator...I am just a mom who has found a balance by trial and error. Besides, you can find REAL decorators all over the internet who will tell you how to decorate a room!

So here is some of what I know about "home interior decor".....

1) You won't ever wake up and say "THIS is perfect."  Your home is ever changing...families grow, kids get older, stuff gets out of date or worn...so embrace the ebb and flow of your changing life and go with it!

2) I give the same advice about major home decor purchases as I do cars...if I show you a stock and tell you that you will pay $40,000 for it today and I can GUARANTEE you it will be worth $20,000 next year, would you buy it?  Nope.  So why would you buy a brand new car or brand new anything? Personal property (furniture, cars, appliances) WILL depreciate.  Keep that in mind when making a home interior purchase.  Let someone else take the depreciation "hit" unless it is a piece you are madly in love with and you KNOW it will be in your home until...well, forever!  Here is a little trick I use sometimes...take the purchase price, divide it by the REAL number of years you think you will use that item...for example, my living room couch cost me $1500.  I knew I loved it and would use it for years...so far, I am going on 10.  So basically I paid $150 a year for this couch.  Yep, that is reasonable in my book! But the fact I have had it for 10 years is VERY unusual! Most people don't keep couches that long! Do the math...spend your money wisely!

3) With that advice in mind, whenever you can, buy used and make it your own!  Learn to paint...learn to refinish...learn to reupholster.  And if you just don't want to do that...or feel you can't...learn patience! Because I can promise you, that "vision" you have in your head for a new tv cabinet or bedroom set or chair will be out there at a garage sale or on craigslist or at a flea market....or seriously reduced at some point! 

I have wanted a coffee table like this for...well, decades.  But I never could find the EXACT coffee table I had in my mind...and when I did finally find it, it needed some attention!  But my patience and ability to DIY paid off...big time!

4) And with that in mind, NEVER BUY IT OR BRING IT HOME IF YOU DON'T SERIOUSLY LOVE IT! Or will love it with a little "tweeking," Because if you can look at it and say "Wow, I really love that!" there is a good chance it will be something you will still love years from now...you won't ever regret that purchase! My rule...if I have to think about it for more than 10 seconds, I don't need it! 

This tv cabinet was expensive...but I love it...it is 8-9 years old and I have NEVER regretted it or questioned the purchase. Great story. When I first fell in love with it, I really couldn't justify spending what they were asking...HOWEVER, they had one that was a "customer cancellation" and had a few VERY minor dings...at HALF the price of a new one. SOLD!  And the great thing was they had one of their experts fix the "dings!"

5) Use "fads" sparingly. Pillows, rugs, inexpensive pictures... basic accessories...can all be easily changed. So use "accessories" as a way to infuse "fads."  The big stuff...primarily furniture...should be something you LOVE and something you know you will probably love 10 years from now.  The only time I break that rule is if it is a second hand piece of furniture that is free or cheap that I am going to "repurpose" or "refinish"...knowing that next year I will pass it along to someone else, or repurpose or refinish it again!

As you can see in my living room I use pillows, framing and the rug to infuse the "blue and brown" that is currently all the rage.  In my den, I bought this little inexpensive side table at Salvation Army and stained and painted it.  

All can be changed or given away when I "change my style" without breaking the bank!

6) Keep "collecting" to a minimum.  Seriously, if you collect more than 1 or 2 things, choose one. Otherwise, it just becomes "clutter."  I collect hard back books.  And Lane Acclaim table...but those are part of my "timeless furniture" so I don't count them as a "collection." My point, "collections" can quickly become "clutter." 

7) If someone offers you a "family heirloom"...china, photos, knick-knacks, furniture...take it! Find a way to infuse it into your decor!  And if you just can't right now, store it away.  But take it!  My grandfathers' tools and leather case...my grandmothers' china...just a few heirlooms and THINGS I LOVE! and decorate with!

8) Pictures.  Photos of you, your family, your ancestors...surround yourself with them.  Find frames at garage sales and thrift stores and paint them...glue things to them...display them in groupings!  They are the people you love...surround yourself with them!

9) Pay attention to tips from designers.  There is a proper height for hanging pictures and a proper size rug...know them and follow those hard fast rules! I have a rug that is too small in my living room...I know it is too small and it bugs the heck out of me...which is why I just ordered a new, larger rug...can't wait to share!!!

10) Make your bedding a part of your "bedroom decor" and make it beautiful. You can buy beautiful, inexpensive bedding on Overstock and at T.J. Maxx and Marshall's. But more than anything keep it simple...and make your bed EVERY DAY! Simple is the key because if you have too much froo-froo and too many pillows you might be tempted to NOT make it because it is a tiresome chore!

IMPORTANT TIP!  Make your bedroom a "haven."  It should not be the room where you do book work, sew, fold clothes, scrapbook, etc...you should never go to bed or wake up to "work."  No matter how small your house is or how cramped you are for space, make it the one room in your house where you can "escape!"

11) Don't be afraid to TRY IT!!! If you see something you like on Pinterest, give it a shot! And if you just aren't the crafty/buildy/DIYER kinda person, find a few awesome flea markets and second hand stores to cruise through every so often...trust me, others are doing the DIY/Pinterest thing and usually you can find what you are looking for...but be PATIENT! 

12) Paint...there are so many tips and tricks to painting....again I could type a hundred posts on how to properly paint anything and everything...but they are already on the world wide web! But my best suggestion is to CHOOSE WISELY. And the only way to do that is to buy the samples pots and paint BIG swatches on your walls...then look at it...for days...or weeks...or whatever it takes to KNOW it is the color you want! I think I have shared how I choose my paint for my bedroom fireplace wall.  I THOUGHT I loved one color...but I kinda liked another too.  So I bought little samples of both, painted one half of the wall with each...and looked at it...for days.  Turns out, I liked the one I "kinda" liked better.  Had I gone with the one I thought I loved, I would have never been happy!

13) Shop thrift stores, flea markets, second hand stores, garage sales, auctions...be picky...be patient....you WILL find what you really love eventually!!!

14) DECLUTTER!!!  Clean out your closets, drawers, cabinets, pantries...GET RID OF STUFF! Don't have "stuff" just for the sake of having "stuff."  A few years ago, I opened up the cabinets under my book shelves...seriously, I bet I hadn't looked in there in 10 years.  You know what I found?  A lot of STUFF...and spiders...lots of spiders! I got rid of the stuff AND the spiders!

And before you bring more stuff home, or order it off QVC or Amazon, ask yourself..."Do I REALLY need this." Learn to distinguish between "need" and "want." And if it really isn't a "utility" item that you need, do you truly LOVE it? 

I watch those "hoarder" shows on TV and I don't get the sheer magnitude of it...because I can't understand the "mental illness" aspect of the whole thing.  But I do understand that we can get soooo caught up in the "wanties" and "gimees" and "Igottahavees" that we surround ourself with STUFF we really don't need. Or even want at some point.

It is one reason I strongly suggest using "fad" stuff sparingly in your decor....trust me, Chevron and burlap WILL go out of style...and your house will look like someone puked 2013 in your living room! It's cute...it can be fun to accent with...but use it sparingly and don't invest so much money in it that you don't feel like you can't get rid of it when it does go out of style!

EVERY SINGLE ITEM in your house should somehow enhance your life or have purpose...if it does not, get rid of it.

Am I guilty of breaking my own rules?  Are you KIDDING?  I'm just like everyone else...I make, and hopefully learn from my mistakes. I know that if I buy really expensive bedroom furniture because I just HAVE to have it right this minute, someday I will be stuck with furniture I don't really like but can't bare to part with because I paid a fortune for it! 

What do I love?  Heirlooms, furniture I was patient and waited for until I found THE perfect piece and the right price, stuff I paid little or nothing for and won't feel guilty kicking to the curb when I don't want it any more. I love my home because I have been very careful about surrounding myself with things that are timeless, things that have meaning (pictures, heirlooms, etc) and things I love. I still have a few "warts" here and there...and honestly, they are things I bought "on a whim" and/or paid too much for. But slowly I am trying to weed those things out!

ALWAYS keep your receipts.  And if it is something you can't return (from a garage sale or thrift store) make sure you pay so little you won't think twice about turning right around and donating it! 

And the NUMBER ONE RULE OF DECORATING YOUR HOME SO YOU WILL LOVE IT...get it clean and organized. Amazing how much more enjoyable your home will be when it is clean, decluttered and organized! 

signature.jpg