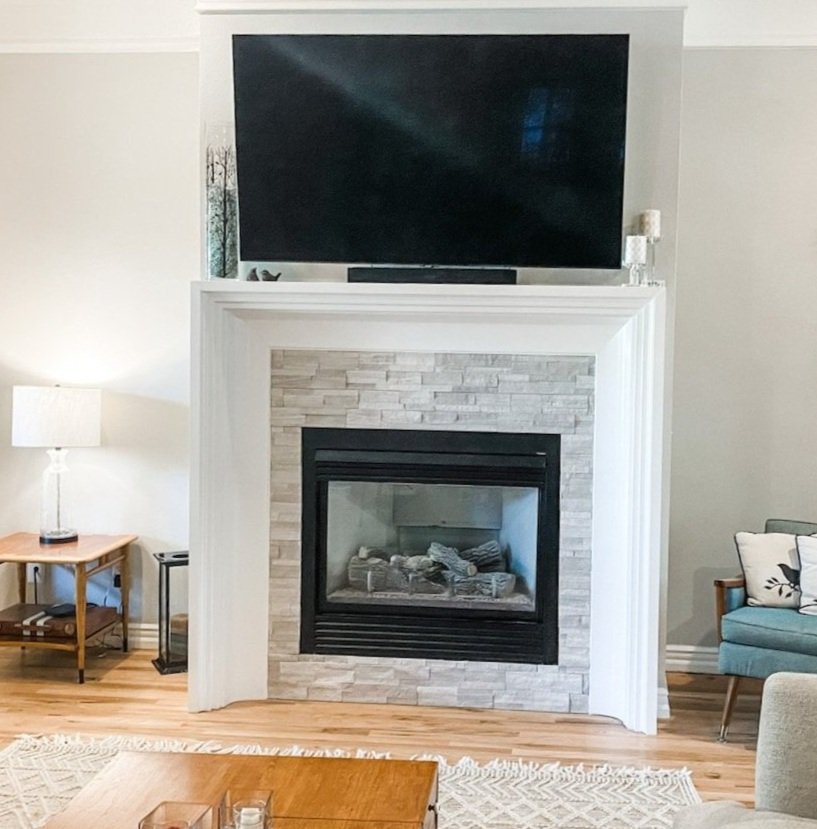
The living room fireplace reveal....

FIREPLACE MAKEOVER!

I have known from day one that I wanted to give each of the fireplaces a little makeover.

HERE I shared the den fireplace….

Now it was time for the living room fireplace.

The original fireplace wasn’t totally offensive. It just wasn’t “my thing.” Whatever that is! A little dated…just blah.

My original plan was something like this…

SOURCE

I really loved this “cove molding” look but this surround is stone…and SUPER expensive. I decided to try to recreate the look with wood.

First thing I had to find was the “cove crown.”

I found it HERE. The only issue I had with it was the fact that it is a “polyurethane” material…basically styrofoam with a plasticish shell…hum. I did some research and it is SUPPOSE to withstand heat up to 200 degrees. That should hold up to the heat put off by my fireplace….should. I guess I’ll find out next year!

So as I mention HERE, I found my inspiration, took measurements and made a tentative plan.

What is the old saying about “best laid plans?”

No matter how carefully we plan, not all will go right.

Case in point.

So I started by removing the old surround….

TIP! When you remove wood trim from a wall, first score the joint between the wood and the wall with a utility knife. It should have caulk between the wood and the wall and if you don’t score it, you may tear the paint finish. If there is still caulk on the wall, just take a chisel or putty knife and gently scrape it off. Also use a board behind the pry bar so you don’t bust through the sheetrock…I did it just for demonstration purposes…NOT!

When I removed the old surround, I discovered this….

I forgot this room originally had carpet. When they added the hardwood, they had to work around the existing fireplace surround which sat on the slab, so of course when I removed it there was a gaping hole in the hardwood flooring.

“Best laid plan” #1….

Not a big deal for me. First, I always keep “spare.” The problem was remembering where I put the spare pieces of hardwood. Once I dug it out from behind all the stored Christmas decorations I went to work patching these floors. Since much of it was going to be covered by the new surround, I didn’t worry about “lacing” it in like you would a prominent area. I glued and laid some 3/4” material as a subfloor, then cut a few pieces of the oak and glued them to the subfloor with construction adhesive, using wedges between the wood and the wall to fit them tight until the glue set up. I sanded and applied one coat of polycrylic before installing it. After installing it, I used wood filler to fill the gaps, gave it a light sanding, then applied another coat of polycrylic.

Hardly noticeable…or as my daddy use to say, “You’ll never notice it on a passing train!”

I decided to build the surround on the wall vs. building it as a unit and then attaching it to the wall. Just personal preference honestly.

I used a stud finder to find all the studs and marked them on the wall.

I put up 2 x 4 “bracing/supports” on the wall using THIS construction adhesive and deck screws. I was able to hit a few studs, but not as many as I would have liked…hence, the adhesive. I like this construction adhesive better than most because I have found it is tackier and less likely to “slide” before it dries.

Since these were the “supports” that all else would be attached to, I made sure they were perfectly straight and level.

I strongly suggest priming and sanding all your materials before installing it…this will save you from a serious dust storm IN the house! First course of business.

I began building the surround by attaching 1x material to the supports I had secured to the wall, using adhesive and nails. I used 1 x 8” poplar material on the outside and faced the edge with 1 x 2 poplar. I attached a 1 x 4 pine on the inside of the supports. Then I added spacers between the two to provide additional support and nailer for the trim.

(At this point the cove crown is just “propped up”…not attached.)

My “best laid plan” was to use crown between the outside board and the inside board….

Okay, here is the problem and where my “plan” completely fell apart.

I was THINKING I would just take plan ole’ crown and “cope” the inside corners. Works on a ceiling, right?

Right…but on the inside corners of a wall/ceiling, you have two pieces of crown joining in the corner, both laying “horizontal.” On the inside corner of this fireplace, you have one piece laying horizontal and one piece laying vertical.

Now, you might not think that is a big issue.

Well it evidently is. I googled, I cut, I made mock ups…I spent an entire day trying to make this work. Evidently this is not a “doable” thing…at least not what I could find.

This might explain why ALL my inspiration pictures were stone or masonry.

I think the reason it worked a bit with the cove crown ( I say a bit, because there were still gaps I had to sculpt with putty and caulk) was because it didn’t have the “fancy” profile of a crown. Smaller cove molding will cut on a 45 on inside corners without coping. The larger cove molding had minimal “gaping.”

If you know anything about cutting trim and coping you know exactly what I am talking about. If you do not, do a TON of research before attempting to trim inside corners…or you too will learn the hard way!

Soooooo….best laid plans.

I rarely just give up, but…..

Time to punt.

I found another “inspiration” that appeared to be “less decorative.” I decided to give this look a shot since it would entail using basic 1x material vs. crown.

Truth is, this is one of those “happy accidents.”

I like the look more than I did the original plan!!!!

I used a 1 x 4 material, then stacked on a 1 x 3 material, then a small cove molding…LOVE.

Moving forward….it was time to attach the large cove crown.

First issue. In all my inspiration photos, I really like the “one piece” look. Since again, they were all stone, the material adjacent to the fire box was the same as the surround. If I recreated that look I would have to use painted wood adjacent to the fire box, and I just didn’t feel comfortable with that. Not that this box gets terribly hot, but it does get a tad warm.

Soooo….what to do. I really wasn’t loving the look of high contrast tile between the box and the surround.

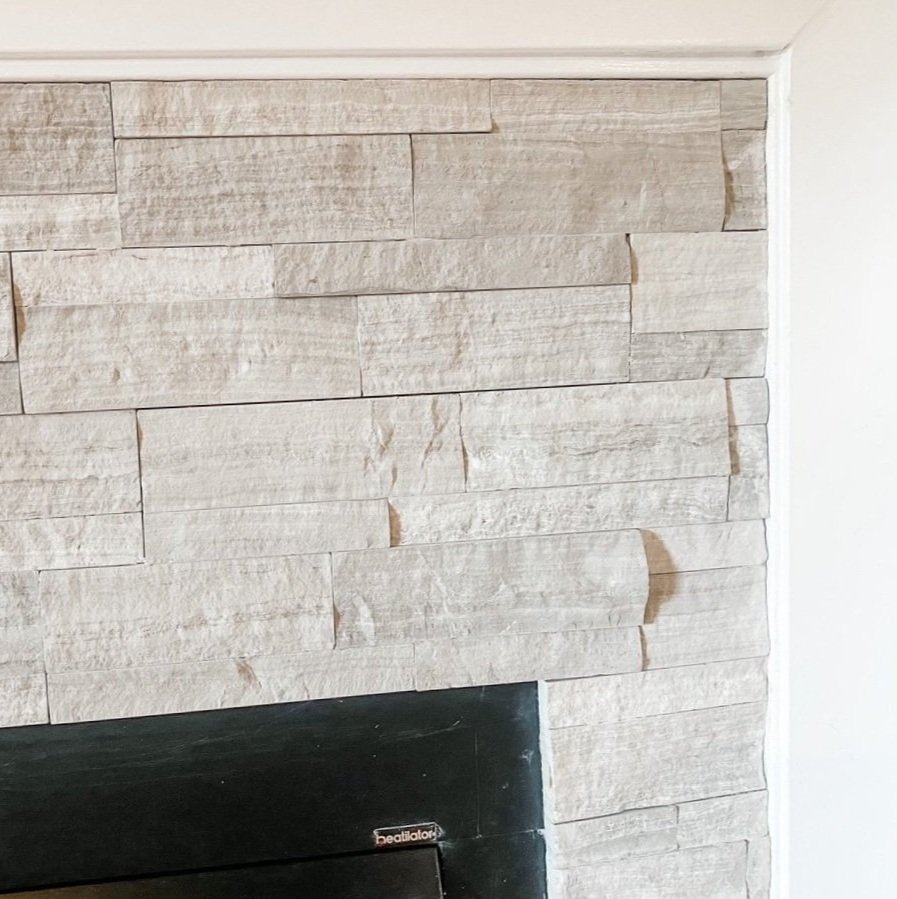
When I was looking at tile, I found a split face travertine tile I really liked.

If you remember the Lankford house den fireplace I installed split face travertine…and I LOVED it. I still do…so I went with it.

Now, travertine is not “all the rage.” So this is a prime example of doing something I LOVE vs. doing the in thing.

Since I decided to go with tile, I used a 1x material for the inside of the cove crown to sit on…just to give it some lift so that the tile wasn’t butting up against it’s 1/4” edge. I glued and nailed 1 x 4s on the wall, then installed the cove crown on top of that.

Second issue…since the cove crown is “polyurethane” and not wood, I couldn’t attach it using a trim nailer. Trust me, I tried. I had to use construction adhesive, then tape it and constantly “press” it until the mastic finally set up. Pain.

Once all that was done, I caulked all the joints, puttied holes, gave it a little sand and then painted it BEFORE I installed the tile surround.

I used a latex paint because my research said that latex is a better product to use in areas where “heat” might be a factor…I guess it has a tad more flexibility. Makes sense.

Don’t forget the Floetrol…makes a world of difference in your paint finish.

After the paint had cured, I installed the tile. Again, there are amazing tutorials out there for installing tile…find one that makes sense to you! Installing tile around a fire box is NOT a difficult DIY project. But you want to make sure you have the right tools (wet saw, properly sized trowel, etc) and that you use a thin set or mastic that works with the type of tile you are using and is heat resistant. RESEARCH!!!!!!

There were a couple of scuffs and marks on the black fire box from scraping the old mastic off. I used a black Sharpie to cover those…works like a charm.

And presto, bingo….a new fireplace surround.

I like it much better than the old one. Bigger but simpler. Not quite so “traditional” looking. Again, I like it much better with the “stacked edge” than I would have with the crown. See, no mistakes, just learning as I go. A lifetime of doing this stuff and I am still learning!

I am EXHAUSTED (just look back at all the projects in the last few months) so I doubt I will be starting any new major projects anytime soon. Course I say that and I am already eyeballing and sketching a few things I have been thinking about starting. Hum….

So until next time…

The "compact" microwave and new stove....

It is done...the new microwave, stove and tile are installed.

And I LOVE them!

It all started with my quest to get rid of the over-the-range microwave.

As I mentioned here, it really became an issue for me when I read that over-the-range microwaves are now considered a kitchen "faux pas." Truth be told, it has bugged me for years...I hated the big ole' hulking thing hanging over my head while I cooked. 

And of course there was the whole issue of the black stainless refrigerator and the fact that the range, microwave and dishwasher were black. We bought the black stainless refrigerator almost two years ago, planning to transition all the other appliance to black stainless. Unfortunately I can't bring myself to buy new appliances when the old work just fine.

The microwave worked just fine...but my "obsession" with getting rid of the big ole' hulking appliance drove me to the point of madness...so I bought this awesome little thing. I guess technically it is still an "over-the-range" microwave, but it is really not much bigger than a vent hood and doesn't bother my aesthetic senses at all!

I ordered the microwave in black stainless, knowing one day I would break down and buy the black stainless stove I had been drooling on for several year. Low and behold my oven went out a few days after I ordered the microwave....curses! Now I HAD to buy a new stove. (Honestly, it was just the ignitor....a relatively easy and inexpensive fix...but that is beside the point!)

The only real issue I had with replacing the much larger microwave with a smaller one was the tile back splash. Several years ago I replaced the original tile backsplash with travertine.

I tiled to the bottom of the microwave...but the compact microwave is about 7" shorter than the original, which means I was going to have to add tile. Fortunately, I am a hoarder of "scrap construction crap" and managed to piece together enough scrap travertine tile to fill the gap.

All I had left from the original install were scraps...so to make sure I would have enough (and not have to order a few pieces of this extremely expensive tile!) I made a little template the size of the space and began laying out the scraps. I numbered each piece on the back so I could install it in the proper order!

If you do not have any scrap of your backsplash (and can't buy it), think about adding a little "decorative" accent...Pinterest is full of inspiration! 

Another little issue was the fact that I had tiled over the original tile (not something I normally do!)...as a result there was a 3/8" difference in thickness. No biggy really, I just put a piece of 3/8" board (scrap sheetrock) to fill the space then tiled with the travertine! 

I picked up a few sticks of travertine pencil liner at Lowe's to create little borders on the sides and under the microwave. Not a perfect match but close enough!

I have one really serious problem now...the dishwasher doesn't match.

Since it was replaced 5 or 6 years ago, I don't see it going out any time soon! Dang it! I'm trying to convince myself that I can live with this unsightly thing....trying! 

I have also ordered a new quartz top for the bar...

I have tired of the black and want something "light and bright." Again, I am always looking for a way to lighten the kitchen without painting the cabinets. The granite counter tops now seem a little "busy and dark" but that has to wait. I desperately want to make some serious changes to master bath and that has to be my next big project!

I haven't used either appliance enough to give a proper review but I can say I LOVE the look of both. The microwave is plenty large enough to do what I do...warm leftovers and melt butter. (Whirlpool is the only company that currently makes a "compact" microwave and their "black stainless" blends well with the Samsung black stainless stove and refrigerator.)

I love the new stove top but I have one minor beef...no drip pans. Not a huge problem...I ordered silicone "cut to fit" drip mats from Amazon. Not sure how happy I will be with this solution but I guess I will find out. It has a "wok grate" but I don't have a wok so whatever! The middle griddle is a neat feature but I'm not sure I will use it much...again, we'll see! The oven has both a "traditional bake" as well as convection...and it will automatically calculate the conversion...which is nice for someone who has been cooking with a regular ole' stove for 40 years! 

I want to share Matt's entry...he is having his kitchen cabinet painted so he wants me to wait to take pictures until he has his kitchen finished...so MAYBE next week!

Until then...

Modifying a cabinet...

When I first remodeled my master bathroom, I loved it...honestly, I still do! But someday soon I want to make some major changes just for practical purposes. Specifically, I want to remove the whirlpool tub (seriously, I think I have used it 3 times in the last 20 years!) and add a walk in shower.

As much as I love the existing tile, I know that will mean picking new tile for the shower....which means I will want to go ahead and replace the floor tiles...you know, while there is already a mess! But picking a tile that will carry me through another 20 years is tough for me...I know people say this or that is "timeless" but I can assure you NO home decor is timeless.

This will all happen as soon as I can find the perfect tile person to construct the shower. I do not want to hire someone who isn't VERY experienced because one of the worst things that can happen would be a shower that leaks! 

There is one other tiny detail that kinda bugged me...the "medicine cabinet."

While I love the look, it just wasn't practical. Why? Because everything in the back half of the cabinet goes there to die! Seriously, I found a bunch of products and pills that had expired years ago.

I cut down my kitchen pantry several years ago and have never regretted losing that extra 12" of space. I like how the smaller cabinet opens up the kitchen a bit! And again, everything in the back of the cabinet had a tendency to expire before I got to it. (No, I don't have a picture of the pantry before I cut it down...that was "preblog!")

So I knew cutting down the depth of the cabinet in the bathroom was doable! 

The first thing I did was take EVERYTHING out of the cabinet and took inventory. Major purgefest! I made sure that what was needed or wanted would fit comfortably if I only had 6" of depth. Yep, all but the basket of old prescription medication and most of it had expired. 

Once I knew that cutting down the cabinet wouldn't pose a logistical problem, I removed the cabinets from the wall, cut them down, rebuilt the back and reinstalled them. (Did I take pictures of this process...of course not...who knew I would share something so mundane!)

Sounds easy...honestly, it wasn't. There was an electrical outlet to deal with and the trim detail and then of course there was the exposed sheetrock boo-boos from the old marble backsplash...curses. I always think a project will be easier than it is!

But again, it was doable, and after a day of cutting and cussing I had a smaller cabinet.

The sheetrock boo-boo was an easy fix...mud, sand and retexture. Since I am good about keeping old paint for touchups...no biggy. Except it had been so long since I painted the bathroom, the paint had hardened. So I got to repaint the entire bathroom! Yippee!

Fortunately I had a couple of left over gallons of paint from when I painted my living areas...

Now I am eyeballing my kitchen again. I am a sucker for the "power of suggestion" so when I read that big ole' hulking over-the-range microwaves are now a kitchen "faux pas" I decided I want to remove the microwave above the stove...which means I have to find a place for a smaller microwave. The counter is not an option since I have a small kitchen and limited counter space. Hum...the pantry...maybe I can put it in the pantry. Well, I could if it weren't so stinking shallow...remember I cut it down so now no microwave more than 13" deep will fit. Thank goodness for the internet...I spent days researching microwaves. Fortunately, I found a few that would work so that's one hurdle! Small little things but honestly the only thing I use a microwave for is to boil water, warm coffee and melt butter.

Hurdle #2...can I afford to loose shelf space in the pantry? Again, I pulled everything out and start measuring cans of beans and moving shelves around. 

Doable! Keep in mind we are now a family of two and I don't need the food storage space I use to!

Hurdle #3...when I take down the over-the-range microwave...what then?

Honestly, I didn't know.

And then I found a solution that changed my whole plan...

A compact over the range microwave by Whirlpool!

I would post a picture but the site won't let me steal the pictures so just go look at it!

How cool is THIS! It's only about 10" tall so I won't feel like I have a big ole' hulking appliance hanging above my head while I am cooking.

I ordered the black stainless even though my stove is black.

I hate to buy new appliances when they work perfectly fine so I thought I would live with my old black stove for the time being.

(Fortunately for me the ignitor went out on the oven this week. Yippeee! Perfect excuse to order the new black stainless stove I drool on every time I go to Lowe's! God forbid I fix it with the $30 part!)

Now I don't have to give up pantry space or counter space. I guess it is still technically a "kitchen faux pas" since it is an "over the range microwave." But you know what...I'm okay with it. I'm probably one of the few who hasn't painted my kitchen cabinets, I have no shiplap in my house and while I would love to retile my entire kitchen and dining area with beautiful, light travertine tile, it's not happening...so I'm okay with bucking the decor trends!

The only problem I have is the space that will have to be tiled after the big ole' hulking microwave is removed. Fortunately, I am a pack rat and kept all my scraps from when I retiled the kitchen backsplash! Yea me! Thank goodness because that stuff was E.X.P.E.N.S.I.V.E!

So when I get the new microwave and stove are installed and the tile work done I'll share...can't wait!


Just another week in paradise....

Me: I lost my truck key but I have the VIN number and need a new one cut.

Dealer Dude: Okay, the key is $177.

Me: I expected it to be pretty pricey.

Dealer Dude: After we cut the key you will have to bring the truck in so we can program it.

Me: Will the key start the truck?

Dealer Dude: No

Me: Then how do I get the truck here to program the key?

Dealer Dude: You will have to have it towed in.

Me: So I have pay to have it TOWED? 

Dealer Dude: Yes, and there will be a $60 charge to program it.

Me: So I have to pay $177 for the key, the cost to tow the truck AND $60 to program it.

Dealer Dude: Yes

Me: (Not something I want to admit saying on my blog.)

Suffice it to say, I had no transportation Wednesday and sat around waiting on Waste Management to call me back to see if MAYBE I inadvertently dropped my keys in the recycle bin that was picked up first thing in the morning. I finally conceded and called a guy to come to my home and cut a new key. Fortunately, I decided to take one more walk around the yard. And there they were...on the brick ledge right where I had laid them. A day of frustration !

I would also like to add that while I have always prided myself in keeping a clean house, I pray no one ever looks under the furniture. N.A.S.T.Y!

My life.

On the upside, I made good progress on my entry. And just for the sake of healing time, I am grateful the travertine tile and new stair treads will not be in until next week! 

Sheetrock repair is done and all the paint is done. The switches may have to wait until Thanksgiving when my SIL comes...makes my brain hurt just looking at all those wires!

I am still debating whether I will just put down new trim or if I want to go all out and add wainscoting or board and batten. I can't decided and since it is the last thing to be done, I think I will wait until the new flooring is down and the stairway is reconstructed before I decide on trim and lighting.

I have finished several pieces lately, and even managed to remember to take a few before AND after pictures...so I will share those in the next few weeks. Until then, I am going to enjoy a weekend with ALL my babies....Sarah is coming in for her birthday and Mitchell is headed home for a short visit!