Guest bath makeover....

I’m trying to complete a few small projects…a few weeks ago it was my laundry room.

This past week it was my guest bath.

The guest bath is right across the hall from the laundry room…since I painted the laundry room a pretty “sagey green” I decided to tone down the blue in the guest bath. While I was at it, I decided to change out the counter top and backsplash.

I installed a glass vessel sink, a super awesome faucet and new lighting when I gave the room a little makeover a few years ago (probably a decade ago!) and I still love them so I didn’t need new ones.

(My dismal attempt to photograph dark cabinets with no natural light!)

The wall decor over the toilet had yellowed a tad because I sealed it with poly. (Yes, poly yellows…to avoid, use polycrylic or a clear coat sealant)

My “plan” was to paint the walls and trim, change out the top and backsplash, strip the cabinet and mirror frame for a “lighter” wood stain and repaint the wall decor.

After painting the room a lighter color and installing a lighter top (white quartz) and white backsplash and lightening the wall decor with a fresh coat of white chalk paint, I decided to stick with the vanity cabinet and mirror “as is” for the time being. I had stained the vanity “java” with gel stain years ago and I think it looks fine (but impossible to photograph!)…the mirror has a “java” stain finish, so it coordinates well with the vanity.

Just these few easy changes made a huge difference…the paint really lightened and brightened it.

Still love the Devoe prints I added two years ago!

One of my favorite little projects…a TP cubby! Super simple!

Fresh white chalk paint with a tiny bit of distressing…this time I sealed it with a clear coat so hopefully it won’t yellow again!

I would like to mention my trim paint…I painted it the same color as ALL the trim in my house. White would have been great but I decided to stick with the color of the trim throughout the house…just my personal preference.

Paint.

A must when you want to change a room! Whether you paint the walls or furniture, JUST DO IT! Paint is relatively cheap (only took 1/2 a gallon for this room) and if you don’t like it, you can always change it!

I love this little makeover. I have been coveting white quartz for my kitchen tops and this tiny bit has REALLY stoked the fire.

Who knows….

ANOTHER laundry room makeover!

One nice thing about blogging is I can go back and know exactly when I did something…case in point, the laundry room.

Here I shared how the laundry room went from this….

…to this….

…in 2014.

I raised the cabinets to the ceiling and painted them. I painted the walls, stenciled the little birdie murals, installed a new light fixture, purged and added a little storage cart. Nothing earth shattering but enough to dress it up a tad.

The most dramatic thing I did to the laundry room was installing reed glass in the door. Here I share a tutorial on how I turned a plain ole’ hollow core door into a really awesome feature!


One thing I debated and am now glad I did not do…put a solid “top” across both the washer and dryer. I worried some day I might go back to a top load washer. Sure enough I did! The shelf is perfect and it is an element I kept!

The only other changes over the last few years was a little kitchen cabinet I removed in one of my kitchen makeovers and put in the laundry room and I moved the sewing machine to a little portable table.

When I painted the walls I was a tad frugal and used some paint I had on hand. I decided to go for broke and actually buy an entire gallon of custom color paint this time. Gasp! I wanted a soft “sagey/greenish” color so I did what I always do…headed to my favorite DIY store, picked up about 15 paint samples and brought them home. Took me all of 2 minutes to pick the perfect shade! Seriously, I think this is the perfect “sagey/green” color…I wish the photos did it justice!

THIS is the process I use for any “makeover”…whether a room or a piece of furniture. Find your inspiration, make a plan and execute the plan.

Inspiration came from cruising Pinterest. As I said in the first makeover, I don’t have the laundry room of my dreams but I have a space I want to be pretty and organized. I knew exactly what I wanted (the plan)…paint, storage, lighting and tile!

First step….PURGE! Empty out the entire space.

Yes, you are going to make a mess…there is just no way around it!!!

My goal is to NOT put back most of the stuff I take out. Now in my case, I am a pretty good “habitual purger” so I have very little “stuff”….but there are always things lurking that have been untouched for years and can go!!!

Next, remove the old light fixture, paint the ceiling (with a flashlight) and install a new fixture. It wasn’t that i disliked the old fixture, but it had fluorescent bulbs that got really hot and one of the three sockets evidently had a short or something because I could never get it to work right. I tried to change out the sockets in the fixture to accommodate LED bulbs, but the wiring was too short and I finally said “FORGET IT” and bought a new fixture.

Remove switch plates, shelving, and stuff on the walls.

Wipe everything down with a damp cloth….don’t paint over dirt!!!

Build storage shelving. I have lived here long enough to know what I need and how I want a space to function.

Caulk the new shelving.

Paint the trim, then walls.

A new shelf…I went with poplar sealed with a clear finish…no stain. I may or may not stain it or paint it in the future…for now, I like this look!

Then a debate. Do I or don’t I stick with my original “plan.”

So my original “plan” called for tile on the wall behind the washer and dryer. I really gravitate towards that look and every time I see a picture of it on Pinterest, I really love it. Yes, that would mean losing the birdies…

HOWEVER, as I have mentioned many times before, NOTHING is “timeless.” And I know me well enough to know that in 5-6-7 years I will not like whatever tile I pick out today…which means that sometime in the future I will have to remove the tile, repair sheetrock and do something else.

NOT something I look forward to. A huge reason why I didn’t put wallpaper in this house 20 years ago, even though it was still a “thing.” I had removed enough wallpaper in my years to know I never wanted to do it again.

So…no tile…for now! I painted the wall and added a little “farmhouse” mirror. The light fixture and the mirror add a touch of “farmhouse fad” without breaking the bank. This is a small room so the mirror is a huge plus!

The storage shelving is THE BOMB!

Love it…it is something I have wanted to do for years! And again, since I have lived in this house for 20 years, I knew exactly what I need. A place for doggy towels, some simple baskets for light bulbs and dust rags and plenty of room for my detergent stockpile! I designed the shelving so I would have the perfect spot for my sewing cart (See how I “upcycled” an old typewriter cart to make a portable sewing table HERE!) At the last minute I added a shelf above the sewing cart so I would have space for a sewing machine if I ever did away with the cart in the future…right now it holds my little coupon box.

Keep in mind that the cart between the washer and dryer I built on the last makeover holds a ton of stuff…dryer sheets, MORE detergent, the iron, spray starch, etc.

The back of the cubby is perfect for storing paints…remember, STORE YOUR TOUCH UP PAINT IN THE HOUSE!!!! Not in the garage or storage building!

Since I now only do laundry for two, my laundry room isn’t near as chaotic as it was when I was raising kids. But whether you do 8 loads a week or 30, there is NO reason to have a disorganized and blah laundry room. Get it organized. Make it a space that is beautiful…it won’t take the sting out of doing laundry but maybe it will make the experience a little more enjoyable.


A marvelous mid century lamp!

Week three of waiting on the trim for the kitchen. Now I think I may just wait until I get the new doors with glass inserts installed before I do a full reveal...at the rate I am going with the trim, the doors will be here about the same time! Curses...

SOOOOO, in the meantime, I want to share a darling little lamp I picked up at an auction for next to nothing. I probably would have paid a little more for it since I knew the minute I saw it, I wanted it. 

Why you ask? Let's be honest, it wasn't much to behold in it's "before" state. But what 50-60 year old piece ever really is! That is the great thing about learning to DIY anything...you can always take a $1 find and give it a good little makeover.

What drew me to this piece originally was the style. TOTALLY different than anything I had ever seen and definitely leaning towards the "mid century" style. My true love. I tried to find one similar...I Googled "mid century wood brass lamp"...."walnut brass lamp"..."atomic lamp." I found a few "similar" but nothing close enough to consider a hit. 

Less the dreaded "oops," this little lamp didn't take a lot of work. I stripped the wood with the 1/2 acetone-1/2 lacquer thinner...that took all of about 5 minutes! I taped off the wood, cord and the sockets, gave the old copper base, finial and sockets a coat of metal primer, light sanding with steel wool, tack cloth, and a couple of coats of gold metallic spray paint! (The "oops" was my impatience which resulted in the need to completely strip the base and reprime and paint the entire thing!) 

Did you know you can easily paint brass...yep...just prime it with metal primer and then paint it any color you want. Have an old brass lamp your mom gave you or you picked up at the thrift store. PAINT IT!!!!

I am slowly coming to terms with gold metallic accents and honestly, I'm kind of digging it! I even painted some ceramic pumpkins with gold metallic for my fall decor!

After the paint dried I applied a couple of coats of tung oil finish to the wood. New lamp shade from Hobby Lobby (40% off...yeah!!!!) and it is ready for another lifetime of use!!!

What is that blue "dish" you asked? I found it in one of the cabinets when I was purging my kitchen...a true gem! (My son would have been 12 when he made this!)

As I mentioned here, I think it is important to decorate with things you love and with things your children have created!

Fortunately, the wiring and sockets were in great shape, but seriously no biggy if an old lamp needs a little rewiring. Here I created a new light fixture out of industrial-type fans, but the general steps for rewiring a lamp would pretty much be the same!

If you are tired of your old boring lamp, paddle fan, or light fixture, check out these posts for just about any lighting project. Fairly simple projects that help you update ANY fixture or "lighten" a room without breaking the bank...because let's be honest...brand new lamps, light fixtures and paddle fans can be expensive. 

Installing a new light fixture

New outdoor lighting

Painting designs on light or lamp shades

Painting light fixtures and paddle fans

Adding under counter lighting to the kitchen


Painting a brass lamp

Rewiring a fan or appliance

There are so many ways to change and update lighting! And super simple! Give it a shot...again, what's the worst that can happen. You still hate it and you still won't get more than a couple of bucks at a garage sale for it! 

Also...a quick reminder! I have mentioned before that if you aren't sure what to do with something, take it down to "base neutral." In my case I have a garage full of projects I haven't decided what to do with yet. But I know one thing for certain...it all has to be repaired, primed and sanded. So yesterday, that is exactly what I did with a wood stool, 2 chests, 1 dresser, a ratan shelf, a few frame shelves and a set of ratan chairs. THIS is "base nuetral".....

Now that it is all prepped and ready for a new look, I am ready whenever the "creative bug" hits!!! If a piece of furniture has got a bad case of the "uglies" and you just don't know what to do with it, just remove the hardware, prime it, sand it, and eventually inspiration will come! 

Christmas home tour....

I noticed many bloggers featured their Holiday Home Tours earlier this month. I've been a bit slow getting around to it for a number of reasons.

First, the dog ate my card reader. Seriously. She ate it. And I read somewhere that you should never hook your digital camera directly to your computer because it could get "infected" with any bugs or viruses that might be lurking in your computer. So I always use a card reader to get my pictures. 

Second, I have been "playing" with the camera. I am notorious for taking "not so hot" photographs. Primarily because I was afraid to use anything but the "auto" setting which makes it difficult to get decent interior photos. Last week I decided to step outside my comfort zone (reasons explained here) and start playing with the camera settings in the manual mode. SHOCK! I was able to take some half way decent interior shots without blowing out the room and subjects with a flash! In the past I had to wait until the light was "just right" in a room or move pieces around or live with cruddy "flash" photos. 

I still honestly have no idea what I am doing "setting wise." But I feel better about turning dials and experimenting. At some point I will take a photography class and actually learn how to use a DSLR camera! Funny thing...I am not a newbie. I have had a digital camera for ten years...I just never used the manual settings and I was terribly limited in the quality of photos I could take.

So today I am going to share a few holiday shots of my house. I still have to be careful about when I take the pictures because I have a lot of windows and the sun can cast some pretty harsh shadows during the day! And they still aren't the best photos...but they are a tad better....

Welcome....

I always try to do a little something during the season around the front. I stick a little lighted Christmas tree in one of the flower pots and then a few wreaths and garland here and there. It is tough to see my Santa and pine forest in the arch window but he is well lit at night!

The living room...

...the BIG feature of course is always the tree! 

I made several Christmas pillows this year...you can see the post here!

Decorating can be as simple as sticking a few sprigs of berries or floral in vases or urns!

I absolutely LOVE the look of garland and ribbon down a bannister, but several years ago I decided I had to make holiday decorating a little easier on myself so I made 6 identical wreaths and tie them to the bannister! Simple but pretty!

For both Thanksgiving and Christmas I buy the little "candle wreaths" and tie festive ribbon on them and hang them on the doors throughout the downstairs. It is an inexpensive way to dress up the doors and I don't feel guilty about buying "fad" colors or styles because they are pretty cheap.

I have a thing for skinny Santas...I don't think it is intentional, but it just seems that all my Santas are a bit on the thin side...

This year I took the gold shades off the dining room chandelier...I like the "brightness" of the lights.The fixture really is simple to decorate. I just wrap a little plain garland around the fixture then stick a few sprigs of red and white berries here and there...a few crystal doo-dads from last years clearance...pretty! 

When my oldest daughter was a baby, my grandmother made her this Raggedy Andy and Ann. With my girls "grown" I really had no way to display them so a few years ago I made little pilgrim outfits for Thanksgiving and Santa outfits for Christmas. Now they get to hang out during the entire Holiday season!

The den during the day...

...and at night! Very cozy especially when it is cold enough for a fire!

Several years ago I decided to dress up the windows in the den...again, wreaths and festive ribbon! Simple.

Another skinny Santa by the fireplace...

I keep the holiday decorating in the kitchen to a minimum. Mainly because I have limited counter space and I don't want to clutter up what space I have. In the last few years I started adding little simple elements to the top of the cabinets...like Lord/Sir ? (Still no name!) 

Just a few little touches here and there can make a difference. I found a Christmasy apron at Hancock's Fabric this year. Holiday salt and pepper shakers, a penguin soap dispenser (you can't see it!), leftover ornaments in glass bowls and serving pieces, wreaths, my Southern Living cookbooks, and again, a few sprigs of holiday floral stuck here and there! Just a few things I think are pretty and festive.

Not much changes from year to year. As I have said before, I stick with the traditional and add just a few little elements here and there every year. But honestly, little changes. My basic rule is if I haven't displayed it or used it in the last two years, it gets donated...and I try not to spend too much time and money on the "fads." One thing about holiday decorating...if you stick with traditional, you probably won't go wrong. "Fads" are good in moderation as long as you don't bust your decorating budget. 

I don't mind hanging a few inexpensive peacock blue and neon green wreaths, but let's be honest...when it comes to Christmas, Santas and snowmen, green garland and pine trees and red, gold or silver colors, will probably never go out of "style!"

Have a VERY merry Christmas!


Painting light fixtures and paddle fans....

See, I'm not even trying to be clever with my titles anymore...just too much brain work!​

When I bought this house 13 years ago, the "bronzed" look was all the rage...not so much now, or at least not to my taste!  I'm more into light, bright and somewhat "modern" looking! 

But who can afford to change out ALL their light fixtures when the old trends sour.  Not me...so it was time to get "creative."​

Paddle fans and dining chandeliers are probably the two biggest expenses in lighting.  And naturally, those are often the most noticeable!  

Since I was somewhat tired of the dining room light and the paddle fan in my office (and both would be expensive to replace), I didn't think I could do much damage if I took a can of spray paint to them...what is the worst that can happen...I have an excuse to buy new ones, right? ​

IMG_8223.JPG
IMG_8226.JPG
THE OFFICE AREA (3).JPG
IMG_8149.JPG

As with everything I paint, I first cleaned them and then "primed" them.  On metals, I use a metal primer...or even Kilz!  Just spray it on and then after it dries hit it lightly with 0000 steel wool...and then of course tack cloth it well before painting. (ALWAYS TACK BEFORE PAINTING!)

On the dining room light I used gloss black spray paint and the "brushed nickel" spray paint on the shades.  I used blue/grey spray paint on the fan blades...the same color I used on my dresser... and brushed nickel on the body and hardware of the fan.  I also added a new light globe to the paddle fan, just to update it a tad.

​The trick to painting light fixtures or paddle fans is taking them down and basically taking them apart...once you "disassemble" them, they are easy to paint!  BUT MAKE SURE YOU KEEP ALL THE HARDWARE AND SCREWS!  That is why I have plastic baggies on my materials list.  Any time you take ANYTHING apart, you need to put all the screws and hardware in plastic baggies and make sure you label them!  (Again, just trust me on these things!)  If you have never assembled light fixtures, and you don't feel real comfortable with the thought of getting it all back together, just take LOTS of pictures while you disassemble it.  I did that with my first upholstery job, and it helped a lot!

IMG_8141.JPG

I found that my swing pergola made the perfect spot to hang the fixtures (with a dog leash) while painting...see, you don't need anything "fancy."​

Note, I also used blue tape on both the fixture and the wires coming out of the ceiling to label what wires went where so I would know how to rewire it...AND DON'T FORGET TO TURN OFF THE POWER TO THE FIXTURE BEFORE TAKING IT DOWN OR PUTTING IT BACK UP!!!​

After 2-3 coats of paint on each of the components, I put 1-2 coats of spray on clear coat, just to give it a durable finish that would allow me to dust and clean them periodically! ​

This easy process allows you to be REAL creative!  It would be fun to paint the fan in your kid's room a fun and funky color...maybe with some interesting design element, like a chevron pattern or polka dots!  Just "think outside the box" and remember my motto...YOU CAN DO IT!  If you don't have the most creative mind, do what I do...Google it!  People post pictures of their projects...and no one is going to be offended if you "copy" their creativity!  It really is the greatest form of flattery! ​

I was kind of sick of my bedside table lamps too...and until I can afford the really awesome crystal lamps at TJMaxx, I got a little creative with those too!

IMG_8219.JPG
IMG_8220.JPG

As much as I had tired of this dining room light, it really did turn out great. And it has always been one of my favorite things to decorate during the holidays.  During Christmas it is perfect for the gold shades I painted and the garland and red berries!!  Sometimes, old is good...it just needs a little facelift from time to time!​

IMG_8312.JPG

Bathroom makeover on the cheap....

I told you earlier in the week this time change thing would be the death of me. I. AM. DYING.  It makes me work too late in the day.  Today I started rebuilding my storage building door and painting the shutters...a project I will share when I am done.  Funny thing is, with all the work I do, I threw my back out this morning WASHING MY TRUCK!  Immediately went the chiropractor, came home and started taking down shutters and building a new door...and I wonder why I feel like death tonight!!!  Geez.

But on to something fun!!! Since I didn't get today's project ready to share, I'll share an oldie but definitely awesome!​

When I first bought my 1800 s.f. 4 bedroom, 2 1/2 bath home it was plenty for my family then.  After a year I added a den and a year later I added a "master suite."  But I have always known that a big master bathroom was something I could easily live without.  I basically shower, primp and do "other" business in there...rarely do I have time to lounge around in my whirlpool tub with candles and a good book.  As a matter of fact, I think I have tried out the whirlpool maybe twice in 13 years.​  When my house was under construction I added a glass block window over the tub before I tiled. (I bought the house while it was being built but did a lot of the finish work myself!) The mistake I made was not adding an operable window at the time.

While they were installing the GOLD shower doors, I was thinking "EWWWWW! What was I thinking when I picked THAT!" I disliked it from day one...but I attempted (unsuccessfully) to decorate around them for 12 years!  ​I also tried to add much needed storage by adding a little white cabinet.  But try as I might, I could never get the bathroom to "feel" and work the way I needed it to.  The ONLY thing I liked about it were the beautiful maple paprika cabinets I have throughout my house...to this day I still love my kitchen cabinets!  But in the bathroom...not so much!

master before.JPG

So last year I decided to do a "semi" makeover in my bathroom.  I had just bought some beautiful granite at an auction...enough for my kitchen and all three bathrooms (again, I promise to tell you about that ubber sweet deal!) This is what I ended up with....​

IMG_5034.JPG
master after.JPG
IMG_5038.JPG

​Okay, where do I start.  Very tight budget so I had to spend wisely!

Paint, that is a given in any room makeover...light, clean...gallon at the most! I did paint the ceilings but after 13 years, it was time!​

​All the tile was fine. Thank goodness because that can be costly!  But the shower doors HAD to go...gold...seriously, what was I smoking?  Removing old shower doors is seriously the EASIEST and one of the biggest changes you can make in a bathroom.  Remove the doors. Just lift up and tilt out.  Take a hammer and carefully knock the top bar "up."  Be careful that it doesn't hit you in the head (yeah, I really do learn these things the hard way).  Now, MOST shower doors have just 3 little screws securing the side brackets to the wall/tile/insert.  So take the little screws out and "pop" the side rails off the wall.  Usually silicone is used as an adhesive, so you may have to do a little prying on the side rails and the bottom rail, but they will come up.  After all the rails are removed, take a razor blade and gently scrap the silicone off the walls/tile/tub.  The three little holes...just take a little bit of silicone and "fill" them.   Haul the entire insert to the curb and say "bye, bye!" Buy a pretty rod and spa curtain and say good bye to soap scum and that nasty black crud that grows in the rails!

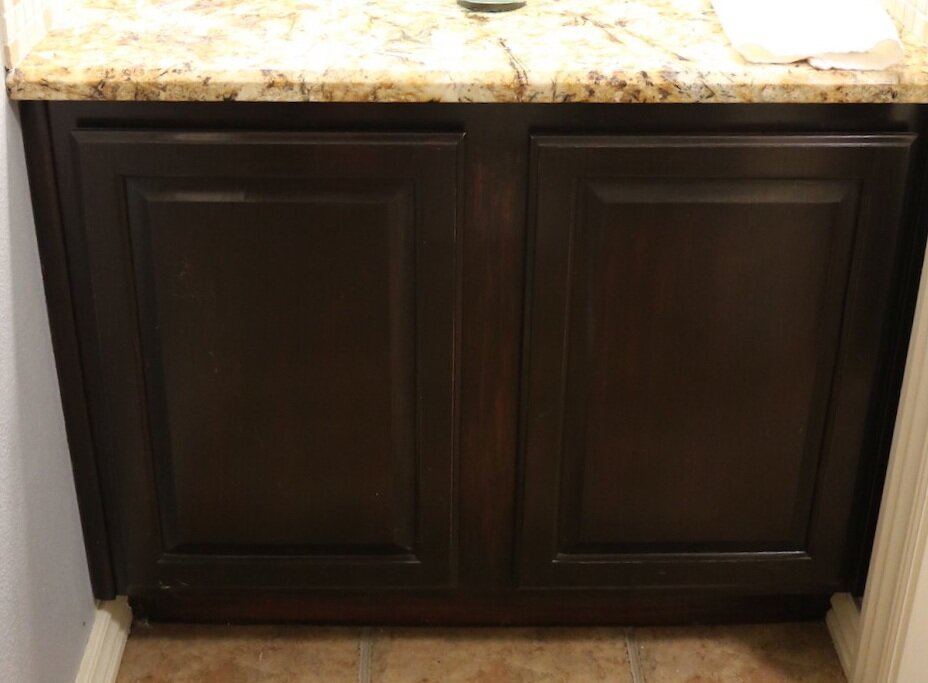
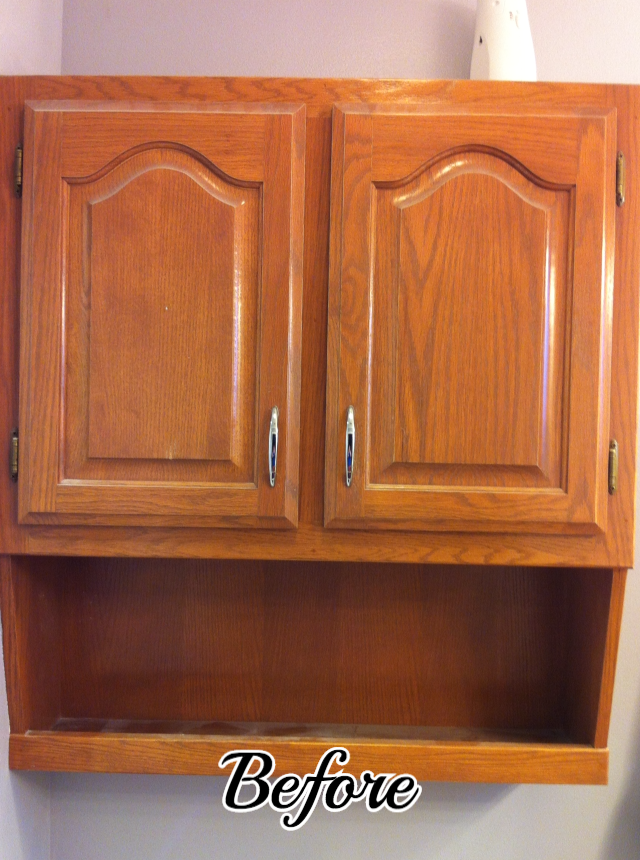
Cabinets.  I bought new cabinets. Big expense. But in a bit, I am going to share a way to change the entire look of your cabinets and bathroom without spending a lot of money!!!​  Seriously...you WANT this!  

I was going for "modern" so I decided to go with brush nickel fixtures and hardware.  I priced the cabinet hardware at a local home decor store....$28 A PIECE...​I only needed 7 but really...$28 for a stupid little handle?  That is when I discovered myknobs.com  Found the hardware for around $8 a piece....SWEET!

Originally I was going to put in two mirrors...but I bought this one on sale at Hobby Lobby for the hall bath and  it didn't work in there so I hung it in the master bath and loved it....so I put in the totally awesome pendant light fixture instead! Well, okay, my totally awesome son in law installed it when he put in the recess lights (not pictures)! 

There is only me...and it's a small bathroom...so two sinks was a waste in my opinion. I decided to add much needed storage and just have one sink.  I got the sink and faucet on Overstock.com!  They have great prices on bathroom fixtures.  Always check them before you buy any fixtures or lighting!

Again, great deal on the granite top.​ Glass tile back splash...yum!  A small amount of glass block in a bath back splash can add A LOT of style and class for very little! (That will be a great tutorial...it's super easy!)

The biggest change was the new window.  That required some pretty serious construction and vinyl and sheetrock repair but it was doable.  ​And having an operable window in a small bathroom is a must have in my opinion!!!  I put in one of those nifty "crank out" kinds and I loooove it!!!  It is so nice to be able to air out the bathroom on nice days!

And of course when you do a "remodel" there are always those "little surprises."  Like the wad of pine needles and leaves I found in the HVAC vent....no air was getting through those vents....but some critter obviously had during construction.  I also discovered that when the plumber installed the wall plumbing behind the cabinets (tech term, rough in) he tore out the sheetrock and insulation, and then the cabinet guys just set the cabinets right over the gaping hole in the wall....you could literally see daylight when I removed the vanity.  I always wondered why the floor was soooo cold!!  And I never could figure out how water pipes I KNEW were in the floor managed to freeze when it was bitter cold. ​

So I promised an inexpensive cabinet makeover....a process that will change the entire look of your bathroom and is ubber easy!!!​  Seriously, it is soooo easy that it totally offended my "craftsman" senses.  Keep in mind, I just came to terms with painting wood furniture...so "refinishing" cabinets with this process really offended my senses.  But I tried it in my kid's bathroom and my guest bath and I LOVE it!  My daughter has refinished her bathroom cabinets, I have used it in the kitchen in my manager's house, and one of my friends just refinished her entire master bath!  It is amazing!

I found this process on Pinterest....which linked me to "Monica Wants It."  Monica gives a GREAT tutorial on refinishing cabinets...follow it to the T...do not deviate. ​(Monica used this on oak cabinets...I have maple...worked great on both! I also used it on unfinished oak and it worked just fine!)  I have used it three times, and it has never failed me!  Nor my daughter nor my friend!  Totally awesome.   (I wish my photography did it justice...but it doesn't!)

guest bath after.JPG
kids bath after.JPG
SARAHS CABINET AFTER.jpg

If you need to make an inexpensive change in your bathroom, use this tutorial to refinish the cabinets (don't forget the hardware!), get rid of that nasty shower door, give the walls a fresh coat of paint and update your lighting!  You would be surprised what a few little changes will make!  ​And YOU CAN DO IT!

Oh, and one personal tip...over the years I have changed all my towels to WHITE!  Why?  Because I can bleach them and they always smell fresh...no more musty towels.  And they look awesome in my new bathroom!​ Very "spa" like!  And TJMaxx or Marshalls always have great prices on shower curtains and bath rugs!!!

Bathrooms are a great place to learn to DIY.  You can go big and do big, or you can start small and do a little at a time!  ​Budget, time and desire dictate!  

Have questions on how you can "change" your bathroom...email some pictures and I will give you some suggestions!​ beckcampbell@cox.net

TDC Before and After

Ode to Joel....

I try to come up with clever post titles....Lindsey at Betterafter.net ​always has the most clever titles for her blog posts.  Just too much brain effort on my part.  Sometimes I am funny, but it is just because I say and do stupid things...not because I am necessarily "witty."   Besides, if you aren't over the age of 45, you wouldn't get the title of this post.  (Ode to Billy Joe....not so great song...even worse movie)

Anywho, it was one of those days I had a million errands to run, one of which was to Hancock Fabrics to pick up some piping for the pillows I am making (another post for another day...if I ever get around to it!) Always on a hunt for a bargain, (i.e. digging around on the back shelves)​ I found some 90% Christmas clearance.  CHRISTMAS IN MARCH!!! LOVE!!!   I love Christmas...I love decorating for Christmas.  And every single year I proclaim "THIS IS IT!!!  Not another thing!"  But then I find the bargains....

IMG_8640.JPG

Seriously, who wouldn't love boxes of ornaments and gingerbread cookie cutters for .59 and strings of silver beads and pearls for 1.49 a strand!!!  And those cute little metal trees for 1.69!  Seriously, who wouldn't love finding this stuff in MARCH!!??? If I didn't love spring and fall so much I would be antsy for the Christmas holiday!!!

Anywho, taking this picture reminded me of how much I LOVE MY UNDER COUNTER LIGHTING....which brings me to my "Ode to Joel."  My FAVORITE son in law in the whole wide world.  Now, he will be quick to remind me that he is my ONLY son in law, but honestly, that is not the point.  He is my favorite.​

And not just because he is an electrician who is gracious enough to work during his visits.  See, I always have some electrical issue that is just a tad over my head...or rather one that I know would take him 4 hours to complete when it would take me 2 DAYS!  And who has time for that during the holidays...seriously! ​

So for YEARS I have wanted to put can lights in my kitchen.  I just thought they were so cool looking AND my kitchen felt a bit "dark" and "smallish" because of the lack of decent lighting.  But the "in" can lights right now are a little pricey and I knew I wouldn't be happy with the ones like I  have in my den...because, after all, those are not the "in" lights right now.  The "in" can lights are like the ones Joel installed in ​my bathroom last summer...that I love...but rarely turn on because you could land a jet in there now when both the vanity and can lights are on!

So last fall,  I went to Lowes (again, my fav) and started looking at lighting options.  I have never been a fan of the little "pot" lights that go under cabinets...kind of thought they were silly looking...but I did like the LED strip lighting they had...and while an 18" strip was around $60, I only needed three!  ​And they last "a lifetime" and you never have to change the bulbs.  Hum....that is right up my alley. 

So that is what we bought.  Long story short, we created a new switch next to the disposal switch (that required adding a larger box and second switch and some unanticipated tile repair....good thing I keep spare everything!) The lighting was hardwired to the switch and Joel was able to run the wires behind the microwave and refrigerator so the wiring wouldn't show.  ​

Oh, My. Goodness!  I swear my kitchen doubled in size!!!​

IMG_5011.JPG
IMG_5009.JPG

It is just sooo difficult to appreciate what a difference this makes with pictures.  Joel installed them the day before Thanksgiving last year, and I swear my kitchen prep space doubled in size!  It made a huge difference in my usable space because the two corners were just always so dark and impossible to use as prep space. ​

Again, he only installed three...one over the coffee pot (far left), then ran the wiring behind the microwave to the left corner cabinets and installed one there, then ran the wiring behind the refrigerator to the corner in the right.  AMAZING!!  ​

I installed new granite counter tops two years ago (talk about the steal of a lifetime...for another time!) and these new lights just made them POP!!!  Seriously, it has "sparklies" in it I didn't even know were there.  Like little pieces of quartz all through it...I knew it was beautiful granite...but with the added lights, it is breathtaking...seriously! 

But the biggest difference, again, was the amount of usable counter space, which in a small kitchen is a huge plus!!!!​

So....Ode to my SIL Joel...not only is he a wonderful husband and father...but he is a pretty handy dude to have around when there is some serious electrical work to be done!  Is this a "DIY" project?  Yes...it very easily could be and I have no doubt I could have done it myself.  But honestly, he did it in a quarter of the time it would have taken me to do it, at a time when I was a bit busy making pies and stuffing.​

So in my book, that makes him the BEST SON IN LAW IN THE WHOLE WIDE WORLD!!!​

IMG_1204.JPG