The wardrobe makeover....

You may have noticed I have been MIA for a few weeks. Pretty unusually for me.

It is the “dog days” of summer…just too stinking hot to do anything major outside. Really too hot to do any projecting inside that requires me to go outside. Just plain HOT!

I have been working on a few little projects. My neighbor has been using her golf cart garage as a make shift office. A tiny little garage in her house with a tiny little garage door. It is heated and cooled and is a good little space for a small office.

No I did not take before pictures. Wish I had because after she had the garage door replaced with a large slider, I spent a few weeks repairing walls, painting and changing out the lighting.

SOOOOO darling. The large slider looks out over her flower garden and the space is just wonderful!

This was one of those “Giving what you have” projects. I can paint, repair sheetrock and do minimal electrical…and that was exactly what she needed.

I also started painting my interior trim. At some point, eons ago, I painted all the trim in the house a “whiter” white. Well now I have found a white that is even “whiter” and is my new “go to” white. BM Chantilly Lace. At some point I started using it on all my trim…when I gave my master bedroom a makeover….the laundry roommy office. I used the new whiter trim paint in all those rooms. But the main part of the house all has the old white trim. When I added the wainscoting in the dining room, I used the new white. No one but me could probably tell the difference….but I could. So now I have to repaint ALL the trim. Curses.

Good project for the dog days of summer!

A few early morning yard projects…a few “give what you have” projects…but really nothing earth shattering!

But that is about to change!

As I have shared, my days of major furniture makeovering are pretty much over. The ole’ back/knees/hands just can’t take it any more. But every once in a while I decide to take on something because, well, I want it.

For over a year a few “inspiration” photos have been on my computer. I just LOVE these cabinets….

(Again, no I don’t have sources…I found them on Pinterest and dropped them onto my desktop. I think the second one is an Etsy find and the third one has her watermark on the photo! She has a pretty good tutorial for the this makeover on her website!)

I just love these pieces and always knew if I could find the perfect piece, I would get it. Never thought I would, until I did.

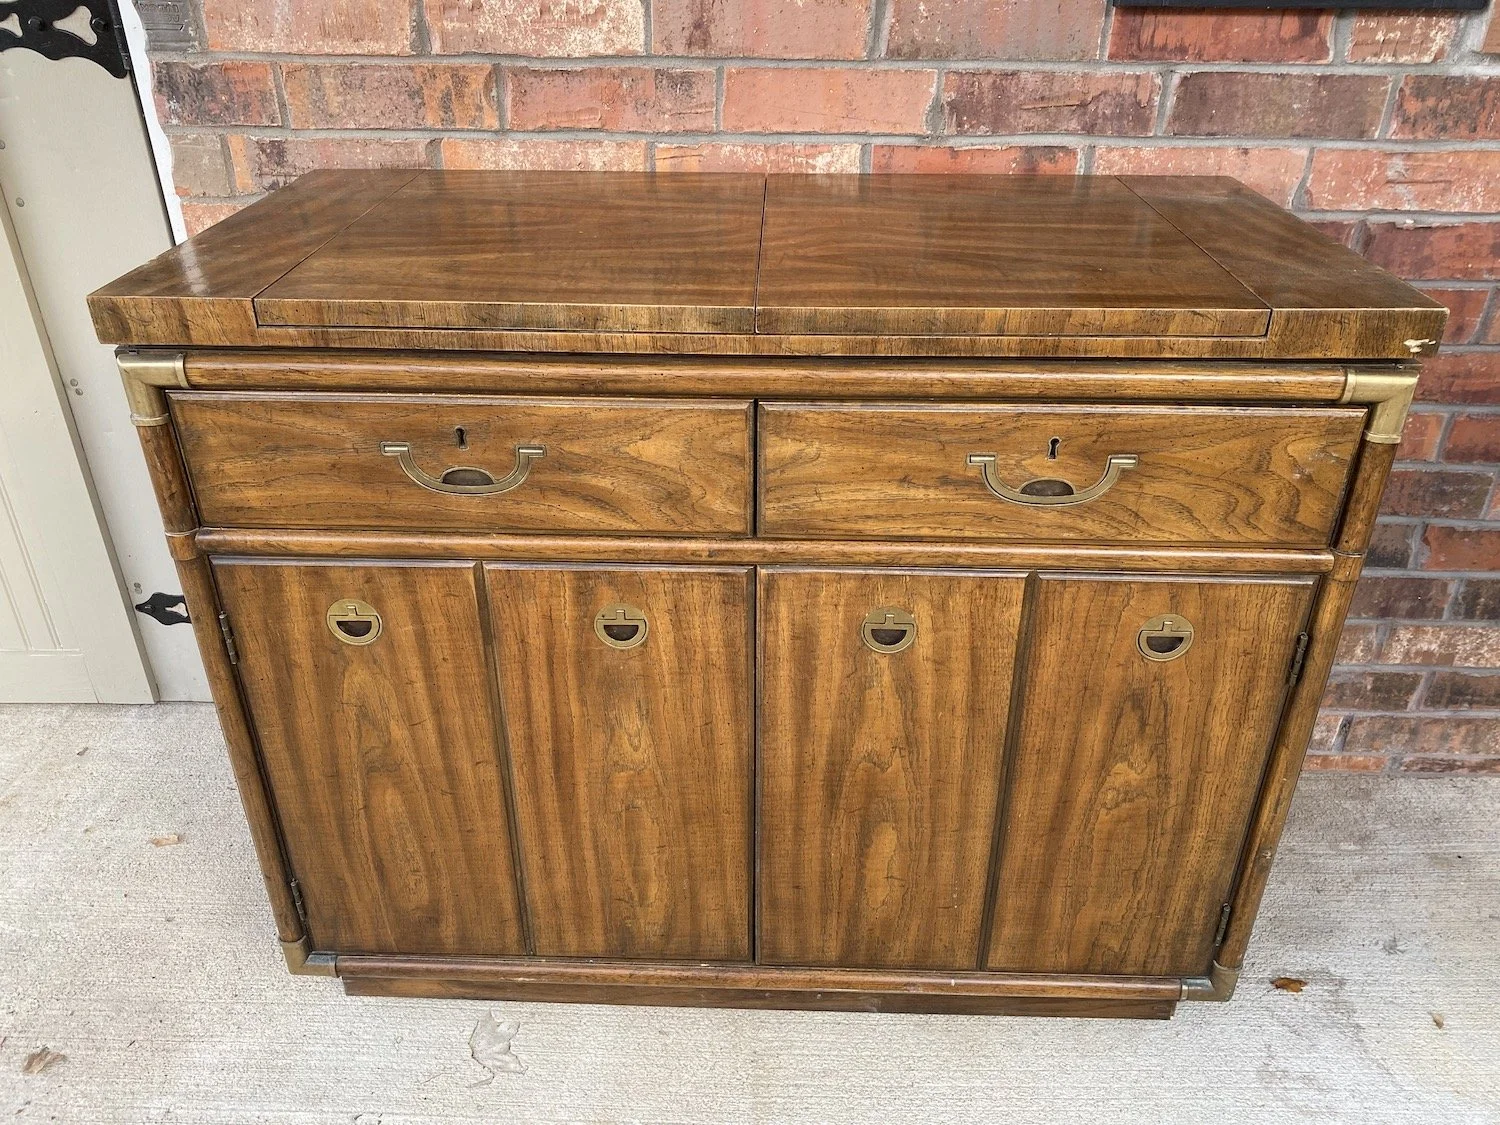
A local flea market posted this piece….

It just so happens that last week I finally sold one of my office pieces….this credenza has been languishing in my home office since we moved in just collecting dust.

It is one of those pieces I LOVE and spent entirely too much money on…so the thought of selling it for pennies was painful. But it had to go…it no longer served it’s purpose as a flat screen tv credenza and was taking up space. So now I have moved my desk to that wall and have nothing on feature wall.

My plan was to put a mid century style credenza on that wall…the wall treatment is kind of “mid centuryist” and I do have a lot of other pieces in that genre. I absolutely love the style and was pretty much sold on the idea. Simple, clean, sleek. No frills or froo-froo.

But when I saw this old wardrobe, I knew it was exactly what I didn’t know I wanted.

Okay, not EXACTLY…it needs some serious work!

I brought it home and parked it in my garage.

I love being able to park my car in the garage now so I RARELY use it for projecting. But this piece was just too big and hulking to haul back to my shop so I decided to give it a facelift in the garage.

The plan….remove the door inserts so I can add glass. Strip and oil the doors and drawers. Strip the interior and lighten it…either with wood bleach or a whitewash treatment. I don’t want it painted “white” but I want it lighter. Rework all the shelving and add glass shelves. Lighting is a must. Paint the cabinet black. Black cabinet, natural wood doors and drawers, lighter interior.

I THINK the doors and drawers are walnut but I won’t swear to it until I get it stripped….I CAN’T WAIT!!!!

I think it will be amazing!

Funny…I have spent the last 20-25 years leaning more towards simpler, mid-centuryish stuff. Moving away from “traditional” and all the old antique stuff I loved so much 25 years ago. Now I find myself drawn BACK to those styles.

Part of it may be this house…I have the space to accommodate larger pieces. But I think the real reason is “style influence.” As much as I THINK I do my own thing and don’t allow myself to be influenced by the trends of the day…if I was honest, I think I do. I use to believe “my style” was mostly eclectic…leaning more towards mid-century/transitional. If I REALLY look at how I have decorated this house, I think it is kind of “modern farmhouse”/traditional…still eclectic…just a different mix.

Hum…interesting.

Regardless, I still think there is something to be said for being “eclectic.” This is a piece that you wouldn’t think would work in a room with a “mid century” influence…the desk, the side table, the wall treatment. But I think it will look amazing!

But that is me…to each his own.

Maybe next week I will have this done and ready to share…maybe. It is still pretty hot outside!

Another Drexel server....

Several years ago I shared a Drexel server I repurposed for my dining room

The “breakfast room” in our new house is almost identical to our old dining room.

Including the Drexel server.

I love it…it is one of my favorite pieces.

So when I spied ANOTHER Drexel server on Marketplace I could not help myself.

As I have mentioned, I have pretty much retired from the whole repurpose/upcycle/refinish business. My hands and back just can’t take all the work that goes into refinishing pieces on the scale I have in the past.

I have refinished a few doozies…just looking back at all the pieces I have shared on this blog blows my mind. There were some pretty nasty pieces that were beautifully refinished and restored and readied for another life-time of love!

When I saw this piece I couldn’t help myself. I had to have it and I wanted desperately to work a little magic on it.

Here is my plan…MAYBE I can discipline myself enough to pick up just one piece at a time, refinish it, sell it, then pick up another…just one at a time. Just one dresser/buffet/nightstand at a time.

Hum…I’m a pretty “self-disciplined” person so I am going to start with this one.

One week into this plan…I have failed. Last week I picked up ANOTHER piece that needs a little TLC….a pretty beat up china hutch.

I have these creative juices in me that have just been screaming for a project.

So, “the plan” ….specifically for the vintage Drexel piece. Strip and oil the drawer and door fronts using THIS process. Shine up the brass hardware….no secret there, just lots of Brasso, steel wool and elbow grease. Prime and paint the “cabinet” a high gloss black lacquer.

For the china hutch…I went to Etsy for inspiration and looked around. There are some beautiful china hutches that have been painted black with the insides painted white…LOVE them.

I THINK that is what I want to do. Sometimes the process takes on a life of its own and I find myself drifting in another direction. We will see.

Right now they are sitting in my AMAZING shop. I was in there last week rearranging everything so I will MAYBE have room to make some kind of paint booth. The shop has electricity and I can easily heat and cool it for temperature control but just not sure I will have enough room since we do use it for mower/yard equipment storage as well.

I can’t wait…this is a “job” that doesn’t really pay well, but it is one I do love.

Today I muse....about "pet proofing" your house!

When we have babies or grand babies, we “baby proof” our house.

But what about our pets.

We know we shouldn’t feed dogs grapes or chocolate…or let them eat mistletoe.

But did you know that there could be other hazards lurking in your home that could be dangerous to your pet?

Like something as simple as a barstool.

WHAT????!!!!

I introduced you to Mr. Jinx last year….

He really is the most precious kitty.

But he has UT issues and last week had to spend 4 days in the hospital…don’t even ask how much that cost!!!

He came home Monday and seemed to be doing well but I noticed Wednesday he was limping badly. When I messed with his back leg he growled and hissed and I could tell it was swollen.

So back to the vet he went…and sure enough his little leg was broken.

What the heck.

Our vet asked if we had any “slatted” furniture. Seems this is a common injury for outdoor cats caused by lawn furniture and picnic tables….but Mr. Jinx is strictly indoors.

Our bar stools.

The cats are always jumping up onto the bar.

I think he may have jumped from the couch to the bar stool, got his little leg stuck in the gap in the armrest and broke his little leg.

The American Veterinary Medical Association provides an excellent list of home hazards for pets!

Check it out! Great information to have if you are a pet owner!

As far as the barstools…don’t know what I am going to do! I love these bar stools but I love the critters more…so something will have to be done!

Hopefully next week I will have Matt and Hannah’s china hutch finished and delivered…so stay tuned!


China hutch makeover...part 1..and paint tips!

Since I have “semi-retired” from DIY for resale, I have a little more time to take on projects for my family.

As I mentioned here, Matt and Hannah got married last month. This past summer he bought a larger home and went from a 1600 s.f. home to a 2200 s.f. home. When he bought his first home we stocked it with a few nice DIY pieces…this dresser and chest setthis oak trestle tablethis breakfast table.this dresser-turned-entertainment centerthis little vintage chair…and of course all the other pieces we have refurbished and built over the years.

A bigger house means more space and in his case he has a large dining area that has nothing but the trestle table…so it feels pretty empty.

This past week I found this “could be awesome” french provincial style china hutch on Facebook marketplace.

I can’t wait to shine up these solid brass pulls…even though I know they probably won’t make the cut!

They really need a “tall” piece in their dining room so I think with a few modifications this one would be perfect.

Of course the froo-froo doors HAD to go…when I sent a picture of the piece minus the doors and hardware, Matt messaged and wanted to know if “the pole things” could come off!

Yes they can…

…which of course means finding a way to “fix” the gap…oh well! Minor issue.

So the question then becomes….solid paint or chalk paint with distressing.

The reason this decision is important is because if you intend to paint the piece with latex or oil-based paint, you HAVE to prime it. If you are going to chalk paint and distress the piece you don’t have to prime.

It is a personal preference and one I left up to Matt and Hannah.

For chalk paint, I usually mix up a batch of homemade using flat latex paint and Plaster of Paris. The recipe I find works best for me is 5 tablespoons of Plaster of Paris, 3 tablespoons of water, mixed well then add 2 cups of flat paint…any color, any brand. I have also used a few different brands of chalk paint and found all of them to be acceptable. I use 220 grit sand paper to HAND SAND after the paint dries well and then I seal the paint with a flat clear coat. I never wax…personal preference.

Here are some paint tips I posted a few years ago for painting with latex or oil based paint. The first two tips apply to chalk paint as well!

1) Always clean the piece of any dirt or debris. Just wipe it down with a damp cloth and make sure you get all the "ick" off! If the piece is super grungy, you might want to clean it with ammonia or wipe it down with mineral spirits! If it has a lot of flaking paint or old finish, you can sand it down a bit or better yet, strip it using this process...just make sure the existing paint or finish is stable!

2) Make repairs. DO NOT waste your time making it pretty if it needs repairs. And remember, glue and clamps are your friend!!!! If you don't know how to repair something, google it or email me. MOST furniture repairs aren't that difficult...but if you do it wrong (or not at all) you will be wasting your time making it pretty! 

3) Primer....always a must if you are going to paint with spray paint or latex or oil paint. If you want your paint to stick and not chip or peel, prime. For smaller projects I use spray primer. For larger projects I roll on primer with a 4" foam roller. Even if your paint says "all in one paint and primer"...use primer.

4) Sand smooth after the primer has thoroughly dried. A 220 grit paper should do the trick...FEEL the surface...if you can feel it, the paint won't hide it. 

5) Use tack cloth. Most tutorials will tell you to wipe the piece with a damp cloth. That won't cut it! Tack cloth will pick up the finest grains of dust and debris you can't see until you paint the piece! Use it before you paint and between each coat!

6) If you are going to brush on latex or oil, use a quality brush AND TAKE CARE OF IT! I have brushes I have owned for years because I am religious about cleaning them thoroughly after use. And don't even think about using those cheap disposable brushes (chip brushes). They are great for many things, but not for getting a smooth paint finish on furniture!!!! 

7) ALWAYS use an additive....Floetrol for latex, Penetrol for oil based paints. 

8) Use quality paint. Especially spray paint. I know it is cheaper at discount stores but pay the extra few dollars and buy a quality spray paint at your home improvement store. Cheaper will NOT be better if it doesn't hold up to wear and tear!

9) I do 2-3 light coats (spray or brush) rather than trying to get solid coverage with one coat...trust me when I say, there is NO paint on earth that will get good coverage with just one coat!

10) Cure time is important. Seriously, I know they style their pieces on those HGTV shows within hours of painting a piece of furniture. Just don't! Just because the paint feels dry to the touch DOES NOT mean it has cured. Latex...a few days...oil...a week. Give your paint time to cure or it is going to peel or chip if you try to use it right away! Put the piece in place and chill!

11) Spray vs. Brush/roller. For me, it all depends. I have learned that large flat areas are tough to get an even coat of paint on with spray paint...and of course there is the expense factor for large pieces. A dresser can take 2-3 cans of spray paint. So it really depends of the piece. Sometimes I will spray the drawer fronts of a dresser and roll the top and sides. 

12) Keep a little spare paint for chips and dings...if you use latex or oil, just put a few tablespoons in a little container and stick it in the back of the drawer...just in case! If you are using spray paint, keep a can with a little paint. Manufacturer's change paint colors and you might not be able to find that awesome color in the future. Keep spare paint in the house...not the garage or storage shed!

If you follow these simple guidelines, you can update a dated piece with just a little time and effort. 

Now, back to the china hutch…at this point it is on hold…we are in a deep freeze here and there is really nothing more I can do. I did strip the top and shelves because Matt wants those stained. But it is too cold to prime or paint so I will patiently wait…not something I do well…lol! But I have learned that temperature matters so I will not rush this project!

Hopefully the weather will cooperate this week and I can share the finished project next week!

Until then….


Heirlooms trump everything!

I have said it time and again....family heirlooms trump EVERYTHING!!! So when my uncle dropped off a china cabinet this week that had been my great-grandmother's, everything was rearranged to make room for it!

It's not "my style."(very traditional) It's not "my wood." (oak) It's not "my finish." (white-wash/pickled kinda look)

But it was my great-grandmother's and that is all that matters.

I even have a picture to prove it!

This is my maternal grandmother, great-grandfather and great-grandmother gathered at a holiday dinner in the early 80s....the china cabinet is in the background and the dishes on the table are my great-grandmother's china I recently acquired.

I vaguely remember this piece in my great grandparent's dining room when I was a child. They lived in a charming little post-war neighborhood in Dallas and during my childhood it was the family gathering spot for holiday's and special occasions.

While I was looking through my family photos for a picture of the cabinet, I also found this awesome holiday photo of my mother's entire family taken in 1948 at their home in Houston.

My mother is the sullen looking teenager in the red gingham shirt, my uncle to her left. The woman to the far left in the picture, in white, is my great aunt Judy. She inherited this china cabinet after my great-grandmother (woman far right) passed in 1986...and now it has come to me!

On the table are my grandmother's dishes I also acquired recently! 

These pictures are pure treasure!

Sooooo...now I have a china cabinet that is not my style, not my wood and not my finish.

I'm not sure what I will do with the finish...if anything. Right now I am just going to let it sit and mull it over. This is one of those pieces I will not touch until I have a very firm game plan in place. I know it needs a few small repairs but the beveled mirrors were replace in 1986...seriously, I found the receipt in the cabinet....$15 for two beveled mirrors. I just spent $130 to replace two mirrors that broke when my living room wall mirror fell off the wall!

I do know I would like to replace the wood shelves with glass...maybe add some interior lighting....and I couldn't wait to remove the metallic red paper inside the cabinet!

Had I picked this piece up at an auction, I would have immediately slathered it in paint. 

Not that I am opposed to making changes to family heirlooms. Sometimes you have to make changes to a piece so it will serve your family for many more decades. But when you are dealing with family heirlooms you should proceed with respect and caution! 

It is time to scale down!!!!

I have made some hard decisions regarding the direction of my "rehab for resale" projecting. For years I have tackled anything and everything...large buffets and china hutches and major upholstery projects Pieces like this that I didn't even take decent pictures of and share!

I made little chalkboards out of the doors!!! 

These pieces are big and bulky and take a lot of time and muscle.

Upholstery pieces (like this precious barrel chair) take a lot of time and material. On major upholstery projects, I barely get my money back on the materials, let alone my time. (If the cost of having something reupholstered knocks your breath out, try it sometime!)

And while I love doing what I do, I can't keep GIVING things away when I have so much time and money invested! (Ask my neighbors...if they say they love something, I usually give it to them!)

So...the big decision. From now on I am only going to do "smaller" pieces...little tables, wooden chairs, a few stools here and there...maybe a few dressers and such. And of course my first love, mid century pieces...big or small! 

This table was a tad bigger....my neighbor bought it at a garage sale and wanted to know if I wanted to tackle it!

I love the old mahogany furniture and I love pieces that allow me to preserve some of the natural wood and still update with a little paint. 

I removed the sides of the top that fold down and filled the screw holes with toothpicks and wood glue so the screws would reset tight. I STRONGLY suggest you do this EVERY time you remove old screws (it is also a great tip if you have a door hinge screw that is loose or stripped!) Takes very little time and will save you a thousand frustrations!

I stripped the top with 1/2 acetone and 1/2 lacquer thinner (see a full tutorial here!) and then applied 3 coats of tung oil finish. No stain...that is mahogany it all it's naked glory! Just breath-taking!!!

I cleaned the base with ammonia and water and then mixed up a batch of "plaster paint" with a "sample" paint from my den makeover. A little distressing and then sealed with spray poly.

This table is perfect for a small space but can easily be expanded if you need a bigger table!

Again, not really "my style" but the color is all the rage right now....evident by the fact that it didn't last a week. And while it was a "hot mess" when I got it, I loved bringing it back to life. It was a very enjoyable piece to work on! 

And THAT is why I do what I do. "Finding the treasures" lurking under years of neglect and abuse. 

It really is what I love to do! So I will continue to do what I love to do but I am going to FORCE myself to stick with the smaller pieces that allow me to enjoy my work without breaking my back! 

We'll see how long this lasts!!!

Since I have posted a recipe in a while, I thought I would share a new roast recipe that is. to. die. for! Check it out here!

Antique china hutch before and after....

I have had this china hutch in my booth at Midtown for several months.

Sadly, I probably paid WAY to much for it...first auction of the season and everything was going for WAY more than what they normally do. I bought it because I think it is beautiful, but truth be told, it really isn't the "style" people look for these days, as is.

I have debated for some time whether I should bring it home and paint it. I just wasn't sure that would be the answer.

Just this weekend I decided to go ahead and bite the bullet but I was still uncertain. Until I saw this....

Marian at MissMustardSeed featured this beautiful piece she painted. You can see the "before and after" on her site!

Sometimes when we see what others do, it is all we need to find our own inspiration and relieve any fears we might have of doing what needs to be done to enhance a piece!

I love the grey against the mahogany, but right now everyone around here seems drawn to the "whites" so that is what I went with!

I used my favorite off-white, Swiss Coffee, for the "plaster paint." I did not sand or prime before painting it with the plaster paint...no need unless the piece you are working on is really rough! I distressed it just a bit (220 grit sand paper) to bring out the detailing and sprayed the exterior with poly to seal it!

I had originally planned to leave the inside stained...but it still seemed a bit dark so I removed the shelves and painted the inside a soft "teal." I taped and papered off the exterior and primed the interior with Kilz, sanded, tacked and then applied two coats of spray paint! I left the shelving the original stain finish.

I absolutely adore the original hardware so I left it!

One thing Marian does is beautifully style her pieces for photos. I rarely have the energy (or back!) to haul a piece inside and "pretty it up" before I take pictures. As I have said before I am more about the process than the pretty. HOPEFULLY someone else can envision the piece in their home and can find their own inspiration for staging it! Someday I may have the energy and space to make a pretty "backdrop" in my shop (okay, so it is really my garage!) Until then, the best you are going to get is a halfway decent "before and after" shot and maybe a little bit of instruction. 

The two top shelves are a little "bowed." They are thin enough that I think I can lay them out with some weights on them to flatten them!

The debate raging right now is whether to reinstall the door (I did not paint it!) or leave it open. 

Hum....

If this gives you a little inspiration to "makeover" a piece in your own home you have fallen out of love with, I have accomplished my goal!