Essentials for a cozy guest room...

I did not realize how unprepared we were for guests until I began my quest for the perfect "guest room."

Sarah and her family are our most frequent "guests." She doesn't have her own room in this house since she had moved away for college the year I bought it...19 years ago! (Wow...where does the time go!) When her family visits they have no problem digging through my bathroom or closet when they need a Q-tip or soap or an extra blanket! I don't mind that they do, but you probably don't want most "guests" scrounging around your bath or closet!

The three youngest babies who grew up in this house have moved on with their lives and I am left with three bedrooms upstairs.

Now, this is where I tell you that when your children first go off to college, do NOT think you can immediately turn their room into "a naked room." (Again, you have to see the movie!) Because truth be told, they do eventually come home...at least for frequent and sometimes extended visits. And the worst is all the "stuff" they leave behind...clothes, books, trophies, high school momentos. Stuff they obviously can't take with them but don't want to get rid of (okay, so MOM doesn't want to get rid of their t-ball jerseys and "Where The Wild Things Are" books...but that's a whole nuther issue!)

But eventually the time comes and you know they will not be moving back.

For me that time has come.

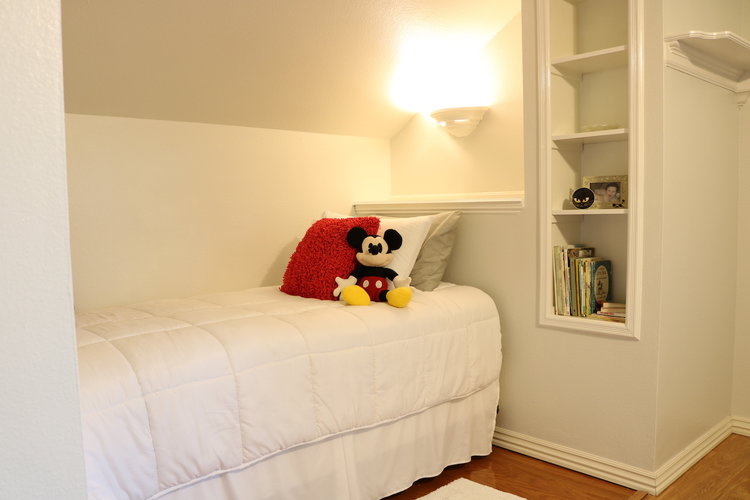
I decided it was time to pull together a real "guest room." It all started here

I finally got Matt's room painted and all three rooms purged. For the most part...there are still a few framed momentos and childhood books scattered about!

Katie's room will be our official "gym"...there is a twin bed and room for the portable cot for the grandsons and it has the large tv so it is perfect for their "game room." 

Mitchell's room has been the unofficial "guest room" but right now it still has a lot of "stuff" in it that I just don't have the energy to deal with. And truthfully, the bed in his room isn't real comfy.

When Matt moved into his new home, he left only a bed and dresser...

...that room has the least to deal with so that will be the "official guest room." After the new paint and purge, it was time to start working on "this list"....

In the bedroom I made sure there where the essentials...comfortable bedding, a bedside table with a lamp, an alarm clock with USB ports (love that little thing!), a scented candle, a flashlight, reading materials, a notepad, a trash can, etc. (I moved the bedside table from Mitchell's room and the lamp from Katie's...it "pays" to shop at home!)

I gathered all the extra blankets and pillows and bought new hangers and put them in the closet....

I put white inexpensive pillow cases on all the spare pillows! Just a reminder that I am a huge fan of white bedding and towels!

In the bathroom I purged all the outdated products (used toothbrushes, old deodorant, expired meds) and stocked it with everything on the list...toiletries, ample towels and washcloths, a blow dryer, personal and oral hygiene products, a first aid kit and basic meds. 

I made sure I checked everything off the list!

I wanted a new bed frame and found the PERFECT one through a friend. 

Okay, so it wasn't really perfect. I added some height to the side rails because I don't like the box springs showing. I used my Kreg jig and wood glue to attach a 1x6 board to the side rails....

...then nailed a piece of trim across the joint...caulk and putty...

Then I painted it! First the KST...kilz, sand, tack...

Then paint. I went with my go-to off white...SW Swiss Coffee. I thought about doing the whole chalk paint and distress thing, but I know that will eventually fade out of favor and I want clean and classic...in other words, something I don't have to repaint in a few years.

I found an inexpensive "indoor/outdoor" rug that works perfect with a neutral color pallet. 

I'm not big on piles of decorative pillows on the bed, but since I don't have to make this bed every day I picked up some pretty decorative pillows!

I replaced the blue and brown curtains with fresh white panels. 

I found this message board in the craft section at Hobby Lobby.

Chalk painted it and then hand painted the wording on it, distressed a tad and sealed. Super simple and just a touch of "farmhouse." 

This little "message board" is the perfect spot for the wifi password info and our home address info. Keep in mind, if you don't have a land line and someone uses their cell phone in an emergency, emergency responders may not know your exact location. Guests should have your physical address! It is also the perfect spot for hanging spare charging cords for I-pads and phones! 

Fresh flowers are on the list, but it is a bit unrealistic to keep fresh flowers in a room I rarely enter...these were from Sarah for my birthday! 

If you do not have an extra bedroom specifically for guests, put together a guest basket...a little basket with all the "essentials" that can be stored in a closet until it is needed! I stocked this one with little "sample size" products. I also pulled items from my hotel stockpile...yes, I am one of those people who takes all the little shampoos, lotions and soaps from my hotel room!

Having a room ready (or even a little guest basket on hand) sure makes it easy to prepare for overnight guests...last minute or scheduled.

I have a large matted frame I intend to hang above the bed if I can find a print I like. The frame was a "silverish" color...not the least bit pretty. I have it primed and ready to paint (and share) when I finally put it all together. Wall decor is something that can take time...like Matt, I don't want "stuff" just to have "stuff." 

I put my dad's walnut chair in the corner and eventually I want to add a mid century dresser...Katie is using this one and I may get it back when she moves so I may hold out for it! I also want to find a luggage stand. When I get that all in place I will share that side of the room!

The "froo-froo" takes time but the absolute must-haves are in place! 

Que "sigh of relief!"

Little Miss Muffet sat on a....

Tuffet?

At least that is what came to mind when I saw these little chairs at an auction. When I googled "tuffet" I found pictures of little ottoman kinda things...but the definition is "a footstool or low seat." So I am going with tuffet. 

As cute as they are (or probably were in 1978) I knew they would require my least favorite chore...upholstery...and sewing! 

So of course they sat in the garage for months.

But I could see them all dolled up in my mind's eye so this week I decided to tackle the project.

First I had to strip off all the old upholstery and remove all the nails and staples!

I found an upholstery material I really love but there wasn't enough to do the whole chair...so I found a solid that coordinates with the fabric...sometimes you have to improvise! 

Chalk painted and distressed the frame...

Rather than use upholstery nails I used gimp...

The cushion is attached to the seat with buttons so I covered buttons with the teal fabric.

Just too stinking cute!

Not sure if these are "technically" tuffets but they are child size and ready for another lifetime of curds and whey!

On a side note, I "googled" what exactly is "curds and whey"...turns out it is nothing more than "curdled milk." I raised two girls...neither included curds and whey in their tea party menu! 

Little Miss Muffet

Sat on her tuffet

Eating her sausage and egg biscuit

Along came a spider and sat down beside her

And Little Miss Muffet squished it. 

We should be empowering our girls...

A proper guest room...

I have three empty bedrooms upstairs. Three empty rooms that my heart still feels are "the kid's" rooms. Truthfully, Mitchell hasn't lived in his room in 12 years. Matt has moved home on a few occasions since he graduated, but he just bought a home. Katie is still in college 15 minutes down the road, but she has made it clear that she has no intention of moving home...she will graduate next year and I have no doubt she will set out to set the world on fire.

So while my heart feels those are "the kid's" rooms, I know in my head that it is time.

Time to paint over the big "fail whale" in Katie's room.

(In case you are wondering, those are the photo albums...for the three youngest...I know, I have issues!)

Time to replace the baseball paddle fan in Matt's room. 

Time to purge a few more things in Mitchell's room.

I've made small changes to each room over the years...Katie's room is now our "home gym." But honestly, throwing a weight bench and elliptical machine in a room doesn't really make it a "home gym." 

I have boxed up MOST of Mitchell's plaques, framed certificates and trophies...but it is still "his" room.

Matt took much of his furniture when he moved into his new home, but he left his junior high jersey and his high school diploma and senior picture, so I immediately rearranged the few pieces of furniture (a bed and chest) and put his personal momentos back on the wall. 

But it is time to make some serious changes...and as always I found the little push I needed and a bit of inspiration on another website. J. Cathell ...a site that showed up on my "Bloglovin'" feed. I also found this tutorial at Today's Creative Life that outlined a few essential "must haves" in a proper guest room.

And this super handy checklist here...a great list to make sure I have all the bases covered if I want to create the perfect guest room.

I don't intend to put the bath items in the bedroom...the bathroom is rarely used so I just need to make sure it is organized, clean and stocked with "guest necessities." 

Inspiration...the first step to making a plan for any project, big or small. 

The room featured on the Jess's site is a tad "over the top" for our needs. Truthfully we don't have a lot of guests...the kids come home for the "momdatory" holidays and occasionally my uncle will come for a visit.

Inspiration none-the-less...and a push to get the ball rolling.

A plan...right now the plan is in my head and relatively simple. 

This week I tackled the first step in "the plan." Since Mitchell's room was the most recent makeover, little will change in there. I boxed up a few more things...VHS movies, books, etc. It will still function as a guest room but it will be a room where I can still display the important stuff like diplomas and such.

Katie's room will still be our "home gym" but it needed to be purged and neutralized...in other words, it was time to paint over the fail whale.

Since it is our "home gym" we think we MIGHT eventually move all the diplomas, framed jerseys and trophy's into that room. It has the largest tv so it is also ideal for the grandkid's game room when they visit.

The paint in Matt's room is not bad, but I want to eventually coordinate all the colors in the three rooms. I painted Mitchell's room BM Rivere Pewter but I wanted to go a tad lighter in Katie and Matt's rooms...so the plan was to paint them SW Nuance...the same color I painted my master bedroom. It appears to be a shade lighter than the Revere Pewter. (As you can see, I managed to get Katie's room painted but after two days of painting and purging, I decided Matt's room will just have to wait!) The trim in Katie's room was the original trim color so it was a tad "yellower" than the Swiss Coffee I have used in the rest of the house...so that was painted as well. 

Brian replaced the baseball paddle fan in Matt's room...not a huge deal.

I wasn't thrilled with the amount of light the new fixture put off. I moved a little wicker side table from Mitchell's room and the lamp from Katie's room and I think guests will have sufficient light!

A major "purge fest" in all three rooms...boxed up the keepsakes that will go in the attic and filled four boxes to donate. I made sure the bathroom was free of expired products and used toothbrushes. I gathered up all the spare blankets and pillows and stacked them in the closet.

Purging, paint and a paddle fan. Seems like a small step but those things made the biggest mess, the biggest impact and set the tone for the rest of the plan.

Eventually I want to paint the walls and change the bed frame in the Matt's room (the REAL guest room). I want to replace the chest of drawers with a nice dresser. Eventually incorporate all the little things Jess featured in her guest room makeover...a comfy rug, a chair or bench, new curtains and wall decor, a charging outlet, a cute wifi passcode sign, a jar with little guest necessities, a luggage rack, nice alarm clock and all the little homey nick-nacks that make a guest room comfortable and inviting. 

Truth is the most important elements of any guest room is that it is clean and clutter-free and has a comfortable bed and bedding....I can check that off my list of "things-to-do." The rest of the checklist will come with time and patience.

Thank goodness we are not expecting over night guest anytime soon!


Another mid century dresser...

I love vintage mid century furniture! Love it. The style is my absolute favorite to refinish and as I have said before, I try to infuse as many pieces as I can into each room. Beautiful wood...clean lines...sturdy as the day it was built!

These are just a few of the dressers and chests I have refinished over the years...

Here....

Here....

Thank goodness my kids have inherited my passion for this style of furniture...because when I found this awesome dresser and matching chest on Craigslist, Matt had no problem taking them off my hands (AFTER I had worked a little makeover magic on them!)

As you can see I couldn't wait to start stripping the old finish before I remembered to get the camera.  And the finish on this sucker...it was a booger! Usually my 1/2 and 1/2 mixture melts old finish right off! I dang near had to blast this stuff off...I finally had to break out the heavy duty stripper and break my cardinal rule against sanding veneer (DO NOT attempt to sand veneer unless you have some serious experience.)

The top is laminate so I decided to paint the cabinet and refinish the drawers and legs....

Stripped and oiled the drawer fronts and legs...KSTP the cabinet and tops...drum roll....

I usually add a piece of protective glass on painted dressers...just to be on the safe side!

I love these pieces...and they are perfect for Matt's new home. He is using the dresser in his master bedroom and the chest in his guest room! Because these pieces were so well built, they will last another life-time!

I have several projects in Matt's house to share! He has already started "projecting" and I try to sneak in and take pictures when I can! So stay tuned for a cute little breakfast table makeover and his updated brick fireplace.

What's my "style"....

As I have said time and again (and evident by my Home Tour) my "style" is very eclectic. What exactly does that mean?

It means I like what I like and because my home is not all "farmhouse" or "traditional" or "mid century" I can pretty much find a place for any piece I fall in love with. 

As I mentioned in my last post my son Matt is buying his first home so I have been on the hunt for pieces that can be transformed and used in his house. Taylor, my daughter-in-law, asked me what Matt's decor style is...hum...not sure I ever asked him. Fortunately, like me, he likes what he likes and doesn't restrict himself to a specific style. He loves the mid century Lane Acclaim tables, but he also loves the farmhouse table I refinished several months ago! I promised him that if it didn't sell, he could have it for his dining area. I have picked up a few chairs and a round oak pedestal table for his breakfast nook. I'll share them when I get their "facelift" done! 

In the meantime I want to share this nifty dresser. Seriously horrid in it's original condition, but I could see the potential. 

Solid wood and very well built...and unique!

I think it could be an awesome piece in his bedroom, along with this little dresser, but I'm not sure I have convinced him it is worthy....but then again, he hasn't seen it finished! 

I absolutely LOVE this piece, especially the old rusty hardware. Matt asked if I could put cup pulls on it like the little dresser, but honestly, this hardware too cool... so unique and amazing. I cleaned them up and reattached them...rust and all! I just think they are awesome!

I chalk painted and distressed the cabinet and gel stained the top. The drawer fronts are latex paint. 

As I said before, if he still doesn't love it, someone else will! 

That is the great thing about being "eclectic"...to each his own! 

I blame it all on "Fixer Upper" ...

As I mentioned here, Matt is buying a house so I have been on the hunt for inexpensive pieces he will need. I often remind my children that it took decades for me to accumulate the pieces I have in my own home...so patience!

But I find myself being terribly impatient when it comes to someone else's house. I blame it on "Fixer Upper." A couple walks into their home after 1 hour and it is perfectly decorated and styled and staged...certainly I can do that in 2 months.

HA!!!! 

Maybe if he had an endless budget...but he doesn't so I have to focus on the essentials with a few "froo-froos" thrown in for good measure.

Saturday I scored a "free" sectional couch. It will be an awesome piece if an upholstery cleaner can get all the nastiness and dog hair off of it...for now it is in the storage shed along with patio furniture, garden tools, kitchen stuff I have picked up and of course his "college day" collection.

I do have a garage full of "projects" and a few of those pieces will work beautifully in his new house...IF it will ever stop raining and I can get them all repaired and painted!!! For now it is just a collection of "junk" that is stressing my OCD tendencies.

Actually I pulled a lot of it out into the driveway Monday, went for supplies, and got home just in time to drag it all back into the garage before it got soaked. Curses. 

I worked Monday and Tuesday building and repairing and cleaning...making wood tops, gluing busted drawers, puttying splintered veneer and misplaced hardware holes. All the stuff you can do when it is raining and you can't drag everything out and start assembly line painting.

One piece is a neat little three drawer chest I scored while emptying out one of my apartments....

It certainly had it's issues. Laminate top, busted drawers, splintered veneer, and an AWEFUL finish! 

Number one rule...if it is broke fix it PROPERLY! No sense in "making it pretty" if the veneer is going to continue to peel or the drawers don't function.

I removed all the "loose" veneer, puttied and sanded. I repaired all the drawers. And because I think this would make an awesome bedside table in Matt's new house, I replaced the top with a stained wood top....

I chalk painted and distressed the cabinet with one of the sample pots I bought when I was looking for a wall color for my bedroom. I kilzed and painted the drawer fronts with another sample! Nothing goes to waste!

And of course new hardware.

Again, I think it would make an awesome bedside table but I have a few other little projects up my sleeve Matt may like better. Nice thing about having a room in a vintage market...if he doesn't love it, someone else will! 

A simple side table...

When we added the new bedroom chairs....

...we decided to take out the "surround sound system." When I built this room 16 years ago, I installed surround sound and we had a whole sound system set up and wired through the walls. 

Truth be told, we haven't used the surround sound system in YEARS...so there was no need to have the hulking components taking up real estate. It was just something to dust.

As pretty as the little MCM table was that held the sound system components, it really didn't work in the space.

But that left one small problem. Brian didn't have anything to set his computer or drinks on. Every guy should have a place to put his "stuff" next to his recliner...right?

Most of the side tables in my house are square or rectangular. And that just wasn't going to work in the space next to his chair.

Fortunately, my neighbor Carolyn has a "flea booth" and has a garage full of odds and ends. So I dug around in her garage and found this little round table....

She bought the little pedestal at a garage sale and attached a round craft board for the top. She hadn't gotten around to painting it and that was just fine with me! Again, "not my style" but it was the perfect size for the space.

So I brought it home, stained and sealed the top and painted the base the same color as the accent wall.

I painted it with chalk paint and considered "distressing" it a bit...and I may do that at some point. 

Right now it serves it's intended purpose.

So now this room is done...right?

Nope.

Last weekend we went shopping for a king size bed. I have NEVER had a king size bed...but sleeping with a huge dog and two cold kitties was beginning to take a toll on my back and sanity. 

So we bought a king size mattress and box springs. 

That set off a frantic search for all new sheets and blankets and a bed frame that will support and conceal the box springs...it all had to keep my bedding simple and easy to make and fit into vision I have for this room.

OH MY GOSH!!!! 

First, I hate shopping. It is just not my thing. Second, I'm "old school"...mattresses go on box springs, not platforms, which seems to be the "in" thing right now. That and REALLY tall head boards, which I don't like, or fabric covered headboards that will NOT work in a house full of critters. Third, box springs aren't suppose to show. And lastly, I'm lazy...the only way you can make a "platform" bed look decent is if you tuck all the blankets in on all sides. That breaks my "make the bed in 30 seconds" rule and we all know what would happen if I didn't make the bed every morning!

I did it. I bought new sheets and a mattress pad. I ordered a new down comforter and quilt online. I ordered a bed frame I THINK I will like...when it arrives in 1-4 weeks. 

So when it all arrives and is put together, I will do ANOTHER reveal on the master bedroom. And that should be the FINAL reveal.... until I change out the paddle fans or buy the new lamps I've been eyeing, or finally find the perfect piece of art for the big blank walls.

It's only taken me 16 years to get this far...no hurry!

Master bedroom paint color...

The "creme" walls just didn't jive with the new grey tone chairs.

It is a real struggle. It is a head banging, nail biting struggle that often leaves me feeling helpless and hopeless.

Just kidding...it's really not THAT big of a ordeal. But it is a struggle for me to change wall paint colors. Truth is, if you hate the paint color of anything, it is a relatively easy and inexpensive fix. Just repaint. Isn't that what I post time and again.

I think for me one of my biggest fears is that it will be too dark. When I was building homes I always told my clients, if you think you like the paint color on the chip, go one shade lighter. If they insisted on sticking with the color they liked, I would buy a sample, paint a huge swatch on the wall and EVERY time they would go lighter....every time. 

That is one reason I advocate painting large samples on the wall and living with it for a few days. Also, every paint has an "under tone" and it is impossible to see until the light in the room or natural light from windows hits it just right That awesome grey you thought you loved suddenly appears green or purple...the "off-white" that looks perfect on the tiny chip suddenly looks very pink...the blue-grey that matches your bedding looks purple when the sun hits it mid day.

I think that is why the process of picking a wall paint color sends me into a dark hole. 

The upside is, I KNOW THIS....and if I will just take my own advice, I will be fine.

So I pick colors I THINK I will like, paint large swatches on different walls in the room and look at them at different times of the day. 

Last week I shared the colors I first picked...and the reasons why I thought they would NOT work!

I did go back and pick up a sample of SW Nuance...it is one shade lighter than Useful Grey. I liked the Useful Grey but I was picking up a hint of green.

So Nuance it was...and I like it...but it is VERY light and truthfully, it is tough to see a real change.

Side by side, you can see that it is an exceptionally subtle change....but a change none the less. 

I probably could have gone with a darker color...this room gets tons of natural light but for now I am happy the "creme" is gone and the subtle gray blends a bit better with the elements in the room! 

Sherwin Williams "Nuance" is pretty close to the color in my "inspiration" color chart....

I originally discovered this little color chart at designseeds.com. It is a great site where you can find color combinations that work together...colors you would never imagine could exist side by side. This color sample has been my inspiration since I first started working on this room 3 years ago...one element at a time! 

This site is a source of endless inspiration and in my opinion it is one of the first sites you should visit when designing a room. If you have an element you HAVE to decorate around it will help you find colors that will enhance, and even mask it....that ugly brown couch or the wing back chair your mom gave you. 

I was able to pull every color off this chart and incorporate it into my master bedroom. The "white" in the trim, the "grienge" on the walls, the "bluish" on the fireplace wall, the "frosted berry" in the rugs, accent pillows and throw, the "grey" in the chairs.

Start your inspiration journey with colors in hand! And remember, if the paint is too light (or too dark) JUST PAINT IT AGAIN!

Master bedroom makeover Part ?

The chairs have arrived. One element of the master bedroom plan I started several years ago!

The original "plan" for this room was to eventually recover the existing club chairs.

But I decided they were just too big and I'm over the whole "matchy-matchy" thing. I wanted smaller and different...and that is exactly what I got!

So the master bedroom "remodel" that started three years ago when I painted the furniture and continued when we installed the laminate flooring, is still on going. 

I still love the original inspiration colors I chose....

The soothing soft blue, the pop of frosted berry...the two new chairs bring in the soft grey element. Unfortunately that makes the soft off white of the walls appear very yellow.

So NOW I need to paint the walls. I noticed too that I have never painted the fireplace surround with the new whiter trim paint I am now using throughout the house. And the 2001 grossly expensive paddle fans? Not feeling it, so those may get changed out....something not in the original plan.

The two empty frames on the wall? Originally they were dark wood and were hanging vertically in my living room with pictures of my kids in them.

They have been sitting in my garage since I added the new mirror over three years ago.

A little KSTP treatment and they are ready for a new life...as a frame for...? Honestly, I haven't decided...maybe pretty landscape water colors or mirrors. I can't decide. That is one thing I have never been able to do in this room...wall decor! I still have massive empty wall space!

As I mentioned here three years ago, I knew I would need to add length to the curtains...or ignore it. 


I share this only so you will understand that a "room transformation" doesn't always happen over night. Sometimes it can take YEARS and in that time frame, your wants and tastes and desires may change. 

One or two elements at a time...slow and steady...you don't have to do it all at once!

Mirror, mirror, on the wall....

I gave up trying to come up with clever blog titles a loooong time ago, but I just couldn't resist!

Mirrors are the simplest way to add wall decor, light and depth to a room. In other words, if you have a small dark room, hang a mirror!

My master bedroom is a pretty large room and it gets tons of natural light but I am in the process of making a few changes. I have a really awesome antique mirror hanging out in my garage that may fit into the plan.

I use mirrors in just about every room of my house....

The living room (featured here)....

The den...

My home office....

And this fun little mirror hanging in a small corner of my room...

The change? Well, I am finally getting around to buying new chairs for my master bedroom. I originally intended to reupholster the chairs I have...

But as you can see, they are very large...and they are "matchy-matchy" which is something I am moving away from. Truth be told, I just don't like them any more!

While I was hunting for a new couch for the living room, I looked at a few chairs that might work in this space.

First, let me explain "this space." When the kids were younger, I added the den so we would have two living spaces. When they got a bit older (and louder), I added a large master suite with this awesome sitting area so we would have someplace to escape to.

Of course, now the kids are gone and we have this amazing sitting area in our bedroom and two living spaces. Um, no, we don't need all this space. Truthfully, we rarely use the sitting area in the master bedroom these days...but my oldest daughter really wants these two large club chairs...and well, it's just time to make a change!

So the hunt for the perfect chairs commenced.....

Two caught my eye, so this week I went back to the store and ordered them both....

This one is a leather recliner. A little bit of information about myself...I DO NOT do recliners. First, they are usually very bulky and unsightly. Second, I have an unfortunate history with recliners...hence, they seem to set off a form of PTSD. I don't really want to share, but suffice it to say, I swore there would never be a recliner in my home.

But I kind of like this one...it is very different from your typical barcalounger recliner and I really didn't find it the least bit offensive. It has a USB port and Brian thinks it is super comfy, so this will be "his" chair.

My chair is actually a "feed me a grape" kinda thing....

Perfect for those nights when my back won't let me lay in bed any longer or cold winter afternoons when I just want to curl up with a blanket and a good book!

I really didn't need an ottoman since Brian will have the recliner but I wanted to be able to stretch out.  This one fits the bill...and it is super comfy!

Which brings me to the mirror in the garage (see, I eventually get around to my point!) 

Months ago I bought a MCM dresser with a mirror. It had obviously been exposed to heat from a fire because the finish had a little bit of "bubbling" and it was covered in soot. I took off the mirror, cleaned up the dresser and sold it. 

These days dressers WITH mirrors just aren't the "in thing" so I kept the mirror and gave it a little makeover with the intent to sell it. The finish was damaged...and of course it was pretty "dark and dank."

I chalk painted it with an off-white paint and distressed it a bit. But I really didn't like the look of it...it just seemed too "white."

So I decided to give it a little "glaze" treatment with some stain. I wiped on pecan stain and then wiped it off. It gave the finish a nice "aged" look. After glazing the entire frame of the mirror, I sealed it with polycrylic and reattached the little medallions.

The mirror is "not my style" (again, whatever the heck that is! Eclectic?) and of course I will have to hang it higher...right now I just stuck it up where the old picture was to see if I MIGHT like it there...don't know. Truth is, I will have to wait until the new chairs are in place.

But my whole rambling point is this...you don't have to live with "dark and dank." Mirror frames can easily be painted. Even if the frame isn't quite "your style" a little paint can go a long way to making a simple cast off mirror a nice statement piece for your room! And trust me, if you have priced mirrors lately, you might want to rethink that thrift store gold framed mirror or that old dresser mirror!

Whether you paint it a bright, solid color or give it a little "aged look" treatment, mirrors are easy to change to fit any decor!