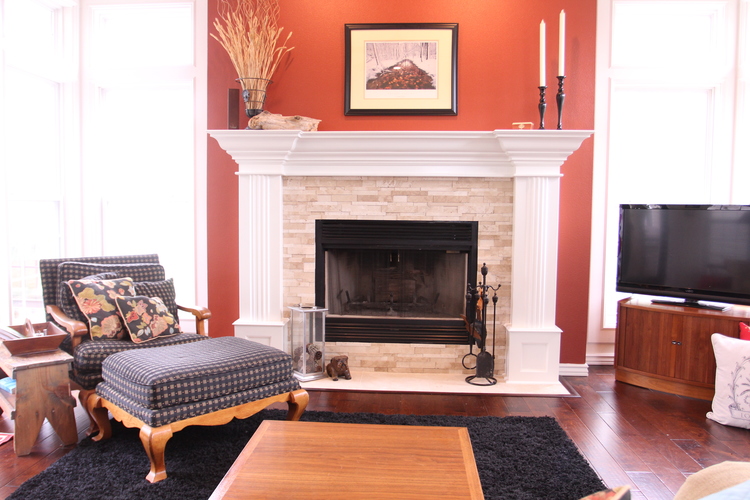
Mid century chair makeover and the dogwoods...

I originally shared the a makeover of this heirloom chair HERE.

After this little makeover it might not look much different…

IMG_1397+copy+3.jpg

…but it definitely is!

It was my grandmother’s and a “few years ago,” while gathering furniture for her college condo, Katie and I recovered the cushions and stripped and oiled the frame.

When she moved into an apartment her junior year, we found two matching mid century chairs she liked a bit better so this one came back home.

A few months ago I mentioned to Kate that I needed to recover the cushions because the dog had done a number on the white vinyl in the last few years. It was pretty ratty looking…

“Mom…you have had that chair in your house for almost 4 years now…it’s been more than a “few” years.”

Wow, time flies!

So yes, it was time to recover the cushions.

Two minor issues…one, the cushions seriously sucked. I am certain they weren’t the “original” cushions…my grandmother probably replaced the original when she recovered them with the darling blue cotton fabric that was on it when I received it. When Katie and I gave it a little makeover 5 years ago, we just added a little batting to the cushions before we recovered them.

They really weren’t sized properly and they were super uncomfortable.

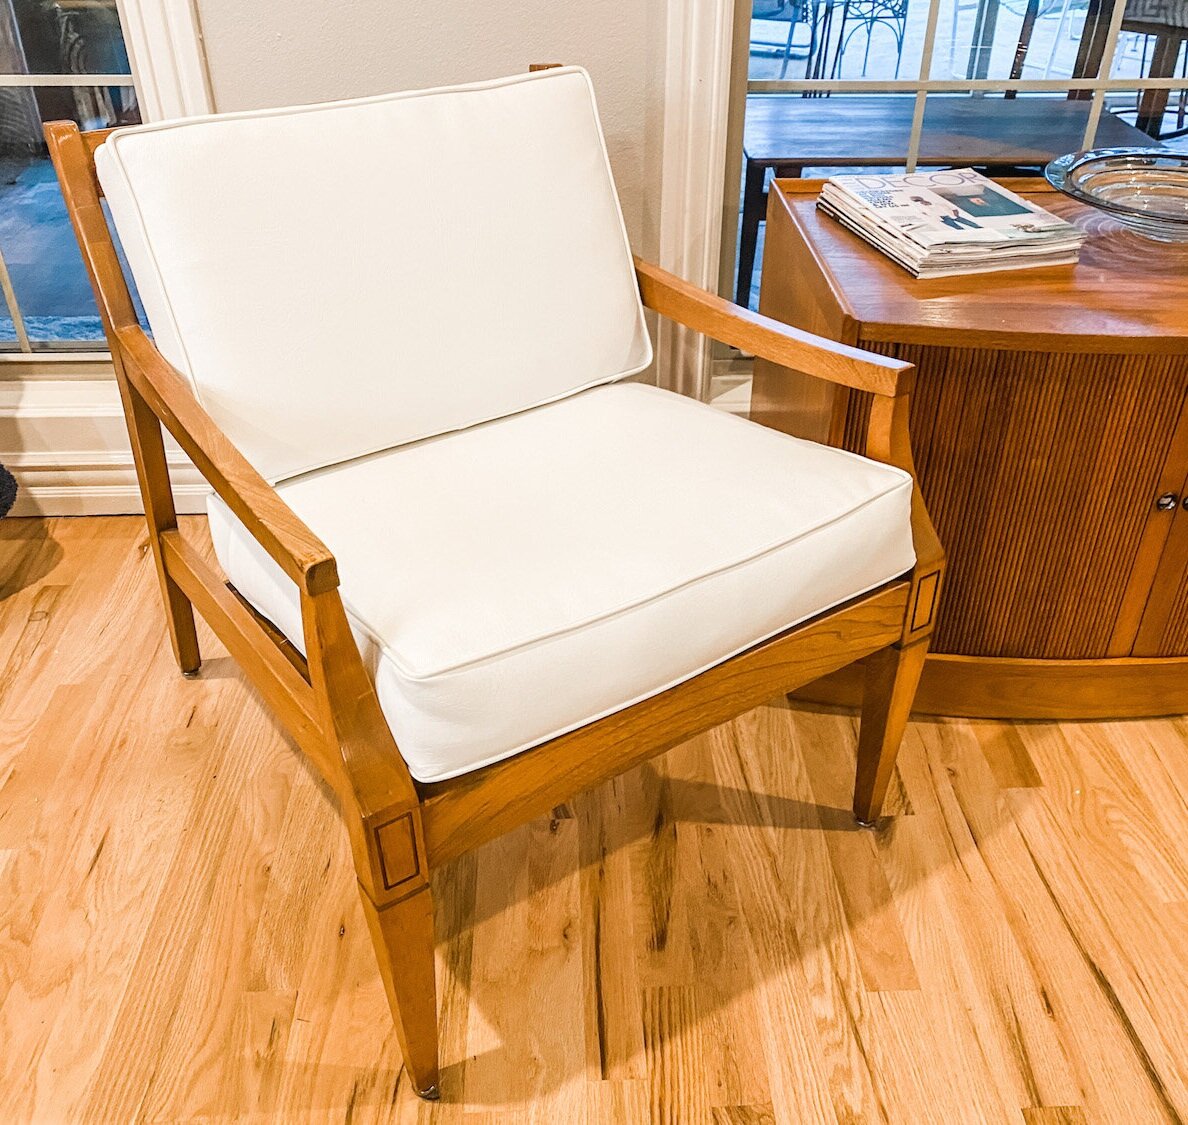
Second, AS ALWAYS, I really struggled with what fabric to use. It is definitely a “mid century” style chair and so many of this style chair are indeed white and black vinyl. As much as I would have liked to “change it up” a tad, white vinyl really was the best option.

The frame is still in pretty good condition. I could have freshened it up a bit with another coat of tung oil finish, but nah…

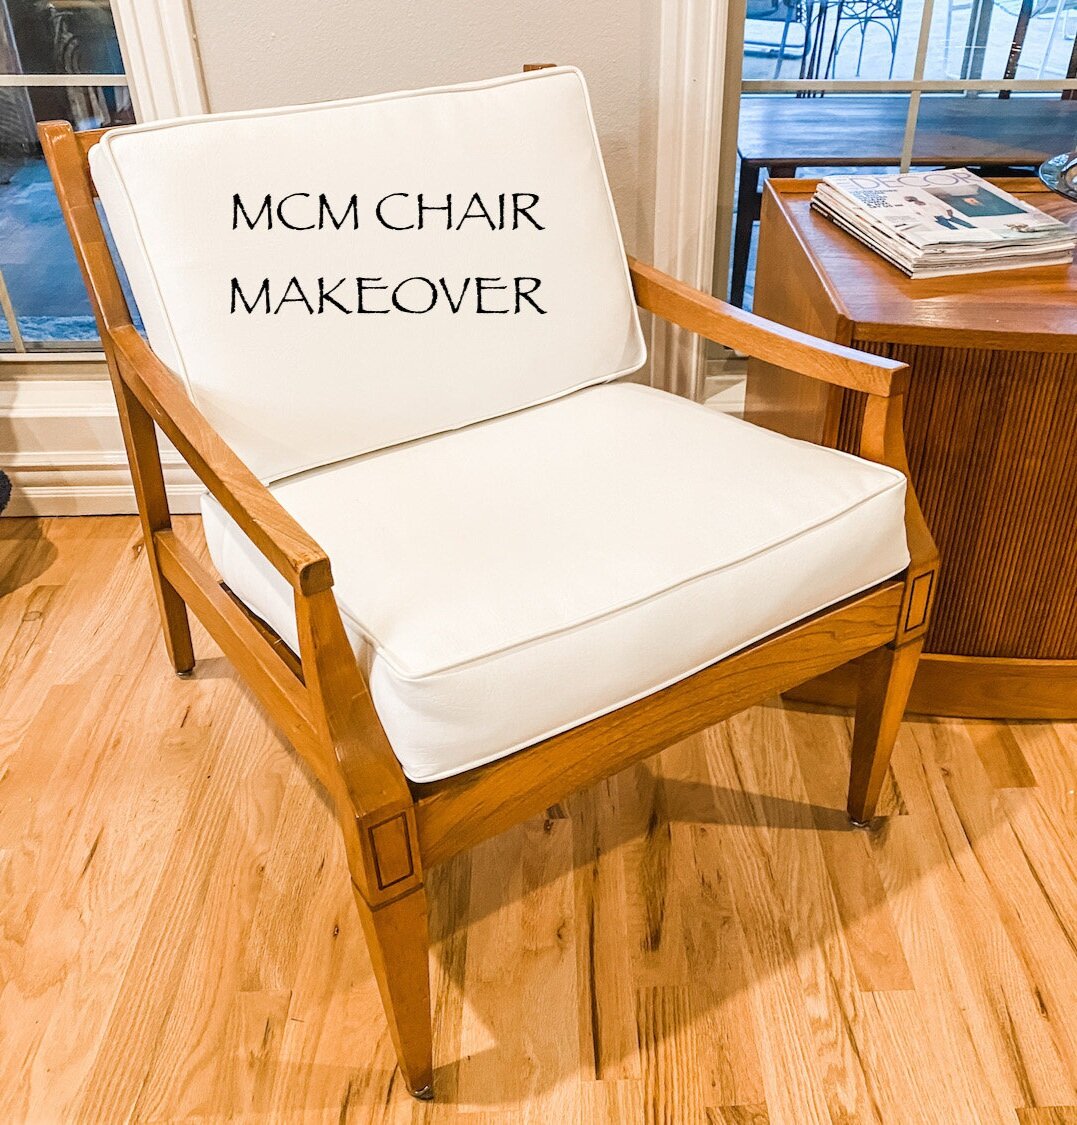
New cushions…new fabric. That is all it really needed.

I bought 4” foam, cut it to fit properly and wrapped it in batting.

IMG_1382.jpg

TIP: The BEST way to cut foam is with an electric knife!

IMG_1181.jpg

The vinyl I used didn’t give me near the issues I had the last time we recovered the cushions. This time it went through my sewing machine just fine and I was able to easily create piping. Piping is a tedious accent to make and truthfully you could easily make cushion covers without it if you want to forgo the detail.

If you are having trouble getting vinyl to go through your machine THIS is a pretty nifty trick….

I have said it before and will say it again…and again…and again. If you do not know how to sew a straight stitch, LEARN. Take lessons from your local craft store, online or county extension. It is a skill that will open up your entire DIY world! On one hand I kind of curse my mom for making me take sewing lessons when I was a teen (because I really dislike sewing), but on the other I am so grateful I can make pillows, cushion covers, and curtains! And don’t think you need a high dollar sewing machine. Mine is a basic model and is AT LEAST 35 years old. The more basic, the easier it is to use!!!

AGAIN, I suck at tutorials so find an instructional video online that makes sense to you!!! Making cushion covers is not hard but there are tips and tricks that will make the process easier!

All in all it was time well spent. The chair now has a fresh new look!

IMG_1397+copy+2.jpg

Thank goodness the dog has now moved on to the big leather chair in the office by the front window. Fits her better and the dirt doesn’t show on the brown leather NEAR as badly!

IMG_1386.jpg

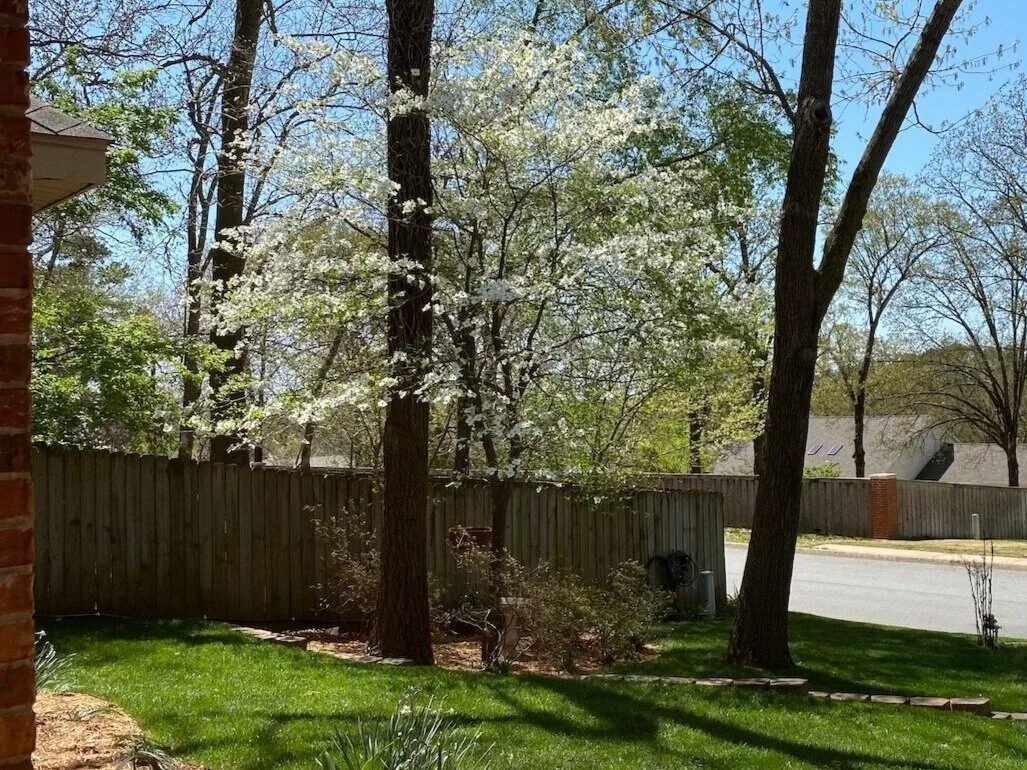
We had awesome snow showers Tuesday (seriously a blizzard Tuesday afternoon and by Tuesday evening it was ALL gone!) and a freeze Tuesday nigh.t I had to cover all the hostas with buckets and sheets. Back in the 70s by this weekend. Typical Arkansas weather. This is why I refuse to plant tender annuals even after our “freeze date.” As it is all the beautiful dogwood and azalea blooms may not survive. Sooooo frustrating.

That is one thing I discovered about this house…every single window has an amazing view of the dogwoods! Beautiful.

From the dining room window.

From the dining room window.

From the front porch.

From the front porch.

From the master bedroom window.

From the laundry room window.

From the laundry room window.

From the screened porch.

From the screened porch.

From the back of the house…this will be the view out of my new master bath windows when they FINALLY get here!

From the back of the house…this will be the view out of my new master bath windows when they FINALLY get here!

This past weekend I took a walk around our neighborhood with Cleo and every single yard has dogwoods and azaleas.

Another reason why I love my home!

static1.squarespace.png

Funky little chair makeover and a few upholstery tips....

Another auction buy that languished in the garage for months until I pulled it out and thought..."Hum, I kinda think that is cool!"

It may not LOOK cool, but it is a funky little chair...and I like "different." Not really my style (Hollywood Regency maybe?) but since my style is "eclectic," I can find a place for it! 

I'm not sure exactly what wood it is...my guess is walnut. But the finish was the typical dark stain with black flecks I see on a lot on furniture from the 70's...not really attractive...


After I stripped all the old fabric, I used my 1/2 and 1/2 mixture and stripping process to strip the old finish and stain...then I applied 4 coats of tung oil finish (no stain)! I like the warmth of natural wood.

As always, if one comes in, one must go out. So this little chair in my office was moved upstairs into the guest room until I have room in my space at 410 Vintage! I bought it 25 years ago at an estate auction and it was my first real reupholstery project.

Fabric is always a tough one for me...maybe because I know how hard it is to reupholster a piece and I don't want to do something I will tire of and have to redo. I found several fabrics I thought I might like, brought samples home and did what I always do...stare at it for a few days. In the end I went with this fun but somewhat conservative "geo" pattern...I like that it is relatively neutral and could be spiced up with a pillow or throw...

And spice it I did. When I was looking at fabrics I found an awesome pink velvet. I was briefly tempted to cover the chair in the fabric but I knew it would be a "fad color" I would later regret. But I couldn't stop obsessing over the pink so I decided to find a pink accent pillow.

Naturally, I couldn't find a pillow I like so I ended up buying a little bit of the pink velvet and made a little pillow. Instead of cording, I decided to go with tassels on the corners but couldn't find any I liked...so I made little "tufts" out of feather cording...just too stinking cute!

A simple but fun little detail that brings in the pink I was drooling over without the huge commitment of covering an entire chair in it! I would advise taking this approach on all "big ticket items." Couches, chairs, bedding...keep them neutral and add the "fad" details and colors with pillows, throws, curtains and rugs...accents that are relatively inexpensive to change out when the color falls out of favor in a few short years!

By the way, you may have noticed I changed the curtain...I went with white just to lighten the corner a bit!

I could never post a good tutorial on how to upholstery YOUR piece of furniture...there are so many great video tutorials online for just about any style of chair/couch/ottoman/etc and I strongly suggest you do a lot of research before you start your project. Find a tutorial that best suits YOUR needs.

I will share a few tips that will make your job a tad easier. It doesn't matter if you are recovering a chair or couch or ottoman...these rules apply!

First, learn to sew. Every DIYer should know how to use a sewing machine if for no other reason than to sew pillows or curtains or do basic upholstery or even hem a pair of pants. If you don't know how to sew a straight stitch, learn! I was fortunate that my mother made me take sewing lessons when I was young but I know a lot of local county extensions and hobby stores offer cheap (if not FREE) lessons! Take them...learn! And don't think you need an expensive sewing machine...I have a basic cheap machine that is at least 30 years old! 

Start simple. Before you tackle an heirloom wingback chair with expensive fabric, try something simple like this ottoman....

The drop cloth material I used was relatively inexpensive and super easy to sew. And I used a premade bias tape for the cording.

Take your time! I always think a project will take a lot less time than it actually does...so know that reupholstering anything isn't a "rainy day project!" Maybe a rainy WEEK...but deconstructing alone will take time and a lot of patience and you want to do it right!

Take LOTS of pictures while you deconstruct! Just snap random pictures as you strip the piece. If you are like me you THINK you will remember, but you won't...and you will find yourself sitting there wishing you knew how in the world it was originally put together. So take pictures!

It is always good to have a visual reference!

TRY to keep the pieces of the old upholstery intact so you can use them as a pattern for the new. If the old is really stinky and ewwwy, make a "pattern" with them out of butcher block paper or old newspaper. Make sure you label each pattern piece or old fabric so you know where it goes! And keep in mind that the fabric you remove has been trimmed...so add a few inches on each side of the piece...you can always trim after it is attached!

If you are going to strip and stain or paint, do it after you strip the old upholstery but before the new! 

Take time to make repairs! Make any repairs that need to be made BEFORE you start painting/stripping/staining and reupholstering! Do not spend the time and money reupholstering a chair if it wobbles or needs new strapping. If you don't know how to repair something property, Google it! Or email me! And remember, glue and clamps are your friend...not silicone, not sheetrock screws, not nails. Do it right or you are wasting your time!!!

Remove ALL the old upholstery nails and staples...all of them. And honestly, I have bought every tool on the market to make the job easier and I always revert back to a plain ole' flat screw driver, a hammer and a pair of good needle nose pliers!

Which reminds me...wear shoes! I don't care how careful you are, those nails and staples fly all over the place and you WILL find them with your bare feet!

Speaking of tools, I think I have tried every electric and manual stapler on the market. I have found that MOST will not set a staple flush or securely. So now I use a pneumatic stapler, similar to this one.  Best. Stapler. Ever!!!!  But word of warning...don't make a mistake and don't plan on recovering the piece any time soon because those staples aren't coming out!

Alway cover old batting with new. Even if the old batting seems to be in good condition, cover it with new batting. Always! If it has old horse hair stuffing replace it...if it has old "strapping," now is the time to replace it!!! On a few chairs, I have actually stripped everything down to the bare wooden bones and added new everything. Trust me, that is better than getting it all back together and discovering that the seat still sags or is lumpy and it smells!

Buy enough material! When you buy material make sure you account for any piping (welt cording) you might have to make. You can buy premade cording, but if you are going to make it out of the upholstery fabric it MUST be cut on the bias...in other words, diagonal across the fabric. To give you an example, on this little chair, I needed less than two yards for the seat and back, but I needed another yard just so I would have enough to make the welting. Again, google welt cording/piping and you will find great tutorials that will show you exactly how to make it. 

Make sure you have enough fabric to complete the project before you start. Lay ALL your "pattern pieces" out on the fabric and account for the welting before you start cutting. Nothing is worse than getting half way through the project only to discover you don't have enough fabric...and you bought the last bit of it! If all else fails you can always use two different fabrics on the project like I did on these little tuffets...but PLAN for it!


Google, google, google. I learned a lot at the elbow of my dad but today we have the world at our finger tips and you can find a good tutorial for just about any project...even upholstering furniture! I always advise watching as many tutorials as you can find and use the one that makes the most sense to you and your project! Watching DIY tutorials is also a great way to decide if you even want to tackle the project...advisable before you buy a wingback chair at a garage sale for $20 with the intent of "learning to upholstery!" 

Until next week when I hope to share Matt's entry makeover...


Little Miss Muffet sat on a....

Tuffet?

At least that is what came to mind when I saw these little chairs at an auction. When I googled "tuffet" I found pictures of little ottoman kinda things...but the definition is "a footstool or low seat." So I am going with tuffet. 

As cute as they are (or probably were in 1978) I knew they would require my least favorite chore...upholstery...and sewing! 

So of course they sat in the garage for months.

But I could see them all dolled up in my mind's eye so this week I decided to tackle the project.

First I had to strip off all the old upholstery and remove all the nails and staples!

I found an upholstery material I really love but there wasn't enough to do the whole chair...so I found a solid that coordinates with the fabric...sometimes you have to improvise! 

Chalk painted and distressed the frame...

Rather than use upholstery nails I used gimp...

The cushion is attached to the seat with buttons so I covered buttons with the teal fabric.

Just too stinking cute!

Not sure if these are "technically" tuffets but they are child size and ready for another lifetime of curds and whey!

On a side note, I "googled" what exactly is "curds and whey"...turns out it is nothing more than "curdled milk." I raised two girls...neither included curds and whey in their tea party menu! 

Little Miss Muffet

Sat on her tuffet

Eating her sausage and egg biscuit

Along came a spider and sat down beside her

And Little Miss Muffet squished it. 

We should be empowering our girls...

A vintage chair makeover for the new house....

As I have mentioned before, it is important to do research on "vintage" or "antique" pieces before you take a can of spray paint to them...God forbid you find LATER that you have spray painted a potentially valuable piece.

Such was the case with this pathetic little chair....

Someone had painted a true "vintage" piece...a McGuire ratan chair. (At least I THINK someone painted it...I couldn't find any information indicating this chair would have originally been painted)

With a little bit of research I found a listing for this pair on 1stdibs selling for a small fortune!

The prices on 1stdibs and Chairish always seem a bit high for my tastes but I have found both sites to be excellent sources for researching vintage pieces. 

When I first researched this coffee table (Drexel Declaration) I found it on one of these sites for around $1600. And this little cabinet for thousands.

This little chair sat out front of 410 Vintage for several weeks before I decided to tackle it. I wasn't drawn to it because of "what it is" but rather Matt needs a few little accent chairs. Since they sold it to me for $10 I didn't feel too guilty about painting it...the "true value" was pretty much toast in its current condition! 

The strapping on the joints (strictly decorative) is actually leather, but it was all pretty dried out and one was broken...a little hot glue fixed it right up. 

I repaired the broken seat strapping, primed the frame with Kilz, sanded a bit, sprayed it with black satin paint and made new cushions and pillows. I had some foam cushions stored away in my attic from an old couch and a few small pillow forms lying around so the only thing I had to buy was the paint and fabric.

Since Matt is a pilot and we are leaning towards an "aviation" theme in his living room, I thought this fabric choice for the pillows was down right clever...lol! 

Not bad for a small investment.

So now Matt has a defaced "McGuire ratan" accent chair...of little value but perfect for his needs! 

And cute as a bugs ear!

Closing is next week and I can't wait to get started...not sure if I am more excited about Matt buying his first home or getting all this "stuff" I have accumulated out of my house! I have most of the pieces ready to load and go! I am ready to roll out the rugs, set the furniture and hang the pictures. 

In a few weeks I will post a few "project pieces" I have worked on for Matt's house. I can't wait to share what a few bucks and a little time and effort can do.

Club Chair Makeover...

For those of you who are old enough to remember 45 records, you know what it is like to buy a record for the "A" side, only to find you love the song on the "B" side.

That is basically what I did when I found the perfect upholstery for my big club chair and ottoman....

No I did not find inspiration in a song. I brought home 4-5 fabric samples I thought I might like. IIICKKKK! They were all awful so I tossed them on the chair, only to find exactly what I wanted on the flip side of one of my selections!

Magnolia Fabric Lemuel Mushroom

I knew I needed a lighter fabric...anything dark would just be too "heavy" for the space since the addition of the brown leather couch (reasons for the hulking brown leather couch here.) "Light" is kind of a problem in a house with a dog that sheds like a dead pine tree and thinks ALL the furniture in the house is for her comfort. You think kids are a mess...HA! 

So I really couldn't go with anything "off white" but I desperately needed a fabric that was "light" and would go with any color.

This chair is really "not my style." It is oak...strike one. It is "queen anneish"...strike two. But what keeps it in the game is the comfort...this chair is soooo comfortable. I bought it 26 years ago and this is it's second makeover, the last being 16 years ago. I have read many books in this chair, watched many movies in this chair, and even spent a few restless nights in this chair!

Originally it was in the den....

...but when the "combining of the households" went down, it was moved into the living room to make room for Brian's leather chair and ottoman!

I still love the black and gold fabric but again, big brown couch! Major "dark and dank!"

Since I knew it would be a major chore to makeover, I wanted to make sure I picked a fabric that I really love, could handle a lot of wear and use and one that would stand the test of time! 

I think this fabric fits the bill...super durable, not too light and not a "fad." It coordinates with any accent color I throw at it...teal, red, black, white, whatever!

And more importantly, I really do love it! 

First I removed all the old fabric and set it aside to use as patterns for the new fabric.

To mask the "oakiness" I stripped the old finish using this process and then stained it with gel stain. I used a gel stain to ensure I would get a deep, rich color. I actually layered several different colors to finally get the look I wanted...one of the reasons I advocate using a stain without a sealer! A few coats of tung oil finish and it was ready to reupholstery.

Again, I could give you a long-winded tutorial...but every chair is different and I really think you can find a perfect tutorial just by searching for a chair/couch/bench very similar to what you have! 

In my opinion, the hardest part of upholstery is stripping the old fabric and pulling the million plus nails and staples. But it is important to remove ALL the old nails and staples! Also, don't forget...NOW is the time to make repairs...wobbly leg...glue and clamp...broken frame...glue and clamp. If it needs new springs or batting or cushions...do it NOW!

I added a little fresh batting and tightened the strapping in the ottoman...but other than that, it was pretty solid!

Make the PROPER repairs before you start upholstering! If you don't know how to fix it, google it! I promise you will find a tutorial to fix anything! 

Now that the chair is done, the other things I want to change are all the more apparent...the window seat cushions and a few accent pillows...and of course the flooring and wall color. IT NEVER ENDS!!!

As I mentioned in an earlier post, I told Brian to just take me shopping if I EVER mentioned reupholstering a piece again. But the truth is, I love this chair...not the oak, not the style...just "the chair." And now that it is recovered in a fabric I really love, I love the chair even more! So I guess the two weeks of hell was all worth the effort...

...I think!

The unwanted chair....

I run a shelter for unwanted furniture.... injured, abused and neglected. Before a neighbor hauls off a piece of furniture, they usually call me first to see if it is something I might want. Or they just drop it in my driveway...I have come home on more than one occasion to find an abandoned piece of furniture on my door step!

My next door neighbors brought me this busted chair a few months ago.

The chair my neighbor, Paula, brought me was a little on the "formal" side...needlepoint fabric, upholstery nail heads, intricate carvings...but it had a busted leg. . Fairly easy fix for me...a little glue and clamping! 

The hardest part of redoing these chairs is removing the billions of tiny upholstery nails. I ordered those nifty staple and nail removal tools. Forget about it! In the end I used a flat head screw driver, a hammer and needle nose pliers. 

After I removed all the nails, staples and upholstery, I chalk painted, distressed, and sealed the wood frame and then reupholstered it. These little chairs really don't take a lot of fabric so I decided to use some scraps I had on hand from another project! 

The fabric may be a tad "casual" for such a regal chair, but personally I think it brings it down a notch...not so houtie-toutie!

Rather than use upholstery nails, I went with gimp trim...much simpler!

I've been pretty swamped the past few weeks. My oldest daughter graduated from college and my youngest daughter moved home for a few weeks until her condo is ready. In the meantime, we are building, stripping, upholstering and painting pieces for her new home.

One thing about little sis...she is learning that if you want something nice, sometimes you have to roll up your sleeves and do a little work. A lesson my dad taught me! Her first major project was this oak library table....now I think she has "the bug!"

So this past week Katie has been a busy little bee (funny since she actually raises bees!) She even attempted to make a dove tail coffee table...after all, she watched youtube videos and it didn't look too difficult. I tried to tell her those guys have been doing that kind of detailed work with VERY sharp tools their entire life. After she dang near sliced two of her fingers off with a chisel she decided to put that project on hold for a time. I ended up buying a beautiful MCM coffee table and she promptly went to work stripping the old yellow finish off! I am making her entertainment cabinet and we still have a few chairs to reupholstery! 

Busy, wonderful time. I have several "resale" projects I need to be working on but I have learned that time with and for my kids is what is really important. I can't remember 1/2 of the stuff I have repurposed and sold over the years but I remember every skill my dad taught me. 

There are things that will last a lifetime...and beyond. 

Reupholstering the new living room chair...

I have said it before and I'll say it again...if you ever complain about the cost of reupholstering a piece of furniture, give it a shot! 

Trust me, you will never complain again...and there is a good chance you will just buy new! 

I spent over $200 just for the fabric for this chair!

It's not really "my style" but I wanted to use it to replace the big hulking brown leather chair in the living room and this one was a "freebie"...for obvious reasons. It had to be big enough for Cleo because that is "her chair." 

Perfect fit.

And honestly, with a down cushion and deep seat, it is super comfy! Not that I would have sat in it before it was completely stripped and covered with new batting...but it LOOKED comfy!

There are THOUSANDS of tutorials on line for reupholstering just about any style of chair so I am not going to do a blow by blow tutorial on how I reupholstered this one. Your best bet is to find a tutorial for a chair similar to the one you are going to do. Besides, it took me a day to strip it and removed 2,453,692 staples, a day to sew the cushion cover and all the piping, and another day to upholster the main frame....my hands were in no shape to hold a camera!

My advice...buy a new chair! HOWEVER, if you insist on reupholstering a chair, find a good tutorial and settle in for some serious work!

I do love how this one turned out. I really want to infuse some "lighter-brighter" furniture so I went with the teal/cream print. I like the texture of the fabric and I think it will be very durable which is important since Cleo immediately reclaimed her spot! 

Naturally the new chair means I will have to buy a new rug, but since Katie wants to take the existing rug to her new condo this summer, I have a valid excuse to buy a new one! 

My next upholster project is this little MCM chair in my den....

Seriously, if I hadn't already purchased the fabric, I might have just said to heck with it and wait for the mauve and pale blue to come back in style. Or just buy a new one! But I adore this chair so when my hands regain their feeling, I'll move on to this project!

The weather has been pretty amazing so I have managed to finish up quite a few little projects, in spite of the fact I can barely grip a paintbrush, so I'll share a few in the coming weeks! 

Dining room table makeover and my recent angst!!!!

Choosing fabric for a piece for "resale" is a tad easier for me than when I have to make a decision for my own home! It is still a struggle, but not nearly as difficult as choosing a fabric for myself.

Primarily because I know how much work goes into reupholstering a piece and I know if I go too "trendy" I will end up having to redo it in a few years. It is one reason I "stay safe" with bigger pieces like couches and chairs...then I use throw pillows, blankets and rugs to pull in the "in" colors. Those things are easy to change...and I don't cringe too much if I have to donate a $15 pillow vs. a $2000 couch! 

Example...I bought this ugly table and chair set at an auction....

In this condition, not appealing in the LEAST and not fit for any space...very dark and dated! But this is the kind of thing I know I can work a little "DIY magic" and make it perfect for another lifetime of use!

Not that I don't struggle with deciding paint colors and fabric for these pieces...this one sat for a while. I knew I would have to paint the top...it is laminate so it couldn't be "refinished." The legs on the table and the chairs are solid wood and in halfway decent shape but the vinyl brown seats had seen better days....that had to go!

I chalkpainted and distressed the table legs, primed and painted the top a flat black and painted the chairs a "steel blue." I found an awesome black/grey tweed upholstery fabric for the seats.

I saw several tables on Pinterest with this upholstery nailhead detailing and knew immediately I wanted to do it when I found the perfect table...and this table is perfect!

That little detail really makes all the difference, was relatively inexpensive (about .50 each!) and was not difficult. I just measured and marked where I wanted each nailhead to go, drilled a tiny hole, then hammered them into place! Cute as a bug's ear!

Obviously someone else thought it was cute as a bug's ear...it sold the day after we took it to 410 Vintage.

Which brings me to my recent angst! Chairs for my own home!!! 

When I remodel my den last year, I knew I wanted to add a teal club chair. I bought this little MCM style chair a year ago and it has sat in my den since, waiting on time and inspiration! It is the perfect size and style for this space, but of course the upholstery is all wrong!

I finally went to the fabric store last week and pulled a bunch of fabric samples that caught my eye. I THINK I have decided I like this teal tweed fabric. This fabric works well with the style of the chair and is pretty much the color I was leaning towards.

I found this chair just last week and I THINK I want to use it to replace my big fat leather chair in the living room!

It is a tad more "traditional" than what I really like but that is okay...again, that is the great thing about having a mosh-pot of styles...or "eclectic" as they say!

One of the reasons I want to replace this chair is because it has become "the dog's chair." In other words, Cleo has claimed it as her own. She sleeps in it, sits in it and jumps on it when anyone comes to visit her (and EVERYONE is coming to visit HER!) As a result, it is in pretty bad shape.

So naturally, she has to check out the new chair to make sure it is comfortable FOR HER!

Not nearly as roomy as the leather chair, but she looks pretty comfy!

Again, fabric samples and nail biting choices....

I kinda sorta like the idea of doing a "two fabric" design. The grey geo on the sides and back, and the black for the cushion. But then again, I worry about being "trendy" with something that is going to require a lot of time and work, so I am leaning towards the simple, one fabric choice in blue. 

What to do, what to do. For now I am taking my own advise. Looking to Pinterest and Google search for "inspiration."  Looking for chair upholstery I LOVE that will work with this style and in my space! 

It is the ONLY way I know how to make a decision and know it will be one I will be happy with for many years. 

June 2015...and MORE chairs!

June 2015 will go down as an eventual month for me. 

For the first time in 34 years, I have no minor children. Katie turned 18 this week and it is official...ALL my children are old enough to vote, be drafted and be sentenced to an adult correctional facility.

We finally had to put our wonderful lab, Ginger, to sleep. She was 13. It was time but that didn't make it any easier. This is the second precious pet we have lost this year. Heart breaking.

Ginger and Cleo....Christmas 2014

And for the first time in years I really felt the sting of Father's Day. My dad has been gone for 20 years but this year was, for some reason, tougher than normal. He died exactly one week before Father's Day so this time of the year is always kind of a "double whammy."

Then there is the accidental "new member" of the family....and may explain some weird typos in my posts. 

I keep a trailer at my apartments for abandoned furniture. A mama cat set up household in the furniture with her 4 babies. A few weeks ago, we THOUGHT we made sure all the kitties were off the trailer before we took it to the dump....only to find two of them still on the trailer when we got there. I managed to grab one and throw it in the truck, but the other ran under the truck. We spent 30 minutes crawling around on the nasty red clay/garbage ground trying to get that stupid kitten, only to have it bolt. Gone. I was heart broken. But to make matters worse, I could not find the other kitten ANYWHERE in my truck. Both Matt and Katie helped me darn near dismantle the interior of the truck...it was not there. I left the windows down the entire day and even put out some food just in case. 

THREE VERY HOT DAYS LATER I went to the truck in the evening...and there was that silly kitten sitting on the back of the seat. It had been in a hot truck, with no food or water, for THREE DAYS! I couldn't believe it survived and neither could the vet.

Soooooo....we have a new "miracle kitty." And being the softy that I am, I can't bring myself to take it to the shelter. Especially with all the guilt I feel for losing her sibling and in spite of my puffy, itchy eyes.

Yes, she is a she. About 8 weeks, according  to the vet, but if that is the case, she is a tiny kitty.

Cleo thinks it is hers and tries desperately to carry it around in her mouth...which means the poor kitten is constantly soaked in dog slobber. It is pathetic, but she tolerates it for some reason. And typing on the computer is like a game to her...hence the typos. She's a funny kitty! 

We haven't named her yet...I keep hoping someone will want her and take her so I will quit itching and sneezing. Why bother...if the three other cats haven't killed me by now, this little half pint won't either! I like Mimi...Katie does not. Mitchell suggested Kitty, but we have a Ms. Kitty because she was another "rescue" that was only suppose to be here until I had time to take her to the shelter...around 9 years ago. So he suggested Little Kitty...so maybe "Litty."

ANYWHO!!!!! When I am having "emotional turmoil" my tolerance for some things is darn near nil. So when I went up to my booth last week, I was annoyed by a few things that have been sitting in there for MONTHS...specifically two chairs. So I threw them in the back of the truck, brought them home and gave them a quick makeover! 

The first is a little folding chair I chalk painted eons ago...I had two and sold one, but this one has hung around far too long. I gave it a little KSTP (Kilz/sand/tack/paint) treatment with white spray paint...then I covered the seat with some leftover fabric from this chair makeover!

The other is a walnut mid-century chair. It is really difficult for me to paint over walnut...but the chair has been in my booth for months as is, and if I am going to sell it, I have to give it a little "pow treatment." Again, a KSTP treatment and new upholstery...someone is going to love it!

I know I make these little chair makeovers sound easy. And usually they are! Chairs are one of the easiest pieces of furniture to "update"...especially ones that just need a little paint and fabric on the seat.

But OCCASIONALLY I bring home a real kicker. One I KNOW is going to take a LOT of time and attention! This chair is a prime example!

I know...it is a HOT MESS!!! I have NO doubt that several people at the auction where thinking "What the heck?" (Including Brian...but again, I think he now trusts my judgment!) But I was so excited I couldn't stand it! 

I was pretty sure, from a quick inspection on a broken piece (that was there, thank God!), that it was most likely mahogany. At this point, after just a tiny bit of research, I THINK it is a Victorian Eastlake arm chair. But I honestly don't know because so far I haven't found anything just like it...only similar. Castors on the front legs and not on the back and hand carvings and stamps on the wood.

And of course the BILLIONS of little nails that were used for the upholstery! ALL of which had to be removed!

I knew the finish was masking some beautiful wood so I couldn't wait to start stripping it! In this picture you can see where I applied the stripper (used in this tutorial) on the left....

Here is the "before" and "after" of the side...

The intricate carvings require some real work, but as I have said before, the very best tool for stripping old finish out of carvings and corners is a good ole' toothbrush! I still have a lot of stripping and scrubbing to do but after two afternoons, I have all 100,398,365,003 nails out and a tiny bit of the frame stripped! 

The fabric is in such bad shape, I honestly don't know what it is...and I wonder if it didn't originally have another fabric on it since there are SOOO many nail holes. Many of the Victorian chairs I have seen have a velvet fabric....what to do, what to do!

My point...not all chairs are easy...some require a little more time and attention. I am going to take my time with this one and there is a good chance I won't sell it. At least not until the next little treasure comes along!

When the mouse is away...

This has been a week of MAJOR work so I will have lots of goodies to share. I had tons of projects piled up in my garage. I even skipped a potentially awesome auction this weekend because I knew I did not need to haul anything else home until I cleared out some projects.  Even though I know I put a huge dent in it, there is still so much to do.

Saturday and Sunday I painted outside. Brian (affectionately, the mouse) went out of town Monday so I rolled out my handy-dandy "sewing cart" and went to work on a few sewing projects! Seriously, I LOVE this sewing cart!!!!

I know it looks fairly organized in the picture, but truth is I had stuff strung all over the dining and living rooms for three days...compressor, staple gun and staples, fabric, piping, pillow stuffing, etc. When I project, I go all out. That is one reason I waited until Brian was gone for a few days...because the house was a disaster (I NEED A SHOP!) and I stayed pretty focused.

Painting and reupholstering. For me, they are time consuming projects because I firmly believe in doing it right, even if I do plan to sell the piece! Whether I am keeping it or selling it, I treat it the same. Maybe that is why it is so hard for me to step out of my comfort zone and go bold on some upholstery projects.

When I rehabbed this side chair and rocking chair a few weeks ago, I picked a very nice and neutral pallet and meticulously painted and reupholstered them. Only to have the person who bought them ask how much I would charge to REupholster them...go figure!

Completed this week..six throw pillows, four upholstered chairs,  three wood folding chairs, two antique oak school desks, one small table...if I had a partridge in a pear tree I would have painted and stuffed it!

The BIG chore is always the upholstered chairs. My first mental block is the fabric choice. I want something that will appeal to a lot of people, but is unique and interesting as well!

I dropped a little tease about this chair here! 

Again, note the grass...dormant...that tells you how long this chair has been stuck in limbo!

When I pulled the back upholstery off this old chair, I found layers of old fabric...including a really cool piece of hand stitched quilt someone had used as padding at one point. I am always amazed at the history these old chairs reveal!

Several of you were fired up about the prospect of PURPLE! Truth is, I'm a tad too boring and conservative to actually paint the entire chair purple. I bought purple paint, but in the end, I just couldn't bring myself to do it. 

But purple is the "color of the year" (or so the ads at Lowe's say!) so I wanted to use a bit on this chair!

I chalk painted and distressed the frame an "off-white" and then covered the back and seat (yes, I had to make a seat!) with this awesome fabric!

Since the fabric had purple in it, I went with purple trim! Aren't I just a wild and crazy gal!

So many other projects completed and I will share a few "before and afters" over the next few weeks. I made a large note and stuck it on the table to remind myself to take pictures before I hauled anything away!

Unfortunately, I don't have the space right now in my booths...so now the question becomes, WHAT DO I DO WITH ALL THESE STINKING CHAIRS!?

I guess I could throw a party...Lord knows there would be enough seating for everyone!!!

IMG_1493.JPG

AWESOME RECIPE PERFECT FOR GARDEN VEGGIES!!!

I haven't shared a recipe in a while but I tried this totally awesome CRISP CUCUMBER SALSA and it is TOO. DIE. FOR! And it is low cal for those who care!

                                                                       Photo and recipe curtesy of tasteofhome.com

Usually I try a recipe verbatim and then mix it up a bit to my own tastes. This recipe has cumin and honestly, I'm not a fan...so I was certain I would change it after the initial try.

Nope. Not changing a thing (except I added a little more tomato.) It is wonderful and perfect for chips or on a salad.

Give it a try...this is a perfect time of the year for fresh cucumbers and tomatoes and there isn't a better way to prepare them! (Okay, sliced with salt is pretty awesome!)