Laundry room floor tile reveal....

 One of the first rooms I shared in our home is the laundry room….I absolutely love it.

I love the storage…I love the window…I love the coffee bar. I just love this space.

I’m sure when I had a house full of kids and piles of laundry I wouldn’t have loved it as much but with just the two of us it is relatively easy to keep it in order.

I love it so much that I really haven’t minded the outdated floor tile!

Much.

Truth is, the stuff kind of gives me the willies. I know this tile is the original tile from 1998 because it is identical to the tile I personally installed in the apartments I built in 1998, 1999, 2000, and 2001. Yes, personally…THOUSANDS of square feet of this stuff. And then for over 20 years I had to scrub it and repair it and look at it covered in nastiness…auuuuggghhhh!

So yes, while I love the space, the floor tile did kinda make me growl occasionally. I knew I eventually wanted to replace it. I think the last time I shared this room I showed you the flooring issue that would need to be dealt with after removing a portion of a wall.

Let’s be honest…it’s just plain ugly.

But oh the work. Tearing out old tile is NOT for the faint of heart or weak in the back.

When we demoed the master bath in my last house we busted up the old floor tile. I have never been one to paint over wallpaper or tile over tile. Take it out and start fresh.

I have only “tiled over tile” one time and it was on a backsplash in a kitchen. Never a floor.

Busting out the old floor tile just didn’t seem like something I wanted to tackle. Tasha at Kaleidoscope Living recently updated one of her girl’s bathrooms and actually tiled over existing tile in a shower.

Hum….dare I?

Yes, I dared. After a TON of additional research. I googled “tiling over existing tile” and read every article and watched every video I could find on the subject. The general consensus was that it is certainly doable as long as the tile you are tiling over is solid.

Mine was.

One thing I could not get a firm consensus on is whether to prime the existing tile. Some articles and videos said prime, others didn’t even mention it.

I decided it couldn’t hurt and might even help…so I primed. I used this product…

… and after a whole three weeks of walking on the new tile I can attest that it works (three weeks people…this is not an endorsement for longevity!!!)

I will say it went on VERY easily…just rolled it on with a paint roller. It also dries quickly and has a low odor. It has kind of a “gritty” feel to it and I felt confident it would give a good base to the new thin set and tile.

Choosing the tile….I did what I always do. I went on Pinterest and looked for “inspiration.” (This is important because sometimes I THINK I want one thing but when I see it in other's spaces I realize I really don’t like it.)

Then I went to the tile store, picked up 4-5 samples, brought them home, laid them on the floor and easily made my decision. This is important when choosing ANY element in a room…tile, paint, curtains…because the lighting in your room may alter what you see in the store.

Here you can see I first moved out the washer and drier, removed the base trim, tiled, grouted, reset and painted the trim, them moved the washer and dryer back and proceeded with the rest of the floor. Much easier than trying to wrangle two big appliances into another room!

I love the new tile!!! Now I don’t growl at the floor anymore!

I did small grout lines (I think that is the “in” thing now and so much more practical) and dark grout. It will make it easier to keep the floor “clean looking.” Except dark floors show fuzzies which is common in a laundry room…but oh well.

Tiling, whether it be a floor or a backsplash, is not a terribly difficult DIY project. A wet saw is a must so if you don’t have one, borrow one or rent one. Watch TONS of how-to videos and make sure you follow EVERY manufacturer’s instructions, even if it doesn’t make sense.

Personally I would leave wet areas like tubs and showers to the professionals. There are special “water proofing” products and techniques that will prevent future leaks…and trust me you don’t want water issues around a tub or shower. If you feel like you want to tackle a tub or shower area, make sure you do a TON of research!

TIPS!!! Pay attention to transitions between the new tile and other flooring and the bottom of the doors. Will adding an additional 3/8” make you have to cut down a door or add a transition piece?

Neither is difficult but you need to plan! I was fortunate in this space. Adding the additional tile did not affect those things. The existing tile actually sat a good 1” below the wood floors in the breakfast room and the new tile butted up to the existing transition piece nicely.

I always carefully remove the existing base trim, repair if necessary, prime and then reinstall it on top of the new tile after I have grouted. Some people add base shoe. If that is the plan make sure it will work with the existing trim BEFORE you install the tile.

I use an oscillating saw (or you can use a special trim saw like THIS one) to cut the casing around the doors at the floor. I lay the new tile down on the floor and use it as a guide to cut the trim. Do this BEFORE you start tiling because it will make a mess and you will want to vacuum or sweep well after cutting the trim. Then when you are installing the new tile you can just slip it under the casing and not have to worry about making tedious cuts!

Which reminds me…always do all your prep work (removing trim, cutting casings, etc) and then vacuum and clean the floors well before starting. I also keep a little hand broom handy just incase I need to sweep a bit while installing. DON’T TILE OVER CRUD!!!!

Remove any doors that swing into the space you are tiling…makes it sooooo much easier to move around!

Prime…I know I could not find a consensus on whether to prime, but I am going to say one should error on the side of caution. I don’t think it is necessary if you are tiling over concrete, but definitely over existing tile.

And again, ALWAYS make sure the floor you are laying it on is sound and solid. If it is not, fix it! DO NOT lay ceramic tile on a wonky floor.

If you are laying on a wood subfloor, I personally would lay down durrock, tape and mud the joints (with a mesh tape and thin set) and add the water proofing products (something like THIS). Again, maybe overkill but better safe than sorry!

Research what size trowel to use with the tile you are installing. It matters!

Research whether to use thin set or mastic with your new tile. My personal rule of thumb is regardless of the size of the tile, I always use thin set on the floor. I only use mastic on wall tiles (like backsplashes) and only if they are small tiles. If you are tiling around a fireplace, make sure the thin set or mastic you are using will withstand heat!

These are just a few of my personal tips. Before you tackle a DIY tile job, or ANY DIY project, do a TON of research online. Read articles, watch videos. Don’t rely on the kid at Lowes manning the flooring desk to give you advice.

So, another little project in the books. The old tile is still in my pantry and in the spare bathroom…maybe someday I will tackle those areas.

But for now, I am just going to enjoy my laundry room floor. It is pretty and makes me happy!

This week I begin tackling my home office. Stay tuned, it’s gonna be fun!


It's time to get organized!

So it is a New Year (Happy New Year BTW) and I spent the early morning hours on Sunday organizing a few spaces and purging expired foods in the pantry. Fortunately I am a fairly organized person so this isn’t a huge task for me. I keep most closets, drawers and cabinets purged and organized.

Just last year I reorganized and purged my pantry so it really wasn’t too bad….

But if you are one who has that closet/drawer/room/pantry that is unorganized and full of unused or out dated things, this is the year to get it organized and purged.

HERE I share how I organize and purge (I reread it and I must say it is a MUST read)…and a few thoughts on the Marie Kondo method. Truth be told, purging and getting organized is more about “letting go” than anything….and of course finding the time.

Time…pick your spaces and then commit to doing one space a month. Don’t try to do your entire house in one day…you will feel overwhelmed and defeated. But one closet, one drawer, one room a month is doable. And getting that one space done may even motivate you to do the others.

As far as “letting go,” if there is an OUNCE of hesitation on whether you should keep it, put it in a box or bag, put in your car and immediately donate it. I PROMISE I have never said “Darn, I wish I hadn’t given that away.” I never think about it again and couldn’t even tell you all the things I have “purged” over the years.

A few suggestions…get a receipt for any donations, it is a tax deduction.

If you have towels, sheets, blankets or even old rugs, take them to the local animal shelter…they really need that stuff.

When my mom passed away, she had an entire hall pantry stuffed full of old sheets and blankets…stuff she had acquired when HER mother died 20 years ago. We took it all to the animal shelter and they loved it!!!

Most importantly, give yourself a break. Being a mom or working person make it really tough to find time to get organized…but I promise once you do it, your life will be so much easier.

One space a month…it is doable. But like ALL “honey dos” don’t beat yourself up if time slips by and you miss a month. The mess will still be there the next month!

I also posted HERE how I keep my house relatively clean and in order. No huge revelations but keeping a fairly “clean and orderly” house goes hand in hand with getting and staying organized. Another MUST read!

HAPPY NEW YEAR...and a link to a "New Year's Resolution" every smoker needs to read!!!!

If you are a smoker this HAS to be the year to quit.

HERE I shared my journey and what worked for me. And is STILL working even though the “craving” still blindsides me every so often!

I am not an addiction specialist and I firmly believe you should do what works for you…EXCEPT SMOKE!!!

But if you are like me and have tried gum, mints, patches, Chantix, hypnosis, 4 pregnancies and NOTHING seems to work, give it a shot.

The power of positive thinking can work miracles…maybe the power of NEGATIVE thinking can help you keep a New Year’s Resolution you MUST keep this year!!!

Happy New Year and good luck!

Merry Christmas!

So little has changed since last year so I decided to link back to a few post from last year….

Here you can check out the “Kitchen Reveal.” Lots of Christmas decor!

Here I shared my “funky bow” obsession….still love them and even made a few more this year. I have made a few for every “holiday” throughout the year!

The only real change is in the “all-season” room. I shared a few changes HERE.

I didn’t decorate this space last year for Christmas because…well, I just didn’t.

On October 1st, I lost my uncle to cancer. We called him “GUS”…because he was our Great Uncle Sam…one of the greatest. He was the 3rd of 5 siblings we have lost in the last year and a half, including my mom, his sister.

They are Stewarts….my Uncle Bob wore his Stewart plaid tie for Uncle Sam’s memorial service and the church decorated all the tables at the reception with Stewart plaid.

So in honor of the Stewart family I decided to decorate this room in Stewart plaid.

Precious. I have always loved Stewart plaid. A simple pre-lit tree with Stewart plaid ribbon and red and green ornaments.

A few plaid pillows and a throw.

Touches here and there in a room that has always honored members of my family.

Two cute little lanterns with remote controlled candles…fun!

I love that you can see the BIG tree through this window!

Here I shared the beautiful stained glass made by my mom and dad and the cool table made from wood salvaged from the building my dad worked in most of his adult life.

So it is fitting that this room honor the “Stewart” family.

Merry Christmas to you and your family. Our family has been hit AGAIN this year with Covid, so AGAIN we will have a “different” Christmas.

But it is still the MOST WONDERFUL TIME OF THE YEAR!

I will be taking a few weeks off but I will have a lot to share in the new year!

Merry Christmas and Happy New Year!!!

Another Drexel server....

Several years ago I shared a Drexel server I repurposed for my dining room

The “breakfast room” in our new house is almost identical to our old dining room.

Including the Drexel server.

I love it…it is one of my favorite pieces.

So when I spied ANOTHER Drexel server on Marketplace I could not help myself.

As I have mentioned, I have pretty much retired from the whole repurpose/upcycle/refinish business. My hands and back just can’t take all the work that goes into refinishing pieces on the scale I have in the past.

I have refinished a few doozies…just looking back at all the pieces I have shared on this blog blows my mind. There were some pretty nasty pieces that were beautifully refinished and restored and readied for another life-time of love!

When I saw this piece I couldn’t help myself. I had to have it and I wanted desperately to work a little magic on it.

Here is my plan…MAYBE I can discipline myself enough to pick up just one piece at a time, refinish it, sell it, then pick up another…just one at a time. Just one dresser/buffet/nightstand at a time.

Hum…I’m a pretty “self-disciplined” person so I am going to start with this one.

One week into this plan…I have failed. Last week I picked up ANOTHER piece that needs a little TLC….a pretty beat up china hutch.

I have these creative juices in me that have just been screaming for a project.

So, “the plan” ….specifically for the vintage Drexel piece. Strip and oil the drawer and door fronts using THIS process. Shine up the brass hardware….no secret there, just lots of Brasso, steel wool and elbow grease. Prime and paint the “cabinet” a high gloss black lacquer.

For the china hutch…I went to Etsy for inspiration and looked around. There are some beautiful china hutches that have been painted black with the insides painted white…LOVE them.

I THINK that is what I want to do. Sometimes the process takes on a life of its own and I find myself drifting in another direction. We will see.

Right now they are sitting in my AMAZING shop. I was in there last week rearranging everything so I will MAYBE have room to make some kind of paint booth. The shop has electricity and I can easily heat and cool it for temperature control but just not sure I will have enough room since we do use it for mower/yard equipment storage as well.

I can’t wait…this is a “job” that doesn’t really pay well, but it is one I do love.

Cute Christmas door hangers...

Last week I was looking back at some old posts and realized I had never shared THESE cute door hangers I promised to share A YEAR AGO…

Most of my doors have the little candle wreaths but I thought these would be fun and different on the two spare room doors. (This one is my gift wrapping room!) Mix things up a bit!

Super simple to make…

I bought two little wood signs at Hobby Lobby…

I made some little “sprays” using materials leftover from some holidays sprays I made for my lanterns. I just bunched them together and secured them with a pipe cleaner and floral tape.

I drilled a hole in the top of the little wooden sign….

…then I just stuck the “spray” into the hole and secured it with hot glue.

Then I made a “funky bow” using the tutorial linked in THIS post and attached it to the spray.

Presto, bingo, cute little door signs!

A simple way to dress up the cute little signs and a great way to do something other than the expected “holiday wreath.”

This week we enjoyed a quiet Thanksgiving and a busy few days of decorating for Christmas. Not much has changed from last year so you can check out THIS post to get an idea of what is where. I did add a few trees…one in the all-season room and one in the den but nothing earth shattering. The all-season room got a “Stewart plaid” treatment…seems to be all the rage for the “in” plaid this year…but I am a true “Stewart” so it has more meaning. I want to add some lanterns and a few other little things so I may share that room in a few weeks.

Next week I will share my new “projectS.” Stay tuned!!! Exciting stuff!

All-season room reveal...again!

Last week I shared the new cabinet I bought for the all-season room and the changes I made to it to turn it into a giant litter box. Brian was a tad miffed that I would buy something only to hack it up for the kitties, but if you have ever had a litter box and all the mess that goes with it, you certainly understand my attempts to corral it.

The litter box is hidden away and the critter food is stored in the drawers!

One week later, it is working perfectly!

The outdoor couch I bought for this space arrived Friday night. I am always amazed that such a large piece can fit into a relatively small box…until I unpack it and start putting it together. Geez!

If I have learned anything in 57 years it is FOLLOW THE DIRECTIONS. While they may not make sense, they make sense. When they say “hand tighten only,” hand tighten.

It is in place and I love it!

It’s not near as plush and comfy as our living room couch but it is an “outdoor couch” so I didn’t expect it to be.

I was a tad concerned about the fact that it is a “canvas white” and the cushion covers weren’t zippered for easy removal in a house full of critters. Our new puppy (oh yes, we got a new puppy! To tired to share that news just yet!) managed to christen it within the first 10 minutes…muddy paws. Fortunately it cleaned easily!

The coffee table LOOKS like teak wood, but it is actually metal. Kind of chintzy if you ask me so eventually I want to get something a little better quality and much smaller…it is just too big for the space.

I am still debating the height of the kitty cabinet…I THINK I want to cut it down but I am living with it for the time being. One day the bug may hit me and I will drag it outside and hack on it some more!

For now I have a space perfect for watching the leaves and snow fall. In the winter I put out corn and bird seed so this will be the perfect spot for critter watching as well.

A few months ago I put a kitty door in one of the windows between the living room and the all-season room so the cats can could come and go without having to leave the door open.

Since this has turned into the “cat room” they will LOVE watching the critters. And no, the cats never go outside so the critters are safe.

Hopefully we will use the space now that the changes have been made…the cats certainly do!

All-season room revamp...

I seriously love this room….

…it stays cool in the summer and relatively warm in the winter. I honestly thought we would spend a great deal of time here.

But we don’t.

When we want to sit “outside” for dinner or drink our coffee in the morning, we always sit on the screened porch.

The “all-season” room has become a place for the litter box and a dumping ground for all my outdoor critter food and seeds.

The rest of the room was still good, but again, we just never used the space like I thought we would.

So I am making a change….

Last week I ordered an outdoor couch. It should be here this week. I moved the big “bar table” to the screened porch, and I decided to corral the critter mess.

I searched Craigslist, flea markets and Marketplace trying to find a credenza/buffet/cabinet type thing I could convert into a storage/“kitty cabinet”….kind of like the one I made for our master bathroom.

I found this….

I like the “style” well enough in this space, but I am not sure about scale…seems kind of tallish so I may eventually cut it down and eliminate the void space. I think it is meant to be a tv cabinet and that space is for Blueray players or such. Who knows. Again, I kind of like the style for this space, I knew I could convert it for the kitty box and the drawers would give me storage for bird seed and critter food.

I decided to leave the bottom right drawer intact and just set the litter box in it. It fit perfectly after I cut the height down a bit and I can easily pull the drawer out to clean out the box. I trimmed the side of the drawer down just a tad using a jig saw. I used a skill saw and jig saw to cut a hole in the side for access….

To give the kitties “head room” I had to remove the guts of the drawer above this one and then glue the drawer front back onto the cabinet…so it’s not really a drawer, it just looks like one.

TIP: To glue the drawer front back onto the cabinet, I applied wood glue all around the edges and put a blob of hot glue on each corner. The hot glue quickly sets up to hold the drawer front in place while the wood glue dries.

Again, not sure about the scale of the cabinet but all in all I am pretty happy with it. It sure beats the mess that was there.

Hopefully the new couch will be here this week and we can get the room completed. Again.

Sometimes you have to live in a space for a time before you know what you REALLY need.

Until next week…..

Fireplace reveal...,

It is done.

As I mention HERE, I had several goals for this room.

The first was easy…replace the paddle fan. Check.

IMG_2074.JPG

The second was a tad more difficult. Reface the fireplace.

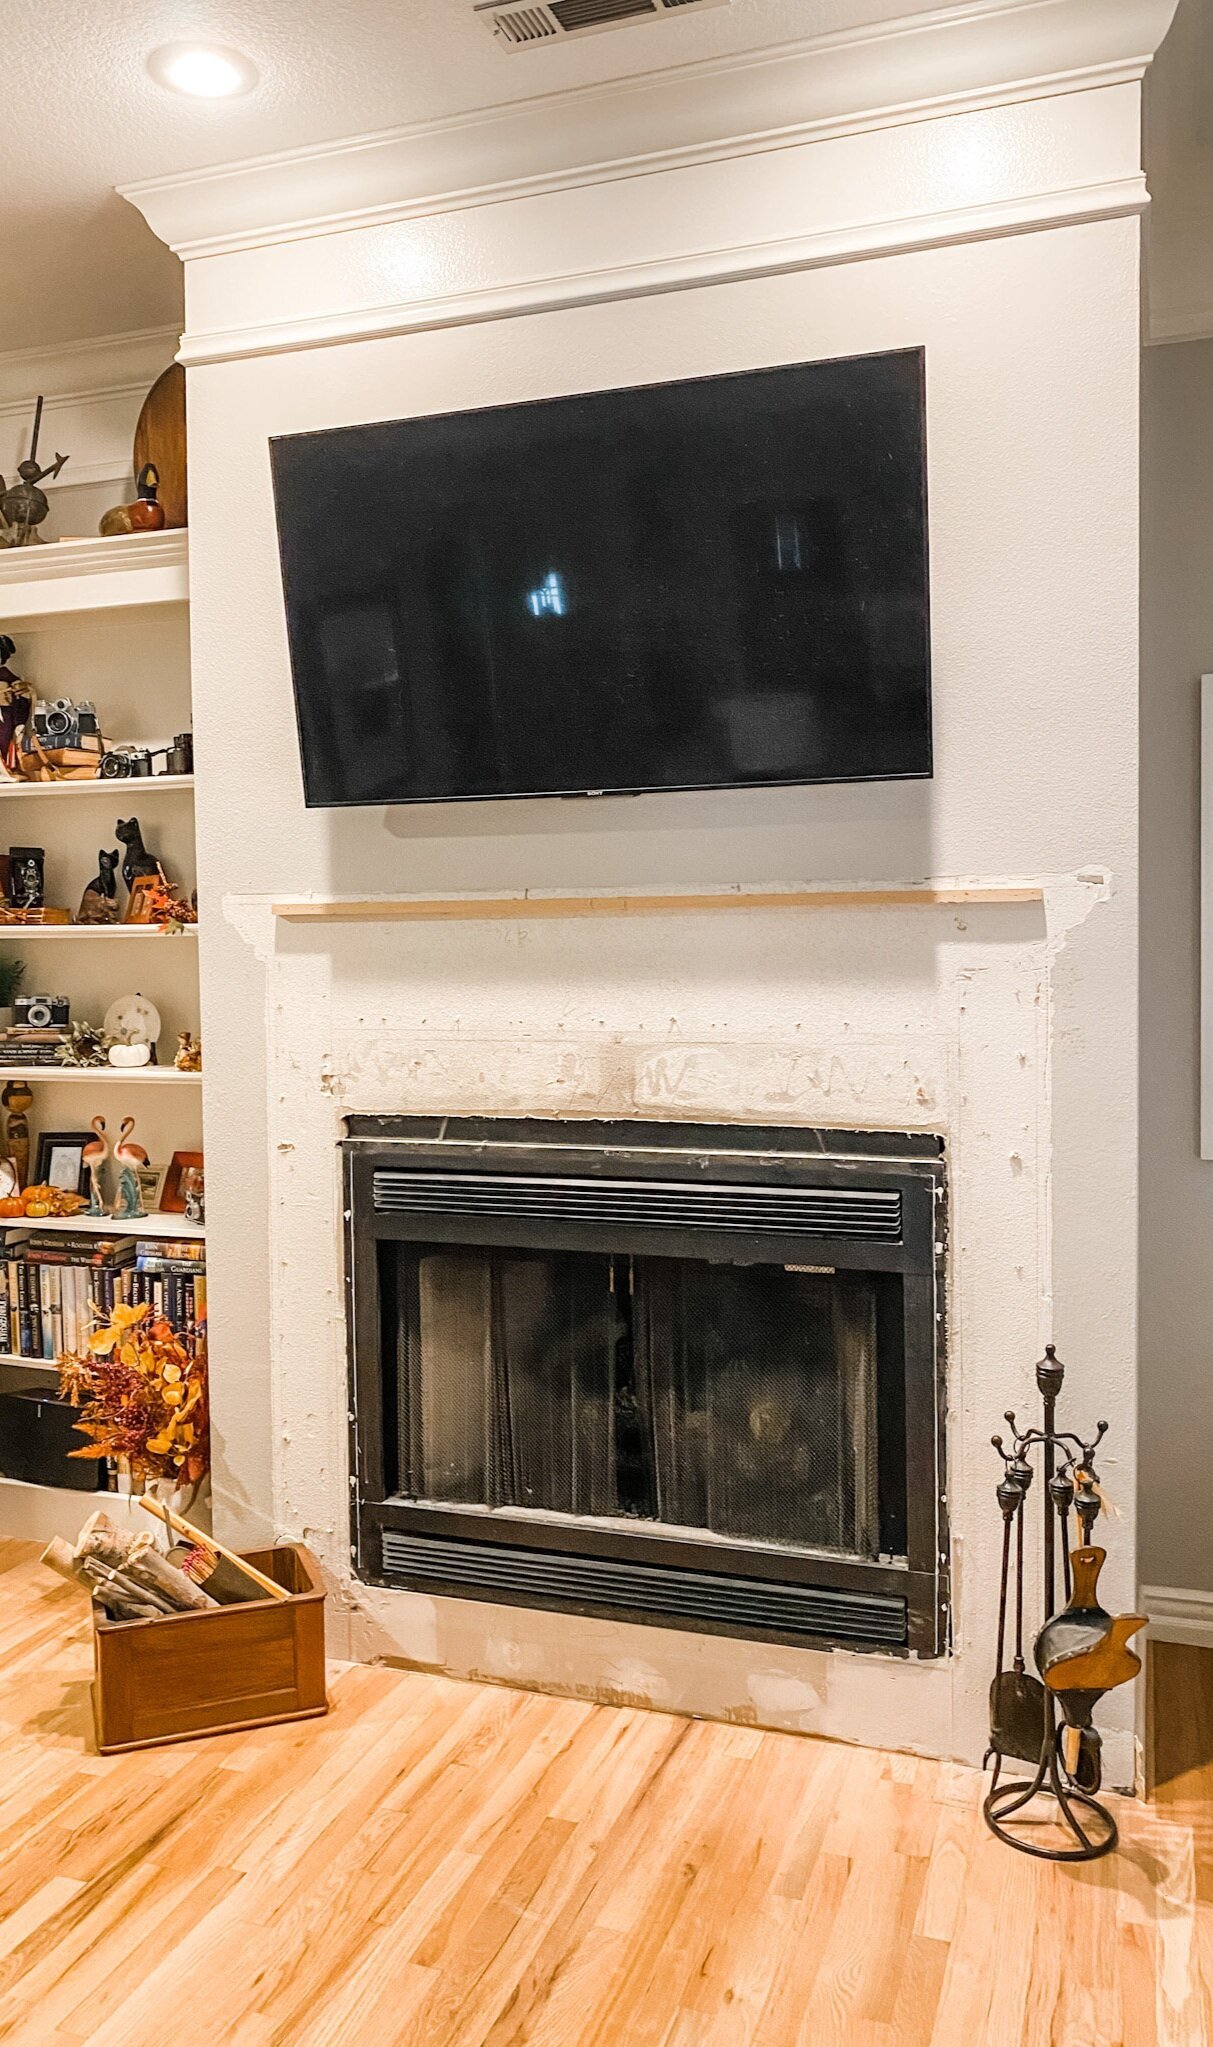
Difficult only because I couldn’t “see” what I wanted which resulted in a spur of the moment “demolition” of what was there….

As I have said time and again, often what “is there” keeps us from seeing “what can be.” I see stuff on Pinterest and in magazines all the time that I love, but I can’t visualize it in my own space because what is there clutters my vision. I have equated it to trying to paint a landscape on a canvas that already has a portrait painted on it.

That is when I advocate painting the canvas white. Base neutral. Painting the piece of furniture or wall white or taking all the furniture and fixtures out of a room so you can visualize what you want rather than what is there. Even if it is a piece of furniture you plan on keeping, take it out…that way you can “see” it in a different spot or even painted a different color.

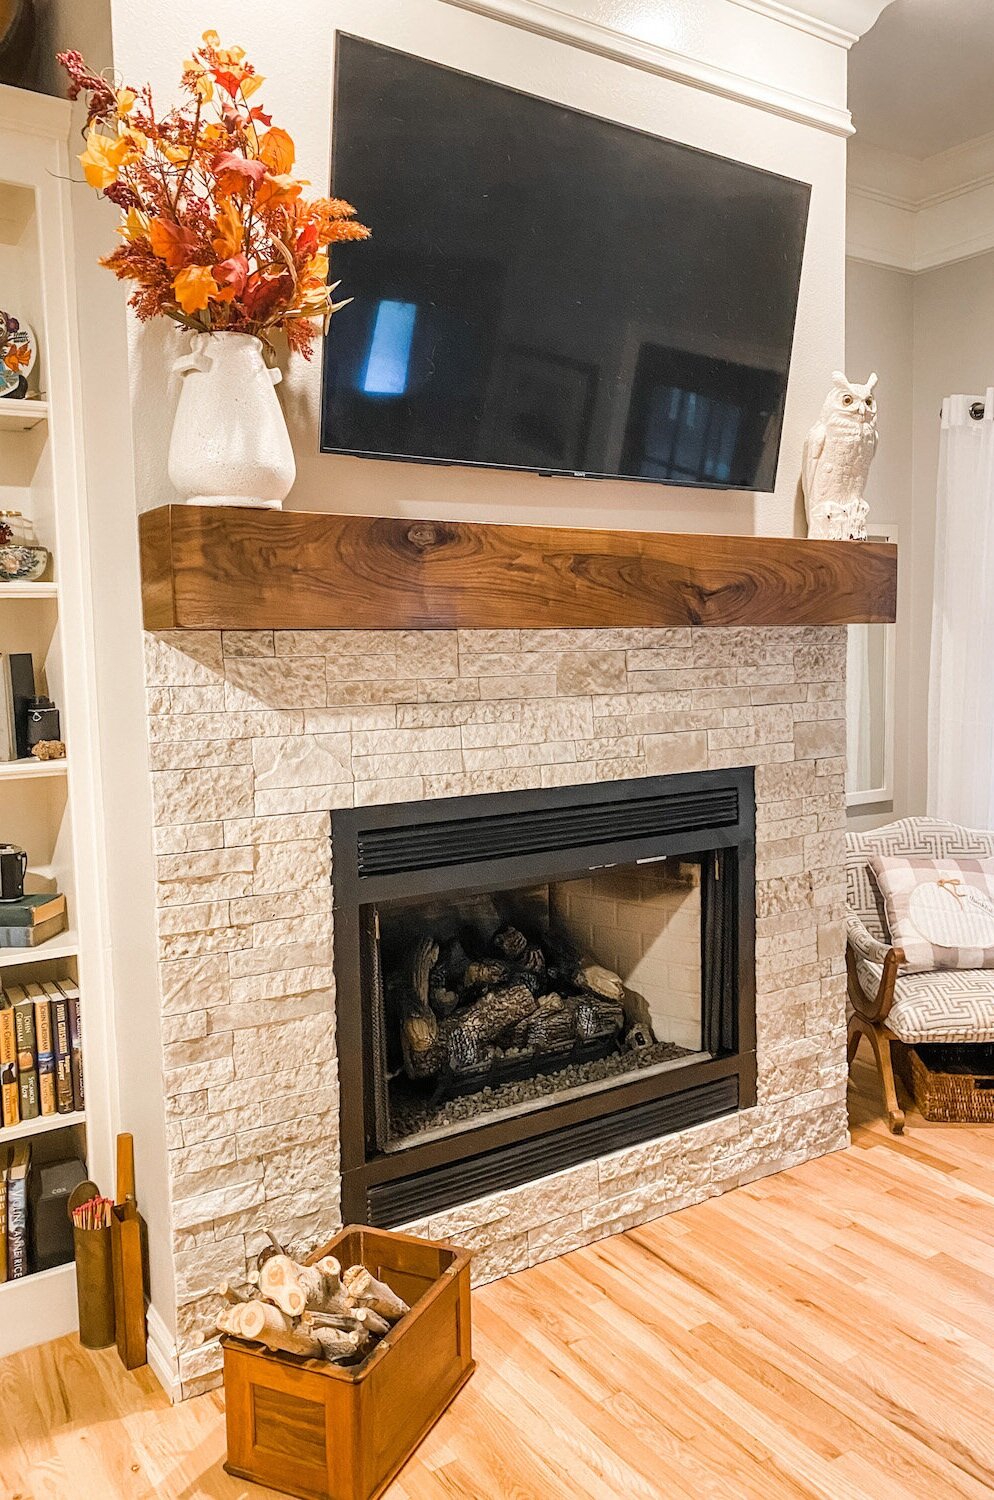
Once I did that with this fire place, I could visualize “the plan.” Rock the bottom…big beefy walnut mantel.

I shared the stone HERE.

Last week Matt and I dragged out the table saw and chop saw and went to work on the mantel. Four coats of Waterlox (I LOVE this stuff) and presto-bingo….the vision came to life. Waterlox is my new “go to” finish…a tung oil finish that gives any wood durable protection while allowing the beauty of the wood grain to shine. And it is SERIOUSLY idiot proof! Just sand, clean the entire piece with a tack cloth and wipe it on. Use 0000 steel wool and tack cloth between each coat. I usually apply 3-5 coats. LOVE!!!

IMG_2040.jpg

I intentionally choose walnut with tons of grain and a few knots…”character.” This house doesn’t lend itself to the “farmhouse look” but I didn’t want formal and fussy either.

The final result was exactly what I envisioned…and I LOVE IT!

Here is the BEFORE (obviously last Christmas)…

image-asset.jpg

And AFTER….

IMG_2073.JPG
IMG_2071.JPG
IMG_2072.JPG

Sometimes we get so wrapped up in getting a project finished as quickly as possible, we fail to live with the results in our minds for a time. Trust me, you will love any DIY project sooooo much more if you will get rid of what is there and take time to live with what you think you want in your mind before you start slathering paint or ripping out walls.

Remember every space is different….just because something looks amazing on Pinterest or in a magazine doesn’t necessarily mean it will work for you. It might, but spend the time to tweek it in your mind before you jump head long into what can be a time consuming and expensive “oops.”

static1.squarespace.png

The fireplace makeover...Part 2...Airstone Faux rock.

The stone work is done….

…and I love it.

I highly recommend the Airstone product. At least as far as installation. It is a relatively easy product to install. Lightweight and exceptionally natural looking.

When we fire up the fireplace in a few months I will let you know how it holds up to heat.

This stone product would work well for a kitchen backsplash, fireplace face or a covered porch area. It SAYS you can use it for exterior application…I can’t attest to that since I did not use it outside.

I think this is a relatively easy DIY project.If you choose to install this product find a tutorial that works for you. More importantly though, FOLLOW THE DIRECTIONS!!!!

I do have a few tips.

Start at the top. Then the sides…them the bottom. That may seem backwards, but it is the way to do it. Start at the top by adding a temporary level brace….I just used some scrap 1x4. I let that dry over night, then did the same on each side, then the bottom. The Airstone mastic sets up fairly quickly.

IMG_2011.jpg

I used pennies as spacers between the floor and the stone. I do this because wood swells and moves and you don’t want the rock sitting on something that has movement. Same would apply if you were using it as a backsplash…don’t set any wall product (faux rock, tile, marble, etc) directly on a top or floor.

Use a tile saw to cut it. I have a wet saw so if you do not, rent one. Makes easy, precise work of tricky cuts.

Pay attention to how to apply the mastic…it’s like frosting a cupcake, not buttering toast.

The tub of mastic specific for the faux stone SAYS it does 30 s.f….it does not. Maybe I “iced” to thickly but I would suggest buying more than you think you will need…you can always return it.

Layout the rock on a template or floor before applying it on the wall and number each piece so you know how to property transfer it to the wall. Also, make sure you pull from different boxes…mix it up. Each box has several different “colors” and “textures”and each box may come from a different run…so you want to make sure you mix it up!

I used the “edge” pieces around the face of the fire box…I think it looks neat.

IMG_2025.jpg

I should have wrapped it around the entire bump out. I would have loved to take it to the ceiling. I am still debating on adding a hearth.

But the “coulda, shoulda, woulda” is always a brain worm until the project is finished.

I didn’t want to take it to the ceiling because I don’t want to remove the crown then have to paint the entire ceiling. I don’t think I want to add a hearth because this is a small space and I don’t want to crowd the space. I didn’t wrap it around the entire wall because, well, I just didn’t.

Hopefully when I get the mantle on, it will all come together.

So the mantel. I think I thought I knew what I wanted but now I not so sure.

My plan is to make a beautiful walnut mantel…smooth…perfect grain…low sheen. Now I am debating on a more “rustic” look with a lighter finish.

What to do, what to do.

As usual, I have searched Pinterest and found dozens of looks…I like them all!

This house style really does not lend itself to that “farmhouse/rustic” look so I think I am going to go with a more smooth, low sheen look. Sometimes you have to “read the room” when making decor decisions.

I bought some walnut boards (dang that stuff is expensive!) and specifically picked pieces with lots of grain and a few shallow knots. Just a smidge rustic but still the beauty of walnut. I know if I apply Waterlox (like I did here with my kitchen cabinets) it will have a dark finish. And I think I am okay with that. The stone is light and I think the dark walnut will be a nice contrast.

Now I am just waiting on my son to have a day we can work on his table saw. I shared HERE about my phobia of table saws. I bought him one for Christmas last year so I have one available and have a “saw buddy.”

Hopefully next week I will have a beautiful new fireplace to share!