Lego table project!

One of the “littles” in our family LOVES Legos. Course I am all for any child’s entertainment that doesn’t involve electronics.

Believe it or not I managed to raise four intelligent, college educated children without video games or smart phones…imagine that!

When I heard she has to commandeer the family room coffee table to build her Lego sets, I decided she needed her own personal space!

I looked at buying a Lego table as a Christmas gift…but as with much of the furniture today, they were all cheaply made and didn’t seem very sturdy…certainly not pieces a child could lean on for hours.

So I decided to build one!

First thing I had to do was locate “Lego flats.” I found these on Amazon…perfect!

The package SAYS they are 10x10 but when I laid out 3 wide I discovered the measurement was actually 30 1/8” …good to know! I decided to build a table that would hold 3 wide and 2 deep…and knowing the exact measurement of them laid out is important. The inside measurement of the trim on the top will be 20 1/4” x 30 1/4” so there is room for 6 total interchangeable flats.

I constructed the table out of 1/2” plywood, 14” furniture legs, 1x3 pine boards and 3 1/4” trim.


I bought a piece of 24” x 48” 1/2” plywood and cut down the width to 34”.

When cutting plywood with a skill saw, make sure you “score” the line you will be cutting with a utility knife…

…then cut on the OUTSIDE of the scored line…this will keep the plywood from “splintering” when you cut it with a skill saw.

After cutting the plywood 24” x 34” I “banded” the entire board with 1x3 pine… then added the leg brackets to each corner. The legs just screw into the brackets.

Banding the plywood top with 1x3 pine does several things…it increases the width and length of the table by 1 1/2” …remember 1”x3” boards are actually 3/4” x 2 1/2”. It also strengthens the plywood and the “skirt” it creates will hide the leg brackets.

Also remember…glue AND nails. ALWAYS USE GLUE!!! The glue is what actually holds everything together!

After the base of the top was constructed, I flipped it over and added the trim to the top…cutting it so that the opening on the table top would be 30 1/4” x 20 1/4” to accommodate 6 flats with a smidge of wiggle room so they can easily be changed out.

Once it was all constructed, I puttied all the holes and caulked all the joints. I primed it with primer, sanded everything smooth, tacked and painted it with Krylon satin white.

A few of the tables I looked at had storage drawers or the tops lifted for storage…cute idea and something I could have incorporated into the design…but truthfully if you have a “lego kid” you know the table would have to be the size of Montana to hold all their pieces…so you are better off finding bins or stackable containers that suit your needs!

This table is strictly so the little doesn’t have to clutter up the family coffee table when she wants to build and tear it all down when it is time to put it away…she can just remove the legs and slide it under the couch or bed!

Super cute and hopefully sturdy enough for hours of leaning.


Simple makeovers for the worst offenders...the KSTP treatment!

There is NO excuse for ugly furniture. With warmer weather just around the corner, it is time to start looking at your furniture with a critical eye and making a list of pieces that CAN be changed with just a little bit of work!

We all have it...those "cheapo" pieces of furniture that are, at the very least, offensive! Maybe they were given to you, maybe you bought them at a "discount" store...maybe you bought it at the thrift store to fill space in a room.

Pressed board construction, laminate tops, dated finishes, pieces you put together with a little allen wrench thingy that came with the worthless little "screws" that promptly strip out and leave the piece wobbly and worthless!

It's ugly and cheap, but seriously who has the money to buy "real wood" furniture when you are struggling from pay check to pay check and having to buy shoes for a kid whose feet seem to grow a size every month.

I get it...I've been there. Fortunately I have learned to shop resale and auctions for "quality" pieces...and even if they need a little TLC, I have the tools, knowledge and time. But not everyone has that...or the money to buy and refinish high quality pieces.

That is why I advocate the KSTP treatment. Let me explain....

First, before you even get to the KSTP treatment, ALWAYS give the piece a good cleaning. On the nastiest, I use ammonia water but some can just be wiped down with a little water and mild detergent. Whatever you need to do to get the gunk off the piece! If it is "stuck" on just scrape it off with a razor! No matter if you scratch the finish...you are going to paint it!

Second, make any and all repairs that need to be made...and if you don't know how to repair it properly, google it! 

Okay, now the KSTP treatment....

K- Kilz (my favorite primer but any QUALITY PRIMER will do! That is why this is the KSTP treatment and not the PSTP treatment!)

For smaller pieces I use a spray can only because it is easy and gives me a nice smooth finish. On larger pieces I use a brush and 4" foam roller! TIP! Always shake the can longer than the directions recommend. Kilz will spray on with a "grainy texture" if you don't shake the can well! No biggy since you are going to sand anyway, but just makes it a little easier! Also, pay attention to the temperature recommendations...it matters!

Many paints SAY they are a "primer and paint in one." Sorry, I am old school....I ALWAYS prime and I personally recommend it. If you want a superior finish that will hold up to use and abuse, prime! 

S-Sand. A 220 grit paper will usually smooth out the piece after it is primed. I wrap a piece around a sanding sponge block!

If you have "ornate" legs or detailing, use 000-0000 steel wool.

USE YOUR HANDS, not your eyes. Feel the piece.

Trust me, if it isn't smooth, it WILL show after you paint it! Sand it until it is smooth to the touch! If you cleaned the piece well, scraped off all the gunk, this step really should only take a few minutes.

T- Tack cloth. A MUST after you sand but before you paint (or apply any finish). Blow or brush off as much as you can, then use a tack cloth!

You can purchase it at your favorite home improvement store...usually in packages of 2 and relatively inexpensive (around $2)! You can wipe a piece down all day with a clean cloth, but you WILL leave "stuff" on the piece if you don't tack cloth it. Tack cloth will remove EVERYTHING. If you still feel "stuff," hit it with the sand paper again and then tack cloth again! 

P-Paint. This is where people usually freak out. My favorite for wood or laminate furniture is oil-based but it can be a tricky paint to work with for a novice and difficult to clean up. Fortunately latex paints have come a long way and are much more durable these days! QUALITY spray paint is probably your best bet for smaller pieces. I say quality because you can buy spray paint a tad cheaper at discount stores, but I am not a huge fan of cheap paint for ANY project! I usually buy Valspar or Rust-oleum from Lowe's.

On smaller pieces of furniture the difference will only be a few dollars but will be worth it in the long run. 

Each of the brands come in LOTS of great colors...just find the color you love! I have found very little difference between the two brands...the Valspar tends to dry a tad quicker....but both are quality paints! ALWAYS shake the cans well and follow the directions on the can!!! 

I have followed every tip in the book to get rid of the occasional "striping" on large, flat surfaces...like dresser tops or table tops. It doesn't seem to matter how I spray, what the temperature is or how hard the wind is blowing...sometimes I get stripes.

My solution has been to purchase the little "sample pots" of paint custom mixed to match the spray paint I am using and roll it on the large flat surfaces with a 4" foam roller! 

Penetrol and Floetrol are a MUST any time you roll or brush on paint...oil or latex!

Use it. It will eliminate the brush and roller marks and give you a MUCH smoother finish! 

These are just a VERY few projects using the KSTP treatment (I have done hundreds!)....world of difference for a little bit of work! I am working on a piece right now that is in the S stage...primed and sanded but now I need to figure out what color I want to paint it...soon!


Even light fixtures and paddle fans can be spray painted!!! On metal pieces and furniture hardware, I use metal primer primarily for the "rust retardant" factor!

One last important TIP when using ANY technique to paint anything....ALWAYS give the piece time to cure before you put it to work! 

I was always skeptical of those "two day" makeovers they did on tv where they would paint something and then "stage" the pieces with all kinds of stuff within hours of putting a final coat on. (Kind of like getting your nails painted at the salon...even though you dry them for 10 minutes, you are still going to ding them if you dig in your purse for your keys! Unless you get gel polish...awesome stuff!) Trust me, that is the fasted way to ruin a finish! Don't do it...be patient and give the paint time to harden (cure) before you set a lamp on it or try to hang the fixture (trust me...I have had to repaint many pieces because of impatience!) 

One dated, nasty, cheapo piece of furniture can ruin an entire room. Toss it or paint it! YOU CAN DO IT!

*I have not been compensated for pimping these products! These are the products I use and work for me!!!*

A little stool project and a time to be thankful!

I spend several days preparing for our family holiday dinner...shopping, baking, cleaning...the usual. 

This year I added another little project to my long list of "to dos!"

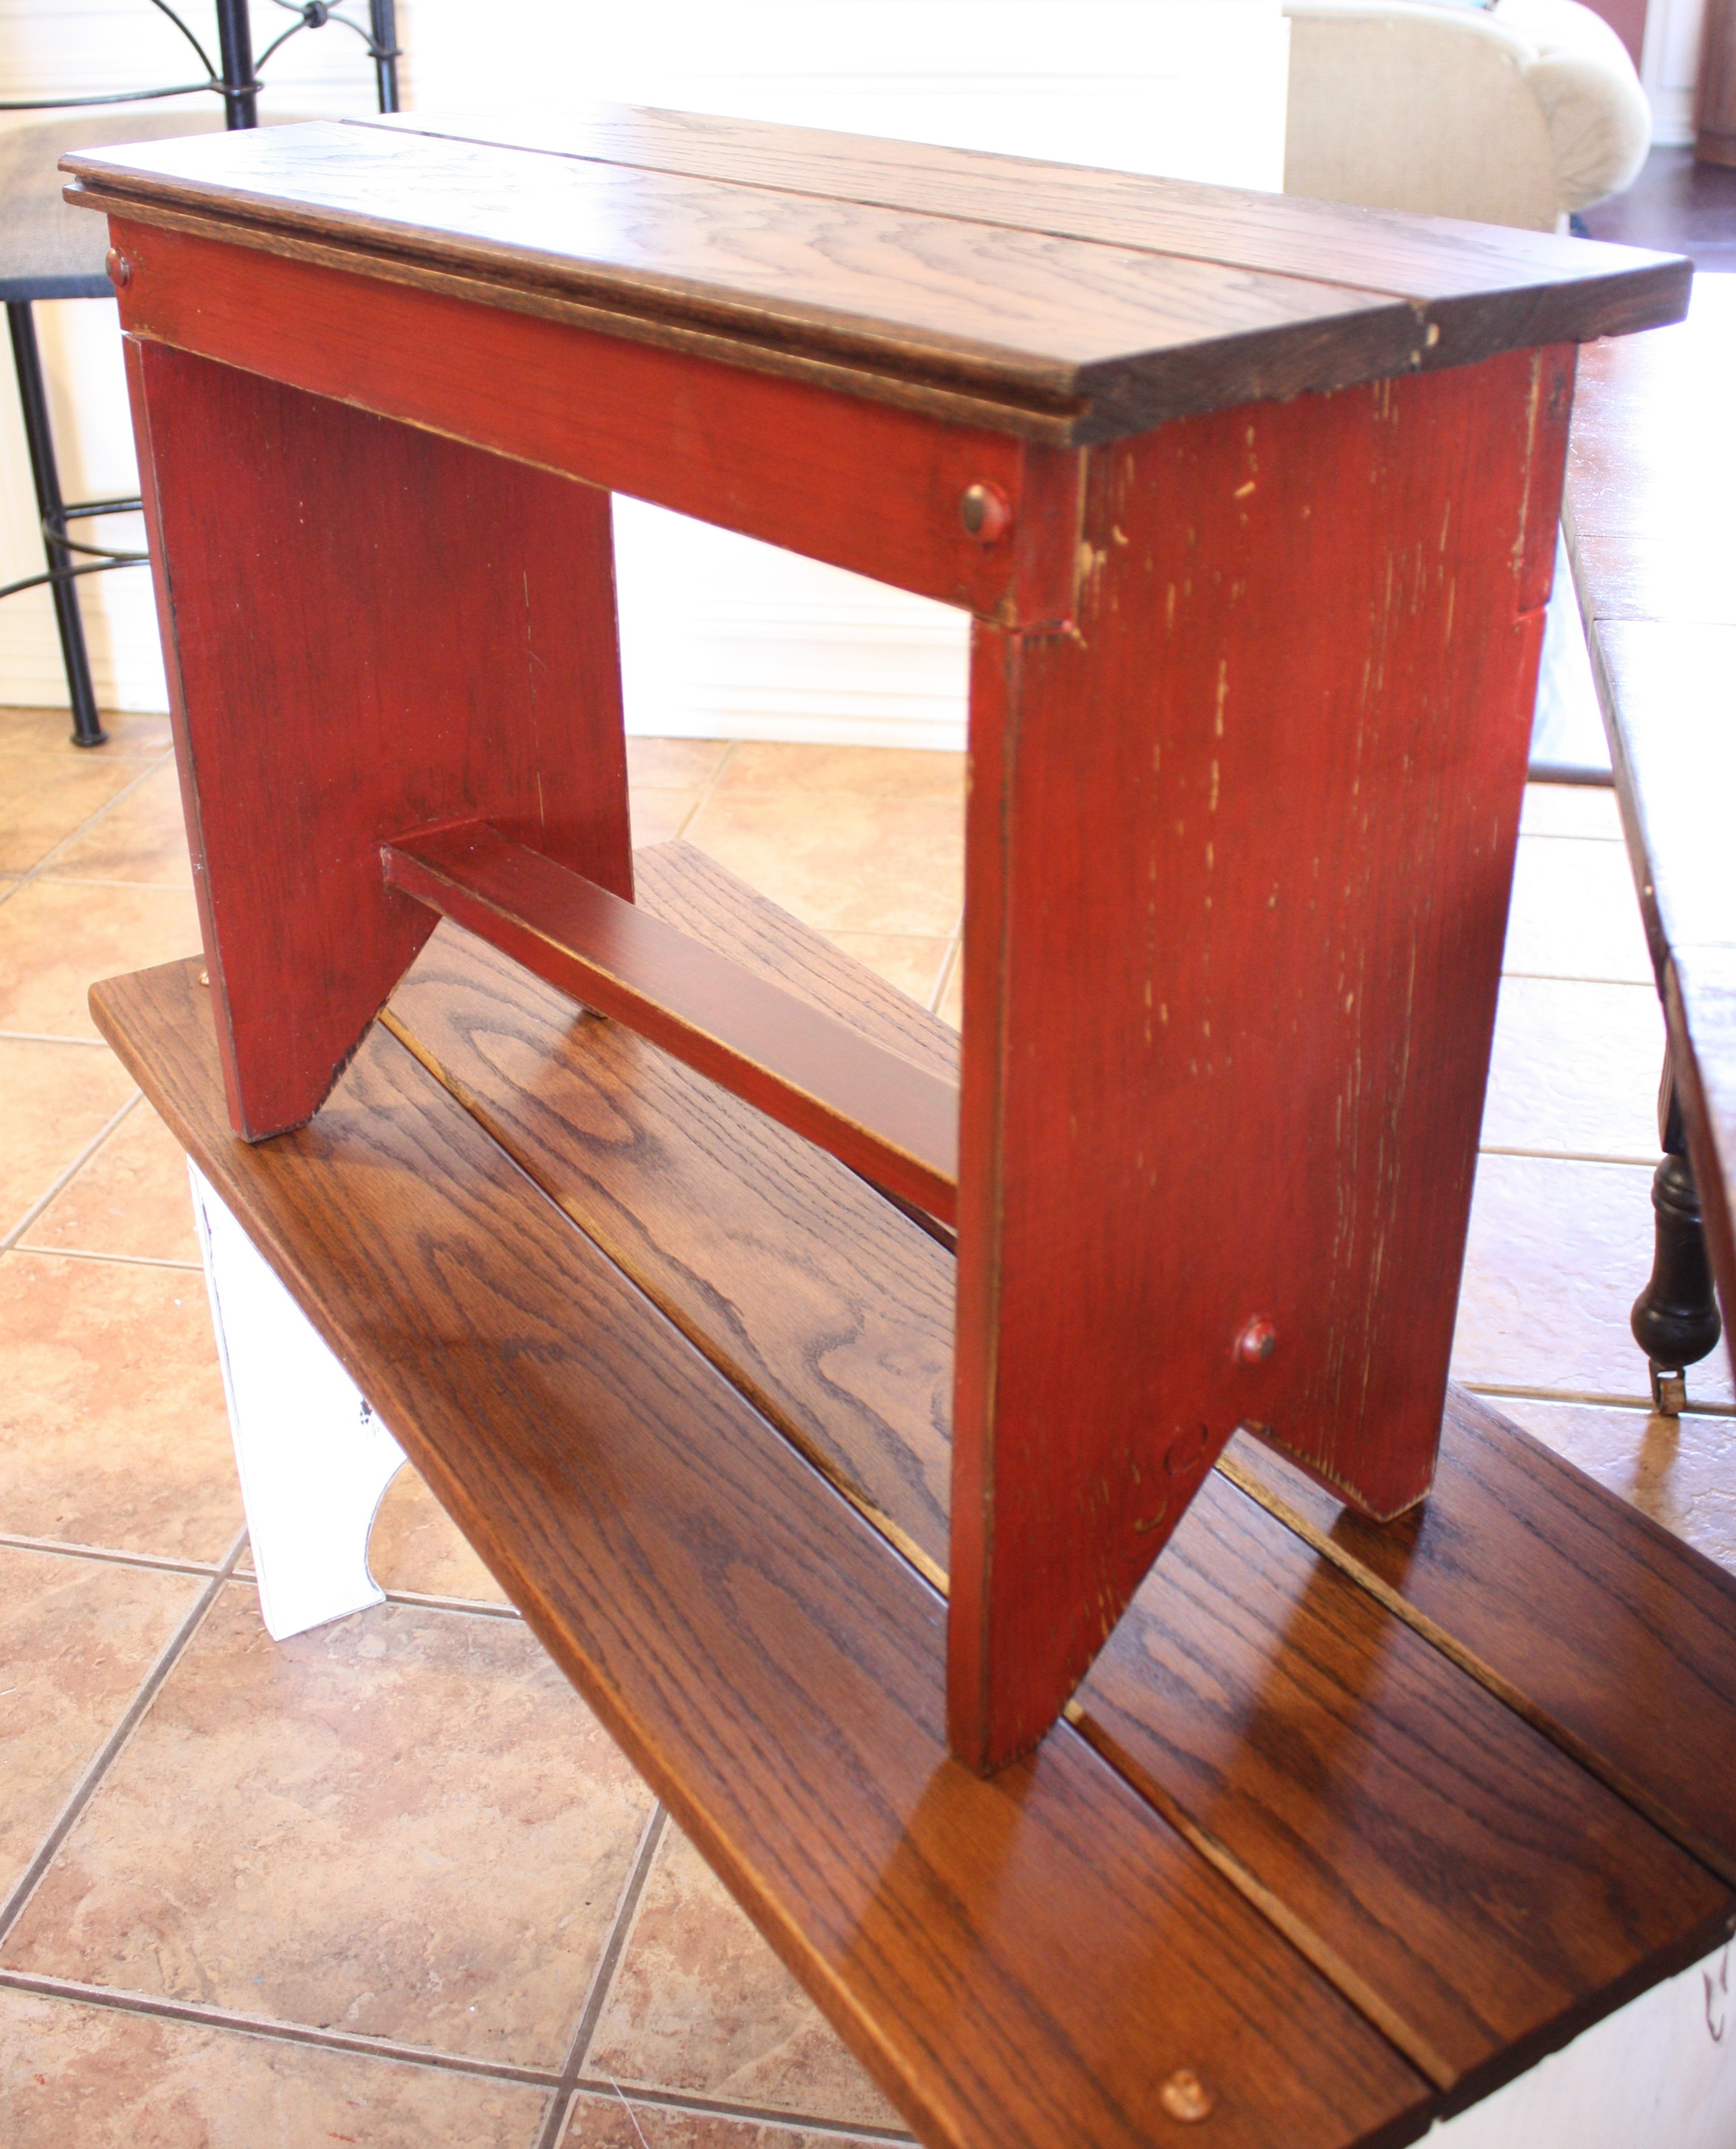
A cute little bench to add additional seating to my Thanksgiving table.

Since we have the bar and rarely use the table, it usually sits against the wall in the dining room with only two chairs. For the holiday dinner, I pull it out and add the leaves. This year I have several sets of chairs in the garage waiting to go to the booth, so I pulled one set in. I like the red, but I didn't like all four of them....

...just "too much" for a smallish table.

I decided I wanted a bench. I searched around a few flea markets, but could never find anything that was just right. 

Even though they weren't the perfect size, I took note of how each was constructed and decided to build what I wanted so I would have the perfect width and height! 

Just one of the MANY things I am thankful for, year round. The ability to make what I need...

I wanted a bench that would fit under the table when not in use so I went with 36" wide. I wanted the same height as a normal dining room chair so I went with 18" tall. The depth of the bench was determined by the material I had for the top...solid oak planking I used on these tables here and here! Although I am not a huge fan of oak, I had a few pieces and it is solid and sturdy and perfect for a bench. Since I plan on selling these little benches after the holiday, it was perfect!

I used stock pine boards for the base since I knew I would be painting it!

The first thing I did was draw out the bench so I knew exactly what materials I would need, how I would construct it and what my cuts had to be. Again, nothing fancy...just paper and pencil! 

(Two buttons looked like a "sad face" so I ended up only adding one...lol!)

Keep in mind that most stock material will actually be LESS than the stated board size...for example a 1 x 4" will actually be 3/4" x 3 1/2". Make sure you take that into consideration when drawing out your "plan." 

The width of the material I used for the legs was a true 12" since I originally planned to use "craft board" as the top. Since I was using the oak planking I had on hand, three pieces of planked together ended up being 15" wide...perfect! So I used the 1 x 12 for the legs!

I ended up with enough "scrap" material to build a smaller bench as well! No need to waste good wood!

I used my chop saw to cut the lengths I needed and a skill saw to cut out the detail on the legs...nothing fancy!

After cutting and assembling all the pieces, I stained the top and base. Even though I was going to paint the base, I knew I would be doing a "distress" treatment on it and wanted the wood that showed through to be darker than natural pine. I did not sand the boards or fill the knots before I painted them so the grain really came out when I "distressed" the painted wood!

I used glue and my trim nailer to assemble everything. I ended up adding little wood "buttons" on the joints. Super easy. Measure and mark were you want the buttons, drill a hole with a tiny drill bit, then use a 1/2" paddle bit to make a 1/8" deep hole on top of the tiny hole. Put a sheetrock screw into the tiny hole, put a dab of glue on top of that, then insert the "button." Since I already secured the joints with glue and trim nails, the screws just add a little bit of stability and the buttons are purely decorative! Not a "have to" but they give the joints a little extra "pop." 

I didn't attach the tops until after I chalk painted and distressed the bases.

I painted the larger bench I will be using at the table my got-to "off white" and I painted the smaller bench red. After I painted and distressed them both, I wiped the red one down with walnut stain...it deepened the color of the wood showing through the "distressing" and darkened the red a bit. 

After the bases were painted and distressed, I attached the tops, again using glue and trim nails. I added a couple of oak buttons to the top of the larger bench just to give it a tiny bit more flare. After they were all assembled, I sprayed them both with poly. Again, I don't wax chalk paint...I like the durability of the clear coat!

IMG_7434.JPG

Perfect.....

I planned to make a really cute little center piece for the table this year. I even went out and knocked pine cones out of my pine trees...goodness knows I have plenty!

I wanted a few additional "fallish" things to add to my pine cones....maybe some reddish berry garland or rusty red flowers to tie the red in. But when I went to the craft store Tuesday, the only "fall" things left were a few ratty scarecrow. Curses! Made me want to drop kick a Christmas ornament across the store. Seriously people, can we not get through Thanksgiving before we drown ourselves in Christmas stuff!

Whatever. I am thankful I have the centerpiece I have!

For me, being "thankful" is not just a one day deal. It is something I TRY to do every day...it is what gets me through the tough days and what I have found makes my life so much happier!

If we would focus on what we are thankful for EVERY day, our lives would be so much easier. I tell my kids often...some days you just have to get up and put one foot in front of the other and force yourself to really focus on what you are thankful for! A beautiful blue sky. The blazing reds of the fall maples. The smell of a neighbors fireplace. Your home. Your family. Your God.

When we focus on the positives, even if we have to force ourselves, there is no room in our brains for negatives. Have you noticed that dwelling on the negatives seem to wear you out whereas focusing on the positives in your life lift you up and give you energy. Yep...that's the power of positive thinking! 

This week is the week we share one day of "thanks" with our friends and family!

This week, really focus on what you are thankful for...and then try to keep those positive thoughts in your head every day, all year!

When you find yourself immersed in your own private pity party, force yourself to focus on the positive.

Being happy, being thankful, loving the life you have...it is a choice. No matter what your circumstances are in life, there is ALWAYS something to be thankful for...find it, embrace it, dwell on it. 


Little oak side table....

I am so bummed. I really wanted to share my little laundry room door project I mentioned last week. The only thing holding me up is the glass. I called and the glass came in, but it was wrong. DANG IT!!!

So today I am just going to share a simple little table. 

One of the reasons I needed a flea market space was because I was always finding cool little pieces at my apartments. I would haul home a table or dresser or chair and give it a cute little make over...and then give it away! 

I don't mind giving things away to friends and family...but after awhile I did have to come to terms with the fact that I was spending money (not to mention a lot of time) on these little makeovers...so the "rehab to resell" became a necessity. That, and I tend to haul home A LOT of little goodies from auctions and as I have said before, if I didn't have the flea market outlet (and wasn't a tad OCD) I could easily become a hoarder.

I love auctions...and I love restoring furniture. What can I say! 

Anywho, I found this little solid oak table in an apartment. It was super sturdy and had already been stripped so it really just needed a little TLC.

I did scrub the top with my acetone/lacquer thinner mixture just to clean it up a bit. Then I stained the top with a walnut stain and applied 3 coats of tung oil finish. After that cured well, I taped and papered off the top and gave the bottom a KSTP treatment. (For those who are new, that is Kilz/sand/tack cloth/paint. I used my current favorite Valspar teal color. 

New life for an old, abandoned table destined for the dumpster. Now it is a perfect little side table for the living room or even a bedside table.

Looking back at all the projects I have shared, it is easy to see that I still struggle with painting EVERYTHING....seems I almost always try to preserve a little "natural wood" if I can. Personally, I think the paint "updates" the piece and the stained wood gives it warmth.  I am working on a desk and a fireplace surround right now and both have stained tops and painted bases....guess that's just my thang! 

Hopefully the RIGHT glass will come in this week and I can share my door next week! I can't wait...it's going to be awesome!!!

In the meantime, pull your least favorite piece of furniture into the garage or yard and give it a little KSTP treatment...trust me...you're gonna love it! 

It is time to scale down!!!!

I have made some hard decisions regarding the direction of my "rehab for resale" projecting. For years I have tackled anything and everything...large buffets and china hutches and major upholstery projects Pieces like this that I didn't even take decent pictures of and share!

I made little chalkboards out of the doors!!! 

These pieces are big and bulky and take a lot of time and muscle.

Upholstery pieces (like this precious barrel chair) take a lot of time and material. On major upholstery projects, I barely get my money back on the materials, let alone my time. (If the cost of having something reupholstered knocks your breath out, try it sometime!)

And while I love doing what I do, I can't keep GIVING things away when I have so much time and money invested! (Ask my neighbors...if they say they love something, I usually give it to them!)

So...the big decision. From now on I am only going to do "smaller" pieces...little tables, wooden chairs, a few stools here and there...maybe a few dressers and such. And of course my first love, mid century pieces...big or small! 

This table was a tad bigger....my neighbor bought it at a garage sale and wanted to know if I wanted to tackle it!

I love the old mahogany furniture and I love pieces that allow me to preserve some of the natural wood and still update with a little paint. 

I removed the sides of the top that fold down and filled the screw holes with toothpicks and wood glue so the screws would reset tight. I STRONGLY suggest you do this EVERY time you remove old screws (it is also a great tip if you have a door hinge screw that is loose or stripped!) Takes very little time and will save you a thousand frustrations!

I stripped the top with 1/2 acetone and 1/2 lacquer thinner (see a full tutorial here!) and then applied 3 coats of tung oil finish. No stain...that is mahogany it all it's naked glory! Just breath-taking!!!

I cleaned the base with ammonia and water and then mixed up a batch of "plaster paint" with a "sample" paint from my den makeover. A little distressing and then sealed with spray poly.

This table is perfect for a small space but can easily be expanded if you need a bigger table!

Again, not really "my style" but the color is all the rage right now....evident by the fact that it didn't last a week. And while it was a "hot mess" when I got it, I loved bringing it back to life. It was a very enjoyable piece to work on! 

And THAT is why I do what I do. "Finding the treasures" lurking under years of neglect and abuse. 

It really is what I love to do! So I will continue to do what I love to do but I am going to FORCE myself to stick with the smaller pieces that allow me to enjoy my work without breaking my back! 

We'll see how long this lasts!!!

Since I have posted a recipe in a while, I thought I would share a new roast recipe that is. to. die. for! Check it out here!