Gel stain tutorial on table makeovers...

I did it again...dove head straight into a project without taking a "before" picture. But at least this time I got an "inbetween" picture!

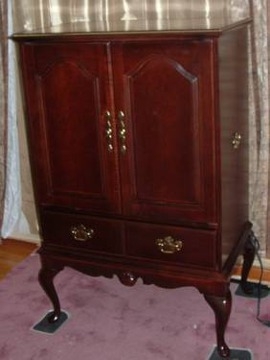
These little tables were simple makeovers. I picked up the side table at an auction a few weeks ago. Got it for a few dollars because, well, it was nasty, the color is pretty putrid AND the top had come unglued.

No biggy for me. I glued and clamped the top, then I sanded off the old finish on it. Yes, you heard me right, I sanded it. Two reason...first, I got glue on the top when I repaired it and stain will not adhere to glue. Second, it is solid wood and I knew I couldn't do a lot of damage to it. Light sanding...220 grit! Just enough to remove the old finish and glue residue.

I got the drop leaf table from my neighbors. I told you I am the dumping ground for neighborhood furniture...it just "appears." Again, the top is solid so I gave it a light sanding.

I knew I wanted to paint both tables but as always I have to have my fix of stained wood. So I used gel stain on both tops. 

Gel stain is SUPER easy to apply IF you use the right technique and product. As I have said before the ONLY gel stain I will use is General Finishes. It is not a brand the big box improvement stores carry so I usually order mine on Amazon. I have tried other gel stains and have not been happy with the results. The General Finishes brand never disappoints. I have used both the Java and Brown Mahogany colors.

I am going to share how I gel stain...it is a super easy application process and perfect for real wood or even that cheapo fake stuff you find on the ends of cabinets. Since it goes on fairly translucent, the wood grain (real or fake) will show through.

I have used this process on cabinets, tables, dresser tops and drawer fronts....some I have stripped down to bare wood, others I simply applied it over the existing finish.  It is a great process to use on any project where you want "stain" but know you might not get a good result by completely stripping the piece and applying penetrating stain!

First step for ANY makeover (after repairs of course)...give the piece a good cleaning. In this case, since both tops were solid wood, I also gave them a good sanding. Sanding is NOT necessary but you want to make sure that any old finish is stable and somewhat smooth. So if your old finish is flaking or a bit rough, sand it smooth with 220 grit paper.

You will need....

The gel stain...again, I ONLY use General Finishes. A quart will cost you around $30+ but it seriously goes a loooong way!!! If you just have a small project, get a pint. I have found that it doesn't store well.

The gel stain top coat...in this case I used the GF Poly wipe-on top coat. But I have used a spray on Polyurethane and Polycrylic and they work just as well. 

Disposable rubber gloves. I always have those on hand. Just the cheap latex gloves you buy in a box so you can toss when finished.

Old athletic socks. Again, I keep a stash on hand. Any time I find old socks at thrift stores or garage sales I buy them. They are perfect for applying any type of stain or finish and I can toss them when I am finished.

That's it...a relatively short list of supplies!

The trick to applying gel stain is to remember it is suppose to be somewhat "translucent." Put on a rubber glove, then an old sock over the glove...dip you finger tips into the gel stain and wipe the gel stain on the piece with the grain. The first coat will look like crud so don't try to get perfect solid coverage! Just wipe it on LIGHTLY WITH THE GRAIN....do not "glob" it or apply it thick...it is NOT paint. I usually wipe it on, then use the clean side of the sock to give it one final wipe WITH THE GRAIN...working edge to edge. 

THE FIRST COAT WILL LOOK LIKE CRUD!!!! I can not stress this enough...you are better to go light than to try to make the first coat look decent. It is not going to! If you can't see the grain through the coat of stain, it is WAY to thick.

Now, let that dry over night. Then do it again. New glove, new sock. Wipe on a second LIGHT COAT! The second coat will look a tad better, but not great. THAT IS OKAY. Keep it light and translucent! 

Let the second coat dry over night. Then with a new glove and sock, apply the third coat. NOW it should look good. The stain should allow the grain to show through!

If you feel like you have messed up....too thick, too streaky, just don't like it...you can still wash this stain off with mineral spirits if you haven't applied a top coat! 

Let the third coat dry overnight. If you are happy with the look, apply your top coat. Again, I used the GF gel wipe on poly on these tables...super easy to apply. Rubber glove, sock, wipe on. As simple as it sounds. You may want to apply 2-3 coats of the finish...especially on tops or cabinets that get a lot of use...just make sure you wipe it down with 0000 steel wool and tack cloth between coats. You will get a nice smooth finish that way!

Presto, bingo! This really is an easy application IF you don't overthink it and try to get a decent looking finish on the first and second coat...if you do, you will put the gel stain on too thick and I promise you won't be happy with it! My neighbor, Tammy, tried this process on a little side table...and sure enough she put the stain on too thick...it did not turn out well! Each coat should be light and "translucent." 

After I let the top coat dry well for a few days, I painted the rest with chalk paint...a light distressing with 220 grit sand paper and sealed with a spray on polyurethane. Again, sometimes I use polyurethane, sometimes polycrylic. I find that the urethane tends to "yellow" and give the piece a bit of an aged look...which is kind of what I was going for here. The polycrylic is a true clear coat and won't alter the color of the paint or yellow with time.

(As you can see the sun was very bright the day I tried to get decent pictures of these two tables...trust me that was the ONLY day this past week that it wasn't dreary, raining or cold as crud. I even had to cover my hostas this week to protect them from a freeze...and they are predicting another freeze this weekend...grrr!)

My recipe for chalk paint is 5 tablespoons of Plaster of Paris, 3 tablespoons of water, mix well then add two cups of flat latex paint. I usually paint two thin coats, then sand and seal.

Cute as a bugs ear and ready for another generation of use!

This week I decided I am getting too old and tired to paint my own house. I actually hired someone to paint my living room, kitchen and den! Ten years ago I would never have paid someone to do something like that! 

But just the process of getting ready to paint creates a mess and is exhausting!

This, my friends, is the reality of home improvement...normally we bloggers only share the beautifully styled and perfect "after." Truth is, most projects make a mess!

I'm a pretty clean person...or so I thought until I moved things that haven't been moved in years...yuck! 

I'm painting my living areas the same color I used in the master bedroom and guest room....SW Nuance. I'm a little nervous about painting these rooms a different color...I told you, change is hard for me. But I have lived with this color in those two rooms and I THINK I will like it! The painter will be here around 10 so there is no turning back now!

Hopefully the weather will take a turn for the better and I can finish and share a few fun projects I have waiting in the wings next week!

Until then....

Eastlake chair makeover!

Years ago, the "wood purist" in me would never have painted an antique anything!

But slowly I have evolved and my snobbishness has taken a back seat to reality...some "antique" pieces have little use in today's world of decor trends. The rich color and grain of walnut, the depth and beauty of rosewood, the vibrate color and delicate grain of mahogany...zip, zilch, nada.

The day will come when those who followed the decor trends of today will glare at their painted furniture and shiplap walls and growl...it happens. NOTHING is timeless. Honey oak cabinets were timeless...8x8 tile floors were timeless...white appliances were timeless. 

The fact is decor trends come and go and we realize that which we thought was timeless, really isn't.

(There are still some who cherish antique pieces...and of course, as always, do a lot of research and make sure the piece you want to paint is not a valuable antique "as is!")

I have no doubt that this piece I slathered in chalk paint and covered in buffalo check fabric will catch the eye of someone looking for a great side chair...but it will someday be stripped down and refinished...exposing the amazing walnut grain and delicate incised carvings. Someday...but not today.

That was my original plan. Strip the old finish to expose the beautiful walnut grain and intricate carvings, reconstruct, seal with oil and reupholster in a fabric worthy of an antique walnut Eastlake piece.

Knowing all that hard work would garner little favor with my "target market," this chair sat in my garage for YEARS. Seriously, I'm not sure when I bought it but I can't remember a time when it wasn't lurking in the back of my garage.

(If you are a "purist" or antique lover, turn away NOW!)

Some would look at this and think EEEWWWWW!

Yes, it was pretty "eeewwwy." And yes, this is pretty much the shape it was in when I bought it. I think I remember removing the original rotted fabric and a few thousand upholstery nails and I did start stripping it using this process. But I eventually shoved it into a corner of the garage where it languished until I got over my snobbiness. 

I constructed a new seat out of plywood...not even close to the original but then again furniture no longer sits in the parlor only to be used by tea sipping adults. 

The richness and beauty of oiled walnut has fallen out of favor for the "farmhouse" chalk paint and distressed everything!

New foam padding and batting...the old horse hair of yesteryear just doesn't cut it these days. (Thank God...that stuff is nasty!)

The crushed velvet or needlepoint fabric that would have originally ordained this piece was a no-go. I went with the trendy buffalo check that I suspect will be as popular as chevron was a few short years ago!

A bazillion metal upholstery nails...no way Jose! Hot glued gimp is the way to go!

Don't get me wrong, I think it is as cute as a bug's ear! I have no doubt someone will LOVE it! It would be a precious side chair or even a dining chair paired with a farmhouse table that are all the rage!

And as always, it is Litty and Mr. Jinx approved....

As much as I would like to think of myself as a "purist" I can certainly appreciate the desire to fill our homes with pieces we love or suit our desire for "going with the flow" without breaking the bank! 

C'est la vie.

Cherry tv cabinet makeover....

I've said it before...I am a bad blogger and mediocre photographer at best.

Bad because I often get in such a hurry to start a project I completely forget to take a "before" picture. Mediocre photographer because...well, my photos speak for themselves.

As is the case of this Queen Anne Cherry tv cabinet. Hello 1998! 

No, I did not take a "before" picture. So I did a little google search and found a cabinet that was SIMILAR to the one I acquired from my neighbor. Color and style are the same, but mine does not have a drawer. 

We have all seen this furniture style...many of us still have it in our homes! I had similar bedroom furniture...not the Queen Anne style, but heavy and dark. I painted my bedroom furniture a few years ago and honestly I don't give it a second thought these days!! In other words, update the outdated and you may stop feeling the need to spend thousands on new!

There are several problems with this tv cabinet. First, who still uses these cabinets for housing tvs? Most of us have transitioned to flat screens...I finally pitched my last hold out a few years ago. 

Second...it is dark and "heavy" looking. Not really the in thing right now.

But they are still good solid pieces that have use and purpose. Maybe not for their original intent, but who couldn't use more storage! 

It is super simple to give these pieces a little update. I know most will not want this piece for a tv cabinet but everyone is looking for storage pieces for crafts, linens or even clothing. Honestly, it could be used in a kitchen for pantry space or a bathroom for towels and such!

Again, it just needs a little facelift.

I removed the back...super simple since they are usually just stapled on.

I added a new shelf then primed the inside of the cabinet with Kilz, sanded, tacked and spray painted it with white paint (KTSP!)

I used bead board to make a new back to add a little "interest." I used THIS process to "stain" it. Normally I would use an accent color but this time I used the same latex paint I mixed up as chalk paint for the exterior.

Making your own chalk paint is super simple...thoroughly mix 3 tablespoons of water and 5 tablespoons of Plaster of Paris and then add 2 cups of FLAT latex paint. You can use satin or eggshell paint but I have found that the flat tends to "chalk" better when you sand.

Sand and seal! Again I never use wax on chalk paint...usually polyurethane or polycrylic. If you want the added character that you get with dark wax, try applying a dark "glaze" before you seal. Personally, I think you get the same affect without having to use wax. I have even used stain as a "glaze"...this mirror being a good example.

Finally, I added simple knobs.

Sealing the piece with poly makes it super simple to repaint when the "distressed" craze ends...and trust me it will eventually! 

Some of us remember when this dark "cherry" look was all the rage...

Essentials for a cozy guest room...

I did not realize how unprepared we were for guests until I began my quest for the perfect "guest room."

Sarah and her family are our most frequent "guests." She doesn't have her own room in this house since she had moved away for college the year I bought it...19 years ago! (Wow...where does the time go!) When her family visits they have no problem digging through my bathroom or closet when they need a Q-tip or soap or an extra blanket! I don't mind that they do, but you probably don't want most "guests" scrounging around your bath or closet!

The three youngest babies who grew up in this house have moved on with their lives and I am left with three bedrooms upstairs.

Now, this is where I tell you that when your children first go off to college, do NOT think you can immediately turn their room into "a naked room." (Again, you have to see the movie!) Because truth be told, they do eventually come home...at least for frequent and sometimes extended visits. And the worst is all the "stuff" they leave behind...clothes, books, trophies, high school momentos. Stuff they obviously can't take with them but don't want to get rid of (okay, so MOM doesn't want to get rid of their t-ball jerseys and "Where The Wild Things Are" books...but that's a whole nuther issue!)

But eventually the time comes and you know they will not be moving back.

For me that time has come.

I decided it was time to pull together a real "guest room." It all started here

I finally got Matt's room painted and all three rooms purged. For the most part...there are still a few framed momentos and childhood books scattered about!

Katie's room will be our official "gym"...there is a twin bed and room for the portable cot for the grandsons and it has the large tv so it is perfect for their "game room." 

Mitchell's room has been the unofficial "guest room" but right now it still has a lot of "stuff" in it that I just don't have the energy to deal with. And truthfully, the bed in his room isn't real comfy.

When Matt moved into his new home, he left only a bed and dresser...

...that room has the least to deal with so that will be the "official guest room." After the new paint and purge, it was time to start working on "this list"....

In the bedroom I made sure there where the essentials...comfortable bedding, a bedside table with a lamp, an alarm clock with USB ports (love that little thing!), a scented candle, a flashlight, reading materials, a notepad, a trash can, etc. (I moved the bedside table from Mitchell's room and the lamp from Katie's...it "pays" to shop at home!)

I gathered all the extra blankets and pillows and bought new hangers and put them in the closet....

I put white inexpensive pillow cases on all the spare pillows! Just a reminder that I am a huge fan of white bedding and towels!

In the bathroom I purged all the outdated products (used toothbrushes, old deodorant, expired meds) and stocked it with everything on the list...toiletries, ample towels and washcloths, a blow dryer, personal and oral hygiene products, a first aid kit and basic meds. 

I made sure I checked everything off the list!

I wanted a new bed frame and found the PERFECT one through a friend. 

Okay, so it wasn't really perfect. I added some height to the side rails because I don't like the box springs showing. I used my Kreg jig and wood glue to attach a 1x6 board to the side rails....

...then nailed a piece of trim across the joint...caulk and putty...

Then I painted it! First the KST...kilz, sand, tack...

Then paint. I went with my go-to off white...SW Swiss Coffee. I thought about doing the whole chalk paint and distress thing, but I know that will eventually fade out of favor and I want clean and classic...in other words, something I don't have to repaint in a few years.

I found an inexpensive "indoor/outdoor" rug that works perfect with a neutral color pallet. 

I'm not big on piles of decorative pillows on the bed, but since I don't have to make this bed every day I picked up some pretty decorative pillows!

I replaced the blue and brown curtains with fresh white panels. 

I found this message board in the craft section at Hobby Lobby.

Chalk painted it and then hand painted the wording on it, distressed a tad and sealed. Super simple and just a touch of "farmhouse." 

This little "message board" is the perfect spot for the wifi password info and our home address info. Keep in mind, if you don't have a land line and someone uses their cell phone in an emergency, emergency responders may not know your exact location. Guests should have your physical address! It is also the perfect spot for hanging spare charging cords for I-pads and phones! 

Fresh flowers are on the list, but it is a bit unrealistic to keep fresh flowers in a room I rarely enter...these were from Sarah for my birthday! 

If you do not have an extra bedroom specifically for guests, put together a guest basket...a little basket with all the "essentials" that can be stored in a closet until it is needed! I stocked this one with little "sample size" products. I also pulled items from my hotel stockpile...yes, I am one of those people who takes all the little shampoos, lotions and soaps from my hotel room!

Having a room ready (or even a little guest basket on hand) sure makes it easy to prepare for overnight guests...last minute or scheduled.

I have a large matted frame I intend to hang above the bed if I can find a print I like. The frame was a "silverish" color...not the least bit pretty. I have it primed and ready to paint (and share) when I finally put it all together. Wall decor is something that can take time...like Matt, I don't want "stuff" just to have "stuff." 

I put my dad's walnut chair in the corner and eventually I want to add a mid century dresser...Katie is using this one and I may get it back when she moves so I may hold out for it! I also want to find a luggage stand. When I get that all in place I will share that side of the room!

The "froo-froo" takes time but the absolute must-haves are in place! 

Que "sigh of relief!"

Little Miss Muffet sat on a....

Tuffet?

At least that is what came to mind when I saw these little chairs at an auction. When I googled "tuffet" I found pictures of little ottoman kinda things...but the definition is "a footstool or low seat." So I am going with tuffet. 

As cute as they are (or probably were in 1978) I knew they would require my least favorite chore...upholstery...and sewing! 

So of course they sat in the garage for months.

But I could see them all dolled up in my mind's eye so this week I decided to tackle the project.

First I had to strip off all the old upholstery and remove all the nails and staples!

I found an upholstery material I really love but there wasn't enough to do the whole chair...so I found a solid that coordinates with the fabric...sometimes you have to improvise! 

Chalk painted and distressed the frame...

Rather than use upholstery nails I used gimp...

The cushion is attached to the seat with buttons so I covered buttons with the teal fabric.

Just too stinking cute!

Not sure if these are "technically" tuffets but they are child size and ready for another lifetime of curds and whey!

On a side note, I "googled" what exactly is "curds and whey"...turns out it is nothing more than "curdled milk." I raised two girls...neither included curds and whey in their tea party menu! 

Little Miss Muffet

Sat on her tuffet

Eating her sausage and egg biscuit

Along came a spider and sat down beside her

And Little Miss Muffet squished it. 

We should be empowering our girls...

Sign post from old bed posts...

I have had these old bed posts for eons...they have been sitting in my garden cubby for...seriously, I have no idea how long! I can not tell you how many times I almost tossed them, only to stick them back in the cubby "just in case."

I love the blogs that post inspiration pictures with links...but there are just too many...and honestly, I'm kinda lazy! If you need or want more inspiration, just search "sign post" on Pinterest. I promise you will find something that trips your trigger.

I stumbled across one in my search for ideas for my guest room (I promise to share soon!) Light bulb moment. I have old posts! I have some old hooks....and scrap wood...and paint. 

I CAN DO THIS!!!!

So I did...

Super simple project...while I have all the necessary tools in my Tool Box, this really is a project that needs little more than a hammer, saw, screw driver, glue and nails. 

First I had to clean all the gunk off the posts...then I puttied the holes and built a sturdy base (just a scrap board screwed into the post and trim)...

....chalk...paint...distress...seal...add a hook!

Perfect for a little "Welcome" sign on the front porch....maybe a hanging basket of flowers. You could even add a few more hooks and use it as a coat rack or set it in your bathroom or by the pool for towels...the possibilities are endless!!!

Super simple. And a great way for me to purge another "just in case" thing from my garden cubby!

Painting a brick fireplace....

The house Matt bought (here) was a "flip." That didn't stop us from making a loooong list of little DIY projects...installing floating shelves in the kitchen, painting the fireplace and replacing the dated floor tiles, adding additional lighting in the living room, painting the kitchen cabinets, opening up the entry, replacing the master bath tub with a walk in shower...and the list goes on!

So I had Matt prioritize...what is important to him and what would his budget allow. 

The first thing we did before he actually moved in was build floating shelves in his kitchen...I will share that a bit later!

The fireplace was second on the list for several reasons. It was a pretty big eye sore and it was a relatively easy and inexpensive fix.

I'm going to give Matt all the credit on this one...he did this ALL on his own.

The first thing he did was remove the old brass cover...he could have painted it and reused it but there really was no need. 

He scrubbed the brick with a metal brush to loosen all the gunk and then he used a shop vac to make sure it was free of any debris! He even scrubbed the inside of the fire box and sprayed it with a flat black heat resistant paint.

We don't know how well that will hold up but he has no plans to build a real wood fire. The fireplace is a masonry fireplace but it is 30 years old and the inspector said it had a few cracks in the masonry flue...so for now he will just stick with the little gas vent-free log set. Those little things don't put off a tremendous amount of heat! 

On to the painting. First he used oil based Kilz to prime all the brick....two coats. That was a booger....he used a 3/4" nap roller and a large paint brush to get into all the joint lines.

Then he painted it all with latex paint.

His original plan was to paint the rough cedar mantel but honestly, after the entire fireplace was painted, the mantel added a much-needed touch of warmth.

The dated 8x8 tile will eventually be replaced with travertine tile but for now this simple little project made a HUGE impact in this room! 

When he first moved in I had collected a bunch of "stuff" to decorate his walls and mantel...Sarah and I even put together a little gallery wall of "stuff" in his breakfast nook. He immediately nixed it...no "random stuff!" At first I was a bit hurt that he didn't seem to appreciate our efforts to create a homey look with all the "stuff" we had spent weeks hunting and gathering. 

Then I understood...he is just like me...he doesn't want "stuff" for the sake of having it...he wants to decorate with things that have meaning...things that have purpose.

Like me, he would rather live with bare walls and an empty mantel until he finds something that has a real value...things that make him happy.

I totally get it!

Great job Matt!!! 

The breakfast nook table and chairs makeover

When Matt decided to buy his first home (details here), I knew my love for "making old new again" would come in handy!

I love the dresser and chest I found and refinished!

He was able to use the farmhouse trestle table I featured here

And of course this "cute as a bug's ear" vintage chair makeover!

But he didn't have a table that would fit in his breakfast nook...a relatively small space in his kitchen.

I knew it needed to be a round table since the space is only about 9x9.

I found this round oak table at a flea market...a tad dated in it's original condition but I knew exactly what I wanted to do with it.

Normally these oak tables are around 48" in diameter but this one was only 32" so it is the perfect size...just not the perfect finish.

I honestly didn't want to strip and restain the top so I decided to go with gel stain...again, I ONLY use the General Finishes brand. It really is the best!

Rather than go with my usual Java color, I decided to go with the Brown Mahogany.

As I have said in other tutorials, the first coat is a bit stressful....

...you really question whether this stuff is going to work. 

Patience...wipe on a coat with an old athletic sock...let it dry overnight...then wipe on a second coat, then a third....

I promise, by the third coat you will see the results you want. Then just seal it with the General Finishes wipe on top coat. 

Sunlight streaming through the windows is awesome in the morning...not so much for photographing furniture...but hopefully you get the idea....

After staining the top, I chalk painted and distressed the table base. I picked up a couple of oak chairs at an auction and chalked painted and distressed them as well...then recovered the seats with some leftover fabric from my club chair makeover!

Perfect fit for this small space.

One tip...this little table came with a leaf...while this space really isn't big enough to expand the table, it is always smart to refinish table inserts just in case want to use them in the future! 

Also, just a reminder that I do not seal my chalk paint with wax...I use polyacrylic. Someday this whole "distress" thing will go out of style and he will want to paint this furniture...wax would have to be stripped before he could repaint the piece!

Next week I hope to share Matt's first big project...painting the brick fireplace. If you are debating whether to tackle yours, you really want to see what a little bit of paint can do...impressive!

So tune in for the big reveal.

A proper guest room...

I have three empty bedrooms upstairs. Three empty rooms that my heart still feels are "the kid's" rooms. Truthfully, Mitchell hasn't lived in his room in 12 years. Matt has moved home on a few occasions since he graduated, but he just bought a home. Katie is still in college 15 minutes down the road, but she has made it clear that she has no intention of moving home...she will graduate next year and I have no doubt she will set out to set the world on fire.

So while my heart feels those are "the kid's" rooms, I know in my head that it is time.

Time to paint over the big "fail whale" in Katie's room.

(In case you are wondering, those are the photo albums...for the three youngest...I know, I have issues!)

Time to replace the baseball paddle fan in Matt's room. 

Time to purge a few more things in Mitchell's room.

I've made small changes to each room over the years...Katie's room is now our "home gym." But honestly, throwing a weight bench and elliptical machine in a room doesn't really make it a "home gym." 

I have boxed up MOST of Mitchell's plaques, framed certificates and trophies...but it is still "his" room.

Matt took much of his furniture when he moved into his new home, but he left his junior high jersey and his high school diploma and senior picture, so I immediately rearranged the few pieces of furniture (a bed and chest) and put his personal momentos back on the wall. 

But it is time to make some serious changes...and as always I found the little push I needed and a bit of inspiration on another website. J. Cathell ...a site that showed up on my "Bloglovin'" feed. I also found this tutorial at Today's Creative Life that outlined a few essential "must haves" in a proper guest room.

And this super handy checklist here...a great list to make sure I have all the bases covered if I want to create the perfect guest room.

I don't intend to put the bath items in the bedroom...the bathroom is rarely used so I just need to make sure it is organized, clean and stocked with "guest necessities." 

Inspiration...the first step to making a plan for any project, big or small. 

The room featured on the Jess's site is a tad "over the top" for our needs. Truthfully we don't have a lot of guests...the kids come home for the "momdatory" holidays and occasionally my uncle will come for a visit.

Inspiration none-the-less...and a push to get the ball rolling.

A plan...right now the plan is in my head and relatively simple. 

This week I tackled the first step in "the plan." Since Mitchell's room was the most recent makeover, little will change in there. I boxed up a few more things...VHS movies, books, etc. It will still function as a guest room but it will be a room where I can still display the important stuff like diplomas and such.

Katie's room will still be our "home gym" but it needed to be purged and neutralized...in other words, it was time to paint over the fail whale.

Since it is our "home gym" we think we MIGHT eventually move all the diplomas, framed jerseys and trophy's into that room. It has the largest tv so it is also ideal for the grandkid's game room when they visit.

The paint in Matt's room is not bad, but I want to eventually coordinate all the colors in the three rooms. I painted Mitchell's room BM Rivere Pewter but I wanted to go a tad lighter in Katie and Matt's rooms...so the plan was to paint them SW Nuance...the same color I painted my master bedroom. It appears to be a shade lighter than the Revere Pewter. (As you can see, I managed to get Katie's room painted but after two days of painting and purging, I decided Matt's room will just have to wait!) The trim in Katie's room was the original trim color so it was a tad "yellower" than the Swiss Coffee I have used in the rest of the house...so that was painted as well. 

Brian replaced the baseball paddle fan in Matt's room...not a huge deal.

I wasn't thrilled with the amount of light the new fixture put off. I moved a little wicker side table from Mitchell's room and the lamp from Katie's room and I think guests will have sufficient light!

A major "purge fest" in all three rooms...boxed up the keepsakes that will go in the attic and filled four boxes to donate. I made sure the bathroom was free of expired products and used toothbrushes. I gathered up all the spare blankets and pillows and stacked them in the closet.

Purging, paint and a paddle fan. Seems like a small step but those things made the biggest mess, the biggest impact and set the tone for the rest of the plan.

Eventually I want to paint the walls and change the bed frame in the Matt's room (the REAL guest room). I want to replace the chest of drawers with a nice dresser. Eventually incorporate all the little things Jess featured in her guest room makeover...a comfy rug, a chair or bench, new curtains and wall decor, a charging outlet, a cute wifi passcode sign, a jar with little guest necessities, a luggage rack, nice alarm clock and all the little homey nick-nacks that make a guest room comfortable and inviting. 

Truth is the most important elements of any guest room is that it is clean and clutter-free and has a comfortable bed and bedding....I can check that off my list of "things-to-do." The rest of the checklist will come with time and patience.

Thank goodness we are not expecting over night guest anytime soon!


Another mid century dresser...

I love vintage mid century furniture! Love it. The style is my absolute favorite to refinish and as I have said before, I try to infuse as many pieces as I can into each room. Beautiful wood...clean lines...sturdy as the day it was built!

These are just a few of the dressers and chests I have refinished over the years...

Here....

Here....

Thank goodness my kids have inherited my passion for this style of furniture...because when I found this awesome dresser and matching chest on Craigslist, Matt had no problem taking them off my hands (AFTER I had worked a little makeover magic on them!)

As you can see I couldn't wait to start stripping the old finish before I remembered to get the camera.  And the finish on this sucker...it was a booger! Usually my 1/2 and 1/2 mixture melts old finish right off! I dang near had to blast this stuff off...I finally had to break out the heavy duty stripper and break my cardinal rule against sanding veneer (DO NOT attempt to sand veneer unless you have some serious experience.)

The top is laminate so I decided to paint the cabinet and refinish the drawers and legs....

Stripped and oiled the drawer fronts and legs...KSTP the cabinet and tops...drum roll....

I usually add a piece of protective glass on painted dressers...just to be on the safe side!

I love these pieces...and they are perfect for Matt's new home. He is using the dresser in his master bedroom and the chest in his guest room! Because these pieces were so well built, they will last another life-time!

I have several projects in Matt's house to share! He has already started "projecting" and I try to sneak in and take pictures when I can! So stay tuned for a cute little breakfast table makeover and his updated brick fireplace.