Parlor table before and after and a new crock pot recipe...

I ran across pictures of a table I forgot to share. It is a prime example of something that was in ratty shape and became something special with just a tiny bit of effort. No surprise...it sold within days!

I picked this table up at Salvation Army....

Overall, the table was in pretty sturdy shape and I loved the turned legs and detailing. The top was veneer, but it was blistered and loose so I scraped it off.

A lot of these older pieces have veneered tops and sometimes it is in rough shape. No biggy...there is usually good, solid wood beneath the veneer. You may have to do some scraping and sand a bit, but the wood is good for stain or paint. I removed the veneer on this oak table and you would never know it...stained beautifully!

The table also had a little veneered decorative doo-dad on the bottom. I pried it off and used wood filler to fill the hole.

I chalk painted the bottom and distressed it a bit. I used Kilz and spray paint on the top but I had a few paint boo-boos so I ended up using mineral spirits to "distress" the top as well.

That is a little trick I learned recently. You would think spray paint and oil based paint would not be "distressable." Well, it is. Take a shop rag, saturate it with mineral spirits and then rub the edges to give it that distressed look. I did it on the top of this table and recently on some shelves I painted for my booth. I wanted to use oil based paint because it holds up a little better, but I wanted the "distressed/worn" look. Perfect.

This table is a tad ornate for my tastes but it is the perfect example of taking an abused and neglected piece and giving it new life! 
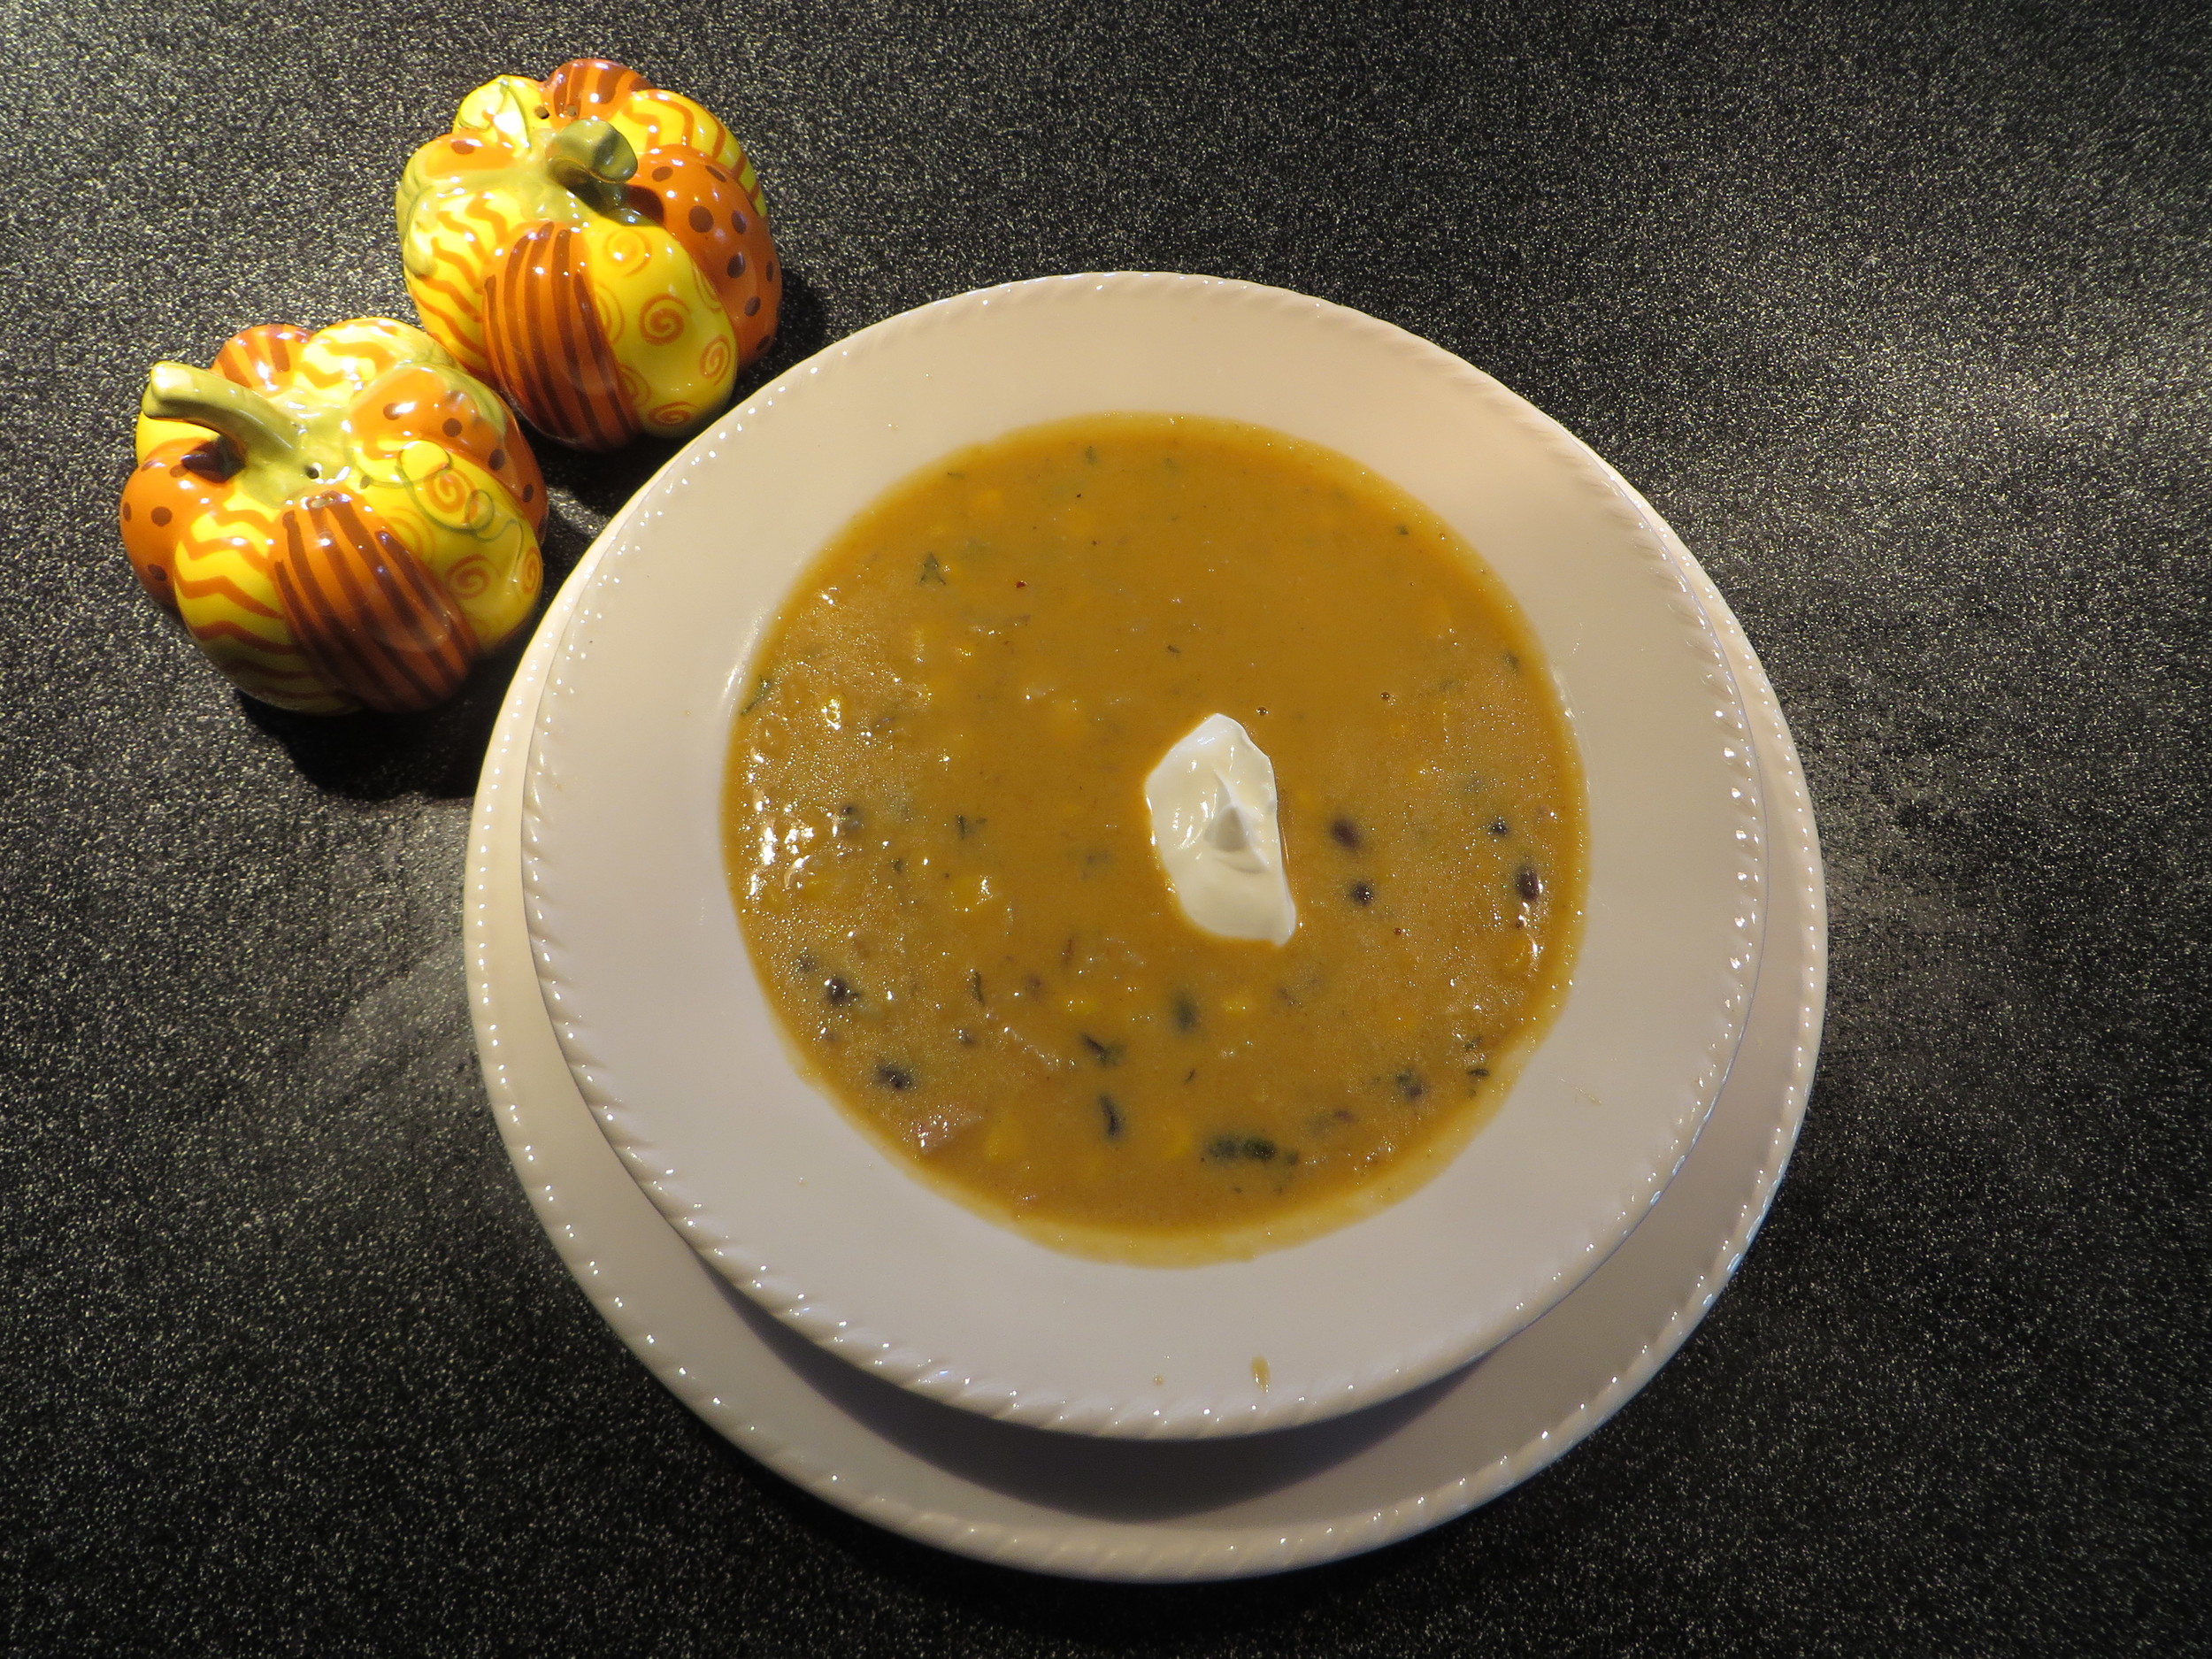
SQUASH SOUP RECIPE

It is that time of the year...soups and stews! I like anything I can throw in the crock pot and serve up for dinner! I don't know why I think the crock pot is a "fall/winter" thing...truth is, it would probably be best to use it in the summer when you don't want to heat up the house. Maybe it is a "comfort" food thing!

Anywho, this is a recipe I found in Ann Rule's murder novel "Too Late To Say Goodbye". It's called "Jenn Corbin's Squash Soup." That is the lady who was murdered and this was one of her favorite recipes. (Macabre, but great recipe! And great book!)

As usual, I made it "by the book" the first time and then I tweeked it to my tastes.

So here is my take on "Jenn Corbin's Squash Soup." Hope you enjoy!


Finding treasures in the world around you...

I featured this little bookcase here....

As I have said MANY times, I look for pieces that grab my attention and are "unusual." Rarely am I looking specifically for something that has great value...I want "different" with style, function and durability.

As I mentioned when I featured this piece, I could not find any information about it...which of course tells me it is indeed "unusual." But this week I was cruising around the Internet trying to find information about another walnut piece I bought and discovered this....

Wow...seriously? I paid $45 for mine in a flea market! 

I bought this little cabinet at an auction for $1 and featured here...

IMG_0295.JPG

For the longest time I couldn't find anything about it! I eventually found it on 1stdibs.com for $2200.

The Lane tables, Drexel coffee table, mid century chairs, my office chair...all pieces I picked up for a fraction of their value, but it is never the "value" or potential profit that motivates me. It is the potential they have to be beautiful additions to my home.

HOWEVER, finding they have a great "value" is validation that these are desirable pieces and are worth the time and effort to bring back to life! Real treasures....

This week I picked up this little walnut table at an auction....

That is NOT a shadow on the top...that is the finish from it sitting in the sun!

Fortunately it still has this little paper label on the underside so I hope eventually I can find out some information on it! So far, no luck.

IMG_2584.JPG

Is that not a beautiful description of walnut? You would never know it based on the current condition of the table, but once you strip away all the abuse and neglect it is indeed a warm, inviting color.

This is exactly why I love working with walnut...a little time and a little effort brings it back to all it's glory and the dignity, permanence, strength and beauty of this wood is evident again! 

My original plan was to refinish the table and sell it...but honestly, as I worked on it I knew it would be making a home right here. 

Just this week a fellow blogger was having issues with "stripping" furniture. The process I use is not easy, but there is no easy way to remove decades of use,  neglect or abuse. But if you take your time, use a proven process AND do it RIGHT, the pride you will feel in yourself and the joy you will feel bringing an old piece back to life will make it ALL worth the time and effort! Trust me!

I used the 1/2 acetone and 1/2 lacquer thinner mixture to strip the old finish. It really does just melt the old finish right off. I scrubbed it with steel wool and used a toothbrush in the fluted groves and corners. After all the old finish was off, I "washed" it down with mineral spirits. (I can not stress enough how important it is to keep a good stockpile of old towels handy if you are going to strip furniture!)

After stripping...before oil finish!

I did have to sand the top a bit but no harm since it is solid and not veneer. Someone had evidently tried to spruce up the top at some point and sanded "across the grain," leaving marks. You can kind of see it in the "before" picture. Trust me...if you can see the sanding marks before you stain or apply a finish, you are definitely going to see them after! Take time to remove them BEFORE you apply stain and finish!

Again, ALWAYS start with a fine grit, sanding WITH the grain, and only work your way down to a courser grit if needed...then work your way up and finish with a fine grit. I used a 220 grit and some serious elbow grease, sanding with the grain, to remove the cross grain marks!

After the mineral spirits dried, I wiped the entire piece with a tack cloth and then applied the first coat of tung oil finish. I did not stain this piece...I love the natural color of walnut! Between each coat, I "buffed" lightly with 0000 steel wool and then wiped it down with a clean tack cloth. I know I stress this step, but it is SO important!!! I applied 3 coats to the base and 4 to the top.

From this....

...to this!!! What a difference!

One of the great advantages to using an oil finish is the ability to easily recoat pieces when they begin to show a little wear or look worn and dull. While I had the oil out and a sponge saturated I applied another coat to my coffee table (I keep scrap foam and old socks in my stash to make oil applicators. It had a few scratches from our new puppy and the cats. I just rubbed it down with 0000 steel wool, wiped it with a tack cloth and then wiped a coat of tung oil finish on it...looks brand new! You can't do that with poly!!! 

Walnut is one of my favorite woods...it is absolutely stunning when oiled. There is no way I could part with this table.

SOOOOO....

Golden rule, if something comes in, something has to go out. 

Yep, now I have to part with a Duncan Phyfe drum table I have had for 25 years...wow...that's going to be a tough one!

But honestly, the new table is more "my style"...

An easy little cutting board project...

What an awesome weekend...it is finally fall...cool temps and rain. LOVE IT!

I'm really looking forward to next weekend. Fall craft fairs, so far no chance of rain and the leaves may be peaking...or darn near close! It is going to be great!

I didn't mind standing around in the cold drizzle Saturday. We started out at a farm auction, bought a few things and then came back to town to an "in town" estate auction. I bought some nifty pieces and I hope to find a little time this week to work on them.

I did finish up a few little projects last week.

Pinterest and the blogisphere are great places to find inspiration. 

I had picked up a few butcher boards here and there! I love the old wood and they are relatively easy to strip and refinish! (See a tutorial here and here!)

I refinished the three smaller boards but I wasn't quite sure what to do with the big square one. I found a little "inspiration" on Pinterest....


Source

I knew I had some wood bowls stuck back in my "stash" somewhere. I think I picked them up at an auction eons ago and just wasn't quite sure what to do with them! 

I cut a simple handle on the cutting board with my jig saw, drilled a hole for the hanger, sanded it down a bit and then stained it. I stripped the finish off the bowls, cut them in half with my chop saw and then glued them onto the cutting board.

After the glue dried, I applied three coats of butcher block oil. If you know you are never going to use it for food prep, you can just spray it with a little poly!

Perfect place for fruits or veggies...maybe peppers! Or a great place to throw your keys and "stuff." 

The tutorial I link to suggested using finishing nails and glue to secure the bowls. I didn't even use nails...just Gorilla glue. It is an awesome glue for repairing or affixing wood...I've never had a problem with it setting up and holding well! 

Simple little project! 

Happy fall!

Why I paid too much for an antique child's rocker!

I pride myself in being "auction savvy." I set bid limits and usually stick to them. Rarely do I see anything at an auction that I HAVE to have. I am there to buy for resale....no emotion or personal attachments allowed...just business! 

Occasionally I am lucky enough to score a really nice piece for myself...like here, here and here!

Most of these pieces are things I love and want to add to my home decor. Naturally I will pay a tad more for something I want for myself, but I always consider the amount of time and work they will take to bring them up to par and I bid accordingly! (I have never walked away upset that I didn't get something...but I always regret paying too much!)

On very RARE occasions something throws me back in time and I get caught up in "sentimental bidding!" That is the WORST thing you can do at an auction. Absolutely THE worst. 

Which is why I paid WAY too much for this....

...a silly little child's rocking chair. 

I have no little children at home and both my grandsons are way too big for this thing! 

So why would I pay WAY too much for this chair (seriously, I am too embarrassed to even tell you how much I paid for it!)

Because....

Yes, that is me and I remember that chair. Sometimes I wonder if I only remember it because of the pictures, but I really do remember that chair...and that house. It was one my dad built when I was around 2 1/2 and we lived there until he went into the hospital with TB when I was 4.

The chairs aren't identical but the style of the one I bought was very similar, so I just had to have it.

Why? I don't know. I have no need for it and honestly no place to put it...but I literally felt myself flush with nostalgia that propelled me into a "sentimental" bidding war. 

I knew I couldn't keep it and I knew I could never sell it and recoup my costs. So for the past few months it sat in my garage. I worked on it a little at a time...first the paint, then the upholstery. 

But it can't languish in my garage forever so it is now ready for another little girl to cherish...and hopefully have very fond memories of when she is all grown up with children of her own....

Last year I shared this little rocker here....

I bought it at a garage sale and it was broken and abused. I didn't understand my nostalgic draw to it...after all, it was only a little rocker.

When I saw the rocker at the auction, it hit me. I finally understood why I loved these little chairs so much!

And that, my friends, is why I paid WAY too much for a silly little rocker! 

Easy fall project!

Brian and I made our annual trip to Colorado this past week so I haven't accomplished a lot. 

We had a blast! Zip lining through the Rockies....

fly fishing on the Colorado River....

and an amazing trip to the summit of Pike's Peak on a COG train....

Wonderful week! 

Fortunately I got all my fall decor up before we left...nothing much has changed since last year. A few little tidbits here and there but honestly, I just don't need anything new. After decorating for 15 years in this home, I have all the bases covered. Truth be told, it looks like fall puked in my house...lol! I still find cute little projects on Pinterest and other blogs, but nothing I can't live without.

So I thought I would share one of my all time easiest, cheapest and favorite projects.

The thing I love most about this project is that it can easily be changed for the season. Fall, Christmas...and even spring and summer! Last year I picked out the fall stuff, stuck it in a plastic bag and labeled it and then decorated it for Christmas. 

Here I show you how to make the "base." A wood box, tree branches, and filler...then just stick your "seasonal" froo-froo in the box! 

So simple...but a great little piece you can stick in a corner or on a table! And you can use whatever you have on hand.

This is my fall box...leftover silk flowers and leaves from wreath and urn projects and pine cones I picked up in my yard!

For Christmas, I filled the box with "crystal branches," dried babies breath and ornaments....all "leftover" stuff from a wreath I made last year!

After the season is over, I just pluck out all the seasonal stuff and stick it in a bag for next year! 

This year I stuck a few yellow sun flowers in the box for the summer. Unfortunately, our new "puppy" found them to be quite tasty...I think only 1 or 2 survived the summer! So far I have only lost 1 of the the 3 orange sunflowers in the fall box! Not sure what she is going to think about all the glittery "balls" in the Christmas box. Course right now, that is the least of my worries...I am praying my 9' Christmas tree and heirloom ornaments survive. 

Guess we will find out...as much as I LOVE this season, I know Christmas is just around the corner!

Maple sidetable before and after...

Before I share my newest project and venture, I want to wish my baby boy a very HAPPY 25TH BIRTHDAY! 

I also want to brag on him a bit...last week he passed his testing for his commercial pilot's license! It's been a long, hard six years and I am so proud of him for accomplishing a goal he set for himself many years ago! 

Congratulations and happy birthday Son! I love you and am so proud of the young man have become!

Maple makeover and my newest venture.....

I have salvaged a lot of the old maple furniture in the past....a secretary, a desk and last year a dresser. 

Maple furniture is pretty "dated" and definitely not something most would find desirable...unless you are still sporting pastel ducks. But the furniture is solid and often well crafted and with just a tiny bit of imagination and effort you can turn an eyesore into a useful and beautiful piece of furniture that will be a welcome addition to any home!

This is a side table I picked up at an auction....

...one of those pieces no one would bid on so the auctioneer zeros in on me because he knows I will rescue any stray "dog." I'm to the point were I really don't want to buy "work" but I knew this little piece could be beautiful again...so I brought her home and gave her a little makeover.

The top had some serious water stains. I don't usually Kilz pieces I am going to plaster paint, but I knew the black stains on top (probably mildew stains) would bleed through even after a good scrubbing with bleach. So a sprayed the top with Kilz, avoiding the edges so the wood would show through when I distressed it. I sprayed the little knobs black (prime first)...they weren't really ugly, just a little dated (I had already taken them off in the "before" picture). After the table was painted, I sprayed it with a poly clear coat...always...that is what makes the finish tough as nails!

Cute as a bug....

There are so many ways to update these old pieces. As I shared here on Kaitlyn's living room tables and the dresser you can stain the tops and paint the bases...plaster paint or spray paint...either one. You can paint the inside of the drawers or just leave them natural wood...you can paint the hardware or invest in new! So many things you can do! Just be willing to take one of these abused gems home and give it a little love and attention...you won't regret it. And trust me...these pieces will hold up SO much better than the cheap "particle board" stuff you find on the market these days!

Even "nice" furniture can benefit from a little update. This year I painted all my bedroom furniture (and here). I had grown very "bored" with the dark stained finish and honestly thought I was going to have to spend a fortune to replace it. Truthfully, I love it now and haven't thought once of replacing it since I painted it!

Etsy Shop

Another baby step for me into the 21st century. I finally "opened" an Esty shop. 

This past week I have been buying Universal Ballerina Mist dishes on Ebay to add to my collection...

As I mentioned here this is a collection that started with a few of my grandmother's serving pieces. Over the years I have been adding to it here and there. I don't NEED more, but I couldn't help myself. I just love these dishes so I started buying plates, salad plates and bowls...I even picked up a few more serving pieces! Don't ask me what I intend to do with them...right now they are piled on top of one of my kitchen cabinets.

Anywho, I got to thinking...why couldn't I sell some of my treasured auction finds online?

Last week I marked all the "glassware" in my booths down 50%  just to move some stuff out.

When I price the glassware and vintage pieces, I usually check out Ebay and Etsy to find out what to price it. I almost always price it WAY below what you can buy it for online. Combine that with no shipping charges, and they are a pretty sweet deal. But I am limited to the people who happen to pass through my booths, so I THINK I can broaden my market by selling a few things online. 

We'll see...in the meantime, if you see anything on here you love, there is a chance it will eventually be in my online shop at Etsy. Right now, you can search "beckwithstreasures" and pull up the few items I have posted on there. I only posted a few things I already have pictures of but eventually I will post more as I have time.

Time...not something I have a lot of this week because Friday WE LEAVE FOR COLORADO!!!! YEAH!!! 

Burglars, don't get too excited...there will be people in my house all week. I almost dread coming home, but everyone knows that mama will freak if she comes home to a mess...so I can only hope and pray (and make long detailed lists) that things will be kept in order...or at least put that way the day before I come back!

So while I am cruising the mountains of Colorado taking in all the glory of the Aspens in fall, get out and find some neglected and dated maple furniture and give it a little makeover! You might just be surprised at how beautiful an ugly ole' piece can be with just a little effort!

"New" chairs and IT'S FALL!!!!

IT'S FALL and I am starting to get my fall groove on!

Brian and I will be taking our annual trek to Colorado later this week and I decided to get my fall decorating done before I leave. Usually I do it when I get home but this year we are going a week later so I wanted to get it done so I can come home and relax...well as much as possible with the fall craft fairs coming up! 

When I get home I will share the "fall decor." Truth is, it hasn't changed much from last year...no big plans to make anything new and "crafty." Who knows, maybe I will find some awesome inspiration in Colorado!

I shared the Penn Scales hereThey will probably be sold at some point! I just think they look very "fallish" with the pumpkins!

I picked up a few cutting boards at an auction and refinished them. As I shared in this post, cutting boards are relatively easy to strip and refinish. I strip the old finish off, sand a tad and then apply 2-3 coats of butcher block oil. I don't sand off all the cut marks because I like the "used" look!

Last week I shared the final stages of the makeover of the antique dining room table. One of the biggest mental blocks I had with this table was my desire to use the mid century chairs. I absolutely love them...and as much as I would love to incorporate them into my decor, I am coming to terms with the fact that it is either the chairs or the table...they just won't work together!

If you check out my Home Tour there is no doubt my style is what you would describe as "eclectic." I absolutely LOVE the mid century pieces, but when it comes right down to it, I love what I love...regardless of the "style." I find myself drawn to a space filled with unique pieces that flow together, rather than a room filled with all shabby chic, or  all mid century, or all traditional. 

The table is definitely "unique." I have NEVER seen anything like it. And truthful, I think it is one of the most beautiful dining room tables I have ever seen. I want it which means I need to use chairs that work with it, rather than against it. And unfortunately, the mid-century chairs work against it. 

Poo. 

Being bored with the Duncan Phyfe table, I decided it was time to change them up a bit so they work in this space. They had already been painted and I loved this fabric....

....but I knew I needed to "jazz" them up a bit!

I love this fabric...it has a very rich color and heavy texture that really doesn't translate in photos! It has the red, gold, orange, blue and green you find throughout my home!

Painting the chairs was a huge, but necessary, step for me. As you may know, painting beautiful wood goes against every fiber in my body...but these chairs needed to be painted for a number of reasons...the primary being the fact that one was busted and had to be repaired! There was just no way to fix it without painting it.

And honestly, the little face lift made me fall in love with them again. 

Traditional chairs...who woulda thunk it!

When did the glaze craze end....

I have always only used a handful of "furniture finishes." 

Naturally, there is the stain and oil finish. Again, rarely do I use poly on furniture unless it is to seal paint...never on a natural or stained piece. For those I use an oil finish...always.

Paint...I use spray paint, plaster/chalk paint and occasionally acrylic paint.

That's about it.

Glaze...when did we stop using glaze to accent pieces? I think it was when waxing furniture took over. Now you can "accent" a painted piece by waxing it with different colored waxes.

But what most people don't know is that wax is not actually a "finish." It bonds with the paint, but it really doesn't protect the wood from the elements or wear and tear. And if you ever want to paint over a waxed piece, you will have to strip the old wax. 

Last month I featured this awesome dining room table I picked up at an auction. I shared how I stripped all the old finish and how I stained and oiled the top. 

And then it sat...with the base unfinished and my head buzzing with ideas on what to do with it...okay so it was actually buzzing from frustration and confusion. 

I just did not know what I wanted to do with it.

Part of the problem is the fact that at some point I want to use my mid century chairs. I love the Duncan Phyfe chairs...especially after I painted and reupholstered them! But I have these awesome mid century chairs I want desperately to use after I get them oiled and when I can find the RIGHT fabric!

Here is a before and after...before I stripped and oiled and after...these chairs are hidden gems!

So here is my problem. I will not paint the mid century chairs...I believe that is a crime in most states! I still haven't decided whether I am going to use them, but just incase....

So I wanted to paint the base of the table...but that kind of seemed like a violation of some antique wood law or something. There is so much beautiful detailing on the base that really needs to be highlighted! 

I thought about doing the "plaster paint/distressing" treatment. But honestly, I think that may be something that will fall by the wayside at some point in the future and I like treatments that are a little more "timeless." I LIKE plaster painted and distressed pieces, I just don't want to use it on pieces I plan on keeping for years.

My original plan was to paint the base a light color and then somehow highlight, or accent, the engraving detail and the wood grain! My thought process....if I am going to leave the chairs stained, I should paint the base.

Then I remembered the can of glaze I have in the garage! Bingo! 

I originally did a "white wash" with watered down off-white paint and then applied a black glaze. Unfortunately, it just looked kinda muddy gray. So I decided to go with a black glaze over the entire base...wiping it down so the grain showed through. After that dried, I sanded it lightly with a 220 grit paper...that allowed the grain and detailing to show through a bit more. Then I applied 3 coats of tung oil finish.

IMG_2420.JPG

Beautiful! I love it! I originally planned to go with a light colored finish, but I really love the "translucent" black. I probably could have just gone with a white glaze...but it's done and I really like it. 

I have decided I am going to add glaze back into my arsenal of products. I want to try it with different colors of paint and on different woods. I just love how it allows the grain to show through and has more of a colored stain appearance than a paint appearance. I think that is the whole point.

Glaze...it may be a "craze" that is over, but it certainly has a place in any arsenal of furniture finishes!


Painting and repairing a maple secretary! And a little auction action!

As I mentioned here, old maple furniture can be pretty "dated" (nice way of saying ugly!) But it is usually solid, well-constructed furniture and great for DIY projects.

Last week I bought a maple Baumritter (Ethan Allen) secretary at an auction.

This piece is really solid (and major heavy!) Some of the screw holes in the drop down top hinges were stripped out, so the top was a little wonky. It looked like someone had actually tried to glue the hinges to the top.

Easy fix...and this fix is perfect for any screw hole that is stripped, especially door hinge screws that are loose. Honestly, I do this just about every time I remove screws during a "makeover"....just to make sure the replacement screw is tight.

The first thing I do is remove the old screw and fill the hole with a good wood glue...

I have a stockpile of various sized wood dowel rods so I usually have one that will fit any hole. (You might want to "dry fit" your dowel rod before adding the glue.) You can also use 2-3 wood match sticks bundled together...dab a little glue on each match stick and stick one at a time in the hole until no more will fit. Then tap the dowel rod or match sticks with a hammer...

Snap the dowel rod or match sticks off flush and wipe the excess glue off with a damp rag. If the wood sticks up a bit, just tap it again with the hammer until it is flush or wait until the glue dries and scrape it with a chisel. Once the glue has dried well, you can put a new screw in.

I read a tutorial that suggests using a golf tee. Personally, I would not...only because they are not easy to break off. 

WARNING! Stain WILL NOT penetrate the wood if it has glue on it. If you are going to stain the piece make sure you do not get glue anywhere you intend to stain. If you do, immediately wipe it down well with mineral spirits!

I decided to paint the inside of the desk my new favorite Valspar color, La Fonda Mirage (a pretty pale teal color). First, I primed with Kilz, sanded and tacked. After I painted the inside, I chalk painted the exterior, distressed it a bit and then sprayed the entire piece with a clear coat.

I was originally going to replace the hardware, but I like the style, just not the color. So I stuck them all in styrofoam, sprayed them with metal primer and then sprayed them with the La Fonda Mirage. After they dried well, I hit them with a clear coat before reattaching them!

I love everything about this little desk now that it has been spruced up a bit. Few would have given it a second look as it was. Try to look past the dated finish on these old maple pieces...they can be awesome additions to any decor with a little primping! 

Awesome auction action!

The weather was perfect Saturday for a day at the auction....fall is in the air!  Usually we try to find an estate auction out in the "sticks." Always neat vintage treasures at those old places. This week we could only find one in town, but it did NOT disappoint!

Auctions are a great way to spend a Saturday if you are looking for a day of good food, good people and good deals!

I have discussed at length the "rules" of auctioning.  Auctions can be a great place to find affordable housewares, tools and furniture, as long as you know what things are worth (both new and used).Never get too emotionally attached to something you think you just have to have. Forget being "competitive." I have seen people pay more than what something cost new...just because they get caught up in a bidding war on something they think they just have to have! Not good. 

This week I brought home a few things that turned out to be exactly what I thought they were...awesome deals that will do well in my booths! And a thing or two I plan on keeping.

I rarely have time to do online research while I am at the auction but when I get home I search Ebay, Etsy and Google to determine how I should price an item.

One thing I definitely will be keeping is this Osterizer Galaxie vintage blender....

Love....it has a glass pitcher and it works! I could probably sell it for around $40, but I need a blender and this one is seriously awesome! 

These antique Penn Scales will be going to the booth even though they will be tough to let go! 

When I was researching them, I noticed most do not have the weights and/or the "scoop." This one had both...amazing!

I wasn't real sure about this vintage Webster manual typewriter.This one had the case and all the papers...I honestly don't think it had ever been used! This particular model is evidently "rare" and collectable. Vintage and antique typewriters usually sell quickly! 

Which was my plan...to sell it...until my teenage daughter saw it and snatched it up. Novelty...I have a feeling I will get it back at some point...she has figured out that typing on a manual typewriter is NOTHING like typing on a computer keyboard. How did any of us keep a fingernail back in the day!?

A wood caddy...again, love. Not sure exactly what I am going to do with it, but whatever...I think I paid $5 for it!

Yard birdies...they have a long stick on them and you can stick them in the ground or in planters. I am a sucker for yard ornaments. I'll probably end up being one of those old ladies with 47 cats and a yard full of pretties....

I also picked up this iron fireplace screen....

It won't go in the den because that fireplace is elevated. It is a little ornate for my room. It would have been perfect for the fake fireplace I had in my booth, but I sold it. I may have to build another for holiday displays...and I will have a perfect place for this iron screen!

Sooooo much more...an old, dated spice rack and bottles. The wood rack will be painted and "repurposed" and the little bottles should sell well even with out the rack. A framed mirror...perfect for a little spruce up with paint!

Glassware, stemware, a little stool, some awesome iron work...lots of goodies! 

Overall a good day well spent. 

Beefing up your door trim and a little "bartering" for a desk....

My precious neighbors, Tammy and BR (his real name is Brian but we call him BR), have been projecting at their house. Their entire living area has "honey oak" wainscoting and BR has been priming, caulking and painting it for weeks. I have to admit it looks soooo much better! 

One of the things Tammy wanted to do was beef up the trim around her front door and back sliding door. I did mine when I built the house and since it is an easy DIY project, I took a few minutes to show BR how to make a huge statement with just a little effort! 

As you can see, I used fluted molding and plinth blocks on mine, but you can get the same affect using just plain 1 x 4s as the casing without the blocks. 

Like many houses built in the 80s, Tammy and BR's trim is 2 1/4" colonial trim...stained! Since he is painting all the trim, this is the perfect time to jazz up the doors. We did the front door this week and he is going to try his hand at the back sliding doors...knowing I am a phone call away! 

Before I got there, BR pulled all the old 2 1/4" molding and nails.

Anytime you pull trim, make sure you "score" around all the trim, door jamb and wall with a shape razor so you don't pull off the paint that might be stuck to the trim! I show you how to do that in detail here. This is important because if any of the wall paint or jamb paint has stuck to the trim, you will pull it off with the trim...not good!

The molding consists basically of four pieces...

Material List! This is all "stock" stuff at Lowe's (and most home improvement stores) and most come in 8' sticks. It will cost about $30 a door...not including caulk, primer and paint!

3-1x4x8 casing material...if you decide to go with fluted, you will need 2 sticks of fluted and one flat 1 x 4. We used pre-primed 1x4 MDF. Cuts and paints nicely. I would NOT use this in areas where the trim is likely to get wet or exposed to moisture! For that I would suggest using 1x4 pine or poplar....and prime both sides and the edges to keep the wood from absorbing the moisture!

1-8' strip of door stop. In case you are wondering what "door stop" is, open an interior door and look on the inside of the jamb. See that little strip that is about 1/4" thick and 1-1 1/4" wide and "stops" your door when you close it? That is door stop.

It comes in several "profiles." Some are flat, some have a rounded edge, some have a fancy profile...pick the one you like best. You don't HAVE to add this piece...you can just set the 1x4 header on top of the casing...I just think it makes it look a little "fancier" and it is a super easy piece to add! 

1 piece of crown. You will only need about 5' but they come precut 8'. We used the 3 1/2" crown. You can go bigger, but don't go so big it makes your door look top heavy.

As you can see, I have a piece of 1x4 on top of my crown that creates a little "shelf." BR and I decided theirs looked better without it...but Tammy may decide she wants it...no biggy, it is easy to add and honestly, it is the last piece you add so see what you think when you get to that point! 

The first thing you will want to do is remove all the existing trim and nails. If you have narrow trim and you are making your door casing wider (1x4s are 3 1/2" wide), this would be the time to remove the baseboard adjacent to the door trim...you can cut it down and reinstall it against your new door casing!

Tammy and BR have wainscoting. Rather than cut the wainscoting, we just notched out the casing...no biggy...just a big "puzzle."

I would suggest checking the "gaps" between the door jamb and the framing stud and make sure you have ample insulation all around the door. This is a perfect time to stuff some more in there if you need to, or use spray foam insulation.

If you are going to use spray foam insulation (my fav!), spray it in the gap and then wait an hour or two and let it expand...you don't want it oozing out of the joints of your new trim. After it has expanded and has dried, just trim any that may have oozed out with your razor knife or scrape it with a chisel! It expands A LOT, so don't over do it! And don't mess with spray insulation foam while it is wet...it is sticky and will not come off without mineral spirits. Just let it dry and it basically becomes a hard foam that can be cut with a knife or scraped off.

You will work from "bottom to top" so the first pieces you will set are the two side casings. You want to leave a 1/4" reveal of the door jamb all the way around, so measure from the finish floor (tile, wood, whatever) to the inside of the top of the door opening, and add 1/4".


That will be your measurement for the side door casings. On most standard doors that should be around 80 1/4". Measure both sides...sometimes there is a smidge difference!

After you have MEASURED TWICE AND CUT ONCE, you will attach these two pieces to the door jamb with your trim nailer (see Tool Box here)! If you do not have a trim nailer (shame, shame) you can use trim nails and a hammer...the old fashion way...lol!

Before you drive in too many nails, now would be a good time to lay a level across the top of the two casings and make sure it is level. You will be laying your header on these two pieces and you want to make sure they are the same height. If you measured correctly, and left a 1/4" reveal, you should be good to go! 

The casing on the hinge side of the door should fit loosely against the hinges, and the casing on the knob side should fit against the door knob strike plate. Watch your "reveal" carefully when attaching these two pieces...remember, you want to leave about 1/4" reveal all the way around! If you have removed existing trim, you may even be able to follow the old paint or stain line left when you pulled the old trim! 

Once those two pieces are secure, measure from the outside of one side of the new casing to the outside of the other side of the new casing....

That will be the width of your "header" piece....the 1x4 that goes on top. Cut the 1 x 4 that length. Then cut the door stop 1" longer. (if you aren't using the door stop, skip this step)

Attach the door stop to the header BEFORE you attach it to the wall.

The best way to attach the door stop to the header is mark the center on both pieces. Dab a little glue on one edge of the header, lay the door stop on the glued edge, lining up the center marks, with the back edge of the doorstop flush with the back of the header, then tack the door stop to the header with a few nails. If you have a door stop that has a decorative edge, you want the decorative edge facing down...away from the header. Your doorstop should hang over the ends of the header by 1/2" on each side since you cut it 1" longer!

Now, attach the header, door stop on the bottom, directly above the door by setting it on the casings. If you measured correctly your header should be the same width as your door casing...you will line those up! 

Crown molding is a tad tricker only because you will have to make two miter cuts so that the crown actually "wraps around" the header. (If you don't know how to cut crown with a miter saw...Google it!) Your two crown ends will be 3/4" since that is the thickness of a 1 x 4...but measure just in case! The crown front will be the same measurement as your header.

To attach the crown, first measure  and mark 1/2" from the top of the header, on both sides...then draw a line. This allows you to attach the crown without having to fumble with a level. Run a little line of glue on the backside of the crown and then tack it with your nailer or trim nails.

I do not recommend using trim nails on the little pieces of crown or any small trim piece, unless you have a very small brad nailer. If you do not, I would suggest using a VERY tacky glue and just glue the end pieces in place. Remember, glue is really what holds everything together! If the glue is not tacky enough to hold the piece in place, try this little trick...dab a few small blobs of hot glue on the pieces...the hot glue will hold it in place until the wood glue sets up well! 

Now is the time to determine IF you want a little shelf thingy above the crown. I did, but Tammy and BR did not.

To add the little "shelf" on top, lay the 1 x4 on top of the crown and measure the distance from the front of the crown to the edge of the 1 x 4. You will want it to hang over the edges of the crown the same distance on each side. If it hangs over more than 1/2" to 3/4", you might want to rip the 1x4 down a bit. Cut your board and then smear a little glue on top of the crown, lay the shelf on top of the crown, and then just tack it in a few spots with a brad nailer. Again, if all you have is a big honkin' trim nailer or are "hand" nailing trim nails, you might want to just go with the glue...a good wood glue WILL hold when it sets up! 

See...super simple!!!!

Now just caulk all the joints, putty nail holes, prime any unprimed wood, give it a quick little sand and paint!

While I was there, I did a little bartering. Tammy had this ugly little maple desk in her garage and wanted to know if I wanted it. HECK YEAH! I told her I would help with the trim in exchange for the desk!

Truth is, I would have done the trim anyway but the desk was a great little find.

The old maple furniture is dated and a bit on the ugly side, but it is sturdy furniture and perfect for DIY projects. While I was working on this piece I also worked on a side table and a secretary...can't wait to share those!

A little plaster paint, a little distressing, a little "pop" of color on the inside and back panel, and this little guy is all decked out for another lifetime of use!!

Good trade if you ask me!