Hung up on guns....

If you are anti-gun, don't read this post! 

Actually, you might like this post...because I managed to "refurbish" a vintage gun in a way that makes it safe and fun! 

I know a lot of parents these days "don't like guns!"  But your husband or father may have an old shotgun, rifle or pellet gun they hold dear and wish they had a way to display without offending mom's good gun senses!   In the south, we cherish our old guns, even if we don't want our kiddos playing with them!

I bought this 1952-1954 (per their website) vintage Crosman 22 at an auction!  It was a mess...again, my photography skills are lacking.  But trust me, it was a mess.  And it was not functioning!

The metal parts on top where actually taped to the stock of the gun!  And it wouldn't hold any air pressure!  I guess someone could refurbish the gun and make it functional, but I decided to do what I do best and make it functional for my purposes!


Many vintage guns have the most beautiful wood stocks...usually walnut, and very easy to refinish.

IMPORTANT WARNING! This is where I am going to tell you the number one rule of gun safety and handling!  ALL GUNS ARE LOADED!!!  Even if someone tells you they are not, ASSUME THEY ARE!  Check and recheck...and until the gun has been checked and rechecked and disassembled with the barrel facing AWAY from any human or animal or window, just assume it is loaded!  Once you are satisfied there are no pellets, bullets or shells lurking in the depths of the gun somewhere should you handle it freely! 

After disassembling this air gun, I stripped the finish off the stock with laquer thinner...unfortunately it took the black off the barrel as well!  The metal barrel was in pretty bad shape and I was planning on doing something that would render it completely "useless" as a gun, so no biggy.  AND once I removed all the bluing (that's the black finish on the gun barrel) I found the model number and the manufacturer's name stamped on pretty brass!

After removing all the old finish, I sanded the stock with 220 grit sand paper. I also sanded the metal parts to remove all the rust spots. 

Three coats of tung oil on the wood stock (no stain, that is the natural finish!) and flat black spray paint on the barrel...then I glued the barrel to the gun, glued all the moving parts so the gun is not functioning, added a few little hooks, and....

WHALLA!!  

A nifty little hat/coat rack fit for a little cowboy...or cowgirl!  Or maybe a hunting cabin!  

This is not something you want to do to an heirloom gun...not without permission from the owner!  And it is NOT a toy!  I plan on putting wall hangers on the back so it can be secured to the wall.

But it is a relatively easy little project and a great way to "disarm" and display old guns lurking in the attic or back of the closet! 

Easy recipe book....

I love recipes.  I've collected a lot of recipe books over the years, including one my mother received as a wedding gift in 1961....a church recipe book.  It is awesome!  Best peanut butter cookie recipe EVER!

My uncle inherited my Grandmother's recipes and I brought them home and scanned EVERYTHING....every handwritten recipe, every newspaper and magazine clipping, every box recipe.  Anything she had in her recipe boxes, I scanned.  Someday I plan on making a recipe book with all the scans...someday.  They have been on my computer for over two years...but someday. 

So when I started cruising Pinterest I wanted to keep ALL the recipes that sounded even remotely good.  But I discovered that sometimes when you pinned a link, it was no longer there when you went back later.  So I had to find a way to organize all the recipes. 

I started printing them off, tacking them to the refrigerator and then if we liked them, I would put them in a "recipe book." 

I found the easiest way to do this was to "cut and paste" the recipe into an email, email it to myself and then print it off.  If it passed the family taste test, I would slip it into my recipe book. 

The book is a simple scrapbook with the little clear sleeves with paper inserts...50% off at Hobby Lobby.  I can add additional pages to it when I need to and the sleeves make it easy to slip the recipes in and keep them from getting cruddy when I splatter stuff on them.  

If I am feeling creative I will put holiday scrapbook paper in place of the white paper inserts.  

Pinterest and the internet are loaded with awesome recipes...and I really believe the secret to being a good cook is the willingness to try new recipes, even if you need to change them up a bit! 

Keeping up with all those recipes can be daunting and most of us rarely have the time to write them down on nice little cards and file them in nice little boxes like our mothers and grandmothers did.

Print, trim and slip....easy.  


Walnut chair reveal.....

Well, it is done....and while I know where the little "goofs" are, I have to keep in mind one of my father's pearls of wisdom...​

"You'll never notice it on a passing train!"

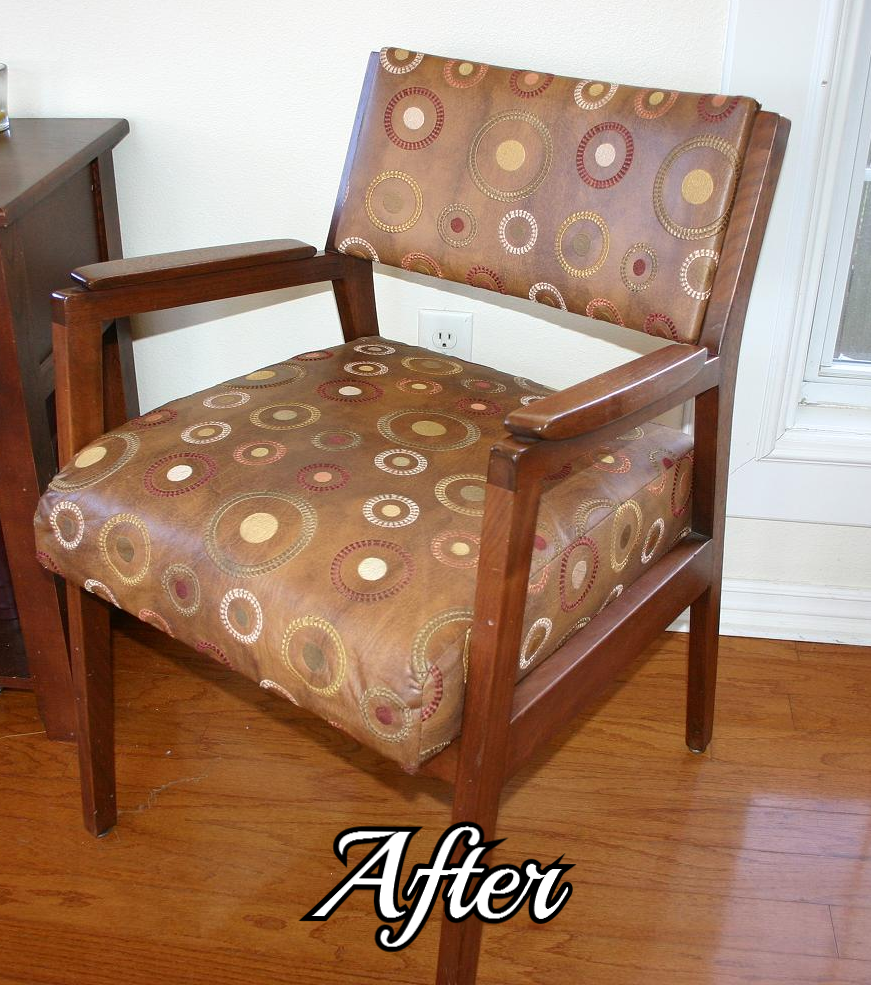
As I have mentioned before (here), Mom told me she and Dad found this chair in a field when I was a baby.  When they found it, it was bleached white from being in the sun...and she is pretty sure it originally had a cane seat and back.  Dad knew it was walnut so he took it home, repaired it and refinished it.  I would bet the upholstery in the "before" picture was probably the second time he refinished it.  This looks more like something he would have done in the 70s or 80s.

I pulled the 5,486 nail heads (so I exaggerate a tad) and removed the old upholstery, nails and padding.  Dad wouldn't have touched polyurethane so stripping the original varnish finish with my favorite Formby's varnish stripper was not a real challenge.  I repaired a few loose joints with glue and clamps!

Even with a new coat of dark walnut stain, it was very "uneven" in places so I had to do some patch-work staining.  Then I put 4 coats of tung oil on it.  And then it sat...and sat...and sat....

I just didn't know what fabric to get.  I knew I wanted something a little more formal and neutral. I let Brian pick from 7-8 fabric samples...wouldn't you know he picked my least favorite, but in all honesty, it turned out beautiful!  I opted for the double welting vs. the nail heads.  I contemplated having it recaned....but decided against it...maybe next time! ​ And I have just enough leftover material for a little pillow!

Every chair in this house has been bought or repurposed to uphold to "abuse" from kids and animals.  But this chair is special and it will be tucked away in the corner of my room where the worst thing that can happen to it is one of the cats will find it!

Maybe someday, when I am long gone, one of my children will cherish it as much as I do....thanks Dad!​

Framing memories....

I think four days of remodeling my closet and painting trim has taken a toll...I am woooorn out.  So today I will do a little coupon shopping! I HATE clothes shopping but give me a good coupon for shampoo or detergent and I am all over it!

So today I thought I would quickly feature some tidbits from past projects...framing memories!

We all frame pictures and diplomas, but frames come in all shapes and sizes and they are a great way to display a collection of things that have great sentiment...and a great way to decorate!

Wicker chair fit for a little ballerina...

It is so hard to take a picture of a piece of furniture that was white but is now a PALE mist green...but I tried! 

IMG_8798.JPG
IMG_8808.JPG

It may not appear in the picture to be a huge difference, but it really is!  And it is perfect for a little girl's room!  Now if I only had a "little" girl....

What is truly amazing about the color I painted the little chair (Valspar,  Mellow Spring) is it matches the color of my 60+ year old Universal Ballerina Mist stoneware to a T! 

My paternal grandmother wasn't a "china" kind of lady...so this was really all she had.  My mom bought the gravy bowl and plate, the serving platter and the tea pitcher at the estate auction after Grandma passed....while she was carrying it back to her car she dropped the pitcher!!  So when mom gave me what she had, the pitcher was beyond repair.  So I did what I always do...I Googled the pattern!   

Turns out it isn't a real expensive stoneware pattern...but the color and style is really beautiful and very "mid-century" since it was probably made and acquired in the 50s.  It is a "mist green" with a platinum band...just awesome.  So when I found more pieces out there, I bought another tea pitcher, the milk pitcher, salt and pepper shakers, a serving bowl and the sugar and creamer set.   

IMG_8814.JPG

Being the "family historian" and "archive fanatic" that I am, I carefully wrapped the broken pitcher, put it in a box, and wrote the story of why there was a broken tea pitcher in it and how I acquired a replacement.... with a Sharpie...on the box!  Hopefully my family won't think their mom was crazy for keeping a broken tea pitcher in the attic (trust me, they have enough reasons!)   

This week while I was sniffing around a new antique shop in town, I found another set of salt and pepper shakers! 

IMG_8815.JPG

Now that I have two sets, I don't mind using one...at least I know I have a replacement if they get broken!   

Pull up a chair...and another...and another...

I have a thing about chairs...and tables...unfortunately, I am running out of room.  But I can't help myself...I see an old battered and abused chair and I KNOW it can be beautiful again. ​

A few of these you have seen...but I thought I would share a few more.  As I have mentioned before, I was DIYing before it became vogue so I have many pieces I don't even have "before" pictures of...I just brought them home and did my thing....​

PA010076.JPG

I think I bought this little guy at a garage sale for $5.  Can't even remember what kind of fabric it had on it, but I bought it when I was remodeling my youngest son's room after he went off to college (it was the last room to get laminate...hence the green carpet)  The oak frame was in pretty bad shape, but a little cleaning, stripping and tung oil spruced it right up and the alligator vinyl is just awesome!​

Another apartment find...I remember it had orange vinyl and was in pretty bad shape...walnut maybe?  Again, strip and oil!  The seat was VERY uncomfortable so I added 4" foam and batting.  I expected the fabric to be "funky and whimsical" but it actually turned out kind of nifty looking and is perfect in my den!  What was really interesting about this chair was the little plaque I found on the underside....

IMG_8644.JPG
IMG_8642.JPG

Every piece has a story...I just wonder how this little guy made it all the way to Arkansas from a bank in Galveston, Texas!

IMG_8645.JPG

I told you at one time my taste was more "traditional."  I loved antiques....I bought a mahogany dining set at an antique store 18 years ago...I think it is all I have left of "that phase."  I have six of these chairs and the table...absolutely beautiful wood. I know a lot of people are painting these now, but I just can't! Over the years I have stripped and oiled them and just recently changed the seat cushions...again.  Nice thing about these chairs...the seat fabric are easy to change when your style changes!  I keep eying the "mid century modern" sets floating around but I'm just not ready to turn loose of this set!​ Yet!

IMG_1184.JPG

I found this nasty little oak creature when we were cleaning out a house...a little cleanup, Kilz and green and white paint and it is now a sweet little desk chair at Kaitlyn's!  Sometimes you have to be willing to look past the grunge!​

IMG_8502.JPG
IMG_8175.JPG

I have no idea where this chair came from.  I do know it has been in my attic since I moved here 13 years ago, and I remember moving it around for many years prior to that!   When I remodeled my office, I searched high and low for the perfect chair! 

IMG_8648.JPG

One day I found this lurking in the back corner of my attic and I pulled it down with the intention of cleaning it up and painting it.  But after stripping away all the ​nastiness I found a beautiful mahogany chair...so I put 4 coats of tung oil on it and recovered the seat....sometimes the very treasures we are looking for are hiding behind our Christmas decorations...lol!​

IMG_8363.JPG
IMG_8743.JPG

There was a reason this chair was 1/2 off at a thrift store...but I saw potential!  And I think it had a little!  ( I will not mention the horrendous mistake I made during the construction of the cushion because no one but me probably notices that a very important element of the fabric design is JUST ALL WRONG and is the perfect example of mistakes one can make even when they are being VERY careful and SOMEDAY when I have an extra 4 hours to spare I will redo the cushion...until then, I just keep hoping nobody notices!​  Grrrrrrr! )

I have posted these along the way...but they are just reminders of my obsession with chairs.  And it doesn't stop inside.  In my yard I have built two swing pergolas, one large patio pergola and have started collecting the old metal lawn chairs from the 50s and 60s...I may be constantly moving, but when it is time to plant it, I want something awesome to plant it on!!!!

wingback_before.jpg
office corner.jpg
houndstooth before.png
houndstooth after.jpg
BEFORE.JPG

And last but certainly not least, my dad's walnut chair.  It is currently sitting in the corner of my room and 

IMG_8574.JPG

every day I look at it and wonder what upholstery will do it justice.​  I've looked for fabric several times and I just haven't found "it."  I will...one day a fabric will just "jump out at me."  And it will be perfect.  Until then.....

Doing a project "right" is about being patient...taking your time..sometimes waiting for the inspiration! 

Off with its head...or upholstery...either one!

wingback_before.jpg

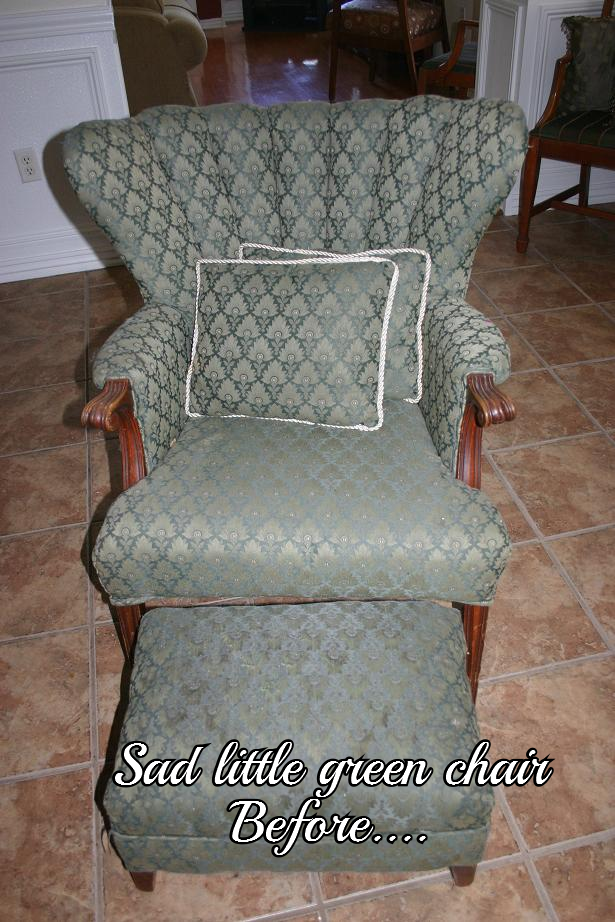
I promised to tell you the story of this sad little chair.​

I bought it YEARS ago at an estate auction.  I paid to have it reupholstered...​lots if I remember correctly.  And 15-20 years ago, the green fabric and the style was to my liking. 

But over the last few years, I have matured a tad and my taste has become more refined.  Okay, so I changed my mind about what I like and don't like.  Regardless, I didn't like it any more and I didn't want it.​

So, on Craigslist it went.  But for some reason, this pathetic little chair didn't seem to appeal to anyone...not even a little nibble. So one day in one of my manic "I CAN'T TAKE THIS CRAP AROUND HERE ANY MORE" moods, I picked it up to haul it to the curb.  See, in my neighborhood, if you set something on the curb of ANY value, it will be gone within an hour...I have done that with cabinets, vanity tops, light fixtures, furniture.  Gone.  Awesome.  Until you realize you could have taken it to Goodwill and gotten a tax write-off...but whatever.​

But then I got to thinking...if I can sew on a button and make a decorative pillow, why can't I upholster a chair?​

HAHAHAHAHAHAHAHAHAHAHA!  Seriously, what sane person thinks like that.​

Obviously ME!  Because that is exactly what I did.  I stripped the little thing naked, taking hundreds of pictures along the way, bought the amount of upholstery the little chart told me to buy for this style chair, Googled "how to upholstery a chair", found a great tutorial...and settled in to complete a project I was certain would take me a day at the most.  Lets just say, it took me MORE than a day just to get all the stinking nails and staples out of the thing.  I can't even remember how long it actually took to finish the job entirely. (My youngest daughter agreed to help initially but quit when her hands began to bleed...not me, I'm a trooper!)

office corner.jpg

This is now my little reading corner in my office...okay, so its really the cats' chair, but it looks good.  And a few side notes on the other items...the table is one of my Lane Acclaim tables I truly LOVE and adore...and buy whenever I can find one affordable. Hard to see, but on the bottom shelf are old wooden tape measures and a wooden level that were my great grandfathers and an old hand tooled leather briefcase that was my grandfathers. The wall is adorned with "things I love" as well....two original works of art by very talented artists (okay, my kids, but they are beautiful), my college diploma (nice to know it has some use) a cross stitch picture I did for my dad 20 years ago for Father's Day, and a picture of my BFF (my better half, Brian) and me on one of our first ski trips together! Things I love!​ The neeto mirror was a clearance at Hobby Lobby and the sweet little crystal lamp is a TJMaxx find!  And the red lantern was $1 at the thrift store and is filled with sea shells I picked up in California! 

Oh, and the pillow?  It was a lady's houndstooth jacket I bought at the thrift store for $2 and cut up for a pillow....sweet!​

And now you know the story of the sad little green chair that was headed for the curb when a demented women thought she could actually turn it into something beautiful....see, this stuff isn't hard...it just takes a bit of imagination and a tad of insanity! ​