Club Chair Makeover...

For those of you who are old enough to remember 45 records, you know what it is like to buy a record for the "A" side, only to find you love the song on the "B" side.

That is basically what I did when I found the perfect upholstery for my big club chair and ottoman....

No I did not find inspiration in a song. I brought home 4-5 fabric samples I thought I might like. IIICKKKK! They were all awful so I tossed them on the chair, only to find exactly what I wanted on the flip side of one of my selections!

Magnolia Fabric Lemuel Mushroom

I knew I needed a lighter fabric...anything dark would just be too "heavy" for the space since the addition of the brown leather couch (reasons for the hulking brown leather couch here.) "Light" is kind of a problem in a house with a dog that sheds like a dead pine tree and thinks ALL the furniture in the house is for her comfort. You think kids are a mess...HA! 

So I really couldn't go with anything "off white" but I desperately needed a fabric that was "light" and would go with any color.

This chair is really "not my style." It is oak...strike one. It is "queen anneish"...strike two. But what keeps it in the game is the comfort...this chair is soooo comfortable. I bought it 26 years ago and this is it's second makeover, the last being 16 years ago. I have read many books in this chair, watched many movies in this chair, and even spent a few restless nights in this chair!

Originally it was in the den....

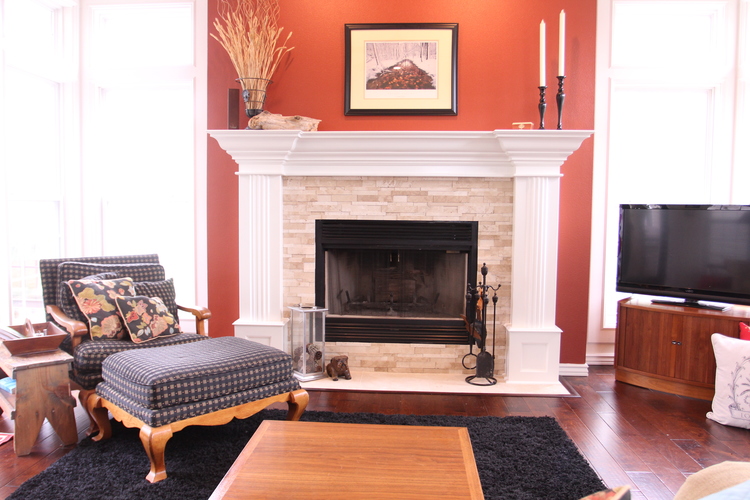
...but when the "combining of the households" went down, it was moved into the living room to make room for Brian's leather chair and ottoman!

I still love the black and gold fabric but again, big brown couch! Major "dark and dank!"

Since I knew it would be a major chore to makeover, I wanted to make sure I picked a fabric that I really love, could handle a lot of wear and use and one that would stand the test of time! 

I think this fabric fits the bill...super durable, not too light and not a "fad." It coordinates with any accent color I throw at it...teal, red, black, white, whatever!

And more importantly, I really do love it! 

First I removed all the old fabric and set it aside to use as patterns for the new fabric.

To mask the "oakiness" I stripped the old finish using this process and then stained it with gel stain. I used a gel stain to ensure I would get a deep, rich color. I actually layered several different colors to finally get the look I wanted...one of the reasons I advocate using a stain without a sealer! A few coats of tung oil finish and it was ready to reupholstery.

Again, I could give you a long-winded tutorial...but every chair is different and I really think you can find a perfect tutorial just by searching for a chair/couch/bench very similar to what you have! 

In my opinion, the hardest part of upholstery is stripping the old fabric and pulling the million plus nails and staples. But it is important to remove ALL the old nails and staples! Also, don't forget...NOW is the time to make repairs...wobbly leg...glue and clamp...broken frame...glue and clamp. If it needs new springs or batting or cushions...do it NOW!

I added a little fresh batting and tightened the strapping in the ottoman...but other than that, it was pretty solid!

Make the PROPER repairs before you start upholstering! If you don't know how to fix it, google it! I promise you will find a tutorial to fix anything! 

Now that the chair is done, the other things I want to change are all the more apparent...the window seat cushions and a few accent pillows...and of course the flooring and wall color. IT NEVER ENDS!!!

As I mentioned in an earlier post, I told Brian to just take me shopping if I EVER mentioned reupholstering a piece again. But the truth is, I love this chair...not the oak, not the style...just "the chair." And now that it is recovered in a fabric I really love, I love the chair even more! So I guess the two weeks of hell was all worth the effort...

...I think!

Little projects that can make a big impact!

While my garage is packed with projects I should be working on, the heat and humidity are just too much. This past week I worked on a few little projects inside!

The first is a "not so little project" but one I have been putting off for a loooong time! I shared the new living room chair I reupholstered here. I also had a little MCM chair and fabric ready to go but I could not bring myself to start the project. Upholstery is one of those things I do ONLY because I like the final results.

I was hoping duck egg blue and mauve would miraculously come back into vogue so I wouldn't have to mess with it, but that's probably not going to happen anytime soon! (Those who remember the 80s will understand this!) 

A teal club chair was one element of my den makeover plan I shared over a year ago. As I mentioned in the reveal post, not all elements of a makeover happen overnight...some may take years. Case in point!

Anywho, this wasn't technically a "little" project. I pretty much had to deconstruct the entire chair, strip and reoil the wood (beautiful!) and then reupholster. 

Once it was done....BIG impact.

But I really did accomplish two relatively "little" projects that have been on my "to do" list and that made a big impact.

The first was changing this little "gallery" wall....one of my "Things I Love" features. Family photos.

Honestly, these have not changed in 16 years but I want to change it up in my quest to "lighten and brighten" elements in my house. Since I am transitioning from the "warm" blacks and burnt reds to "cooler" reds, off-whites and teals, I decided these frames would be easy little elements to update with a little paint and new mats. Still love the pictures...just not how they are displayed

Here I shared the changes to the pictures on my dining room wall....

Just painting the frames and adding new mats made a HUGE difference in this space and cost very little.

I removed all the matting, photos and glass from the frames (good time to REALLY clean the glass!) I had mounted these pictures ON TOP of the matting so all I had to do was cut new teal matting using the old mats as a template and then reattach the photos using double sided tape. Frames are super easy to paint...a little primer and a little spray paint (Valspar Riviera Dune...my favorite off white spray paint) 

Perfect! (Um...yeah...I need to do something about the nasty looking thermostat!)

The other little project was super easy as well. I have wanted "modern" type house numbers for some time. I even painted some on my front door several years ago.

The actual house numbers that can easily been seen from the street are in the gable above the garage door...just cheapo, boring black numbers. Right now they are covered up with the "ivy" that is creeping all over the front of the house and at Christmas they are covered with a huge wreath (that warranted a visit from the code enforcer one year!) 

In my defense, this stuff usually doesn't get THIS out of control. Brian usually pulls it down every year when he puts up the Christmas lights. But last year we used one of those "star shower" thingies and didn't put any lights on the house...so...well...it is out of control! 

I have a plain "ho-hum" brick column on my tiny front porch that I thought might be perfect for a number display!

I ordered the "modern" style 4.5" numbers from Amazon. 

Somewhere along the way I picked up a plank of walnut. I've kind of been hoarding it for the last few years waiting for the perfect project and this was it.

I laid out the numbers on the board, measured and then cut the board the length I needed. Not sure how well tung oil finish will hold up outdoors, but that is what I used to seal the wood (3 coats).

Then I measured and marked where each number was going to go, drilled holes, secured the numbers using hardware screws, and then mounted it all on the brick column.

I used masonry screws to attach the board to the column. Since I didn't want the screws to show, I drilled a hole 1/4" deep with a 1" paddle bit, then pre-drilled in the middle of that hole for the masonry screws and then covered it all with hardwood plugs.

Dabbed a little tung oil finish on the plugs....cute as a bugs ear!

Doesn't look like the heat is going to let up any time soon so I have hauled several pieces into to the dining room to chalk paint! Maybe I can get a little bit of projecting done and get some room to breath in my garage! Maybe....

Dining room table makeover and my recent angst!!!!

Choosing fabric for a piece for "resale" is a tad easier for me than when I have to make a decision for my own home! It is still a struggle, but not nearly as difficult as choosing a fabric for myself.

Primarily because I know how much work goes into reupholstering a piece and I know if I go too "trendy" I will end up having to redo it in a few years. It is one reason I "stay safe" with bigger pieces like couches and chairs...then I use throw pillows, blankets and rugs to pull in the "in" colors. Those things are easy to change...and I don't cringe too much if I have to donate a $15 pillow vs. a $2000 couch! 

Example...I bought this ugly table and chair set at an auction....

In this condition, not appealing in the LEAST and not fit for any space...very dark and dated! But this is the kind of thing I know I can work a little "DIY magic" and make it perfect for another lifetime of use!

Not that I don't struggle with deciding paint colors and fabric for these pieces...this one sat for a while. I knew I would have to paint the top...it is laminate so it couldn't be "refinished." The legs on the table and the chairs are solid wood and in halfway decent shape but the vinyl brown seats had seen better days....that had to go!

I chalkpainted and distressed the table legs, primed and painted the top a flat black and painted the chairs a "steel blue." I found an awesome black/grey tweed upholstery fabric for the seats.

I saw several tables on Pinterest with this upholstery nailhead detailing and knew immediately I wanted to do it when I found the perfect table...and this table is perfect!

That little detail really makes all the difference, was relatively inexpensive (about .50 each!) and was not difficult. I just measured and marked where I wanted each nailhead to go, drilled a tiny hole, then hammered them into place! Cute as a bug's ear!

Obviously someone else thought it was cute as a bug's ear...it sold the day after we took it to 410 Vintage.

Which brings me to my recent angst! Chairs for my own home!!! 

When I remodel my den last year, I knew I wanted to add a teal club chair. I bought this little MCM style chair a year ago and it has sat in my den since, waiting on time and inspiration! It is the perfect size and style for this space, but of course the upholstery is all wrong!

I finally went to the fabric store last week and pulled a bunch of fabric samples that caught my eye. I THINK I have decided I like this teal tweed fabric. This fabric works well with the style of the chair and is pretty much the color I was leaning towards.

I found this chair just last week and I THINK I want to use it to replace my big fat leather chair in the living room!

It is a tad more "traditional" than what I really like but that is okay...again, that is the great thing about having a mosh-pot of styles...or "eclectic" as they say!

One of the reasons I want to replace this chair is because it has become "the dog's chair." In other words, Cleo has claimed it as her own. She sleeps in it, sits in it and jumps on it when anyone comes to visit her (and EVERYONE is coming to visit HER!) As a result, it is in pretty bad shape.

So naturally, she has to check out the new chair to make sure it is comfortable FOR HER!

Not nearly as roomy as the leather chair, but she looks pretty comfy!

Again, fabric samples and nail biting choices....

I kinda sorta like the idea of doing a "two fabric" design. The grey geo on the sides and back, and the black for the cushion. But then again, I worry about being "trendy" with something that is going to require a lot of time and work, so I am leaning towards the simple, one fabric choice in blue. 

What to do, what to do. For now I am taking my own advise. Looking to Pinterest and Google search for "inspiration."  Looking for chair upholstery I LOVE that will work with this style and in my space! 

It is the ONLY way I know how to make a decision and know it will be one I will be happy with for many years.