Entry cabinet/console/buffet makeover...

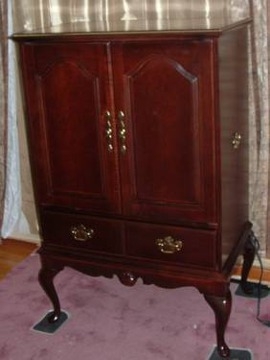
Occasionally I will buy something at an auction for resale I THINK I won't need to do anything to! Example...this nifty "primitive" cabinet/console/buffet...

It could be used for many things...hence the cabinet-slash-console-slash-buffet.

It would make a darling entry table. Or a tv console. Or even a small dining buffet.

The wood is really rustic and rough...nifty iron hardware.

But alas, no one shared my vision and it sat in my space at 410 Vintage for MONTHS!

Last week I did a little reset...technical word in the world of retail for "move stuff around." Since this little cabinet/console/buffet had been hanging out for quite some time I decided to bring it home and give it a little facelift.

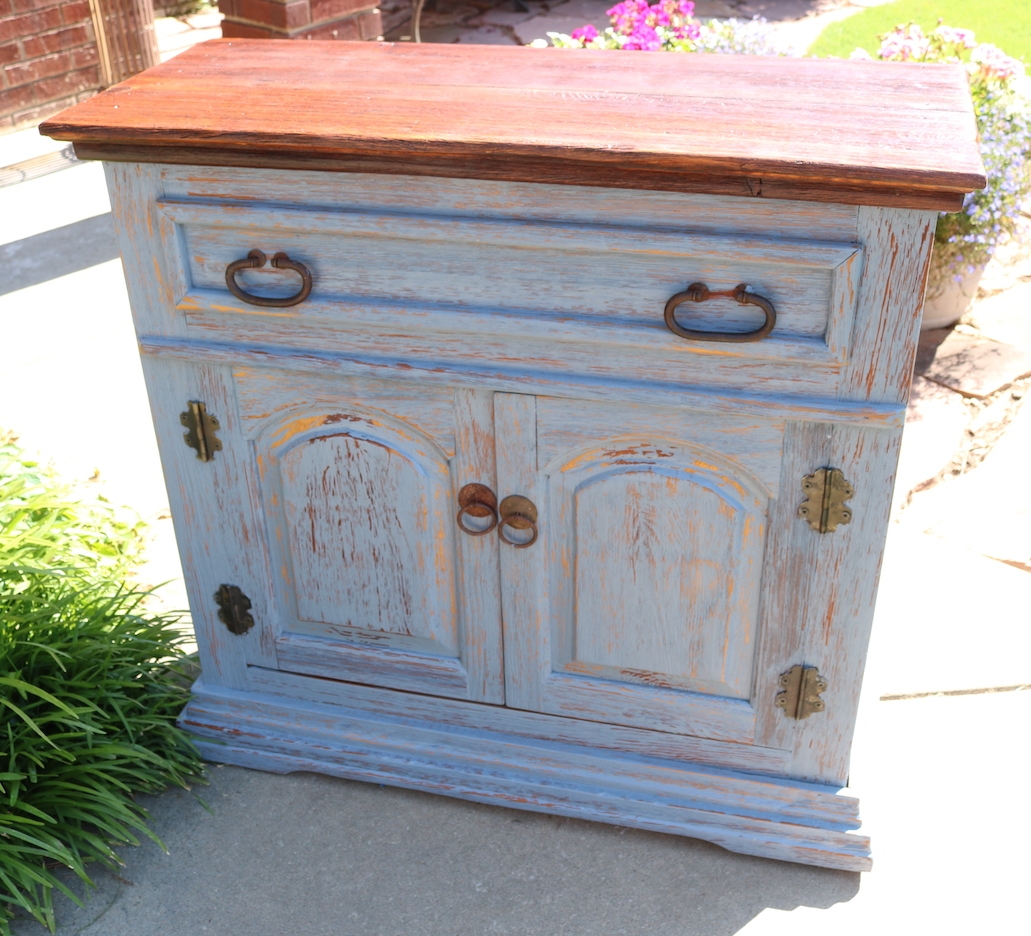
Darker gel stain on the top and a grey/blue chalk paint and distress on the base.

I think it is darling and HOPEFULLY someone else will agree! 

Another example of how easy it is to change things up a bit with just a little effort!

Eastlake chair makeover!

Years ago, the "wood purist" in me would never have painted an antique anything!

But slowly I have evolved and my snobbishness has taken a back seat to reality...some "antique" pieces have little use in today's world of decor trends. The rich color and grain of walnut, the depth and beauty of rosewood, the vibrate color and delicate grain of mahogany...zip, zilch, nada.

The day will come when those who followed the decor trends of today will glare at their painted furniture and shiplap walls and growl...it happens. NOTHING is timeless. Honey oak cabinets were timeless...8x8 tile floors were timeless...white appliances were timeless. 

The fact is decor trends come and go and we realize that which we thought was timeless, really isn't.

(There are still some who cherish antique pieces...and of course, as always, do a lot of research and make sure the piece you want to paint is not a valuable antique "as is!")

I have no doubt that this piece I slathered in chalk paint and covered in buffalo check fabric will catch the eye of someone looking for a great side chair...but it will someday be stripped down and refinished...exposing the amazing walnut grain and delicate incised carvings. Someday...but not today.

That was my original plan. Strip the old finish to expose the beautiful walnut grain and intricate carvings, reconstruct, seal with oil and reupholster in a fabric worthy of an antique walnut Eastlake piece.

Knowing all that hard work would garner little favor with my "target market," this chair sat in my garage for YEARS. Seriously, I'm not sure when I bought it but I can't remember a time when it wasn't lurking in the back of my garage.

(If you are a "purist" or antique lover, turn away NOW!)

Some would look at this and think EEEWWWWW!

Yes, it was pretty "eeewwwy." And yes, this is pretty much the shape it was in when I bought it. I think I remember removing the original rotted fabric and a few thousand upholstery nails and I did start stripping it using this process. But I eventually shoved it into a corner of the garage where it languished until I got over my snobbiness. 

I constructed a new seat out of plywood...not even close to the original but then again furniture no longer sits in the parlor only to be used by tea sipping adults. 

The richness and beauty of oiled walnut has fallen out of favor for the "farmhouse" chalk paint and distressed everything!

New foam padding and batting...the old horse hair of yesteryear just doesn't cut it these days. (Thank God...that stuff is nasty!)

The crushed velvet or needlepoint fabric that would have originally ordained this piece was a no-go. I went with the trendy buffalo check that I suspect will be as popular as chevron was a few short years ago!

A bazillion metal upholstery nails...no way Jose! Hot glued gimp is the way to go!

Don't get me wrong, I think it is as cute as a bug's ear! I have no doubt someone will LOVE it! It would be a precious side chair or even a dining chair paired with a farmhouse table that are all the rage!

And as always, it is Litty and Mr. Jinx approved....

As much as I would like to think of myself as a "purist" I can certainly appreciate the desire to fill our homes with pieces we love or suit our desire for "going with the flow" without breaking the bank! 

C'est la vie.

Cherry tv cabinet makeover....

I've said it before...I am a bad blogger and mediocre photographer at best.

Bad because I often get in such a hurry to start a project I completely forget to take a "before" picture. Mediocre photographer because...well, my photos speak for themselves.

As is the case of this Queen Anne Cherry tv cabinet. Hello 1998! 

No, I did not take a "before" picture. So I did a little google search and found a cabinet that was SIMILAR to the one I acquired from my neighbor. Color and style are the same, but mine does not have a drawer. 

We have all seen this furniture style...many of us still have it in our homes! I had similar bedroom furniture...not the Queen Anne style, but heavy and dark. I painted my bedroom furniture a few years ago and honestly I don't give it a second thought these days!! In other words, update the outdated and you may stop feeling the need to spend thousands on new!

There are several problems with this tv cabinet. First, who still uses these cabinets for housing tvs? Most of us have transitioned to flat screens...I finally pitched my last hold out a few years ago. 

Second...it is dark and "heavy" looking. Not really the in thing right now.

But they are still good solid pieces that have use and purpose. Maybe not for their original intent, but who couldn't use more storage! 

It is super simple to give these pieces a little update. I know most will not want this piece for a tv cabinet but everyone is looking for storage pieces for crafts, linens or even clothing. Honestly, it could be used in a kitchen for pantry space or a bathroom for towels and such!

Again, it just needs a little facelift.

I removed the back...super simple since they are usually just stapled on.

I added a new shelf then primed the inside of the cabinet with Kilz, sanded, tacked and spray painted it with white paint (KTSP!)

I used bead board to make a new back to add a little "interest." I used THIS process to "stain" it. Normally I would use an accent color but this time I used the same latex paint I mixed up as chalk paint for the exterior.

Making your own chalk paint is super simple...thoroughly mix 3 tablespoons of water and 5 tablespoons of Plaster of Paris and then add 2 cups of FLAT latex paint. You can use satin or eggshell paint but I have found that the flat tends to "chalk" better when you sand.

Sand and seal! Again I never use wax on chalk paint...usually polyurethane or polycrylic. If you want the added character that you get with dark wax, try applying a dark "glaze" before you seal. Personally, I think you get the same affect without having to use wax. I have even used stain as a "glaze"...this mirror being a good example.

Finally, I added simple knobs.

Sealing the piece with poly makes it super simple to repaint when the "distressed" craze ends...and trust me it will eventually! 

Some of us remember when this dark "cherry" look was all the rage...

Little Miss Muffet sat on a....

Tuffet?

At least that is what came to mind when I saw these little chairs at an auction. When I googled "tuffet" I found pictures of little ottoman kinda things...but the definition is "a footstool or low seat." So I am going with tuffet. 

As cute as they are (or probably were in 1978) I knew they would require my least favorite chore...upholstery...and sewing! 

So of course they sat in the garage for months.

But I could see them all dolled up in my mind's eye so this week I decided to tackle the project.

First I had to strip off all the old upholstery and remove all the nails and staples!

I found an upholstery material I really love but there wasn't enough to do the whole chair...so I found a solid that coordinates with the fabric...sometimes you have to improvise! 

Chalk painted and distressed the frame...

Rather than use upholstery nails I used gimp...

The cushion is attached to the seat with buttons so I covered buttons with the teal fabric.

Just too stinking cute!

Not sure if these are "technically" tuffets but they are child size and ready for another lifetime of curds and whey!

On a side note, I "googled" what exactly is "curds and whey"...turns out it is nothing more than "curdled milk." I raised two girls...neither included curds and whey in their tea party menu! 

Little Miss Muffet

Sat on her tuffet

Eating her sausage and egg biscuit

Along came a spider and sat down beside her

And Little Miss Muffet squished it. 

We should be empowering our girls...

Sign post from old bed posts...

I have had these old bed posts for eons...they have been sitting in my garden cubby for...seriously, I have no idea how long! I can not tell you how many times I almost tossed them, only to stick them back in the cubby "just in case."

I love the blogs that post inspiration pictures with links...but there are just too many...and honestly, I'm kinda lazy! If you need or want more inspiration, just search "sign post" on Pinterest. I promise you will find something that trips your trigger.

I stumbled across one in my search for ideas for my guest room (I promise to share soon!) Light bulb moment. I have old posts! I have some old hooks....and scrap wood...and paint. 

I CAN DO THIS!!!!

So I did...

Super simple project...while I have all the necessary tools in my Tool Box, this really is a project that needs little more than a hammer, saw, screw driver, glue and nails. 

First I had to clean all the gunk off the posts...then I puttied the holes and built a sturdy base (just a scrap board screwed into the post and trim)...

....chalk...paint...distress...seal...add a hook!

Perfect for a little "Welcome" sign on the front porch....maybe a hanging basket of flowers. You could even add a few more hooks and use it as a coat rack or set it in your bathroom or by the pool for towels...the possibilities are endless!!!

Super simple. And a great way for me to purge another "just in case" thing from my garden cubby!

The breakfast nook table and chairs makeover

When Matt decided to buy his first home (details here), I knew my love for "making old new again" would come in handy!

I love the dresser and chest I found and refinished!

He was able to use the farmhouse trestle table I featured here

And of course this "cute as a bug's ear" vintage chair makeover!

But he didn't have a table that would fit in his breakfast nook...a relatively small space in his kitchen.

I knew it needed to be a round table since the space is only about 9x9.

I found this round oak table at a flea market...a tad dated in it's original condition but I knew exactly what I wanted to do with it.

Normally these oak tables are around 48" in diameter but this one was only 32" so it is the perfect size...just not the perfect finish.

I honestly didn't want to strip and restain the top so I decided to go with gel stain...again, I ONLY use the General Finishes brand. It really is the best!

Rather than go with my usual Java color, I decided to go with the Brown Mahogany.

As I have said in other tutorials, the first coat is a bit stressful....

...you really question whether this stuff is going to work. 

Patience...wipe on a coat with an old athletic sock...let it dry overnight...then wipe on a second coat, then a third....

I promise, by the third coat you will see the results you want. Then just seal it with the General Finishes wipe on top coat. 

Sunlight streaming through the windows is awesome in the morning...not so much for photographing furniture...but hopefully you get the idea....

After staining the top, I chalk painted and distressed the table base. I picked up a couple of oak chairs at an auction and chalked painted and distressed them as well...then recovered the seats with some leftover fabric from my club chair makeover!

Perfect fit for this small space.

One tip...this little table came with a leaf...while this space really isn't big enough to expand the table, it is always smart to refinish table inserts just in case want to use them in the future! 

Also, just a reminder that I do not seal my chalk paint with wax...I use polyacrylic. Someday this whole "distress" thing will go out of style and he will want to paint this furniture...wax would have to be stripped before he could repaint the piece!

Next week I hope to share Matt's first big project...painting the brick fireplace. If you are debating whether to tackle yours, you really want to see what a little bit of paint can do...impressive!

So tune in for the big reveal.

What's my "style"....

As I have said time and again (and evident by my Home Tour) my "style" is very eclectic. What exactly does that mean?

It means I like what I like and because my home is not all "farmhouse" or "traditional" or "mid century" I can pretty much find a place for any piece I fall in love with. 

As I mentioned in my last post my son Matt is buying his first home so I have been on the hunt for pieces that can be transformed and used in his house. Taylor, my daughter-in-law, asked me what Matt's decor style is...hum...not sure I ever asked him. Fortunately, like me, he likes what he likes and doesn't restrict himself to a specific style. He loves the mid century Lane Acclaim tables, but he also loves the farmhouse table I refinished several months ago! I promised him that if it didn't sell, he could have it for his dining area. I have picked up a few chairs and a round oak pedestal table for his breakfast nook. I'll share them when I get their "facelift" done! 

In the meantime I want to share this nifty dresser. Seriously horrid in it's original condition, but I could see the potential. 

Solid wood and very well built...and unique!

I think it could be an awesome piece in his bedroom, along with this little dresser, but I'm not sure I have convinced him it is worthy....but then again, he hasn't seen it finished! 

I absolutely LOVE this piece, especially the old rusty hardware. Matt asked if I could put cup pulls on it like the little dresser, but honestly, this hardware too cool... so unique and amazing. I cleaned them up and reattached them...rust and all! I just think they are awesome!

I chalk painted and distressed the cabinet and gel stained the top. The drawer fronts are latex paint. 

As I said before, if he still doesn't love it, someone else will! 

That is the great thing about being "eclectic"...to each his own! 

I blame it all on "Fixer Upper" ...

As I mentioned here, Matt is buying a house so I have been on the hunt for inexpensive pieces he will need. I often remind my children that it took decades for me to accumulate the pieces I have in my own home...so patience!

But I find myself being terribly impatient when it comes to someone else's house. I blame it on "Fixer Upper." A couple walks into their home after 1 hour and it is perfectly decorated and styled and staged...certainly I can do that in 2 months.

HA!!!! 

Maybe if he had an endless budget...but he doesn't so I have to focus on the essentials with a few "froo-froos" thrown in for good measure.

Saturday I scored a "free" sectional couch. It will be an awesome piece if an upholstery cleaner can get all the nastiness and dog hair off of it...for now it is in the storage shed along with patio furniture, garden tools, kitchen stuff I have picked up and of course his "college day" collection.

I do have a garage full of "projects" and a few of those pieces will work beautifully in his new house...IF it will ever stop raining and I can get them all repaired and painted!!! For now it is just a collection of "junk" that is stressing my OCD tendencies.

Actually I pulled a lot of it out into the driveway Monday, went for supplies, and got home just in time to drag it all back into the garage before it got soaked. Curses. 

I worked Monday and Tuesday building and repairing and cleaning...making wood tops, gluing busted drawers, puttying splintered veneer and misplaced hardware holes. All the stuff you can do when it is raining and you can't drag everything out and start assembly line painting.

One piece is a neat little three drawer chest I scored while emptying out one of my apartments....

It certainly had it's issues. Laminate top, busted drawers, splintered veneer, and an AWEFUL finish! 

Number one rule...if it is broke fix it PROPERLY! No sense in "making it pretty" if the veneer is going to continue to peel or the drawers don't function.

I removed all the "loose" veneer, puttied and sanded. I repaired all the drawers. And because I think this would make an awesome bedside table in Matt's new house, I replaced the top with a stained wood top....

I chalk painted and distressed the cabinet with one of the sample pots I bought when I was looking for a wall color for my bedroom. I kilzed and painted the drawer fronts with another sample! Nothing goes to waste!

And of course new hardware.

Again, I think it would make an awesome bedside table but I have a few other little projects up my sleeve Matt may like better. Nice thing about having a room in a vintage market...if he doesn't love it, someone else will! 

The miracle chairs...

Even after years of proving I can turn just about any "trash" into a little "treasure," I think Brian still raises an eyebrow from time to time.

Such was the case with these chairs....

We went to a farm auction and these chairs had been tossed into an old barn, only to see the light of day when the auctioneer dug them out and sold them...to me!

What would possess me? They were literally caked with nastiness and two were in pieces. But I saw the potential (and of course the old mud dauber nests and spiders and bugs!). 

Rarely will I take a hose to a piece of wood furniture...but I had no choice. Even then I had to scrub them with a strong detergent and steel wool.

Then I pulled nails, scraped old glue, cut out broken spindles and removed splintered veneer.

Then I had to clamp and glue everything back together. One chair was missing a side apron so I cut a new one and secured it in place with glue and my Kreg jig! 

My original plan was to prime and paint them. They still had a few rough spots and I knew I wouldn't get a pristine finish I would be happy with so I decided to do a chalk paint and distress finish on them! Always a good choice for a piece that has a few "boo-boos!" 

I think the boo-boos and the distressed finish give the chairs "aged character." After recovering the seats on the two Duncan Phyfe style chairs and making a new seat for the other, I think they turned out pretty sweet.

My plan is to stage them with this trestle table I will be taking into 410 Vintage this week, just in time for the holidays! 

Just in time for Brian and me to take our annual trek to Colorado! I can't wait...two days of fly fishing, several days of sight-seeing and maybe even a day of gambling in Central City! The forecast shows the temps in the 50s and 60s so I will be packing my coat and Uggs! One thing is for sure, I always come home recharged and ready to enjoy my favorite season

I made a few changes to my fall decorating this year...one being these little pumpkins...

I added a few silk sunflowers, a fall garland, fall picks and deer antlers (yes, my kids killed them....ick!).

Not sure I am loving this little vignette but I have a few more months to make changes and additions!


Mirror, mirror, on the wall....

I gave up trying to come up with clever blog titles a loooong time ago, but I just couldn't resist!

Mirrors are the simplest way to add wall decor, light and depth to a room. In other words, if you have a small dark room, hang a mirror!

My master bedroom is a pretty large room and it gets tons of natural light but I am in the process of making a few changes. I have a really awesome antique mirror hanging out in my garage that may fit into the plan.

I use mirrors in just about every room of my house....

The living room (featured here)....

The den...

My home office....

And this fun little mirror hanging in a small corner of my room...

The change? Well, I am finally getting around to buying new chairs for my master bedroom. I originally intended to reupholster the chairs I have...

But as you can see, they are very large...and they are "matchy-matchy" which is something I am moving away from. Truth be told, I just don't like them any more!

While I was hunting for a new couch for the living room, I looked at a few chairs that might work in this space.

First, let me explain "this space." When the kids were younger, I added the den so we would have two living spaces. When they got a bit older (and louder), I added a large master suite with this awesome sitting area so we would have someplace to escape to.

Of course, now the kids are gone and we have this amazing sitting area in our bedroom and two living spaces. Um, no, we don't need all this space. Truthfully, we rarely use the sitting area in the master bedroom these days...but my oldest daughter really wants these two large club chairs...and well, it's just time to make a change!

So the hunt for the perfect chairs commenced.....

Two caught my eye, so this week I went back to the store and ordered them both....

This one is a leather recliner. A little bit of information about myself...I DO NOT do recliners. First, they are usually very bulky and unsightly. Second, I have an unfortunate history with recliners...hence, they seem to set off a form of PTSD. I don't really want to share, but suffice it to say, I swore there would never be a recliner in my home.

But I kind of like this one...it is very different from your typical barcalounger recliner and I really didn't find it the least bit offensive. It has a USB port and Brian thinks it is super comfy, so this will be "his" chair.

My chair is actually a "feed me a grape" kinda thing....

Perfect for those nights when my back won't let me lay in bed any longer or cold winter afternoons when I just want to curl up with a blanket and a good book!

I really didn't need an ottoman since Brian will have the recliner but I wanted to be able to stretch out.  This one fits the bill...and it is super comfy!

Which brings me to the mirror in the garage (see, I eventually get around to my point!) 

Months ago I bought a MCM dresser with a mirror. It had obviously been exposed to heat from a fire because the finish had a little bit of "bubbling" and it was covered in soot. I took off the mirror, cleaned up the dresser and sold it. 

These days dressers WITH mirrors just aren't the "in thing" so I kept the mirror and gave it a little makeover with the intent to sell it. The finish was damaged...and of course it was pretty "dark and dank."

I chalk painted it with an off-white paint and distressed it a bit. But I really didn't like the look of it...it just seemed too "white."

So I decided to give it a little "glaze" treatment with some stain. I wiped on pecan stain and then wiped it off. It gave the finish a nice "aged" look. After glazing the entire frame of the mirror, I sealed it with polycrylic and reattached the little medallions.

The mirror is "not my style" (again, whatever the heck that is! Eclectic?) and of course I will have to hang it higher...right now I just stuck it up where the old picture was to see if I MIGHT like it there...don't know. Truth is, I will have to wait until the new chairs are in place.

But my whole rambling point is this...you don't have to live with "dark and dank." Mirror frames can easily be painted. Even if the frame isn't quite "your style" a little paint can go a long way to making a simple cast off mirror a nice statement piece for your room! And trust me, if you have priced mirrors lately, you might want to rethink that thrift store gold framed mirror or that old dresser mirror!

Whether you paint it a bright, solid color or give it a little "aged look" treatment, mirrors are easy to change to fit any decor!