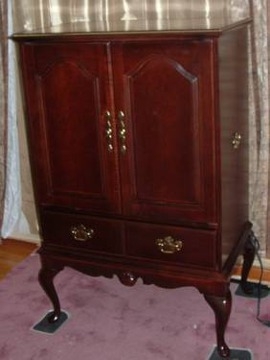
Cherry tv cabinet makeover....

I've said it before...I am a bad blogger and mediocre photographer at best.

Bad because I often get in such a hurry to start a project I completely forget to take a "before" picture. Mediocre photographer because...well, my photos speak for themselves.

As is the case of this Queen Anne Cherry tv cabinet. Hello 1998! 

No, I did not take a "before" picture. So I did a little google search and found a cabinet that was SIMILAR to the one I acquired from my neighbor. Color and style are the same, but mine does not have a drawer. 

We have all seen this furniture style...many of us still have it in our homes! I had similar bedroom furniture...not the Queen Anne style, but heavy and dark. I painted my bedroom furniture a few years ago and honestly I don't give it a second thought these days!! In other words, update the outdated and you may stop feeling the need to spend thousands on new!

There are several problems with this tv cabinet. First, who still uses these cabinets for housing tvs? Most of us have transitioned to flat screens...I finally pitched my last hold out a few years ago. 

Second...it is dark and "heavy" looking. Not really the in thing right now.

But they are still good solid pieces that have use and purpose. Maybe not for their original intent, but who couldn't use more storage! 

It is super simple to give these pieces a little update. I know most will not want this piece for a tv cabinet but everyone is looking for storage pieces for crafts, linens or even clothing. Honestly, it could be used in a kitchen for pantry space or a bathroom for towels and such!

Again, it just needs a little facelift.

I removed the back...super simple since they are usually just stapled on.

I added a new shelf then primed the inside of the cabinet with Kilz, sanded, tacked and spray painted it with white paint (KTSP!)

I used bead board to make a new back to add a little "interest." I used THIS process to "stain" it. Normally I would use an accent color but this time I used the same latex paint I mixed up as chalk paint for the exterior.

Making your own chalk paint is super simple...thoroughly mix 3 tablespoons of water and 5 tablespoons of Plaster of Paris and then add 2 cups of FLAT latex paint. You can use satin or eggshell paint but I have found that the flat tends to "chalk" better when you sand.

Sand and seal! Again I never use wax on chalk paint...usually polyurethane or polycrylic. If you want the added character that you get with dark wax, try applying a dark "glaze" before you seal. Personally, I think you get the same affect without having to use wax. I have even used stain as a "glaze"...this mirror being a good example.

Finally, I added simple knobs.

Sealing the piece with poly makes it super simple to repaint when the "distressed" craze ends...and trust me it will eventually! 

Some of us remember when this dark "cherry" look was all the rage...

Mirror, mirror, on the wall....

I gave up trying to come up with clever blog titles a loooong time ago, but I just couldn't resist!

Mirrors are the simplest way to add wall decor, light and depth to a room. In other words, if you have a small dark room, hang a mirror!

My master bedroom is a pretty large room and it gets tons of natural light but I am in the process of making a few changes. I have a really awesome antique mirror hanging out in my garage that may fit into the plan.

I use mirrors in just about every room of my house....

The living room (featured here)....

The den...

My home office....

And this fun little mirror hanging in a small corner of my room...

The change? Well, I am finally getting around to buying new chairs for my master bedroom. I originally intended to reupholster the chairs I have...

But as you can see, they are very large...and they are "matchy-matchy" which is something I am moving away from. Truth be told, I just don't like them any more!

While I was hunting for a new couch for the living room, I looked at a few chairs that might work in this space.

First, let me explain "this space." When the kids were younger, I added the den so we would have two living spaces. When they got a bit older (and louder), I added a large master suite with this awesome sitting area so we would have someplace to escape to.

Of course, now the kids are gone and we have this amazing sitting area in our bedroom and two living spaces. Um, no, we don't need all this space. Truthfully, we rarely use the sitting area in the master bedroom these days...but my oldest daughter really wants these two large club chairs...and well, it's just time to make a change!

So the hunt for the perfect chairs commenced.....

Two caught my eye, so this week I went back to the store and ordered them both....

This one is a leather recliner. A little bit of information about myself...I DO NOT do recliners. First, they are usually very bulky and unsightly. Second, I have an unfortunate history with recliners...hence, they seem to set off a form of PTSD. I don't really want to share, but suffice it to say, I swore there would never be a recliner in my home.

But I kind of like this one...it is very different from your typical barcalounger recliner and I really didn't find it the least bit offensive. It has a USB port and Brian thinks it is super comfy, so this will be "his" chair.

My chair is actually a "feed me a grape" kinda thing....

Perfect for those nights when my back won't let me lay in bed any longer or cold winter afternoons when I just want to curl up with a blanket and a good book!

I really didn't need an ottoman since Brian will have the recliner but I wanted to be able to stretch out.  This one fits the bill...and it is super comfy!

Which brings me to the mirror in the garage (see, I eventually get around to my point!) 

Months ago I bought a MCM dresser with a mirror. It had obviously been exposed to heat from a fire because the finish had a little bit of "bubbling" and it was covered in soot. I took off the mirror, cleaned up the dresser and sold it. 

These days dressers WITH mirrors just aren't the "in thing" so I kept the mirror and gave it a little makeover with the intent to sell it. The finish was damaged...and of course it was pretty "dark and dank."

I chalk painted it with an off-white paint and distressed it a bit. But I really didn't like the look of it...it just seemed too "white."

So I decided to give it a little "glaze" treatment with some stain. I wiped on pecan stain and then wiped it off. It gave the finish a nice "aged" look. After glazing the entire frame of the mirror, I sealed it with polycrylic and reattached the little medallions.

The mirror is "not my style" (again, whatever the heck that is! Eclectic?) and of course I will have to hang it higher...right now I just stuck it up where the old picture was to see if I MIGHT like it there...don't know. Truth is, I will have to wait until the new chairs are in place.

But my whole rambling point is this...you don't have to live with "dark and dank." Mirror frames can easily be painted. Even if the frame isn't quite "your style" a little paint can go a long way to making a simple cast off mirror a nice statement piece for your room! And trust me, if you have priced mirrors lately, you might want to rethink that thrift store gold framed mirror or that old dresser mirror!

Whether you paint it a bright, solid color or give it a little "aged look" treatment, mirrors are easy to change to fit any decor!