Purging...

I really do try to "purge" on a regular basis and stay organized. I do it more out of necessity than anything...the more "stuff" I have the more unorganized I seem to be. So I make it my mission to get rid of stuff I don't use and keep storage areas clean.

I'm not real big on the pretty "basket and bins" storage system. They look awesome but I like to be able to see what I have so I just make sure I stay organized.

Even if a space doesn't necessarily need to be "purged" I try to clean and organize spaces from time to time. This weekend I pulled everything out of my little storage building, sprayed the ant invasion and scrubbed up all the oil and gunk of the floors.

People assume this is a cute little play house or something...I dolled it up a bit (here) so it doesn't look like a boring old storage shed. But inside...that's exactly what it is...a "yard" shed!

I managed to toss a few things but a good scrubbing and organizing all the "stuff" made a huge difference! I try to do this every couple of years because it can get pretty dirty and cluttered! When buckets of ants start falling on my head when I pull something down and spiders skitter across the floor when I get the mower, it is time! Past time!

My general rule is if I haven't seen it or used it in over a year, it is out of here. But occasionally something hangs around a few decades too long.

This stuff is a prime example. Probably 10+ years ago I went through a scrapbooking phase. Then I archived all our old family photos. 

I had carefully organized and stored the mountains of leftover paper and scrapbook tools in plastic containers...and there it has sat for Lord knows how many years.

As you can see, the floor had also become a magnet for some pretty nasty stuff!

On very rare occasions I might need ONE piece of colored paper. Guess what....I have TONS of it. Which I think is why I tend to occasionally hoard "stuff." God forbid I need ONE piece of paper and don't have it...so let's keep 5 reams of colored paper...just in case. Or what if I decide to start scrapbooking again...certainly I will need all those scraps of paper with Easter bunnies on it! 

So here is the deal...I honestly haven't needed it for TEN years. And the chances of me scrapbooking again are pretty slim...that phase is over...kind of like my size 6 jeans phase. 

So why keep it and take up valuable real estate that could be better utilized for something else! 

I kept a few things I thought I might need eventually...heavy stock paper and some archive slips and of course the paper cutter that I do use...but the rest will better be served elsewhere. Fortunately I know a few teachers and this is "stuff" I know they can use in their classroom!

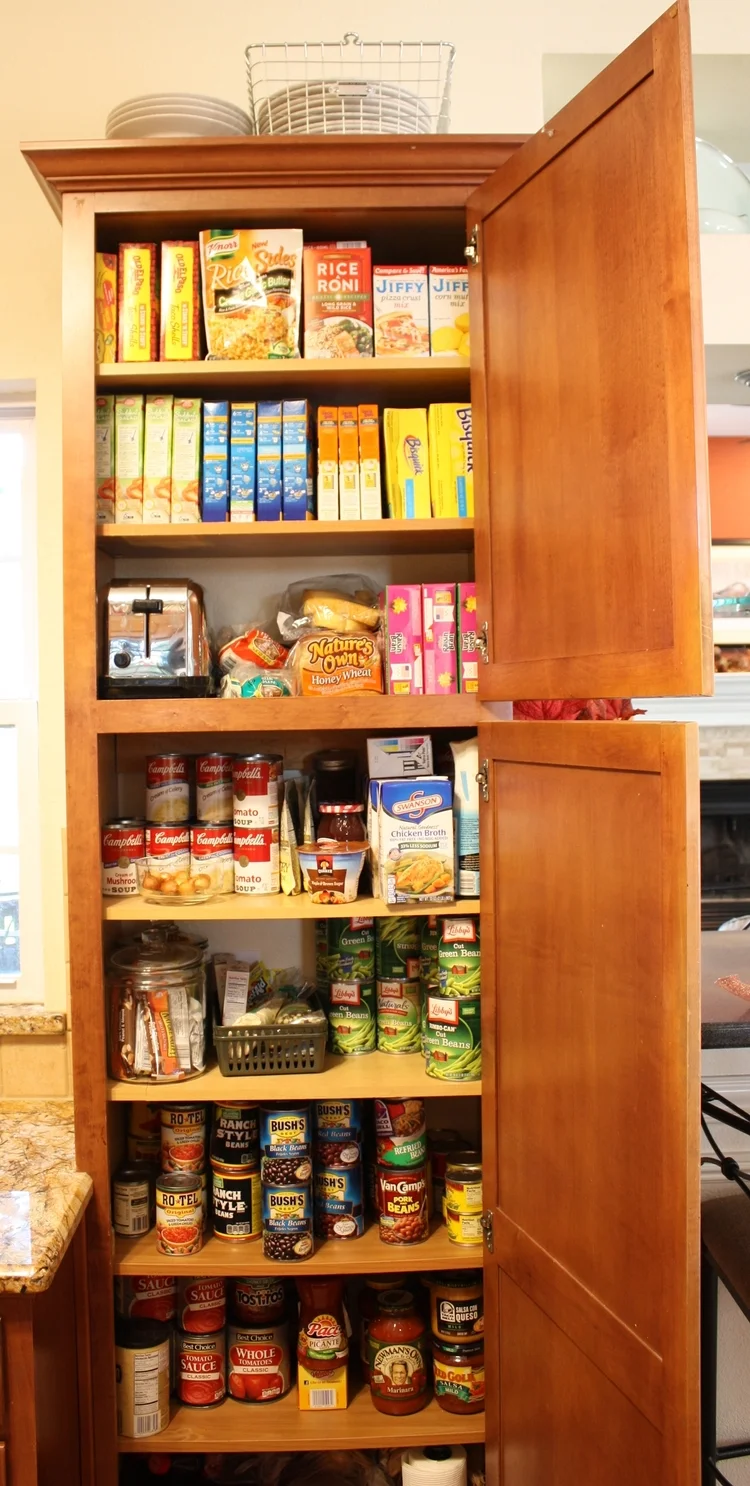
Old blankets, sheets and towels.....donate to your local animal shelter. Clothes and toys...women and children shelters. Canned and boxed food items...church pantries. Athletic gear...your local youth center! Paper and craft stuff...drop it off at your local elementary school! 

All that "stuff" you have crammed in closets is needed by someone NOW! Why store it "just in case" when it can be put to use now?

Purge and clean one closet, cabinet or drawer a month and within a year you will be surprised at what you don't miss AND you will find your closets and drawers manageable...and will have plenty of room to bring in more "stuff." LOL! 


Your yard may need a new "rug!"

As I mention here (when I ranted about my neighbor's trees!) my yard is an extension of my home.

I obsess when it is time to replace a rug or flooring...I cruise the internet, pin every room that catches my eye on Pinterest, and spend months bringing home hardwood and tile samples! (Stay tuned for the drama of the new couch selection!)

But what about our yards...does your yard need "new flooring?" Mine sure as heck did!

It's not like I have ignored it....I have resodded this area at least 5 times in the last 17 years...most recently just last year. But it never thrived because I kept putting down the wrong sod...Bermuda and Zoysia...both of which need sun and this area of my yard did not get enough.

I resisted putting down the sod I KNEW I needed...Fescue. Silly reason actually. Most of my yard gets tons of sun and the Bermuda has thrived. Bermuda goes dormant in the winter and turns brown. Fescue does not...it pretty much stays green year round. The thought of having two different types of grass was more than my OCD could tolerate.

The fact is, after years of failure, there really was no other option...dirt or grass. No brainer really, but the grass I WANTED to grown wasn't going to survive the shade! Want in one hand, poo in the other.

Fescue it is...and it made a HUGE difference. 

Just showing off some of my pretty potted plants!

The MAJOR upside to sod is instant gratification. A day of hard labor and you have a beautiful yard that will not wash away!

Sod vs. seed. In my opinion, the difference financially is really minimal longterm. Yes, the upfront cost of sod may seem substantial. I probably spent $600 on 4 1/2 pallets of sod and some top soil.

You have to top seed with straw. You will have to hope and pray you don't get a heavy rain that will wash away the seed (we have had more than a few of those in the last month!)...and of course there are always the birds who find it very tasty! Yes, you have to water sod, but you will water much more to establish seed and even then you might have a tough time nurturing it through the hot dry months of the summer! Seeding in the spring just does not give new grass time to get a good root system before the heat of summer! 

In my opinion, sod is the only way to go if you have the ability to put it down yourself...and trust me, it takes very little "skill!" Just a strong back and clothes you don't mind getting dirty (REAL dirty!)

By the end of a back breaking day I had a beautiful new "rug" for my yard...and hopefully THIS time it will survive! 

Life....

I have lived in this home for almost 18 years...and I have spent 17 years and thousands of dollars landscaping my yard...it is, after all, an extension of my home!

One of the areas I first landscaped was behind a massive row of pine trees in my side yard (I live at the end of a cul-de-sac so my side yard is adjacent to my neighbors back yard)....

This area got zero sun and the soil was really too acidic due to the pines to grow much. The trees on the left were large oak and wild cherries in my neighbors yard...the pines and Bradfords on the right are mine. The two lines of trees provided ample shade from noon on. I built my first swing pergola for shady afternoon lounging, laid Lord knows how many tons of flagstone and filled the beds with shade loving ground cover.

Another area I have carefully cultivated because of all the shade....

Because of the pines, the pin oak and the smaller Purple Plums in my yard and the row of mature tree in the neighbors yard, the little bed got very little sun. Perfect for tender hostas.... and they have thrived!

Several weeks ago, I spend a fortune and a few hard days of labor laying new Fescue sod. Between years of erosion and the new fence, it was time! Fescue is perfect for shady areas and like hostas it can not tolerate too much sun. 

Which brings me to "life." 

The neighbors cut down ALL their trees...ALL of them! The entire row of mature oak and wild cherry trees that ran along their fence, that shaded my yard and flower beds...gone! 

In one fell swoop, my hostas, ground cover, new fescue lawn and even my pergola is now exposed to full blown sun from late morning on.

I am devastated...WHY would you do that? Why would you cut down an entire row of beautiful, mature trees.

I know....they aren't my trees and they can do as they please....and just because it destroys 17 years of careful landscaping is not their problem!

This is life....when you depend on others to "cultivate your garden" you take a big risk...because in one fell swoop they can alter their life so drastically, it can have a devastating affect on your life.

IF you choose to see it that way. Truth is, the only thing we control in our lives is how we CHOOSE to react to what happens around us...and our attitude. Period. End of story.

I want to pout, and scream, and go beat up my neighbor. But the truth is, it won't bring back the trees they cut down. It won't save my hostas or keep my grass and ground cover from burning up this summer. 

So what choice do I have? That's what I am working on this week...planting new trees, moving my hostas, watering the heck out of my tender new grass. 

I cut a poem out of a newspaper 30+ years ago...I probably didn't even realize at the time what it REALLY meant...but I do now and it hangs on my office wall....

After a while you learn the subtle difference

Between holding a hand and chaining a soul

And you learn that love doesn't mean leaning

And company doesn't mean security

And you begin to learn that kisses aren't contracts

And presents aren't promises

And you begin to accept your defeats

With your head up and your eyes open

With the grace of a woman, not the grief of a child,

And you learn to build all your roads on today

Because tomorrow's ground is too uncertain for plans

And futures have a way of falling down in mid-flight

After a while you learn

That even sunshine burns if you get too much.

So you plant your own garden and decorate your own soul

Instead of waiting for someone to bring you flowers

And you learn that you really can endure....

That you really are strong

And you really do have worth

And you learn and learn

With every goodby you learn.

Life and landscaping...learn from your mistakes, don't depend on other's to cultivate your happiness, when others actions affect your life put on your big girl panties and get to work doing what you need to do, and as frustrating as it can all be, keep a good attitude! Because shit happens and you can't let your bad attitude kill your happiness.

That's right...it isn't the actions of others that will kill your spirit or make you happy...it is the choice YOU make...it is YOUR attitude...

Drexel Accolade Nightstand makeover....

I cringe when I even think about painting any MCM piece but occasionally I bite the bullet and paint. Painted this MCM dresser and chest and have never regretted it...yet.

These little Drexel Accolade campaign "nightstands" are described as "MCM" but my research shows they are from the 1980s...so at best they are "vintage." (I cringe even more describing anything from the 80s as "vintage" since I graduated from college in the 80s!)

These little tables vary in "value." Originally my intent was to sell both as-is. But one had some serious "splash marks" all over it and as much as I tried I could not get it off. My only option was to completely strip and refinish the piece...or paint. 

Since I am AGAIN working on the final stages of my den makeover, I decided to paint the one with the serious flaws and use it as a side table. I started to strip and stain it, but I really need a painted piece rather than stained....just my preference. I believe it is important to have a balance of paint and natural wood in any decor and in this case the scales tipped toward paint.

(I will remind you to use extreme caution when painting "vintage" or "antique" pieces...do your research and know what you have FIRST! Make an informed decision before you refinish or paint...you don't want to find out later that you slathered paint on a 1796 colonial side table or spray painted a Hans Wegner chair...just watch "Antique Roadshow")

You can use ketchup or lemon based cleaners to clean brass. Just Google!

The brass hardware on these little tables needed some serious attention!

One interesting tidbit I ran across was how to determine if you have solid brass or brass plated...a magnet...magnets won't stick to solid brass...if it sticks, it is plated...interesting. Mine are solid so that determined how "aggressive" I could be cleaning them.

I'm not sure if a "clear coat" was sprayed on this hardware or age had taken a toll (maybe both), but even my 1/2 and 1/2 mixture didn't cut it. In the end I used a toothbrush, 0000 steal wool, a heavy duty brass cleaner and a ton of elbow grease.

Then I gave the entire piece a little KSTP treatment...Kilz, sand, tack cloth and then paint. 

I really like the look of "high gloss" so I went with a high gloss lacquer white...I think the brass really pops against the gloss white and hopefully it will look good with whatever couch I finally set my sights on!

One word of warning I hope all will take seriously...give paint time to "cure." Nothing is more frustrating than spending time and effort making a piece pretty with paint, only to mess it up by putting doo-dads on it too soon! Cure time IS important!!!! 

I cleaned up the other and it may be sold...I may hang onto it for the time being to see if I can use it in the den...but I am not really into "matchy-matchy" so I may not use it...who knows. And besides, that brass is a booger to shine up so I'm not really looking forward to doing that again any time soon!!!

You may notice I have a mix of MCM and "traditional" in my den...and that is honestly how I would describe "my style"....eclectic or maybe "transitional"...a little of this and a little of that. It allows me to add elements I love without having to worry too much about the actual "style" of each piece. 

Until next week....

Oak trestle table makeover...

I bought a table at an auction this past weekend that may be difficult for me to sell...

Hang with me...I know it didn't look like a winner when I brought it home, but the vision was there.

The reason it may be difficult to turn loose of is because I have been contemplating giving my dining room a little "farmhouse" flare.

Again, that is not "my style." But if I can infuse a little bit of the current craze into my decor without a lot of expense and time (like I did here with my bed), I am willing to give it a shot.

For 17 years, my dining room has basically been a "walk through"...from the living area, to the kitchen, to the den....we always use the bar for meals. The table (that got a makeover here) is pushed against the wall for 364 days out of the year and only comes out for Thanksgiving dinner. With the inserts added it easily seats 6-8 with the addition of a few chairs and a bench

But the antique trestle table fits right into my "I think I might" plan. It is the perfect size and style, just needs a little face lift.

The first draw back is it is oak. Again, NOT my favorite wood, but honestly oak is a great "farmhouse" wood to work with.

Second, I like my toes...they aren't the greatest toes, but they always seem to find anything that is out of place...vacuum cleaners, chairs, tables, an animal...whatever is NOT suppose to be there, the toes will find it. One of the reasons I am super careful moving furniture around.

The fact that there has not been a table in the middle of this room for 17 years may pose a problem for my toes.

To complete my vision, I would need the perfect chairs...not a huge deal because I see awesome chairs all the time at auctions. I may have to find a buffet for the wall...had one a few years ago and I kind of liked having a place for a little "fluff." And then there is the whole window, wall, rug, trim detail thing...hum. 

Regardless of what I do in my own home, I know the table needs a little love and attention. So that was the project this week...give this little table a makeover as if it were going into my own home. Then if I decide to actually move forward with my vision for the dining room, I have the table...if not, someone else will get a beautiful antique dining table!

I easily stripped the top using this process...not a lot of finish left on this old beauty but it did have dark "water rings." 

Several months ago a very wise reader commented on another table project and suggested using oxalic acid on water rings. I have never tried it and always just "embraced" the imperfections on antique pieces since nothing I tried worked well. But I did order the acid and had it on hand.

WOW!!!! Just wow. Worked like a charm. I made a paste with the acid crystals and water, dabbed it on the ring, and within 30 minutes, gone! I was a little miffed at first because it "bleached" the wood, but I scrubbed it with my 1/2 and 1/2 mixture and that disappeared as well!

I stained the top and applied three coats of tung oil finish...my favorite! I painted the base with homemade chalk paint, distressed a bit and sealed with polycrylic.

Just beautiful....for now I am going to take my daughter's advise...set it in place and mull it over. Maybe see how many times my toes find it!!!! No harm in letting it hang out for the time being (except for maybe a few toes!)

Right now my den is in disarray and I am trying to decide what I want to do. I gave my couch to my daughter so now I have no choice but to buy a new couch...part of the "den makeover" plan that started several years ago (remember, if you can't "see" it, get rid of what is there and live with a blank slate for a time) Since the reveal, the club chair has been reupholstered and moved to the living room to make room for Brian's big leather chair. The coffee table is laying on Mitchell's bed because we needed more room for Cleo and our grandpuppy, Zoey, to wrestle! There is a new rug...

The jury is still out on it...doesn't seem to be wearing well and not real comfy...hum. I like the look, just not sure I like THIS rug!

So taking on a dining room makeover just isn't on my priority list right now. I know if I am ever going to do it, I should probably hang onto this table since they cost a pretty penny new. But I also know that if I take the plunge I will have a sizable project on my hands...and my hands are pretty full right now.

Maybe it can just hang out for the time being! Never know when a bug attack!

Until next week....

Our trip to New York City!

I am not a "travel blogger" so I rarely share my travels (not that I go too many places) but last week my youngest son, Matt, and I spent 3 1/2 days in New York City.

In 2005 the boys and I went to New York so Mitchell could do a photo shoot with Emmitt Smith. An awesome experience and the one day of sight-seeing hooked me....a city I never cared to visit became a city I couldn't wait to see again...it only took 12 years.

Matt and I met at Laguardia Sunday night...I flew in from Northwest Arkansas, he from Detroit. We hit the ground running Monday morning and spent three and 1/2 days walking, climbing, riding, standing and seeing....by the time we left Thursday afternoon, I wasn't sure I could manage walking to my gate, but we had a blast!

First, I got to spend time with one of my kids. That is, by far, one of my greatest pleasures in life. I watch worn out, stressed out parents with small kids and I know now that those tough years were worth every second...and I often wish I could go back and live every minute of that time! They go off to college and become adults and believe it or not, you miss them terribly...so getting to spend three fun-filled days with one of them is a true treasure!

I didn't take a decent camera (not that I know how to use my expensive digital camera) so all my pictures were taken with my I-phone. But that is okay....I think sometimes were are so busy trying to "capture the moment" with our cameras that we forget to take our eye out of the lens and really "see" the moment. Making memories is about living in the moment, not just capturing it on film (showing my age here...lol!)

But we did stop to take a few pictures along the way!

One place I desperately wanted to visit again was "Ground Zero." When we were there in 2005, the site was just a huge hole in the ground. I was amazed by the very existence of St. Paul's chapel across the street from the World Trade Towers....it seemed to be untouched by the massive destruction of the towers!

This little church, were George Washington prayed after his inauguration, survived that fateful day in 2001 and actually opened it's doors to the people who worked tirelessly in the days and months that followed. They have a room dedicated to 911 memorabilia, the most interesting to me was a pew from the chapel on which rescuers rested, leaving scratches and gouges from the equipment they wore. How tired they must have been....

When you looked west in 2005, across the serene cemetery that surrounds the church, you saw nothing...where the towers stood there was nothing but a gaping hole... an ugly wound on the landscape of our country.

A beautiful new tower and stunning memorial literally rose from the ashes. It is not the view that was there on September 10, 2001, but what is there is a testament to our country's resilience and strength....

The 911 memorial is...well honestly, I can not describe it. You have to see it for yourself. I am sure there are writers who could capture the magnitude and magnificence of the place, but I believe that every person will experience it differently...I don't think my words can do it justice. 

As I walked around the memorial, I noticed little white roses stuck in a few of the names inscribed in the memorial. When I finally took time to read the plaques, I discovered why. Such a simple but powerful reminder of what that one day means to someone, somewhere. 

We went into the 911 museum. It is a vast underground maze chronicling the events and people of that fateful day and the days that followed. I did not take pictures...I was too overwhelmed reading and listening and seeing to even think about taking a picture. The sheer magnitude of what happened, the lives lost and the final moments of their lives, the experiences of the survivors and first responders, and our country's collective reaction on that day and in the days that followed, completely overwhelmed my mind and senses. 

One quick observation shared by me and my son. I know the museum is meant to be a "historical accounting" of that event...and I understand why certain things were included. But both Matt and I walked away disturbed by the inclusion of the pictures and history of the "terrorists" who were responsible for the events that unfolded and changed the course of history. I came home and did a little research on the "why"....it is one of those things my mind understands, but not my heart.

From the memorial and museum we headed south to Battery Park...beautiful park with the friendliest little squirrels. I have pictures of Matt hand feeding peanuts to the little guys when we visited in 2005. This one figured out real quick that Matt didn't have any REAL food...he then proceeded to attack him. 

We took the ferry to Liberty Island and Ellis Island. Historical sites you have to see.

I took this picture from the main building on Ellis Island. I'm sure entering the harbor and seeing the Statute of Liberty was exhilarating...but millions of immigrants stood where I stood knowing that the final moments to their new lives were just a few processes away.

And that was just the first day! We went to the top of the Rockefeller Center (we did the Empire State building in 2005) BTW, my son (who is a pilot) is terrified of heights...so you can imagine what this view did to his blood pressure!

The view of Lower Manhattan from "Top of the Rock"

The architecture throughout New York City is simply breathtaking...from the simple little "5 floor walk-up" apartments to the magnificent churches throughout the city....

St. Patrick's on 5th Avenue

Central Park....

An absolute "must see" and if you really want to impress everyone rent a bike and ride ALL the way around the park. I'm still recovering a week later but by gosh I did it!!!

We rode a subway for the first time (only 2 stops but it counts!) from Grand Central Station. We walked across the Brooklyn Bridge. We visited the magnificent New York City library and enjoyed an evening in the park listening to a jazz band and watching the swing dancers. We toured the Intrepid carrier and saw the Enterprise space shuttle. We rode a water taxi. We took pictures with the Wall Street bull. We rode across the Manhattan bridge at night. We ate beef on a stick and breakfast in a cafe where the owner sat at the bar and visited in either Italian or Greek (not sure which!) 

For us the absolute best way to get around New York and visit all the amazing sites was with a New York City Pass. It allowed us to ride all over the city and take in all the beautiful sights and sounds without getting crushed by the mass of New Yorkers and tourists on the sidewalks. The pass includes admission to anything you would want to see....worth every penny!

We didn't even make it to all the museums or Chinatown or the garment district or a Broadway show or any number of things we could have done...but I honestly think that might take several weeks...I was lucky to survive three full days!

New York is certainly not the place I would choose to live...but it is definitely one of those places you have to visit! Whether your passion is food, architecture, different cultures, history, entertainment, etc...it is ALL there!

Home again and back to the grind stone so next week I'll again start sharing what I know best....

Until then....

Gun cabinet "repurpose."

I saw a picture online of a "repurposed" gun cabinet and thought...cruuuuuud! I see those ALL the time at auctions and they go for nothing. Dang! NOW I know what I could do with one! 

Lo and behold, the very next week, I found one at an auction! 

Structurally it was pretty sound. Just needed a little TLC!

First, I gave it a good cleaning...usually a dish detergent and water does the trick. I CAREFULLY removed the sliding glass doors, popped the back off, removed the gun rack shelf and hardware then I painted the entire piece with homemade chalk paint. A little "distressing" to give it that "farmhouse" vibe. 

My go-to recipe for homemade chalk paint is 3 tablespoons of plaster of paris mixed well with 1 1/2 tablespoons of water...then add one cup of flat latex paint...mix well. I usually only mix up what I am going to need for a project since it really doesn't store well!

After I painted the entire cabinet, I added three shelves. I painted those with latex paint since I didn't "distress" them. 

The new back is "paint stained" bead board. I used the same process to "stain" it as I used on THIS cabinet makeover. Water down any colored paint, brush it on the wood and immediately wipe it off.

I sealed the entire piece with a clear coat...again, I never wax! New cup pull hardware on the drawer and it is good to go! 

Simple little makeover!

As you might notice, I rarely take time to "stage" a piece. More doing, less froo-frooing! 

I just happen to have this little walnut clock laying around....

While I had some chalk paint mixed up I decided to give it a quick little makeover as well...similar to this wall clock.

This makeover produced all the "scrap" bead board I used on this little bee box shelf I feature here....

You may have noticed I actually did TWO posts this week. Truth is I had this one ready to go for next week and well...I wasn't paying attention. But that is okay because next week I will be in NEW YORK CITY!!!! Yippeeee...just a little mini vacation with my son Matt...seeing the sights and doing the "tourist" thing. So until week after next....

Bee Box Shelf....

Sometimes things get "stored" in my garage and I spend a few years kicking them around. 

My daughter started raising bees several years ago. She would occasionally bring home old "bee boxes" to paint. 

One has been hanging out in my garage for...oh, I would say at LEAST two years. Waiting to be painted. Never happened.

In my quest to "organize" my mess of a garage I decided to purge a few things...but it is always hard for me to toss anything wood. One of my few "hoarding" tendencies.

An old bee box...scrap pieces of bead board from another project...old dresser drawer pieces...hum....what to do, what to do!?

Yep...a "bee box" shelf.

I used one side of an antique dresser drawer as the shelf and the scrap bead board for the back. A little glue...a few nails. I sanded the box and the shelf to clean them up a bit. (I could actually smell the honey!)After sanding and assembling I sprayed the entire piece with a clear coat just to seal the "chippy" paint.

Easy, peasy. 

Not my style so of course it will be sold, but just a quick reminder that you can turn any old "scraps" into something pretty and functional with just a little imagination...this didn't take too much time or any expensive tools...just a saw to cut the shelf, a hammer and a little sand paper. 

Next week I'll share the project that produced all the scrap bead board...another "repurposing" project! 

Until then....

MCM dresser makeover AGAIN!

I featured my personal dresser make over here!

I really love this dresser but as I mentioned in the original post, I have always regretted painting the drawer fronts. They have a little slant and as you can see in the linked post, they have a little "inlay" detail! Looking back, I wish I had stripped the drawer fronts, oiled them and just painted the cabinet and top....kind of like what I did with this dresser!

I guess I could have rolled up my sleeves and taken on the task of stripping the fronts...but honestly, you can't go back and easily undo what has been done...or can you?

If you find the exact same dresser, YES YOU CAN!!!

I happen to be driving down the street this past weekend and spotted a dresser and chest of drawers sitting out in a driveway. It just so happens they were the EXACT same style I have. I couldn't stop fast enough (annoying to the person behind me since I was hauling my 14' trailer) but was disappointed when told someone was coming to pick them up later that evening. I asked them to call me if they weren't picked up...that is when I found out they were GIVING them away...would I be willing to PAY for them? YOU BET YOUR BAZOOKA!!!! I couldn't get them in my truck fast enough. Do I feel a tad guilty that someone showed up later that evening to pick up their free furniture...only to find it gone...naaaaaa...okay just a tad.

So this is what the dresser looks like in it's original glory! A "Ward Furniture Manufacturing" dresser. It is identical to my blue one before I gave it a little makeover.

Hardly a scratch on it and the veneer was all intact and in good condition. I am always amazed when a 50 year old piece of furniture is in such amazing condition...I wish this 53 year old had faired as well!

I removed all the drawers and stripped the fronts using this process...never fails and a pretty quick process! Even though the finish was near perfect, old finishes "muddy" and "amber" over time and just removing the old finish really brings out the beauty of the piece!

TIP! When you remove drawers from a chest or dresser, make sure you label each drawer (I mark them on the underside with a pencil!) 

The drawers may look identical, but truth is they may not fit properly in a different place...age and wear can make drawers "stick" if they aren't put back where they were originally! 

I gave the cabinet a little KSTP treatment...Kilz, sand, tack and paint! I applied 4 coats of tung oil finish to the drawer fronts and legs...sanding (with 0000 steel wool) and tack between each coat. 

I. LOVE. WALNUT. AND I. LOVE. MID CENTURY! 

And now I. LOVE. THIS. DRESSER! 

I didn't "dislike" the original dresser, but again, I did regret that I didn't restore the drawer fronts. Now...perfect! 

As much as I would love to keep the matching chest, it will be sold. Can't keep every piece and since these aren't "valuable" MCM pieces, I don't feel too bad letting it go!  

Painting dressers today so until next week....

A new bed frame!

The last time I shared my master bedroom I had just finished the laminate flooring!

In this post I shared the "before and after" of my bedroom furniture.....

The bed was just so big and heavy and dark! Painting helped a bit, but it was still pretty big and "scrolly"...and I was just never really fond of it. For the record, I was madly in love with the entire set when I paid a fortune for it 16 years ago...but not so much these days.

It is no secret that in my OWN home, I have been slow to embrace the "country" style in large scale...mostly because I am afraid it will be a "passing fad." Not as bad as the chevron and burlap "fad" of 2014, but I worry enough about it that I am not going to start dragging my prized furniture to the garage and slathering it in chalk paint. (And for the record, it is another reason I am a HUGE advocate of sealing chalk paint with poly rather than wax...when the fad fades, you can easily repaint the pieces without having to strip the wax! And yes, you will have to strip the wax!)

What I have done is be very selective about incorporating the style into my home decor with a few pieces that I won't be too torn up about when the "fad" fades and I have to restyle them or dispose of them. 

To me, that is the secret to decorating. Incorporate the latest trends in less expensive ways...decorative pillows and curtains, wall decor, small furniture, wall paint. 

It is one reason I have not jumped on the painted white cabinet train...it is a HUGE undertaking...both financially and physically, and when the trend fizzles in a few years, there are going to be a lot of people not so happy with a kitchen filled with expensive painted cabinets. (For the record, I am NOT opposed to painting some kitchen cabinets...just not mine...yet!)

"But white cabinets never go out of style" you say. Well I say you obviously don't remember "honey oak" or "cherry furniture." EVERYTHING goes out of style. So be selective and proceed with caution when shelling out big bucks and Herculian effort to follow the trends! Do what you love, but think very carefully before taking on a massive Pinterest project!

Sooooo...back to the big, heavy and still too "dark" bed frame. 

Since I have not been "in love" with this piece of furniture for many years, and since I have made an effort to TRY to fall in love with it again, and failed, it is time to make a change.

And here is how I did it....

Now, before you think "OMG, she bought an expensive country style bed frame," let me tell you how I did a little horse trading to get this piece without breaking the bank.

First, I bought an entire bed room set at an auction. I didn't take pictures of the bed frame, but this is the matching dresser and nightstand...

Honey oak...EEEECKKK! My least favorite wood and color. And it is certainly "not my style." But stay with me!

So it came with a mattress and boxsprings...I didn't need them so the auctioneer resold those for me...deduction number one. Then I sold my old bed frame...deduction number two. At this point, I am at "break even." The dresser and bedside tables are getting a makeover and will be sold. The frame got a little makeover for my room.

This is how I justify incorporating the latest trend in my bedroom...it didn't cost me anything but a little time and paint.

Am I madly in love with it? Umm...not really but I like that I have incorporated the latest trend with little expense and effort.

I like that it is not as big and dark and hulking as my other bed frame...simpler, smaller, different. 

I do LOVE the fact that when the "country faze" finally fizzles, I will not beat myself up for disposing of an expensive piece of "trendy" furniture! 

Adding elements of the current "decor craze" doesn't always entail making a big financial commitment.

Case in point....