WHATEVER soup....
Hopefully we are in the last few weeks of this winter deep freeze. But there is still time to make a few crock pots of soup to warm your tummies!
Today I posted my "WHATEVER" soup recipe...when you see it, you'll get it!
Enjoy!


Hopefully we are in the last few weeks of this winter deep freeze. But there is still time to make a few crock pots of soup to warm your tummies!
Today I posted my "WHATEVER" soup recipe...when you see it, you'll get it!
Enjoy!
Thank goodness I got this chore done last week when it was in the 60s. Yesterday we had rain, sleet, ice, snow AND thunder...all in a thirty minute span. And then MORE ice, sleet and snow. I am sooooo ready for spring this year!
When I bought this house, I had a plain ole' metal "builder" grade door. I hated that thing. Not only was it ugly and had zero character, but I might as well have had a window open on cold windy days. Miserable.
So years ago I bought and installed an awesome fiberglass "mission style" door. You could buy the little shelf thingy that went under the window, but I liked the simplicity of it without the shelf! It has a "fake" wood grain on both the interior and exterior sides. I love that it lets a tad of light in, and I am able to see who is at my door without having to install an ugly peep hole. I removed the entire frame of the existing door and bought and installed this "prehung" door. "Pre-hung" doors come in the frame and you just slip it into the existing framing...sounds easy, huh? New frame, trim and exterior brick mold...lots of foam insulation...and this puppy is air tight!
I painted it black. Occasionally I get a bug and contemplate painting it a bright funky color...maybe a pretty teal color. But my home exterior is a very "traditional" red brick, so I decided to stick with a traditional color....black. Blah, I know...
But over the years, colors tend to fade...and doors get a lot of wear and tear. People may never see your laundry room or bathroom or closet...but they will see your front door EVERY time! Keep it in good shape!
This Christmas I put one of those "rub on" decals that said "Merry Christmas" across the door. When I peeled it off a few chips of paint came with it. No biggy...the door needed to be painted anyway! Perfect opportunity to go with a bright funky color...right?
Nope. Black. Again. I'm boring, I know!
So today I am going to share with you how to freshen up your front door...whether you stick with a blah color or decide to go with bright and funky! Makes no difference. (I say go with the bright funky!)
Usually I paint interior doors and trim with oil-based paints but I decided to go with a latex interior-exterior paint. No earth shattering reason....just did. I bought a premixed black because black is a really tough color to have custom mixed and besides...I just want plain ole' black.
Before you start painting, make sure you give the door a good cleaning...if nothing more than a wipe down with a damp lint free cloth to get the dust off. Scrub with water and a mild detergent if it is really dirty. Just make sure you wipe it down with clear water to remove the detergent residue! Paint will not stick to some soap/cleaner residues and it will not stick to oils and dirt!
The first thing I had to do was deal with the "chips" from the decal. If you just paint the entire door, chips and all, the chips are still going to "show" through. The best way to deal with that is lightly "sand" the spot with steel wool to feather out the edges a tiny bit.
Then take a small brush and dab a little paint over the area. Don't "glob".... just kind of "prime" the area with a coat of paint.
If you have rust on a steel door, you need to sand the rusted area smooth, wipe it with mineral spirits and then prime it with a primer specifically designed to seal the rust BEFORE you paint. Ask...they have it!
This is also a good time to remove any old kick plates, door knockers and such you might want to get rid of. Just remove them, fill any holes with wood filler, let it dry, then sand and prime. This may add a little time to the process, but this is the time to do it!
Some kick plates and knockers are applied with adhesives...just pop them off and then use mineral spirits to remove the adhesive stuck on the door.
And of course, if the door is "raw wood" or has never been painted, you will want to use a good exterior primer on the entire door before applying your paint! You will want to tape BEFORE you do this!
Tape off any windows, peep holes, hinges, knobs, etc. I have found the green "Frog" tape is totally awesome. A little more expensive than regular ole' masking tape, but really worth it in the long run.
TAPE OFF THE HINGES! Nothing is uglier than painted hinges...unless they have already been painted...then whatever! Easiest way to tape a hinge is to lay a piece of tape over the entire hinge, then take your utility knife (with a VERY sharp blade) and trim the hinge...presto! Also, make sure you run a piece of tape down the edges of the door you won't be painting...that way you don't risk making a mess on the inside white edge of your door when you are painting the outside that funky bright color!!!
TIP!!! I see people make this glaring mistake ALL the time. What color do you paint the edges of the door, if the front and back are two different colors? Here is the rule...stand directly in front of the side of the door you are painting and open your door a tad....the edge you see should be painted the same color as the side you are painting.
Example...if I am standing outside looking at the outside of my door while it is open, I see the "hinge edge." Therefore, the hinge edge is to be the same color as the front of my door. If I am standing on the inside, facing the inside of the door, I see the "latch edge." Therefore the latch edge would be the same color as the inside of my door.
This "rule" applies to all doors...paint or stain...interior or exterior! Hope that makes sense!
Not a huge biggy for me because I have painted all the interior doors black...but I used oil base on the inside, so I taped off the edge.
ANOTHER TIP! I know I have probably posted this tip before, but it bares repeating. When opening a new can of paint, stain or finish, take a small nail and a hammer and punch little holes along the INSIDE rim of the open can. That way, when you pour the paint or wipe your brush on the edge, any paint that settles in the rim will drip back down into the can, rather than end up on your face and walls when you hammer the lid back on. And it keeps paint from gumming up on the edge and making it impossible to open the can again in the future!
Okay, so the door is clean, the "chips" and rust are primed, everything is taped off, and we are ready to paint.
There are several good references on the web as to "how to" paint a door...which direction to brush or roll. The best advice I can give is ALWAYS paint WITH the grain! In my case, my doors all have "fake" grains. Not all doors do, and if yours does not, you can use this reference I found here...
For ALL doors, especially "flat" doors with no grain, I highly recommend the 4" sponge rollers. I use a brush to get in the corners and such, but then I go back and roll as much as I can. Brushes are good, and a good brush can make a world of different. But the little foam rollers leave a nice "smooth" finish. And remember, latex paints dry a LOT faster than oil-based, so the paint doesn't have a lot of time to "level"...in other words, smooth out on it's own. If you leave brush strokes, there is a good chance they will be there when the paint dries.
And the REALLY awesome thing...sponge rollers are cheap and you can toss them rather than clean them!
Again, I always add a little Floetrol additive to latex paints (Penetrol for oil-based) just to help the paint go on a little smoother!
Now paint! Follow the chart if you have to, but again, go with the grain!
I only had to put one coat on my door since I wasn't changing the color. If you are changing your color or the door has never been painted, you need to put on two coats! Follow the direction on the paint for dry time!
TIP: When painting doors, or anything you have taped off, CAREFULLY remove the tape while the paint is still wet. I usually do this right after I clean my brush. If you wait until the paint dries, you risk "peeling" the paint off the surface. Huge mess...just trust me!
And there you have it! A fresh front door ready for that spring decor...provided it ever warms up again!
Check out the tutorial HERE on how to paint your address on your front door...the RIGHT way!
I thought I would give you a sneak peek at what I am working on this week to feature.
A freshly painted front door....
A facelift for an old chair....
I try to post on Mondays and Thursday so check back in this week!!!
We have winter weather moving back in so not sure how much I can get done...but I have a few projects in queue so there is always something fun to share. See you soon!
Envy is a bad thing. We all know that.
But occasionally I stumble across a beautiful display of ironstone on a blog or Pinterest. The crisp, whiteness of the ironstone is just beautiful. It just looks so "clean" and pretty. And for a second, I envy.
Don't ask me why. Truth is, I have no use for "knick-knacks" or non-useful items that require dusting...even if they do look pretty!
But heirloom pieces are another matter and I decorate with them whenever possible! I love the dishes and china I do display because every single one of them is an heirloom piece inherited from my grandmothers, great grandmother and mom, as well as a few pieces of my own.
As I have mentioned before, my decor taste has transitioned over the years from "traditional" to more "mid-century." But truth is, my home decor is probably more "traditional" than "modern." I describe it as "eclectic." Regardless of the style, I have worked hard to remove the things I don't particularly care for and fill my home with pieces I love.
I seriously cherish the heirloom pieces I have inherited from family, and in spite of the fact most lean more towards "traditional," I display them with honor and pride.
That is what makes a house a home.....surrounding yourself with pieces you love and cherish and have meaning!
Several years ago I bought this curio cabinet so I would have a safe place to display my heirloom china. (I'm seriously thinking about painting it!) It is obviously not big enough to store ALL the china I have inherited, but I decided to display one place setting of each set. The rest is carefully wrapped and packed and stored in clearly marked boxes in the attic.
I have two sets from my maternal great-grandmother....
One of my maternal grandmother's....
My paternal grandmother's stoneware....(interesting story about the tea pitcher you can read about here) This is my favorite (right now) because it is pretty much "my style" right now. Simple, soft "blue mist" color and platinum edge.
My china...I have THREE sets (One isn't even displayed). Don't ask me why, other than the fact that I love china. And I hadn't inherited my grandmothers' yet so I felt I should have a set...or two...or three. Funny (only now, years later!) story about the first set. I bought a full set at an auction 25 years ago. Years later, while in the process of moving, I had displayed the entire set in my china hutch...not realizing that the top shelf was not secure...and it ALL came crashing down. Naturally, it broke the least replaceable pieces...the tea pot, salt and pepper shakers, sugar and creamer set.
Six years later, I went to an auction at a house my (ex) husband and I were buying...the lady was in her 90s and she had a beautiful set of china...identical to the one I had!! She had all the "select" pieces I had broken. PAY DIRT!
I bought this set at an auction as well.
I have filled the cabinet with a few other heirloom pieces.
A Fenton tulip vase that was my mother's. She has another that matches this one!
A pink carnival cream and sugar set...
...and more!
I run across beautiful pieces like this all the time in estate auctions. Fine china, Fenton and carnival glass, painted porcelain and Wedgwood...all for ridiculously cheap prices. Primarily because in today's world of decorating everyone wants the "clean, crisp" of stoneware and ironstone. And let's be honest, who really USES these pieces any more? Most of it is not even dishwasher safe...GASP!
But it is beautiful...and if they are pieces you have inherited from you family, you should display them with pride.
UPDATE: When I first posted this I spelled Cristina's name wrong...one of the few things we bloggers ask for is proper credit! My apologies! Thankfully the links still worked so make sure you drop in and see her wonderful stools!!
Cristina at Remodelando la Casa inspired me. Or rather SHE STARTED IT ALL! I was perfectly content with my boring little kitchen stool.
I stumbled across Cristina's stools she "gussied up" with a little reconstruction, some paint, graphics and stain. Suddenly my boring little stool seemed very pathetic and bland!
Actually, I have two little stools. I painted one a "mustard" yellow color and took it to my booth. I kept the natural one in my kitchen. But the cabinet drawers wouldn't open unless I moved it, so I brought the yellow one home...it's a tad shorter and I don't have to move it to open a drawer!
Christina was kind enough to share her "coffee" graphic and I really like all the little graphic designs at The Graphics Fairy. Let's be honest....I'm more comfortable with a skill saw and paint brush than I am with transfer paper and iron-on stuff. But I have always wanted to try the different "transfer" methods, so I thought these little stools would be the perfect medium for a test run.
I first tried the "wax paper" transfer method. (All of these different transfer methods are outline here!) I used it on the yellow stool. It is a great method, but I can honestly tell you it is NOT as easy as it looks and sounds. The good news is, if you mess it up, it will wash right off a painted wood finish with soap and water. It took me four shots to get a halfway decent transfer and even then the imagine is a bit "blurry" and "blotchy" from my inability to keep it still during the transfer process. Honestly, I wouldn't sell this stool but it will do fine in my own kitchen.
I painted the little birdie graphic on the other stool after I sanded the old finish off the top...
I used the same method of transfer I used here on the pillows. I printed off my graphic, taped sewing trace paper on the back of the picture, traced it onto the stool top and then hand painted it with black latex paint (without the fabric medium!) You can also use a black sharpie!
Then I applied a couple of coats of walnut stain and sealed it with a spray on poly. I also spray painted the legs off-white!
I found this disgusting, broken down shop stool in an apartment.
I removed the stool top (not hard since it was missing two bolts) and removed the old rubber feet. I scrubbed the metal base, primed it with metal primer, sanded, tacked and sprayed it with a gloss black. I bought new rubber feeties at Lowe's and put them on!
I removed what was left of the old plastic seat cover. I added 1" foam padding to the top (spray the top with a little spray adhesive just so the padding won't move) and then covered the entire top and sides with two layers of batting. I use regular quilt batting on stuff like this...just softens the edges a bit so the fabric lays better and you don't feel the "hardness" of the wood frame. I do the same on ottomans
I used plain ole' drop cloth material (washed and dried) for the top. It is inexpensive and not something I will stress about if my transfer experiment goes wonky. I cut out a piece big enough to cover the entire seat and sides and applied the transfer to the fabric BEFORE covering the stool top.
After reading The Graphic Fairy tutorials, I settled on this iron on transfer paper. The Amazon reviews were a tad mixed but honestly, I usually follow the lead of other "DIYers." If it works for them, it should work for me.
And it did. I followed the directions on the package to a T to apply the transfer to the fabric and then covered my stool seat. Honestly, I am not happy with the "pleating" on the sides, but the seat is round and I have a bum shoulder...what can I say! I used fabric glue to add a piece of black fabric to the underside, just to give it a nice "finished" look in case someone is laying on the floor looking at it. Plain ole' felt works great for that kind of thing.
So there you have it...three super simple stool makeovers with three different transfer methods.
And while I am at it...let me show you another little stool I found in an apartment...
Cheap little stool...nothing fancy. It was missing one of the cross bracings so I cut a piece of 1x2 poplar and glued and clamped it in place. Then a little kilz, sand, tack and Valspar "Azure Snow" spray paint. I didn't even recover the top...just a good cleaning!
Cristina was generous enough to share her coffee graphic with me, but I decided not to copy her TOO much...although I do intend to use it at some point...on something! And her transfer method was a tad different than mine, so make sure you check it out! I will definitely try it as well!
Experiment...do what works for YOU! The Graphic Fairy has 100s of awesome transfers free for your own use and easy to follow tutorials that will help you transfer onto ANYTHING!
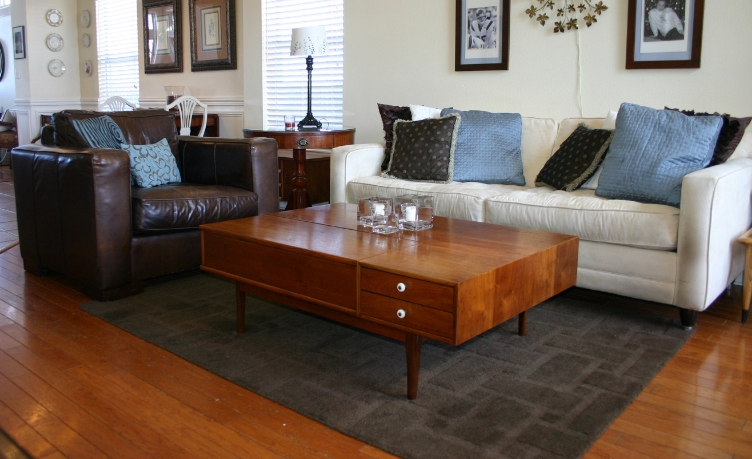
As I mentioned in this post, having the properly sized area rug in any room is a must! I had a brown wool rug I bought on the cheap from Target....but I have always known it was the wrong size. Especially after I put the awesome mid-century coffee table in the room!
If your furniture grouping BARELY fits on the rug, you know it is too small. HGTV is a great resource for figuring out what size rug you need for your space!
Area rugs are an important element in my decor....primarily because over the years I have removed every stitch of carpet in my house, except my master bedroom.
I even removed the carpet from my stairs and put down oak treads and risers. Every time I am able to clean the stairs with a dust rag rather than hauling a vacuum cleaner up and down, I am soooo happy I did this! If you have carpeted stairs, there is hope! When I pulled the carpet from this space I not only found that it was just "rough framing" but the amount of dust, sand, and filth under the carpet and padding was enough to make a grown woman barf! It is a tedious project, but trust me, if you don't think you have the skill to complete this project, it is well worth the money to hire it done!!! Best money you will ever spend. Someday I will post a tutorial on how to do this...it IS a doable DIY project...just one big "puzzle" that requires a chop saw, nail gun and construction mastic! And caulk and stain and poly...and time...and no kids for a few days...but that's all...I think.
Anywho, after training a puppy (who is now 12) and with my aversion to filth and dust, hard surface floors throughout the house were a must. The ONLY reason I haven't pulled the carpet from my master bedroom is because I haven't quite figured out what I want to do design-wise...so I don't know what kind of flooring I want to go with just yet...someday!
An area rug can pull together a room aesthetically and of course provide comfort and warmth under foot in the sitting areas! As my "old kitty" Molly aged, it became apparent area rugs where not something I was going to be able to have for a time...trust me, once they have been "used" you will not get the smell out no matter what you clean it with and they WILL get "used" again! (YOU may not smell it, but THEY will!) So for years, we have done without.
But now Molly stays in my bathroom, with an occasional trip outside when it is warm. So for now I don't have to worry about my rugs being "used."
Which explains the inexpensive, small brown rug in my living room. We had to have some cozy under our feet but I just couldn't bring myself to spend a lot of money on something that may have to be tossed. It served it's purpose.
Last week after I placed the larger coffee table, the brown area rug became a glaring issue...it just wasn't cutting it! So I went searching for a new rug. I wasn't sure exactly what I wanted, but as I said in my early post, rugs can be a relatively inexpensive way to infuse "fad" colors and design into your decor. "Relatively" being the key words.
I knew I wanted one that was lighter and complimented the blue and brown I have chosen (for now) in my living room. But finding an affordable, attractive 8x10 rug was not an easy task. Rugs can be expensive.
So I took to the interweb and stumbled across this site....Rugsusa.com. At the time they had their rugs 70% off and free shipping!!! Which means the rug I thought I wanted was about $100+ less than what I could find it for on Overstock or Joss and Main, two sites I ALWAYS check when buying anything related to home interior decor.
Now the problem with ordering rugs online is the inability to actually feel the rug and know the TRUE color. If it isn't right, there is the added expense of return shipping, rather than throwing it in your car and taking it back to the store! To put it in layman's terms, it's a "crap shoot."
I've had many wool rugs so I felt pretty confident in the texture of the rug. And I also know that you can completely change the comfort of the rug just by adding inexpensive carpet padding beneath it! So that wasn't a huge issue for me.
Since I was ordering a blue rug, I was a tad worried. But as I looked around this room, I realized I have about 5-6 different "blues" in all the pillows, window seats and frame matting. So as long as it wasn't too terribly glaring in "tone" I was pretty sure it would be okay.
And it was okay...truthfully, I love it. It is provides an awesome template for my new coffee table and while the blue doesn't match all the blues exactly, it compliments everything quite well.
As far as the size...it is perfect. It grounds this sitting area and really pulls this grouping together nicely!!! I love, love, love it! I love the texture, tone and trellis design.
You may notice I don't do a lot of "froo-froo" staging on my coffee table. While I kind of envy all those beautifully staged coffee tables, I know mine will serve one primary function...to rest feet on. Yes, we put our feet on the furniture! That is why I harp on durable, easy-to-fix finishes!
My next big chore for this room is the addition of this mid-century chair I bought eons ago. It is a hot mess right now, but I really think if I reupholster it in a brownish/bluish/taupish wool fabric, it will be awesome! I love the style and construction which is why I bought it even though the upholstery was hideous!
Right now, it is my booth at Midtown...if it doesn't sell, it is coming home for a major makeover...as soon as my shoulder and hip heals!
Oh, the shoulder and hip? What did I do to it? I turned 50! And if you think that carpet on your stairs is okay and it's not a problem to occasionally haul a vacuum cleaner up and down, wait til you turn 50!
One big "fad" right now are the old wood benches and tool boxes...."primitives." I've had a few in my booth and they fly out the door. Like this one I featured here....
I'm not really in to all the "primitive" decor...including old wood benches and tool boxes. But it dawned on me a while back that I had my dad's old wood work bench stored in one of my supply buildings at the apartments. And while I am not big on "vintage" or "primitive," I am a huge fan of "heirlooms!"
He built this little bench and for as long as I can remember he carried his tools in it and even used it as a step stool!
When I finally dug it out, I found that it was in worse shape than I remembered....covered in some serious gunk, oil, filth and old paint! The top board and one of the cross boards had cracks! (Again, my photography skills just don't do it justice!)
Probably to be expected...I remember my dad using this bench when I was little. And I know I used it for many years. While I was stripping it I discovered old royal blue paint all over it...royal blue paint? Then I remembered...25 years ago I painted my sons' bunk beds royal blue...and evidently I used this old bench during the process.
It took some serious time and chemicals to strip off all the old paint and gunk. I didn't want to sand it because I want to retain all the "character" beat into the wood from decades of use!
I don't know if dad used a skill saw to cut the boards when he built this, but I have no doubt he used a hand saw to cut the Vs in the legs...you could actually see the saw marks!
After removing all the old paint and gunk, I even found where someone (me?) had carved tic-tac-toe markings in the wood!
After removing all the paint and gunk with chemical removers, I scrubbed the wood with lacquer thinner and steel wool and then washed it with mineral spirits. Then I let it dry out for several days.
I really debated what to do with the little bench at this point. I know it would be really pretty with a nice coat of paint...maybe distressed a bit. But the "character" in the wood is amazing and I really hesitate to do anything to cover any of it!
So for now I just coated it with some tung oil finish. Maybe someday I will get a stroke of inspiration and do something different. Until then I will just admire it for what it is...an old tool bench that my dad built and used.
That, in my book, makes it priceless just as it is!
This is a prime example of WHY you should take anything and everything someone in your family gives you...it may seem like trash at the time, but someday it will be a true treasure. My dad has been gone 19 years...anything I have of his is a treasure!
I started a post entitled 'Reflecting on 50 years of life." I thought I might share all my "pearls" of wisdom. Really? I, of all people, do not need to be giving life lessons...I'm 50 and still learning something new every day! Although I think if others would learn from MY mistakes, their lives would be a lot easier and pleasant. But truth is, everything you need to know to live a fulfilling life is either in the Bible or on Pinterest. Choose wisely (that is ONE of my "pearls"...ALWAYS choose wisely)
Anywho, I decided that I would be better off giving advice on how to make your home a place you will love. I'm not going to give you "decorator tips" because I am not a decorator...I am just a mom who has found a balance by trial and error. Besides, you can find REAL decorators all over the internet who will tell you how to decorate a room!
So here is some of what I know about "home interior decor".....
1) You won't ever wake up and say "THIS is perfect." Your home is ever changing...families grow, kids get older, stuff gets out of date or worn...so embrace the ebb and flow of your changing life and go with it!
2) I give the same advice about major home decor purchases as I do cars...if I show you a stock and tell you that you will pay $40,000 for it today and I can GUARANTEE you it will be worth $20,000 next year, would you buy it? Nope. So why would you buy a brand new car or brand new anything? Personal property (furniture, cars, appliances) WILL depreciate. Keep that in mind when making a home interior purchase. Let someone else take the depreciation "hit" unless it is a piece you are madly in love with and you KNOW it will be in your home until...well, forever! Here is a little trick I use sometimes...take the purchase price, divide it by the REAL number of years you think you will use that item...for example, my living room couch cost me $1500. I knew I loved it and would use it for years...so far, I am going on 10. So basically I paid $150 a year for this couch. Yep, that is reasonable in my book! But the fact I have had it for 10 years is VERY unusual! Most people don't keep couches that long! Do the math...spend your money wisely!
3) With that advice in mind, whenever you can, buy used and make it your own! Learn to paint...learn to refinish...learn to reupholster. And if you just don't want to do that...or feel you can't...learn patience! Because I can promise you, that "vision" you have in your head for a new tv cabinet or bedroom set or chair will be out there at a garage sale or on craigslist or at a flea market....or seriously reduced at some point!
I have wanted a coffee table like this for...well, decades. But I never could find the EXACT coffee table I had in my mind...and when I did finally find it, it needed some attention! But my patience and ability to DIY paid off...big time!
4) And with that in mind, NEVER BUY IT OR BRING IT HOME IF YOU DON'T SERIOUSLY LOVE IT! Or will love it with a little "tweeking," Because if you can look at it and say "Wow, I really love that!" there is a good chance it will be something you will still love years from now...you won't ever regret that purchase! My rule...if I have to think about it for more than 10 seconds, I don't need it!
This tv cabinet was expensive...but I love it...it is 8-9 years old and I have NEVER regretted it or questioned the purchase. Great story. When I first fell in love with it, I really couldn't justify spending what they were asking...HOWEVER, they had one that was a "customer cancellation" and had a few VERY minor dings...at HALF the price of a new one. SOLD! And the great thing was they had one of their experts fix the "dings!"
5) Use "fads" sparingly. Pillows, rugs, inexpensive pictures... basic accessories...can all be easily changed. So use "accessories" as a way to infuse "fads." The big stuff...primarily furniture...should be something you LOVE and something you know you will probably love 10 years from now. The only time I break that rule is if it is a second hand piece of furniture that is free or cheap that I am going to "repurpose" or "refinish"...knowing that next year I will pass it along to someone else, or repurpose or refinish it again!
As you can see in my living room I use pillows, framing and the rug to infuse the "blue and brown" that is currently all the rage. In my den, I bought this little inexpensive side table at Salvation Army and stained and painted it.
All can be changed or given away when I "change my style" without breaking the bank!
6) Keep "collecting" to a minimum. Seriously, if you collect more than 1 or 2 things, choose one. Otherwise, it just becomes "clutter." I collect hard back books. And Lane Acclaim table...but those are part of my "timeless furniture" so I don't count them as a "collection." My point, "collections" can quickly become "clutter."
7) If someone offers you a "family heirloom"...china, photos, knick-knacks, furniture...take it! Find a way to infuse it into your decor! And if you just can't right now, store it away. But take it! My grandfathers' tools and leather case...my grandmothers' china...just a few heirlooms and THINGS I LOVE! and decorate with!
8) Pictures. Photos of you, your family, your ancestors...surround yourself with them. Find frames at garage sales and thrift stores and paint them...glue things to them...display them in groupings! They are the people you love...surround yourself with them!
9) Pay attention to tips from designers. There is a proper height for hanging pictures and a proper size rug...know them and follow those hard fast rules! I have a rug that is too small in my living room...I know it is too small and it bugs the heck out of me...which is why I just ordered a new, larger rug...can't wait to share!!!
10) Make your bedding a part of your "bedroom decor" and make it beautiful. You can buy beautiful, inexpensive bedding on Overstock and at T.J. Maxx and Marshall's. But more than anything keep it simple...and make your bed EVERY DAY! Simple is the key because if you have too much froo-froo and too many pillows you might be tempted to NOT make it because it is a tiresome chore!
IMPORTANT TIP! Make your bedroom a "haven." It should not be the room where you do book work, sew, fold clothes, scrapbook, etc...you should never go to bed or wake up to "work." No matter how small your house is or how cramped you are for space, make it the one room in your house where you can "escape!"
11) Don't be afraid to TRY IT!!! If you see something you like on Pinterest, give it a shot! And if you just aren't the crafty/buildy/DIYER kinda person, find a few awesome flea markets and second hand stores to cruise through every so often...trust me, others are doing the DIY/Pinterest thing and usually you can find what you are looking for...but be PATIENT!
12) Paint...there are so many tips and tricks to painting....again I could type a hundred posts on how to properly paint anything and everything...but they are already on the world wide web! But my best suggestion is to CHOOSE WISELY. And the only way to do that is to buy the samples pots and paint BIG swatches on your walls...then look at it...for days...or weeks...or whatever it takes to KNOW it is the color you want! I think I have shared how I choose my paint for my bedroom fireplace wall. I THOUGHT I loved one color...but I kinda liked another too. So I bought little samples of both, painted one half of the wall with each...and looked at it...for days. Turns out, I liked the one I "kinda" liked better. Had I gone with the one I thought I loved, I would have never been happy!
13) Shop thrift stores, flea markets, second hand stores, garage sales, auctions...be picky...be patient....you WILL find what you really love eventually!!!
14) DECLUTTER!!! Clean out your closets, drawers, cabinets, pantries...GET RID OF STUFF! Don't have "stuff" just for the sake of having "stuff." A few years ago, I opened up the cabinets under my book shelves...seriously, I bet I hadn't looked in there in 10 years. You know what I found? A lot of STUFF...and spiders...lots of spiders! I got rid of the stuff AND the spiders!
And before you bring more stuff home, or order it off QVC or Amazon, ask yourself..."Do I REALLY need this." Learn to distinguish between "need" and "want." And if it really isn't a "utility" item that you need, do you truly LOVE it?
I watch those "hoarder" shows on TV and I don't get the sheer magnitude of it...because I can't understand the "mental illness" aspect of the whole thing. But I do understand that we can get soooo caught up in the "wanties" and "gimees" and "Igottahavees" that we surround ourself with STUFF we really don't need. Or even want at some point.
It is one reason I strongly suggest using "fad" stuff sparingly in your decor....trust me, Chevron and burlap WILL go out of style...and your house will look like someone puked 2013 in your living room! It's cute...it can be fun to accent with...but use it sparingly and don't invest so much money in it that you don't feel like you can't get rid of it when it does go out of style!
EVERY SINGLE ITEM in your house should somehow enhance your life or have purpose...if it does not, get rid of it.
Am I guilty of breaking my own rules? Are you KIDDING? I'm just like everyone else...I make, and hopefully learn from my mistakes. I know that if I buy really expensive bedroom furniture because I just HAVE to have it right this minute, someday I will be stuck with furniture I don't really like but can't bare to part with because I paid a fortune for it!
What do I love? Heirlooms, furniture I was patient and waited for until I found THE perfect piece and the right price, stuff I paid little or nothing for and won't feel guilty kicking to the curb when I don't want it any more. I love my home because I have been very careful about surrounding myself with things that are timeless, things that have meaning (pictures, heirlooms, etc) and things I love. I still have a few "warts" here and there...and honestly, they are things I bought "on a whim" and/or paid too much for. But slowly I am trying to weed those things out!
ALWAYS keep your receipts. And if it is something you can't return (from a garage sale or thrift store) make sure you pay so little you won't think twice about turning right around and donating it!
And the NUMBER ONE RULE OF DECORATING YOUR HOME SO YOU WILL LOVE IT...get it clean and organized. Amazing how much more enjoyable your home will be when it is clean, decluttered and organized!
I have a ton of projects piled up in the garage I worked on all weekend...except when my dang hip went out Saturday morning and I had to go over to my neighbor, Caroline, so she could massage the muscle spasms. (Who wouldn't love a massage therapist right across the street!) Then I had to sit...which I don't do well...and stare at the tv...which again, I don't do well. As soon as it would feel a tad better I would jump up and go sand or paint something...then I would hobble back in and grumble about how it sucks to get old! Brian is very sympathetic and helpful...at first. Not so much after I intentionally push the limits.
Seriously, this is the first time in a month it has been nice out and I could project...and my stinking hip goes out...curses!
Anywho, since I not quite ready to share the projects I worked on, I thought it would be a good time to share a "must have" recipe for your recipe book.
Seriously, if you want to impress your family, you have to try this one!
CARAMEL PECAN APPLE PIE....the only thing missing is the chocolate! Next time I think I will throw a handful of chocolate chips in there ;)
This is about as good as it gets...except for a little heart shaped wood wreath by the front door. I go all out for fall and Christmas...not so much for this "holiday."
But LOVES to all my Valentines! You know who you are!
In my home we always hug and say "I love you" when we part...doesn't matter where you are going or for how long you will be gone. Always.
Best parental advice I ever got (and can give)...hug often and NEVER be the first to let go.
I hope the people I love know how I feel EVERY day!