Grandmother's Lemon Jello Cake!
Time for another AWESOME recipe.
This was my Grandmother Stewart's Lemon Jello Cake. An absolutely heavenly recipe and a must have!
Jump over to Cooking 101 and check out this awesome recipe here!

Time for another AWESOME recipe.
This was my Grandmother Stewart's Lemon Jello Cake. An absolutely heavenly recipe and a must have!
Jump over to Cooking 101 and check out this awesome recipe here!
I finally restocked my booths at Midtown and Tontitown! I love filling both with all the goodies I have picked up at auctions and pieces I have repurposed.
Like these pieces I featured here....
The clock shelf, desk, bed frames and typewriter all sold within days!
I work hard to find exciting and unusual pieces and it usually pays off! Debbie at Midtown said people often ask when I am going to be in to restock...seems I have a bit of a following. So I am always anxious to get my little treasures in place and excited to see what has sold!
The secret to my success? Quality repurposing and refinishing, unusual pieces and affordable prices. Not everyone has the time to scrounge around auctions, thrift stores and garage sales or the ability to transform trash to treasure. I may not be making any money doing this, but I am doing what I love....and sharing it with others!
One of the pieces I picked up at the auction last week was this typewriter table....
It would be perfect in either booth. I had one a few months ago that sold within a week. I took this one and ended up not having room in either booth, so I brought it home.
And got to thinking.
Hum?
Might I actually be able to USE this piece?
YOU BET!
One of the things I really dislike doing (my kind way of saying "hate") is sewing but I do it often. I love my portable sewing machine, but it really is kind of a pain to haul out and set up. I always have to set it up on my dining room table, risking scratches and dings.
Last year I rehabbed an awesome sewing desk so I would have a place for my sewing machine. Problem was, I had no place for the desk...so I sold it!
This typewriter table is PERFECT for a portable sewing machine. I can store the table and machine in my utility room cubby and easily roll it out when I need it.
AWESOMENESS!!!
Only one small problem...the rust. It may be useful, but it is certainly not beautiful!
I picked up these two precious chairs at an auction last fall but I haven't touched them because I knew I would have to deal with "the rust!"
Rust is really not THAT big of an issue. But it is one you have to deal with properly or all your hard work will be for nothing when it begins to creep back through your paint job.
Last year I refinished two old metal lawn chairs (here)....
Even after sitting out all winter, these chairs held up very well and none of the rust has crept through the new paint. So I knew the process I used for these chairs would work perfectly on the typewriter table and little chairs!
The first thing I do with metal pieces that have rust is sand...vigorously! It is the ONLY time I use 40 grit paper on my palm sander and I go to town! A heavy grit sand paper is the best way to knock off heavy rust and even out the surface. This time I also used a vinegar scrub (straight vinegar and steal wool) on each of the pieces after sanding. This accomplished two things...it removed the lighter rust and it cleaned the pieces.
TIP: Make sure you only use the vinegar someplace where it won't come in contact with vegetation...like grass. Vinegar is a natural "weed killer" and could easily damage grass and plants. I used mine under one of my swing pergolas!
Usually you will not be able to remove ALL the rust...unless it just has a tad. But that is why a good metal primer is soooo important! I use the Rust-Oleum automotive primer from Lowe's. It specifically says it "stops rust." So far, so good...so I am going to believe them.
After a good sanding and a vinegar bath, I let the pieces dry overnight. I taped off the little wheels so I wouldn't get paint on them. Then I primed, sand to a smooth finish, wipe with a tack cloth, prime again, then sand again!
Now the hard part is done and they are primed and ready for an awesome paint treatment.
The problem now? What color? What fabric for the chairs?
Oh the choices! I want the primer to cure a few days so I have time to mull that over! When I get them done, I will make sure to post pictures!!
In the meantime, I will be enjoying time with my family this weekend! My oldest daughter, SIL and grandsons will be in town this weekend to attend Katie's musical stage premier! She is Fiona in Shrek the Musical!
If you want an opportunity to see some remarkable kids perform, or introduce your children to live performances, this would be a great evening out with the family!
Friday and Saturday night, 7:30 p.m., Har-Ber High School, Springdale Arkansas.
Come out and support our high school performing arts and enjoy a fantastic performance!!! I know it will be good...Katie (Fiona) was 1st chair All-Region choir and 2nd chair All-State and Shrek (Jacob Reynolds) was 1st chair All-Region and 5th chair All-State. And several of the other characters (Harrison Strouse is Donkey!) were all-region and all-state participants! Talented group of kids!!!
Until next week....
I tend to be a bit wordy at times...but this pretty much sums up what I believe about home decor....
And remember, even "useful" things can be beautiful!
That's all I have to say about that....
For now!
The weather has been awesome which is good because I have a lot of little projects in the pipeline.
And I picked up sooo much more this weekend at TWO auctions. That's right, I went to one Friday AND Saturday.
These are just a few of the things I hauled home Friday!
The biggest problem with going to an auction on Friday is I have no "man power." Matt is laid up in a body cast and Brian was working.
Truthfully, I should have been working too but it had been one of those weeks. Between Matt's accident and a lot of movement in the apartments, I had worked myself to death and I wanted a day "off." As much as I love going to auctions, when I buy, I work. And I bought!
I did manage to finish up a few little projects last week.
A bedside table I picked up at an auction over a month ago....
And a little "half" table I picked up at a garage sale last week. I sanded, chalk painted, distressed and clear coated! New life!
I also bought a mirror and a little chalkboard-mail-holder-thingy and gave them both little makeovers as well. I spray painted the mirror frame a pretty light green (no "after" picture!)
I didn't like the "dated" look of the mail/chalkboard piece so I cut off the top scrolly thingy, added some simple trim and chalk painted it a pretty yellow. Welcome to the 21st century!
The top on the bedside table had blistered veneer. The wood underneath the veneer was "chip" board and it was a flaking mess. So I cut a new top out of MDF, routed the edge and used liquid nail to secure it to the top of the table.
I removed all the hardware and hit it with some gold spray paint. Kilz...sand...tack...and spray paint!
Good as new!
I also made another frame shelf from some trim I had laying around and painted it yellow as well. I love this yellow...just so springy!
These are all simple little makeovers that show you can take the "ugliest" piece and give it a simple little "makeover" to give it a new life!
I picked up several other projects this weekend at the auctions, but I had a lot of yard work to do. Mostly spring "prep" work. The big chore for the weekend was power washing the deck and patio.
A few years ago I rented a heavy duty 3500 PSI power washer. It cleaned the deck, but it pretty much chewed up the wood. I had to reseal the wood after that...but honestly, it needed it.
I bought a commercial grade power washer at an auction last year, and while it isn't as powerful as the one I rented, I am able to power wash everything once a year so nothing gets too terribly dirty!
Renting a power washer to clean decks, patios, siding and drives every few years is a good investment! You can rent them for around $50 a day. If I see "mildew" I spray it with a little bleach before I power wash. Straight ammonia is great for cutting through heavy grease and gunk. JUST MAKE SURE YOU DON'T MIX THE TWO CLEANERS! That's one mistake I won't make again! (Seriously, it is toxic)
I will share more as I get things done! Lovin' this weather!!!
Mothering is not a "phase." It is not something we stop doing when our children "grow up."
In my opinion, little boys don't really grow up...they just get married. Since mine have not gotten married, they are still my responsibility.
They are "my little boys." Even though they are 24 and 26.
If more wives understood this, they would resent their mother-in-laws a little less.
Rarely do I "muse" in my "Projects, Musing and More." But today I need to "muse."
I received a text Sunday from my youngest son. "I think I'm going to the hospital in Harrison. I will need a good dentist."
Long story short, he had a motorcycle accident on a dirt road waaaaay out in the middle of nowhere. It took the ambulance an hour to get to him and an hour to get to the hospital.The hospital was an hour and a half from me. Long ride.
We are lucky on several fronts. First, he was alive. Second, he had on ALL his gear (people who ride without helmets are morons, plain and simple!!!) and he was riding with experienced guys who were watching out for one another!
I remember being in the grocery store after work when my boys were 4 and 6. They had the "daycare" funk going on...smelly, dirty, tired, hungry. Moms know...that funky "dirty kid" smell and the kind of dirt you can see running down their little sweaty faces. And they were being little stink bugs, running amuck, telling me how hungry they were!
As I was standing in the checkout lane I looked down and the oldest was picking his nose and putting it in his mouth. I discreetly told him to quit...to which he LOUDLY proclaimed, "But Mom, I TOLD YOU I WAS HUNGRY!!"
Mortified.
That is the only way I know to describe my reaction. I remember an older lady tapped me on the shoulder and asked me how old they were. Four and six. She looked at me with understanding eyes and said "It doesn't get any better."
At the time, I took it as "slit my wrist right here....I'll never survive"
But looking back, I realize...it really doesn't get any better. Parenting is the greatest joy there is on earth and I know now that there will be absolute lows and insane highs.
I believe with all my heart those lows are what allow us to appreciate and cherish the incredible highs. And the incredible highs are what carry us through the lows.
Sunday was one of those absolute lows. The kind of day that requires a mom to find the strength of Hercules and the faith of Ruth.
After X-rays, CAT scans and MRIs, it was determined that my son needed to be air lifted to a trauma center. Unfortunately we had storms moving in. Plan B actually worked out far better because it meant he could be taken by ambulance to a hospital near our home.
He is home with 4 broken vertebra and a few chipped teeth. Three months in a body cast. As bad as it may seem, it truly is a miracle it wasn't worse.
This is not my first rehab rodeo. My oldest son had a broken arm that required surgery to place titanium plates and this son had knee surgery. Both required a three month "healing period" and then rehab. This, of course, on top of the typical little boy injuries of numerous trips to the ER and doctor for stitches, busted teeth, burns and minor scrapes.
Little boys may grown up, but they never stop being our little boys.
There will be lows, but there will be some incredible highs.
Keep the faith. Cherish every minute because when times are tough, you will need those highs to remind you that being a mom is the great joy on earth...
IT DOESN'T GET ANY BETTER!!!
I get it...I've been there. You are on a tight budget and all you have is cheap furniture that you hate...and you are looking at all these Pinterest projects and blogs and saying to yourself "I wish my stuff could look that nice."
It can. Even if all you have is simple fake wood tables and thrift store furniture, you shouldn't have to live with drab, outdated stuff. You don't have to have antique waterfall dressers or have the space and ability to completely transform a tired old dresser. No special tools or skills to turn a dresser into a tv cabinet (although my goal is to get you there eventually!)
A simple can of spray paint is all you really need to turn the drab into fab!
This is an inexpensive particle board table...you know...that wood that isn't really wood...it's like cardboard with a little more substance. The kind of thing you buy at Wal-Mart or Target and put together with the little allen wrench that came with the fasteners.
I found this one in one of my apartments, but I have seen them for next to nothing at thrift stores. A little Kilz and a pretty spray paint and it is as good as new!
This table needed a little more TLC...some wood putty for the hinge cut outs. I chalk painted and distressed the bottom so I did spray it with poly sealer. But again, you can just clean it, prime it, hit it with a little sand paper and spray paint the whole thing. Simple project that took a tired, out dated table and turned it into something pretty and desirable again!
Do you have an old mirror that has an ugly frame or the color is just "not right?" Tape it off and SPRAY PAINT IT!!!
Are your bedside tables disgusting? Okay, so this one was pretty disgusting...but it shows what a good cleaning and a little primer can do!!!
Nasty old wood shelves? Chalk paint them or spray paint them! The natural wood shelf was chalk painted white and distressed. I spray painted the green shelf with one of my favorite yellows!
Lamps and frames are perfect projects for spray paint! No need to pay hundreds for "pretty" lamps when you can buy cheap lamps at the thrift store and give them a little "makeover!"
Here you can see I even tackled the bigger task of painting light fixtures and paddle fans. The post also shows the bedside table lamps I painted!
The other day I was working at my booth in Midtown and a precious girl asked me about a little table I chalk painted. She asked if she could pay me to paint her tables because she didn't think she could "do it right."
Seriously, it's not hard...and there is no need to be afraid of picking up a can of spray paint or mixing up a batch of chalk paint and giving it a try! Like I always say, the worst thing that can happen is you STILL don't like it and it ends up in a garage sale. Trust me, it won't bring any more or less and I would almost bet you will not only like it, but you will gain a new sense of pride in your accomplishment.
A few bits of advice for the "simplest" project. First, always clean the item first. If you are going to spray paint it, use a primer. It makes the paint stick better and you are less likely to have chips and dings in the future. I like Kilz spray-on primer...$5 a can and worth every penny!
Second, don't buy spray paint at "discount" stores. Buy a good quality spray paint from a home improvement store, like Lowe's. The paint really is a better quality and the VERY few extra pennies you will spend will be worth it!
Lastly, make sure you tape everything off you don't want painted. No need to buy expensive paper...just use old newspaper. I love the Frog tape, but you can buy inexpensive masking tape when you are starting out! Just make sure you CAREFULLY pull it off before the paint is completely dry!
I love "oops" paints at the home improvement stores and I have learned to shop places like Habitat for Humanity and thrift stores. Look at old furniture with a "new eye." What could it be if you chalk painted it or spray painted it?
You will be shocked at what you can find for next to nothing and what YOU CAN DO with just a tiny bit of time and effort!
It was 80 degrees today...spring is HERE!!!
So today has been a day of MAJOR projecting. I have 7 chairs and who knows how many frames piled in the garage that all need "make-overs." A little repair here and there and lots of paint! I may even make a few frame shelves because the others sold pretty quickly.
A few chairs need a little upholstery but nothing major so hopefully I will be able to share these projects next week! Sometimes I get so caught up in the BIG projects that I forget to share the little ones.
Today I am going to share a few chairs I finished. I got the frames painted, but they aren't distressed or top coated and I didn't have time to build any frame shelves!
I scrubbed all these pieces with ammonia and then let them dry out for a few days. After all the nastiness was washed away, I found some amazing wood!
I am always in awe when I find solid old furniture made with woods like mahogany and walnut...you just don't find solid pieces like that any more!
I knew the top on the little bench was pine...but once I got all the gunk cleaned off I found that the base was mahogany.I couldn't bring myself to paint over it, so I just chalk painted the top of the bench. I chalk painted the chair but left the seat natural and put a few coats of tung oil finish on the seat and legs of the bench.
I used a mix of latex "off-white" paints I had on hand and made a home-made plaster paint. These little oak chairs were ideal for the distressing because of the detailing on the back and legs!
I picked up a pretty "yellow" at Lowe's the other day. It just made me happy...and after the chair was painted and I started taking pictures I figured out why...
...it looks like SPRING!!!
Tulips! The always arrive the week of my daughter's birthday!
HAPPY BIRTHDAY SARAH!!!!
Sarah and her family (and new puppy, Duke) will be coming for a visit tomorrow! Her favorite cake is my Grandmother's lemon cake. A.M.A.Z.I.N.G. I will have to remember to take pictures and share the recipe next week. Super simple but will knock your socks off!
Last year I gave my little storage shed a much needed makeover!
You can see the complete transformation here.
This is the perfect time of the year to complete this kind of project...too early in most places to plant flowers but warm enough most days to paint!
Let's be honest...storage sheds can be a real eye sore. But with a tiny bit of imagination and a little "oops" paint from your local home improvement store, they can easily be transformed. They have paint for every type of material...plastic, metal, wood! Hose it down first, then use a good exterior primer and GET CREATIVE!!!!
Is your storage shed one of those ugly "barn" shaped things? Paint it to look like a REAL barn. (Barn red with white trim! Google it!)
No windows in your shed? Paint fake ones...seriously, just paint a fake window. Maybe some shutters...real or painted! Attach a little flower box and put some flowers in it!
Same with the door...paint it to look like mine! Or a pretty atrium door. Hang a grapevine wreath on it...anything to doll it up a bit!
Attach fake light fixtures or hang lanterns! (Mine are real light fixtures, but they don''t work!)
Again, google "garden sheds" or "storage buildings" and find something you think is cute and "fake" it! Pinterest has some awesome pictures of dolled up storage and garden sheds!
Anything to make it look like something other than a boring old storage shed.
This is a great weekend project for the entire family. Who cares if you drip paint all over the yard...PERFECT project for the kids! (Kids always think they want to help paint...always!)
Turn your ugly old storage shed into something other than an "eye sore!" You won't regret it!
AND YOU CAN DO IT!!!!
Spring is in the air. When the daffodils bloom, that is my cue to start working on the yard and getting beds ready for the summer bloom. (My hostas are already popping their little heads. I hate it when they do that before I get mulch down!)
It is also my cue to start sprucing up the porch and patios!
One of the things I wanted to do was change things up a bit on the front porch. It's a tiny little porch so I try to dress it up as best I can without "cluttering."
Last year I decorated with one of the old wood windows that have been all the rage....
I like the look, but a few weeks ago I bought a wood and iron wall deco at an auction. To be honest, it was one of those times I paid a little too much so I knew I probably couldn't sell it for more than I paid for it! Oh darn, guess I'll have to keep it!
I like it in it's "natural" state, but it kind of faded into the dark brick...
I had a little sample container of a "no formula" greenish colored paint ( 50 cent clearance!) so I mixed up a batch of homemade chalk paint and gave the wood a little "makeover." Distressed it and sprayed it with a clear coat poly.
Simple change but one I think makes a huge difference! I can't wait to get some bright flowers in the planters...but I will because our freeze date is still a week away! It's bad enough I have to drag every blanket and sheet into the yard just to save my hostas!
Don't be afraid to give a piece a little makeover if you are bored with it or just isn't quite right. Spray paint it, chalk paint it, WASH it! So you still don't like it...big deal...it's not going to fetch any more or less at a garage sale! And you might just end up liking it again!
This was a weekend of WORK! Lots of yard work! Saturday morning I took my trailer to the dump to toss some old furniture so I could haul mulch! Four yards (8 tractor scoops) at my apartments and then I loaded three yards of natural cedar for my house.
I want to repeat something I mentioned in an earlier post. RED MULCH...leave it be. Don't use it if you plan to plant anything in the bed. I use to grow impatiens 2'-3' tall...seriously...if you know the plant, you know how amazing that is! Then I started using that pretty red mulch. All of a sudden I was lucky to get my impatiens and other annuals through the summer. They "failed to thrive."
I did some research and many were pointing a finger at the red mulch. And honestly it is the only thing I can think of that I was doing differently.
Anywho, I was standing at the mulch store (seriously, they just sell mulch, rocks and dirt) and a couple was debating which mulch to get. I piped up and told them to avoid the red. The guy standing next me was a landscaper and knows his stuff...and he whole-heartedly agreed. He said I am the first person he had ever met that knew NOT to use the stuff. His experience had been like mine...plants that wouldn't thrive and beds that were sucked of nutrients after using the red mulch.
So, there is all the confirmation I needed...someone else who had a bad experience with red mulch. Plain ole' cedar or hardwood it is!
You will make a few mistakes flower gardening...maybe you plant something in a place that get's too much sun, or not enough. Maybe you under water or over fertilize.
Flower gardeners are a lot like DIYers...we love to share our successes and failures. If you see flowerbeds or plants you love in a yard, stop and ask the homeowner about them! Trust me, they will be happy to talk to you! If you get lucky they might even send you home with a few clippings or cuttings...but more importantly, they will send you home with a wealth of information!
Pond cleaned and running...check! (EVERY yard should have a water feature!)
Wisteria trimmed...check! (Save yourself some grief...just don't plant it...just don't!)
Mulch down...check! (A must for any flower bed!)
Pots cleaned out and ready for new soil and plants...check! (Don't forget to look for containers for planting! The more unusual, the better!)
And then the rains came...before pictures, so you will have to wait. But honestly, it's just mulch. I will say the white on the Bradford pears, the blue on the vinca ground cover and the yellow of the daffodils sure is beautiful! If only for a few weeks!
Lots done...much more to do! I still need to power wash the patio and decks...hang my exterior "summer decor"....clean the windows (must-do chore twice a year!)...service the mower...clean out the storage building. And of course plant my pots! Lots of work in the month of April, but it is SO worth it when I can sit back and truly enjoy my yard.
Remember, your yard should be an extension of your home! Don't neglect it! Even if you just plant a few pots like I suggested here, you won't regret it! You may even learn to love it!
I sold the antique grandfather clock I repurposed and featured here! There is only one downside to repurposing pieces for resale...they sell. It makes me sad that I work so hard on a piece, only to have it go away AND leave a big hole in my booth...darn.
The super upside is someone else loved and appreciated the piece enough to take it home with them! That makes me super happy!
The problem then becomes filling the "hole" in my booth. It just so happens there was a "cheap" knock-off grandfather clock for sale at Midtown. Certainly not anything like the true antique piece I repurposed, and it had a few structural flaws. But nothing that couldn't be fixed with a little glue, clamps and wood putty.
So I loaded it up and brought it home. And yes, it was in need of some serious "shoring up!"
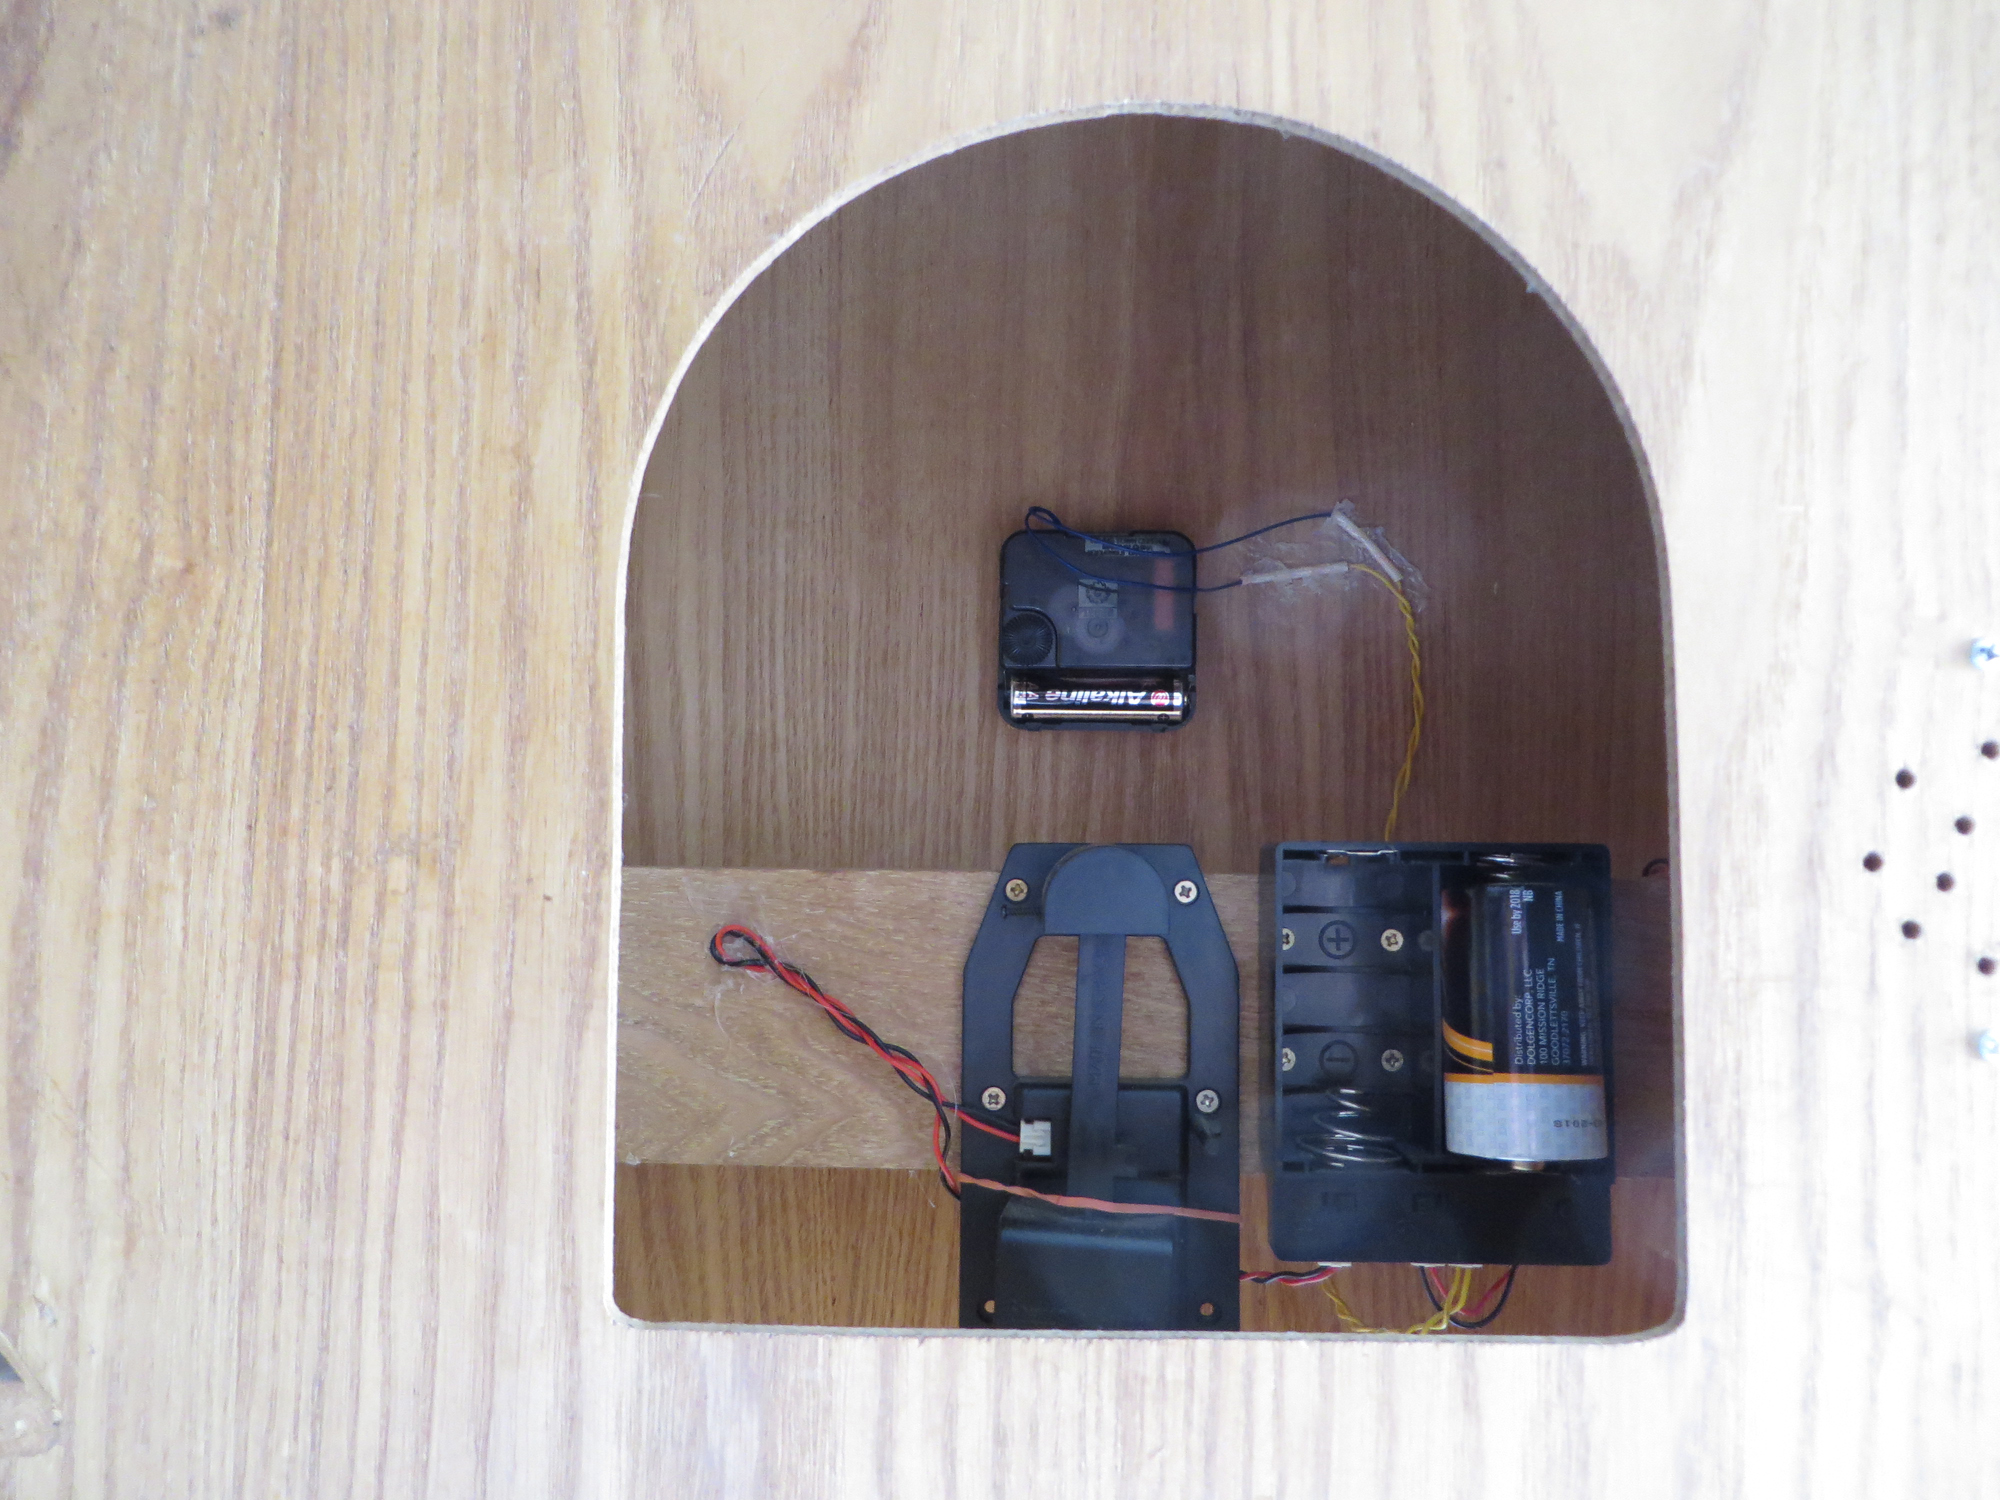
This piece is what I call a "fake" grandfather clock. The clock is actually an inexpensive battery operated thing, so the chains and pendulum serve no purpose. That leaves the cabinet part of the clock open and begging for shelving! PERFECT!!!!
I could have taken the clock part out and turned that into a display area as well. But I like the idea of having a working clock AND a display cabinet all in one. I think it makes a more "useful" piece!
I did remove the door and all the decorative "do-dads." Just too much froo-froo for my tastes. I added decorative trim on the edge of the main shelving area...just to dress it up a bit and cover where I had patched the cuts for the hinges.
The question then becomes what kind of paint treatment? Light? Dark? Distressed or no? Maybe a Razorback red cabinet? That sounds fun! I thought about doing a Disney motif...my teenage daughter thought that would be awesome!
But no...simple is always best when you are repurposing something for resale. So I did all my glueing and clamping. Then I added two shelves, kilzed the entire piece, sanded, tacked and painted!
Super simple but a great improvement. If someone wants to dress it up with a transfer or some-such, I think that would be awesome!
I love it when bloggers "stage" their pieces with pretty knick knacks...and I would do that as well IF the darn stuff wasn't so heavy and difficult to drag in and out of the house...20 years ago, I would have been all over it. Today...I'm lucky to get it in and out of my truck! I do stage the pieces once I get them in my booth, but do you really think I remember to take a camera...ha!
Another Great Day at the Auction!!
We went to an awesome auction Saturday and I picked up some really wonderful pieces. The clock and my newest finds are already at Midtown ready for someone else to fall in love with them and take them home.
When I go to auctions I try to find unusual pieces that you don't find every day...or at least pieces that I think people will really love. These are just a few of the items we brought home.
The head board is twin size...I bought two. They would be precious painted and distressed...but I decided to let someone do their thing. The retro clock/lamp WORKS!!! That was a tough one for me to let go...but I honestly just don't have a place for it right now! The typewriter is a Royal Junior dating in the mid-30s. Even came with a case.
The antique wood and cast iron school desk is an Andrews. I had to glue and clamp the back and then I scrubbed it with varnish remover and wiped the wood down with a little danish oil finish just to nourish it and clean it up a bit. I decided to leave the little doll rocking chair "as is." Just cleaned it up. That is going to be a precious piece for a little girl!
And this is just the stuff I have ready to go...I still have 5 chairs (including one similar to this one), a little stool, pictures, and a few other knick knacks that need some attention before they will be ready to sell!
Lots of projects to work on in the next few weeks!!!