The never ending project....

Six months ago I shared a project I was working on …quilts. Sewing…UGH!!!!

As I pointed out in the original post, it was for a good cause…a way to show off the years of Christmas PJs my family wears every Christmas.

I finally finished the first SIX quilts I tackled.

Four are throws that are being given to my daughter-in-laws and my grandsons for their birthdays. I know they should probably be Christmas gifts but I want them to have them for the Christmas season. I also made a twin size and a full size for the upstairs bunk room.

This past week I added shelving and organized our spare room closet so that Brian can move all his “stuff” out of the guest room closet and into the spare room closet. While in the process I finally decided to organize the boxes of leftover fabric from the massive quilt project.

Well, low and behold, I had enough panels to make a throw for Katie…might as well whip that up…

…and Sarah wanted pillows…I didn’t have any panels for those so of course I had to whip those up as well…

…and I wanted a pillow using some scrap green velvet I found…whip that up. Two days of “whipping” and I am WHIPPED!!!

But I managed to use up a good bit of my leftover scraps and get everything organized. I still have a bunch of plaid pieces left I may do something with…someday!

It has been a few weeks of “giving what you have.”

One neighbor wanted a counter top over her washer and dryer…done!

Another wanted a walnut mantel… (similar to mine)

…and a storage divider for her baking sheets…

Done and done.

And of course I have a long list of things I want to get done before we head out on vacation in a few weeks. So little by little I am chipping away at the list on my refrigerator.

No, the closets and the sewing projects weren’t on the list.

That reminds me, I need to add them to the list so I can check them off!

Fireplace reveal...,

It is done.

As I mention HERE, I had several goals for this room.

The first was easy…replace the paddle fan. Check.

IMG_2074.JPG

The second was a tad more difficult. Reface the fireplace.

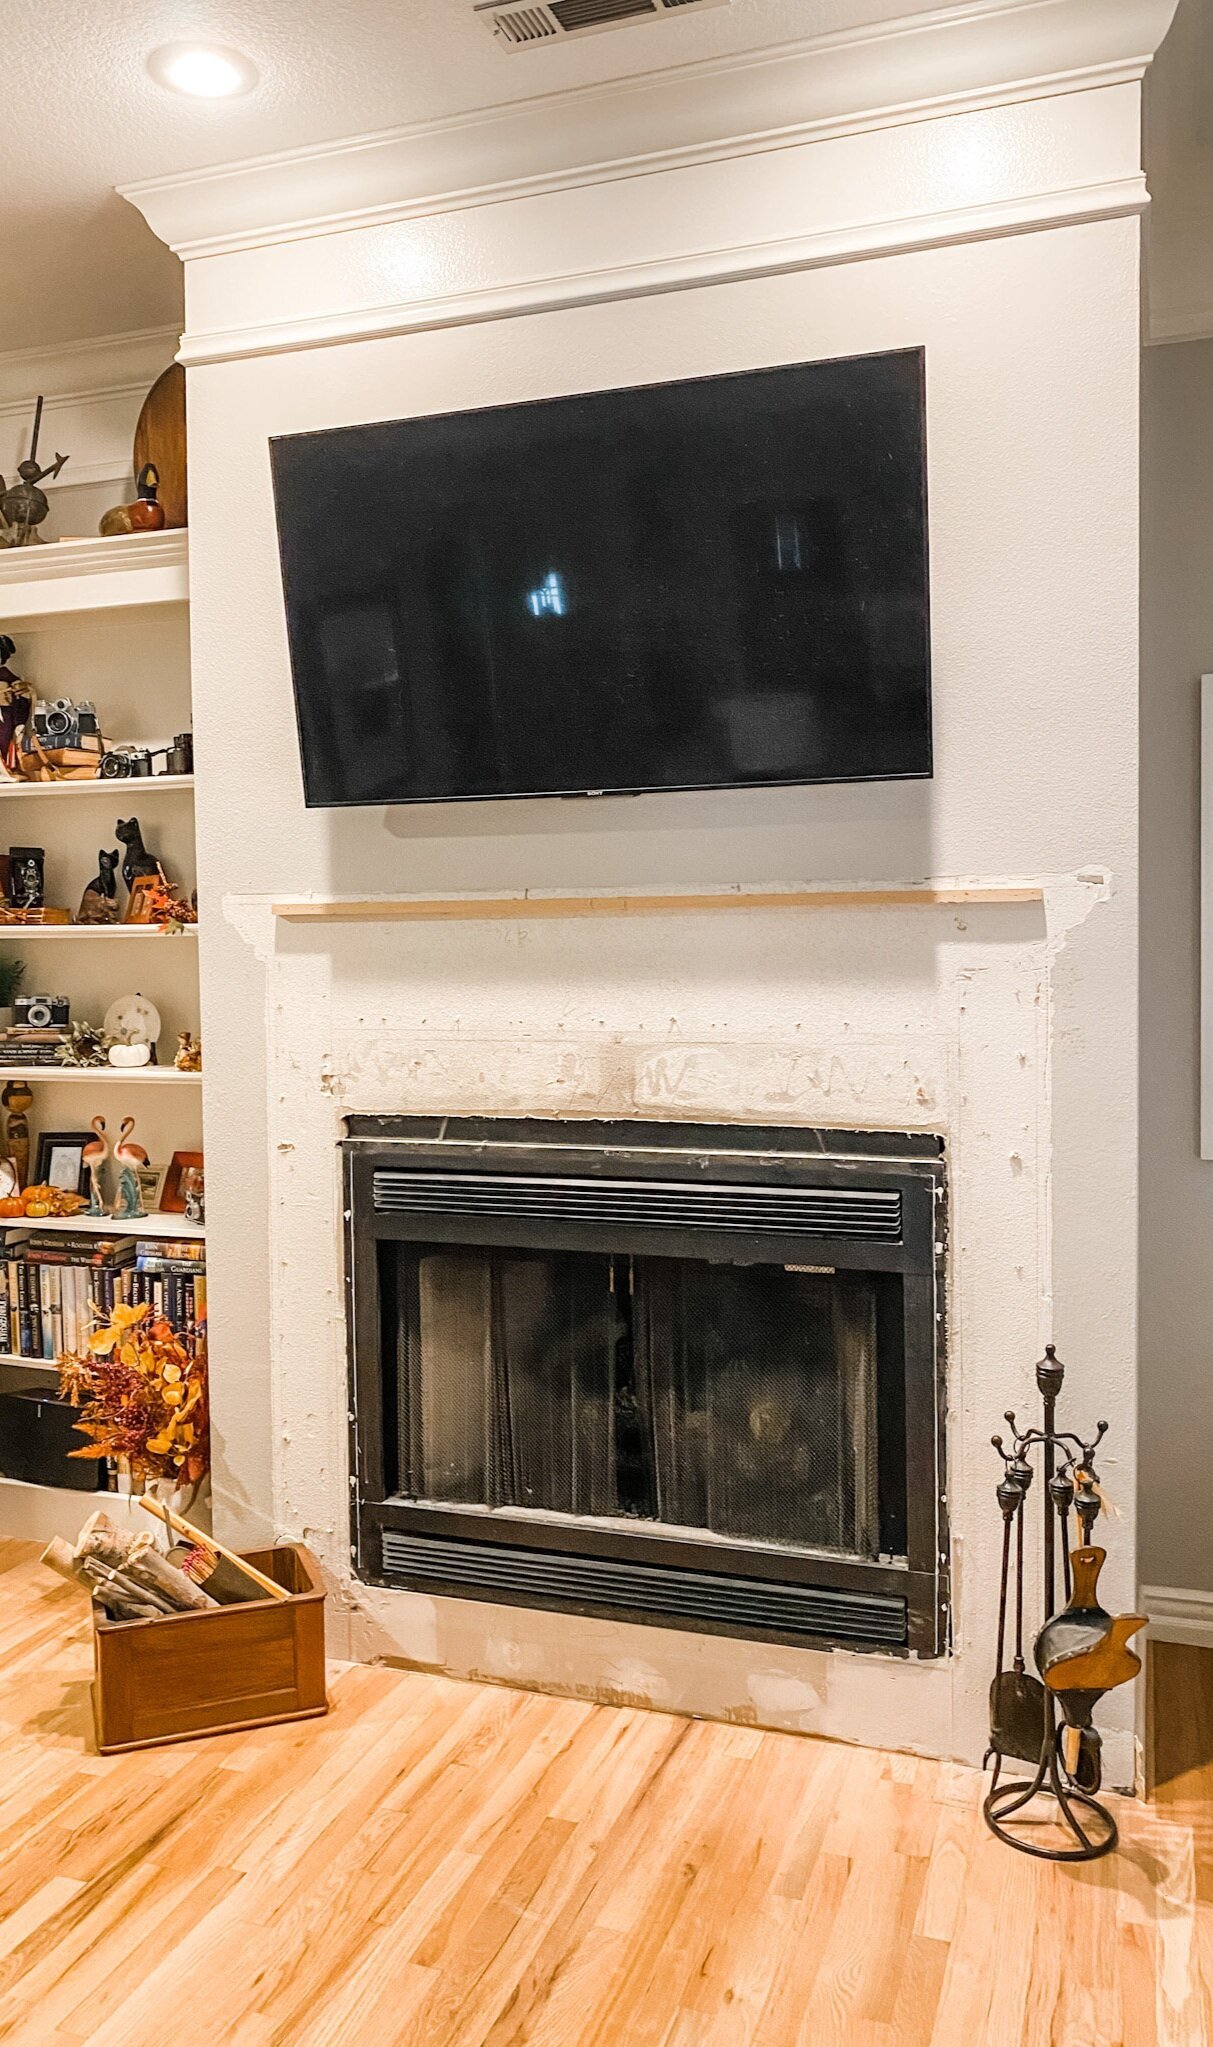
Difficult only because I couldn’t “see” what I wanted which resulted in a spur of the moment “demolition” of what was there….

As I have said time and again, often what “is there” keeps us from seeing “what can be.” I see stuff on Pinterest and in magazines all the time that I love, but I can’t visualize it in my own space because what is there clutters my vision. I have equated it to trying to paint a landscape on a canvas that already has a portrait painted on it.

That is when I advocate painting the canvas white. Base neutral. Painting the piece of furniture or wall white or taking all the furniture and fixtures out of a room so you can visualize what you want rather than what is there. Even if it is a piece of furniture you plan on keeping, take it out…that way you can “see” it in a different spot or even painted a different color.

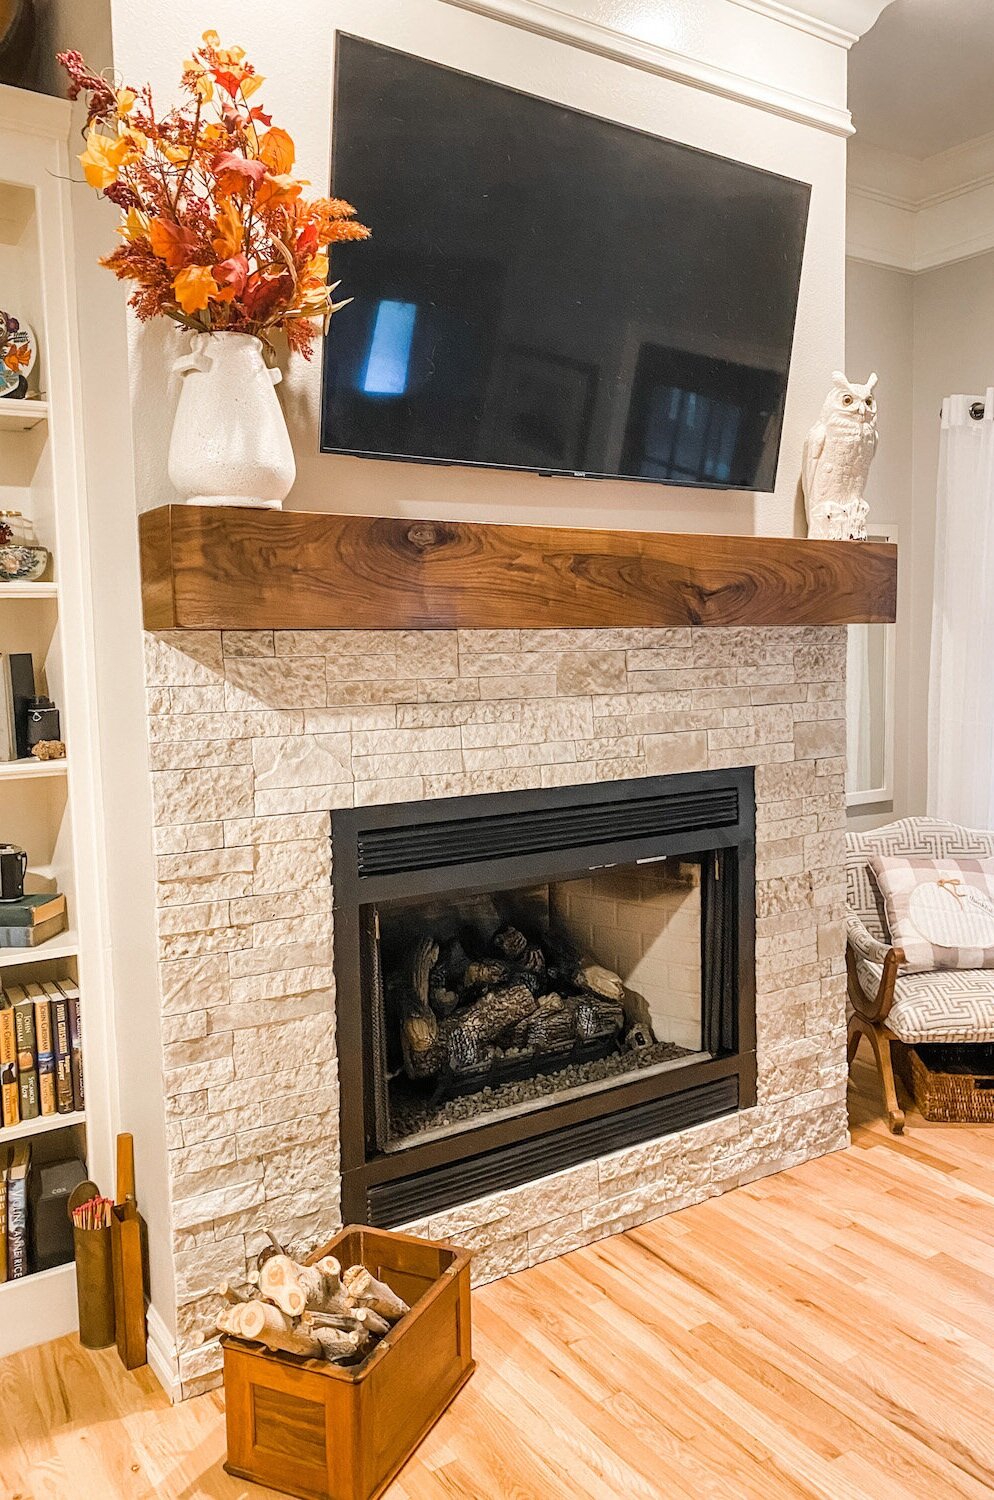
Once I did that with this fire place, I could visualize “the plan.” Rock the bottom…big beefy walnut mantel.

I shared the stone HERE.

Last week Matt and I dragged out the table saw and chop saw and went to work on the mantel. Four coats of Waterlox (I LOVE this stuff) and presto-bingo….the vision came to life. Waterlox is my new “go to” finish…a tung oil finish that gives any wood durable protection while allowing the beauty of the wood grain to shine. And it is SERIOUSLY idiot proof! Just sand, clean the entire piece with a tack cloth and wipe it on. Use 0000 steel wool and tack cloth between each coat. I usually apply 3-5 coats. LOVE!!!

IMG_2040.jpg

I intentionally choose walnut with tons of grain and a few knots…”character.” This house doesn’t lend itself to the “farmhouse look” but I didn’t want formal and fussy either.

The final result was exactly what I envisioned…and I LOVE IT!

Here is the BEFORE (obviously last Christmas)…

image-asset.jpg

And AFTER….

IMG_2073.JPG
IMG_2071.JPG
IMG_2072.JPG

Sometimes we get so wrapped up in getting a project finished as quickly as possible, we fail to live with the results in our minds for a time. Trust me, you will love any DIY project sooooo much more if you will get rid of what is there and take time to live with what you think you want in your mind before you start slathering paint or ripping out walls.

Remember every space is different….just because something looks amazing on Pinterest or in a magazine doesn’t necessarily mean it will work for you. It might, but spend the time to tweek it in your mind before you jump head long into what can be a time consuming and expensive “oops.”

static1.squarespace.png

The fireplace makeover...Part 2...Airstone Faux rock.

The stone work is done….

…and I love it.

I highly recommend the Airstone product. At least as far as installation. It is a relatively easy product to install. Lightweight and exceptionally natural looking.

When we fire up the fireplace in a few months I will let you know how it holds up to heat.

This stone product would work well for a kitchen backsplash, fireplace face or a covered porch area. It SAYS you can use it for exterior application…I can’t attest to that since I did not use it outside.

I think this is a relatively easy DIY project.If you choose to install this product find a tutorial that works for you. More importantly though, FOLLOW THE DIRECTIONS!!!!

I do have a few tips.

Start at the top. Then the sides…them the bottom. That may seem backwards, but it is the way to do it. Start at the top by adding a temporary level brace….I just used some scrap 1x4. I let that dry over night, then did the same on each side, then the bottom. The Airstone mastic sets up fairly quickly.

IMG_2011.jpg

I used pennies as spacers between the floor and the stone. I do this because wood swells and moves and you don’t want the rock sitting on something that has movement. Same would apply if you were using it as a backsplash…don’t set any wall product (faux rock, tile, marble, etc) directly on a top or floor.

Use a tile saw to cut it. I have a wet saw so if you do not, rent one. Makes easy, precise work of tricky cuts.

Pay attention to how to apply the mastic…it’s like frosting a cupcake, not buttering toast.

The tub of mastic specific for the faux stone SAYS it does 30 s.f….it does not. Maybe I “iced” to thickly but I would suggest buying more than you think you will need…you can always return it.

Layout the rock on a template or floor before applying it on the wall and number each piece so you know how to property transfer it to the wall. Also, make sure you pull from different boxes…mix it up. Each box has several different “colors” and “textures”and each box may come from a different run…so you want to make sure you mix it up!

I used the “edge” pieces around the face of the fire box…I think it looks neat.

IMG_2025.jpg

I should have wrapped it around the entire bump out. I would have loved to take it to the ceiling. I am still debating on adding a hearth.

But the “coulda, shoulda, woulda” is always a brain worm until the project is finished.

I didn’t want to take it to the ceiling because I don’t want to remove the crown then have to paint the entire ceiling. I don’t think I want to add a hearth because this is a small space and I don’t want to crowd the space. I didn’t wrap it around the entire wall because, well, I just didn’t.

Hopefully when I get the mantle on, it will all come together.

So the mantel. I think I thought I knew what I wanted but now I not so sure.

My plan is to make a beautiful walnut mantel…smooth…perfect grain…low sheen. Now I am debating on a more “rustic” look with a lighter finish.

What to do, what to do.

As usual, I have searched Pinterest and found dozens of looks…I like them all!

This house style really does not lend itself to that “farmhouse/rustic” look so I think I am going to go with a more smooth, low sheen look. Sometimes you have to “read the room” when making decor decisions.

I bought some walnut boards (dang that stuff is expensive!) and specifically picked pieces with lots of grain and a few shallow knots. Just a smidge rustic but still the beauty of walnut. I know if I apply Waterlox (like I did here with my kitchen cabinets) it will have a dark finish. And I think I am okay with that. The stone is light and I think the dark walnut will be a nice contrast.

Now I am just waiting on my son to have a day we can work on his table saw. I shared HERE about my phobia of table saws. I bought him one for Christmas last year so I have one available and have a “saw buddy.”

Hopefully next week I will have a beautiful new fireplace to share!


The fireplace project...taking it to base neutral!

As I mentioned when I first shared the den, one of my “eventual projects” was to reface the fireplace.

image-asset.jpg

But as I have said before, often “what is there” blinds us to “what can be.” So the absolute best thing you can do with any mentally blocked project is to take it to “base neutral.” Whether it be a room, a dresser, a fireplace….take out what you don’t want or paint it all white…and start with a blank slate.

After months of being mentally blocked, I took a hammer and crow bar and took it to “base neutral.”

IMG_2004.JPG

I love that this house has two fireplaces…and the one in the living room is fine ….for the time being….

IMG_2007.jpg

(Yes, fall puked in my house!)

But the den is a “less formal” space and I really want something less formal looking…like stone and a big beefy wood mantel.

I’ve dropped a few “inspirations” into a computer file…

Screen Shot 2021-09-27 at 2.49.47 PM.png

…and I have found several looks I like on Pinterest.

I like the look of stone or brick to the ceiling but that would entail removing the crown, which would then mean I would have to paint the ceilings throughout the entire space…kitchen, den and breakfast room. And that is just not a project I want to even think about at this time.

My plan is brick or stacked rock and a big beefy wood mantel…preferably walnut. I have been researching the Airstone product (sold at Lowes) and if I go with the stone look, I may give it a shot. But I also like the brick look so I am looking at brick tile as well….

That’s the plan…I think…maybe…

I don’t know. What I do know is it will be much easier for me to visualize what can be now that what was is gone.

I better get to visualizing because as you can see, I will need both mantels for stockings in about two months!!!

static1.squarespace.png