Modifying a Dillingham MCM dresser....

So often I buy mid century pieces fully intending to clean them up and sell them. But then, well, I don’t. Inevitably I fall in love with them or one of my kids does (just search mid century on this site…you will see)

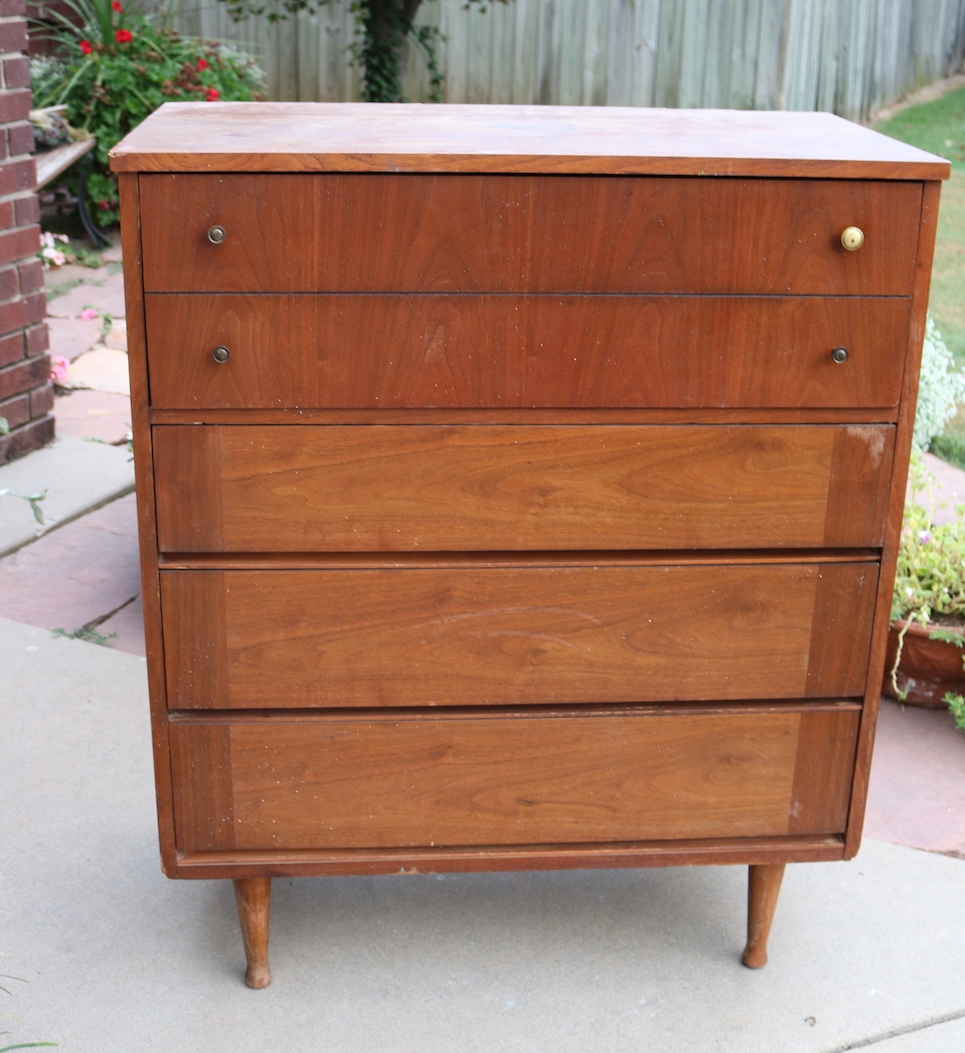
Such was the case with this mid century walnut Dillingham dresser….

It did have a few boo-boos…a broken corner piece I was able to fix with a little wood glue…

A tiny bit of chipped veneer I decided to ignore…

And of course the finish was a little worn and tired looking and needed some freshening. First I tried a little Restor-a-finish….

You can kind of see the difference…the right side has been wiped down with Restor-a-finish.

It helped a tad but in the end I scrubbed it down with mineral spirits and steel wool and applied 2 coats of tung oil finish…brightened it right up and blended all the scratches and wear…after all it is a 50+ year old piece…it’s gonna have a few nicks and dings. But again, nothing terribly glaring.

Even though the issues were relatively minor, I hesitated to sell it. I considered painting the sides to disguise the biggest issue…the broken corner.

Enter my kid! Matt absolutely LOVED it and wanted it for an entertainment cabinet!

The dark walnut matches his vintage Lane tables perfectly and like me he has a real affinity for MCM pieces.

So I went to work modifying it for his needs..specifically he needs a place for his turn table.

(Side note…I get tickled at the newest generation of vinyl lovers. People my age remember how thrilled we were to get away from bulky old record players and vinyl records that scratched and skipped. Cassette tapes and walkmans and boom boxes…life changing! Now the younger generation have circled back around to “vinyl” and think they have discovered the greatest thing since sliced bread…HA!!! See, if you live long enough, it all comes back in style!)

So…how to modify this dresser without changing it too much.

I decided to make the bottom two drawers one deep drawer. That entailed removing the face front of the middle drawer and attaching it to the black face frame and bottom drawer…creating what appeared to be two separate drawers…but is actually just one deep drawer.

Confusing I know…let me see if I can show you what I mean in pictures.

First I had to cut the face frame in half to detach it from the cabinet.

Since it is a laminate material, I knew I needed to tape it first to keep it from “splintering.” ALWAYS tape laminate before you cut it and draw your cut mark on the tape!

I could have used a skill saw with a trim blade to make the cut. But I knew a skill saw wouldn’t work to cut the little shelf inside that separated the two drawer spaces. So, darn, I had to buy a new tool…I hate that when that happens! (NOT!)

I have a small Dremel that has similar functions but this little guy is pretty heavy duty…and it worked like a charm!

Next I used my Kreg jig and glue to attach 1x2 pieces of oak to both edges of the face frame. The drawer fronts and face frame only over lapped by about 1/8”…attaching the oak allowed me to secure the face frame to the drawer fronts with glue and screws.

We used a hole saw to cut a hole in the back of the cabinet to feed electric wires through.

That was pretty much all the modification this dresser needed to turn it into the perfect entertainment cabinet!

In the photos you get a peak of a few of the changes Matt has made to his house since he bought it a year ago…the painted fireplace I shared here and the new tile I haven’t shared yet.

I have promised for A YEAR to share a few of the projects he has completed on his house…he opened up the entry, painted his kitchen cabinets and installed glass cabinet doors, built open shelving in his kitchen and laid new tile in the entry and around the fireplace. He has even built a little storage shed! I am so proud of his “projecting” so while I was there taking pictures of his new entertainment cabinet, I snapped a few of his entry and kitchen and I PROMISE to share those next week.


A mid century chest of drawers makeover...Part one!

While my master bathroom remodel is still progressing (yea!) I finally found time to tackle an amazing mid century dresser I found!

This chest of drawers was pretty shady. Nasty finish, chipped veneers, busted veneers, mismatched hardware…just not something you really want in your home!

It had many of the problems you may encounter with old pieces so it is the perfect project to share a little “step-by-step” tutorial on turning a trashed dresser into something you will want front and center in your home!

First, there was a busted drawer! (Which reminds me, ALWAYS number your drawers on the underside as you take them out!)

This is NOT a huge issue.

I can not stress enough the importance of making proper repairs to any piece before you start making it pretty. Glue and clamps people…NOT silicone, not screws, not nails…just plain ole’ wood clue and clamps.

This one really wasn’t too bad…there have been some I had to completely tear apart and rebuild!

One drawer was missing the wood slide like this one…

Kinda necessary if you want your drawer to not be all whomper jomped. Again, no biggy. You can buy slides online but I used some scrap 1/4” plywood and scrap trim to make one. Again, glue and clamps and good as new!

TIP: If you have a drawer with wood slides that seems to be difficult to pull out, try rubbing a wax candle on the wood slide. If you have a metal slide, make sure it isn’t bent…if it is, just take a pair of pliers and manipulate the metal.

Also, if you find the drawers to be a tad smelly, first wipe them down with ammonia and water, then spritz them with vinegar water and let them sit. Truthfully, I have found a few that smelled no matter how well I cleaned them….in that case I taped off the fronts and painted the interior and exterior of the drawer with Kilz and latex paint (here is an example!)…sometimes you have no choice!

Next up chipped and scratched veneer.

A lot of the older furniture is veneered. If it is chipped or scratched, take the time to remove any loose veneer and repair it with a little wood filler.

The first few coats don’t have to be pretty…you just want to make sure you fill all the boo-boos well. Don’t rush this process…it may take two or even three coats to get a smooth repair!

In this case it took two coats (sand between each coat) and a lot of sanding with a fine grit paper (220) to get a smooth repair, but in the end it will be worth all the effort!

I have found that after I prime and sand, I can often see how well the “patch” will look and can add more filler and do more sanding if needed. If it looks and feels rough after priming, it’s going to look bad with paint…so do a little more work on it after the primer if needed!

My plan originally was to strip and oil the top since it is a walnut veneer, but I did a number on it dragging it out of my truck…so repair and paint it is.

I would like to stress (again!) the importance of sanding and FEELING! You want it smooth to the touch. If you can feel it, you will see it when you paint it! So sand it smooth.

The veneer on the drawer fronts were in mint condition…the finish just looked old and “muddy.” I removed the mis-matched hardware and then stripped the old finish (using this process). It took me less than 30 minutes to strip all four drawers.

The two on the right have been stripped…the two on the left have not…as you can see, they weren’t THAT bad, but this quick step brightens the color and really allows the grain to shine.

On veneers it is important to use chemical stripping as opposed to sanding. Veneers can be very thin and if you sand through the veneer there is no salvaging it…you will have to putty and paint!

After stripping them I applied three coats of Formby’s tung oil finish. I love this stuff and it is my “go-to.” No stain, just a clear finish!

(It was pointed out to me by a kind reader that the original Lane Acclaim tables came with a “toned lacquer” finish….true of many mid century pieces. That may be the case but again, this is the process that works for me and the one I prefer…do your research and do what works for YOU! I prefer the “easy to wipe on and freshen in the future” tung oil finish over lacquer)

I also stripped and oiled the legs since they were in pretty good condition. Same process, same finish.

If your drawer fronts have MINOR chipping like this one did, I would suggest carefully removing or glueing any “loose” veneer (I use a toothpick to slide a bit of glue under any loose veneer and wipe the glue residue with mineral spirits) and then apply the finish. As my daddy use to say, you will never notice it on a passing train! Any time I can salvage and feature a beautiful walnut veneer, I do!

Again, my apologies…this will have to be one of those “to be continued” posts. We had rain and a cold front roll in (yea! it really is fall now!) and since I don’t have a nice cozy shop I am at the mercy of the elements.

Priming, paint and reveal will have to wait until next week!

This process may SEEM daunting and time consuming but in the end it is all worth the time and effort to bring these sturdy old pieces back to life!

Take your time and do it right and you will have a piece fit for another lifetime of use! Hopefully next week you will get to see the results of all this prep work!


Just ANOTHER mid century dresser!

I can't help myself...when I see one, I just gotta have it!!!

A mid century bedroom set...Fashion Trend by Johnson Carper. I couldn't find a maker's mark anywhere on the set so I googled "mid century dresser" and found a picture of one like it!

(Look at the curves on this lady!)

I ended up having to buy the entire set at an auction...dresser, chest of drawers and full size bed frame. I sold the chest to off set the cost of the dresser...which is the piece I really wanted! I have a full size bed in  Mitchell's room so I might use the bed frame in there.

I decided not to strip and oil the drawers...they really are in excellent condition....I wiped them down with Restor-a-finish just to clean and brighten a bit. I painted the "box" (KSTP...high gloss white) only because the top was laminate... I did that with Matt's dresser and I love how it turned out!

My original plan was to put the new dresser in the guest room until I get this one back from Katie in a year or so...

But then I got to thinking...why would I hide a beautiful piece like this in a guest room? 

So I took the dresser out of my room and put it in the guest room and put the new one in my room!

LOVE!!!

The only other thing I have added to my "proper" guest room is this little rattan table (bought two and sold one) and the magazine rack from the living room. 

Again, you will not find AFFORDABLE new furniture that is built as well and with woods like walnut, teak, rosewood and mahogany! There is a reason vintage and antique furniture have managed to survive decades of use!

When I walk around my house and look at some of the beautiful vintage pieces I have collected I am amazed at just how little I have paid for them. Keep in mind MOST were in much need of a little care and attention but if you are willing to roll up your sleeves and do the work, you can create a home filled with beautiful pieces too! 

That is why I have this blog...to show you just how easy it can be!!!

Stop drooling and start doing!!!