Fall tablescape...

I have some hard fast rules for decorating for the holidays. Fall decor goes up the week before we leave for vacation…usually the last week in September. Christmas goes up the weekend after Thanksgiving.

It’s the rules.

This past week I broke the rules.

It wasn’t really my fault. I got an At Home magazine in the mail. It had a really pretty picture of a fall tablescape and I was compelled to immediately go buy MORE fall stuff for my formal dining room. I blame it all on their devious advertising.

I went upstairs and dug around in my stash of heirloom china. I also pulled out the fall box marked “formal dining” …then I decorated my dining room.

I used my china and added little glass pumpkins, some amber stemless wine glasses and green place mats from At Home and straw placemats from Amazon

I picked up a few fall table runners but they didn’t make the cut.

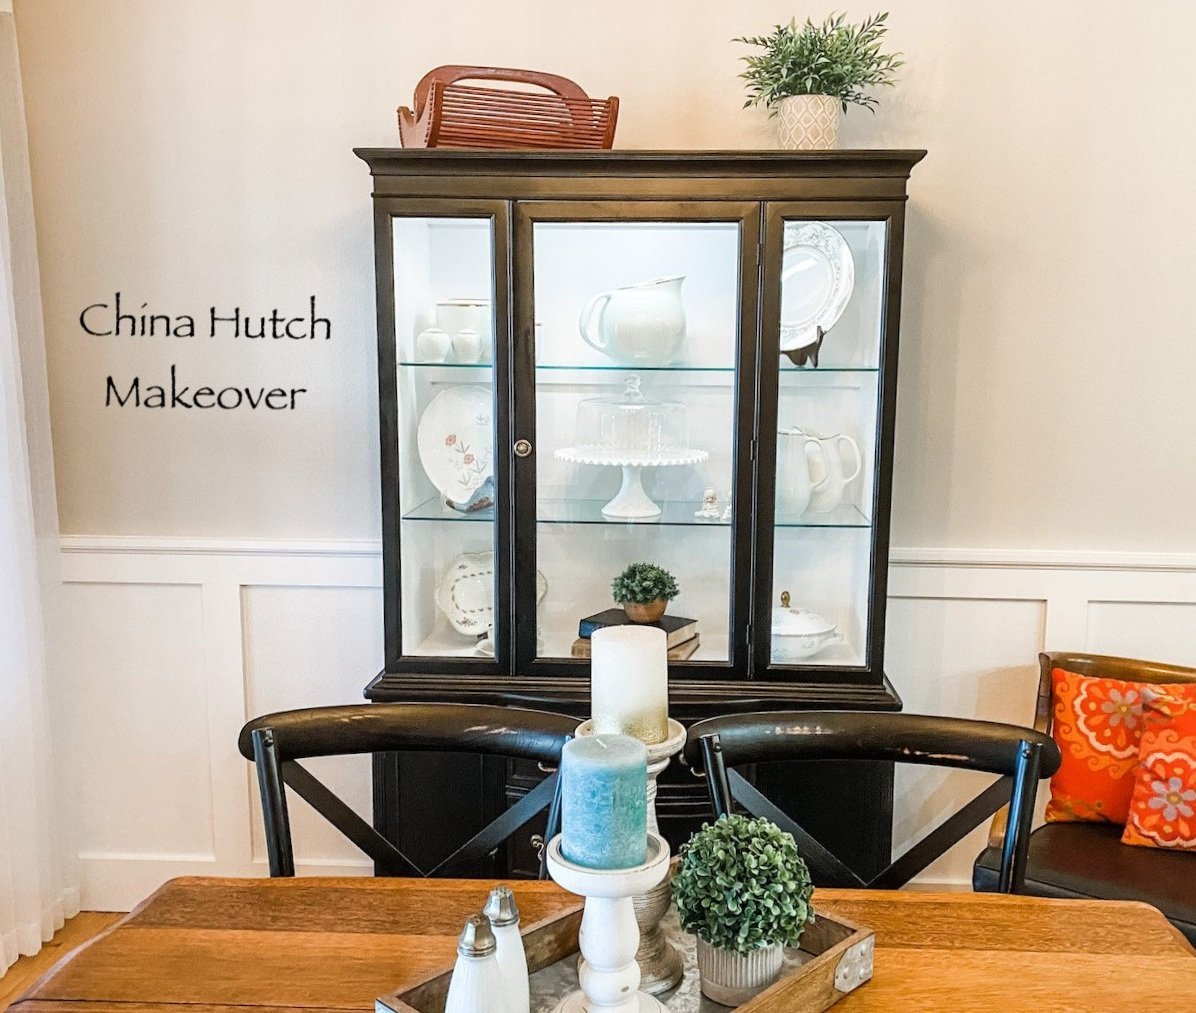
i stuck a few little fall doo-dads in the china cabinet…

I made the center piece last year…fall candles, pumpkins, fall picks and some cotton stems in a round tray.

LOVE!

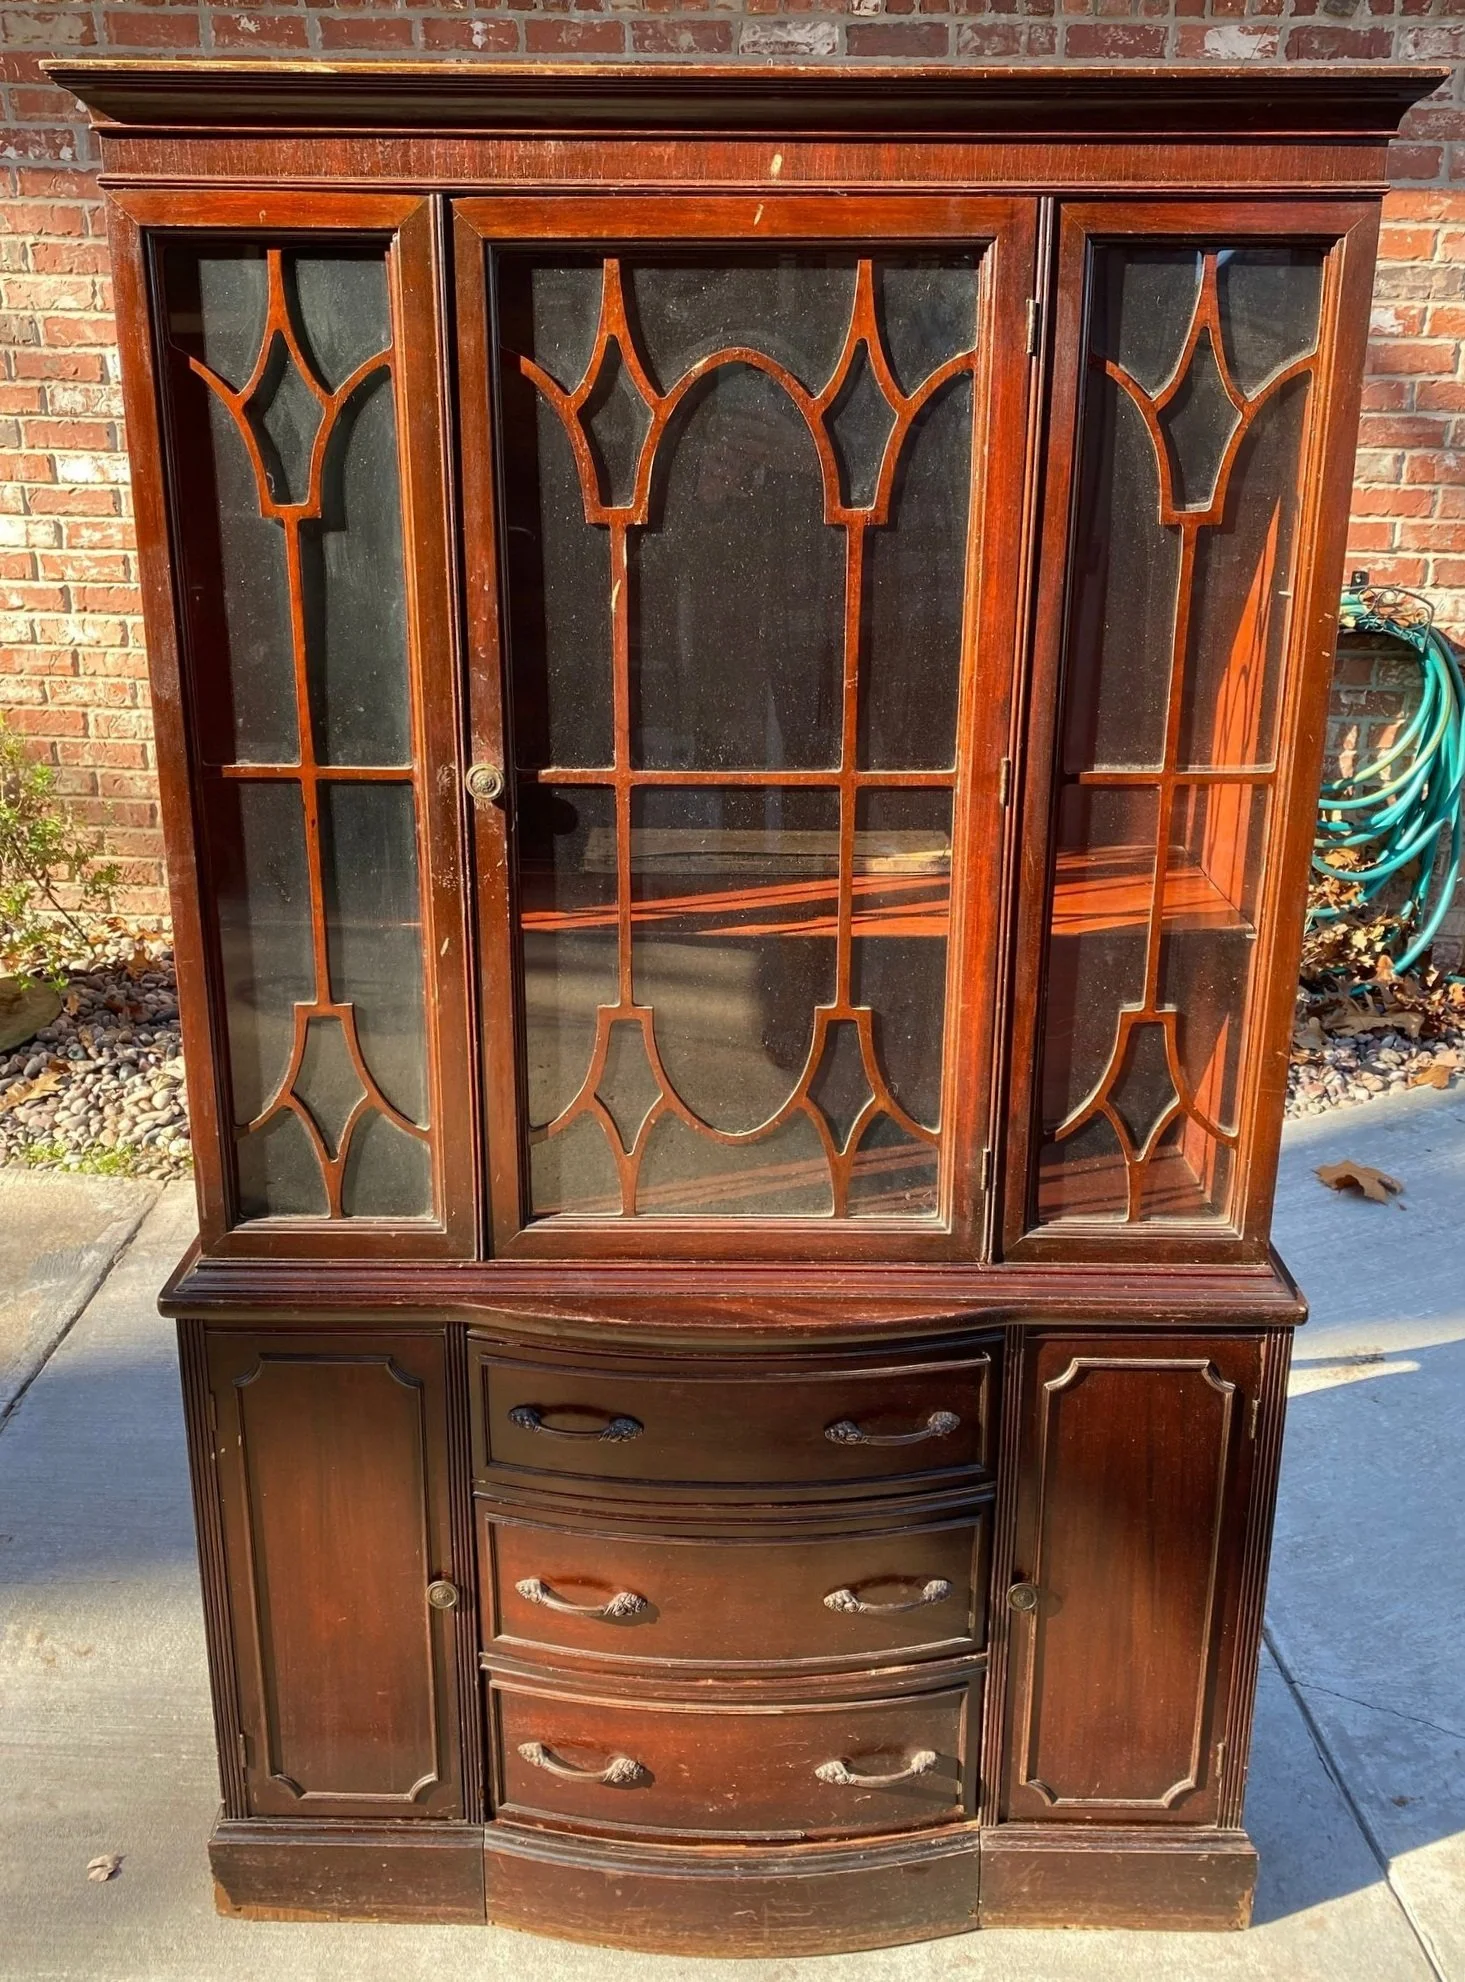
(You can check our the china cabinet makeover HERE!)

My son insists we use this room during our Sunday dinners. Since this china has to be hand washed, I have no doubt it won’t actually get used…we will just have to sit in the other dining room or move this fancy stuff out of the way…but it sure looks pretty.

For those who advocate using the fine china for every day use and not just for “formal”….you obviously have never had to hand wash dishes after feeding your entire family.

Right now we are having to hand wash everything anyway…our TWO YEAR OLD dishwasher isn’t working. I have no idea why…I’ve googled…could be one of four things. But after having to buy a new washing machine because we couldn’t get a simple part, we decided we would just buy a new dishwasher rather than pay $150 to have a repair main come out and tell us we can’t get a part we need. A brand new one was installed Tuesday.

So back to fall decorating. I love it and every year as soon as the temp drops below 80 degrees, I get the itch to start digging out the pumpkins and fall wreaths. But like every year, the temps climbed back into the 90s this week so now I haven the dining room decked out but the rest will have to wait a few more weeks.

That is okay! I will just enjoy the glorious summer flowers! And they are glorious this year!!

china hutch makeover...

I originally bought this piece to makeover and sell…

When I gave my breakfast room a little makeover (featured HERE last week) I decided I kind of like the look and it gives me a place to display my heirloom china….

I didn’t take pictures while I was giving it a makeover because, well, I just didn’t….

But the process was pretty straight-forward.

I removed all the hardware. The drawer hardware was not the original so I ordered hardware that would have come with the piece originally. Fortunately the door hardware was still there so I just cleaned it up a bit with Brasso and SOS pads to highlight the engravings.

Before you go scrubbing on hardware with Brasso and SOS pads, make sure it is real brass. A magnet will NOT stick to real brass…if one doesn’t, scrub away.

I removed the shelving. I also removed the glass and decorative glass inserts. Not difficult because it was just held in place by some strips of tiny molding and nails…I just popped those right out and set them aside to paint and reuse.

The shelving was pretty warped and I tried my trick of laying them on the floor and placing weights on them…no go. So I ordered glass shelves to replace them. Honestly, I like the glass better.

The glass shelves where a lot heavier than the wood shelves. Originally the piece just had two little supports on each side for the wood shelving (no supports along the back for the span which might explain why the shelves bowed.) I didn’t feel comfortable with that so I added 1x3 support boards along the back, securing them with glue and staples. Now I feel confident that the shelving is properly supported and can handle the weight of dishes. (If you have ever had a glass shelf come crashing down on your china you would understand my concerns. Yeah, it happened!)

There were a few other minor repairs that had to be made…since I was painting the piece, I did them before primer and paint.

Remember, if you are staining, stain first then repair. If you are painting, repair first then paint.

I cleaned the piece well then I caulked all the “joints.” Remember if you are painting a stained piece you have to caulk all the places where wood meets wood…and you may even have to putty nail holes. If you miss anything it will show up when you prime the piece…just caulk and putty and spritz it with a little primer.

I sprayed the entire cabinet with Bullseye primer. Primer is MUST on mahogany pieces because it will bleed through the paint! If you paint a piece and see “red” or “shadows,” that is the mahogany bleeding through…or water stains, oils, etc…more layers of paint WILL NOT cover it. Prime it then repaint it. Or save yourself the grief and prime everything before you paint. Mahogany is not the only thing that will bleed through paint. Nail holes and “gaps” will show up and you will be able to fix them before you apply your paint.

Also, you will get a much prettier and durable finish.

I know some paints (like this one) profess to be paint and primer in one. Maybe so but I always prime with a primer. Usually Kilz or Bullseye.

I sanded it smooth then wiped it down well with tack cloth.

I decided to paint the inside white and the exterior black. I painted the inside with some satin white latex I had on hand, let it dry and cure then taped it all off to spray paint the exterior.

I painted the interior a satin finish but I wanted a flat black for the exterior. I went with Rust-Oleum Matte Farmhouse black.

After the black had cured (I usually give it a few days) I replaced the hardware, reinstalled the door glass (without the decorative doo-dads) using the small trim and silicone and moved it into the house. I gave it another few days to cure before adding the glass shelving.

I did not paint the inside of the drawers or the inside of the lower cabinets. I rarely do unless the piece has an odor or stains I can’t get rid of by cleaning. If you have a piece that has odors or stains sometimes your only recourse is to prime and paint!

I added a LED light to give the display a little glow! That entailed drilling a small hole in the top for the cord and mounting an LED light strip in the top of the cabinet….simple simon!

Lovely.

This is where I remind you that “cure time” is super important when working with painted wood. I always get annoyed when I watch those shows on HGTV and they paint and stage furniture the same day. DO NOT DO THAT!!!! Be patient…give paint time to cure. If you don’t you will scuff and scar your new paint job and will be seriously disappointed.

If you look back at this blog you will see I use to do this kind of thing all the time…I loved it.

I don’t do it much anymore and I forgot how much I love taking an old abused and neglected piece and turning it into something beautiful and useful again!!!


Finally...painted walls!

I finally did it...I painted the walls in the main living areas! 

Over a year ago I seriously contemplated painting the downstairs living areas. I called my painter friend and set up a time for him to paint while we were on vacation! I painted samples all over the walls...and promptly cancelled the painter and painted over the sample spots with the same ole' "Cream" paint color that has been on the walls for 19 years.

I just couldn't pull the trigger! I know one of the issues was my inability to commit to a paint color. The other issue is my inability to admit I am just getting too old to tackle these big projects.

But last year I painted my master bedroom SW Nuance (a much smaller project, but a butt-kicker all the same!) I then used the same color in the guest room makeover.

I really love it. It contrasts nicely with the Swiss Coffee trim but it's not so dark that it over powers the room. It seems to be the perfect back drop for any decor accent I want to add in a room.

After living with this new paint color in my bedroom for a bit, I kinda sorta thought I might like it in the living areas. I called my painter friend and rescheduled.

It is no secret that major changes are tough for me...so the fact that I picked a paint that wasn't TOO different from what I had before isn't surprising.

While it isn't a HUGE difference, it is indeed different. The original color was "SW Cream" and it was definitely on the "yellow" spectrum. The Nuance is more of a very light "griege" ...one shade lighter than Useful Grey on the color chart! 

You can really see the difference on the walls side by side....

When it was all said and done, I really love it...it looks clean and fresh. While I had everything off the cabinets and walls I took the opportunity to deep clean (OMGosh there was some nasty gunk lurking behind and beneath!) and rethink all the stuff I had adorning the walls and cabinet tops! 

I removed the "heirloom china" from the dining room walls and pass throughs and a few knick-knacks and china plates from the cabinet tops...not huge changes but enough to open it up a bit.

One of my favorite changes was the dining room art...

Several years ago I painted the frames and changed the mats...but I was never a huge fan of the actual prints. 

A few weeks ago I bought some botanical prints at an auction. They are numbered prints by Kate Nesslar (Google her!) and they really are beautiful! I removed the not-so-pretty black and gold matting and they fit perfectly in the red mat! And they look awesome!

I don't know why picking a paint color is so hard for me...paint is one of the simplest and least expensive ways to make a big change...and the best thing is if you don't like the color, no biggy...just repaint it. 

Hiring something to do what I could have easily done myself ten years ago is another toughy.

But in the end, I can't believe I waited this long to make this change and I certainly don't regret hiring someone else to do it for me!

The next big chore on my list of home improvements is the tub/shower in the master bath! I want to take out the whirlpool tub (that I have literally used MAYBE 3 times in 19 years) and add a large walk in shower. And that my friends will get hired out as well!

Getting older has a few advantages...