A few MCM makeovers and a life decision...

Again, I am a baaaad blogger. I jump head-long into a project and fail to take “before” pictures.

Prime example…

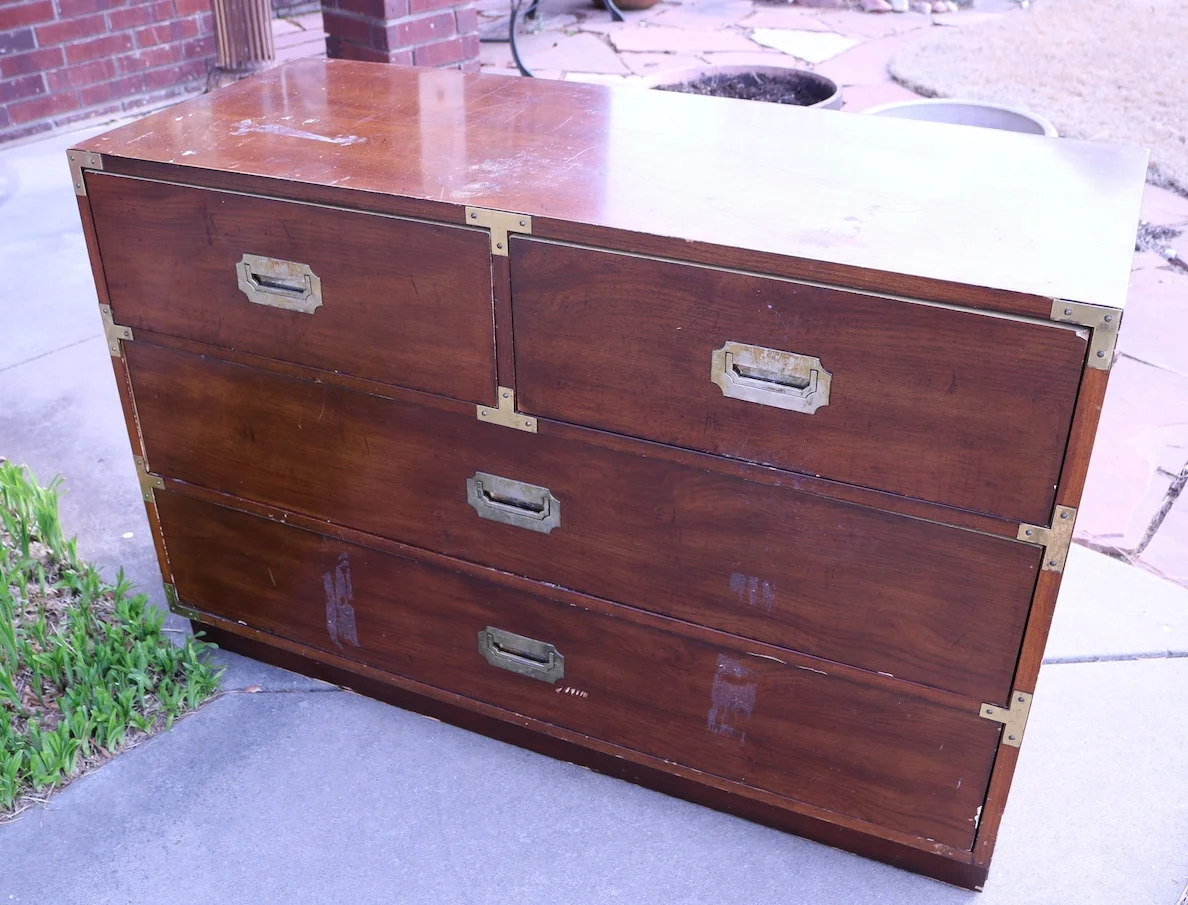
No “before” picture. It was in similar condition to THIS dresser…reeeeally bad. But of course I have no proof of that. Just take my word for it…again.

The entire piece was originally the old “natural” finish with a lot of “wear and tear.” I primed and painted the six side drawers and cabinet and stripped and oiled the top and middle drawers.

I absolutely love the wood handle “hardware” and the super nifty black concave and brass hardware. I sprayed the little concave pieces with metal primer and black paint.

The top had some chipped veneer. I originally planned to paint the top so I could repair these areas, but I just can’t resist beautiful walnut…even veneer. So I did what I often do…I just let it be what it is…an older piece with a few blemishes. You can buy replacement strips of veneer…but I would rather have flawed original…just a personal preference!

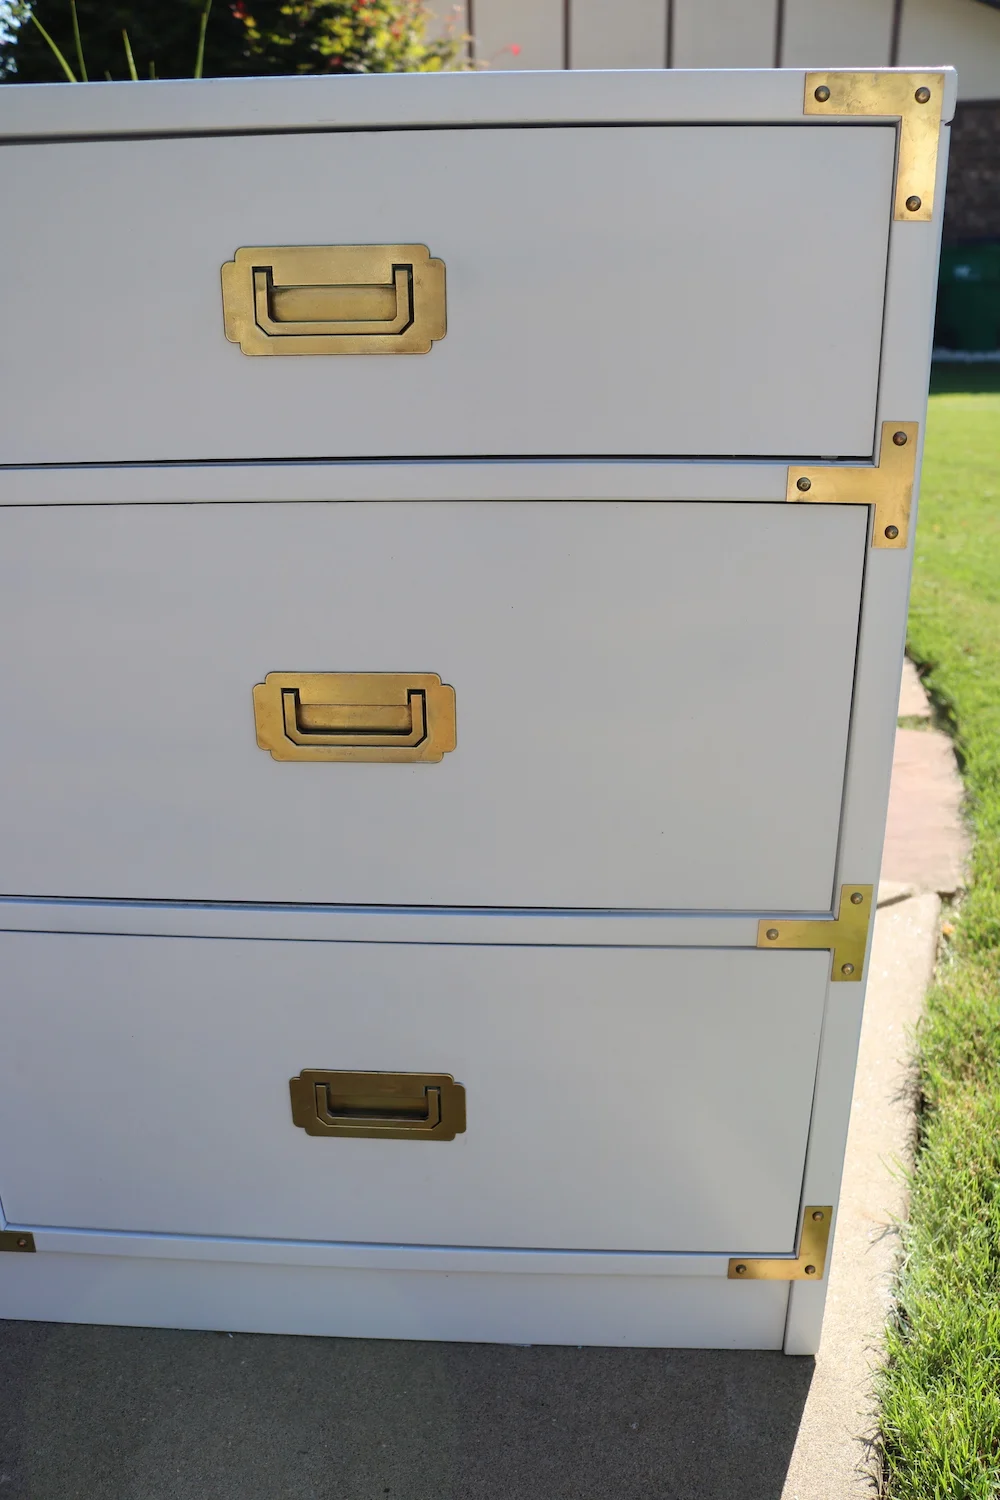
I did take a before picture of this piece….

I love the brass hardware on these pieces…again, the way to tell if it is solid brass is to use a magnet. A magnet will not stick to solid brass. Important because in order to clean these pieces I have to really scrub them with steel wool. No secret to cleaning brass hardware…lots of Brasso, steel wool and elbow grease!

Now…on to my “life decision.”

I have decided to stop doing the whole “auction/flea booth/resale” thing. I love doing what I do but doing it to “pay the rent” has become tiresome. I am just not enjoying it the way I use to.

So this past week I gave my notice at 410 Vintage and I went on a major “purgefest” in my garage (aka shop). I sold a lot of stuff on Facebook Marketplace, I donated a truck load to our local community thrift store and I took a truck load to the dumpster.

I have a friend who opened an awesome little consignment/flea market (Gathered Goods) so I took a few things to her to sell on consignment.

My garage has been a disaster for some time.

I painted the walls and cleaned all the shelving and cabinets!

I installed a Rubbermaid track system for large items….

…and we installed a nifty metal peg board system for all our tools. I knew where all my tools were but no one else could really figure out where anything was.

I even gave the door between the garage and laundry room a fresh coat of paint.

I am not “retiring” completely. I will still refinish and rehab pieces…I just won’t have to go looking for projects. If I find a project I want to work on, I can always take it to Darlene at Gathered Goods.

So fear not…I will always have a project to share here…and of course there are always my enlightened “muse” posts.

Another campaign dresser makeover!

If I find one, I'm gonna buy it! A campaign dresser!

This one isn't a "vintage" campaign dresser...probably an imitation but sweet all the same! Well...it wasn't when I bought it....

Structurally it was in great shape but the finish was definitely lacking. A little KSTP (Kilz, sand, tack and paint...high gloss white lacquer), scrubbed up the brass hardware, and presto....

Again, this one wasn't a REAL vintage campaign dresser...but that didn't stop someone from buying it 1 hour after taking it to 410 Vintage.

This, my friends, is a REAL campaign dresser!!

I have already scrubbed up the brass hardware (no tricks there...Brasso, Brillo and A LOT of elbow grease.) I had to order a few replacement hardware pieces...holy cow those little brass doo-dads are expensive (found them on Etsy.) I sprayed on Kilz and sanded it down. Now I just need to apply a few coats of white lacquer...I can't wait! I will make sure I share it when it is done because I know it will be beautiful!

PORCH MINI-MAKEOVER....

Now that Matt has settled into his new house, we have started on a few little projects that make his home a little bit more...well..."him." (If you search "Matt's house" on this site you can will see several of the projects we have worked on!)

The back yard was a total disaster...lots of trees and years of neglect. I wish we had been smart enough to take before and after pictures of the side yard we have been working on. We added a few flower beds, raked up a truck load of rocks and brought in four truck loads of dirt and mulch. We seeded with fescue. I know it will probably burn up this summer but he was so excited to see the little guys sprouting! We dug up some of my neighbor's lirope and transplanted it in his new flower bed....repurposed the stones that were originally used as a "pad" to make a stepping stone path....a new little Japanese maple. I think it will all be wonderful when he is finished. My yard is an oasis...I have remind him it took 19 years of hard work to get it that way!

The back patio was a tad on the blah side. I did remember to snap a few pictures with my Iphone before we added just a few little touches.

We changed out the flush mount "boob" light for a pendant light...seriously, who puts a dinky flush mount light on a vaulted ceiling?

Threw down a pretty striped rug and added a potted palm and hanging basket. Nothing earth shatter but just a few simple touches to dress the space a bit!

He still needs to change out the seat cushions and eventually I would like to add a baker's rack or build a potting bench...maybe add some kind of wall decor on the wall! We could paint the wood railing but he is determined to eventually add a large deck off the patio so no sense in putting out the effort for the time being!

A few little touches here and there can add personality and style to a space.

It takes time to make a house your home... 

More painted furniture projects and how you can get perfect paint results!

I know I share a lot of painted furniture projects. There was a time when I was a "paint snob." If it is wood, no paint.

But I have learned in my resell business that paint is often the best way to "enhance" a piece and give it new life. 

We all have "that piece." The one mom gave us or maybe we bought at a thrift store or garage sale because we needed a dresser or side table. A maple dresser from the 60s or one of those fake wood "cherry" tables from the 80s. We still need it for the storage or even to fill a space and buying new just isn't an option.

As I have said before, life is too short to live with ugly furniture and even the ugliest piece can benefit from a little "makeover" 

Updating an old dresser or bedside table isn't difficult. Yes, Pinterest is filled with precious stenciled and glazed projects...and we all envy. But simple is easy and the impact can be huge.  I have shared hundreds over the years and every week I complete at least 2-3 pieces that often do not get shared...either I forget to take pictures or they sell so fast I think "why bother." 

So today, again, I'm going to share a few simple little projects and how to get the best results.

Mini makeovers that can make a huge impact in any room!

This campaign dresser had seen it's better days....

As you can see, it had been seriously abused. But even the ugliest piece has potential....

Not the best "after" picture, but I didn't think to take a picture before I took it into 410 Vintage so I snapped one with my phone...but you get the idea. (If you haven't been to 410, GO!)

It sold the day I took it in! These "upcycled" dressers are perfect for a bedroom or even a tv and storage cabinet in the living room.

You might have noticed one piece of the hardware was missing. I happened to have one of the pulls from this project so I used the same method to retrofit it. You don't have to do anything that complicated...most home improvement stores have tons of hardware options. All the hardware was solid brass so I cleaned it up with some Brasso, steel wool and elbow grease. The point...the hardware doesn't have to be all matchy-matchy. 

This little bedside table had seen it's better days!

A simple little makeover...paint and new hardware....new life....

This is a typical hard rock maple dresser you can find for next to nothing at thrift stores and garage sales...

Usually sturdy as the day they were built, but seriously ugly and dated!

They obviously can benefit from a little love and attention...nothing fancy just a little paint and hardware update....

An inexpensive little "fake wood" side table......

And AGAIN...

I liked the brass hardware on this one so I just cleaned it up!

Sooooo...what do all these projects have in common. 

KSTP...Kilz (or any good primer!), sand with 220 grit paper, wipe down with a tack cloth and paint.

The two dressers were painted with latex paint using a 4" foam roller and paint brush. I used spray paint on the two little side tables.

So, here are a few TIPS for getting the best results when painting furniture.

1) Always clean the piece of any dirt or debris. Just wipe it down with a damp cloth and make sure you get all the "ick" off! If the piece is super grungy, you might want to clean it with ammonia or wipe it down with mineral spirits! (If it has a lot of flaking paint, you can sand it down a bit or better yet, strip it using this process...just make sure the existing paint or finish is stable!)

2) Make repairs. DO NOT waste your time making it pretty if it needs repairs. And remember, glue and clamps are your friend!!!! If you don't know how to repair something, google it or email me. MOST furniture repairs aren't that difficult...but if you do it wrong (or not at all) you will be wasting your time making it pretty! 

3) Primer....always a must if you are going to paint with spray paint or latex or oil paint. I swear by the oil-based Kilz. If you want your paint to stick and not chip or peel, prime. For smaller projects I use spray Kilz. For larger projects I roll on Kilz with a 4" foam roller. Even if your paint says "all in one paint and primer"...use primer.

4) Sand smooth after the primer has thoroughly dried. A 220 grit paper should do the trick...FEEL the surface...if you can feel it, the paint won't hide it. 

5) Use tack cloth. Most tutorials will tell you to wipe the piece with a damp cloth. That won't cut it! Tack cloth will pick up the finest grains of dust and debris you can't see until you paint the piece! Use it!

6) If you are going to brush on latex or oil, use a quality brush AND TAKE CARE OF IT! I have brushes I have owned for years because I am religious about cleaning them thoroughly after use. And don't even think about using those cheap disposable brushes (chip brushes). They are great for many things, but not for getting a smooth paint finish on furniture!!!! 

7) ALWAYS use an additive....Floetrol for latex, Penetrol for oil based paints. 

8) Use quality paint. Especially spray paint. I know it is cheaper at discount stores but pay the extra few dollars and buy a quality spray paint at your home improvement store. Cheaper will NOT be better if it doesn't hold up to wear and tear! I do 2-3 light coats (spray or brush) rather than trying to get solid coverage with one coat...trust me when I say, there is NO paint on earth that will get good coverage with just one coat!

9) Cure time is important. Seriously, I know they style their pieces on those HGTV shows within hours of painting a piece of furniture. Just don't! Just because the paint feels dry to the touch DOES NOT mean it has cured. Latex...a few days...oil...a week. Give your paint time to cure or it is going to peel or chip if you try to use it right away! Put the piece in place and chill!

10) Spray vs. Brush/roller. For me, it all depends. I have learned that large flat areas are tough to get an even coat of paint on with spray paint...and of course there is the expense factor for large pieces. A dresser can take 2-3 cans of spray paint. So it really depends of the piece. Sometimes I will spray the drawer fronts of a dresser and roll the top and sides. 

11) Keep a little spare paint for chips and dings...if you use latex or oil, just put a few tablespoons in a little container and stick it in the back of the drawer...just in case! If you are using spray paint, keep a can with a little paint. Manufacturer's change paint colors and you might not be able to find that awesome color in the future. Keep spare paint in the house...not the garage or storage shed!

Regardless of whether you spray or roll/brush, you have to follow the first rules of KSTP....Kilz (primer), sand smooth, then tack....then paint!

If you follow these simple guidelines, you can update a dated piece with just a little time and effort. 

Again, life is too short to live with ugly furniture...

The hardware sets the tone...dresser makeovers!

We have been pretty busy this past month so I haven't been able to go to too many auctions. I was forced to scrounge around on Craigslist and online garage sale sites to find a few pieces to work on..

They did not disappoint!

As usual, I am drawn to the "nobody wants me because I am totally ugly" pieces of furniture.

I like different and unusual.

This chest and side table checked off all the boxes...kinda ugly and unusual.

The ugly part is pretty obvious but they do have nice "bones." Solid and sturdy!

The unusual part was the hardware. I love unusual hardware. Sometimes the hardware dictates what direction I go with a piece.

In this case the heavy black handles pushed me towards blue/gray. A friend asked me what paint color I used. Well, let's see...I had some blue, I threw in some black...too dark, so I added some white. 

So I have no idea what color it is....blue/gray!

They had some detailing so I decided to do a chalk paint and distress treatment. I usually save that for pieces that have good detailing that will "pop" when I distress it. 

Two coats of chalk paint, a little distressing and sealed with poly. The hardware just needed a little cleaning and it was good to go!!!

Hardware can be a booger when it is missing. I picked up a campaign dresser last week and the brass hardware was amazing. The only problem was it was missing one handle and they are next to impossible to replace.

I really wanted to stay "true" to the style of this dresser...a mid century campaign. But the old finish was pretty dark and dated. (did I take a before picture like a good blogger...um...no!) 

Very similar to this little side table I recently refinished. 

I decide to shine up the brass hardware and give the piece a sleek new look with gloss white paint.

The missing handle, however, posed a real challenge!

I knew I was going to have to scale back to one handle on each of the top drawers but I couldn't just patch little screw holes because the handles actually "inset" into the face of the drawer. 

The thickness of the hardware was 1/4"...so I bought 1/4" pieces of craft board....

....cut out a hole big enough for the hardware to sit in and then attached the boards to the face of the drawers with wood glue to cover the existing cut outs! 

KSTP (Kilz, sand, tack and paint!) treatment, reinstalled the spiffed up hardware and.....

Perfect! Obviously someone else thought it was perfect because it sold the day I took it in!

Until next week....