Finding the perfect display shelf (hopefully)....

I haven’t really been MIA…I’ve been here. My computer however has been with my accountant for two weeks while she did my taxes. AAUUUGGGGHHHH! I seriously dislike taxes. Which is why I pay an unGodly amount to have someone else do them.

Last year was a nightmare….first year I didn’t have a “kid deduction” and I sold the apartments and bought rent houses through a tax exchange.

Nightmare I tell ya.

But it is done and life goes on. Just one of those annual unpleasantries in life like mammograms and having your teeth cleaned…painful but necessary.

When last we spoke I promised to share the board and batten in my entry. I think I will wait for a full reveal until the custom bench I ordered comes in. The problem is I have put the walnut table back and I am really digging the “entry table” look. But I put hooks on the wall specifically for guests to have a place to hang coats so I HOPE I love the bench look!

Sooooo….what have I been up too. Well, nothing of any great consequence. The past two weeks have been typical winter weather so I have had to limit myself to “inside work” and since many of my inside projects entail some outdoor time, I haven’t accomplished much. It has warmed a bit this week so I am hoping to start getting more done!

I did get my Easter decor up. I have decided that rather than just decorate for fall and Christmas, I am going to do something for each season that will carry me through the entire year. So after Christmas came down, I did a little for Valentine’s Day…after that a little Easter…after Easter I will do Spring, then Memorial Day/ 4th of July, then Summer, Fall and finally Christmas.

Nothing HUGE like fall and Christmas but table decor on the dining room table (since we rarely use it)…

IMG_1083.JPG

A wreath on the front porch…

IMG_1080.jpg

Seasonal pillows on the porch chairs…

A little kitchen froo-froo…

And a few knick knacks and pillows here and there.

Simple but fun!

I love this little sign.

IMG_1081.JPG

I bought two, not knowing whether I want to go with white or black.

IMG_1078.jpg

I love the black by the front door. They each have a simple bow on the top (like the white one) and I discovered you can take the bows off…the little wire that holds the bow and greenery is fed through a little hole in the sign. At Christmas I made a Christmas bow and it was so cute I decided to make one for each season…a little seasonal ribbon and a little bit of greenery. Cute as a bugs ear and super simple!

I have spent YEARS propagating my fall and Christmas decor, and I REALLY don’t need to add to those collections. I have decided that every year I will start adding to my other “seasonal” collections….I so dislike how “bare” the house looks after the Christmas comes down and it will be nice to look forward to keeping the house festive year round. Again it will all be much more scaled down than fall and Christmas, but fun all the same!

My next big project will be shelving for my living room. I want to put a display shelf/bookcase to the right of the fireplace.

IMG_1077.JPG

I thought seriously about doing a credenza type look with tall art or some such but I feel like I need something with more height since the shelving on the left is “low.”

I have to keep in mind too that eventually I want to reface the fireplace…I have NO idea what I want to do, but eventually that may impact this area.

I think I went into EVERY furniture store in NWArkansas looking for the perfect shelving. Nothing.

I wasn’t exactly sure what I wanted, but I knew when I saw it I would know.

When I saw this “industrial” style unit in the store where we purchased our dining room table, I loved it.

SOURCE

Now, I didn’t think I wanted “industrial” style shelving but again, that is the great thing about being somewhat “eclectic” in my design choices…I can add just about any style and it will work.

The bad news was the price….waaaay more than I really wanted to spend on a bookcase. Not that their furniture isn’t worth it, I just know me well enough to know that this is a “design choice” that may not be one of those “heirloom” pieces like our dining room table was.

So I kept looking and found this….

Screen Shot 2021-02-28 at 7.02.07 AM.png

SOURCE

Waaaay less expensive…and for obvious reasons. The frame is metal vs welded steel and the shelving material is MDF vs. beefy solid wood.

But here is my thought process. The look and style is very similar…almost identical sizing…and I can replace the MDF shelves with beefy wood shelving. It won’t be one of those “heirloom” pieces like the walnut shelves that were my grandmother’s (left of the fireplace) but they will serve their purpose and HOPEFULLY give me the look I THINK I want. Considering the savings, if I don’t like it, I can relegate it to a spare room with out feeling bad! And I won’t feel like I have to factor it into any decisions about the fireplace because if it won’t work, the “cost” won’t be a big factor.

The shelves arrived yesterday so we will see how my “best laid plans” work out. Hopeful they will turn out to be exactly what I want and I can share them next week!

Hopefully….

Until then….

static1.squarespace.png

Pantry storage....

Winter has truly arrived and it is literally FREEZING outside…no bad winter precipitation, but frigid temperatures make going outside brutal. So inside where it is toasty warm is where I have been for the better part of the last week!

I started working on my awesome pantry and this week I finally put up some board and batten in the entry. The latter I will share when the paint dries and I am able to reset a few things.

The pantry…MAN OH MAN!!!

As I mentioned HERE I don’t need a lot of upper cabinet space because I have a super awesome walk in pantry.

IMG_0654.jpg

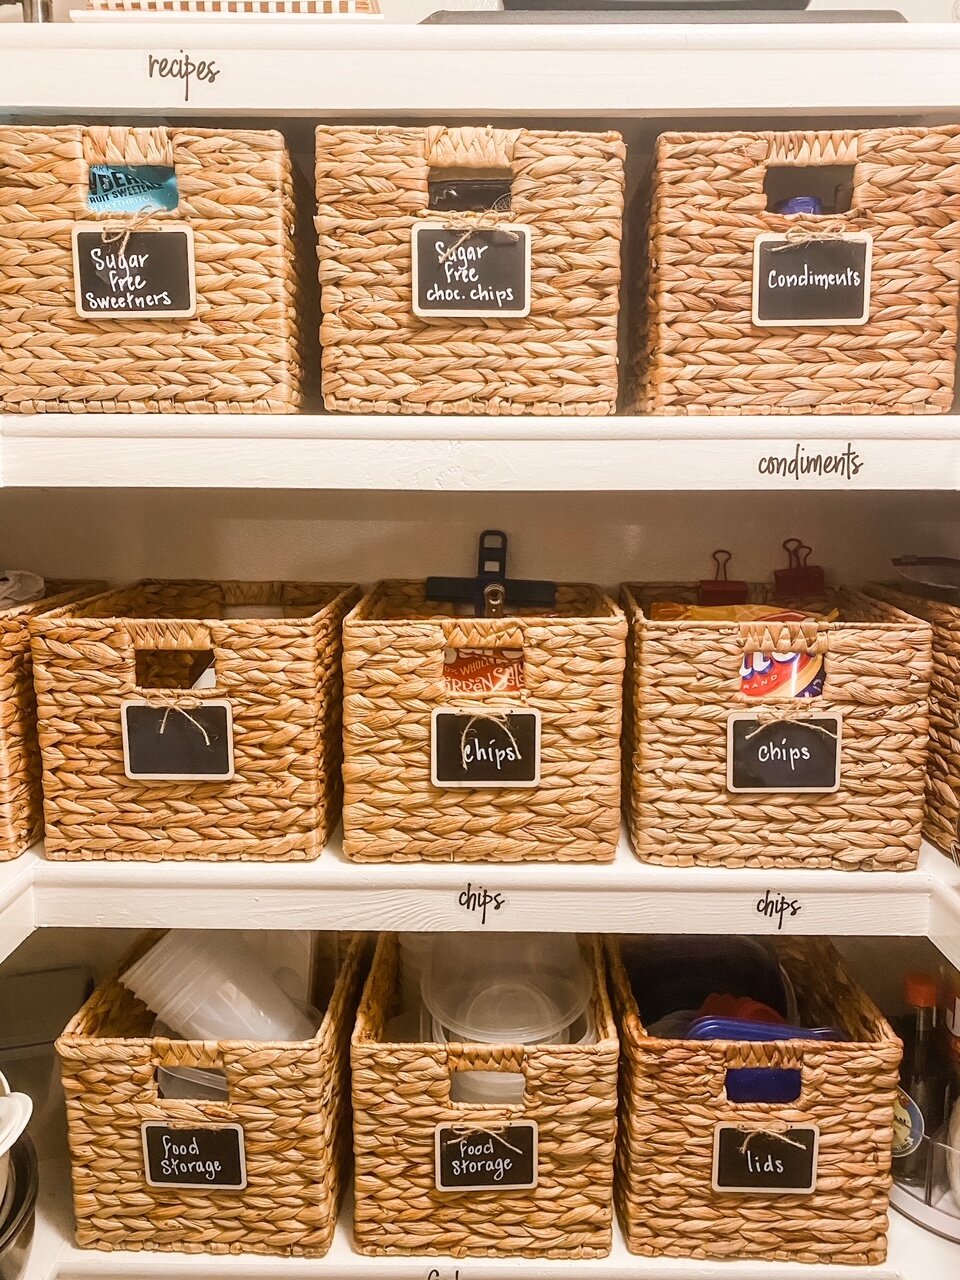
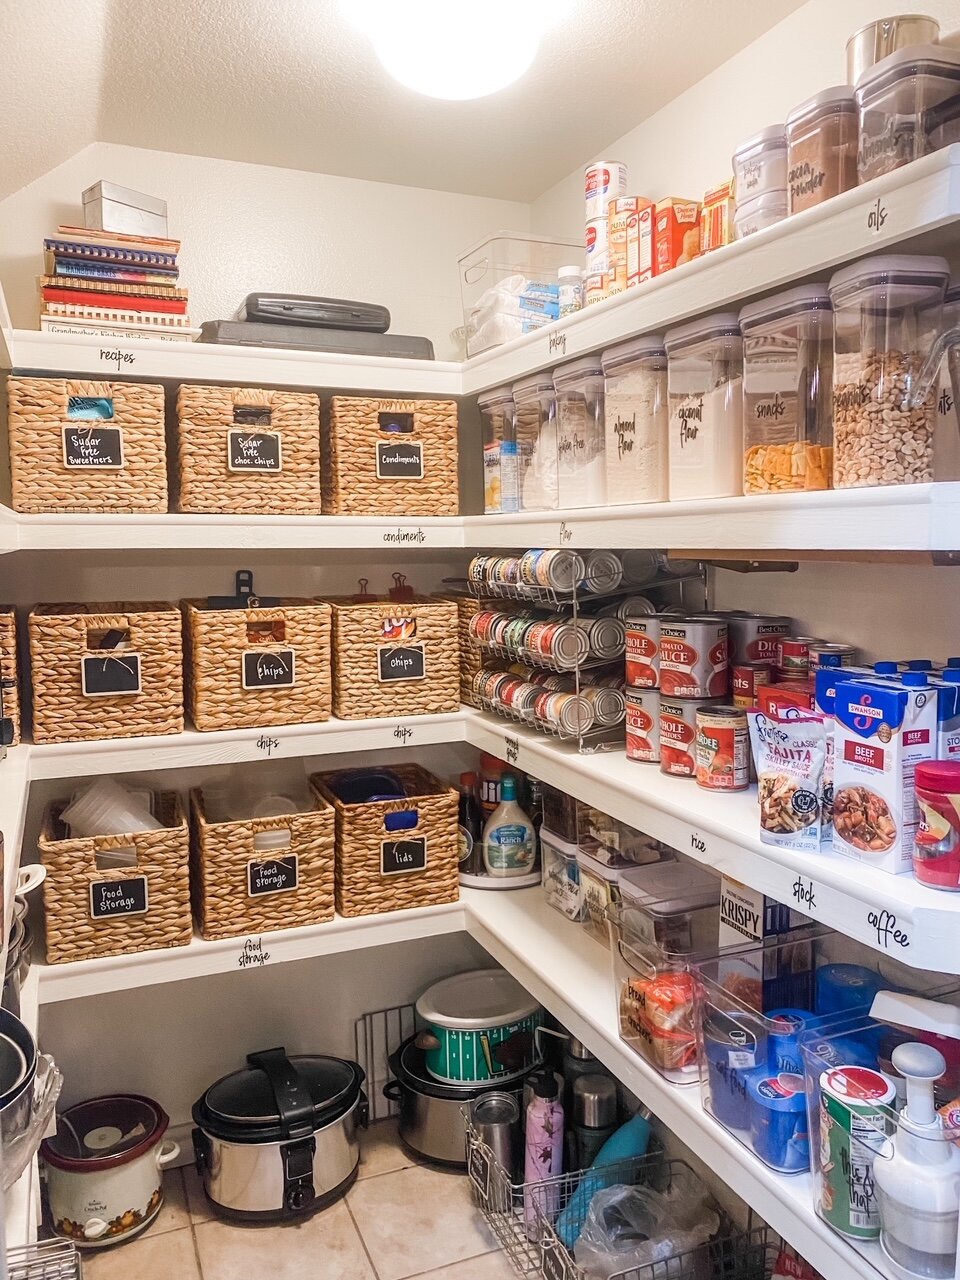
As organized as my pantry seemed to be (for ME) I decided to give it a little “facelift”….more baskets, some storage containers, labels…all the froo-froo stuff I normally don’t even bother with. But again, I am “semi-retired” now and looking for things to do until I can’t go outside and dig in the dirt!

In my last house I only had a small cabinet pantry and didn’t see the need for all the bins and boxes and “stuff.” But since I store more in this pantry, everything from food to serving dishes to cookware, I decided I wanted to get super organized.

The first thing I did was pull out everything I wanted to put in containers and baskets. Everything that wasn’t going to be put in a basket, container or bin was organized. (I also took the time to wipe down all the shelving even though it had only been 6 months since it was last cleaned!

Here is my #1 tip for organizing ANY space…figure out what storage containers you need for the items you have FIRST, then go buy your storage containers…don’t go buy a lot of baskets and bins and containers.

In my case, I already had a few wicker baskets…perfect for holding chips, storage containers and lids, seldom used sweeteners, seasonal dish towels, cookie cutters, etc. I had 7 but based on the stuff I knew I wanted to store in them, I needed a few more. Fortunately I got them at Lowe’s and they still have them!

IMG_0999.JPG


I love these little chalkboard labels I got HERE….super cute! They have a little string but I tied the string in a bow and just hot glued them directly onto the basket.

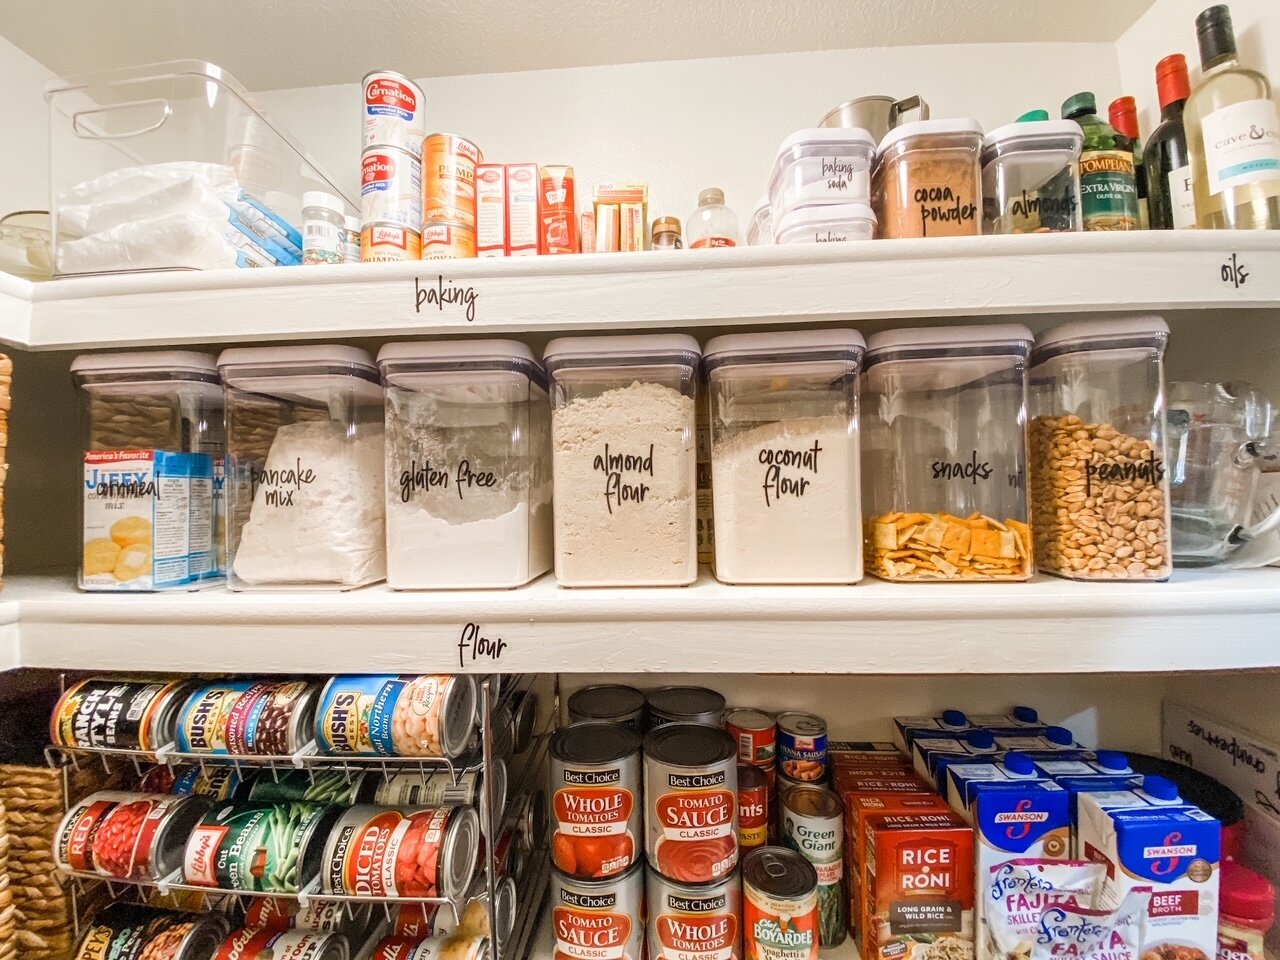
I have a lot of different flour…almond, coconut, gluten free, pancake mix, etc. I knew I would need proper storage for the flours and such.

My initial plan was to put everything in the Heritage Anchor Hocking jars…I just LOVE the look of a pantry filled with glass jars. But here’s the deal…they are heavy…and I am getting too stinking old and clumsy to be lugging around 1 gallon glass jars filled with flour.

So I wanted pretty to serve my purpose….

I found some nifty OXO storage containers at Home Goods…similar to these. I love them….I bought different sizes for the flours and mixes, baking soda and powder, cocoa powder, cornmeal, nuts, etc. The varying sizes stack neatly.

IMG_1001.JPG

I also bought three sets of labels…small for the spice jars and medium and small for the pantry containers….I got them HERE! (I went a little over board labeling the actual shelves…I’ll probably take those off.)

The can food rack is a nifty little gadget to store canned food…in theory. In the picture on Amazon it shows that it holds four cans in each section…but it really doesn’t without one of the cans being all womper jomped…meh…whatever…it will do for now!

I bought a few clear containers… the baskets are great for hiding open chip bags and random storage containers and lids but I wanted clear bins for things I use daily like cat food, bread, and a few odds and ends.

IMG_0998.JPG

As you can see I store a lot of stuff on the floor…bulky items like crock pots and big bags of animal food! I had some wire baskets I originally bought for my holiday wrapping station…perfect for holding water bottles, thermos’, potatoes and critter treats.

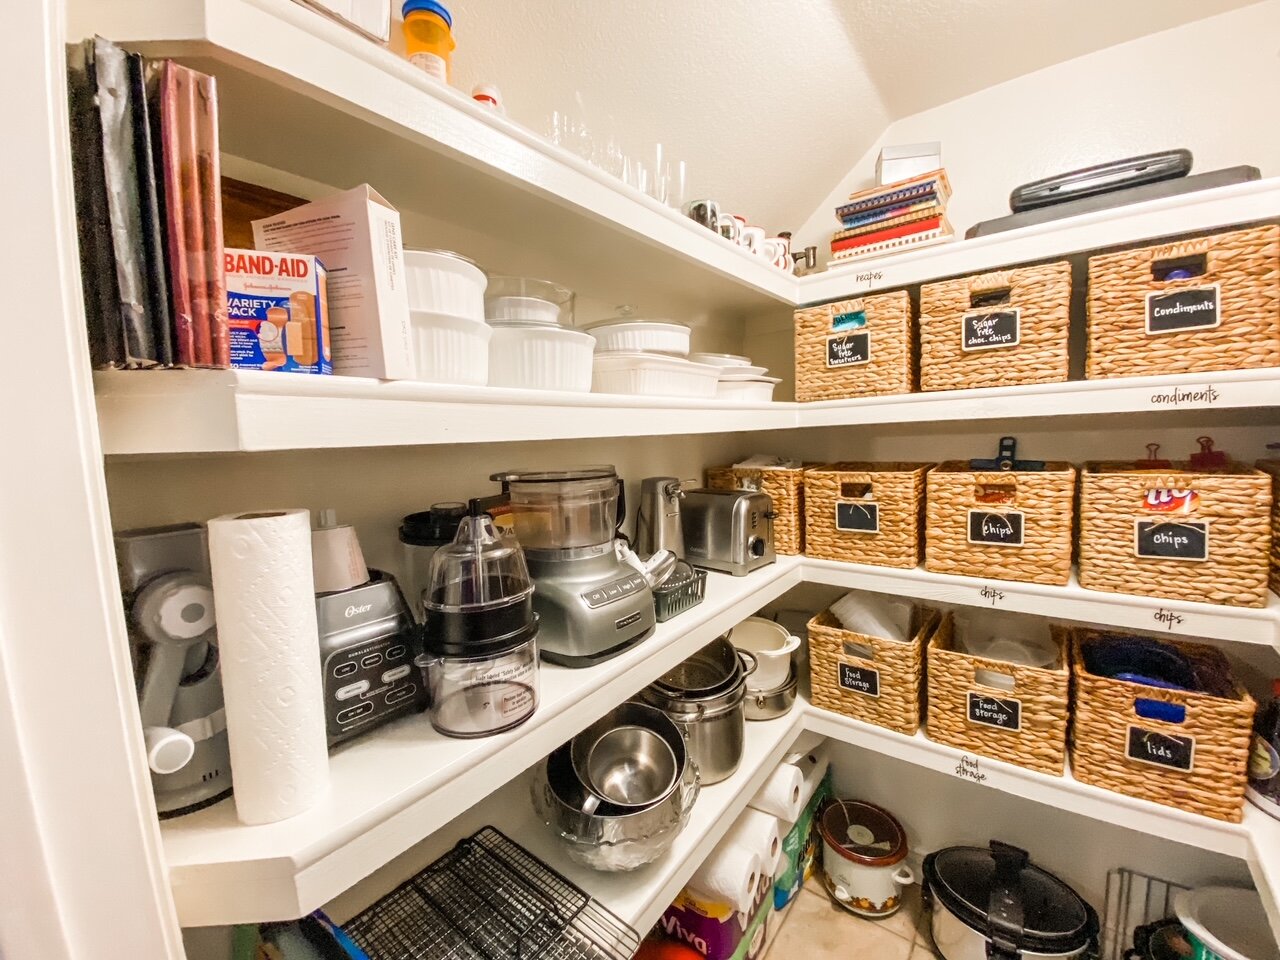
The left side of the pantry is for cooking ware…casserole dishes, mixing bowls, appliances and spare pots and pans…

One thing I LOVE about this panty…it has an outlet…so I can leave my toaster and can opener in the pantry rather than take up counter space.

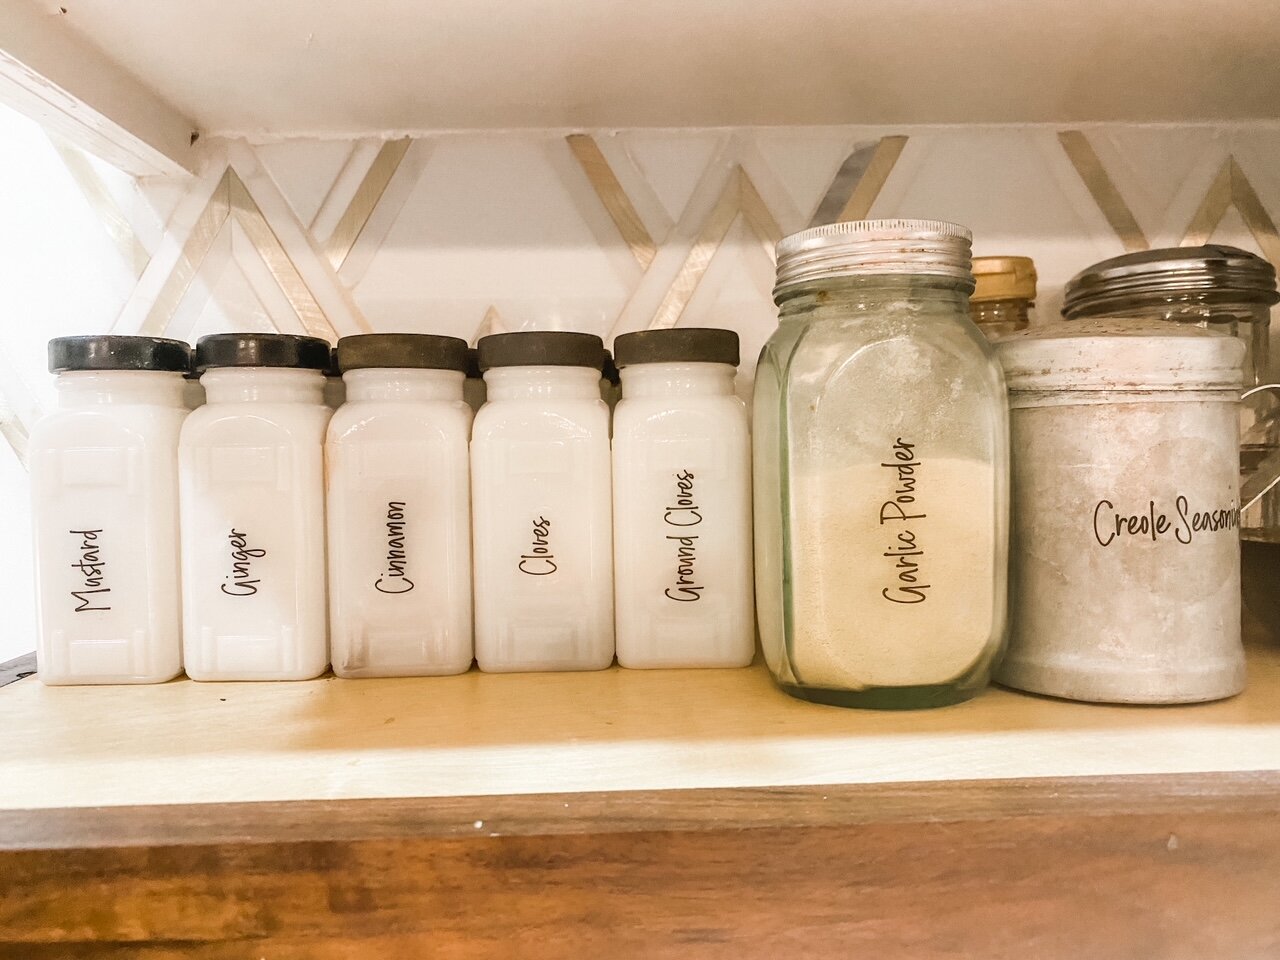
While I was organizing and labeling I decided to do all my spices as well….

IMG_1004.JPG

I had the milk glass jars but didn’t use them because they weren’t properly labeled…now they are!

At some point in the future I really want to add glass to the pantry door like I did to my laundry room door HERE.

IMG_1005.JPG

No earth shattering reason…I just think it would look awesome with the glass cabinets.

But again, winter is here and there is NO way I can do any work outside…so that little “to do” will have to wait until warmer days!

Hopefully I can share my entry next week. I THINK I like the board and batten…maybe when I get it all staged I will know for certain.

So until next week….

static1.squarespace.png


Curtains...

Last week I concentrated on hanging curtains in a few windows.

I have a “list of things to do” but it is still pretty cold outside. I need to paint the trim in the office, master bedroom and laundry room. I am using oil base paint and as you know, cleaning brushes with mineral spirits can take a bit of time outside. I want to do some trim work in the entry, but again, outside work. I may tackle the pantry this week but not sure exactly what I want to do…I ordered some jars and labels.

I have Raynaud’s which is this stupid circulation thing with my hands and feet. No biggy except whereas a “normal” person could probably work out side for short periods of times when it is below 65 degrees, I can not. It causes great pain and distress and is frustrating as heck!!!

I’m still adjusting to being “semi-retired.”

For those of you who grind it every day like I did for years, the idea of “retiring” may seem appealing. If you like waking up on Monday morning with little purpose for the week, go for it. If you like sitting around reading or binge watching 10 year old TV programs days on end, go for it. If you think you are going to volunteer, forget it. They don’t want you during a pandemic. If you think you are going to garden all day or project outside, make sure you have a library ready for the three or four months out of the year you can’t get outside.

The highlight of my entire week was the little warm up we had. I was able to get out and reorganize my garage.

Seriously, that was the highlight of the ENTIRE week.

I knew finding a “purpose” would take time….it’s still taking it’s time…lol!

Enough of my pity party…on to the curtain adventure!

So as you may know from my last house, I am not a big “curtain person.” Every single window in this house has 2” mini blinds…which are nice but they are just so….”mini blindish.”

One of the really awesome things about this house is that no window gets direct sunlight, so no window really needs to filter out hot sun. Also, no window is really “open to the public” so privacy is not a huge issue.

The windows in the living room and den adjoin the all-season room.

The windows in the breakfast room adjoin the side screened porch.

The windows in the dining room face west…

… but are shaded by the covered front porch and the large trees in the front yard. There is a bit of a need for “privacy” since they face the street…but not much. You would have to be on our front porch to see in and truthfully I am rarely in a state of “need for privacy” in my dining room!

So basically the need for curtains boil down to aesthetics…I look at curtains kinda like lipstick. You don’t HAVE to have it but it kind of dresses things up a bit and finishes off the “look.”

For the record, I rarely wear lipstick either!

But since I want to really make an effort on this house and since I have WAAAAY too much time on my hands, I decided to tackle a few windows…put a little lipstick on the rooms so to speak.

So off to the home decor store I went.

Again, I don’t really NEED curtains in the dining room but I found a set I really like.

(I notice I need to make some adjustments…especially to the curtain on the left.)

I decided to leave the blinds in place for now just incase we do need privacy or to block the sun…eventually I may do something different but not sure what. I do love the curtains and they work well with the “glitter/monotone” vibe I am going for in this room.

I did have a debate as too where to hang the curtains…above the transom or between the transom and the window. I looked on Pinterest and decided I actually like the look of curtains above the transom…so that’s where I hung them.

My plan is to make this table my “seasonal decor” spot. Since we rarely use this table, it is the perfect place to go all out…kinda of like I did for Christmas….

I plan to do this for every holiday. I picked up a bunch of stuff for Easter but can’t find anything I really like for Valentine’s Day so right now it is kind of bare.

I am a big fan of Pinterest. If you are looking for inspiration…what color or how high…just search and cruise. I promise you will eventually see a pattern to what you do and don’t like.

Went with simple for the den and breakfast room…I removed the blinds and added plain ole’ white sheers. Neither of these windows need shading or even privacy for that matter and I thought this simple look was like a bit of lip gloss. Simple and understated.

I found curtains for the office but still have to get another curtain rod…another project for another day!

So I made an effort and I like the little changes. The major change will be the living room windows. I tried just removing the blinds…I like it…Brian doesn’t. I thought about shutters but when I looked at “shutters” on Pinterest I realize I really didn’t like the look. I may try tall curtain panels across the entire wall but then the big question becomes “what fabric…what color…blah, blah, blah”

I may have to save that for another week…between the afternoon of rearranging the garage and my eye appointment on Tuesday I am plum worn out.


A new year....

I was SOOOOO excited for Christmas this year…the new house all decked out in all its stunning Christmas glory. (and HERE) It was the first year in years that the entire family would be here Christmas morning. It was our first year without Mom so being surrounded by family was super important.

Then the “2020 curse” hit. Brian tested positive for Covid the Tuesday before Christmas. Sarah and Ashton were already here so they immediately packed up and went home to quarantine for two weeks. Mitchell had driven in from Phoenix so he was kind of stuck. Brian immediately went to bed and could not have ventured out of the bedroom if he had wanted too. I wore a mask in the house and Mitchell and I “social distanced” in my own home.

Mitchell finally went home Saturday and it hit me like a train Monday morning. I spent 5 days in bed wondering if this would be the point in my life when I would start wetting the bed. I was exhausted!!!

Christmas…the most wonderful time of the year.

Not so much this year.

My oldest grandson couldn’t go home for Christmas and my son-in-law stayed in their camper for two weeks because Sarah and Ashton were quarantining after being here. Christmas morning I watched Sarah and her family open gifts on Zoom. Christmas day Mitchell and I opened presents alone….we had to stay across the room from each other and wear masks…no hugs. Matt and Hannah came over and got one gift each and opened them in the front yard while I watched from the window. This past week we finally felt well enough to celebrate Christmas with the local kiddos. Matt and Hannah and our grandpup Piper. Brandon and Taylor and our grandpups Zia and Zoey. I made them all wear their pajamas…I made a few crockpots of soups and chowders and a few desserts.

Katie will be here this weekend…she and her boyfriend had to cancel their trip home for Christmas and spent the day alone in their apartment.

The whole thing made me sad.

Time to buckle down and focus on the positive.

That is ALL I could do to keep from feeling totally overwhelmed with the “grief” of losing what I just knew would be a wonderful day filled with all the magic of a Christmas with ALL my kids. Last year was so difficult because two of the kids were missing. This year Mom would be missing so I was really focused on the fact that ALL our kids would be home and we have a beautiful new home to celebrate in.

So what are the positives…

1) Been there done that…we are finally able to go back to eating out without the fear of catching this blasted virus. We use to go out for breakfast every Saturday morning but had to stop last March.

2) No more “living in fear.” As I have shared numerous times, I believe “fear” can destroy our happiness and cripple our ability to live life to its fullest. While we still wear our masks in public because it is a state mandate, we no longer have to “fear” catching the virus. We’ve had it and we survived.

3) We survived. While I strongly believe the odds are greatly in your favor of making a full recovery, the media has drilled it in our heads that this has the potential to be a crippling and even deadly illness. So the fact that we both came out of it with nothing but some residual fatigue is a positive!

4) None of our family caught it from us. That alone is a miracle and something I am soooo grateful for! This virus is a “flu” and if you have ever had a full blown case of the flu you know it is NOT fun! I am soooo grateful we didn’t infect people we love.

I certainly wouldn’t encourage one to go out and intentionally get this thing, but now I feel like we can begin to live our lives with a tad bit of normalcy again. And while it crippled our Christmas this year, I now have a bit of hope that NEXT year will be better!

All this whining to say…I want to start some projects but right now all I can do is walk around an THINK about it.

So what next? Well it is a bit cold to be projecting outside. Even so, I am chomping at the bit to start landscaping this yard…I think I already have the entire yard landscaped in my mind!

The house…now that all the Fall and Christmas decor is down, the house just seems so “blah.” But now I can start thinking about what I want to work on next.

The entry….

…it needs SOMETHING. Not sure what but it will get some froo-froo. Certainly a rug…maybe a little board and batten.

The living room and den…

…I know for certain I want new paddle fans and SOMETHING with the fireplaces.

The breakfast room…

…I know all the windows need window treatments. My vision is wood tone Roman shades and white curtains.

The dining room…

…I have NO idea but it desperately needs something!

The kitchen….

…I’m pretty happy with the kitchen. I may do something different in the pantry but not sure yet.

Then there is the trim in the bedroom and office that still needs to be painted. The bathroom and laundry room cabinets I think I might want to paint. The all season room ceiling I might want to paint.

So I have a lot of projects I think I want to do…I just have to get focused. Right now the energy level is still lacking a bit and as I said, the best I can do is walk around and think…and maybe that is a good thing. Sometimes the longer I “look and think” the happier I am with the results.

So here is to 2021…may we all have a better year. Healthier, happier and more productive.

No concrete goals but sometimes just working towards a “concept” is a good thing!

My Christmas gift to you....

Next week is Christmas so I plan to take a bit of a break for the next few weeks so I can focus on the holidays and my kids! HOPEFULLY they will all be here this year. I know many are forgoing family gatherings due to the virus but we have all agreed to tread lightly and carefully for the next few weeks so that we can all be together!

For Christmas this year, I want to give YOU the greatest gift I can give.

Advice. (Course this may be a prime example of “you get what you pay for…” LOL!)

Okay, so obviously we all (me included) fail to take GOOD advice or we would all have dang near perfect lives. Because let’s be honest, throughout our lives those who were older and wiser told us what we needed to do or not do to have a happy life…we just didn’t take it to heart.

But I saw this on Facebook (if its on Facebook it must be true and wise, right?!) and I thought, this…this is a few bits of good advice. MAYBE I should start taking to heart GOOD advice so my life will be better…and happier…and easier.

Of course, I have had to add my two cents…

1) Love your life…and if you don’t, CHANGE IT!!!! Change your circumstances, change who you allow in your life, CHANGE YOUR ATTITUDE!!! If you are unhappy, lonely, hurting….you have all the power to CHANGE IT!!!!

2)Take pictures of everything….but don’t get so busy trying to “capture the memory” you forget to put down the camera/phone and take in what is before you…nature, your kids, a pet. Take pictures, but remember pictures go in albums or in the cloud…the “picture” you take with your mind will stay with you forever if you commit it to your memory! On average it takes about 30 seconds to commit a “short term” memory into a “long term memory.” Put down the phone or camera and soak it all in!!!!

3) Tell people you love them. Say “I love you” every opportunity you have…always. One day they may be gone and you don’t want to live with the regret of not telling them how much they mean to you.

When my mother was dying I leaned down and said “I love you Mom.” She was not really coherent at that point but I SWEAR she said “I love you too.” It is a precious moment I will carry with me for the rest of my life.

Say “I love you.” Not necessarily for THEM but for YOU!

4) Talk to random strangers. Not hard for me…I’m kind of an extrovert. But this may be tough for some. Step outside of your comfort zone…even if it is just a quick comment on the weather. You would be shocked to know that there are A LOT of lonely people out there who would be touched by the acknowledgement that they exist.

5) Do things you are afraid to do. Fear is a HORRIBLE thing to control your life. As a matter of fact, I would argue that if fear is dictating ANY part of your life. you are not living your best life. A “healthy respect” for things that can harm you (leaving your doors unlocked, not washing your hands religiously) is good…but FEAR is not good. Really evaluate if your fear is RATIONAL! If it is not, work to eliminate that fear hanging over your head!

6) Take your life and make it the best story in the world. Again, make the most of your life…if you are not happy with your life, CHANGE IT! You and you alone are responsible for your happiness. You are responsible for whether your life is the best it can be. Don’t blame your unhappiness on circumstances or on others…regardless of how badly they have hurt you. YOU have the power to to make your life the best it can be…you have the power to “write” your own story. And see #5, because sometimes fear is controlling our ability to make positive changes…both in our circumstances AND our attitude.

Quick side note…I read somewhere that fear, frustration, and hurt are the catalyst for anger. Hum…if you feel “angry, “ something to think about.

7) Don’t waste it. You get one life. Even if you believe in an after life, these few short years is all you are going to get on this earth. This is it. You were born, you will die. Every day you waste being negative and unhappy is a wasted day. What if this were your last day on this earth…do you really want to spend it consumed by negative emotions…. fear, anger, bitterness, hate!

So as we FINALLY put this tough year behind us, let’s all vow to live a better life.

After all, we all have the power within ourselves to do exactly that.

Take lots of pictures, but commit to memory those special people and places.

Challenge yourself to conquer your fears…pet a spider, jump out of a plane, clean out that closet!

Say I love you more to the people we love.

Say hi to a strangers, give them a smile, pay them a compliment…

Say thank you…

Be kind…

Vow to make your life the best it can be….

Merry Christmas and Happy New Year!


The kitchen reveal...

When I photographed the kitchen and den for this post, I didn’t know where to start…this space is amazing from every angle.

So get ready for A LOT of pictures!!!!

A few “befores.”

As you can see, the kitchen wasn’t THAT bad…certainly livable and very workable with a little tweeking. But when I bought this house I did so knowing I was going to make it my own. And I did! 

This is how I start at “base neutral.” Take it out…take it ALL out…cabinets, walls, fixtures, carpet…EVERYTHING!

I think this was about the time Brian walked in and about had a stroke! He trusts my “vision” but I had DESTROYED a perfectly fine kitchen!

Sometimes I have to take a space or a piece of furniture to “base neutral” before I can get a clear picture of what I want to do…the “what is” can really clutter your mind!

Eventually I started putting it all back together.

HERE I shared how and why I chose many of the design elements in the kitchen. After 20 years of “tweeking” and having just completed a “mini makeover” on my last kitchen a few months ago I knew what I wanted in this space.

I also had a computer file full of inspiration….HERE is my process for “finding my inspiration,”

 There are so many things I love about this kitchen…where to start.

Let me start with the element the entire kitchen was designed around.

The tile backsplash!

I found it HERE. Now…yes, it is super expensive.But I didn’t need a lot and I firmly believe every room should have at least ONE element that is the foundation for all else. It should be something you absolutely love. As long as you can afford to pay cash for it and not “charge” it, I say go for it!

The minute I saw this tile I know it was going to be the foundation for my entire kitchen design.

The grey Carrera marble accent in the tile coordinated with the grey veined quartz and the stainless steel appliances.

The gold fixtures above the island and brass hardware coordinated well with the gold accents in the tile.

Speaking of island…OH MY GOSH I love this piece. I found the largest piece of quartz I could buy (approximately 65x132) and designed the cabinet bases around that.

I ended up with three awesome storage cabinets on the bar side…

Two great built in shelving units on the ends….

 The trash cabinet, drawers, sink and dishwasher on the “work side”…

 The drawers…I LOVE the “dish drawers.” I had the cabinet maker make the drawers heavy duty and I used THIS system in the drawers for my dishes….

The bottom drawer has the same system and holds glasses and small plates.

I also had the him make “drawer in drawer” systems for the drawers that would hold all the silverware and cooking utensils…then I built the dividers!

 Again, LOVE!

 As you can see, the utensils were total chaos without dividers!

You may notice I don’t have a “junk drawer” in the kitchen. Well, that’s because I have tons of drawer storage in my laundry room and have TWO designated junk drawers!!!

Okay, one is actually a “tool” drawer. I keep a hand full of tools in the house so I don’t have to go to the shop every time I need a hammer or screwdriver. (Wait til you see the shop…OH MY!)

Again, I built dividers to keep everything relatively organized!

Building drawer dividers is NOT hard…I showed you how HERE. I used ½” oak on these so they are a tad sturdier!

You may also notice I only have two upper cabinets.

That is because I don’t NEED tons of upper cabinet space because I have an AMAZING walk in pantry.

It even has an electric outlet so I don’t have to clutter my counter tops with the can opener and toaster.

The “cooking space.”

First, it is no secret I love walnut. When I was working with my cabinet maker I made it clear that I wanted the most beautiful walnut he could find for these bases. I showed him this “inspiration photo.”

He did not disappoint.

 No stain…just three coats of Waterlox.  This product is amazing!!! Super easy to apply and has held up beautifully so far. My experience with oil finishes is even when they do get a little worn and tired looking, a quick wipe with 0000 steel wool and tack cloth and a fresh coat of the oil finish brightens like new!

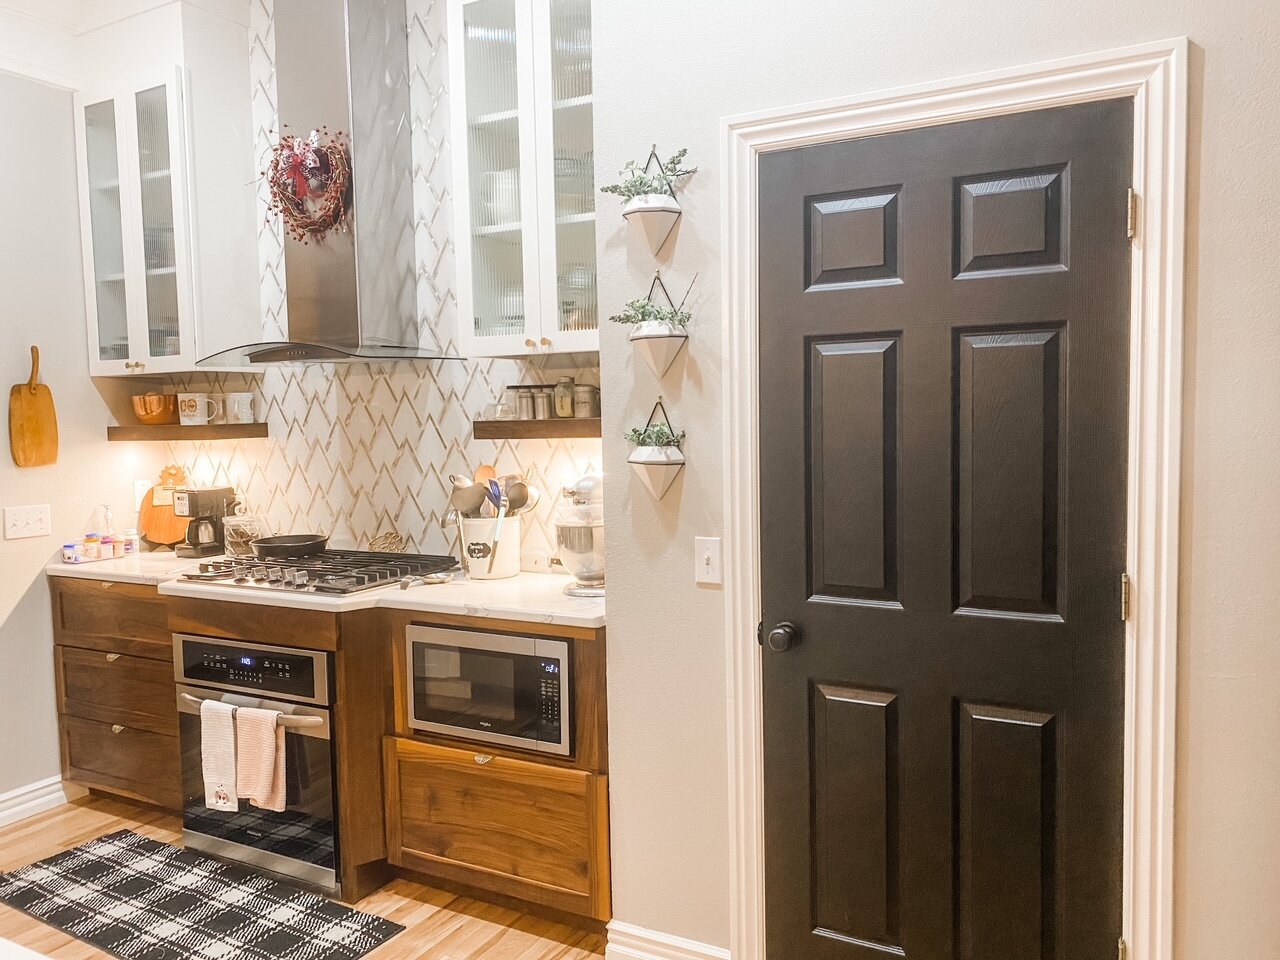
So much of my “inspiration” for this space came from my last home…floating shelves, reed glass upper doors, under counter lighting and gas cooktop.

The oven is a tad “low” for my tastes but the gas cook top needed a specific clearance beneath it. I love the built in look of the microwave…it is just a counter top microwave sitting in a cutout. The large drawer beneath the microwave holds all my daily cooking pots and pans. All the drawers left of the oven hold utensils, baking sheets, mitts, etc. Plenty of organized space for things you need every day at your fingertips! Again, the pantry is large enough to hold things I don’t need every day…crock pots, large pots, mixing bowls, casserole dishes, etc.

The “breakfast room” is adjacent to the kitchen…I shared it HERE when I shared my laundry room….

One thing in my pantry is super special…a functional piece that has sentimental value. This pull down knife holder was my grandmother’s…then my mothers…and now mine.

 Maybe silly to some that such a simple piece can mean so much, but it does!

The den….

A perfect space for just the two of us! I didn’t make HUGE changes in this space.

One change was the built ins. “Back in the day” a big base cabinet with shelving above was all the rage. Probably so you would have a place for your big ole’ honkin’ television.

I wanted plain ole’ built in floor to ceiling shelving. I removed the base cabinet and custom built shelving to fit in the space…presto-bingo…shelving!

There are still a few changes I want to make to this space. Again, reface the fireplace and change out the paddle fan…again, all in due time.

The guest room and exercise room are right off the den. Nothing show worthy at this time…the guest room is almost identical to the guest room in my other house. The exercise room is currently my “wrapping room” and that is REALLY not going to be shared at this time!

This is my gift wrapping room….

I did promise to share how I made the cute door signs. I think I will save that for next week! This post is getting a bit long.

So until then….


It's the most wonderful time of the year!

Christmas really is the most wonderful time of the year!

And we all desperately need something positive to focus on right now!

It has been a tough year. I can’t believe we have all spent almost an entire year “social distancing” and wearing masks in public. We even cancelled Thanksgiving this year…now that was a stinger!

For me, it has been a fairly stressful year. First, I sold the apartments and bought rental houses…a major “career change.” I bought this house and waded through the treacherous process of “remodeling.” I sold my home of 20 years and went through the whole purging, boxing, moving struggle.

My mom died and we had to clear out and sell our “family home” of 50 years.

It has been a stressful year.

So I am clinging to every single “happy” “positive” “joyful” thing I can possibly find….as I shared before, some days it is really hard to find the positives when life seems to be throwing you one negative after another…but it is sooooo important to find and focus on any little positive thing you can find!

So today I am super focused on all the wonderful changes we have made to this house to make it our home!

Welcome to our home!!!!

I shared our front porch several months ago HERE. I absolutely love it…and last month they FINALLY got our yard sodded…looks amazing!

The porch lanterns are beautifully decked out for the holidays!

I love the few changes I have made to the entry,…

The “before.”

You can see my attempts to “detraditionalize” the house by changing out the transoms and removing the crown above the windows and cased openings. A new front door.

One of the first things I did in this house was paint all the interior doors black. It is something I had done in my last house and I loved it…and it was something that made this house feel like “home” from day one.

I changed out the light fixture in the entry…nothing major but I like the “big lantern” look. Inexpensive light fixtures are a good way to bring in current decor trends without breaking the bank. I found this style for over $800…but this particular fixture was under $100 at Lowes.

One of the HUGE expenses in the little makeover was the flooring. The house had REAL hardwood flooring but carpet in the living room, dining room, master bedroom and office. Again, I am not a big oak fan but I decided to work with what was there. We removed all the carpet, laced in new wood flooring, sanded it all down and just added a clear coat…no stain. I love them!

My office is to the right of the entry….nothing drastic in there yet…just cozy and functional.

Eventually I want to do something with this entry…maybe some board and batten…maybe a long runner…who knows. Something. Someday.

The dining room…this was one room I couldn’t wait to get decorated for the holiday.

Again, the before….

Again, the look of a more expensive chandelier but for MUCH less…I got it HERE. Elegant but simple.

I absolutely adore this room! I have never had a formal dining room and while I’m not sure how often we will use it, it is a beautiful space!

I had originally planned on using a round table because the room is “square” and smallish. After cruising the blogosphere and Pinterest I decided I did not like round tables. James and James makes beautiful custom furniture so I was able have a 6’ table with a 24” insert made…it is GORGEOUS!!

(The door in the dining room goes up to what we refer to as the “bunk” room. A HUGE room over the garage. We have every thing from our attic PLUS all the seasonal decor we had in a storage unit stored on one side…the other side has a full size bed and a twin bed and a gaming TV for the grands…hence the “bunk” room! It is AWESOME but not really show worthy!)

You may notice I went a bit “bow batty” this year…I found an amazing tutorial on youtube for lantern swags and funky bows. LOVE! Again, I could do a tutorial but find one that works for YOU. This tutorial worked for me!

Next week I will share some cute door decor I created with funky bows and wood signs…just too cute!!!!

James and James make benches but I decided to construct one…

I applied the same stain I used on THIS cabinet top. On raw pine it has more of a “pinkish/whitish” color.

I really like the bench and I bought a sheep skin rug to mimic an “inspiration photo” I found on Pinterest.

I love the bench…I love the rug on the bench…but I absolutely love this table and I can’t being myself to “hide it” behind a simple bench. So for now the bench sits behind the couch where it will be easy to pull in when we need the additional seating.

The living room…super excited about this room as well. In our other home we had two living areas…both were about the same size, neither big enough for “large gatherings.” As our family has grown, a large gathering room is essential.

The before….

(Wait til you see what I did with that wall between the living room and kitchen!!)

The minute I saw this space I knew what I wanted to do with it.

Even though we first toured the house in July, I immediately zeroed in on the perfect spot for a Christmas tree (don’t ask me what I think I will do with the space the other 11 months out of the year…lol!)

I still want to reface the fireplace and replace the paddle fan…all in good time!

The “den” is a cozy space for two…this room will fit the entire family Christmas morning!!! Something fun to look forward too!

For now I am going to save the kitchen and den area. It has, by far, the most dramatic changes and is the “cream on the top” of this house. It deserves a spotlight all it’s own! Maybe next week I can find time to get it all staged and ready for it’s debut.

Until then…find the positive, focus on it and be grateful!


The master bath reveal....

This room, like almost every room in this house, is still “a work in progress.” I still have some decorating I want to do and I made one HUGE mistake during the remodel that I hope one day to rectify. Not today, or this week or this month, but SOMEDAY!

The room isn’t finished, but the “bones” are done…

This is the “before.”

ISvcllus19ibas1000000000.jpg

(The lighter appearance of the “before” of this room was a result of “camera tricks”…..it wasn’t REALLY lighter and brighter. Example, the shower and fixtures look stainless…they weren’t, they were gold. The cabinets look white…they aren’t they are “cream.”)

It has only been two years since I remodeled the master bath at my last house. I really tried to change up the tile a bit but in the end I went with the exact same wall and floor tile!

Right down to the “live edge” tile backsplash I shared HERE!

I love what I love.

So, all new tile, quartz vanity tops, new fixtures, sinks and lighting, paint and mirrors.

This week I FINALLY got the base trim done and painted all the trim my “new white.”

The master bath is awesome…two separate vanities with tons of cabinet and drawer space, a large storage closet, high ceilings, a potty room and now a large walk in shower. Extremely functional and slowly evolving into a very pretty space.

(You may notice there are no photos in the black frames…that’s just how I roll! Someday I may figure out what I want in them!)

I LOVE the large walk in closet…this is my half…it is actually L shaped so it is twice this size!

Still on my “to-do” list…paint the vanities and change out the hardware. And of course decorate. Someday.

As I have mentioned before, I am not a huge fan of shower doors…so for now I have a simple curtain. I am debating on a glass door. Just don’t know. I like that I can take a curtain down and bleach it…keeping a glass door spotless just seems like a real pain in the rear.

This past week I had to deal with this whole “issue.”

I have three cats….I love my cats…but the whole litter box thing was really getting on my nerves. The look, the smell, the stupid litter all over the floor.

So I decided to find a piece of furniture that would fit this space that could be modified into a “litter box cabinet.”

My son brought me this piece they have no room for in their new house. Not my style and again I’m not a big fan of oak but it was a perfect fit and I knew I could fix it up!

I set it in place for a few days to make sure the cats would use their new “potty room.” Yep…so off to the shop it went for a little makeover! (Wait til you see the shop transformation…man oh man!)

Now before you purist scream at me for “destroying a beautiful antique” let me remind you that this piece was unwanted and unloved in its current state. I did my research and it had no real “value.” For my purpose it needed to be modified and painted. Now it is useful and wanted and loved.

I wanted to try something new with the top so I picked up this “semi=transparent” stain.

IMG_0448.jpg

Evidently this “restoration hardware finish” look is all the rage. While cruising Pinterest for Christmas decor ideas I saw all kinds of tutorials to get this look. Somehow I subconsciously picked up the”inspiration!”

After stripping and sanding the top I applied two coats of the stain then sealed it with polycrylic. The top needed some repairs and again, I always do repairs AFTER stain and initial sealant. Why? Because if you get glue on raw wood the stain will not take…so stain THEN repair!

I removed the little fancy doo-dads on the front of the doors.

The big change…the cut-out on the side for access to the kitty box. I just cut a big hole using my jig saw and trimmed it with L molding. Primer, sand, paint!

The hardware is a little different but was pretty cruddy…

I could have changed it out entirely but I am kind of into brass these days so I shined it up with a little Brasso and A LOT of elbow grease. Love.

For now it serves a purpose…hides the kitty box.

So what was the HUGE mistake I made during the remodel?

Operable windows.

The room has upper fixed windows and they let in a ton of natural light.

I snapped this picture when the leaves were turning…so pretty.

But there are no operable windows to let in fresh air…and for me, that is a must.

My “plan” is to add two casement windows on either side of my vanity mirror…similar to the one I added in my last bathroom.

That will entail some structural modifications, brick work and a big mess…and after months of “mess” I’m kind of over it right now! But I know me and I know in the spring when it is time to open up the house I will want operable windows in the bathroom. So it is on my “to do” list….

Seems the more work I do, the longer the list gets!

Until next week…OH MY GOSH…that will be thanksgiving! Hum, maybe I will have a few words of “grateful” wisdom. Guess we will see!

Oldie but goodie!

So much going on around here but still nothing finished enough to share so thought I would revisit one of my favorite fall/Christmas froo-froos!

I love the versatility of this little box and the only real change I’ve made in last 6 years was the addition of some Aspen picks I got in Colorado.

Looking back at this post REALLY made me miss our Colorado trip this year. With the whole “pandemic” thing we decided to forgo a vacation.

I have so much to share if I can get something completed and get a few pictures taken. This week I am working on the shop doors…hopefully those will be done. My couch finally came in but I want to wait until I get the Christmas decor up before I share that….the day after Thanksgiving and not one day before! My kitchen is done and someday I might get around to taking some pictures. I have a “hidden litter box” project I want to share but that’s another project that will be done SOMEDAY!

See, I have stuff in the works but my OCD is clashing with my ADD…so it just feels like nothing is “just right.”

But you know what…THAT IS LIFE! It will never be perfect and at some point I need to just bite the bullet and take the pictures and share. The whole house really is looking good, but there is always something that makes me stop and say “hum, no just yet.”

It is a “work in progress”…as is every single home. Maybe next week I’ll start sharing the “progress.”

Until then….

The guest bath....

It dawned on me this week that I do actually have ONE room in the house that is completely finished.

One.

Out of 13.

I must celebrate the small victories!

The walls and trim are painted.. The cabinet and counter are done. The lighting is done. The flooring is done. The plumbing is done.

Yippeee!!!

The hall bath now….

The hall bath before…..

A tiny room hardly worth a passing picture during our initial walk thru!

Gold goddy mirror. Broken pedestal sink. The 90s overhead cabinet decorated with cleaning supplies.

Pretty ick.

The bad thing is you see it the minute you walk in the front door so it needs to be pretty.

I know I shared my laundry room and breakfast room last week…and they may APPEAR to be finished. But I am repainting all the trim in the house and I haven’t painted the trim in those rooms…so TECHNICALLY they aren’t finished. I also want to eventually change the tile in the laundry room and possibly paint the cabinets….sooooo….

But the little hall bath is finished. New custom vanity, new lighting, new sink and faucet, new paint….

Done!

Again, I had just completed a mini makeover on my hall bath in the other house so the wall paint color and quartz top was a no brainer.

First thing i did was remove that super awesome wall cabinet above the toilet…gago! Just removing that cabinet opened up the space and made the room FEEL larger!!!

I discovered why a pedestal sink was necessary in this bathroom….

It is so tiny that the door would not clear a standard vanity depth. So I had my cabinet guy custom make a simple and small “floating” vanity. I painted it with white lacquer and added “modern” pulls.

Then I had to find a sink that would fit on a small vanity…not an easy task considering I wanted one similar to the sink at my old house…a glass vessel. I found a small one on Overstock…HERE.

The mirror was a fluke. I originally wanted a round mirror, but stumbled on this one at At Home. I love it because it has a “white lacquer” look and I knew I was going to paint the vanity with white lacquer.

The light fixture is from Lowe’s. Simple but fun!

Small guest bath…check!

Again, celebrate the SMALL victories.

The kitchen and den are ALMOST done…this week my goal is to finish painting all the trim and then those two rooms will be finished.

Not a huge difference but it is. While painting the trim I again realized just how much trim and how many interior doors and windows this house has! Dang!

The kitchen is SOOOO awesome. I can’t wait to share it!

The living room SHOULD be done if the couch is delivered this week…figures and toes crossed.

The dining room is months away from being “done.” The table I ordered will take four months and I am just now looking at chairs…and then there is the whole rug thing…and wall decor…and…you get the picture.

The master bath is coming along…the walk in shower is done and I have a little bit of trim work and paint i want to do before I share it. It is one of those rooms that will still need “decorating” but getting the “foundation” (trim, paint, tile, etc) is taking time.

We have rain EVERY day this week so my yard has been pushed back again…such is life. It will get done eventually!!!

I’ve said it before and I’ll say it again…creating a “home” is a process. And it never seems to be “finished.”

Thank God I enjoy this process.