A dresser makeover and a few changes to an "heirloom"

As I mentioned here I am no longer doing the whole “resale/flea market” thing. I am still working on a few projects here and there because it is what I love to do!

This piece is one I bought eons ago and has sat in my garage waiting on inspiration and time.

I bought it and the matching chest of drawers at a barn auction. Yes, it had been sitting in a barn…yes, I could tell it had been infested with mice at one time. No, I was not expecting to find two mouse carcasses while cleaning it. GAG!!!!

The ONLY way I have found to rid old furniture of old furniture smells (mice, cigarettes, moth balls, etc) is to first scrub with ammonia and then vinegar (do not do them at the same time!). Sometimes I will spray the inside of the piece with diluted vinegar and just let it dry. If that doesn’t do it, then I suggest you prime and paint the inside of the drawers. Fortunately, the heavy duty cleaning on this piece worked and I did not have to paint the drawers!

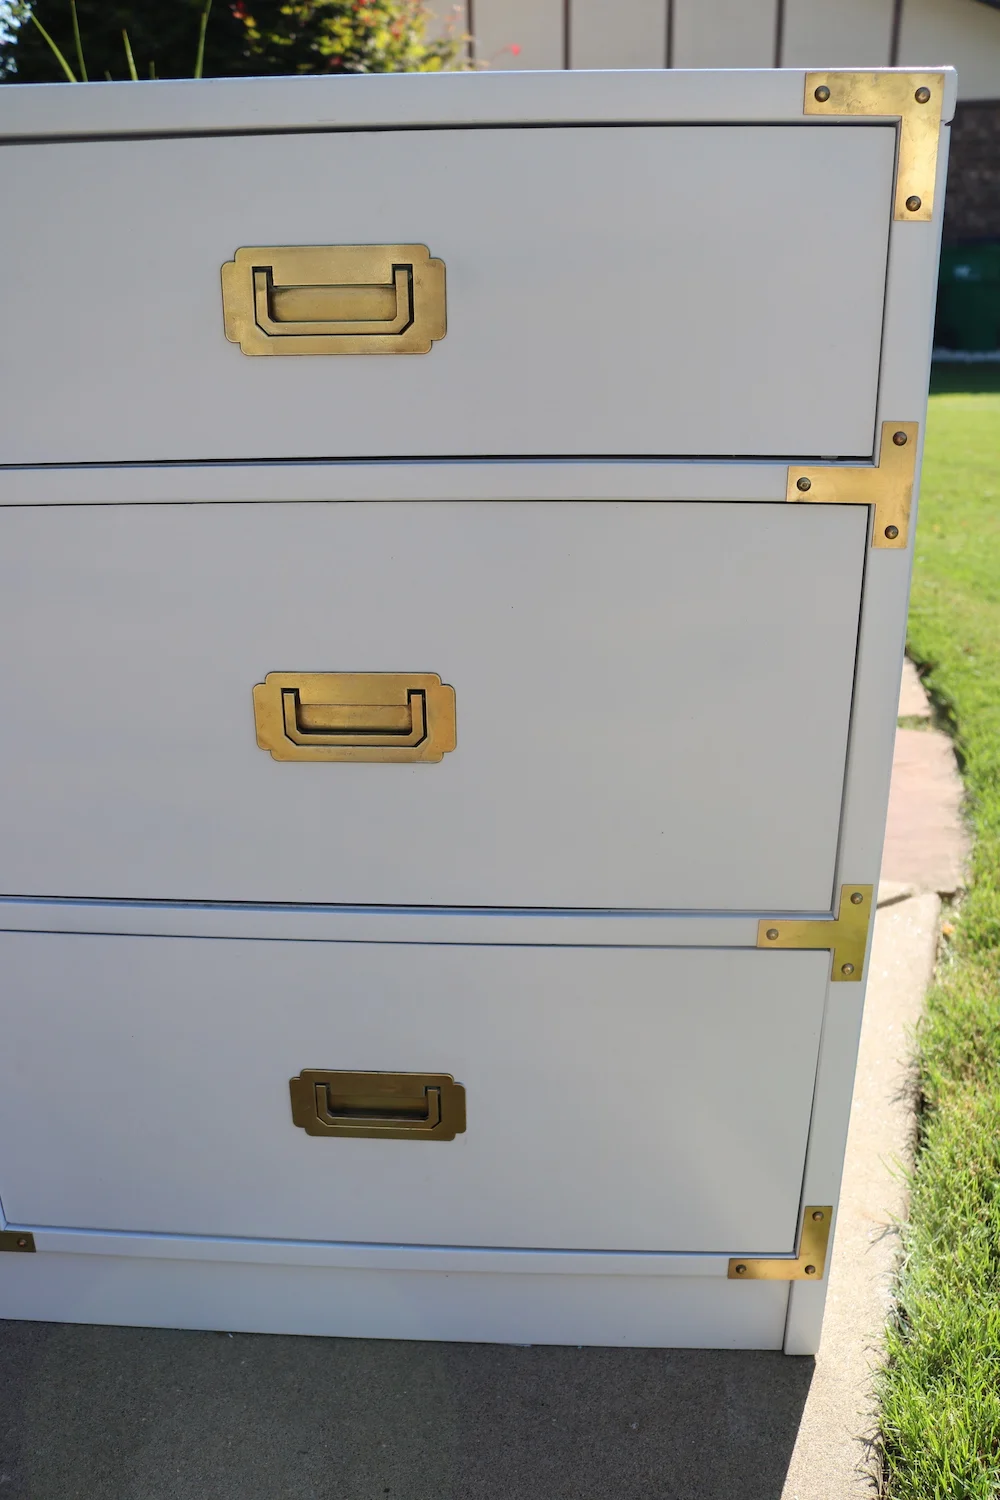
The top and drawer fronts are cherry veneer. The veneer was in pretty good shape and really just needed to be stripped and oiled…I used THIS process to strip the old finish. Tried and true! I know I link to this tutorial a lot, but it works!

After stripping the veneers, I applied three coats of tung oil finish and chalk painted and distressed the cabinet!

The hardware was in pretty good condition…just icky. So I primed them with metal primer and painted them with flat black paint.

AGAIN, another example of how a very few dollars and some elbow grease can turn the ickiest piece into something pretty awesome!

While I had the “farmhouse white” chalk paint mixed up I decided to give some old frames a little makeover.

When I visited my uncle this summer he gave me two old framed portraits of my great-great grandmother and my great-great-great grandmother.

They do tend to be on the “goulish” side…but I NEVER turn down family heirlooms. When he offered me THIS china cabinet….

…I knew it wasn’t “my style” but as I said, heirlooms trump everything. So I made a few changes to make it a little more appealing…I removed the red paper on the back, added glass shelves and cabinet lighting. Then I filled it with the great’s and grand’s china…it is what it is…and heirloom piece filled with heirlooms.

I decided I might be able to make the portraits a little less “goulish” by painting the frames…they were just so “heavy and dark.”

I hung them in the GUEST ROOM….

Meh…not swooning over them but again, they are family heirlooms. (I think they need to be closer together!)


Another VW van dresser makeover.

I love this little project. I featured my first HERE. When I found another “waterfall” chest of drawers I decided to do another…they are just too much fun.

This little makeover takes a bit of patience…mainly because you have to “layer” the different paints. Each “layer” needs time to cure before you tape it for the next “layer.”

The first thing I had to do was remove all the hardware, putty the holes I would not be using, prime, sand and tack. Then it was just a matter of drawing and taping my design…

The “base layer” is white lacquer…from there I painted the teal, then the light grey “glass”…then all the outlining and detailing.

In the end you have a precious little chest!

I used some black and white I had on hand and bought a sample pot of the teal. Between the primer and paint, I probably spent less than $10.

The only “major” purchases were the VW decal (purchased HERE) and the two handles that make the windshield wipers…less than $20. (I had the round knobs in my hardware stash but you can buy them for next to nothing) All in this little project cost me the price of the dresser and less than $30 in materials.

I made a few “design changes” and truth be told I like the first one I did better….but nothing you will notice on a passing train…so I let it slide! It did affect the placement of the VW decal so I ended up having to “cut” it between two drawers…boo!

Again, one of my favorite projects and since I am no longer having to work at keeping “inventory” for a booth, I have more time to be creative and have fun!


dining room makeover...

For years my “dining room” has been little more than a pass-thru from the kitchen and living room into the den.

A few months ago I refinished a little table that is my current love…

You can see the evolution of my dining tables here. The criteria for a table is that it is compact but can expand to seat 8-10 people the one time a year we need a big table…basically Thanksgiving.

This new table fits the bill but try as I might, I could not find chairs I was really happy with. I knew what I wanted but I couldn’t find them in my normal “thrifty” way…I tried these “mid century” style chairs…

No way Jose’….super ick.

So I bit the bullet and ordered chairs from an actual retail store.

Whoa! Who knew dining chairs could be so stinking expensive!

Other than a revolving door of tables and chairs and a few changes to the art work and a new light fixture…and maybe the addition of ANOTHER buffet, the space never got a full-fledged “makeover.”

It has never really been styled as a “dining room.” Truth is, I have a bar we use regularly so other than our holiday gatherings, this space gets very little use.

I don’t really have an actual dining ROOM…it is more like a dining “space.” And again, it has always just been a thoroughfare from the kitchen to the den. So why bother styling it…

Because it is a very prominent space in my house that has been horribly neglected so it was time it got a little time and attention.

First, the table…I love the little mahogany trestle table. Maybe not specifically the style…or specifically the color…but just the whole of the sum. Don’t know how to explain it any better than that…it’s just pretty and small but easily expands.

The buffet. I love this piece…it only took me a year to figure out what to do with it, but now I love it….the style, the color, the size.

These two pieces alone are as different as night and day…one VERY traditional and antiquey looking and one very mid-century. That pretty much sums up my entire home decor…”eclectic.”

I changed up the buffet vignette a bit…just simplified it a tad…you can see HERE how I turned a candle stick into a lamp.

So, on to the rug.

What a nightmare. I THOUGHT I wanted to use this little space to infuse some serious color into my home.

Hum….not really loving it to be honest.

The first….

Wow…now that was some color.

ALL the pictures on Pinterest show rectangular rugs with rectangular table and round rugs with round tables….but because this space is a bit smallish and because we walk through this space A LOT, I tried a round rug…

Meh….

I LIKE the look of a round rug…but again, not sure I am digging all the color…even though I THOUGHT I wanted to infuse color into this space.

So I took the first one back and picked up another rectangular one with color, but a lighter background…

Hum again…

I LOVE this little scatter rug but alas it doesn’t come any bigger…curses.

I just love the colors and the amazing textures! But it did make me rethink my “color plan.”

This plain ole’ blue one….

I like the simplicity…I like the style…I like the quality. Nothing earth shattering and obviously I gave up on the idea of infusing color by putting down a “wild and crazy” rug. Oh well…I never professed to be a designer.

The wall decor. For a few decades I really liked the look of the two frames I had on this wall. They have “transitioned” over the years…first they went from the “dark and dank” to a chalk painted frame and new matting…then I changed up the matting and added botanical prints. So often I get so use to a certain look that it is difficult for me to see anything different…such was the case with these prints. I loved the pop of red of the matting and I adored the botanical prints. Unfortunately it was obvious two was not going to work…and one just looked so dinky.

Brian and I found these totally awesome mirrors.

IMO they look pretty awesome…not terribly expensive so when I tire of them I won’t feel too bad. But it took me 19 years to get rid of the two large frames so I doubt these go anywhere any time soon!

Fortunately, I LOVE the table, the buffet and the light fixture. Rugs and artwork are an easy change out if I find something I like better.

For now I will keep the little bench off to the side. It is perfect for when I expand the table and need a little extra seating.

I am excited to decorate this space for the holidays!

The only other thing I MIGHT add are curtains on the two flanking windows…or maybe shutters. Who knows…they have had blinds for 19 years…what’s the rush!

This is where I will admit I am like 90% of you out there… I just want Emily Henderson or Candice Olson or Joanna Gaines to swoop in and just do it all! I am always amazed that they can do in one hour what it has taken me 19 years to do!

I have avoided the whole “farmhouse decor” look only because I think it is a fad that will pass in short order…but this dining room gives me a little taste of the “farmhouse look” without going all out. Just a pinch and a dab that can easily and inexpensively be changed out when the time comes.

Making a lamp out of a candle stick...

Next week I hope to share my entire dining room makeover…just waiting on a rug and the chairs I ordered.

This week I want to share one tiny element.

In my quest to make a few improvements to my dining room I decided to change up the buffet vignette…specifically get rid of the floral arrangement and style it a bit differently.

(You can check out the buffet makeover HERE! )

So off to Home Goods and At Home I went. One element I wanted to add to the buffet was a tall lamp but I couldn’t find the one I had in my mind. I found some candle sticks I liked…only problem was I didn’t really like the tallest one as a candle stick…but when I stuck this little lamp shape on it I decided I kinda liked the look of it as a lamp…

Hum?

I THOUGHT the candle stick was ceramic or resin…I also thought it was hollow. So I THOUGHT I could drill a hole in the top and a hole in the base with a masonry bit, thread in some lamp cord, add a little socket and presto-bingo…a lamp.

What is the old saying about “best laid plans.”

Yeah…well…some things just don’t work out the way we THINK they should…this, my friends, is more the norm in DIY. Things often don’t go as planned….

So the first thing I discovered was that it is wood…not a biggy.

I can just drill a hole from the top to my bottom hole with one of my really long drill bits…right? Wrong. Because the drill hit metal…turns out the candle stick is actually made up of three different sections…with screws AND glue between each. Impossible to take apart so I ended up cutting the sections with my chop saw.

Fortunately it was a tad easier to drill through the individual sections than to drill through the entire tall candle stick.

Whew…that was a booger…but after that was all said and done, it was time to “repurpose” the whole thing into a lamp.

To make anything into a lamp, you will need a socket and a lamp cord…fortunately you can buy both of these things at Lowe’s.

To use the little top socket, I just removed the little screw on the side of the base…

… and drilled a hole in the top of the candle stick big enough for the base of the socket to sit in (1/2”).

To thread the new electrical cord through the stick, I threaded a thin wire (floral wiring works well) through the stick sections. Then I wrapped the thin wire around the end of the new electrical cord and pulled the wire back through.

Once the new electrical wiring was threaded through each section, I easily attached it to the new socket, set the socket into the 1/2” hole I drilled on the top section and hot glued it in.

Then to reconnect the three sections, I applied wood glue and a dab of hot glue just to hold it all together while the wood glue set up.

Presto-bingo…a lamp made out of a candle stick.

I like it.

Unfortunately I don’t think the existing art work will work with the candlestick/lamp…curses. For now I think I will just leave it be.

I took a few sprigs of the greenery from the old floral arrangement and stuck them in a little ironstone creamer…one of my little birdies…a stack of old books I had stashed away.

Trying to keep it simple for now but really looking forward to having a buffet to decorate for the holidays!

I THINK I will like the new rug and chairs I ordered…we will see. I already have one rug in the garage ready to go back to “At Home”…didn’t like it. My plan was to go with a tad more color but this rug has me second guessing that decision.

I am also contemplating curtains…I’ve had blinds for 20 years…we’ll see…one thing at a time.

It is coming along…


A few MCM makeovers and a life decision...

Again, I am a baaaad blogger. I jump head-long into a project and fail to take “before” pictures.

Prime example…

No “before” picture. It was in similar condition to THIS dresser…reeeeally bad. But of course I have no proof of that. Just take my word for it…again.

The entire piece was originally the old “natural” finish with a lot of “wear and tear.” I primed and painted the six side drawers and cabinet and stripped and oiled the top and middle drawers.

I absolutely love the wood handle “hardware” and the super nifty black concave and brass hardware. I sprayed the little concave pieces with metal primer and black paint.

The top had some chipped veneer. I originally planned to paint the top so I could repair these areas, but I just can’t resist beautiful walnut…even veneer. So I did what I often do…I just let it be what it is…an older piece with a few blemishes. You can buy replacement strips of veneer…but I would rather have flawed original…just a personal preference!

I did take a before picture of this piece….

I love the brass hardware on these pieces…again, the way to tell if it is solid brass is to use a magnet. A magnet will not stick to solid brass. Important because in order to clean these pieces I have to really scrub them with steel wool. No secret to cleaning brass hardware…lots of Brasso, steel wool and elbow grease!

Now…on to my “life decision.”

I have decided to stop doing the whole “auction/flea booth/resale” thing. I love doing what I do but doing it to “pay the rent” has become tiresome. I am just not enjoying it the way I use to.

So this past week I gave my notice at 410 Vintage and I went on a major “purgefest” in my garage (aka shop). I sold a lot of stuff on Facebook Marketplace, I donated a truck load to our local community thrift store and I took a truck load to the dumpster.

I have a friend who opened an awesome little consignment/flea market (Gathered Goods) so I took a few things to her to sell on consignment.

My garage has been a disaster for some time.

I painted the walls and cleaned all the shelving and cabinets!

I installed a Rubbermaid track system for large items….

…and we installed a nifty metal peg board system for all our tools. I knew where all my tools were but no one else could really figure out where anything was.

I even gave the door between the garage and laundry room a fresh coat of paint.

I am not “retiring” completely. I will still refinish and rehab pieces…I just won’t have to go looking for projects. If I find a project I want to work on, I can always take it to Darlene at Gathered Goods.

So fear not…I will always have a project to share here…and of course there are always my enlightened “muse” posts.

A whole lot of shaking going on!

AGAIN, I have been MIA for weeks. Trust me, I would have loved to have a day to sit and muse.

As I shared here, Matt moved into a new home and Katie moved out of her college apartment.

I laugh at people who think their “parenting” somehow ends when their kid turns 18. Trust me, that is when the REAL work begins. In my case it means helping kids maneuver through life…i.e. move, sell. buy, marry, give birth…in other words, any time they need help, Mom is here to help. The years of “rearing them up” are over, but their lives get crazy and complicated and they still need guidance and a strong back!

Soooooo, what I have I been up to?

The house Matt bought was the home of his aunt’s sister…she passed away in March. So imagine you walk out of your home and die…and everything you own is in that house. Yep…and not only is it a big house, it was PACKED FULL! No one was able to really begin sorting and packing and moving her stuff out until after Matt closed so the week before Katie moved, I was at Matt’s new house sorting and packing!

After a few days of doing that, we loaded up a 16’ moving truck with all of Katie’s belongings and her cat, Simon, hooked her car up to the back, and drove 21 hours to her new home in Delaware.

I made an instagram post about this trip…one of the hashtags was #budgetrentalssmelllikeass…enough said about that issue.

The truck did not have cruise control. I never thought of that feature as being a “must have” on a vehicle. I was wrong.

I will NEVER complain about the condition of Arkansas highways again after driving through Missouri, Illinois, Ohio and Pennsylvania.

NEVER book a motel in a city if you have no idea where their “bad side of town” is….there is a good chance the hotel will be smack dab in the middle of it.

When driving a 16’ box truck towing a vehicle DO NOT get yourself in a tight spot…only get gas where 18 wheelers get gas!

All that being said, we were extremely fortunate to find parking right in front of her apartment. Fortunate as well that she has a friend who had moved to Wilmington the week prior and was available to help unload the truck. We were able to get everything moved into her little apartment the evening we pulled into town.

Then the REAL work began.

The apartment was advertised as 700 square feet…I can assure you it is not! “Tiny living” is a real challenge, even for a recent college graduate who has few possessions. Unfortunately, that is all that is really affordable if you are looking for a safe neighborhood close to downtown in an older Northeastern city.

You have to be very judicious about possessions, you learn to be very organized and you make the most of all the space available.

So for two days we unpacked, purged, built shelving, and arranged and rearranged furniture and “stuff.” It was a challenge but in the end she has a precious “home” that is perfect for her and Simon!

The kitchen was the biggest challenge. Katie loves to cook and she buys in bulk and stores everything in mason jars. Since the kitchen only had two upper cabinets, we spend the better part of one day just building shelves to hold her storage jars, dishes and spices. (All the photos are from my Iphone, and again, I am not a travel blogger!)

The living room wasn’t as big of a challenge since it wasn’t much smaller than her college apartment!

The pen and ink drawings are of the old train depot and old post office in Fayetteville…a little token of her college town.

She finally ordered pillow covers for her throw pillows. She learned from her mama…keep the big stuff neutral and infuse color in the decor…pillows, rugs, art, etc. The pillows she ordered are bright and fun and full of color!

Two days of driving, two days of moving/building/staging/purging and then the fun begins….

NEW YORK CITY BABY!!!!!

Yep, I finally got to take my baby to New York City! We took a train from Wilmington, Delaware to Penn Station in New York City, walked 10 blocks to our hotel and spent 3 1/2 glorious days in New York City!!!

Okay, glorious is a stretch….it rained the first day and they were experiencing their first big “heat wave” of the summer….weather-wise, not so glorious.

So what did we do in the rain and the heat? AS MUCH AS WE COULD!

We saw two Broadway plays….

It was the one thing I regretted not doing when Matt and I went to NYC.

We did the whole “Rockefeller Center” thing…bought a sweatshirt in the NBC shop, went to the Top of the Rock and had coffee in the plaza.

We ate a pastrami sandwich and a HUGE slice of cheesecake in a sweet little cafe off Time Square….

We rode bikes around Central Park….keep in mind it was pushing 100 degrees so we were pretty melted. That being said, when Matt and I road around Central Park two years ago, I had to walk 1/2 the way…I was just soooo out of shape! After losing 20+ pounds and biking for the last year, I was able to ride around the entire park without stopping at all! Yay, me!!!

We ate dinner in Bryant park, took the night bus tour across the Manhattan bridge to Brooklyn, walked across the Brooklyn bridge in the rain, visited the 9-11 memorial, took the ferry to the Statue of Liberty and Ellis Island. We took the extended tour of Ellis Island. We spent a morning in the Museum of Natural History (really should have spend ALL day there), took a bus tour of Harlem, saw Grant’s tomb, visited the Federal Hall where Washington was inaugurated and the little church across from the 9-11 memorial where he prayed after his inauguration. We took a water taxi up the west side of Manhattan. We visited the church were Alexander Hamilton is buried and of course, St. Peter’s Cathedral on 5th Avenue….

Which reminds me…how many Catholics does it take to change a light bulb….

Even in the most reverent places my mind goes places. But seriously, it is BEAUTIFUL cathedral!

I know we did much more…but basically we saw as much of NYC as we could in a few short days.

Then I flew home from Laguardia and Katie returned to her new little apartment in Wilmington.

My baby has officially “left the nest.”

And while I would love to sit and “muse” about this next chapter in my life, I really didn’t have much time to dwell. I had work to do at the apartments, a pile of projects in my garage, and a son who needed help with his yard and garage at his new house.

Man I need a vacation!

Maybe in the pile of projects in my garage I will have a makeover to share next week.

Until then….


Bleaching in an HE washer...who knew?

I know I have been MIA but June was a crazy busy month and this month isn’t going to be any better!

This past week we traveled to New Braunfels, Texas for a little family reunion. Great fun visiting family, floating the Comal and Guadalupe Rivers and doing the “tourist” thing at the Alamo and on the River Walk in San Antonio!

I had a few major projects at the apartments the last few months!

We moved Katie out of her college apartment and all of her stuff is in storage waiting on her move to Delaware in a few weeks. She is there this week apartment hunting.

I’m not looking forward to driving over 22 hours in a big moving truck but after we get her settled we are headed to New York City for a few days! One of my all-time favorite places to visit and I have wanted to take Katie for years! We will take the train from Philadelphia to New York! Just too much fun!

Matt sold his “starter home” and will close on it and his new home this month…bigger house with a pool!

So…what do I want to share today.

Something that is LIFE CHANGING!!!!

Bleach loads with HE detergent.

As I have mention before, I love white bath towels, bath rugs, sheets, dish towels, and wash clothes…and of course I love my white cotton undies and Brian always wears white cotton t-shirts. My favorite thing about them all is the fact that I can bleach everything…clean and sanitary.

Right?

WRONG!

I noticed something weird when i went from a “regular” washing machine and detergent to a front load machine and HE detergent…the white towels and wash clothes always seemed to have “stains” that just never came out…makeup, coffee, chocolate…and the under arms of the white t-shirts always seemed “dingy” and never really “smelled” clean.

A few months ago we bought a new washing machine…we went from a front load to a top load…but it still uses HE detergent.

Side note: this is exactly why I didn’t put one of those nifty counters across the top of my machines when I remodeled my laundry room a few years ago…I THOUGHT I might eventually go back to a top load machine. Sure enough, I had my fill of front load washers. Maybe it was brand, but we had two machines that lasted about 4 years each. This time we went with a good ole’ “American made” brand…we will see how it holds up!

ANYWHO….a few weeks after we installed it i noticed it was making a weird knocking noise during the spin cycle…so I called and they sent out a repair person who promptly IDed the problem…the water hose was hitting the back of the machine during the spin cycle.

But the BIG news was that I found out WHY my whites didn’t seem to be getting as “white” and clean as I thought they should.

According to the repair guy, HE detergent and bleach DO NOT mix….basically if you mix bleach and HE detergent, the detergent will not “clean.”

Some machines dispense the bleach AFTER the wash…mine does not so I have basically been bleaching my whites, but not really washing them.

So now I wash my whites in hot water with the HE detergent….then I do a “rinse and spin” cycle with the bleach.

Adds a step to my bleach loads but it is well worth the effort!

Now, I want to qualify that this is what the repair guy told me. After a few months of testing his theory, I have come to the conclusion that there is merit to his madness.

My whites are whiter, the stains have disappeared and the t-shirt pits smell fresh and are no longer “dingy.”

So…there you go!

Hope this bit of information works for some of you…as I said, for me, it has been life-changing!


A simple "before" and "after"....

A simple and inexpensive makeover.

Before….

After….

A little homemade chalk paint….5 tablespoons of Plaster of Paris and 3 tablespoons of water, mixed well. Add 2 cups of latex paint. Two coats…a little distressing…sealed with polycrylic.

The hardware wasn’t anything special…I primed it with metal primer and hit it with some blue spray paint I had on hand…could have been black, teal, white…whatever…not sure I am loving the navy but it would be easy to change it!

Simple, inexpensive…but oh so much better!

Remember, LIFE IS TOO SHORT TO LIVE WITH UGLY FURNITURE!!! YOU CAN DO IT!

My happy place....

This month has been crazy busy. I started painting the older buildings at my apartment complex…the weather hasn’t been very cooperative so only 1/2 is done. I have had to tear out and replace rotted flooring in an older unit and I have had a few vacancies which is always a lot of work. My daughter graduated from college week before last and everyone came home (I shared that here) and my grandson graduated from high school this past weekend.

Crazy busy!!!

One thing I am eternally grateful for is my yard…it is my happy place and I am so glad I got all the mulch down and the planting done before life got too hectic.

One of my favorite ways to unwind is sit in my backyard and just breathe….

Not much changes in the front and side yard but since my neighbors murdered their trees, my swing pergola in the front gets too much sun in the afternoon to really enjoy….

…but again, visitors may not see your backyard but they will see the front…so keep it pretty! (I shared the construction of the window planters HERE)

I do have a few moles causing a bit of stress….HERE I talk about what I have learned about moles and how I deal with them (it ain’t pretty!)

But since I now plant all my “tender annuals” in pots, they really do little but annoy me. Truth is they are nature’s little tillers for flower beds and if they didn’t run through the yard to get to the flower beds, I probably wouldn’t give them a second thought.

I am grateful I have the ability to do the work I do…but I am even more grateful I have a place I can go to recharge….

Another new dining room table and the greatest Mother's Day gift....

ANOTHER dining room table…obviously I have a soft spot for chairs and tables. When I saw this pathetic trestle table at a barn auction a few weeks ago, I just knew she had some serious potential….

The top was in pieces and the finish was crud…but oh the potential. And it wasn’t until I got her home that I discovered her little hidden secret…

She has this super nifty fold out “leaf.”

Just too fricking cool!

In spite of the fact that I have been up to my earballs in work at the apartments, I couldn’t wait to start working on her. The first thing I did was strip all the old finish…HERE is the process I used. This is a tried and true process that makes quick work of a daunting task!

After all the old finish was stripped off I had to glue and clamp the table top back together….

I always make my repairs AFTER I strip but before paint or finish…and I always make sure I make all the necessary repairs. No sense in making it pretty if it is just going to fall apart…glue and clamps!!!

The top was solid (vs. veneers) so the pieces were a tad warped…no biggy…I clamped it as well as I could and then I sanded the joints smooth…starting with the finer grit (220) and working my way down to a rougher grit (150) and then back up to a finer grit, before applying a tung oil finish.

Tung oil finish is my “go to” finish for many reasons…it is super easy to apply, it is super durable and it is super easy to reapply when the finish gets scratched or begins to dull!

So, when all was said and done, this little table will now take her place in the dining room….at least for the time being….it is no secret I swap out tables on a regular bases….here are just a few I have featured over the years…

A Duncan Phyfe….I gave it a little makeover HERE before selling it….

An antique trestle I featured here

An oak farmhouse table featured here…..

The most recent…an antique draw leaf table…

All these tables have one thing in common…they are relatively “compact” but can be expanded to handle Thanksgiving dinner. Basically once a year I need a large table…and these all fit the bill.

The newest little trestle table is compact, expands, and beautiful!

So get ready for a few pictures…..

I just LOVE the new light fixture from Wayfair I featured here….

I love how it can easily be expanded. No more having to find a place to store leaves or hauling them out for one dinner…just slide open the top and fold out the insert…simple (especially after a little WD40)

One huge problem….I REALLY dislike the Duncan Phyfe chairs with it…they just don’t look right…and sadly I know exactly what chairs I want for it and I have had them and sold them a few times over. The good news is I will eventually find what I want….

Until then I bought this little piano bench at the same auction. Again, pretty cruddy…

…but I stripped and oiled the top, scrubbed up the brass feeties and painted the base with my new favorite blue…the same one I used on the buffet (here)

Meh….not really “swooning” over it, but it will serve the purpose for now…until I can find the chairs I want or another pathetic little table catches my eye. I wouldn’t take bets on which happens first!

THE GREATEST MOTHER’S DAY GIFT

This year I received the absolute best Mother’s Day gift!!! Another college graduate.

My youngest daughter, Katie, graduated from the University of Arkansas with a degree in Bio-Engineering.

She is beautiful, smart, and talented…and I could not be prouder.

She, as well as her brother Matt (Masters 2015), are fourth generation Arkansas graduates….my great grandmother graduated in 1920, my grandfather graduated in 1943, and I graduated in 1987.

Brian and I are now 5/5….five kids, five college graduates. And the fact that all five were here for Katie’s big day, which happen to be Mother’s Day weekend, made my day extra special!