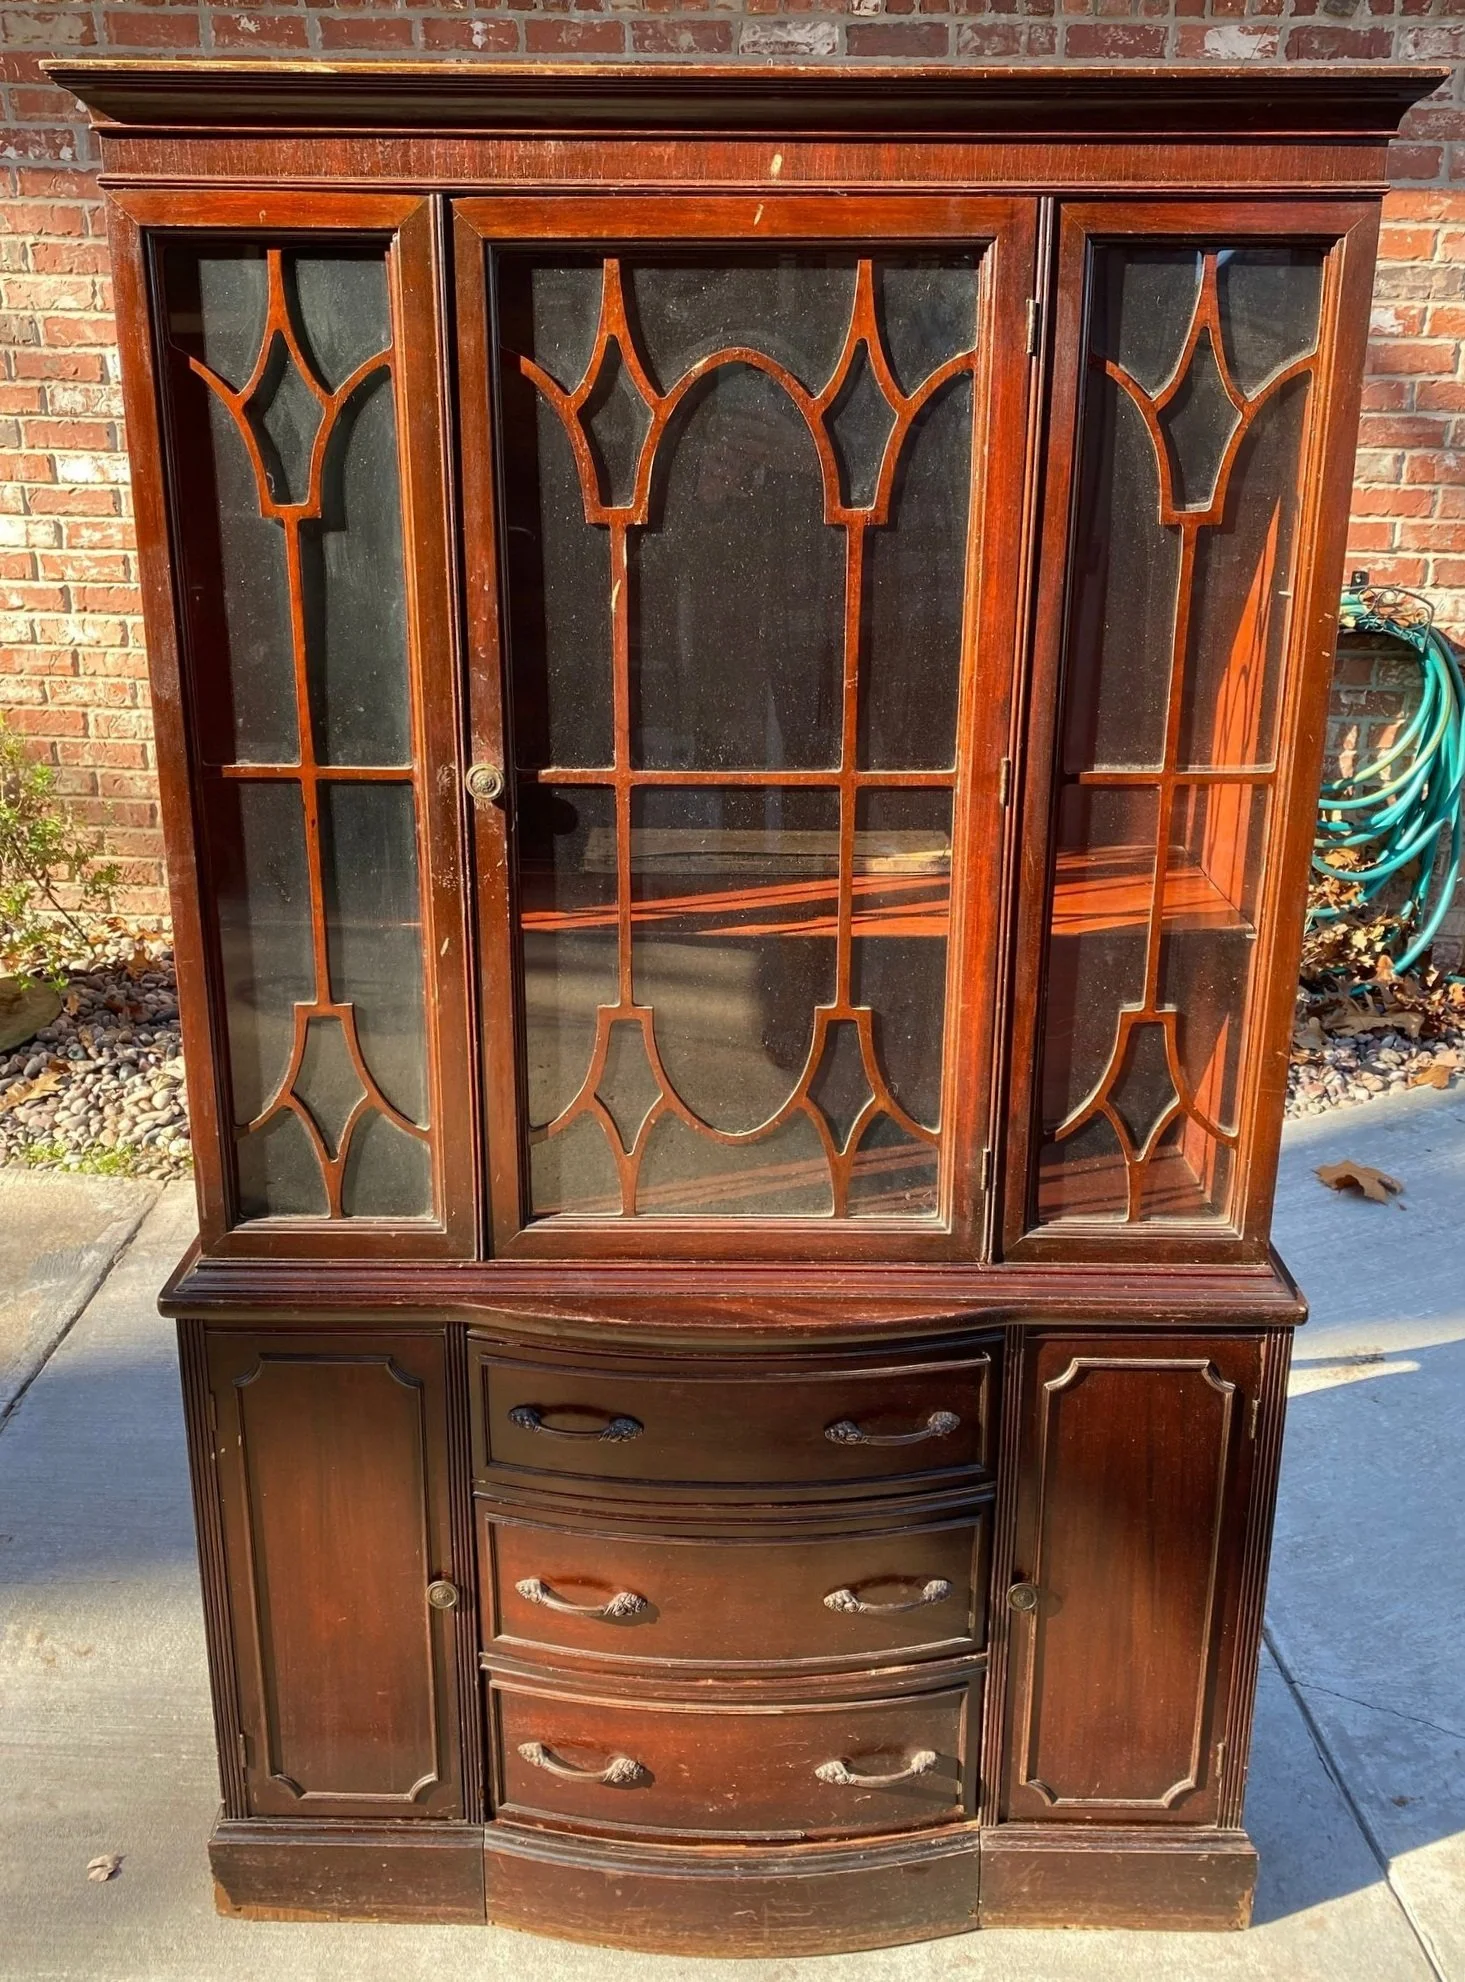
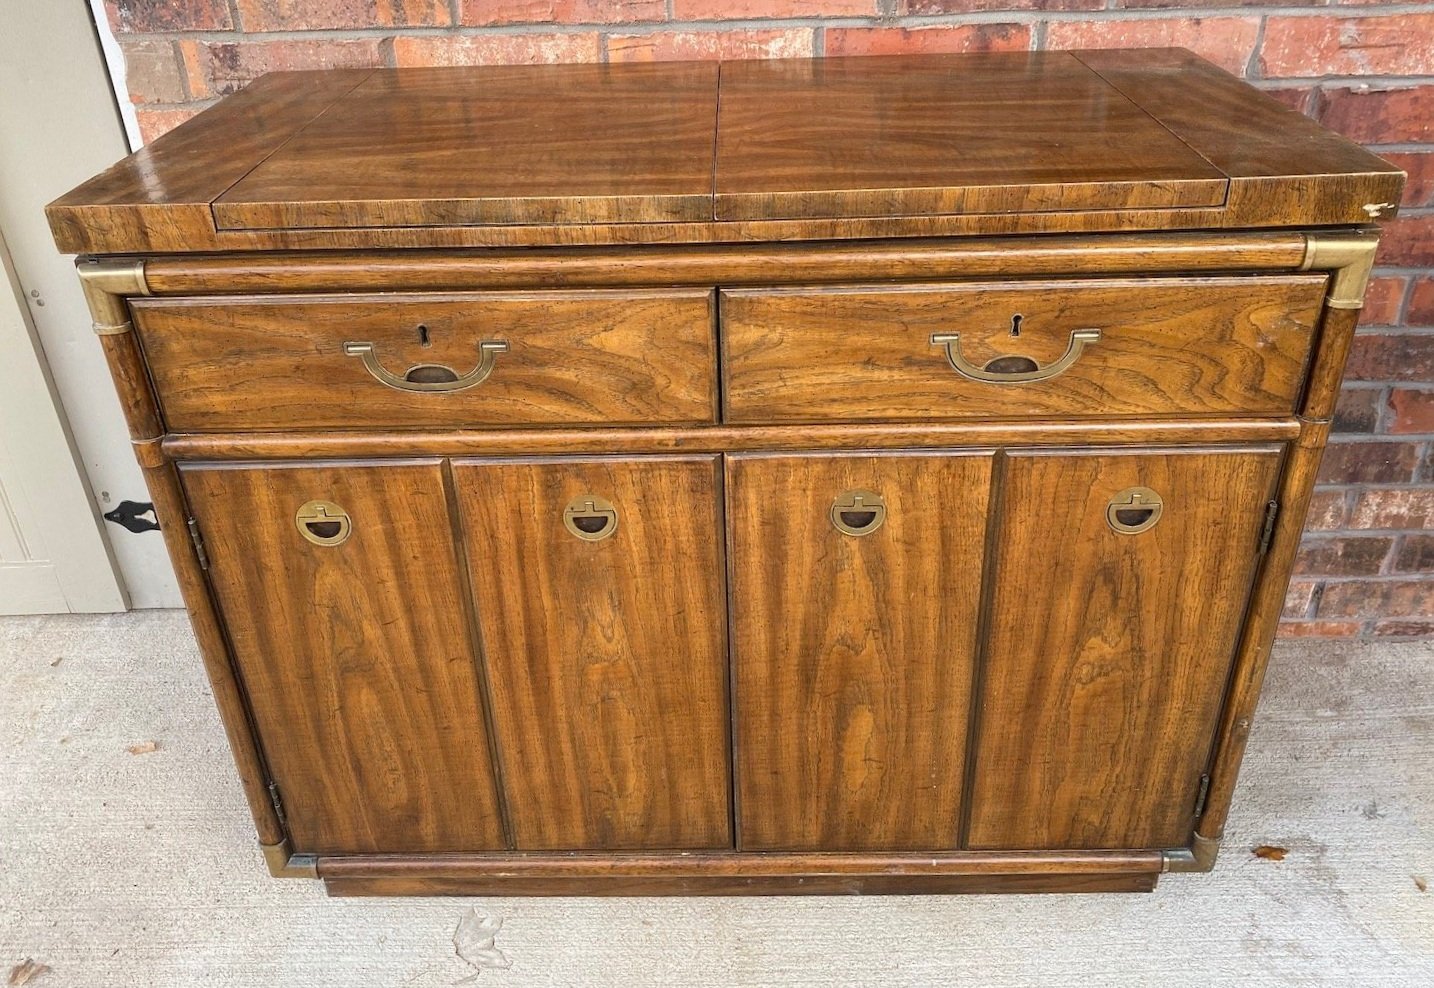
The "new" Drexel server....

I shared my plan for this wonderful vintage piece HERE….

I know purists cringe when people even talk about painting vintage pieces.

This is a prime example of “doing what you love.” If a piece will be more loved and treasured in a different state then go for it.

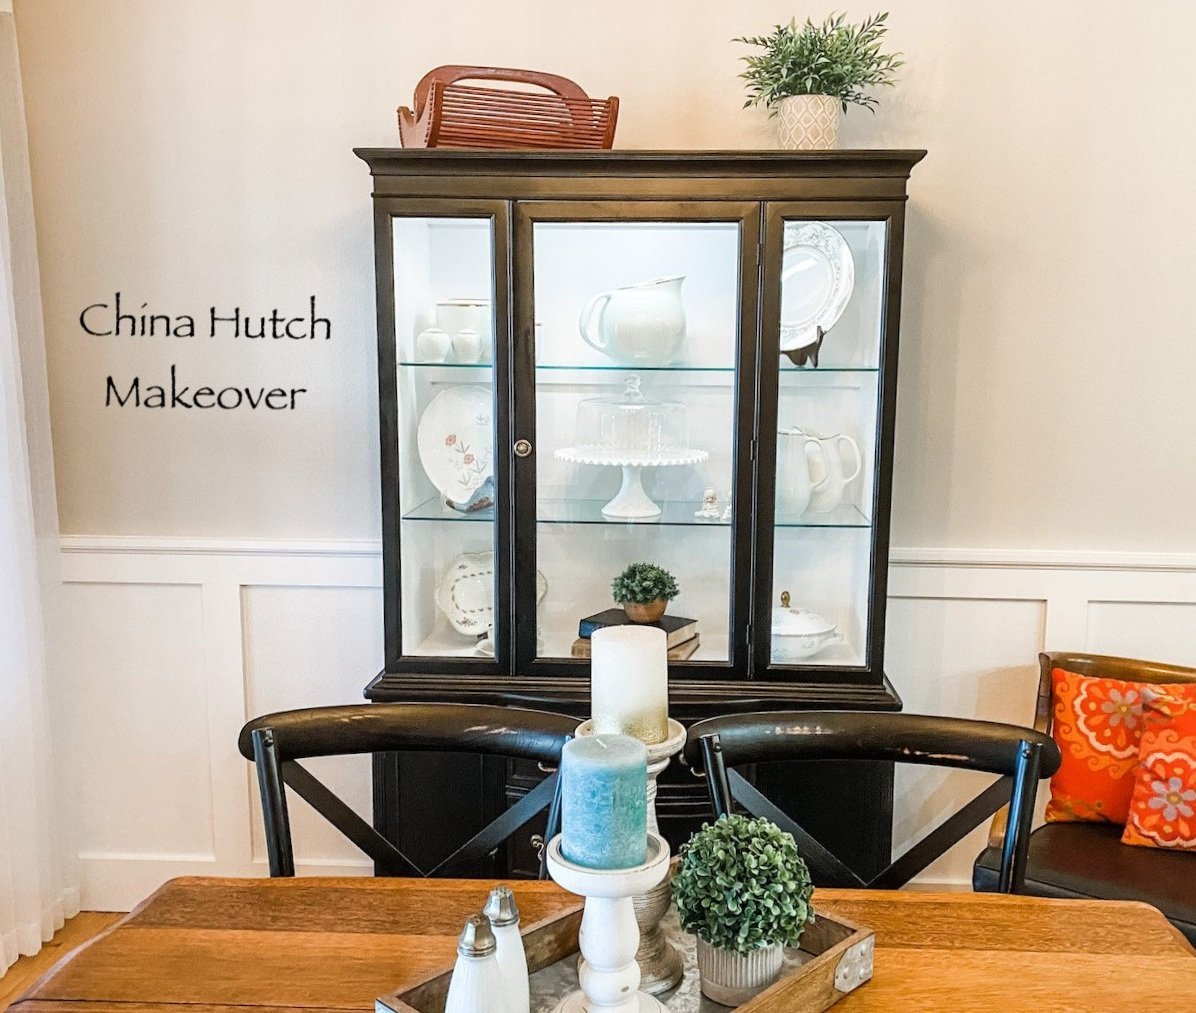
I painted the first one I found years ago and have had it in my dining/breakfast room…

…I recently swapped it out for the china hutch (featured HERE) and sold it.

Now this piece, a Drexel Accolade, has some value as is….if you do a little research you will find they sell for hundreds. But for me “hundreds” is not a value that will keep me from giving a piece a little makeover. If we were talking tens of thousands, yeah, no.

I also have a Drexel nightstand I refinished and shared HERE.

I planned to sell this piece after it’s makeover but I have moved it into my dining room and now I am kind of liking it…hum…guess we will see.

So…what did I do to give this thing a little more appeal?

First, I removed all the old hardware and brightened it up.

The hardware on these pieces are solid brass but after a few decades of neglect it is hard to tell. You can tell if something is solid brass with a magnet. A magnet WILL NOT stick to solid brass.

If the hardware is solid brass, the only way I have found to really brighten it up and get the decades of grime off is with Brasso and SOS pads.

Coat each piece with Brasso. I use a little chip brush to coat the pieces. After that sits for awhile, take an SOS pad and scrub away. You may need to repeat this process a time or two. I also use an old toothbrush to get in all the nooks and crannies.

After all the pieces are really clean, I scrub them with “Never Dull.” It seems to get the last layer of grunge off and gives them a little bit more “brightness.”

Not the easiest or fastest way to clean brass hardware but I just don’t think you can beat beautiful brass hardware.

Now, if the hardware is NOT brass and you want to spruce it up (without the cost of replacing) you can always give it a good scrubbing, prime it with metal primer and then paint it with spray paint. (TIP: put the screws back into the screw holes so that you don’t get paint in the threads.)

I shared another brass hardware restoration project HERE.

So, the hardware is done. If you find a Drexel piece and it is missing any of it’s original hardware, you can find replacements on Ebay…but be prepared to pay dearly for it! Each pull can range from $30 to $110 EACH!!!

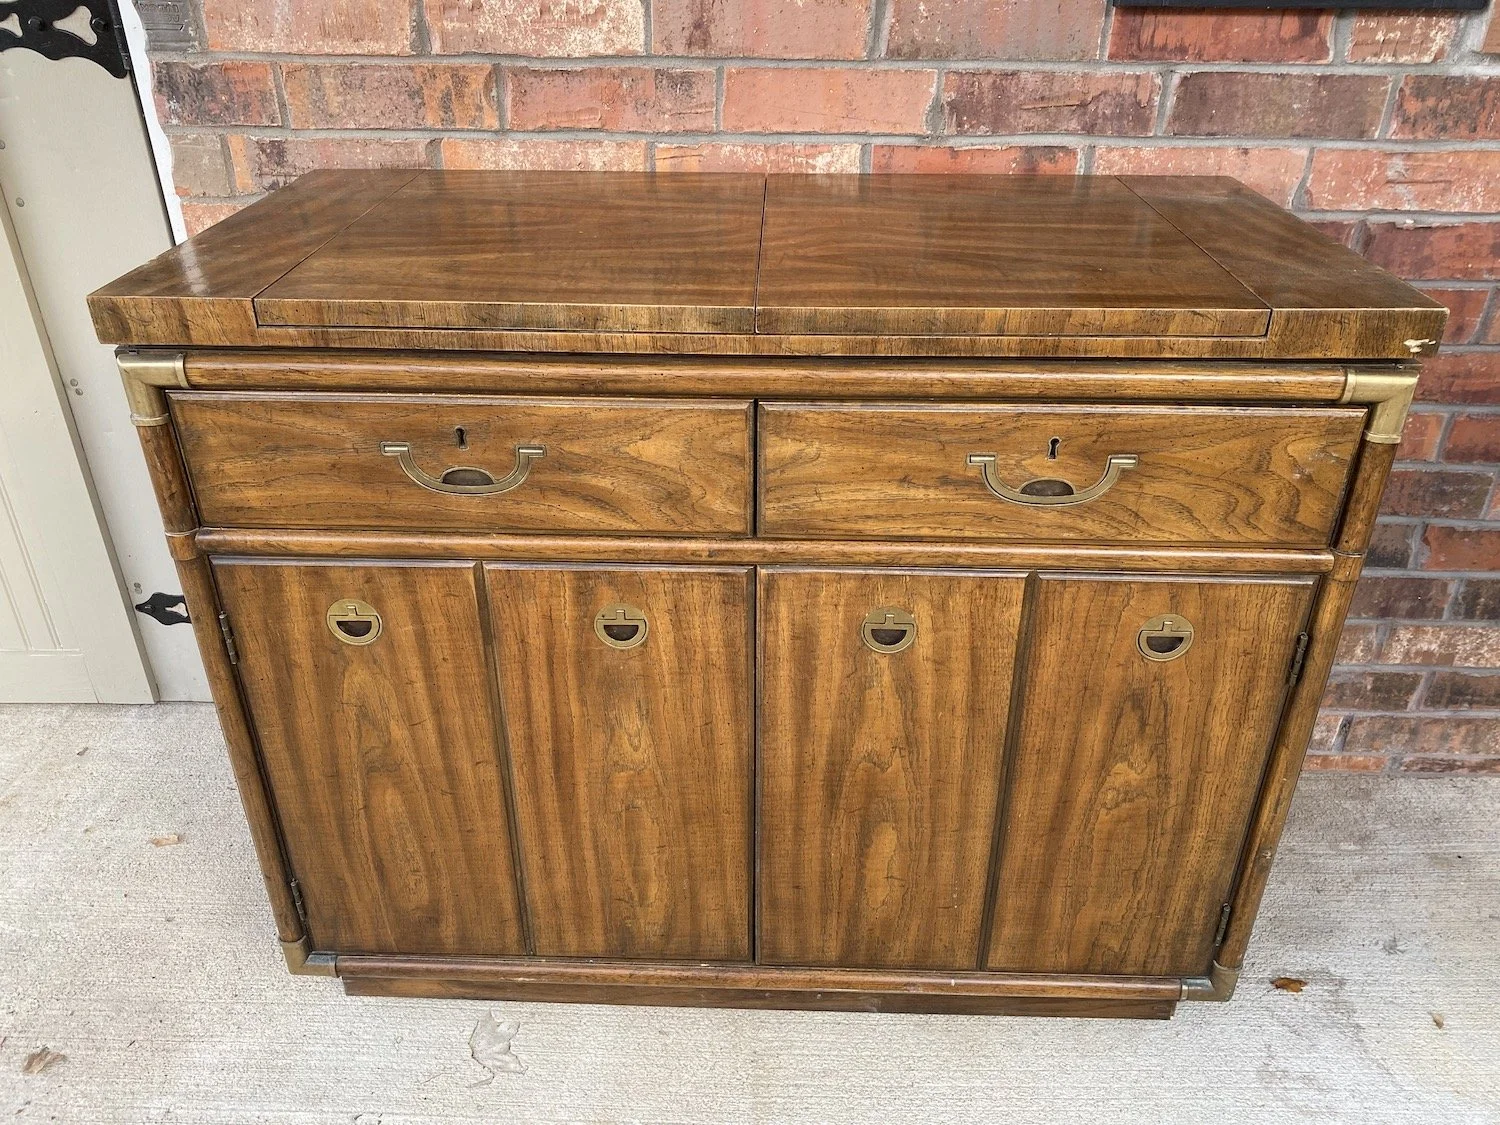
I decided to strip and oil the drawer and door fronts. On the last Drexel makeovers (the bedside table and server) I painted the entire piece. This time I decided to shake things up a bit.

While I like wood grain, I am not a huge fan of oak. No biggy since, again, my original plan was to sell this piece. To highlight the pretty wood grain, I stripped the drawer fronts and doors using my trusty 1/2 and 1/2 mixture. 1/2 acetone, 1/2 lacquer thinner. HERE I posted a pretty lengthy tutorial on how to use this mixture to strip even the most stubborn finishes!

After stripping off the old finish I gave the drawers and doors a little mineral spirit wash, lightly sanded, wiped with tack cloth, then applied 3 coats of tung oil finish…my current favorite being Waterlox.

After that had dried and cured well, I taped and papered the doors and began prepping the cabinet for paint. (I removed the drawers to strip and oil them!)

I didn’t need to paint the inside of the cabinet so I taped that off, along with the black laminate under the flip top. I primed with Bullseye primer, then sanded smooth with 220 grit paper and wiped it all down with tack cloth.

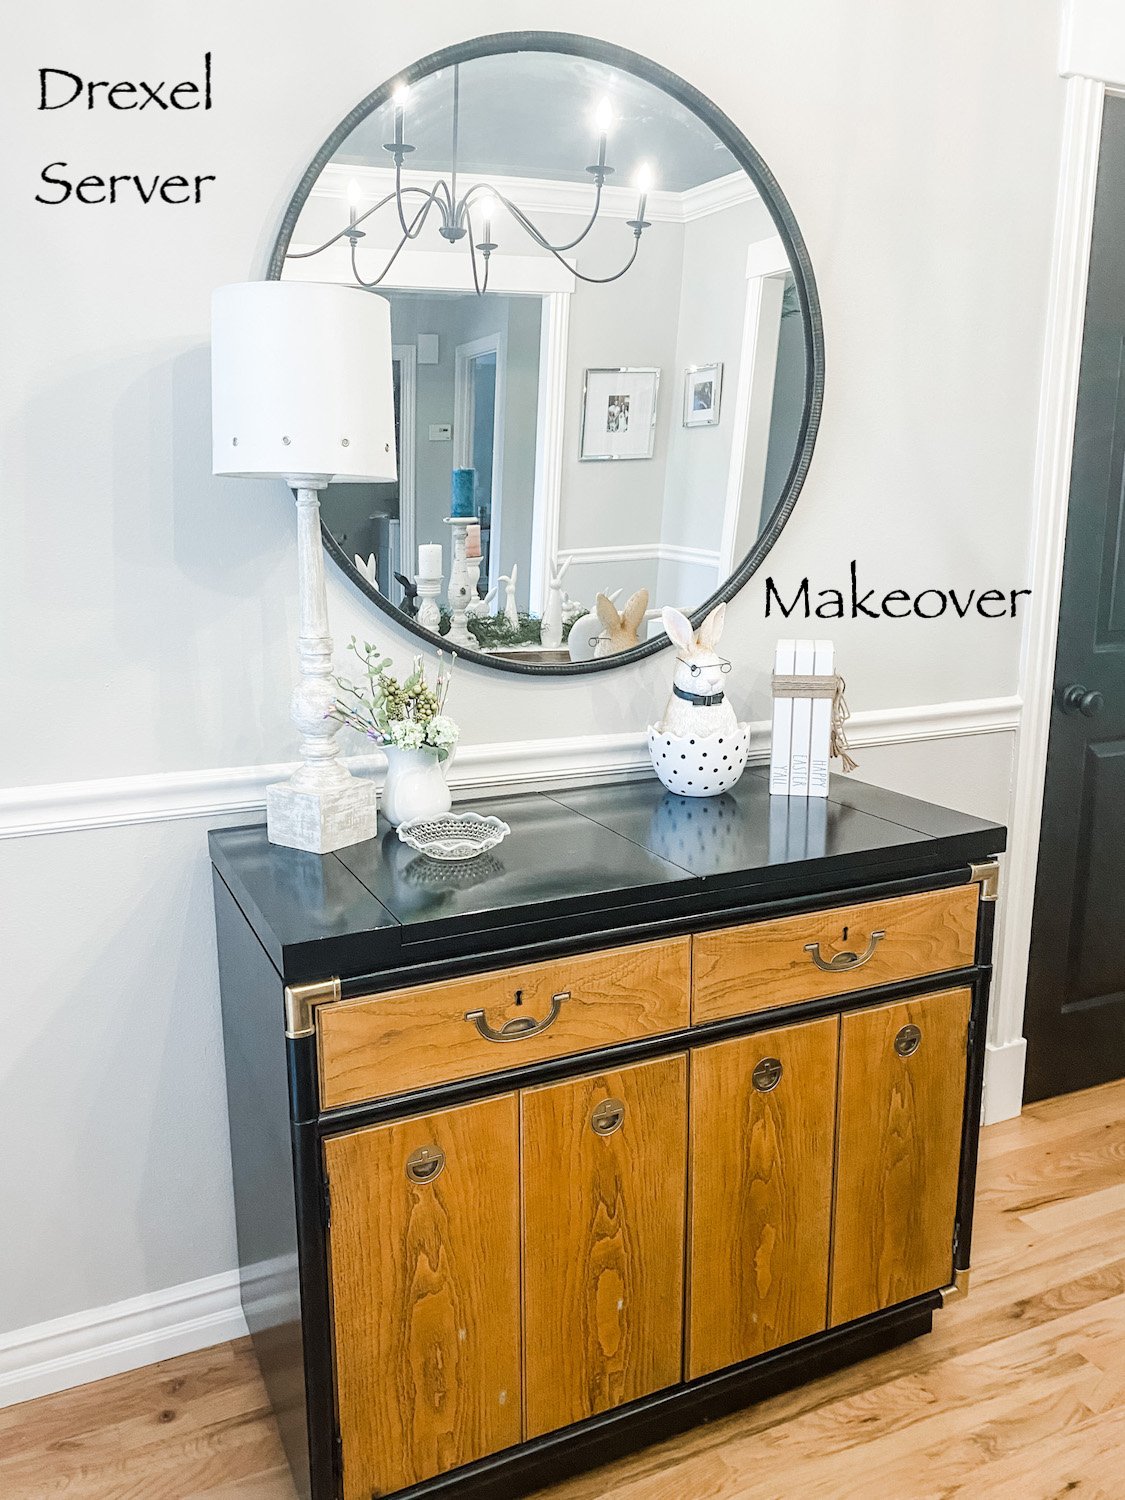
I decided to paint the cabinet with high gloss black lacquer spray paint. I am obsessed with the high glass finish on these pieces. I just think it really makes a huge impact, especially with the bright brass hardware.

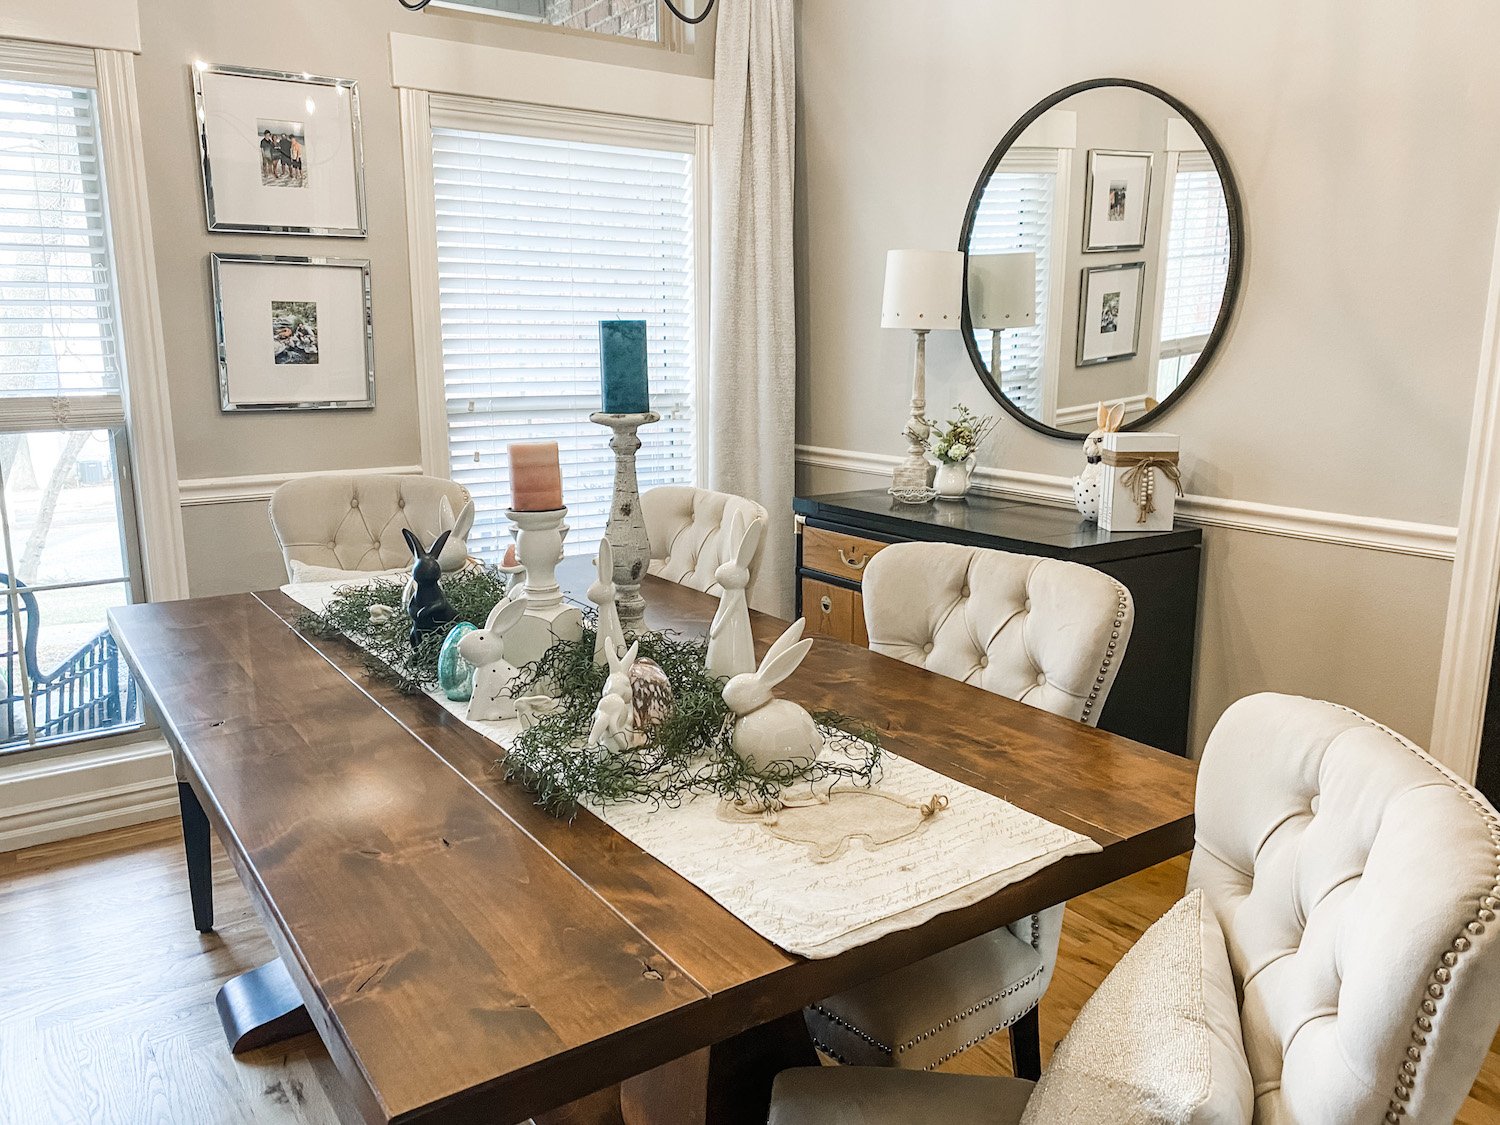
(You may notice I am all decked out for Easter…that is my new thing…decorating for each holiday/season. Next up will be Memorial Day/4th…patriotic stuff…then “summery”…then fall…then Christmas…then Valentine’s and back to Easter. See what happens when you “retire.”)

The trick to a flawless spray paint finish is LIGHT COATS…lightly spray, let it dry, spray again. It may take 3-4-5 coats but it dries quickly and in the end you will have a beautiful finish. If you go heavy handed you will have drips and runs and will be hugely disappointed!!!

Also pay attention to the temperatures and humidity. If it is too hot or too cold, or if the humidity is really high, you may have issues!

HERE you will find some additional tips on how to property paint furniture…very helpful!

After the paint had properly cured (gave it a good day or two) I replaced the hardware and OH. MY. GOSH!!! I seriously love this piece. Even though I am not a huge oak fan I am really loving it!!!

So the past few weeks I have been tackling a MAMMOTH project. Maybe next week I can share it. Hint, in entails A LOT of the thing I hate most….but man will it be worth it…I think…I hope….

china hutch makeover...

I originally bought this piece to makeover and sell…

When I gave my breakfast room a little makeover (featured HERE last week) I decided I kind of like the look and it gives me a place to display my heirloom china….

I didn’t take pictures while I was giving it a makeover because, well, I just didn’t….

But the process was pretty straight-forward.

I removed all the hardware. The drawer hardware was not the original so I ordered hardware that would have come with the piece originally. Fortunately the door hardware was still there so I just cleaned it up a bit with Brasso and SOS pads to highlight the engravings.

Before you go scrubbing on hardware with Brasso and SOS pads, make sure it is real brass. A magnet will NOT stick to real brass…if one doesn’t, scrub away.

I removed the shelving. I also removed the glass and decorative glass inserts. Not difficult because it was just held in place by some strips of tiny molding and nails…I just popped those right out and set them aside to paint and reuse.

The shelving was pretty warped and I tried my trick of laying them on the floor and placing weights on them…no go. So I ordered glass shelves to replace them. Honestly, I like the glass better.

The glass shelves where a lot heavier than the wood shelves. Originally the piece just had two little supports on each side for the wood shelving (no supports along the back for the span which might explain why the shelves bowed.) I didn’t feel comfortable with that so I added 1x3 support boards along the back, securing them with glue and staples. Now I feel confident that the shelving is properly supported and can handle the weight of dishes. (If you have ever had a glass shelf come crashing down on your china you would understand my concerns. Yeah, it happened!)

There were a few other minor repairs that had to be made…since I was painting the piece, I did them before primer and paint.

Remember, if you are staining, stain first then repair. If you are painting, repair first then paint.

I cleaned the piece well then I caulked all the “joints.” Remember if you are painting a stained piece you have to caulk all the places where wood meets wood…and you may even have to putty nail holes. If you miss anything it will show up when you prime the piece…just caulk and putty and spritz it with a little primer.

I sprayed the entire cabinet with Bullseye primer. Primer is MUST on mahogany pieces because it will bleed through the paint! If you paint a piece and see “red” or “shadows,” that is the mahogany bleeding through…or water stains, oils, etc…more layers of paint WILL NOT cover it. Prime it then repaint it. Or save yourself the grief and prime everything before you paint. Mahogany is not the only thing that will bleed through paint. Nail holes and “gaps” will show up and you will be able to fix them before you apply your paint.

Also, you will get a much prettier and durable finish.

I know some paints (like this one) profess to be paint and primer in one. Maybe so but I always prime with a primer. Usually Kilz or Bullseye.

I sanded it smooth then wiped it down well with tack cloth.

I decided to paint the inside white and the exterior black. I painted the inside with some satin white latex I had on hand, let it dry and cure then taped it all off to spray paint the exterior.

I painted the interior a satin finish but I wanted a flat black for the exterior. I went with Rust-Oleum Matte Farmhouse black.

After the black had cured (I usually give it a few days) I replaced the hardware, reinstalled the door glass (without the decorative doo-dads) using the small trim and silicone and moved it into the house. I gave it another few days to cure before adding the glass shelving.

I did not paint the inside of the drawers or the inside of the lower cabinets. I rarely do unless the piece has an odor or stains I can’t get rid of by cleaning. If you have a piece that has odors or stains sometimes your only recourse is to prime and paint!

I added a LED light to give the display a little glow! That entailed drilling a small hole in the top for the cord and mounting an LED light strip in the top of the cabinet….simple simon!

Lovely.

This is where I remind you that “cure time” is super important when working with painted wood. I always get annoyed when I watch those shows on HGTV and they paint and stage furniture the same day. DO NOT DO THAT!!!! Be patient…give paint time to cure. If you don’t you will scuff and scar your new paint job and will be seriously disappointed.

If you look back at this blog you will see I use to do this kind of thing all the time…I loved it.

I don’t do it much anymore and I forgot how much I love taking an old abused and neglected piece and turning it into something beautiful and useful again!!!


Another Drexel server....

Several years ago I shared a Drexel server I repurposed for my dining room

The “breakfast room” in our new house is almost identical to our old dining room.

Including the Drexel server.

I love it…it is one of my favorite pieces.

So when I spied ANOTHER Drexel server on Marketplace I could not help myself.

As I have mentioned, I have pretty much retired from the whole repurpose/upcycle/refinish business. My hands and back just can’t take all the work that goes into refinishing pieces on the scale I have in the past.

I have refinished a few doozies…just looking back at all the pieces I have shared on this blog blows my mind. There were some pretty nasty pieces that were beautifully refinished and restored and readied for another life-time of love!

When I saw this piece I couldn’t help myself. I had to have it and I wanted desperately to work a little magic on it.

Here is my plan…MAYBE I can discipline myself enough to pick up just one piece at a time, refinish it, sell it, then pick up another…just one at a time. Just one dresser/buffet/nightstand at a time.

Hum…I’m a pretty “self-disciplined” person so I am going to start with this one.

One week into this plan…I have failed. Last week I picked up ANOTHER piece that needs a little TLC….a pretty beat up china hutch.

I have these creative juices in me that have just been screaming for a project.

So, “the plan” ….specifically for the vintage Drexel piece. Strip and oil the drawer and door fronts using THIS process. Shine up the brass hardware….no secret there, just lots of Brasso, steel wool and elbow grease. Prime and paint the “cabinet” a high gloss black lacquer.

For the china hutch…I went to Etsy for inspiration and looked around. There are some beautiful china hutches that have been painted black with the insides painted white…LOVE them.

I THINK that is what I want to do. Sometimes the process takes on a life of its own and I find myself drifting in another direction. We will see.

Right now they are sitting in my AMAZING shop. I was in there last week rearranging everything so I will MAYBE have room to make some kind of paint booth. The shop has electricity and I can easily heat and cool it for temperature control but just not sure I will have enough room since we do use it for mower/yard equipment storage as well.

I can’t wait…this is a “job” that doesn’t really pay well, but it is one I do love.

Another family heirloom...a desk makeover.

As I have mentioned a bazillion times I am all about family heirlooms.

So when my mother offered me “dad’s desk” I didn’t hesitate…even though I have absolutely no use or room for it.

If I remember the story right my dad built this desk when he was 12…he would have been 79 this year…that makes the desk 67 years old…something my dad made when he was a boy….yes, I want it!

Fortunately my son Matt loves family heirlooms as well and since he just moved into a larger home, he has the space and need.

The desk was sporting green. I THINK it is green because at some point I did have it and I painted it green for Matt’s room. When the boys were younger everything in Mitchell’s room was blue and everything in Matt’s was green!

I guess at some point I gave it back to Mom.

Originally the desk would probably have been stained. I remember a time in the 70s when it was red. Then there was the “mauve” phase in the 80s. In other words, I knew there were at LEAST four layers of finish on it!

My original plan was to strip it down to bare wood and stain it.

What is the old saying about “best laid plans….” Yeah…that wasn’t happening.

There was the green…then the mauve…something white I suspect is a primer that was painted over the red…the red was painted over the original finish…whatever that may have been

I used every trick in my arsenal and still could NOT get all the paint off. Industrial stripper, my 1/2 and 1/2 mixture and even sanding.

One thing I will say about both my dad and I…when we do something, we do it to last!

After a few days of stripping and sanding I was able to get all the paint off the top but finally gave up on the rest of it…it wasn’t happening without doing serious damage to the wood itself.

I decided to stain the top and paint the base.

I sanded everything as smoothly as possible, primed it, sanded again, rubbed it down with tack cloth then painted it with a white enamel.

I stained the top with a java stain and sealed it with poly.

It is not exactly what I wanted but Matt and I both love the way it turned out. Right now he is using it as a tv stand in his den.

I was only able to snap a quick picture with my phone but as you can see, it turned out pretty cute.

We are in the process of making some major changes in his new house…new flooring, paint, shelving, etc.

Our plan is to eventually makes some major changes to his kitchen and den and when we do, hopefully I can get some good, staged pictures!

Until then I just wanted to share what one can do with older pieces…and also show that even we “old pros” get stumped occasionally…and when we do, we just drop back and punt!

A new storage project and Christmas 2019!

It has been a minute since I shared a home project…just too much going on the last few months to do anything other than what HAS to be done around here!

But I saw this little storage idea HERE and knew it was exactly what I need in my guest bathroom!

I had to build a little Christmas gift but I can’t share that just yet since it is suppose to be a surprise. But while I had the saw and nail gun out I decided to take time to build this little storage unit.

I keep plenty of spare toilet paper under the vanity but it is out of reach if you have already sat down. So for years I kept spare rolls in a basket on the floor next to the potty but I just didn’t think it was a sanitary place to store paper. So I set up a little wickerish box…paper inside, magazines on top.

So here’s my opinion about reading materials in a bathroom. First, I don’t want guests hanging out long enough to read an article in the guest bathroom…seriously, do that in your own bathroom. Second, if you have to sit there long enough to read an article, add fiber to your diet.

I needed something to set a little Christmas tree in so the little box got “repurposed.”

Anywho, I saw this little storage idea and thought “HEY! I can do that!”

I constructed mine a tad differently than Barb, but the concept is the same…and as I always suggest, use the tutorial that makes sense to YOU!

Either way, SUPER simple build! Something you could do with a miter saw and box. hammer and screw driver if you don’t have fancy power tools!

The first thing I did was use a stud finder to locate the studs then I cut into the sheet rock to measure the exact distance between studs…

…15”. Most wall studs are 16” on center so they SHOULD be 15” apart, but you never know so it is better to be safe than sorry! Just measure the distance between the studs and make your box a smidge narrower than that…or do as Barb did and “fur out” the studs to make a box a specific width.

I laid out the TP hanger (THIS is the one I used) and the spare rolls to see how tall I wanted the entire box to be…17” seemed to be perfect.

One suggestion…make sure the bar on the holder you choose “pivets”…you want the bar the paper will sit on to swing freely so you can swing it out of the box to put the paper on!

I used 1x4 (actually 3/4” x 3 1/2”) pine boards and 1/4’ luan to build the box. I cut the width pieces about 14 3/4” to give myself a little wiggle room between the studs. Basically I made a 14 3/4” x 18 1/2” box (outside measurements), then backed it with luan, cut to fit. I used wood glue and brad nails…ALWAYS glue your joints…trust me, the nails just hold everything together until the glue dries!

I used “door stop” for the face trim…it is 1/4” thick and 1 1/2’ wide and has a very simple profile! I used it when I installed the glass on my laundry room door…simple and beautiful!

After the box was constructed, I puttied the holes and caulked the joints, primed it with Bullseye primer, sanded it smooth, then wiped it down with a tack cloth.

I used the backside of the box as the “template” to mark the sheetrock, making sure it was level with a small 6” level (don’t assume your studs are level). I used a sheetrock knife to cut the sheetrock.

To install, I slipped the box between the studs, making sure the trim sat flush on the sheetrock. I drilled four 1/4 “holes approximately 3/8” deep on the inside of the box (2 on each side) and used 1 1/2” sheetrock screws to attach the box to the studs. Then I used wood putty to fill those holes and sanded it smooth after it dried.

All my trim is oil based “Swiss Coffee” (and of course I have spare paint on hand) so I painted the box with the trim paint. Again, ALWAYS use an additive when brushing or rolling paint on wood…in this case Penetrol since I am using an oil based paint. Two coats!

After the paint dried well I installed the TP holder and stocked it with spare paper.

Too stinking cute and perfect for storing extra paper and even a little “air freshener.”

Christmas is next week and so little changes from year to year it seems almost redundant to share my Christmas decor. But I will leave you with a few pictures of our cozy holiday home…

I hope you and yours have A VERY MERRY CHRISTMAS!!!

Hutch makeover reveal....

I shared the china hutch I started HERE.

Not the prettiest piece of furniture I have ever seen but I knew it would be perfect for the space Matt and Hannah have in their dining room…with a little tweeking!

In this post I also shared a few important tips for painting any piece of furniture. Tried and true advice!

First thing I had to do was “find my inspiration.” It doesn’t matter if you are making over an entire room or a piece of furniture…you have to find your inspiration.

In this case I needed to find a similar hutch so naturally I searched Pinterest…I sent several pictures of “french provincial china hutches” to Hannah and she liked this one best (originally posted on 509 Design)…

…beautiful. I love the stained top and the Miss Mustard Seed boxwood green.

The kids did not want doors or dividers on the top so those were removed.

They also decided to paint the entire inside white.

The first thing I did was strip the old finish and stain on the top of the base. Keep in mind that the top and the base where attached pretty tight so I just left them as is and only stripped and finished the part of the top that was showing. I used this process and it literally took me less time to strip and re-stain than it did to tape it all off. I used General Finishes Brown Mahogany stain, then sealed it with poly.

After the the top had dried (a day or two) I taped and papered it well so I could prime the entire piece. I also removed the drawers and taped and papered those so I could just paint the fronts.

Removing the vertical dividers left a gap that had to be repaired…

Pretty simple fix…I just cut a piece of decorative wood from the pieces I had removed and glued and clamped it over the gap…

After primer, I sanded it well, wiped it all down with a tack cloth and then painted…first the inside of the top with satin white. After that dried I taped it off and sprayed the rest of the hutch with Kylon Satin Italian Olive paint….closest green in a spray paint to Miss Mustard Seed’s boxwood. Again, it SAYS it is a “paint and primer” in one but I always prime wood furniture with Bullseye or Kilz.

I mentioned the brass froo-froo hardware in the original post…I honestly didn’t think it would make the cut.

But after some serious scrubbing with Brasso and SOS pads, they shined right up and believe it or not, the kids loved them!

So….here is the final product in place….

The farmhouse table is one I featured HERE. I found the black chairs at the apartments and they just needed a little repair, paint and reupholstery (never featured those), the bench is one I made for Thanksgiving one year, the plaid scarf is like the ones I featured HERE and the candle sticks were used as the stands for their wedding cake! It took YEARS for all this tp come together and now that it has…cute as a bug’s ear!

I know the original brass hardware may be a tad “gaudy” but I love it!

The “gap fix” isn’t exactly perfect, but as my Daddy use to say “You’ll never notice it on a passing train!”

I love how this piece turned out…and it shows what you can do with a pretty, um, not-so-attractive piece of furniture with just a little time and paint…all in all I probably spent less than $20 on supplies!

Hannah and Matt aren’t into all the “knick-knack” and “froo-froo” stuff so I am sure they will style it to their tastes!

Another VW van dresser makeover.

I love this little project. I featured my first HERE. When I found another “waterfall” chest of drawers I decided to do another…they are just too much fun.

This little makeover takes a bit of patience…mainly because you have to “layer” the different paints. Each “layer” needs time to cure before you tape it for the next “layer.”

The first thing I had to do was remove all the hardware, putty the holes I would not be using, prime, sand and tack. Then it was just a matter of drawing and taping my design…

The “base layer” is white lacquer…from there I painted the teal, then the light grey “glass”…then all the outlining and detailing.

In the end you have a precious little chest!

I used some black and white I had on hand and bought a sample pot of the teal. Between the primer and paint, I probably spent less than $10.

The only “major” purchases were the VW decal (purchased HERE) and the two handles that make the windshield wipers…less than $20. (I had the round knobs in my hardware stash but you can buy them for next to nothing) All in this little project cost me the price of the dresser and less than $30 in materials.

I made a few “design changes” and truth be told I like the first one I did better….but nothing you will notice on a passing train…so I let it slide! It did affect the placement of the VW decal so I ended up having to “cut” it between two drawers…boo!

Again, one of my favorite projects and since I am no longer having to work at keeping “inventory” for a booth, I have more time to be creative and have fun!


Vintage car handle hardware...

I am trying desperately these days to be a bit more “creative” and get out of my “everything white” funk.

I saw a really cute idea on Pinterest….vintage car handles as hardware. Naturally I jumped on Ebay and began searching for vintage car handles. I looked back at my Ebay history…I ordered them in JANUARY!!! Didn’t have anything in the works, just thought is was a cute idea.

Did I save the link to the “inspiration?” Um, no. Did I have a plan in mind as to how to attach them to a drawer front.? Um, no. Did I have a table to even attach them to? Um, no.

Just thought it was a super cute idea.

The first thing I had to do was figure out how to attach the handles to a drawer front…the hole in the backside is not threaded. My original plan was to find a bolt that fit snuggly in the handle hole, then just use JBWeld…love that stuff. The problem with that is it would make it darn near impossible to remove the handles in the future. Not MY problem, but as I have said before, I want buyers to be able to makeover the piece again in the future.

Thought maybe I could JB Weld a light fixture bolt (threaded on both ends) into the handle, then just add a nut and washer…hum….that could work and still allow for removal in the future.

While I was at Lowes scouting bolts one of the nice associates showed me this nifty brass insert thingy….

Because brass is “soft” you can screw this little plug into the hole (using a flat screwdriver), then get a bolt that will fit the inside of the plug…in this case a 5/16 hex bolt. I slipped a washer onto the bolt so that it would sit snuggly against the back of the drawer.

Problem 1 solved.

Problem 2 is finding the perfect little table…fortunately I found a cute little solid wood side table at a garage sale for a few bucks….

Problem 3….as you may have noticed, the handles have a 1” “bump” on the backside which would make it impossible for them to sit flush on the drawer front.

I removed the little wood handles on the drawer fronts and puttied the little holes.

I took a 1 3/8” paddle bit (I couldn’t find my 1 1/4”) and made a hole in the front of the drawer front deep enough for the handle to sit flush. Then I used a 5/16” drill bit to make a hole in the center of that hole for the bolt.

TIP: To make sure you don’t drill your large hole all the way through the drawer front, wrap a piece of blue/masking tape on the paddle bit to indicate the depth you need to drill. (Not pictured)

Now I was able to set the car door handle flush on the front of the drawer and run the bolt (with washer) through the backside and into the little brass plug.

Since I knew the bolt may “loosen” and there is only one bolt holding the hardware in place, I added a dab of construction mastic (liquid nail will do) to the hole just to give the handle some stability.

Before applying the hardware, I primed, sanded, tacked and painted the table a high gloss red (See HERE why I can no longer call it my KSTP process.) The insides of the drawers were a tad cruddy so I primed those as well and painted them black…not necessary but kinda cute!

I found some “L” shaped metal floor trim and decided to add it to the front corners of the little table….installed the new door handle hardware….and presto bingo….

Too stinking cute!!!!

And now that I have figured out all the logistics to turning vintage car handles into hardware, grab a few and have some fun!!!

I have a few of these door handles left…now I just need to find another little table or small dresser!!!!

Craftsman dresser....

I have said it before…”Imitation is the sincerest form of flattery.” Unfortunately, not every one likes to be “imitated”…or “copied.”

But I have to wonder…why do others post projects on blogs or Pinterest if not to give inspiration…inspire others to “imitate” their creativity.

I have NO problem with others “imitating” my creativity…imitate away! This entire blog is here to inspire you to make your home more beautiful. And if you are looking for inspiration for projects you intend to sell, help yourself….there are A LOT of people out there who couldn’t paint a piece of furniture or hammer a nail if their life depended on it. They need your abilities and creativity and if I can inspire you to create for others…yay me!

I try desperately to give credit where credit is due…if something “inspires” me I try to link back to the site. Unfortunately, I am the world’s worst at seeing something I like, “drag and dropping” the photo into my “inspiration folder” and not actually saving the link. I really do try to go back and find where the photo might be posted, but I can’t always find it! Same with recipes. I’ll see one I like, print it off and then I can’t find the original recipe.

Fortunately, this time I not only have a picture of the inspiration, I also have the link….HERE! (This dude has some mad woodworking skills and his dresser got some heavy duty reconstruction.)

The minute I saw this little dresser/changing table I knew I had to do one.

Fortunately I found a dresser that had perfect wood detailing on each drawer that allowed me to paint the “silver handles” rather than add new detailing. I also didn’t do any “reconstruction” on the piece other than adding bracing and wheels.

You can buy these wheels at Lowes…they just screw on!

Unfortunately, this is where I have to admit AGAIN what a bad blogger I am because I failed AGAIN to take a “before” picture. Suffice it to say, it was just a plain ole’ fake wood grain dresser…perfect for a little makeover!

Other than the wheels, the only other thing added was the “Craftsman” decal…believe it or not you can buy them on Ebay…HERE.

I found a red gloss spray paint that is a perfect match for the “Craftsman red”….the black on the drawer fronts is black lacquer…and of course the silver is just “stainless” paint. I primed the entire piece with primer, sanded well and wiped it down with tack cloth…then paint (KSTP).

Just too stinking cute!

Feel free to be “inspired” and copy away!

Drexel Accolade Makeover...

An entire year…A YEAR!!!! That is how long this Drexel buffet has sat in my dining room in it’s original state because I couldn’t pick a stinking paint color. I may be able to paint and refinish and upholstery…but picking a paint color or fabric is TORTURE!!!!

I LOVE the white lacquer finish on this little side table….

….and I love how the bright brass hardware just POPS on the white lacquer but I really wanted to do something different.

But I could NOT make up my mind. I did a lot of research and most of the painted Accolade pieces are white or black…and honestly I did not want to do black.

Hum….

I found a paint color I am madly in love with!!!! It is actually a Krylon “chalky paint” and I have used it on several pieces and I just LOVE the color…Krylon’s Anvil Gray. While it has “gray” in the name it really is a true deep, rich navy. And it sprays on beautifully!

There was one problem with this paint for this project…it is super flat…like most “chalk” paints. I desperately wanted a “high gloss” finish so I tested a few clear coats over the paint to see if I could find a good gloss. I tried a new product (at least to me), Krylon Triple-thick Crystal Clear Glaze. It SAYS it is a “glass-like coating” and “superior high-gloss finish” and it is as good as advertised.

The finish is super high gloss and exceptionally durable…I am VERY pleased.

So…

I changed up the art in the dining room over a year ago and I still love it. I still love the red fabric I used on the chairs. I love the draw leaf table. If you search “buffet” or “dining room table” on this site you will see few last long around here….but truthfully, I think I am finally loving the “look” of my dining room…so these pieces may actually make it a tad longer.

Again, no secret to cleaning brass….lots of brass cleaner, SOS pads, and elbow grease…but worth every bit of the work!

I have already stocked it with my holiday and seasonal dishes. Pretty with a purpose…my favorite. But as I said, buffets don’t last long around here so we’ll see how it fairs.

I think I have mentioned before that I DO NOT have a green thumb when it comes to indoor plants….so some of you may be shocked by the massive peace lily.

A little side story…we went to an auction…they were selling the plants (yes, they sell EVERYTHING!) Nobody would bid on this big ole’ monster so then they threw in a monster pothos plant…I’m talking HUGE!!!! My youngest daughter has been sprouting “cuttings” for her apartment so I knew she would love the pothos…so I ended up buying them both for ONE DOLLAR!!! No kidding….a dollar for two huge plants. She didn’t want the peace lily so I stuck it in my dining room and other than dump my leftover night time water in it every morning, I pretty much ignore it.

And you know what…it THRIVES. It is growing, it is healthy and it is constantly blooming. Go figure!

Now I want to share a little issue I am having with my beloved Kilz…I had this issue sometime back when I was using white lacquer…so honestly I attributed it to the paint since lacquer tends to be a “hot” finish.

But I had the same issue this time, and I was using plain ole’ spray paint.

I call it “alligatoring.”

I cleaned the pieces, sprayed on the Kilz, sanded smooth, then wiped it down with tack cloth. When I sprayed on the paint, it “alligatored.” Curses!!!

I thought MAYBE the tack cloth left a weird residue, so I sanded the spots smooth after they dried well, reapplied Kilz, sanded and then just wiped it down well with a rag…another coat of paint…same problem, just in different areas. The entire piece alligatored randomly. WTF!!! Temperature…nope…humidity…maybe. But I had the same problem when I painted on a drier day. So who the heck knows. Like I said, I had this problem sometime back on another project.

The Kilz is what is actually crackling…not just the paint. I contacted Kilz and they swear they didn’t mess with the formula and were as stumped as I was.

My solution….well I had to sand the entire piece down, paying close attention to the areas that “alligatored.” After everything was smooth and clean again, I used Bullseye 1-2-3 Primer, let it dry well, sanded, and tacked. Sprayed on the paint and presto-bingo…perfect.

Kilz was kind enough to send me a replacement can of primer. Yippee…somehow I guess that is suppose to make up for two days of grief and cursing.

So now my “KSTP” process will become “BSTP” …eck…not really a good acronym…but I hesitate to use Kilz if it really is the only common denominator in this little disaster. Since no other factors seemed to affect the out come, I can only assume it is the culprit.

Who knows…but from now on I can’t say that Kilz is the be-all end-all of primers when painting furniture.

Sorry guys!