Another day, another project....and a new venture! And my annual HOLIDAY CHALLENGE!

My neighbors, Kenny and MaryAnn, bought a beautiful antique dresser. The problem with beautiful antique dressers is they usually need a little work. Ever watch the tv show "Botched?" I should do a show about "botched" repairs on old furniture because 9 times out of 10 someone else has already tried to "fix" little problems, only to create much bigger problems.

In exchange for a few hours of work and a few choice curse words, MaryAnn gave me this little pine cabinet....

IMG_7489.JPG

At some point Kenny had removed the back and like me, had NO idea where he put it. That is okay...I have "repurposed" little cabinets like this before and one of the first things I do is remove the back and replace it with something with a little more "character."

This tung and groove "craft board" is perfect for adding a little "pop" to otherwise boring or dated cabinets. Since I decided to remove the doors and turn this into an "open shelving" unit, I knew it needed a little something....

Rather than paint the boards a solid color, I usually do a little "white wash" treatment on them in whatever paint color I plan on using on the exterior. I painted the inside of this cabinet my favorite off-white color and plan on painting the outside a soft teal. 

The first thing I did was cut the boards down to the size I need for this project. Then I just dip my paint brush in water, then dip it in the paint, brush the boards, then wipe them with a damp cloth....

This allows the grain to show while still giving the boards a little color. After the boards dry, I spray them with a clear coat. 

I put a tiny bit of glue in the "groove" of each board. Not a lot or it will ooze out and make a mess...a little glue goes a long way...and fit them together one at a time across the back! 

I use my pneumatic stapler to attach them to the cabinet....

This board is so thin you could probably attach it with a manual stapler if that is what you have handy!

This bead board really does dress up and update these old cabinets..

IMG_7529.JPG

Now all I have left to do is paint the exterior and replace the hardware...I will make sure I share the transformation when I get it finished!

I recently used this same treatment on a huge old ugly (but very solid oak) cabinet I hauled home from the apartments. 

I decided to use it for display in my new "room" at 410 Vintage

Yep, this is my "new venture." An entire room at 410 Vintage, rather than just a booth!

IMG_7466.JPG

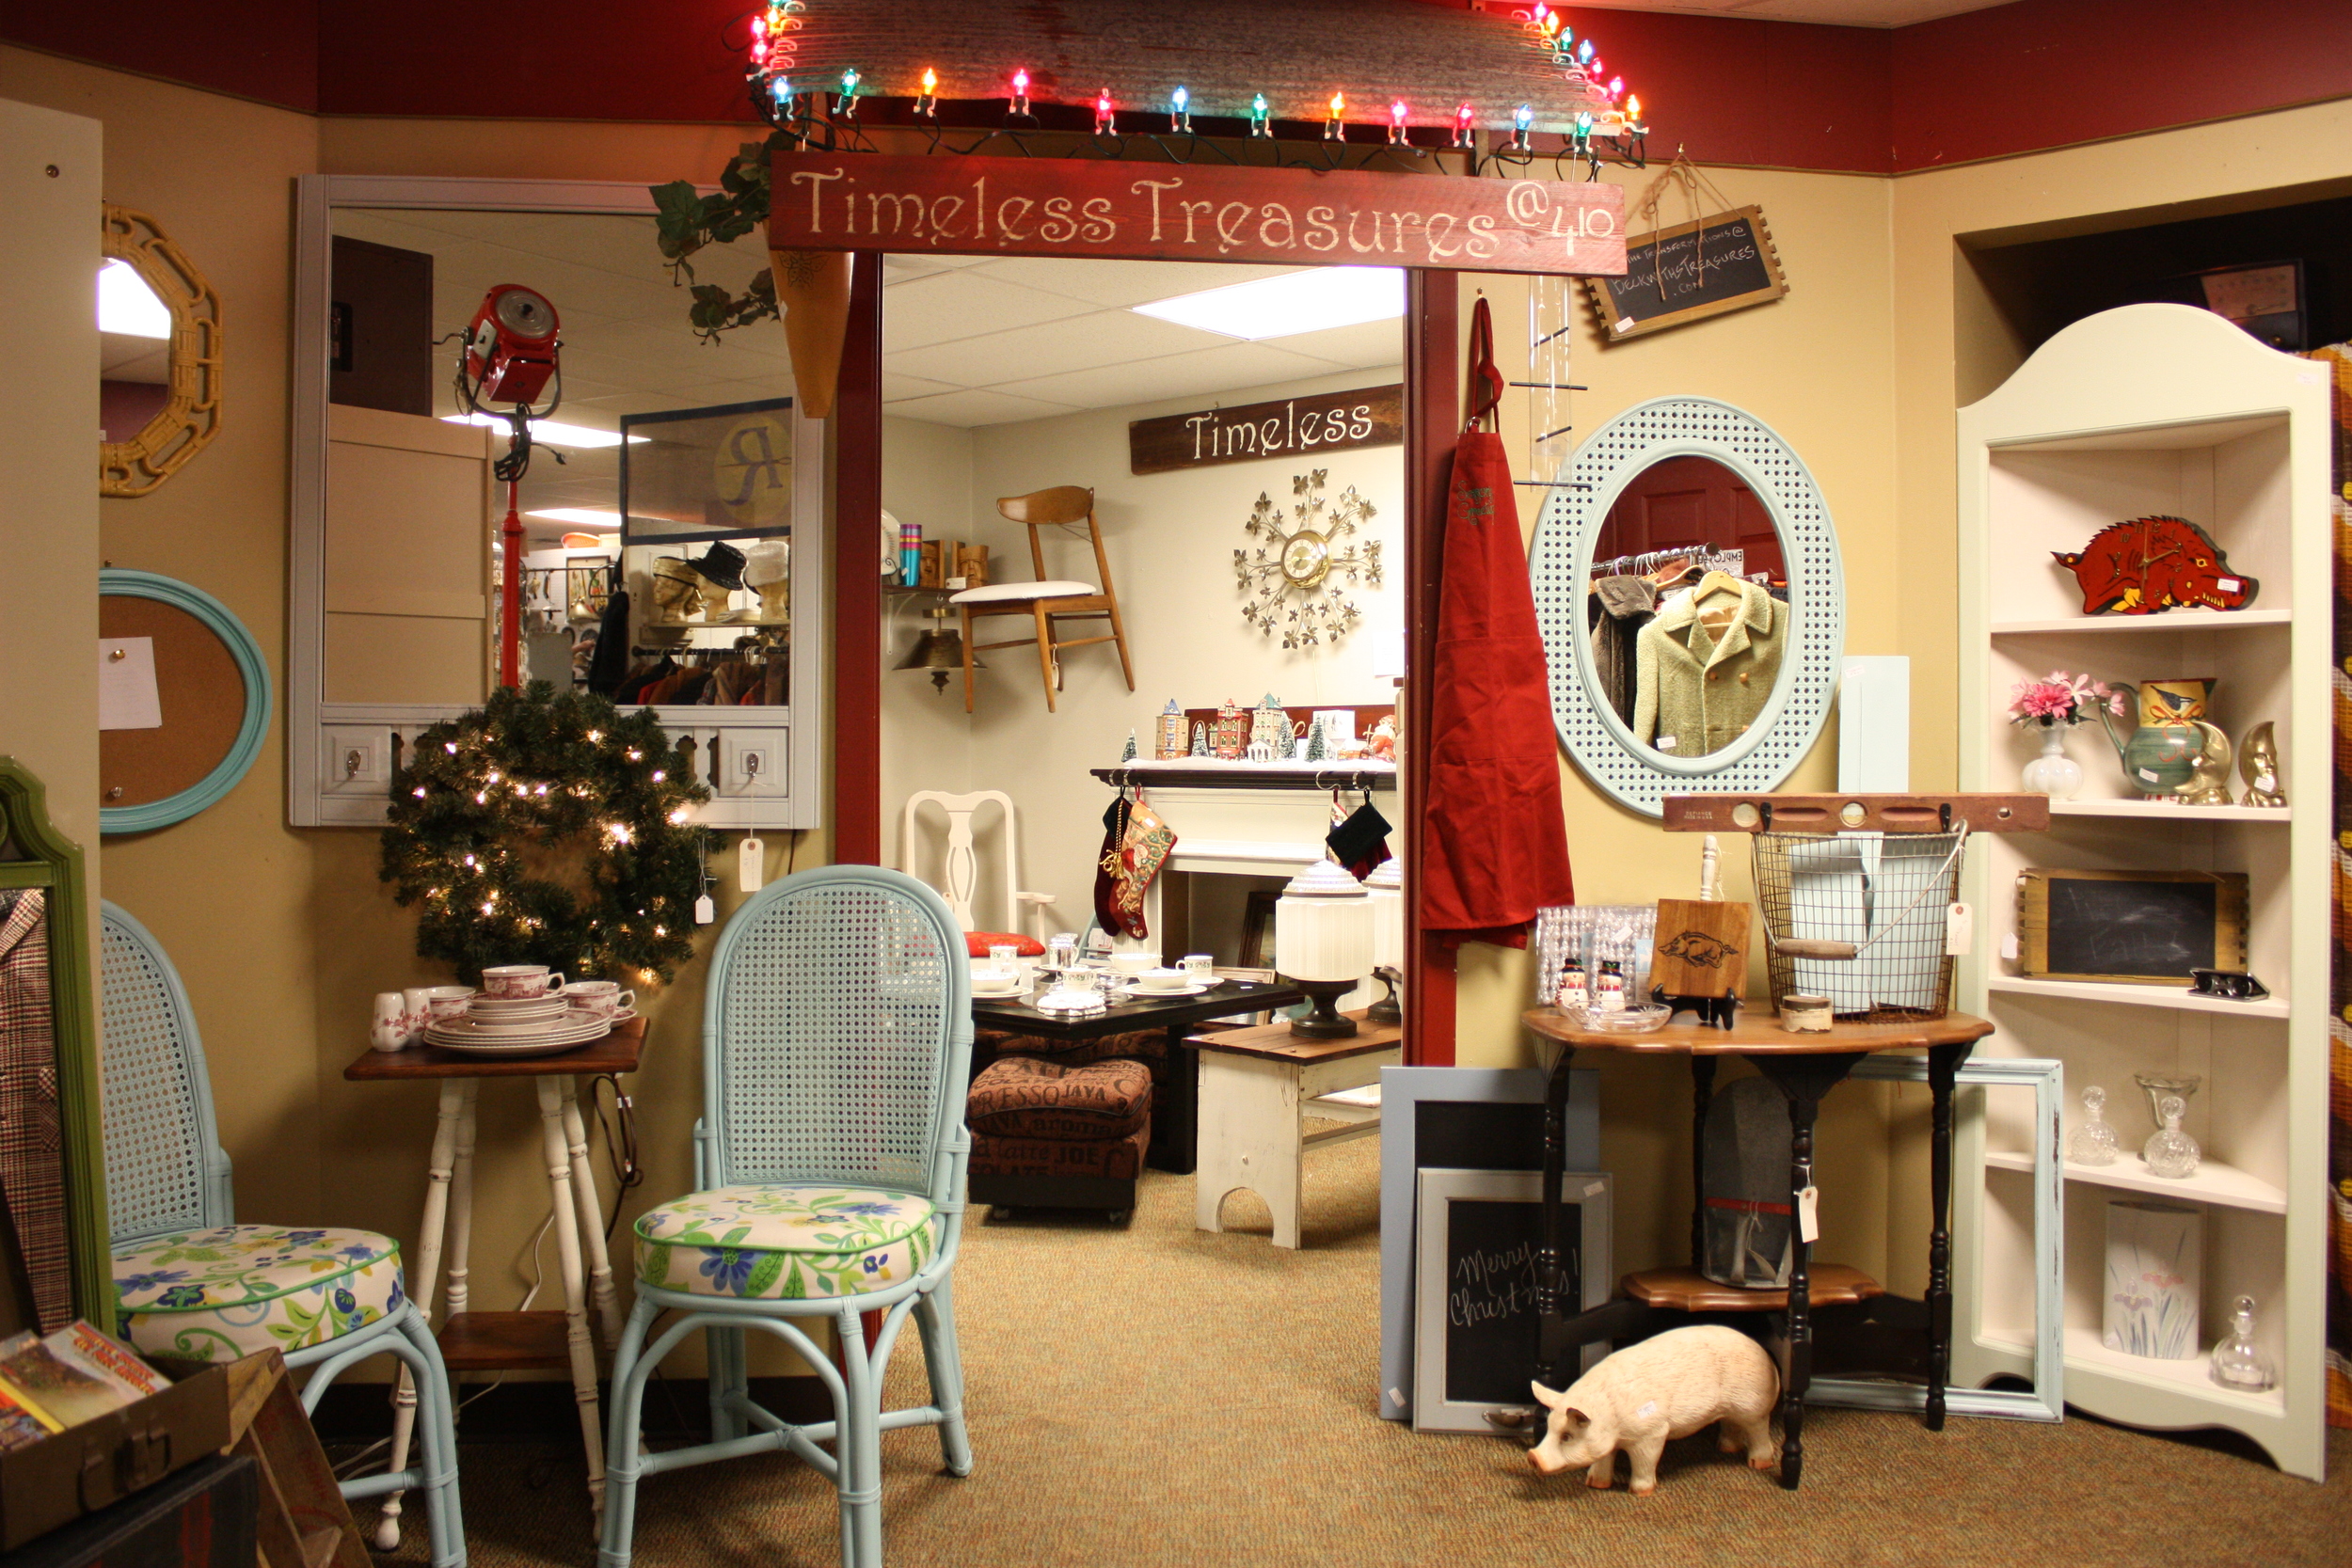
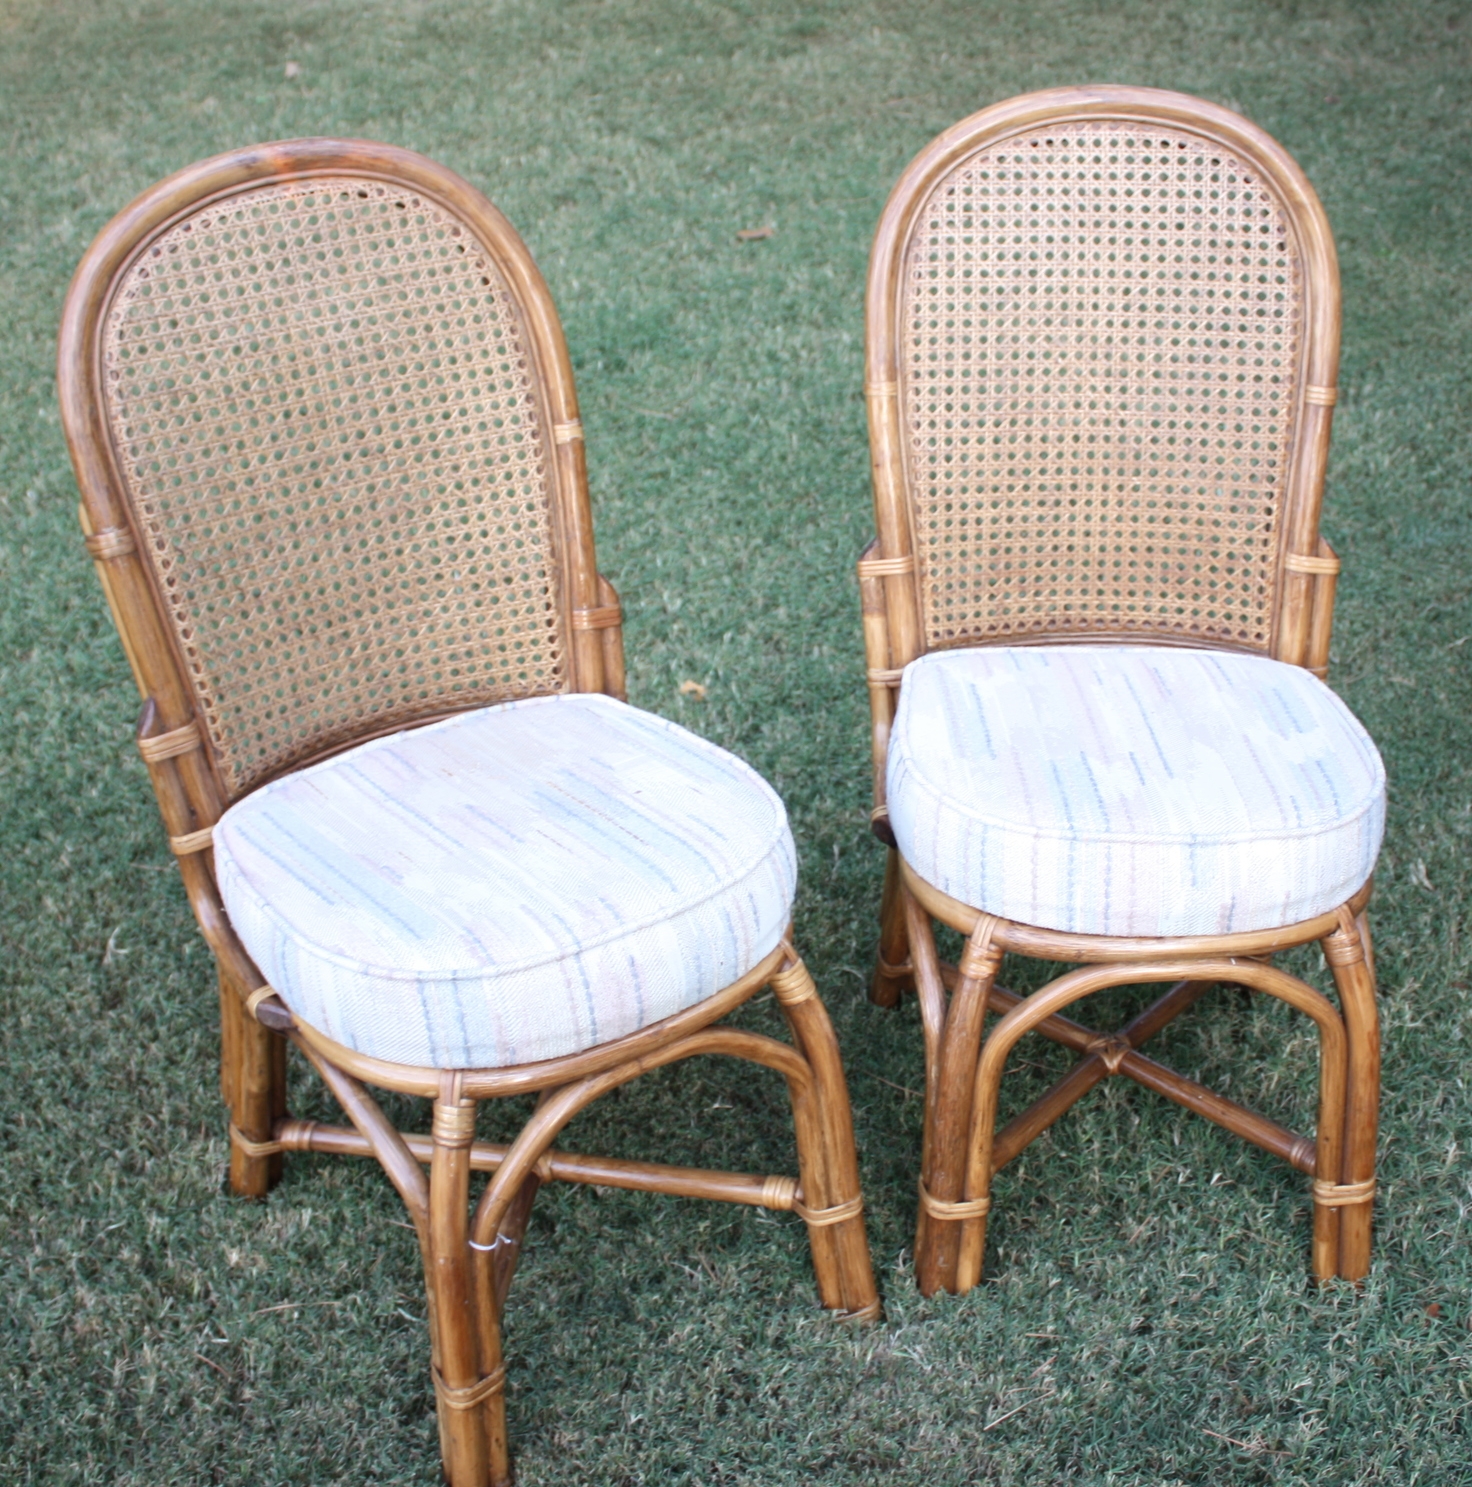
This is just a little sneak peak at my new room...you can see the amazing ratan chairs that started out in a total state of FIX ME!!!!

(I had several dining room tables that where set all pretty for Christmas...neither lasted a day!)

IMG_6625.JPG

A couple of little side tables that had a bad case of the uglies...

They both just needed a little TLC...

I have filled this room with my auction treasures and furniture rehabs...its is a fun space!

If you are local and have not checked out 410 Vintage in Fayetteville, you really should drop in! The owner has one side filled with "mid century" awesomeness and the other side of the building are spaces filled with anything and everything vintage, retro, antique and wonderful! They have an Instagram page that is updated several times a day with new arrivals. I don't have an Instagram page but if you do, you might want to check it out!

HOLIDAY CHALLENGE!

This is the time of the year when I want to remind you of my "HOLIDAY CHALLENGE!" Our family use to do the Angel Tree every year and always enjoyed buying gifts for our "angel." But as the kids have grown and have less time to shop with Mom, I have encouraged them to find their own way of giving. For me, it is random giving. Every year I set aside 5 $20 bills...and I wait. At some point during the season, I will run across someone who will have a "need." Maybe at the grocery store...or the car hop at Sonic. One time I was getting gas and I felt the person at the pump next to me could probably use gas money. You never know...if you open your heart, you will know when to give! 

If you don't have a lot of cash to give, give of your time!

We may not have everything we WANT, but we always had what we NEEDED! It feels wonderful to be able to give back...even if it is just a tiny bit! 

A few new storage solutions!

In my quest to make my kitchen a tad more "user friendly" I stumbled upon a nifty little storage gadget at Lowes that will help me manage my casserole dishes and mixing bowls a bit better. 

As I have mentioned, in my "dream kitchen" I have nothing but big deep drawers in my lower cabinets. Unfortunately that is a "dream" so I have to work with what I have and digging around in a lower cabinet for heavy casserole dishes and keeping all my mixing bowls organized has become an issue.  

Again, and I can not stress this enough, the number one key to getting organized is PURGING!

Pull it ALL out and ask yourself...DO I REALLY NEED THIS?! In my kitchen cabinet, I had several casserole dishes that were duplicates of what I have but they didn't have lids. Do not need! I had 5 large 9x13 casserole pans...do not need them all! I had 3 stainless bowls the same size, which made stacking them a impossible...do not need! I have FIVE crock pots...two smaller ones just for dips and such. I DO need those but only once or twice a year so there is no need for them to take up valuable kitchen real estate. So off to the hall pantry they went! 

I contemplated building and installing either 4 drawers or 2 large drawers in this cabinet base. Lots of work! So when I found these nifty little metal storage drawers at Lowe's I knew I had found a relatively easy solution.

The problem with these metal drawers is they are not custom sized so I was going to end up with a lot of "dead space." I decided to only install one for my bowls and casserole dishes since those are things I use almost every time I cook. I left the other side shelf space for crock pots and dishes I only use occasionally.

The drawer component lets me easily get to my bowls and casseroles dishes without wallering around on the floor and pulling everything out to get to the stuff in the back.

A perfect, and simple, solution for organizing a tough space.

When Brian and I went scrounging around the flea market out in Tontitown last weekend, I found this neat little wall decor. A framed chalkboard with two "distressed" wire baskets. I knew it would be perfect for organizing magazines that tend to get piled up in the coffee table, which in turn means they get ignored!

I'm pretty sure it is probably something one could pick up at Hobby Lobby, or something I could easily make with an old frame and paper storage racks from an office supply store. But it was there, and it was done...the only thing I did not like was the original  finish on the frame...kind of a "white-wash" natural wood looking thing. I immediately painted it with some chalk paint and distressed and sealed it. Great for magazines or mail. Remodelaholics featured a bathroom with a similar one.

I like it in the bathroom but I am of the opinion that if you are in the bathroom long enough to read an article, you probably ought to seek treatment. Just saying....

Last fall I bought this awesome antique sewing machine at an auction. The "lid" flips back to reveal the machine

I immediately fell in love with the little wood box that covered the machine. After a little research I discovered they are called coffins....most often in mahogany or walnut. BEAUTIFUL! I immediately jumped on Ebay and found a few of these amazing little boxes.

Naturally they needed to be refinished, but a little magic mixture and a few coats of tung oil and they are amazing!

My original plan was to use them in the "kitchen reset," but there really was no good place for them so I have them scattered around the house for storage. In the den, I use them to store some of my photo albums. They would be darling with little castors for "rolling" storage. l absolutely love them! 

When I reset my kitchen, I dug around in my flea booths looking for "functional decor." In other words, pretty with a purpose! A few things caught my eye.

The first was a little glass pumpkin...perfect for this time of the year! I usually keep my coffee in a crystal decanter, but this little pumpkin is perfect for the fall season.

Now I am going to be on the look out for one I can use for the Christmas season!

I also found this little sterling silver piece. I THINK it might have originally been for sugar since it has a little notch in the lid where a spoon may have rested but most sugar jars are smaller. Regardless, it is the perfect size for my coffee filters. 

And of course the need to store 1/2 of my dishes when I built my floating shelves...seriously, who needs 20 plates! I purchased this little basket from Kaufmann Merchantile with a gift certificate from my son but I also found some on Amazon and have ordered 3 for my holiday wrapping station! (I'll share that little project when I get it set up!)

I have mentioned time and again that I really don't decorate much with  "pretty" without "function" or purpose...unless something has sentimental meaning. 

I am learning that these little touches are what really give a home "character." No need to use boring old plastic containers or cardboard boxes if you can "think outside the box" and find interesting pieces that are "pretty" but can also serve a useful function! 

Anything that can make my life more organized is great...the fact that it is pretty or interesting is a huge plus!


THREE different Floating shelf tutorials...

I am going to wait to do a full reveal on my kitchen "reset." I call it a "reset" because I didn't paint the exterior of the cabinets or get new flooring or counters...just moved cabinets around, removed a few doors, painted the inside of a few cabinets, added some under-counter lighting and added shelving. So while it is a major change, and looks and functions MUCH better, it isn't a full-blown makeover.

Today I am going to share a tutorial on floating shelves. Actually THREE different tutorials!

The first thing I had to do was figure out which cabinets I wanted to "pop up" and where I wanted open shelving. That was what all the planning and measuring and drawing has been all about for the last few months. After I decided on the "configuration" of the cabinetry, I moved the cabinets that needed to be moved (see a tutorial on doing that hereand decided what "stuff" I wanted on each shelf...that is an important part of the plan because you don't want to plan on storing a 10" tall Anchor Hocking jar on a shelf that, in the end, only has 9" clearance!

The problem with adding floating shelves to any room is the need to plan for the weight of the items it will hold and whether or not there are studs to anchor the support.

In my kitchen, I had four areas I wanted to add floating shelves. I didn't want brackets, so the "support" for each shelf was a huge issue. In the end, I had to construct and anchor three different types of shelving to give me the clean look of floating shelves!

The first area was the hardest only because it was the longest span and will hold all my dishes. When I weighed my dishes they came to SIXTY FOUR POUNDS!!!! Just for plates, bowls and salad plates....that didn't account for cups, glasses or condiment bowls! Course then it dawned on me that I really didn't NEED to display ALL my dishes so I pulled out 8 place settings and stored the rest above the pantry! Not a great place to store something you use every day, but perfect for things you only need a few times a year! I actually have MORE of these dishes in my hall pantry...they are Pier One Bianca ironstone and they don't make it any more...so I stock up every time I find them on Ebay or Etsy!

The two shelves were still going to hold a lot of weight and I knew I needed something sturdier than a pre-build floating shelf you buy at Lowe's. 

The wiring is from my under counter lighting that was attached to the cabinet! Notice the black piece of electrical tape on the switch so someone didn't accidentally flip that switch!!

I found a tutorial online for floating shelves using metal brackets attached to the studs by cutting out the sheetrock. God help me, I did not save the link! Since I knew what I needed to do, I didn't need to refer back to the tutorial! Hopefully my tutorial will give you the information you need!

My plan was to attach L brackets directly to the studs and then conceal them with sheetrock and the construction of the shelf! 

The first thing I did was locate the two studs with a stud-finder. I marked the location, used my L brackets to "trace" out the area I needed to cut out and then cut out the sheetrock. 

You can use a Dremel with a cutting blade but I didn't want to blow dust all over the place. I just cut it out with a utility knife and chisel.

After cutting out the opening, I set the L brackets directly on the studs, made sure it was level between the brackets by laying a 24" level across the two, predrilled the holes for the screws and then attached them to the studs using heavy duty wood screws...3/8" bolts will work as well!!! 

You may notice that the brackets are set 1/4" above the top of the tile...that is because the underside of the shelf will be 1/4" plywood and I want to be able to slip it on top of the tile. Someday I MIGHT change my backsplash and I want to be able to remove the tile without messing with the shelving!

After the brackets were attached, I used sheetrock mud to fill in the holes...right over the bracket attached to the studs. You could "patch" the area like I showed you here, or you can just fill them with mud. As the mud dries, it will crack, and you may have to sand and refill it 2-3 times...no biggy....I had a lot of stuff going on over several days so I wasn't in a hurry!

After the mud dried, I sanded it well, sprayed it with texture (again, this tutorial shows you how to do that) and then painted it (AGAIN, this is where having leftover touchup paint is SO important...unless you are repainting the entire wall!)

Here is the downside to doing tutorials...I don't always take the pictures I should take! Sooooooo......try to follow me here. The shelf was pretty much constructed the same way the shelves adjacent to the refrigerator were...so you can see pictures of the construction later in this post!

I cut, primed, sanded and put one coat of paint on all the shelving components before I put them together...that way, once it was all constructed all I had to do was caulk, putty the holes and give it one final coat of paint! (I used oil based paint on the shelves...maybe overkill but I know it will hold up!)

I used 3/8" plywood for the top of the shelf...I cut it (and the 1/4" ply for the underside) the size I wanted the shelf, LESS the 1/2" for the strips of wood used to face the front and both sides (Example, if you want your shelf to be 8" deep and 30" wide, you would cut your plywood 7 1/2" x 29"). I glued and nailed 1/2" plywood strips to the underside of the 3/8" top to create a "channel" for the electrical cord for the under counter lighting and for the bracket. I laid the 3/8" plywood across the two brackets and attached the top to the L bracket with #10-3/8" screws and then glued and nailed 1/4" plywood to the underside. So all in all, the thickness of each shelf was 1 1/8" thick (3/8" top + 1/2" inside strips + 1/4" underside = 1 1/8" thick.)

I wanted to reinstall my under counter lighting to the bottom shelf so I measured for it's placement and drilled holes for the electrical wiring in the underside (1/4" plywood) of the bottom shelf and ran the wiring between the "channels" and through the holes before I attached the bottom to the top of the shelf. KNOW WHERE YOUR ELECTRICAL WIRING IS so you don't put a nail through it when you are nailing the underside to the top!

I capped the edges off with 1/2" boards...1/2 x 2" (actually 1/2" x 1 1/2") for the top shelf with no light and 1/2 x 3" (actually 1/2" x 2 1/2") for the bottom shelf so the light fixture would not show when it was installed. Caulked, puttied and gave them one final coat of paint!

A huge advantage to constructing your own support or frame is you can make the shelves any depth you want...I actually made the bottom shelf a little deeper than the top shelf.

The spice corner was a tad easier. Since the items on those shelves were pretty light weight I used premade floating shelves. The only adjustment was the width of the shelves. The smallest premade floating shelf I could find was 18" but my space was only 15". The upside is the metal bracket the shelf slips on to was only 15" wide, so I was able to cut the actual shelf down...1 1/2" off each side, and still use the metal bracket! I painted those to match the dish shelf and installed them per the directions. (Yes, you can easily paint pre-made floating shelves...you aren't limited to white or black!)

The two 15" shelves on either side of the refrigerator were another "challenge" and constructed completely different because one side had NO studs in the 15" span and the other side only had ONE stud. Curses.

Not a biggy. Sometimes you just have to get creative!!! 

I built a "skeleton" for each shelf using 1x2 material (actually 3/4" x 1 1/2") I didn't want to make the skeleton too terribly heavy but since only one side of each shelf could be attached to the adjacent cabinet, I decided to beef up the "free floating" side with a 2x2" (actually 1 1/2" x 1 1/2") I used oak on the side that attaches to the wall since it is a "harder" wood! The rest is poplar since it is a little bit lighter! Make sure when you "design" your skeleton that you account for the 1/2" "facing" that will go on the front and sides. For example, my space was 15" wide x 14" deep...since I was "facing" the shelves with 1/2" material on the front and one side, I made my skeleton 14 1/2" x 13 1/2". Sometimes it helps to actually draw it out with the measurements!

I glued each joint, tacked them with a trim nailer and then counter sunk screws...just to make it all nice and sturdy!

If you don't have a special "counter sink" screw bit, you can always cheat like I do...first, predrill the hole using a small bit (1/16th ish bit!)...

...then use a bit that is a tad larger than your screw head and drill on top of the small bit hole, maybe 1/8" deep...then just put your screw in!

It is important to predrill holes because the wood WILL split if you do not!

After constructing the "skeleton" for the shelf, I placed it on the wall, leveled it, then predrilled 4 holes through the skeleton into the sheetrock. 

Notice I tacked a piece of 1/4" plywood to the bottom of the skeleton so I could maintain enough space to slip the 1/4" plywood underside on after the skeleton and top were installed!

After pre-drilling the holes through the skeleton and into the wall, I removed the shelf and inserted "self-screwing" sheetrock anchors into the wall... the package says they hold 80 pounds each...I'm hoping four will do the job since there is no stud in this area!!!

I used the screws that came with the self-drilling drywall anchors to secure the skeleton to the wall. I added washers on the left shelf since it didn't have a stud in the wall to attach to.... just for good measure!

Litty inspected my work every step of the way!!!!

 The right side had one stud to anchor to, so I used two self-drilling drywall anchors (no washers this time) and two sheetrock screws into the stud. For good measure I used my nail gun to nail from the inside of the skeleton into the adjoining cabinet (making sure it was level from back to front!)...again, probably overkill!

After the skeletons for the shelves were securely anchored, I used 1/2" plywood for the top and 1/4"  for the underside. Glue and a few trim nails. The thickness of the shelf is 1/2" top + 1 1/2" skeleton + 1/4" underside = 2 1/4"... so I used 1/2" x 3" boards (again, actually 2 1/2") for the front and sides (all pre-primed and 1 coat of paint). Caulk, putty, paint!

Three different construction methods...this is one of those times when one shoe WILL NOT fit all and you really have to get creative! 

This may all seem like a daunting task...and I may make it seem easy. But even for me, it is not. You really have to think, and draw, and measure and plan. And be willing to throw your hands up and start over when something doesn't work the way you thought it would! THAT is what DIY is all about.

You may have noticed that since I popped up the cabinets, you can actually see the underside now...that will not do! And that is one of the pieces of "trim" I am waiting on to finish things up...1/8" maple ply that will cover the underside of the cabinets. I had David at Sherwin Williams do a stain match and he did an AWESOME job...so as soon as the trim and skins come in and I get them stained and installed, I will do a full reveal! 

In the end...I have exactly what I want...open shelving in my kitchen and when I reveal the entire kitchen you will see how this all ties together. At least for now you know that you are not limited to the measly little 10 pound limit of a pre-built floating shelf! You CAN build a floating shelf that will hold more weight, anywhere you want! 

"Blah" to "BAM" cheap furniture makeovers...YOU CAN DO IT!!!

This past week I have been working on my kitchen (I told you the "small" projects wouldn't squash the urge!) I still have a few little trim details to hunt down and then I will try to do a feature next week. I had to construct three different types of open shelving and I rewired an 80 year old Westinghouse fan...AND IT WORKS!!! I'll share all that as well!

This week I want to share a few little projects that YOU can do! Do you have a piece of furniture (or two or ten) that is just "blah?" A cheap little shelving unit you picked up at the big box store and put together with the little allen wrench that came with the screws. Maybe a few ancient bedside tables you inherited from your mom. A particle board table that has seen it's better days.

I know I have harped on this before, but seriously it bares repeating! If you are just starting out, are on a tight budget, feel the need to keep furniture given to you by family, or just want to change things up a bit, you NEED to be able to do simple makeovers!

Before you toss a piece of furniture to the curb, think about "updating" it a tad. Even the cheapest, most basic piece can be saved with just a tiny bit of time and effort! As I have said time and again, the worst that can happen is you still hate it and it still only brings $1 at your next garage sale. 

I find pieces like this all the time at my apartments. I drag them home, clean them up with ammonia (stinky but gets the old gunk off!) and then give them a little facelift!

This was one haul out of one unit....

The little bedside tables are the old orange maple...ugly as sin but super sturdy and solid wood! The little coffee table is one of those inexpensive "fake" wood things that comes with the little allen wrench tool for the bolts! And the spindle shelf had particle board shelving. All in all, pretty dated stuff!

This little shelf came out of another unit...

It was missing a drawer and it had a few loose bolts, but whatever...still salvageable!

I find these things in my apartments, but you can find them at thrift stores and garage sales for next to nothing! 

All I did to the little shelf with reeded drawers was give it a little KSTP treatment (Kilz, sand, tack cloth and paint!

Perfect for added storage in a bathroom, kitchen or kid's room!

I decided to do something a little fancier on the coffee table and bedside tables. I striped the tops with the acetone/lacquer thinner mixture, added a little java gel stain, then sealed them with spray on poly (if stripping and staining is beyond your skill level, just paint the tops!)

The bases are simple KSTP treatment. New hardware on the bedside tables and these pieces are perfect for updating any space! 

The spindle corner shelf got a simple KSTP treatment! 

I don't have a "before" picture of the little chalkboard shelf. Basically it was a stained wood frame with an ugly picture of a teddy bear! Ewwwww. Gave the frame a chalkpaint and distress treatment (spray paint would work too!) and I painted the board backing with chalkboard paint. Super simple "upcycle!"

Years ago I scrapbooked all the boys athletic pictures. A chore considering they both played football and baseball their entire childhood! (I strongly suggest you do this every year rather than try to find time to do all 15 years at once!)

The square frames were a perfect fit for a 12x12 piece of scrapbook paper and would be perfect for someone who wanted an easy way to display their kid's sports pictures. I applied the scrapbook paper onto the foam backing with a spritz of spray adhesive, used a glue stick to attach pictures and KSTP the frames. This would be the perfect way to "scrapbook" photos...then you can take them out of the frame and just slip them into an album when it is time to change out the pictures next year!

Before you paint a piece, make sure all the "bolts and joints" are tight and the piece is sturdy. If tightening a screw or bolt doesn't solve the wobbles, take time to GLUE AND CLAMP whatever ails the piece. No sense in making it pretty if it is going to collapse the first time one of the kids leans on it! 

All these projects have one thing in common. Spray paint. Seriously...a little primer, a little sanding and a little spray paint...and you have changed the entire look! 

I have shared many of these simple little makeovers in the past! A few dressers here, here here and here. Several coffee tables here, here and here and Lord knows how many frame makeovers (herehere, and here!)

Challenge yourself. Pick out ONE piece of furniture or a frame in your house you really don't like. Go to Lowes and pick up a can of Kilz, a little sandpaper, a package of tack cloth and a can of your favorite color spray paint (total under $15) and give it a go! YOU CAN DO IT! 

I promise!

Finding inspiration for a ladder shelf!!! And my master bedroom update!

One of the awesome things about the "blogisphere" is all the great inspiration and instruction you can find for just about anything you want to do! 

A few weeks ago, my inspiration came from Kristi at "Making it in the Mountains." She built a ladder shelf for her back deck and it is awesome!!!

Someday I plan on making one exactly like this! I bought a few ladder shelves at an auction recently and when I priced them to see how much I should sell them for they were going for around $150! Craziness! And they aren't even fit for outdoor use like Kristi's!

Anywho, MONTHS ago I ended up with a beat up old desk from an auction...the auctioneers know us now so when no one bid on the poor old thing, he pointed at me and asked if I would pay a dollar...whatever...I figured I could do something with it. Heck, the awesome hardware is worth a buck!

IMG_0416.JPG

I originally planned on restoring it but truth be told, it was pretty rough and I have learned that "rehabbing" these old desks really isn't worth the time and effort for resell. The top was laminate and the drawers were veneered. The only good solid wood was the leg and it was hanging on by a few flimsy nails!

But the drawers were well constructed...and the veneer was easily "patched." 

So I decided to use the drawers and make a "modified" version of the ladder shelf...a drawer shelf! 

I think it could be used as a storage shelf in a bathroom or laundry room...maybe toy storage in a kid's room! It's pretty sturdy so it can hold a lot of "stuff." 

I painted the drawers with the "frosted berry" paint I bought for my room. Not that I think it NEEDED to be that color, but I have the paint and I like it! Rather than use the awesome hardware (I am hoarding those for a special project) or fill in the holes, I used rope on the two bottom drawers and a plain white knob on the top! It doesn't NEED pulls, but I want it to look like what it is...drawers!

I cut the top drawer down....I contemplated cutting the middle drawer down as well...no reason why I didn't...I just didn't! 

Thanks for the inspiration Kristi!!! 

(BTW, it sold within  hours of putting it in my booth! Wow!)

MASTER BEDROOM PROGRESS!

As I mentioned in this earlier post, I finally broke down and bought the laminate I want for my master bedroom! Lumber Liquidators had a deal I just could not pass up! Fortunately, it will take two weeks to get it.

"Back in the day" that would frustrate me. There was a time when I could pull the trim, remove the old flooring, lay the laminate, reinstall the trim and paint...all in ONE day...or at least a weekend. Now...not so much. I have been pulling carpet and glue-down hardwood for over a week! My back ache and sore legs make living in this disaster of destruction somewhat tolerable!

Please note that even when my room is in complete disarray, I still make my bed every day! I am thoroughly convinced that the first day I don't make my bed will be the day I die...it's a "thing" I have. (discussed in detail here)

I had to remove the base of the fireplace surround to remove the flooring. I stupidly laid the floor THEN built the fireplace surround...I know better than that. This is a prime example of WHY it is a problem to set cabinets and fireplace trim on top of flooring!!!! Chances are you will replace the flooring long before you replace cabinets or fireplace surrounds...and removing the old flooring will be very difficult if it is under the cabinets or surround!

I did find one neat thing...I guess when I built this room I painted "I "heart" you" on the floor. How sweet!

There is a downside to DIY projecting! The mess! But I have wanted new flooring for YEARS so it will be worth it!

I decided to reuse the existing trim and set it on top of the new flooring...so I have to pull all the trim, remove the nails and scrape off the old caulk. 

I also decided to do the floors in the office...but right now I am only going to do the main bedroom and get it back in order before I tackle the office. The office is ALL glue-down hardwood and it will be a booger to get it all up! I played with gel staining the existing hardwood...and it would have worked had I stained it all at once rather than doing a big "test splotch." Unfortunately, you can see the "lap over" of the stain and it looks horrid. So it all comes up and new flooring goes down! 

I am hiring my neighbor to remove all the old flooring in the office...it is a small room but after a week of working on the master bedroom and what I know will be a labor intensive 2-3 days of installing the new flooring, I am finally having to admit I am too fricking old to "do it all."

Curses.