Patriotic Wreath....

PATRIOTIC WREATH

PATRIOTIC WREATH

I saw this wreath on Facebook and loved it…

IMG_1372.jpg

But as I have mentioned before, I learned the hard way NOT to order from unknown sites and always pay close attention to reviews….this one got bad reviews on Amazon.

So I decided to make one.

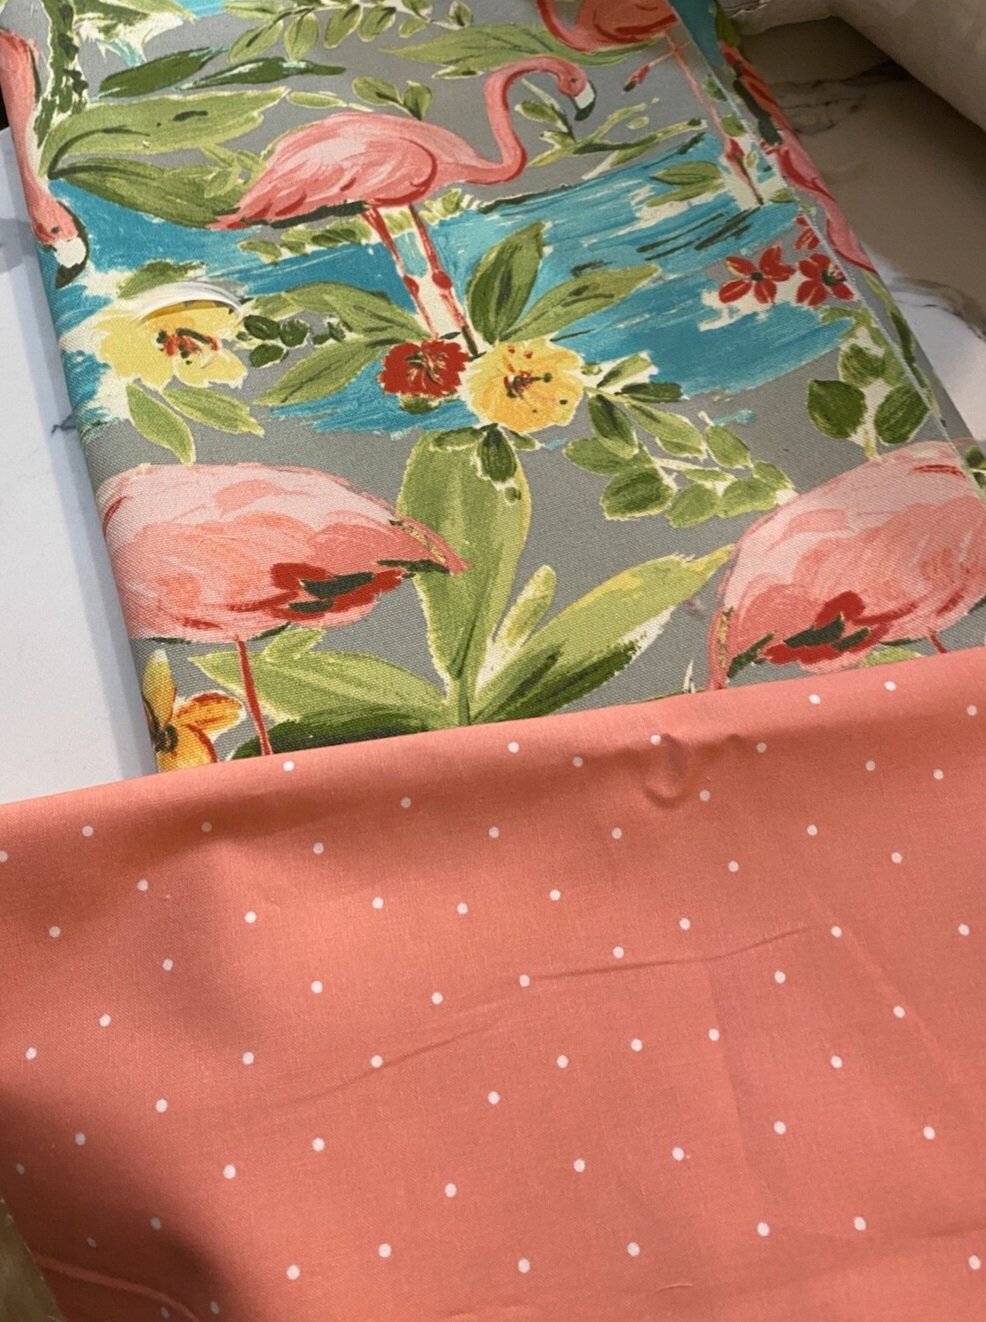
First, I had to create the “bunting.” I decided to sew together three fabrics I found.

IMG_1394.jpg

I also picked up all the goodies I wanted to adorn the wreath with…

IMG_1479.jpg

….ribbon, floral pics, the wreath. Since Hobby Lobby only has select stuff on sale every other week, this can take some time. For the record, the grapevine wreaths never go on sale, but they are only around $9. For that matter, if you have a wreath you are no longer in love with, deconstruct it and reuse it, or pick up a cheap one at a garage sale!

IMG_1450.jpg

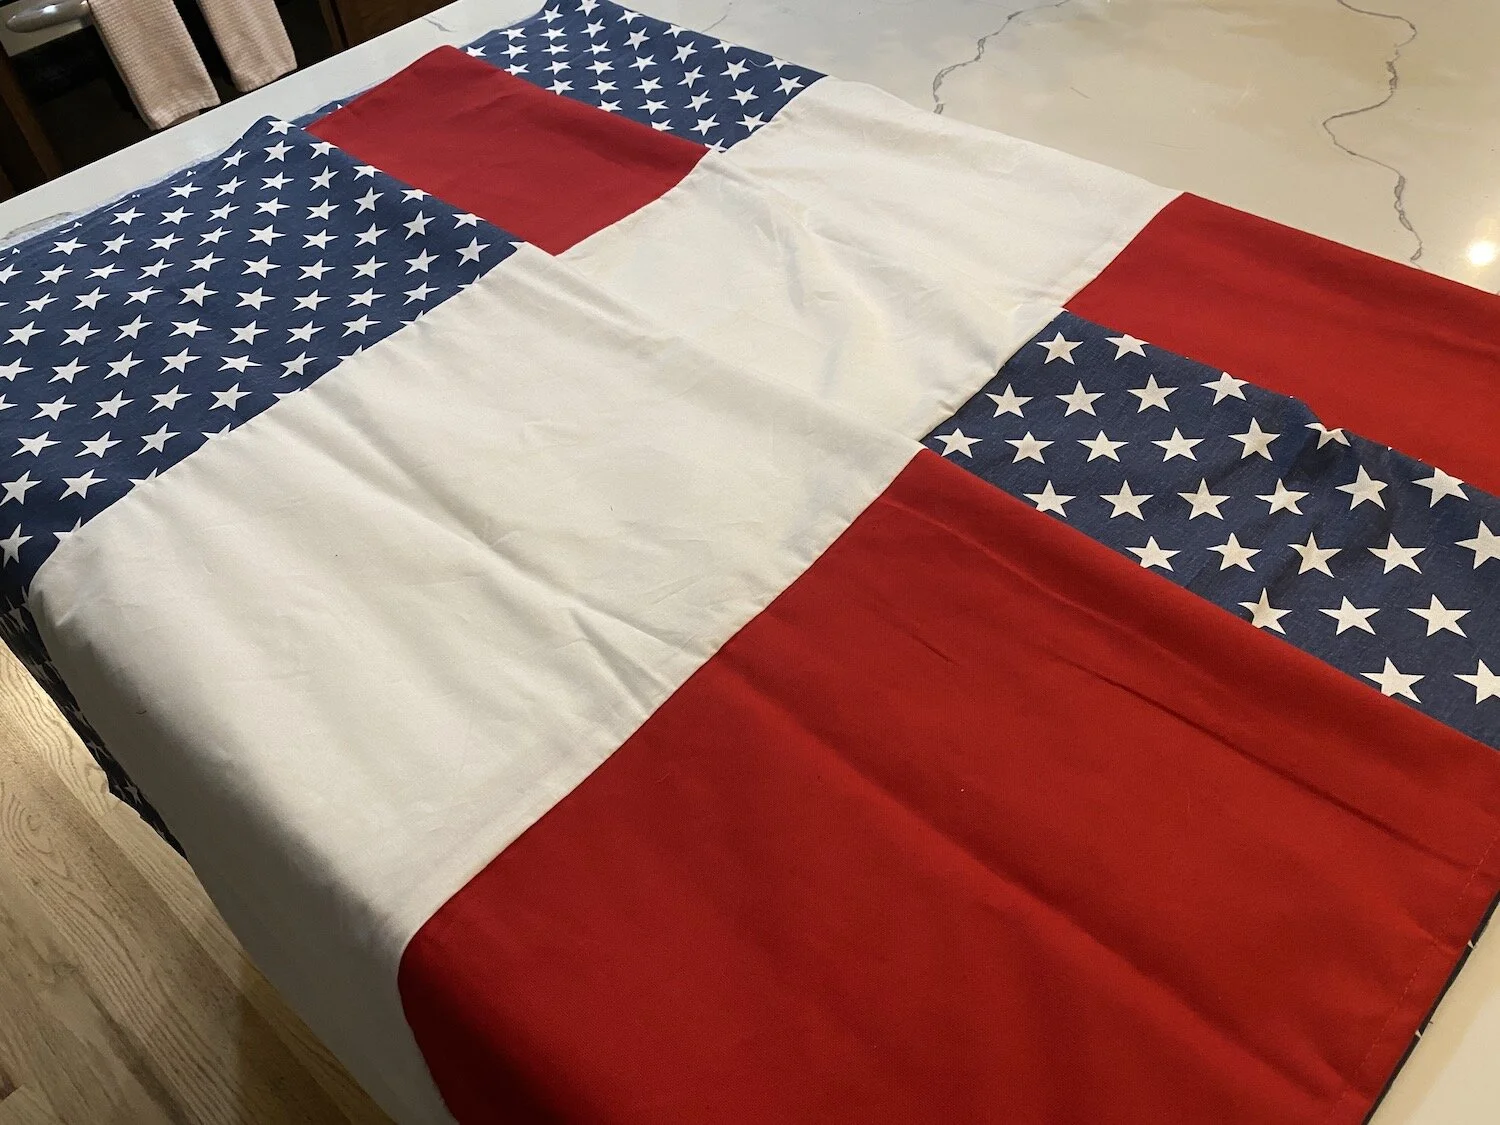
I bought two yards of each fabric, cut the widths in thirds, then sewed each together. I actually got three buntings so I made a few extra wreaths. Two yards would be 72” so you could also use a table runner or a long scarf if you want to avoid the whole sewing thing.

I folded the fabric in half and kind of gathered it by hand then laid it onto the grapevine wreath….

IMG_1481.jpg

After getting it pulled super tight, I secured it with a zip tie. After adjusting it by hand I hot glued the edges of the bunting at the top just to give it a little bit more security,

Next I made a spray and my funky bow. I have linked to THIS tutorial several times since I discovered it at Christmas. I LOVE how easy she makes this process! I have now made dozens of these decorative sprays for every holiday, big and small, and I just love them.

IMG_1482.jpg

I made my floral spray and made sure it was the size and fullness I wanted. Then I made my bow. I chose these three ribbons for my bow…

IMG_1483.jpg

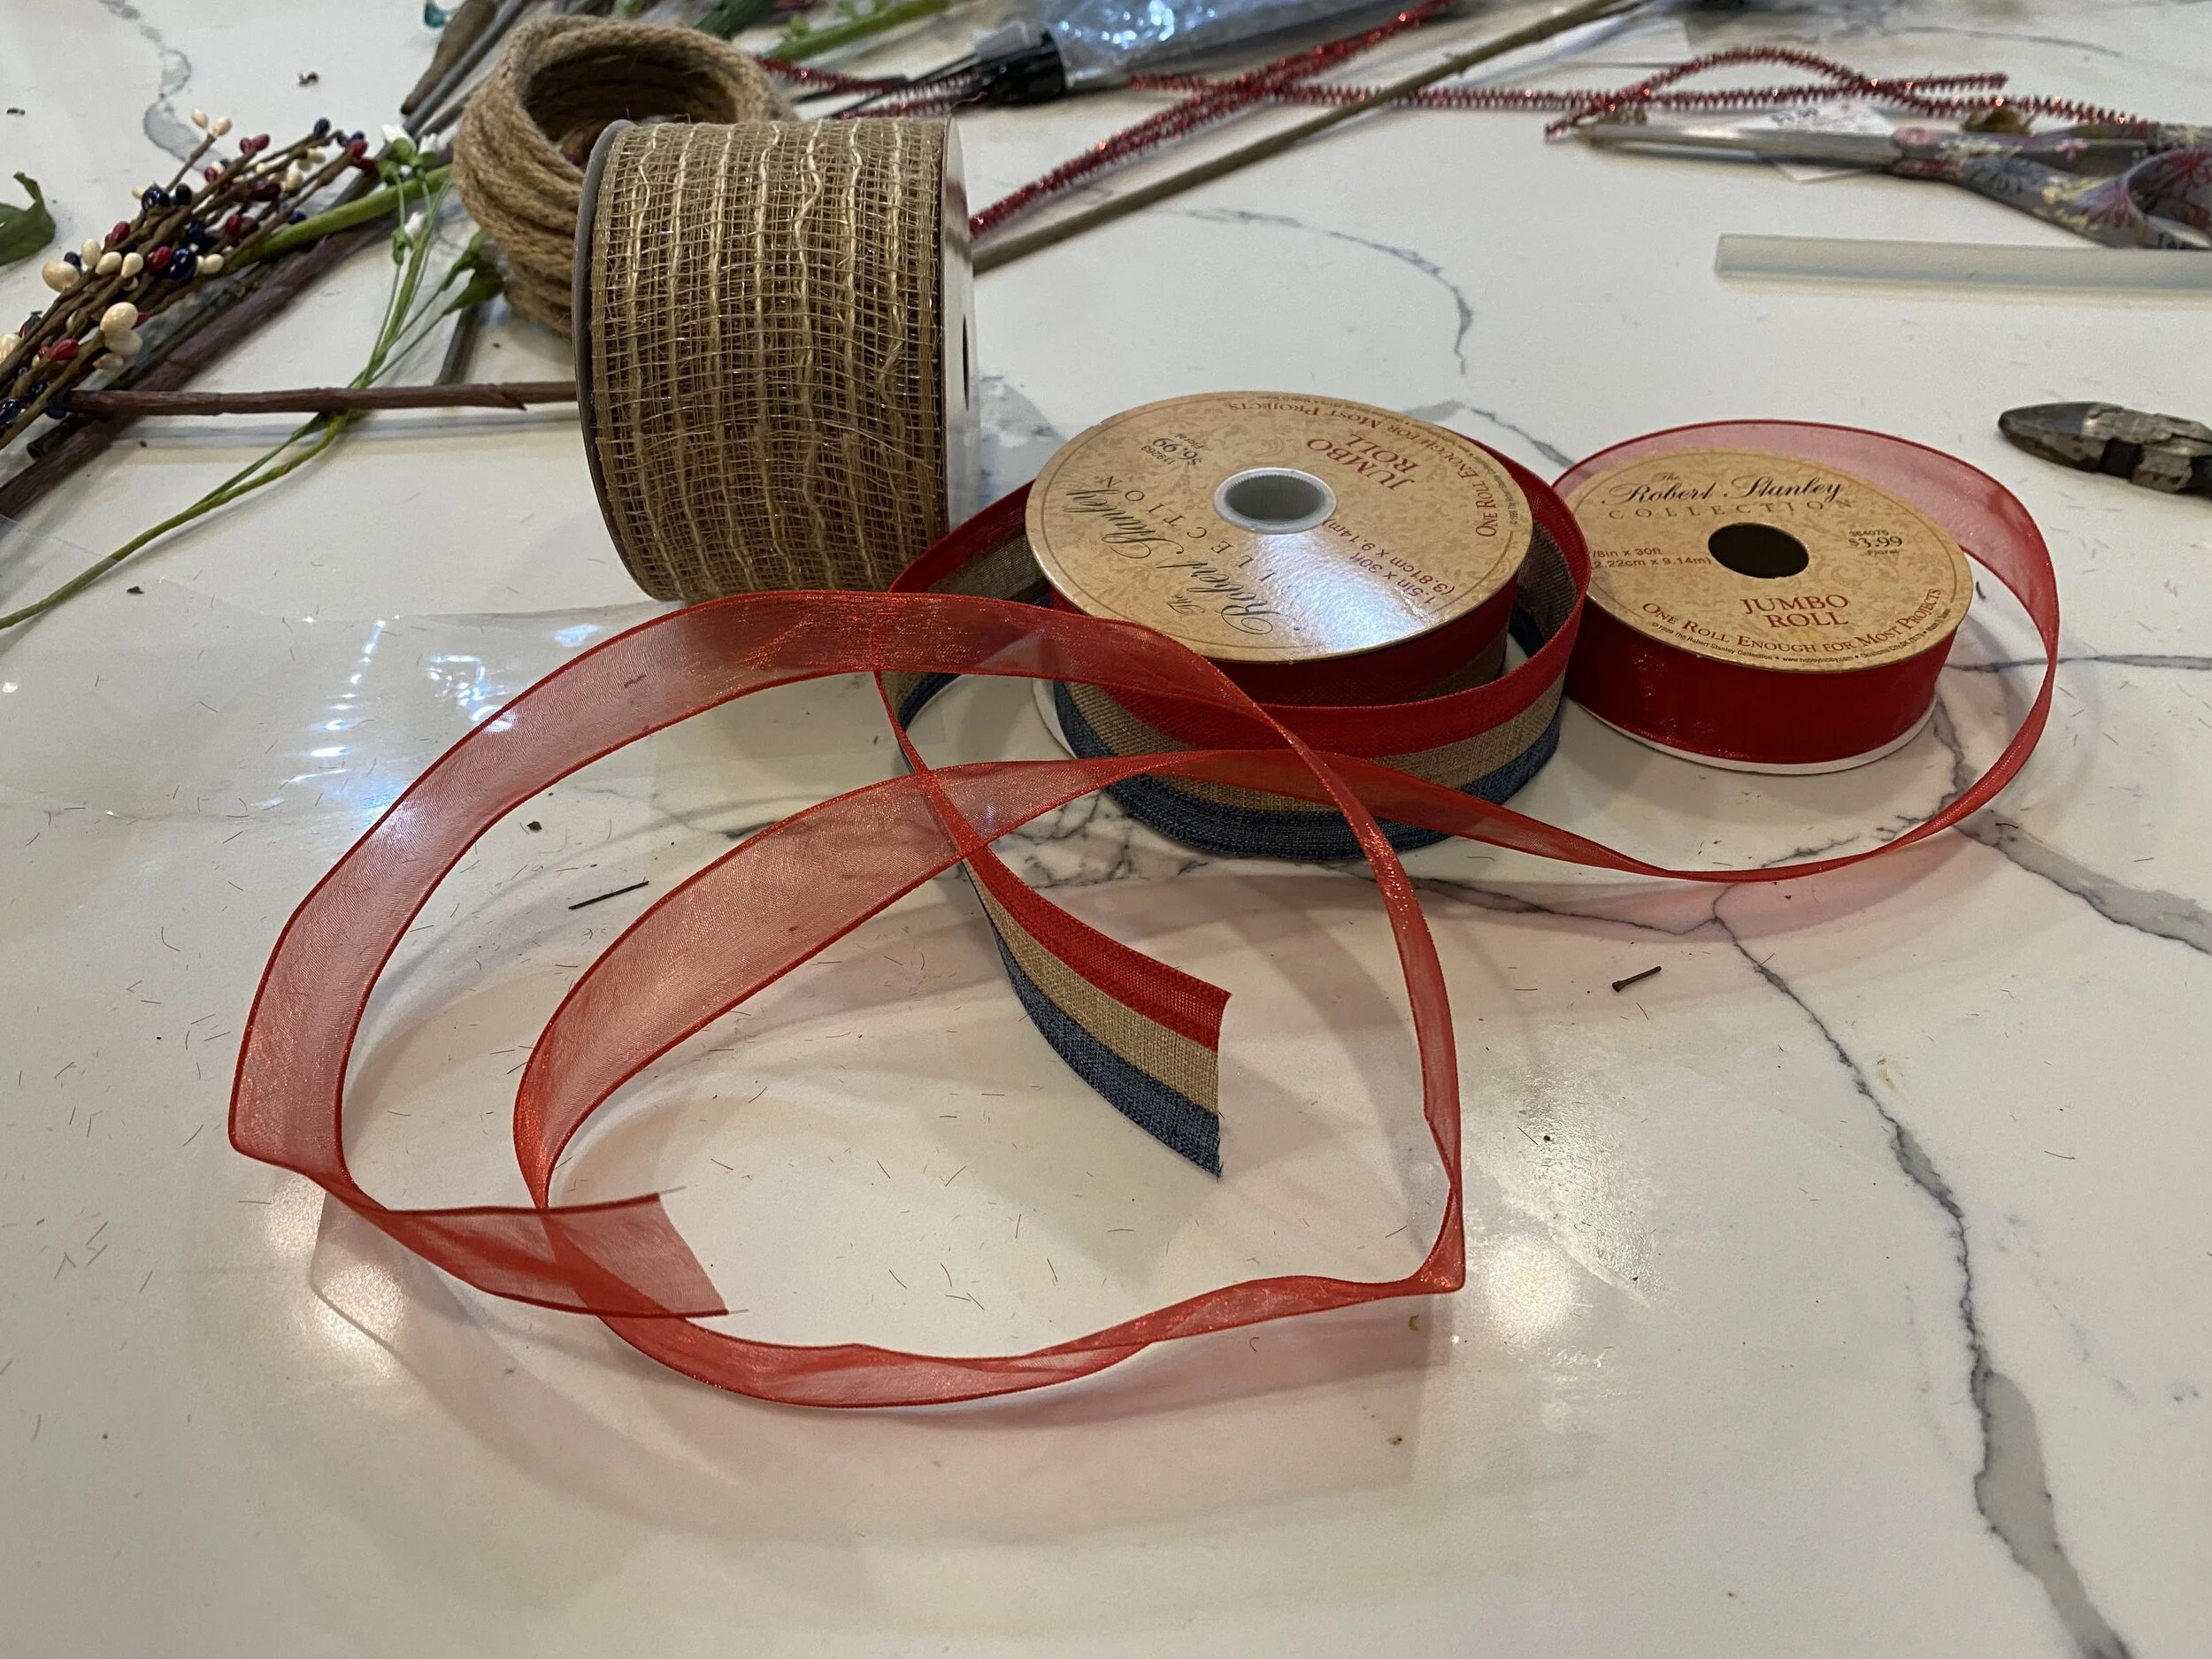
These bows may look intimidating, but trust me, the tutorial I linked makes it SUPER simple!

After making the bow, I secured it to the spray with floral wire then attached it to the wreath with small zip ties and floral wire!

IMG_1487 2.jpg
IMG_1486.jpg

I absolutely love this wreath and it will work perfectly from Memorial Day through July 4th! In a few weeks I will swap out my spring pillows on the porch for my patriotic pillows! I already have my red, white and blue candles on the table and last week I swapped out the little ribbon on my welcome sign….

IMG_1451.jpg

All part of my plan to stay festive year round. Who said decorating for the “holidays” is only for Thanksgiving and Christmas.

My bathroom windows are finally installed and the only thing left to do is the brick…but the inside is trimmed and painted and I LOVE IT! Can’t wait to share!

Until next week….

static1.squarespace.png

Twiddling my thumbs...

Sometimes I feel like I am just sitting around twiddling my thumbs…waiting.

Right now I am waiting on the brick guy to come cut the brick so I can install operable windows in the master bath.

Relatively easy project…until I removed the sheetrock and the insulation and discovered that plumbing will have to be moved on one side and a whole bunch of electric wires have to be moved on the other. CURSES!!!!

Always something.

Okay, I’m not really sitting around twiddling my thumbs…while I wait I have been chipping away at a few other little projects, like the little patriotic bow I made for my welcome sign….

Whatever it is, the way you tell your story online can make all the difference.

I shared THIS funky bow tutorial when I shared my Christmas decor. I am going to decorate a tad for every holiday so I made another seasonal “funky bow” for this little Welcome sign.

I also spotted this patriotic wreath online…

Whatever it is, the way you tell your story online can make all the difference.

I really like it but I learned the hard way,..don’t order ANYTHING from an “unknown” online company. And pay attention to the reviews on others…this one got horrible reviews on Amazon.

So I decided to tackle this one myself. I have already started the “bunting”…

Whatever it is, the way you tell your story online can make all the difference.

…which of course entailed by LEAST favorite DIY chore…sewing.

I’ve bought the ribbon and the floral stems and now I am just waiting on Hobby Lobby to have their grapevine wreaths on sale.

Another project is my screened porch. I absolutely LOVE Tasha’s screened in porch! Just stunning!

Mine is much smaller and way less WOW! But that doesn’t mean it has to be a neglected space.

We really only use this space for two purposes…sometimes we sit at the little outdoor table and eat or drink coffee and sometimes I sit out there and read.

I decided to go “fun and funky” and since flamingos are “fun and funky” and all the rage right now, I decided to go with them.

Now keep in mind I think pink flamingos will be kind of like watermelons, burlap and chevron was 5 years ago…EVERYWHERE. Now not so much. So I want to keep that in mind when decorating…don’t spend a lot of money on something that is just a “passing fad.”

Another “funky bow”….

Whatever it is, the way you tell your story online can make all the difference.

Some “fun and funky” throw pillows for my reading chairs…

Whatever it is, the way you tell your story online can make all the difference.

We installed a new paddle fan, painted the little metal table and chair, made a wood top for a metal base I am going to use as a side table and I am waiting on cushions and fabric for the lounge chairs.

Nothing as grand as Tasha’s porch but a few little changes that will spruce it up just a tad.

When I get it all done I promise to share…both the porch and the patriotic wreath.

Until then I shall sit and twiddle my thumbs…..

static1.squarespace.png

Adding glass to an interior door...

IMG_1434.JPG

As I mentioned before there are certain things that made this house instantly feel like home.

Like my master bath….

IMG_0439.jpg

Almost identical to the master bath in my last house.

IMG_4031.jpg

Same backsplash, floor tile, vessel sink, shower tile…right down to the same ole’ shower curtain and rugs. And I am waiting on windows that are pretty much identical to the window I had in my old bathroom. Still not sure what I want to do with the cabinets but I have always liked the stained and open shelving look of the last house…

….who knows. I may do a little cabinet makeover at some point.

My black doors….

after.png

Loved them in the old house, love them here…it was one of the first things I did to make this house feel more like my home.

IMG_0716.jpg

The entry…

IMG_1171.jpg

Same board and batten, same mirror and wreath, same rug…black door…

IMG_5981.jpg

I like what I like…and these are just a few of the design elements I really loved in my old house.

Then there are the paint colors, plants, shelving….sooooo much more!

One project I did at the old house that I always loved was the reeded glass door in my laundry room…

IMG_5030-1.jpg

I absolutely loved this project and it was one time I actually posted a pretty good tutorial. Mainly because when I went looking for a tutorial, I couldn’t find one!

I have known from day one I wanted another door like this in my new house. I debated whether to do it with the pantry door or laundry room door.

I finally decided to start with the pantry door….

IMG_1005.jpg

Primary because I used the reeded glass in the upper cabinets and I thought it would look good to have matching glass in the pantry door.

IMG_1434.JPG
IMG_1435.JPG
IMG_1432.JPG

I LOVE it! I love this pantry and the door is just the cherry on top! Eventually I may do the laundry room door as well because then the light from the window in the laundry room can filter into the breakfast room. For now I am perfectly content with the one door.

This is a MUCH less expensive option than purchasing a new glass door…and you get the option to choose the type of glass you want vs. having to get whatever “frosted” glass is in the door you purchase. And it is seriously NOT a difficult project to complete.

YOU CAN DO IT!!!!

Master bedroom reveal....

When we moved into this house in September we basically moved our old bedroom into this new house. Nice fit, but zero thought put into the “design” of the room…I basically just put furniture on the floor and a few pictures on the walls.

A few weeks ago my daughter sent me a picture of a well designed bedroom similar to ours.

IMG_0694.jpg

That’s when I realized our current master bedroom has ZERO “design character.” I hadn’t even taken the time to paint all the trim the “new” white.

IMG_1317.JPG

Twenty year old lamps, white and brass paddle fan, stacks of pillows in bleach spotted pillow cases, no curtains, scuffed and dinged furniture, clutter…

IMG_1318.JPG

The picture was perfect inspiration! The push I needed to work this space to it’s potential.

So last week my goal was to to tackle the room. Paint the trim and furniture, new curtains, throw pillows, a few little touches here and there, and declutter.

I painted my bedroom furniture (HERE) almost 7 years ago and while I still love the pieces, they have gotten quite dingy looking. Remember, whites yellow over time and of course there are chips and scratches from normal wear and tear. So it was time to give them a little paint refresher! And the side table tops…holy crud they have gotten nasty. So it was time to strip and restain the tops as well.

Of course the little “room refresh” became a three day chore!

In the end, worth every minute.

New curtains (I still need to hem them), a little wall art and a plant and new throw pillows.

IMG_1315.JPG

I stuck with my tried and true white bedspread…with a big dirty dog I need something I can bleach every week. It covers a down comforter in the cold months.

I have always loved the larger throw pillows in the guest room so I bought new for that room and put the guest pillows on our bed.

IMG_1308.JPG

(The giraffes? They were made in Africa from the root of a tree…they are Brian’s…they are different…what can I say!)

I painted the high boy and bedside tables and stripped and restained the tops of the bedside tables. ..the dark java stain has pretty much run its course. New lamps (finally!!!)

I love the look of chandeliers in bedrooms but as I have said before, I HAVE to have a paddle fan above the bed. Brandon gave us a paddle fan he took out of his house and it worked perfectly in our room.

Decluttering is always a must in any room makeover so a lot of stuff was put away.

One thing I loved in the inspiration room picture was the bed bench. My trunk belonged to my grandparents so it has to stay. You can still see my granddad’s name stenciled on the side.

I love the basket and pillows on their bench but our big dog uses this trunk as a spring board so that wouldn’t have worked out well. Sometimes you have to change up a plan to fit YOUR life-style (a.k.a. accommodate animals and kids!)

I still want to do more on the “tv side” of the room. I repainted and stripped and stained the top of THIS little side table…

Maybe add a plant…a little more wall art….a wall leaning mirror.

IMG_1306.jpg

It only took me a few decades to style the master bedroom in my last house so again, already working at warp speed here.

My next big project are the master bathroom (reveal HERE) windows…

Oh, it’s happening. I cut big holes in the wall to kind of “force the issue.” Windows are on order and the brick guy is on call.

This was the one thing I neglected to do, and my BIGGEST regret, when I remodeled this house…no operable windows in the master bath. I know from my last house that an operable window in the bathroom is a must. I have ordered two casement windows (the kind that crank out) and hope to have them by the end of the month. I have some plumbing to move (WHY IS NOTHING EASY!!!) and framing to do. These windows will look out at the large flower garden out back…I CAN’T WAIT!!!!

Wait I will though…it has been warm enough to plant a few larger perennials like azaleas and Kimberly ferns, but the threat of a freeze until mid-April prevents me from going all out with the annuals. So I sit…and wait…patiently. Okay, not so patient, but I learned the hard way not to rush the early spring planting! Pay attention to your “last freeze date”….then add a few weeks. Ours is the middle of April, but a few years ago it snowed the first week of May!

Until next week…

A kitchen makeover and painting a refrigerator...YOU CAN DO IT...and sometimes should!

My friends, Tammy and BR, have lived in their home for over 20 years…and like me they are constantly “projecting.” Tammy is the designer ( a.k.a.instigator,) BR is the muscle and craftsman, and usually I am just an advisor and cheerleader.

A few months ago, they started a HUGE project…remodeling their kitchen.

It is a project they have dreamed about and we have discussed and one their 1990s house desperately needed for years!

63279344411__FAECBF4B-CD0D-4684-9D1D-C641426B6A4A.jpg

This picture was taken after they replaced the head scratching paddle fan over the bar with a thrift store upcycled light fixture. MUCH better but as you can see, there was soooo much more to do.

Remove the funky over-the-cabinet florescent lighting and add can lighting, paint the cabinets, replace dated hardware, a new venthood, new tops and backsplash and replace the ORIGINAL almond stove.

A major list on a tight budget.

During one of our “advisory sessions” (again, my advice and opinions are always free) Tammy mentioned she couldn’t wait for her black refrigerator to go out so they HAD to replace it.

With all the other “must have now” expenses, like replacing the dated almond stove with a stainless, replacing the black refrigerator just wasn’t in the budget. They had already replaced the dishwasher and like most people (including myself) the expense of replacing all our appliances at once is often cost prohibitive.

Light bulb moment.

PAINT IT!!!

I know they have “stainless” spray paint but I seemed to recall a product specifically made for painting refrigerators to look stainless. So I started googling and found this product on Amazon….

The product had good reviews. And like I told Tammy, if it doesn’t turn out great, you can still probably sell the refrigerator on Craiglist for a hundred bucks.

So this is what we started out with…a plain ole’ black refrigerator….

IMG_1096.jpg

The first thing I did was read ALL the directions but most importantly, the Amazon reviews. The people who have used the product gave some pretty solid advise.

After reading all the reviews, we went to work. I removed the handles (even if you want to paint them, remove them), cleaned the doors thoroughly, and taped off the water dispenser and inside around the rubber gaskets. One of the sagest pieces of advice was to apply THIN coats…so after the first coat this is what it looked like…

IMG_1100.jpg

While this might not instill confidence in one’s ability to do this, I know how important it is to “trust the process.”

The second coat, a tad better….

IMG_1101.jpg

By the third coat we were all amazed at how great it looked!

BR did a great job of working Tammy’s list…he removed the over head florescent lighting and capped off the cabinets with crown and installed can lights, painted the cabinets and added new hardware,…

…. removed the old venthood and cabinet above the stove and installed a new stainless vent…

IMG_1239.jpg

….and removed the old tile backsplash and installed new.

IMG_1231.jpg
IMG_1238.JPG
IMG_1236.jpg

Quartz counter tops were a little bit out of the budget but they were able to achieve a very similar look with new formica.

Beautiful!

Tammy LOVES her new kitchen and fortunately she loves her “new stainless” refrigerator.

Would she be happier with a brand new REAL stainless fridge? Wouldn’t we all!!!! But this is a prime example of changing an element in a room that will stop the growling (and the envy and frustration) until you can afford to do what you really want to do. I have done it over the years with furniture and now I can say I have successfully done it with a refrigerator.

If you don’t love it, CHANGE IT!!!!

Pantry storage....

Winter has truly arrived and it is literally FREEZING outside…no bad winter precipitation, but frigid temperatures make going outside brutal. So inside where it is toasty warm is where I have been for the better part of the last week!

I started working on my awesome pantry and this week I finally put up some board and batten in the entry. The latter I will share when the paint dries and I am able to reset a few things.

The pantry…MAN OH MAN!!!

As I mentioned HERE I don’t need a lot of upper cabinet space because I have a super awesome walk in pantry.

IMG_0654.jpg

As organized as my pantry seemed to be (for ME) I decided to give it a little “facelift”….more baskets, some storage containers, labels…all the froo-froo stuff I normally don’t even bother with. But again, I am “semi-retired” now and looking for things to do until I can’t go outside and dig in the dirt!

In my last house I only had a small cabinet pantry and didn’t see the need for all the bins and boxes and “stuff.” But since I store more in this pantry, everything from food to serving dishes to cookware, I decided I wanted to get super organized.

The first thing I did was pull out everything I wanted to put in containers and baskets. Everything that wasn’t going to be put in a basket, container or bin was organized. (I also took the time to wipe down all the shelving even though it had only been 6 months since it was last cleaned!

Here is my #1 tip for organizing ANY space…figure out what storage containers you need for the items you have FIRST, then go buy your storage containers…don’t go buy a lot of baskets and bins and containers.

In my case, I already had a few wicker baskets…perfect for holding chips, storage containers and lids, seldom used sweeteners, seasonal dish towels, cookie cutters, etc. I had 7 but based on the stuff I knew I wanted to store in them, I needed a few more. Fortunately I got them at Lowe’s and they still have them!

IMG_0999.JPG


I love these little chalkboard labels I got HERE….super cute! They have a little string but I tied the string in a bow and just hot glued them directly onto the basket.

I have a lot of different flour…almond, coconut, gluten free, pancake mix, etc. I knew I would need proper storage for the flours and such.

My initial plan was to put everything in the Heritage Anchor Hocking jars…I just LOVE the look of a pantry filled with glass jars. But here’s the deal…they are heavy…and I am getting too stinking old and clumsy to be lugging around 1 gallon glass jars filled with flour.

So I wanted pretty to serve my purpose….

I found some nifty OXO storage containers at Home Goods…similar to these. I love them….I bought different sizes for the flours and mixes, baking soda and powder, cocoa powder, cornmeal, nuts, etc. The varying sizes stack neatly.

IMG_1001.JPG

I also bought three sets of labels…small for the spice jars and medium and small for the pantry containers….I got them HERE! (I went a little over board labeling the actual shelves…I’ll probably take those off.)

The can food rack is a nifty little gadget to store canned food…in theory. In the picture on Amazon it shows that it holds four cans in each section…but it really doesn’t without one of the cans being all womper jomped…meh…whatever…it will do for now!

I bought a few clear containers… the baskets are great for hiding open chip bags and random storage containers and lids but I wanted clear bins for things I use daily like cat food, bread, and a few odds and ends.

IMG_0998.JPG

As you can see I store a lot of stuff on the floor…bulky items like crock pots and big bags of animal food! I had some wire baskets I originally bought for my holiday wrapping station…perfect for holding water bottles, thermos’, potatoes and critter treats.

The left side of the pantry is for cooking ware…casserole dishes, mixing bowls, appliances and spare pots and pans…

One thing I LOVE about this panty…it has an outlet…so I can leave my toaster and can opener in the pantry rather than take up counter space.

While I was organizing and labeling I decided to do all my spices as well….

IMG_1004.JPG

I had the milk glass jars but didn’t use them because they weren’t properly labeled…now they are!

At some point in the future I really want to add glass to the pantry door like I did to my laundry room door HERE.

IMG_1005.JPG

No earth shattering reason…I just think it would look awesome with the glass cabinets.

But again, winter is here and there is NO way I can do any work outside…so that little “to do” will have to wait until warmer days!

Hopefully I can share my entry next week. I THINK I like the board and batten…maybe when I get it all staged I will know for certain.

So until next week….

static1.squarespace.png


Swing pergola tutorial....

The past few months have been super busy and honestly a little over-whelming. (When I can, I will share.)

As a result I haven’t had a lot of time to do many DIY projects around the house. Which of course explains my absence last week. For now, the best I can do is link back to some of my all-time favorite projects!

One of my all time favorite projects was the swing pergola. As I mentioned in the earlier post, I have built several over the years!

This is a picture of one of the pergolas pre storage building update and we now have a privacy fence along the back of the lot. I meant to take a “current” photo, but see above!

With so many people at home looking for “projects,” this little build is perfect!

It takes a few days and will require a few sets of hands, but it is doable.

Trust me, you will get HOURS of enjoyment out of it! And maybe even a few naps!

(And remember, wear a mask when you pick up materials!)

How to paint your front door properly...

I have been super busy with things other than DIY projects. But one project I did manage to do this past week was repaint my front door…just a quick little one coat “refresher.”

My tutorial for painting an exterior door gets a lot of traffic so I though I would link back to that post just in case you need a little help.

image-asset.jpg

I also painted house numbers on the door and I shared that tutorial HERE.

Remember, not everyone will see you newly remodeled bathroom or organized linen closet…but almost every guest will see your front door…keep it nice!!!

This is just one of the little projects I managed to get worked in this past week in the midst of some “big stuff” that I will share when I can.

In the meantime, I may be linking back to some little projects ANYONE can do! So if you are new around here you might want to stay tuned for some basic tutorials!


Guest room decor and a little history.....

Last fall I shared a little “makeover” of the frames of these portraits of my great-great-great and my great-great grandmother. They hung in the guest room above the bed…

I never really LOVED these portraits and my daughter swears they gave her nightmares when she came to visit. I have to admit, they are a tad on the “ghoulish” side even with lighter and brighter frames.

Before I reveal the changes I made, I have to share this “small world” story!

A friend of mine tagged a friend of his on Facebook on an article about a house his friend owns…a house he now runs as a B&B in Arkansas City, Arkansas.

The minute I saw it, I knew it was the house my great-great grandparents (Hubert and Ionia Furr) built in 1910…the house my great grandmother grew up in and my grandmother was born in! (My great great grandmother is the portrait on the right, her mother on the left!)

I immediately contacted the owner…he had very little history on the house other than what was written up in the National Register bio. I, being the keeper of the family photos and documents, have sooooo much more!

Poor guy…I flooded his email with pictures of my great great grandparents, the house and all the documents I could find.

I think one of the neatest things I have is a picture of the house while it was being constructed…

I won’t bore you with all the pictures and documents I have about this home and my ancestors and the little town in southeast Arkansas.

But this house and the people who resided there have a tremendous amount of history.

It is the house where my ancestors lived during the 1918 pandemic. A flu pandemic that killed almost 700,000 in the United States and 50 MILLION world wide.

The house also survived the great flood of 1927 that wiped out most of the town and actually changed the course of the Mississippi River.

While I was digging through all the family documents looking for more information on the house to share, I ran across this letter…written by my great-great grandmother during the flood of 1927 to my great-grandmother….


I won’t post pictures of the entire letter, but this is the transcript…

Arkansas City, Sat ? (postmarked May 3, 1927)

Dear children-

Am going to make this do for both you girls. Haven’t heard from you in more than 2 weeks and twill be 2 weeks Tues. since we have had a newspaper. Everything is closed here on account of water-we have 85 inches inside the house only 5 steps of the stairway being visible. You can imagine my state of mind as the South Bend break will give us more water by tomorrow I suppose. We go in and out of the house through the middle bedroom window in your old bedroom. I step off the roof onto a floating dock where I keep the chickens. Only lost two by drowning.

Water came in town last Sunday 2:30 and was 2 ft deep in 20 minutes. I waded above my knees getting up the hens and by dark it was in the house. It has been raining ever since til today when it has fallen ½ in. to get ready for the next rise. The wood shed and garage bucked up and Daddy has wired them to keep them from floating off in a storm. The teacherage is entirely under water and lots of other houses.

The town is simply ruined. An airplane takes the mail and your telegraphs were sent by radio by way of Memphis and so had to be sent collect.

I am so worried because we can’t send Gladys’s board money and do hope the matron will wait on her or that you will take her to your house for this last month. We have no way to get the money tho the levee board owes Daddy $125 or $150 which will be paid when this strain is over. The youngsters run bateaux on the bank porch so of course the bank is closed for the time. Please help us out in this pinch and we will make it up to you some way. I do hope the next rise will not be much for 2 ft. will ruin the ceiling.

The Matthews are upstairs in 2 small rooms. 2 of the boys sleep over here and they seem to be having a good time. Of course all my flowers are done for the crude oil is killing the vine on the house. Most every one lost their chickens. Lawrence Demarke (?) must have lost over 1000 also Emmat Furlong. The water came too fast to let them be picked up.

I suppose all Watson is nearly washed away. Mr. Kemp’s house disappeared as did everybody elses. The little Dollar house is on the Pike if it hasn’t fallen to pieces.

The break at Scott Miss. Saved us from the Miss. R. as we would have broken either at Chicot or Fulton inside of 3 or 4 hours. The river fell here nearly 2 ft. the first day and is much lower now than it is on the inside of the levee. Several hundred tents are on the levee and it is a queer sight. The govt is feeding them and the negros seem so happy.

We will have no more school this term. The girls left for Memphis and I guess they finally got to Conway. Betsye is at the hotel tho’ Daddy and I both invited her to stay with us. Bro. Still’s furniture is in the water upon a scaffold not high enough. All Mrs. Cunningham’s furniture and best clothes are in her house with the water up to the roof. I left most of my dishes downstairs so I guess they will be lost.

Well I hope you girls and your girls also Bill are well and happy. Want to hear from you soon and find how Gladys arranges for her board. Daddy is well and busy helping the distressed.

Granny Muff died this afternoon in a box car. Will be buried on the mound.

Love to you all and if we are washed away dispose of the remains as you please, Mother

I share all this for one reason.

To remind you…our country and our ancestors have survived pandemics and floods and wars.

Like our ancestors we too will survive…and we will thrive. We just have to stay positive and focused on our future! In 100 years our great great grand children will be sharing stories of our strength and endurance during difficult times….we are living proof!

So now the changes…heirlooms in their own right and a bit more cheerful.

These prints are from Hawaii and Bermuda…my parents traveled there in the 80s and these have been in my mother’s home for 30+ years. She is in the process of distributing a few things in her house so I took them and reframed them and decide they would be perfect in the guest room!

They are a tad off-center so at some point I probably need to rehang them. Someday…nice thing about this room, I literally only go in it a handful of times a year, before and after guests. Unlike wall decor in my living room or bedroom, this isn’t going to keep me up nights…lol!

Maybe I can find a narrow something-or-another to hang on the left to balance it out.

Not sure what I will do with the ancestral portraits…but I will find some where perfect for them…eventually.


How to set stone in your lawn...

My first love is flagstone…I share HERE how I created a little flagstone patio in the front of the house…

This was a massive project and required “excavating” a large area.

My project this week is the same process but “small scale.”

My mother offered my Granddad’s grindstones that my dad had set in their yard as a pathway.

There are a few things I have that make me see “old ladyish”…my grandmother’s china and hutch, an old camera collection, a few knick knacks here and there…and certainly a grindstone pathway in the yard would qualify. Truth be told, I can not pass up anything that is a family heirloom.

If you don’t know what a grindstone is, google it.

Nifty stones that were originally used to sharpen tools. I have no idea if my grandfather actually used them for their intended purpose but I believe they were set in his yard as stepping stones…and my dad got them and did the same.

So now I have moved them to my house…and this past weekend I set them in the yard.

I had already set a few of them when I realized it would be a great way to show you how I create a path set in the ground…no worries about having to mow around it.

Whether you use grindstones, slabs of wood, bricks or flagstone…this is the way to property set them individually to create a “stepping path.” I have found that this method creates the least destruction to existing turf. You can even do it before you seed or lay sod.

The first thing you want to do is lay them out where you want them.

Look at them from every angle…maybe walk on them to see if they “step right.”

Once you have them laid out where you want them, it is time to get down to the REAL work. (I will refer to “stone” because that is what I used…again, you can create a path with just about any durable material!)

First, take a shovel and go around the stone… about 1'“-2” from the edge of the stone…keep the shovel straight and go into the ground at least 4”. (My stones were about 2” thick and I want at least a 2” bed of sand and soil to set the stone on.) You are basically using the stone as a template.

Once you have gone around the entire stone, just flip it out of the way for the time being.

Since my yard was sodded, I wanted to salvage the sod and use it to fill in a few bare spots here and there…so I used my shovel to carefully remove the sod…

I used a little hand rake to remove the bulk of the dirt off the piece of sod and relocated it to the bare spots.

Then I used the shovel and my hands to remove all the excess dirt in the hole. I put it in a bucket and used it in an area of the yard that need a little fill.

I made the hole about 4” deep, then I added sand.

You can buy bags of “play sand” or even “paver base.” Just make sure you put some kind of sand or base in the hole to create a stable, level bed free of rocks and debris. .

I would suggest hosing down the sand just to make sure it is packed well…your goal here is to create a level, compact bed for the stone to set on.

Once the sand is leveled, replace the stone and make any adjustment by lifting and filling where needed.

I used the dirt I removed from the hole to fill in around the stone.

Once all the stones were set, I saturated them…this forces the dirt around the stones to seep under the stones and also lets you see which ones may need to be lifted and additional sand toss under.

Step on them and make sure they seem “firm.” I had one that “rocked” so I lifted it and added sand. As the dirt around the stones seeped underneath I added more and plugged in a few pieces of sod.

With a little water and sun I expect the grass to fill back in nicely over the next few weeks!

(You can see HERE how I dolled up the storage shed a bit!)

I saved a little dirt in the bucket because I know some of the soil around the stone may compact a bit. Also, this part of my yard is fescue so I may have to over-seed a bit…but that is okay! I like the look and even though it may be a little “old ladyish” I have a walking path that has a little bit of sentimental value.

Perfect!