An easy little cutting board project...

What an awesome weekend...it is finally fall...cool temps and rain. LOVE IT!

I'm really looking forward to next weekend. Fall craft fairs, so far no chance of rain and the leaves may be peaking...or darn near close! It is going to be great!

I didn't mind standing around in the cold drizzle Saturday. We started out at a farm auction, bought a few things and then came back to town to an "in town" estate auction. I bought some nifty pieces and I hope to find a little time this week to work on them.

I did finish up a few little projects last week.

Pinterest and the blogisphere are great places to find inspiration. 

I had picked up a few butcher boards here and there! I love the old wood and they are relatively easy to strip and refinish! (See a tutorial here and here!)

I refinished the three smaller boards but I wasn't quite sure what to do with the big square one. I found a little "inspiration" on Pinterest....


Source

I knew I had some wood bowls stuck back in my "stash" somewhere. I think I picked them up at an auction eons ago and just wasn't quite sure what to do with them! 

I cut a simple handle on the cutting board with my jig saw, drilled a hole for the hanger, sanded it down a bit and then stained it. I stripped the finish off the bowls, cut them in half with my chop saw and then glued them onto the cutting board.

After the glue dried, I applied three coats of butcher block oil. If you know you are never going to use it for food prep, you can just spray it with a little poly!

Perfect place for fruits or veggies...maybe peppers! Or a great place to throw your keys and "stuff." 

The tutorial I link to suggested using finishing nails and glue to secure the bowls. I didn't even use nails...just Gorilla glue. It is an awesome glue for repairing or affixing wood...I've never had a problem with it setting up and holding well! 

Simple little project! 

Happy fall!

Arch window covering and temporary window coverings!

It's that time of the year...time to put up the blinds and shades to keep out the blazing sun and cool down the house a bit!

This past week Brian and I put up the outside roll-down blinds that cover the west-facing windows in my den! I love all the natural light, but when the sun hits those windows around 4:00 on a hot summer day, oh my! 

Hanging the blinds on the OUTSIDE makes a huge difference...and honestly it makes this room much more comfortable in the summer! (As you can see, I turn the couch around in the summer!)

The arch window in my living room is another story! I know....arch windows are soooo 90s. But that was when this house was built so that is what is there! It is a great place for fall and Christmas displays!

It would be very difficult to put a blind on the outside of the this window...so I had to settle with putting something on the inside. 

This is how bright it is BEFORE I put up a blind....

And AFTER...

Seriously, no Photoshop and no camera tricks. Before and After...within a few minutes. That is how much difference there is and it makes a huge difference in the temperature of the living room!

Fortunately my living room is two stories, so it still FEELS bright and airy, I just don't have the blazing sun heating up the room!

I couldn't really afford a "custom" blind for this arch. When I was searching for a solution, I stumbled across a "temporary" pleaded blind...maybe $15.00. It is perfect! When I put my fall decor up in the fall I take it down, fold it up and store it away until late spring. It has a clear plastic "base" that sits in the middle of the window and you just drop one end of the pleated blind into the holder, "fan" it out and secure the outside ends. It came with a "peel and stick" adhesive on the base of both sides, but that was pretty much shot after the first year. So now I either tape it or tack it down. Even though it is just a cheap little thing, it has lasted a good 5-6 years! Worth the small investment!

So if you have a room that is uncomfortable because of the heat generated by the summer sun, think about using temporary window treatments! You just might find the room a little more enjoyable and you will help cut down your cooling bills. 

Antique glass lamps.....to hot glue or not to hot glue...

Several months ago I bought two antique glass lamps at an auction.  They are amazing! So simple yet elegant.  Kind of a "Grace Kelly" lamp if you ask me...lol!

They have a faint decorative etching in the glass that is difficult to see...very subtle...but so pretty. 

The exposed metal on the lamps have a little "corrosion" but I have decided to leave that be for the time being. Amazingly, they don't have a chip anywhere on the glass!

I decided to keep one and replace the little round crystal lamp I have in my office.  But I wasn't real keen on the lamp shade, so I decided to keep the lamp shade from the crystal lamp....

I have some pearl froo-froo trim I bought after Christmas last year for pennies.  I decided I would gussy up the lamp shade with trim...just to give it a little more glam.  

That is where the question of hot glue vs. tacky glue comes in. 

I think hot glue has a time and place.  But whenever possible, especially on fabrics and upholstery, I always use a quick drying tacky/fabric glue.  It takes a tad longer to set up but it holds better in the long run. Sometimes I will put a tiny bit of hot glue on something just to help it hold until the tacky/fabric glue dries completely. I do the same for wood working projects...apply a little bit of hot glue just to hold something in place that can't be clamped until the heavy duty mastic or wood glue can dry completely. But hot glue can break down in extreme hot and cold temps or even with too much "stress" from use. So I rarely use it exclusively...I just think, long term, tacky/fabric glue (and liquid nail or wood glue for wood projects) is a better option. 

I see upholstery tutorials suggest hot glue for piping and trim.  I personally think that is a mistake!

On this lamp shade, I applied a line of the tacky glue along the edge and then pressed the decorative trim in place....

Again, subtle...but it is the little subtle changes and additions that can make a difference in the "big picture." 

HINT: If you use tacky/fabric glue, go back after the glue has "tacked" (10-15 minutes) and press the trim down again!  At that point the glue will have a better "grip" and the trim will press flat and adhere better.

(Yes, that is a piece of driftwood on the table...I picked it up on our fishing trip in Colorado last year and I just love the texture of driftwood...I have another piece on my mantel in the den that I picked up off a frozen lake in Georgetown, Colorado 10 years ago!)

Lamps can be an expensive accessory in a room.  But they are soooo easy to spruce up or change...just by painting or changing the shade. Several years ago I got a bit tired of my bedside lamps...too dark. So I painted the base AND the shades.  

Not a humungus difference...and I am still not real keen on the style.... but it is enough to keep me from running out and paying $200 for the two lamps I wanted.

Painting light fixtures and lamps is a great way to personalize and update a space on the cheap! I featured painted light fixtures and paddle fans here and outdoor fixtures here.

Again, give it a shot...what's the worst thing that can happen...you don't like it. So what...you don't like it as it is...before you toss it, paint it or trim it. It will fetch the same price in the garage sale regardless...lol!


Growing Knock Out roses

Knock Out roses are hardy little plants and super easy to grow!! 

Two years ago I built a flower bed in an area where I have trouble getting grass to grow because of the drainage in my side yard and planted 5 little rose bushes.

After the first year!

They get plenty of sun throughout the day and evening, and when they bloom...OMGosh...A.M.A.Z.I.N.G.

Today...two years later!

I planted these two light pink bushes years ago next to two "real" rose bushes. They too were just tiny little "bushes" when I first planted them!

(This gate door is actually the neighbors...it bores me! I am searching Pinterest for some inspiration to doll it up...maybe a pergola kinda thing....someday!)

The "real" rose bushes died long ago...probably because I have NO idea (or interest) how to maintain a "real" rose bush. Just too tedious and fininicky for my gardening tastes. They did produce beautiful roses perfect for cutting. I always thought they were something I could manage until I read my grandmother's old letters to my great-grandmother and she wrote about all the pruning and fungus and pest control and special fertilizers and blah, blah, blah.... I wasn't real torn up when they finally bit the dust. Nor did I feel terribly guilty.

I want plants that need a little sun (or shade), water and occasional fertilizer....not prima donnas that have to be properly pruned and groomed and constantly attended to. (I have enough problems battling slugs, heat and crown rot just to get my hostas through the year!) 

Knock Out roses fit the bill and have amazing blooms all spring, summer and fall! The flowers are not something you will cut and use in the house...I tried...they wilt pretty quickly, but they are beautiful plants in the yard. 

One word of warning...they will NOT naturally climb...and as they get bigger they can get "leggy" so it is best to put them somewhere where you can tie them up. I use plain ole' string or burlap ribbon to stand them up along my fences. I do have to prune them back in the fall and remove the dead "wood." No biggy as long as you wear gloves.  Unlike "real" roses, there really is no "murderous" way to prune them...one year I took a weedeater to a few (probably not advisable!)

This is one I rescued from my apartments last year...it was still in it's original pot and was pretty much dead....

I brought it home, planted it in my flower bed...some decent soil, lots of water and a little fertilizer and presto....beautiful!

(I thought Cleo was being sweet and smelling the roses....she wasn't...she was eating them!)

If you have a fence that needs "screening" or a full sun bed that needs a pop of color, this is a perfect plant! They can easily be pruned back if you want to keep the plant smaller and more compact!

I did lose a beautiful pink tea rose bush this year I had in my side bed. Not sure what got it...maybe old age, maybe disease or bugs, harsh winter...it was over 12 years old...who knows. No biggy...Katie got me a beautiful hydrangea for Mother's Day and it filled the spot perfectly!

As I have shared before, the BEST time to buy any perennial is in the early summer...usually after they have lost their "forced blooms" and aren't nearly as attractive. Most garden and home improvement centers will mark them down considerably...just plant them in a well composted spot, water well and watch them grow and bloom year after year! 

When planting any flower or bush, whether it is an annual or perennial, make sure you pay close attention to what type of "sun" or "shade" they prefer. I have found that, more than anything, it makes the biggest difference on whether the plant with thrive or struggle long-term! 

Get out and enjoy your yard...even if you have a small yard or just a little patio or porch area, get out and get your hands dirty. Even if you just start with one little container plant!  Gardening is honestly something you LEARN to love. Truth be told, I don't have a live plant in my house, and I have even managed to toss most of the fake stuff!

For me, flower gardening is a natural "anti-depressant" and spending time tending to my plants is always time well spent!

Nasty little chair makeover...PART I!

My INTENT was to get this chair done this week so I could feature it. The weather and a bum back kind of slowed me down.  But I got it done...but I am still going to break this up into a "Two Part Series" because the work that had to be done was pretty extensive. If you just want to see the before and after, check out Part II and scroll to the bottom!

This gives me a great opportunity to stress the importance of TAKING YOUR TIME and DOING IT RIGHT! 

The simplest little makeover takes time.  You can't rush the process.  Strip it properly, sand it properly, prime it properly, paint it properly!  Otherwise you are wasting your time and money!

My newest project is very similar to a chair I did for Sis....it was one of my first "features" here. (I wish I had taken better pictures to show all the detail!) The paint part was a tad easier because it didn't have to be stripped first.  But it was one of my first upholstery jobs, and the more experience you get, the easier it is. Okay, it doesn't get easier...you just know it is going to be a challenge.

One thing I have learned about upholstery...no two pieces are the same and ALL have their challenges. You learn to be creative, take your time, and use the proper tools...more on that when we get into the actual upholstery process!

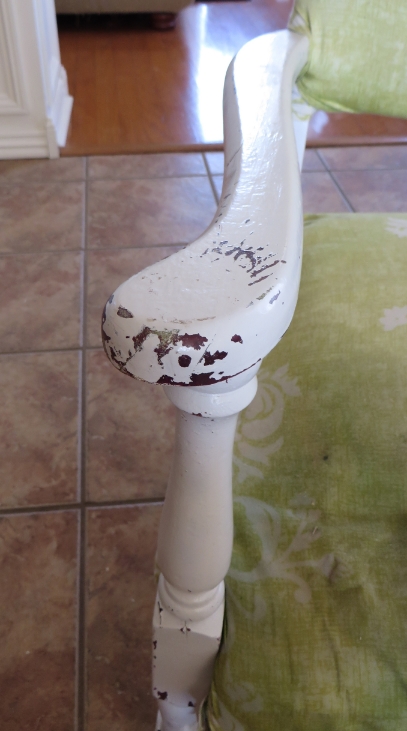
I spied this pathetic little chair sitting outside an apartment...obviously it was being neglected and unloved! And then it was abandoned! So I tossed it in the back of my truck and brought it home. As with most projects, it sat and waited for inspiration (and time).

I know many tout the virtues of chalk and plaster paint.  No sanding, no prep, no prime.  But 1) I am old school and 2) the paint on this chair was literally crumbling off and I could scrape the white paint off with my fingernail!

IMG_0214.JPG

I wasn't going to risk painting this chair only to have the old paint flake off! Besides, I have to have a nice smooth "template." So my best bet was to strip, sand, prime and paint.

First I had to remove the old upholstery.  I'm not sure what is worse...a seriously botched attempt to "cover" the old upholstery or doing so and leaving the old upholstery intact. Which means I had to remove the 8,324 staples someone used to haphazardly attach the disgusting green fabric and the 6,352 upholstery nails (these are just estimates) used on the original disgusting fabric.

Regardless of what you are removing...good or bad...I always suggest taking TONS of pictures while you deconstruct.  You THINK you will remember how something was constructed, but you may not.  It is always good to have pictures to refer back to! When I took my first shot at reupholstering a chair I took hundreds of pictures as I deconstructed it...boy was I glad later when I got stuck on something and wasn't sure what to do! I just referred back to the picture of the original and I knew exactly what I needed to do!

After hours of pulling, prying and cursing, I was down to bare bones (both the chair and my hands!)

Once I got all the old upholstery off, I addressed the little "wobbles." This chair was in pretty good shape structurally but it is important to make sure all the joints are secure and tight. Glue and clamps! Don't move forward on a project like this until you make sure everything is in tip-top shape. You don't want to be glueing and clamping after you have a shiny new finish on!

Now it was time for a little strip job.

I used Citristrip jel to remove the multiple layers of paint! It actually took 2 applications. An old toothbrush on all the nocks and crannies. I used a mineral spirit wash to remove all the "goo." Then I let it all dry thoroughly.

I know stripping old finish and paint is a tedious, nasty, back-breaking process...and I have no doubt it is the reason someone came up with the idea of mixing plaster and paint.  But again, my "old-school" mentality just won't let me move forward without properly stripping all the old paint off.  

I don't paint over wallpaper, I don't tile over vinyl, I don't upholster over old upholstery.  I just don't. Call me crazy. 

Then I sanded....and sanded....and sanded! Getting all the old paint out of the grooves in the legs was not an easy task...but absolutely essential! This is exactly why I always keep old toothbrushes with my shop tools!

After sanding, I primed it with Kilz.  I like Kilz for several reasons.  For me, it is my personal preference after years of experience. Others swear by Zinsser. This is just one of those things you need to experiment with and do what works best for you! Regardless, I will ALWAYS recommend an oil-based primer!

Nine times out of ten I am going to prime a piece before I paint it.  I am not willing to take the risk of "bleed through", I want a smooth finish and I want my paint to stick!  On rare occasions I will not apply a primer if I am going to use chalk/plaster paint and plan to distress the piece.  But even then I prime areas I suspect might bleed through or cause problems.

Anywho, after I got MOST of the old paint off and sprayed on the primer, I let it dry thoroughly. Then I sanded, and sanded, and sanded...again. I started with a 80-120 grit, and finished with a 220.

I like to sand. Or rather I like how the piece feels and looks after it has been primed and sanded.  And in my opinion, "feeling" is the key! 

Funny story...years ago I was feeling quite smug about the fact that I had not gotten all those nasty little wrinkles all my friends had around their eyes and mouths and on their neck.  Until I put my readers on one day to pluck my eyebrows...and there they were.

Even though I finally broke down and got prescription glasses, I still don't trust my eyes to see all the imperfections...but I do trust my hands.  As I sand, I "feel."  If you can feel it, it will show through a coat of paint!!! Sanding transforms the piece and if done properly, it can mean the difference between having a piece that is beautiful and professional or one that looks like an inexperienced DIYer threw it together!

After priming and sanding, I used my compressor to blow the dust off and then tack cloth to get rid of all the little smidges of dust and debris! I know I harp on using tack cloth...I can not stress how important this step is!

My original plan was to paint the chair a "blush/salmon/coral" color and then upholstery it in black damask. I saw a chair almost identical to this one in those colors SOMEWHERE...and then I couldn't. What I could find was a lot of teal and damask...and since this is a piece that will be sold, I decided I had to go with what is obviously "in." A "pink" chair can be risky! Pretty, but risky!

So teal it is....

The trick to spray painting anything (besides the prep work) is to do 3-4 VERY light coats...let it dry for 30-45 minutes between coats. If you get a drip or run (which you shouldn't if you do LIGHT coats) let it dry OVER NIGHT and then carefully and lightly sand it with a VERY fine grit sand paper! Tack and then lightly spray it again.

After the paint dries I gave it a good coat of clear poly finish.  Probably overkill considering the Valspar spray paint I use SAYS it is an "all in one."  Again, I'm old school.  You clear coat everything. 

The key now is to WAIT.  Wait and let the paint dry and cure for a few days. Upholstery can put a lot of wear and tear on a piece so you want the paint to be cured before you begin working on the upholstery.  

And as you can see, this piece has some serious reconstruction to do before I can ever begin to put the fabric on! I'll make sure I take good pictures and share step-by-step instructions on how to reconstruct and reupholster this chair!

IF YOU WANT IT DONE RIGHT....TAKE YOUR TIME!

Stay tuned! Part II is on its way!

Reflecting on 50 years of "decorating" life....

I started a post entitled 'Reflecting on 50 years of life."  I thought I might share all my "pearls" of wisdom. Really?  I, of all people, do not need to be giving life lessons...I'm 50 and still learning something new every day! Although I think if others would learn from MY mistakes, their lives would be a lot easier and pleasant. But truth is, everything you need to know to live a fulfilling life is either in the Bible or on Pinterest. Choose wisely (that is ONE of my "pearls"...ALWAYS choose wisely)

Anywho, I decided that I would be better off giving advice on how to make your home a place you will love. I'm not going to give you "decorator tips" because I am not a decorator...I am just a mom who has found a balance by trial and error. Besides, you can find REAL decorators all over the internet who will tell you how to decorate a room!

So here is some of what I know about "home interior decor".....

1) You won't ever wake up and say "THIS is perfect."  Your home is ever changing...families grow, kids get older, stuff gets out of date or worn...so embrace the ebb and flow of your changing life and go with it!

2) I give the same advice about major home decor purchases as I do cars...if I show you a stock and tell you that you will pay $40,000 for it today and I can GUARANTEE you it will be worth $20,000 next year, would you buy it?  Nope.  So why would you buy a brand new car or brand new anything? Personal property (furniture, cars, appliances) WILL depreciate.  Keep that in mind when making a home interior purchase.  Let someone else take the depreciation "hit" unless it is a piece you are madly in love with and you KNOW it will be in your home until...well, forever!  Here is a little trick I use sometimes...take the purchase price, divide it by the REAL number of years you think you will use that item...for example, my living room couch cost me $1500.  I knew I loved it and would use it for years...so far, I am going on 10.  So basically I paid $150 a year for this couch.  Yep, that is reasonable in my book! But the fact I have had it for 10 years is VERY unusual! Most people don't keep couches that long! Do the math...spend your money wisely!

3) With that advice in mind, whenever you can, buy used and make it your own!  Learn to paint...learn to refinish...learn to reupholster.  And if you just don't want to do that...or feel you can't...learn patience! Because I can promise you, that "vision" you have in your head for a new tv cabinet or bedroom set or chair will be out there at a garage sale or on craigslist or at a flea market....or seriously reduced at some point! 

I have wanted a coffee table like this for...well, decades.  But I never could find the EXACT coffee table I had in my mind...and when I did finally find it, it needed some attention!  But my patience and ability to DIY paid off...big time!

4) And with that in mind, NEVER BUY IT OR BRING IT HOME IF YOU DON'T SERIOUSLY LOVE IT! Or will love it with a little "tweeking," Because if you can look at it and say "Wow, I really love that!" there is a good chance it will be something you will still love years from now...you won't ever regret that purchase! My rule...if I have to think about it for more than 10 seconds, I don't need it! 

This tv cabinet was expensive...but I love it...it is 8-9 years old and I have NEVER regretted it or questioned the purchase. Great story. When I first fell in love with it, I really couldn't justify spending what they were asking...HOWEVER, they had one that was a "customer cancellation" and had a few VERY minor dings...at HALF the price of a new one. SOLD!  And the great thing was they had one of their experts fix the "dings!"

5) Use "fads" sparingly. Pillows, rugs, inexpensive pictures... basic accessories...can all be easily changed. So use "accessories" as a way to infuse "fads."  The big stuff...primarily furniture...should be something you LOVE and something you know you will probably love 10 years from now.  The only time I break that rule is if it is a second hand piece of furniture that is free or cheap that I am going to "repurpose" or "refinish"...knowing that next year I will pass it along to someone else, or repurpose or refinish it again!

As you can see in my living room I use pillows, framing and the rug to infuse the "blue and brown" that is currently all the rage.  In my den, I bought this little inexpensive side table at Salvation Army and stained and painted it.  

All can be changed or given away when I "change my style" without breaking the bank!

6) Keep "collecting" to a minimum.  Seriously, if you collect more than 1 or 2 things, choose one. Otherwise, it just becomes "clutter."  I collect hard back books.  And Lane Acclaim table...but those are part of my "timeless furniture" so I don't count them as a "collection." My point, "collections" can quickly become "clutter." 

7) If someone offers you a "family heirloom"...china, photos, knick-knacks, furniture...take it! Find a way to infuse it into your decor!  And if you just can't right now, store it away.  But take it!  My grandfathers' tools and leather case...my grandmothers' china...just a few heirlooms and THINGS I LOVE! and decorate with!

8) Pictures.  Photos of you, your family, your ancestors...surround yourself with them.  Find frames at garage sales and thrift stores and paint them...glue things to them...display them in groupings!  They are the people you love...surround yourself with them!

9) Pay attention to tips from designers.  There is a proper height for hanging pictures and a proper size rug...know them and follow those hard fast rules! I have a rug that is too small in my living room...I know it is too small and it bugs the heck out of me...which is why I just ordered a new, larger rug...can't wait to share!!!

10) Make your bedding a part of your "bedroom decor" and make it beautiful. You can buy beautiful, inexpensive bedding on Overstock and at T.J. Maxx and Marshall's. But more than anything keep it simple...and make your bed EVERY DAY! Simple is the key because if you have too much froo-froo and too many pillows you might be tempted to NOT make it because it is a tiresome chore!

IMPORTANT TIP!  Make your bedroom a "haven."  It should not be the room where you do book work, sew, fold clothes, scrapbook, etc...you should never go to bed or wake up to "work."  No matter how small your house is or how cramped you are for space, make it the one room in your house where you can "escape!"

11) Don't be afraid to TRY IT!!! If you see something you like on Pinterest, give it a shot! And if you just aren't the crafty/buildy/DIYER kinda person, find a few awesome flea markets and second hand stores to cruise through every so often...trust me, others are doing the DIY/Pinterest thing and usually you can find what you are looking for...but be PATIENT! 

12) Paint...there are so many tips and tricks to painting....again I could type a hundred posts on how to properly paint anything and everything...but they are already on the world wide web! But my best suggestion is to CHOOSE WISELY. And the only way to do that is to buy the samples pots and paint BIG swatches on your walls...then look at it...for days...or weeks...or whatever it takes to KNOW it is the color you want! I think I have shared how I choose my paint for my bedroom fireplace wall.  I THOUGHT I loved one color...but I kinda liked another too.  So I bought little samples of both, painted one half of the wall with each...and looked at it...for days.  Turns out, I liked the one I "kinda" liked better.  Had I gone with the one I thought I loved, I would have never been happy!

13) Shop thrift stores, flea markets, second hand stores, garage sales, auctions...be picky...be patient....you WILL find what you really love eventually!!!

14) DECLUTTER!!!  Clean out your closets, drawers, cabinets, pantries...GET RID OF STUFF! Don't have "stuff" just for the sake of having "stuff."  A few years ago, I opened up the cabinets under my book shelves...seriously, I bet I hadn't looked in there in 10 years.  You know what I found?  A lot of STUFF...and spiders...lots of spiders! I got rid of the stuff AND the spiders!

And before you bring more stuff home, or order it off QVC or Amazon, ask yourself..."Do I REALLY need this." Learn to distinguish between "need" and "want." And if it really isn't a "utility" item that you need, do you truly LOVE it? 

I watch those "hoarder" shows on TV and I don't get the sheer magnitude of it...because I can't understand the "mental illness" aspect of the whole thing.  But I do understand that we can get soooo caught up in the "wanties" and "gimees" and "Igottahavees" that we surround ourself with STUFF we really don't need. Or even want at some point.

It is one reason I strongly suggest using "fad" stuff sparingly in your decor....trust me, Chevron and burlap WILL go out of style...and your house will look like someone puked 2013 in your living room! It's cute...it can be fun to accent with...but use it sparingly and don't invest so much money in it that you don't feel like you can't get rid of it when it does go out of style!

EVERY SINGLE ITEM in your house should somehow enhance your life or have purpose...if it does not, get rid of it.

Am I guilty of breaking my own rules?  Are you KIDDING?  I'm just like everyone else...I make, and hopefully learn from my mistakes. I know that if I buy really expensive bedroom furniture because I just HAVE to have it right this minute, someday I will be stuck with furniture I don't really like but can't bare to part with because I paid a fortune for it! 

What do I love?  Heirlooms, furniture I was patient and waited for until I found THE perfect piece and the right price, stuff I paid little or nothing for and won't feel guilty kicking to the curb when I don't want it any more. I love my home because I have been very careful about surrounding myself with things that are timeless, things that have meaning (pictures, heirlooms, etc) and things I love. I still have a few "warts" here and there...and honestly, they are things I bought "on a whim" and/or paid too much for. But slowly I am trying to weed those things out!

ALWAYS keep your receipts.  And if it is something you can't return (from a garage sale or thrift store) make sure you pay so little you won't think twice about turning right around and donating it! 

And the NUMBER ONE RULE OF DECORATING YOUR HOME SO YOU WILL LOVE IT...get it clean and organized. Amazing how much more enjoyable your home will be when it is clean, decluttered and organized! 

signature.jpg

Easy recipe book....

I love recipes.  I've collected a lot of recipe books over the years, including one my mother received as a wedding gift in 1961....a church recipe book.  It is awesome!  Best peanut butter cookie recipe EVER!

My uncle inherited my Grandmother's recipes and I brought them home and scanned EVERYTHING....every handwritten recipe, every newspaper and magazine clipping, every box recipe.  Anything she had in her recipe boxes, I scanned.  Someday I plan on making a recipe book with all the scans...someday.  They have been on my computer for over two years...but someday. 

So when I started cruising Pinterest I wanted to keep ALL the recipes that sounded even remotely good.  But I discovered that sometimes when you pinned a link, it was no longer there when you went back later.  So I had to find a way to organize all the recipes. 

I started printing them off, tacking them to the refrigerator and then if we liked them, I would put them in a "recipe book." 

I found the easiest way to do this was to "cut and paste" the recipe into an email, email it to myself and then print it off.  If it passed the family taste test, I would slip it into my recipe book. 

The book is a simple scrapbook with the little clear sleeves with paper inserts...50% off at Hobby Lobby.  I can add additional pages to it when I need to and the sleeves make it easy to slip the recipes in and keep them from getting cruddy when I splatter stuff on them.  

If I am feeling creative I will put holiday scrapbook paper in place of the white paper inserts.  

Pinterest and the internet are loaded with awesome recipes...and I really believe the secret to being a good cook is the willingness to try new recipes, even if you need to change them up a bit! 

Keeping up with all those recipes can be daunting and most of us rarely have the time to write them down on nice little cards and file them in nice little boxes like our mothers and grandmothers did.

Print, trim and slip....easy.  


Noodle boots....

I love Pinterest...but it wears me out!  Always such neat "projects"​...and I want to DO IT ALL!  

But there are a few nifty little tidbits here and there that are not difficult and require very little effort. One suggestion I saw was putting pool noodles in boots!  Seriously nifty idea and since I am on my master-bedroom-closet-remodel-kick, this is the perfect time to do this kind of thing!​

Just so happens I stopped by a garage sale this morning and picked up a pool noodle for TWENTY FIVE CENTS!  They aren't a huge expense, but that was a pretty good bargain.  One noodle will do two pairs of boots!​

IMG_8885.JPG

Just cut the noodle with a pair of scissors and stuff the pieces into your boots!​

I'm not a big shoe shopper but I do pay good money for my boots...and storing them properly will add years to their life!​

Not a big life changer, but a neat little "tip."